
Grove - Stroller BRITAX - Free user manual and instructions
Find the device manual for free Grove BRITAX in PDF.

| Product Type | All-terrain stroller |
| Brand | Britax |
| Model | Grove |
| Maximum child weight | 22.6 kg (50 lb) |
| Maximum child height | 111.8 cm (44 in) |
| Basket capacity | 9 kg (20 lb) |
| Stroller weight | Approximately 11 kg |
| Unfolded dimensions (approx.) | 90 x 60 x 100 cm |
| Folded dimensions (approx.) | 30 x 60 x 80 cm |
| Recommended age | From birth (with car seat) up to approximately 3 years |
| Use | Walking only (not for running) |
| Seat positions | Reclining, forward-facing or rear-facing |
| Harness | 5-point, height and width adjustable |
| Front wheels | Swivel with lock |
| Brake | Parking brake on both rear wheels |
| Canopy | Extendable with window and sun visor |
| Included accessories | Bumper bar, CozyFit insert (liner, leg rest, head cushion), storage pockets |
| Car seat compatibility | Britax car seats (forward-facing or rear-facing); other compatible seats rear-facing |
| Materials | Aluminum frame, polyester fabric |
| Care | Hand wash with mild soap, air dry; do not machine wash |
| Warranty | 2-year limited |
| Country of manufacture | China |
Frequently Asked Questions - Grove BRITAX
User questions about Grove BRITAX
0 question about this device. Answer the ones you know or ask your own.
Ask a new question about this device
Download the instructions for your Stroller in PDF format for free! Find your manual Grove - BRITAX and take your electronic device back in hand. On this page are published all the documents necessary for the use of your device. Grove by BRITAX.
USER MANUAL Grove BRITAX
natural_image
Line drawing of a baby stroller with decorative frame and wheels (no text or symbols)Grove™ Stroller
User Guide
Guide de l'utilisateur
Guía del usuario
IMPORTANT
THIS USER GUIDE CONTAINS A MANDATORY ARBITRATION CLAUSE AND CLASS ACTION WAIVER (“ARBITRATION AGREEMENT”) THAT AFFECTS YOUR LEGAL RIGHTS, REQUIRES YOU TO ARBITRATE DISPUTES, AND LIMITS THE MANNER IN WHICH YOU CAN SEEK RELIEF.
IMPORTANT
LE PRÉSENT GUIDE D'UTILISATION CONTIENT UNE CLAUSE D'ARBITRAGE OBLIGATOIRE ET UNE RENONCIATION AU RECOURS COLLECTIF (« CONVENTION D'ARBITRAGE ») QUI A UNE INCIDENCE SUR VOS DROITS LÉGAUX, VOUS OBLIGE À ARBITRER LES LITIGES ET LIMITE LA FAÇON DONT VOUS POUVEZ DEMANDER UN REDRESSEMENT.
IMPORTANTE
GROVE™, CozyFit™ and BRITAX® are trademarks owned by Britax Child Safety, Inc. All rights reserved. ©2023 Britax Child Safety, Inc. Printed in China. This product and its components are subject to change without notice.
Safety Information....2
In The Box....5
Stroller Overview 6
Accessories Overview....7
Britax Stroller Modes....8
Stroller Assembly 9
Unfolding the Stroller Frame....9
Installing the Front Wheels....9
Installing the Rear Wheels....10
Attaching the Toddler Seat 10
Installing the Canopy....11
Stroller Disassembly....12
Removing the Canopy 12
Removing the Toddler Seat 13
Removing the Rear Wheels 14
Removing the Front Wheels....15
Stroller Operation....16
Using the Stroller....16
Using the Parking Brake 17
Using the Front Wheel Swivel Locks....18
Adjusting the Stroller 18
Using the Harness....19
Grove Stroller Accessories....21
CozyFit™ Insert 21
Bumper Bar 24
Securing Your Child 26
Infant Car Seat Mode 28
Using a Compatible Britax Infant Car Seat....28
Care and Maintenance.... 30
Warranty 31
Arbitration Agreement 32
Safety Information
WARNING!
Failure to follow all warnings and instructions could result in SERIOUS INJURY or DEATH
Read these instructions carefully before using this product. To ensure proper use, store this user guide in a convenient place so it can be consulted often.
- Never leave child unattended.
- Avoid serious injury from falling or sliding out. Always use harness to secure child.
- Avoid finger entrapment or injury. Always ensure any child occupants or bystanders are away from the stroller while folding or unfolding.
- Use only with an infant car seat until child has sufficient head and neck control.
- Do not use stroller with a child taller than 44 inches (111.8 cm).
- Do not use stroller with a child who weighs more than 50 lbs (22.6 kg). Exceeding this limit may cause stroller to become unstable.
- Until the child is ready to transition into the CozyFit™ insert the infant car seat must be used as instructed with the stroller.
- The CozyFit™ insert is ONLY intended for use with the toddler seat. Do NOT use outside of the stroller seat.
- The liner, wedge and the head pad is for infants weighing 10 lbs (4.5 kg) or more ONLY and MUST be used until the infant has sufficient head and neck control.
-
The wedge and the head pad MUST ONLY be used with the stroller harness straps to secure the child in the most reclined position of the toddler seat.
-
The liner and the head pad may continue to be used with children after they have sufficient head and neck control.
- Do not allow the infant to lie face down on the insert or any padded material.
- Do not allow infant to sleep in stroller. The CozyFit™ insert is not intended for sleep.
- Do not overload basket – Maximum weight in basket is 20 lbs (9 kg), this includes the basket storage pockets. Overloading the basket may cause the stroller to become unstable and tip over.
- Do not overload toddler seat storage pockets and child storage pocket. Maximum weight for toddler seat storage pockets and child storage pocket is 1 lbs (0.5 kg) each. Overloading may cause the stroller to become unstable and tip over.
- Do not attach parcels, bags, or other items to the handlebar or frame of stroller except those recommended by Britax, as stroller can become unstable and tip over.
• Always make certain that the stroller is fully open and locked before use. - Assembly of this stroller must be performed only by an adult.
- Only use Britax approved car seats, accessories, and replacement parts with this stroller.
- Do not allow children to climb on or play with the stroller.
- Do not use the stroller on stairs, escalators, moving vehicles, or steep inclines. Stroller can tip over.
- Do not use stroller receivers as a carry handle.
- Stroller is intended for walking speed only. Do not use while jogging, skating, or any activity other than walking.
-
Always set the parking brake when stroller is not moving. Never load or unload the stroller without the parking brake set.
-
Do not park on inclines. The parking brake is intended to park the stroller on flat surfaces only. Parking on inclines may result in tip over or runaway stroller.
- Do not exceed the manufacturer's maximum weight limit when using an infant car seat with this product. See infant car seat user guide for maximum occupant weight and other instructions.
- Compatible Britax infant car seat can be installed parent facing/rear-facing or forward-facing. See page 28 for information about compatibility.
- Other compatible car seats MUST be installed parent facing/rear-facing. See page 28 for information about compatibility.
- Do not modify the stroller or any labels. Doing so voids the warranty and could lead to a dangerous condition.
- Failure to regularly inspect this product and its components to make sure they are in good condition and good working order can result in injury. Discontinue use of stroller if damaged or any parts are missing.
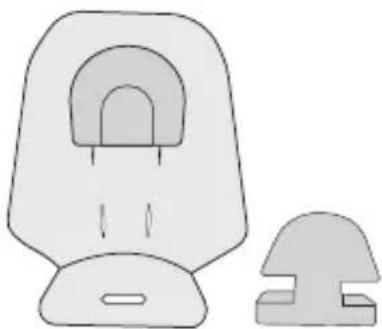
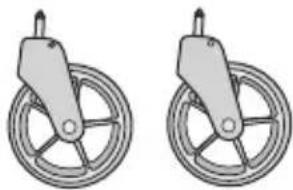
In The Box
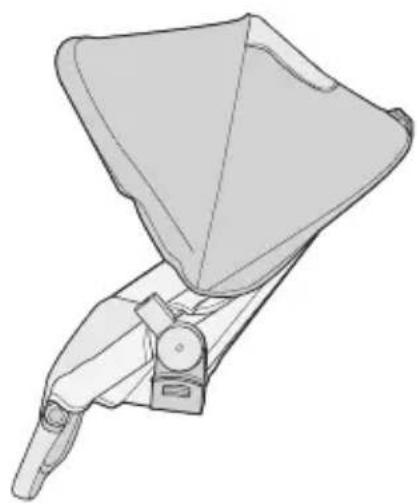
natural_image
Technical line drawing of a mechanical device with no visible text or symbolsToddler Seat
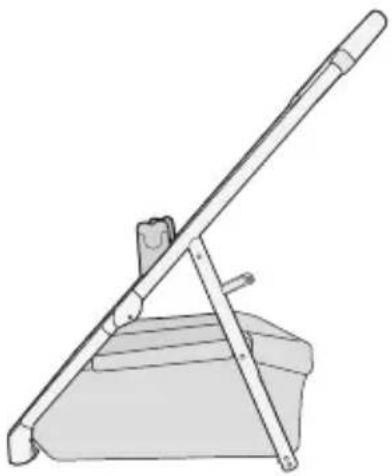
natural_image
Line drawing of a lever mechanism with a flat support and lever (no text or symbols)Stroller Frame
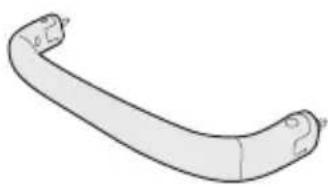
natural_image
Simple line drawing of a curved mechanical or architectural component (no text or symbols)Bumper Bar
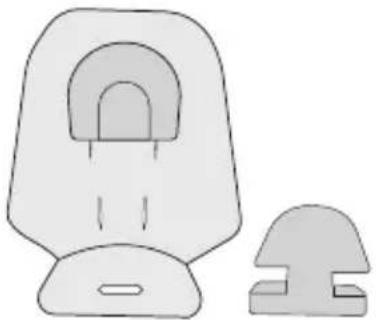
natural_image
Simple line drawing of a seat and side table (no text or symbols)CozyFit™ Insert
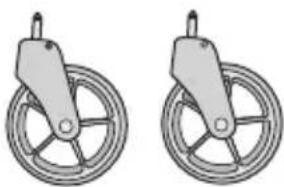
natural_image
Two identical mechanical pulley systems with no text or symbolsFront Wheels
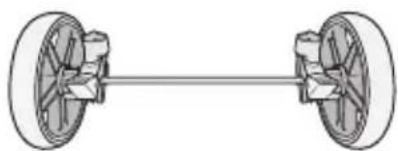
natural_image
Diagram of a two-dot-wheeled vehicle chassis with wheels and suspension components (no text or symbols)Rear Wheels
Actual product may vary from images.
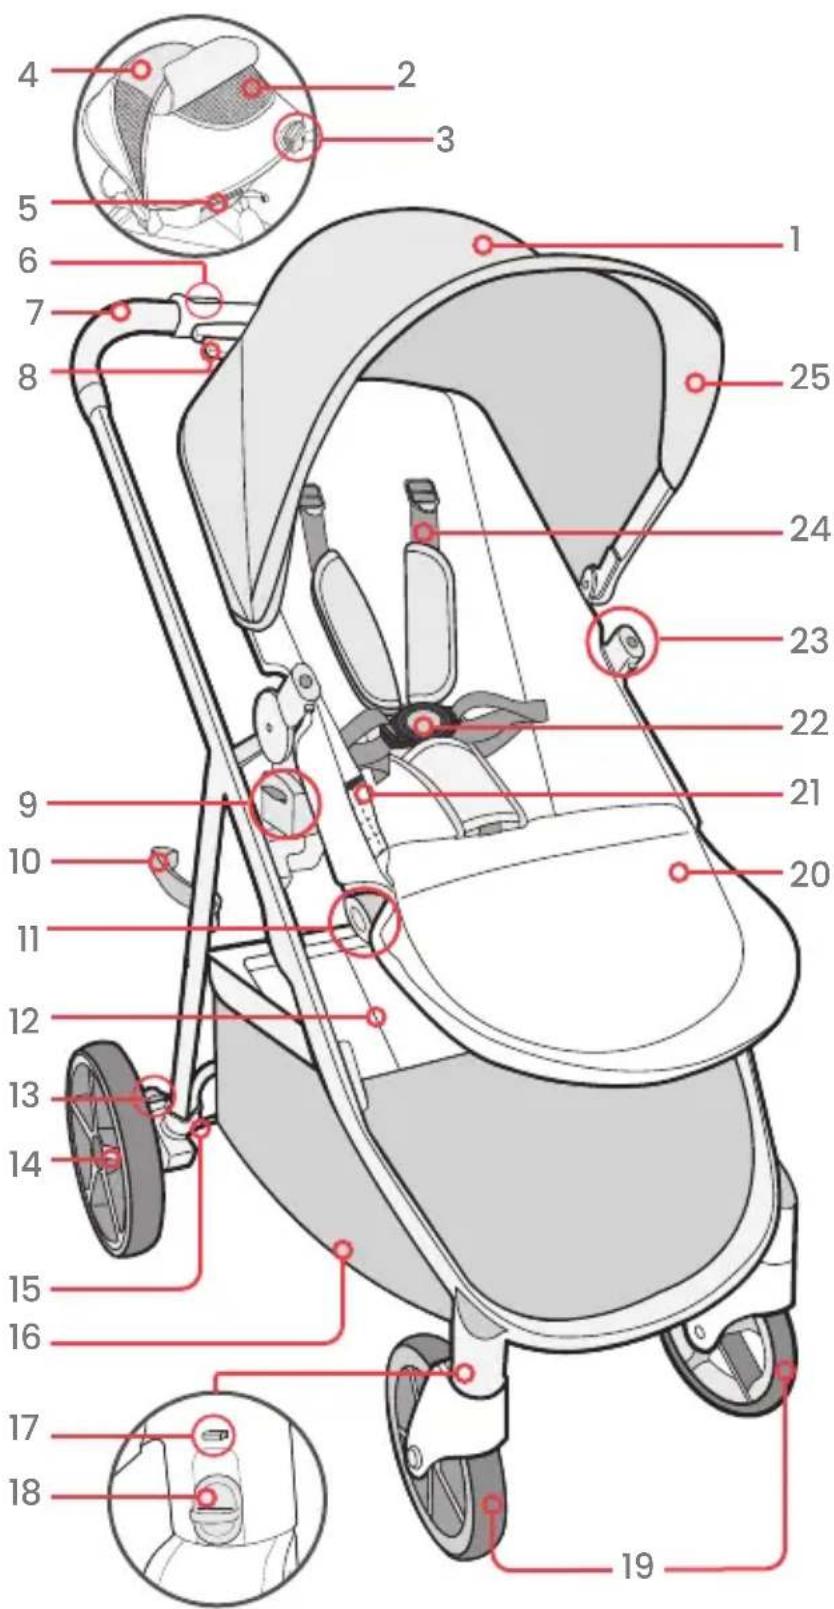
Stroller Overview
-
Canopy
-
Canopy Window
-
Seat Recline Handle
-
Extended Canopy
-
Toddler Seat Storage pockets (2)
-
Stroller Fold Button
-
Handle
-
Stroller Fold Lever
-
Seat Receiver and Stroller Adapter (2)
-
Frame Lock (on right side of frame)
-
Foot Rest Adjustment Buttons (2)
-
Basket Storage Pockets [2 (Inside)]
-
Brake Pedals(2)
-
Rear Wheels
-
Rear Wheel Release Button (2)
-
Cargo Basket
-
Front Wheel Release Button
-
Swivel lock
-
Front Wheels
-
Foot Rest
-
Child Storage Pockect
-
Child Buckle
-
Child Accessory Mounts (2)
-
Harness
-
Sun Visor
Actual product may vary from images.
Accessories Overview
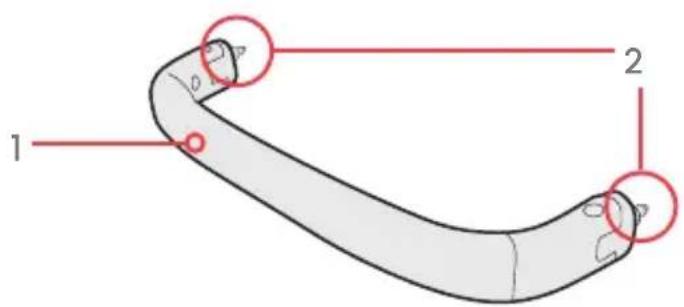
Bumper Bar
CozyFit™ Insert
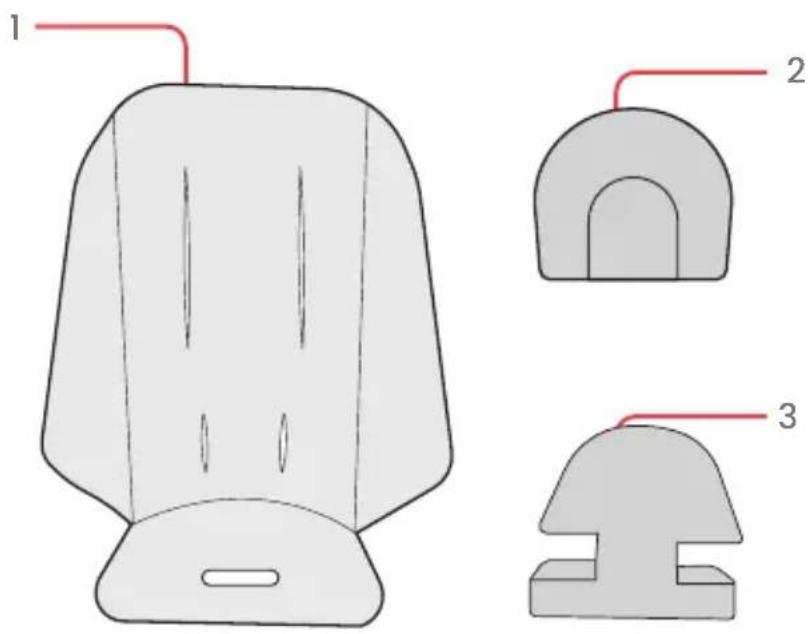
- Bumper Bar
-
Pins (2)
-
Liner
-
Head Pad *
-
Wedge*
Until the child is ready to transition into the CozyFit™ insert the infant car seat must be used as instructed with the stroller.
* The wedge and the head pad is for infants weighing 10 lbs (4.5 kg) or more ONLY and MUST be used until the infant has sufficient head and neck control.
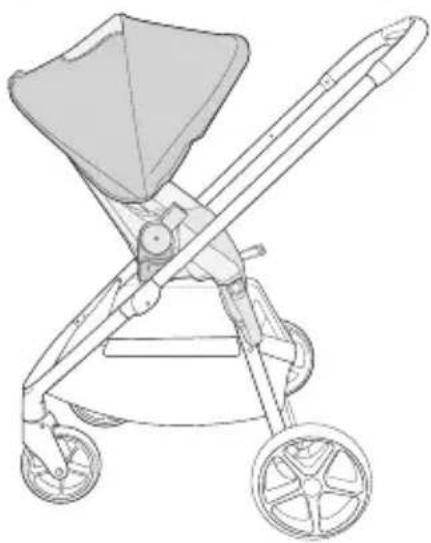
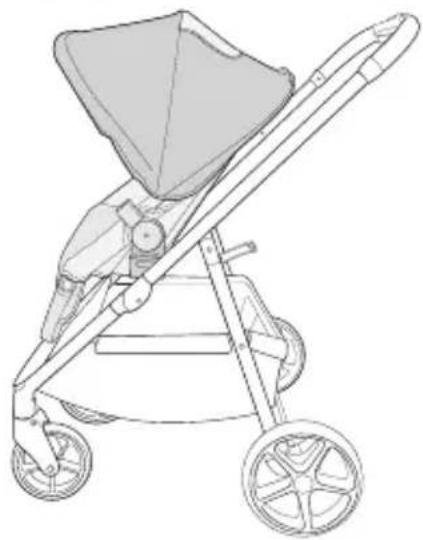
Britax Stroller Modes
! WARNING!
- Do not exceed maximum weight limits defined in the infant car seat or accessory user guide.
Parent Facing/Rear-Facing
natural_image
Line drawing of a baby stroller with two wheels and a canopy cover (no text or symbols)Forward-Facing
natural_image
Line drawing of a baby stroller with two wheels and a canopy cover (no text or symbols)Toddler Seat Modes
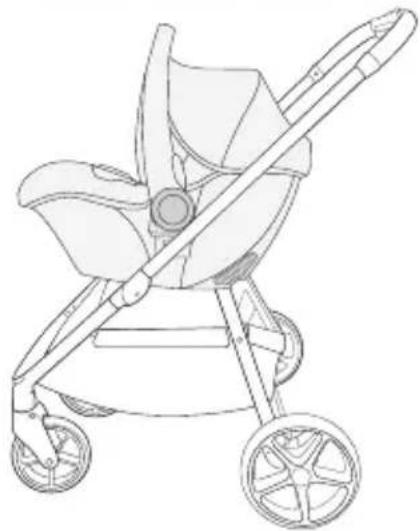
Infant Car Seat Modes
- Compatible Britax infant car seat can be installed parent facing/rear-facing or forward-facing. See page 28 for information about compatibility.
- Other compatible car seats MUST be installed parent facing/rear-facing. See page 28 for information about compatibility.
Parent Facing/Rear-Facing

natural_image
Line drawing of a baby stroller with two wheels and a handle (no text or symbols)Forward-Facing
natural_image
Line drawing of a baby stroller with two wheels and a handle (no text or symbols)Stroller Assembly
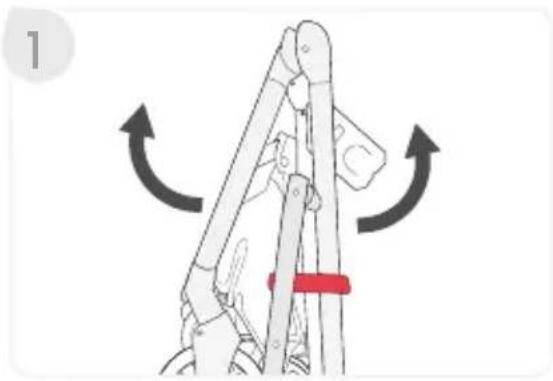
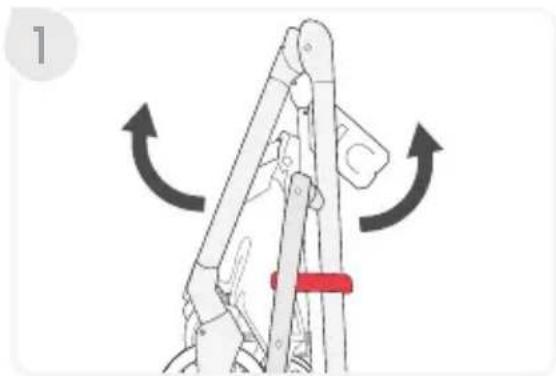
Unfolding the Stroller Frame
-
Lift the frame lock and open the frame.
-
Lift handle until frame locks into upright position.
NOTE: After stroller is upright, push down on handle to make sure frame is locked in open position.
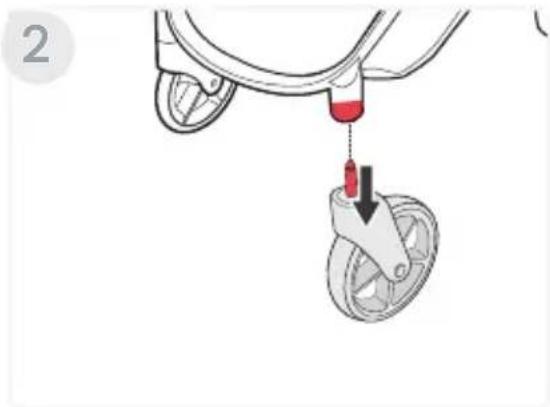
Installing the Front Wheels
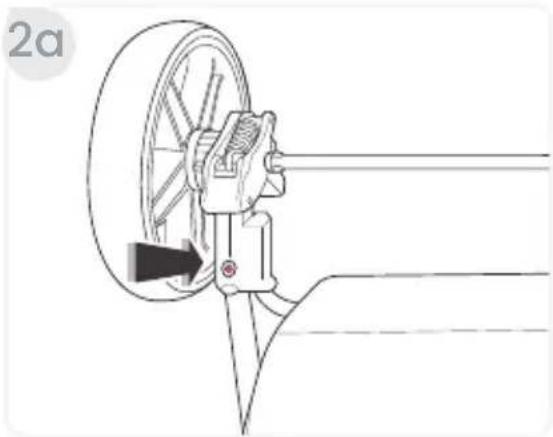
-
Slide front wheel mounting pin into the housing on the frame until they lock into place. Repeat on the other side.
-
Pull wheel to ensure that it is secure.
natural_image
Diagram of a mechanical linkage mechanism with directional arrows indicating motion (no text or symbols)
natural_image
Diagram of a red lever mechanism with a curved arrow indicating motion (no text or symbols present)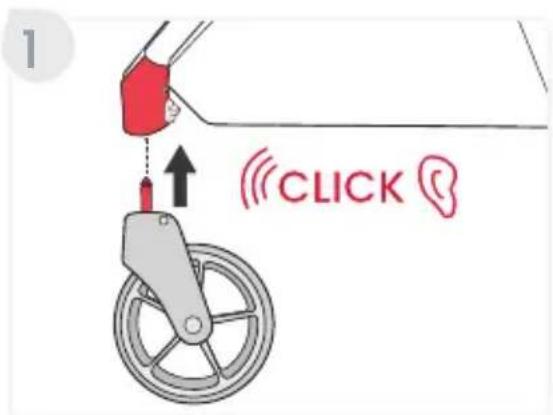
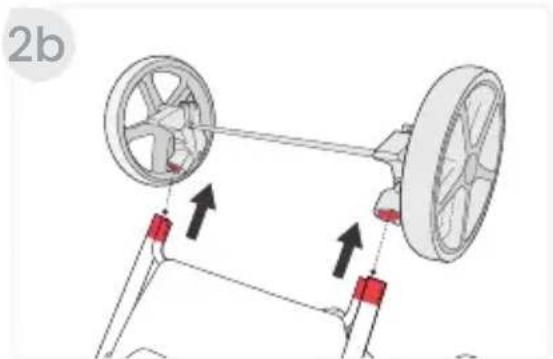
Installing the Rear Wheels
-
Place the stroller upside down.
-
Align the rear wheel assembly to the stroller frame.
a. Make sure the pin holes are aligned with the pins on the stroller frame.
b. Slide the rear wheel assembly to the bottom of the stroller frame.
- Pull on the wheel assembly to ensure that it is secure.


natural_image
Illustration of a person using a wheeled cart with a wheel, showing mechanical components and motion direction (no text or symbols)Attaching the Toddler Seat
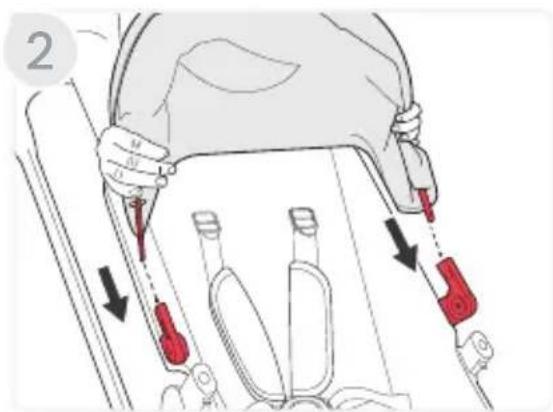
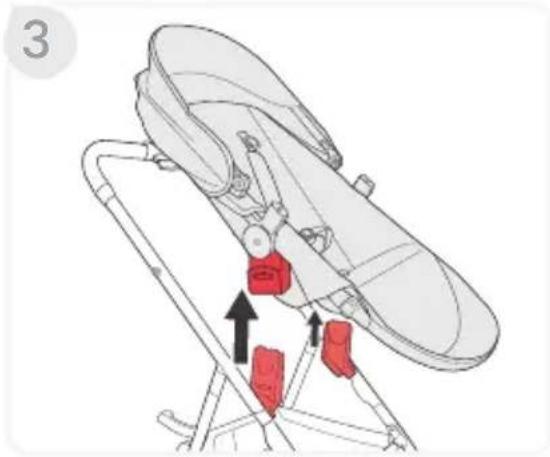
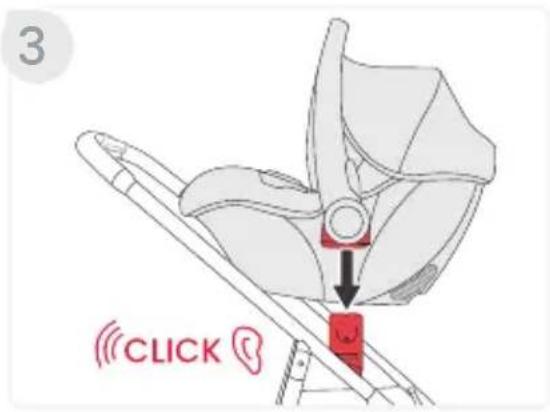
- Press both brake pedals down to lock the parking brake.

natural_image
Diagram of a mechanical linkage system with red components and directional arrows indicating motion (no text or symbols)- Align seat receivers with stroller adapters and push onto frame until a click is heard on each side.
NOTE: Seat attaches forward or parent facing/rear-facing.
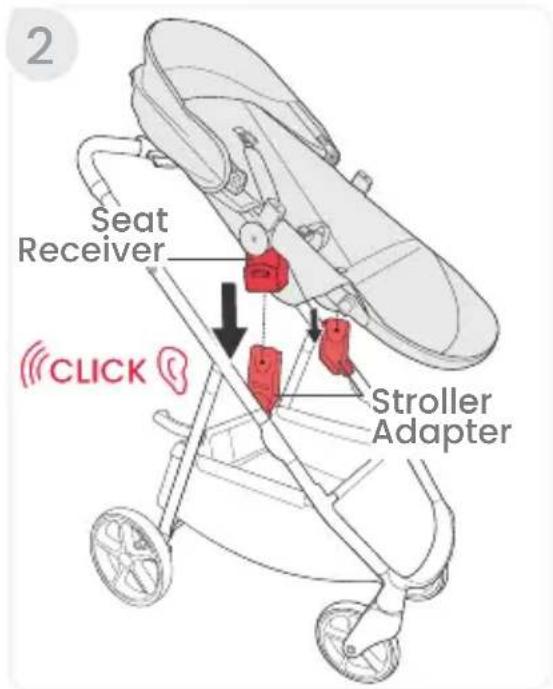
- Pull up on both sides of the seat to ensure that it is locked into place correctly.
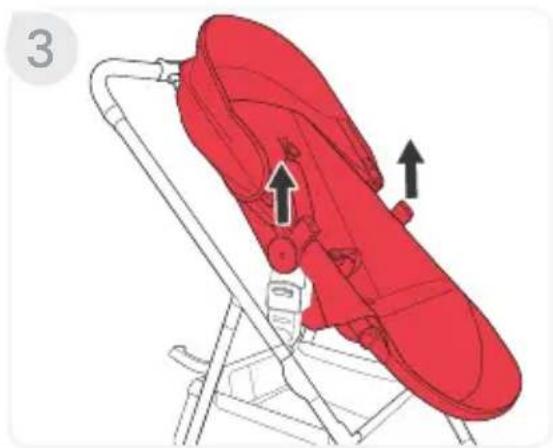
natural_image
Illustration of a red baby seatbelt with arrows indicating movement or positioning (no text or symbols)Installing the Canopy
- Position the seat upright.
- Slide the canopy stays into the canopy brackets until they lock into place.
-
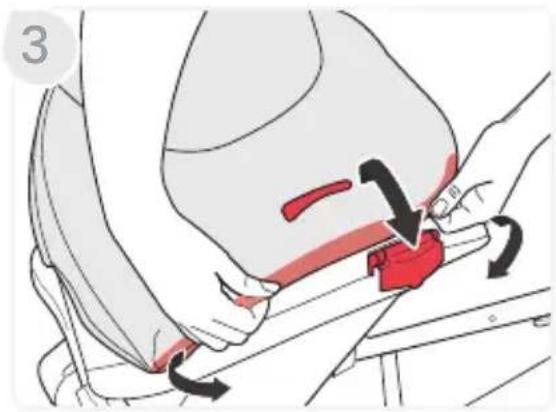
Extend the canopy forward and lift the rear of the canopy and tuck around the seat recline handle and the back of the stroller.
-
Wrap the hook and loops around the toddler seat frame on each side.
Stroller Disassembly
Removing the Canopy
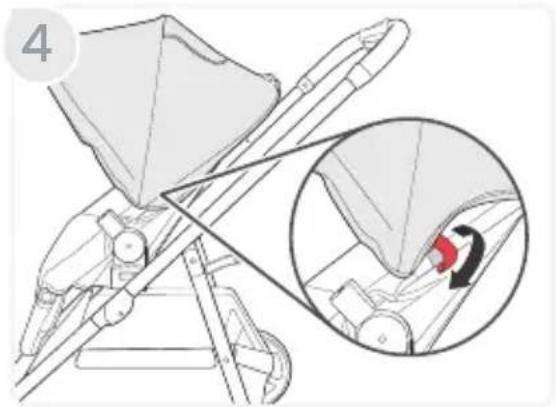
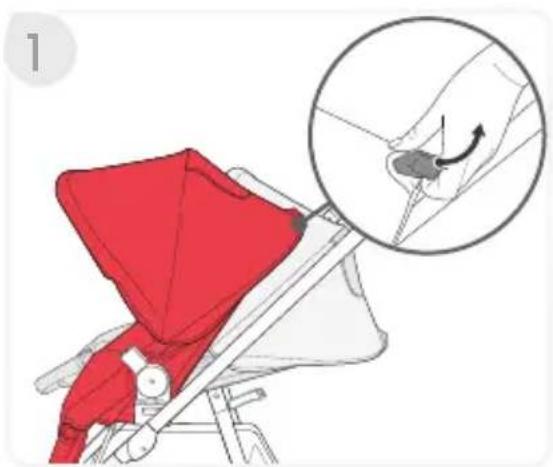
- Unwrap the hook and loops on each side of the canopy.

natural_image
Technical illustration of a stroller with an inset showing a mechanical component (no text or symbols present)- Push the canopy forward and untuck the rear part of the canopy from the back of the seat.
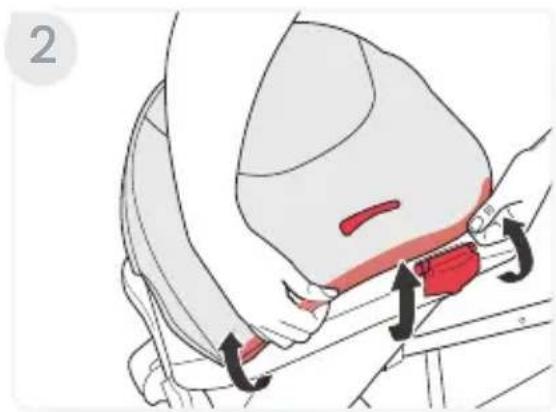
- Push the tab on the outside of the canopy stay with a screwdriver and pull away from stroller. Repeat on the other side.
Removing the Toddler Seat
- Press both brake pedals down to lock the parking brake.
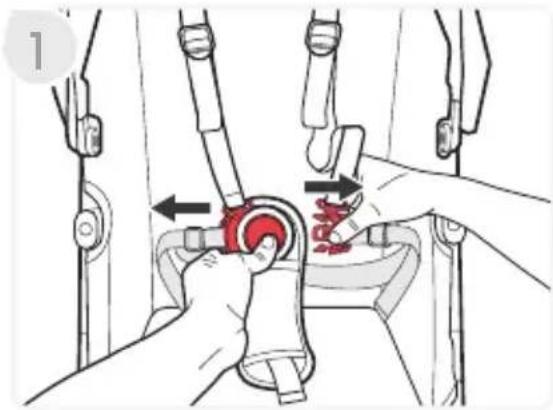
- Lift both release levers on the receivers at the same time.
natural_image
Medical illustration showing a surgical procedure on a patient's shoulder and hip area (no text or labels)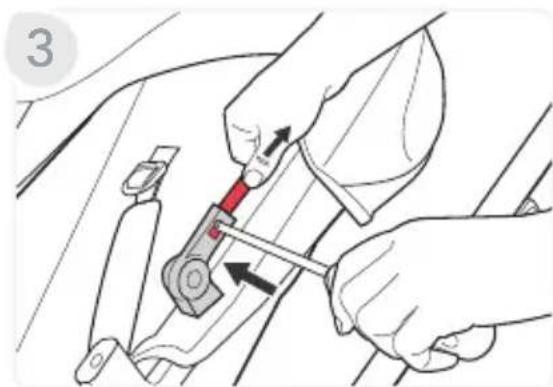
natural_image
Illustration of hands using a tool to adjust or install a car seatbelt (no text or symbols visible)
natural_image
Diagram of a mechanical linkage system with red components and rotational arrows indicating motion (no text or symbols)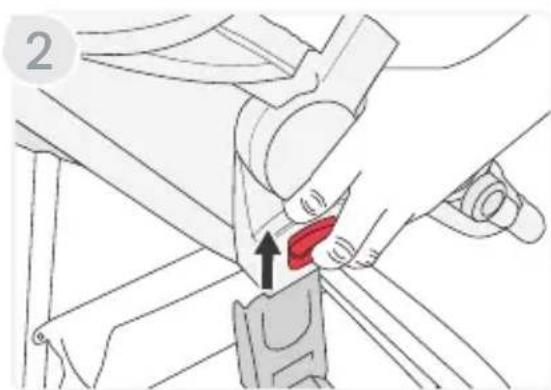
natural_image
Illustration of a car seatbelt buckle being adjusted, showing the red seatbelt being inserted (no text or symbols present)- Lift the seat up and away from the stroller frame.
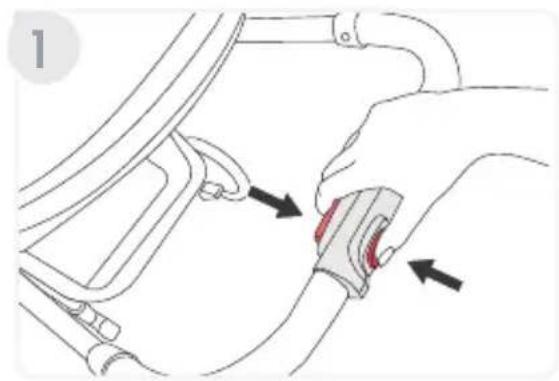
Removing the Rear Wheels
- Place the stroller upside down.
- Remove the rear wheels.
a. Press the release button on the rear wheel assembly housing and lift. Repeat on the other side.
natural_image
Technical diagram of a mechanical assembly with a wheel and shaft, showing a directional arrow (no text or symbols)b. Pull away from the wheel housing.
natural_image
Diagram of a vehicle suspension system with two wheels and red adjustment knobs, showing motion direction (no text or labels)Removing the Front Wheels
- Push the button at the back of front wheel housing.
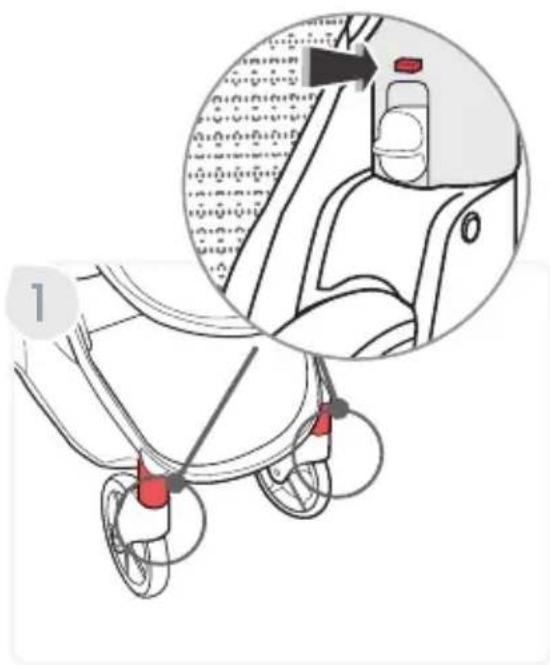
- Pull the wheel from the stroller. Repeat on the other side.
natural_image
Illustration of a bicycle suspension system with a red tool inserted into a wheel (no text or symbols)Stroller Operation
Using the Stroller
IMPORTANT: Before and during use, always make sure the child's hands and feet are away from wheels.
Folding the Stroller
IMPORTANT: Always apply brake and remove children before folding the stroller.
-
Press the stroller fold button and then stroller fold lever located on the handle, and step back while pushing handle downward.
-
Continue folding until the frame lock engages.
NOTE: You may need to compress the frame to engage the frame lock.

natural_image
Illustration of a red bicycle with wings and wheels, showing a curved arrow indicating motion (no text or symbols)Unfolding the Stroller
-
Lift the frame lock and open.
-
Lift the handle until frame locks into upright position.
NOTE: After stroller is upright, push down on handle to make sure frame is locked in open position.
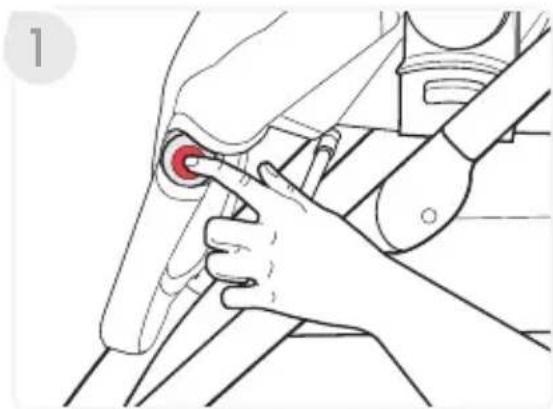
Using the Parking Brake
- To completely engage the parking brake, step on both brake pedals.
IMPORTANT: Pressing one brake pedal will only lock one back wheel.
NOTE: After setting the brake, check that the brake is set properly by attempting to roll the stroller forward and backward. If the stroller will not roll, the brake is set properly.
- To disengage, lift each brake.
natural_image
Diagram of a mechanical linkage mechanism with directional arrows indicating motion (no text or symbols)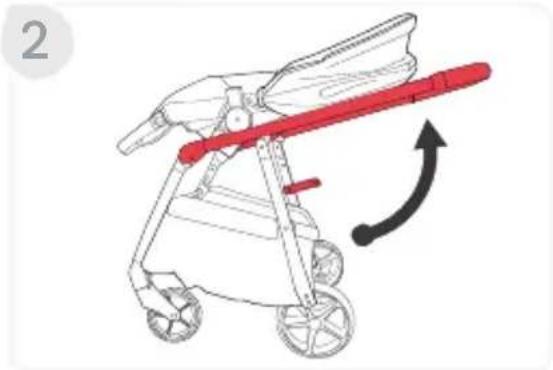
natural_image
Illustration of a stroller with red handle and arrow indicating motion (no text or symbols)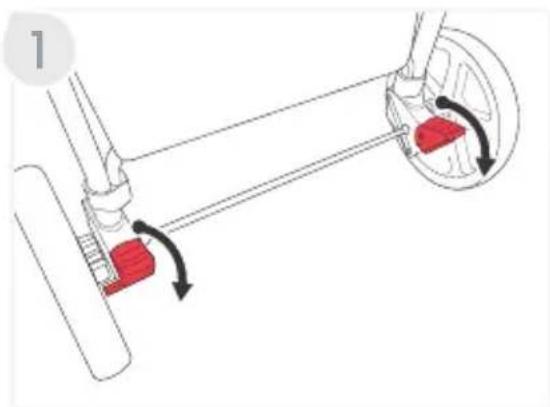
natural_image
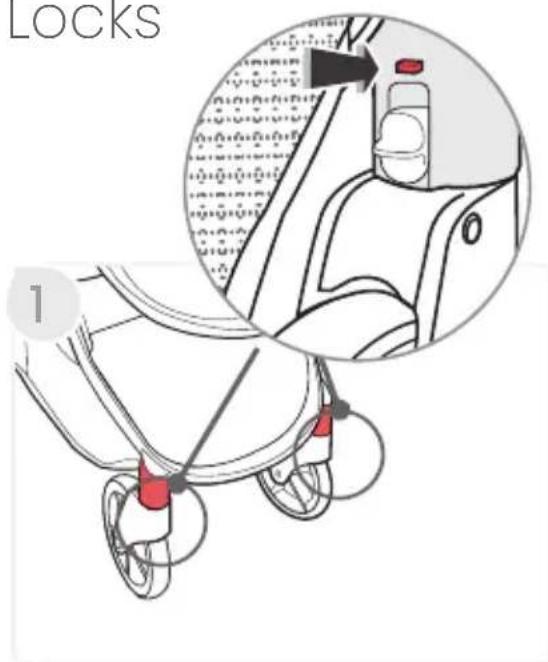
Mechanical diagram showing a lever mechanism with red blocks and directional arrows indicating motion (no text or symbols)Using the Front Wheel Swivel Locks
- Move the swivel wheel lock on the back of the front wheel housing up or down on both sides. Down will lock wheels inline with stroller and up will allow wheels to swivel.
NOTE: You may need to swivel the wheels to the proper position to engage the swivel lock.
Adjusting the Stroller
Reclining the Seat
- Lift and hold the seat recline handle on the back of the seat for raising or lowering to the desired position.
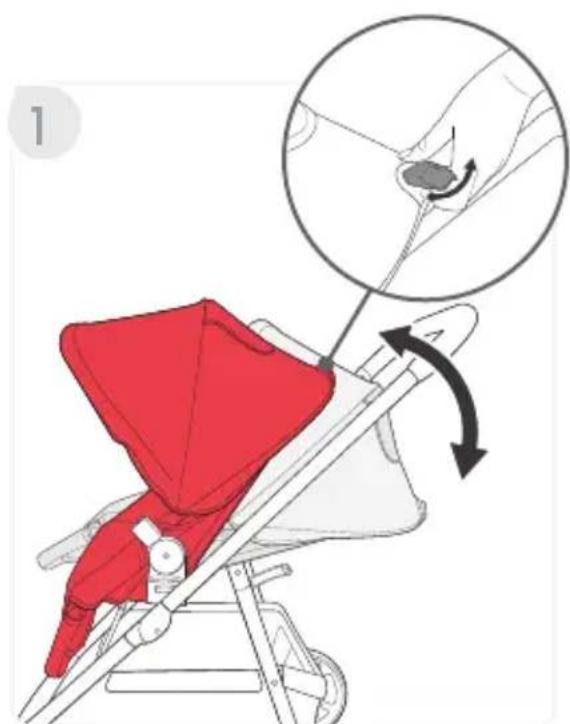
Adjusting the Foot Rest
- Press and hold both buttons on either side of the foot rest hinge while raising or lowering the foot rest to the desired position.
natural_image
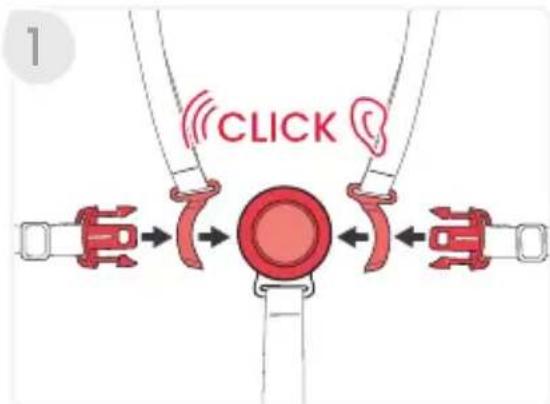
Illustration of a hand adjusting a red circular component on a mechanical assembly (no text or symbols)Using the Harness
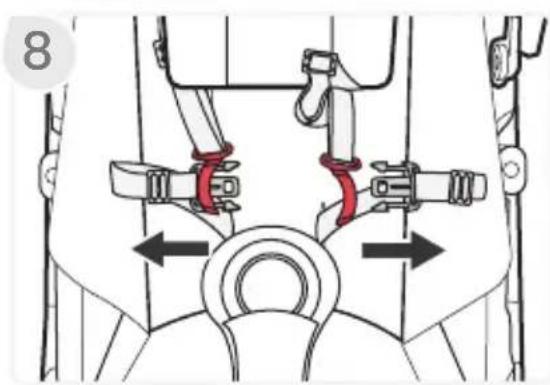
IMPORTANT: Shoulder and hip straps separate for care and maintenance, but should always be used together to secure your child.
-
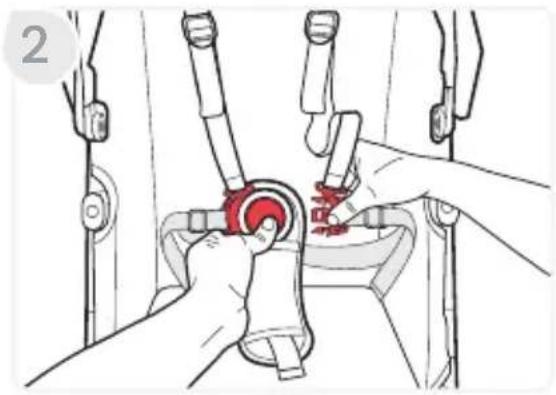
Align the tongues on the hip straps with the retainers of the shoulder straps and slide through until they lock into place.
-
Insert the tongues into the buckle assembly until a click is heard.
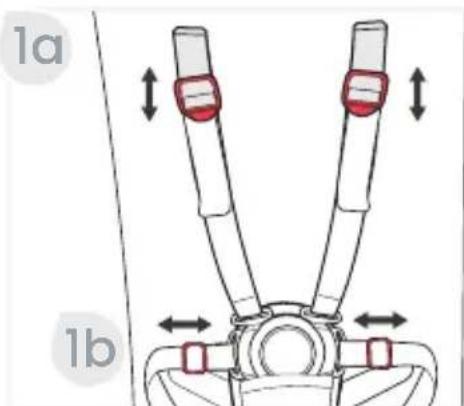
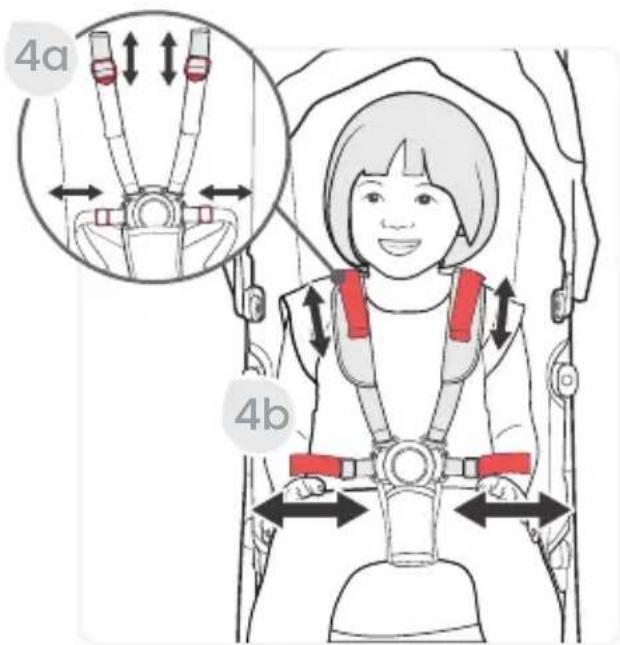
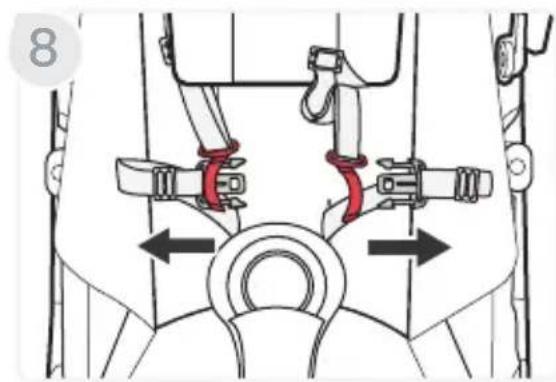
Adjusting the Harness
- To adjust the harness.
a. Slide the shoulder adjuster up or down. b. Slide the hip adjuster left or right for a proper adjustment.
NOTE: For a proper adjustment, harness straps at or above your child's shoulders.
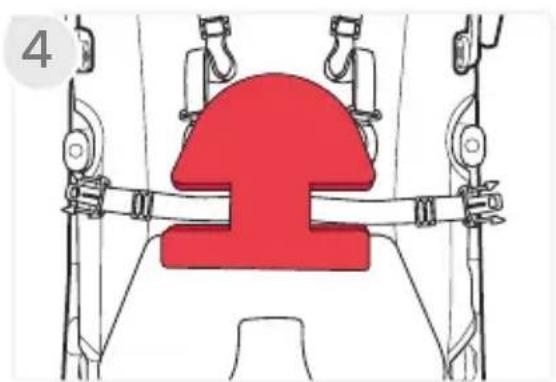
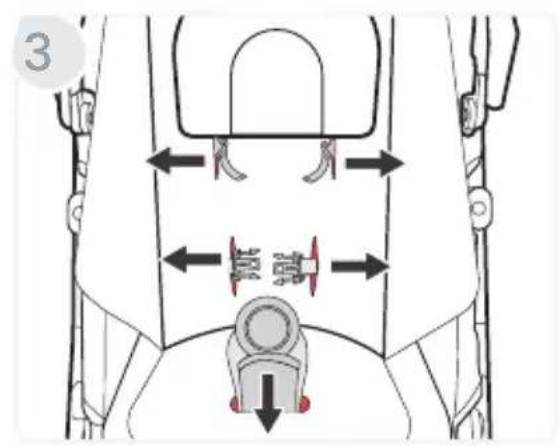
Adjusting the Buckle
-
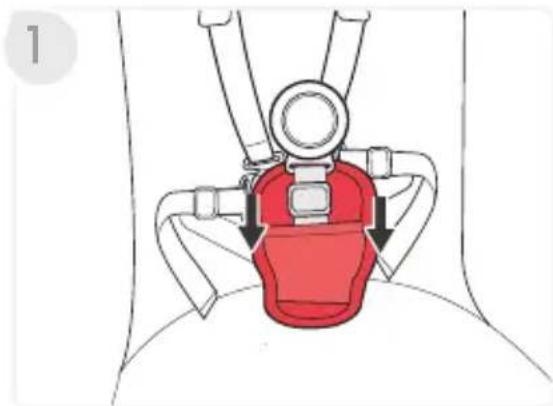
Push down the belly pad to reveal buckle strap and adjuster.
-
Slide the buckle adjuster up to lengthen or down to shorten.
NOTE: Buckle strap length should be adjusted to have a snug fit.
natural_image
Diagram of a medical device with red highlighted area and arrows indicating movement or force (no text or symbols)
natural_image
Diagram of a car seatbelt buckle with a red square marking the seat area (no text or symbols)Grove Stroller Accessories
CozyFit™ Insert
Britax recommends you consult with your pediatrician regarding whether your child has sufficient head and neck control.
WARNING!
- Until the child is ready to transition into the CozyFit™ insert the infant car seat must be used as instructed with the stroller.
- The CozyFit™ insert is ONLY intended for use with the toddler seat. Do NOT use outside of the stroller seat.
- The liner, wedge and the head pad is for infants weighing 10 lbs (4.5 kg) or more ONLY and MUST be used until the infant has sufficient head and neck control.
- The wedge and the head pad MUST ONLY be used with the stroller harness straps to secure the child in the most reclined position of the toddler seat.
- The liner and the head pad may continue to be used with children after they have sufficient head and neck control.
- Do not allow the infant to lie face down on the insert or any padded material.
- Do not allow infant to sleep in stroller. The CozyFit™ insert is not intended for sleep.
Installing the CozyFit™ Insert
1. Recline the seat.
a. Lift and hold the recline handle on the back of the seat, and recline into the lowest position.
natural_image
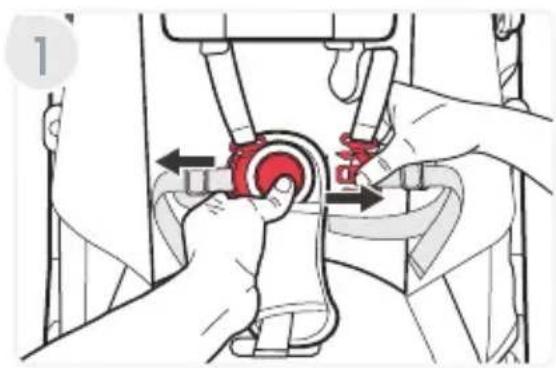
Illustration of a red children's seat with a hand holding a small object, showing a hand positioning and a magnified inset of the object (no text or symbols present)- Release the harness by pressing the button in the center of the buckle while pulling the two tongues away from the buckle assembly.
- Pinch the waist strap tongues while you separate them from the shoulder strap. Place them to the side.
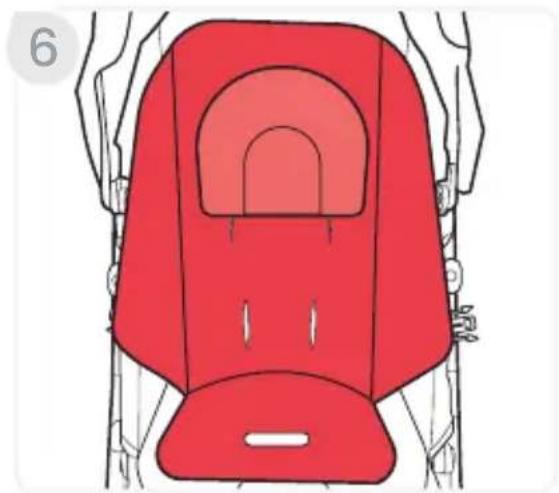
- Place the wedge with the curved side facing upward.
Note: The wedge is for infants weighing 10 lbs (4.5 kg) or more ONLY and MUST be used until the infant has sufficient head and neck control.
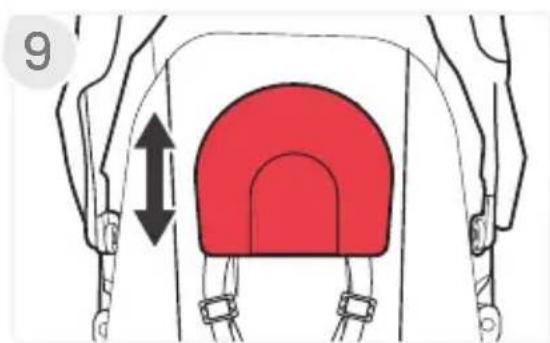
- Attach the head pad hook and loop behind the liner.
Note: The head pad MUST be used for infants weighing 10 lbs (4.5 kg) or more until the infant has sufficient head and neck control.
natural_image
Illustration of hands operating a mechanical device with a red valve (no text or symbols visible)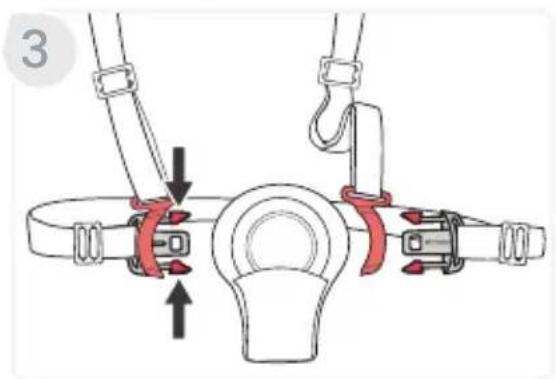

natural_image
Diagram of a mechanical lifting device with a red central component and attached pulleys (no text or symbols)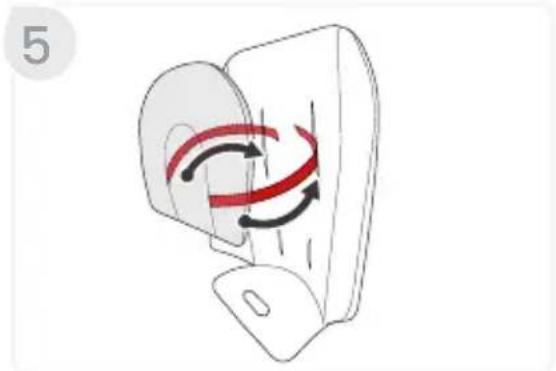
natural_image
Diagram of a device with red curved arrows indicating rotational motion (no text or symbols)- Place the liner on the toddler seat aligning its openings with the respective straps.
- Route the waist straps, shoulder straps, and the buckle through the liner slots.
- Align the waist strap tongues with the shoulder strap retainers and slide through until they click locking into place.
- Slide the head pad up or down for a proper adjustment.
natural_image
Illustration of a red baby seat with a curved seat and two side seats, no text or symbols present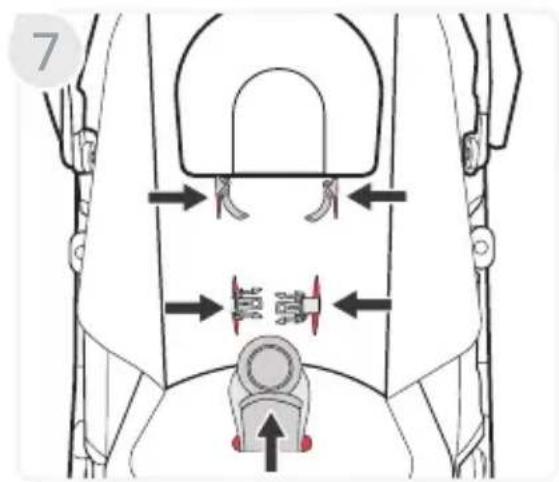
natural_image
Mechanical diagram showing a valve mechanism with red clamps and directional arrows (no text or labels)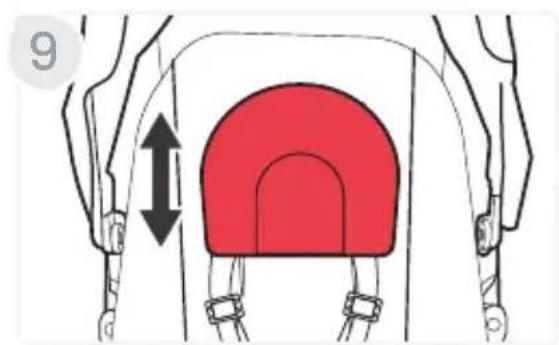
natural_image
Diagram of a red arch-shaped object with directional arrows, enclosed in a white frame (no text or symbols)Removing the CozyFit™ insert
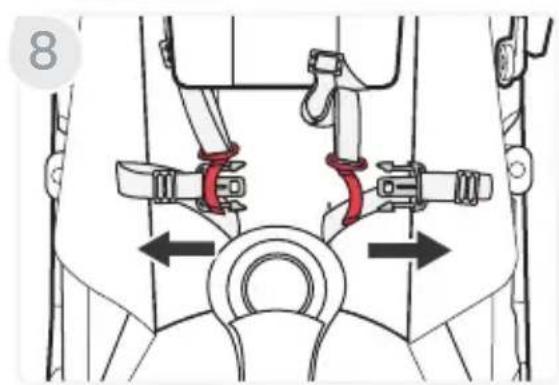
- Release the harness by pressing the button in the center of the buckle while pulling the two tongues away from the buckle assembly.
- Pinch the waist strap tongues while you separate them from the shoulder strap.
- Pull out the waist straps, shoulder straps, and buckle from the liner slots.
- Remove the liner and the wedge seat insert from stroller.
- Reconnect the shoulder strap retainers with the waist strap tongues. See page 19.
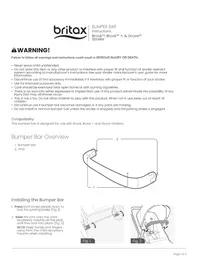
Bumper Bar
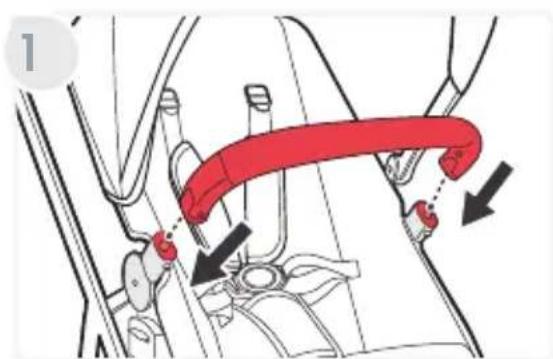
Installing the Bumper Bar
- Slide the pins onto the child accessory mounts on the seat until they lock into place.
NOTE: Keep hands and fingers away from the child accessory mounts when installing.
natural_image
Illustration of hands adjusting a red mechanical component with arrows indicating motion (no text or symbols)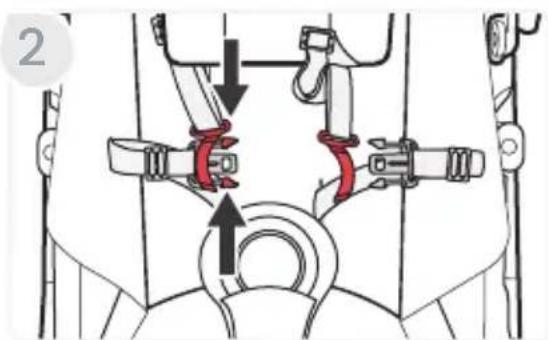
natural_image
Mechanical diagram showing a belt drive mechanism with red and black arrows indicating motion (no text or labels)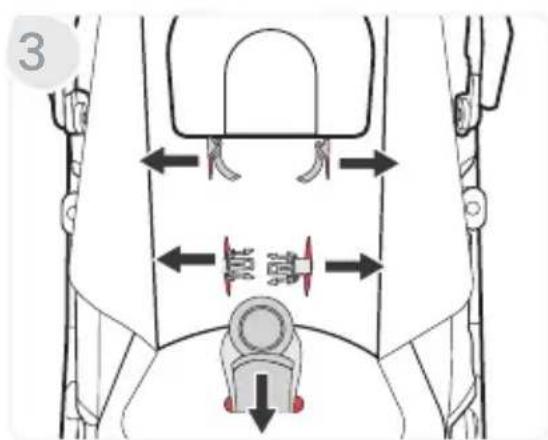
Rotating the Bumper bar
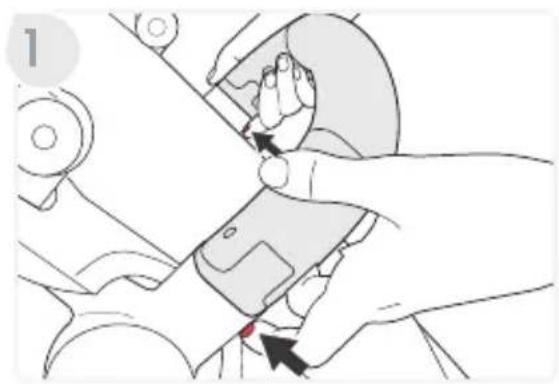
-
Disengage either side of the bumper bar by pressing the button underneath the bumper bar.
-
Rotate the bumper bar to the side of the stroller.
Removing the Bumper Bar
-
Disengage either side of the bumper bar by pressing the button underneath the bumper bar
-
Pull the bumper bar away from the stroller.
natural_image
Illustration of a hand using a tool to adjust or install a device (no text or symbols visible)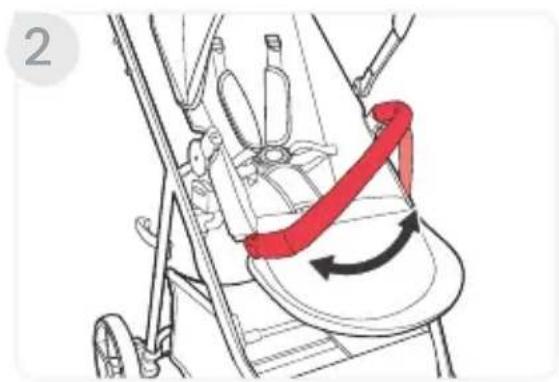
natural_image
Illustration of a stroller with a red belt and directional arrows indicating motion (no text or symbols)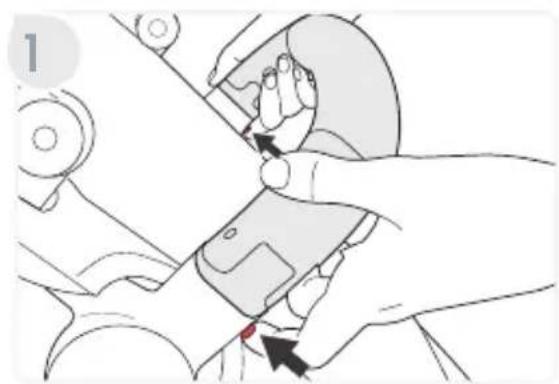
natural_image
Illustration of a hand using a tool to adjust or install a mechanical component (no text or symbols visible)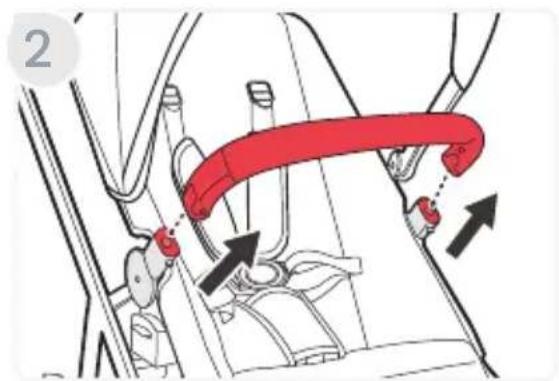
Securing Your Child
-
Release the harness by pressing the button in the center of the buckle while pulling the two tongues away from the buckle assembly.
-
Fasten the harness by inserting the tongues on the harness straps into the buckle assembly.
NOTE: Ensure the straps are not twisted.
- Adjust the buckle strap.
a. Slide the buckle adjuster up to lengthen or down to shorten.
NOTE: Buckle strap length should be adjusted to have a snug fit.
natural_image
Illustration of a mechanical device with hands operating a valve and a red component, no text or symbols present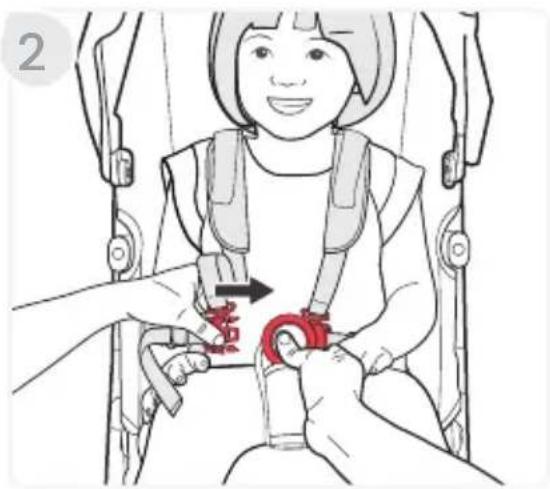
natural_image
Illustration of a child in a baby car seatbelt being lifted by adult hands, no text or symbols present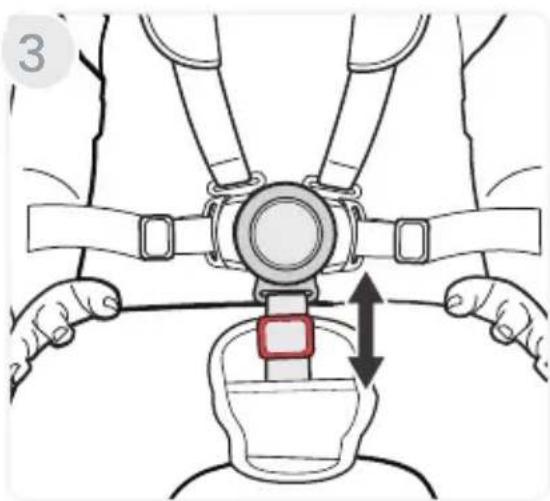
natural_image
Illustration of a person's seatbelt with a belt buckle, showing two hands and a double-headed arrow indicating rotation (no text or symbols)- Adjust the harness strap.
a. Slide the shoulder adjuster up or down and slide the hip adjuster left or right for a proper adjustment.
b. Tighten the harness straps by pulling the harness straps.
NOTE: For a proper adjustment, harness straps at or above your child's shoulders.
Infant Car Seat Mode
IMPORTANT: Not all infant car seats are compatible with the Grove stroller. For infant car seat compatibility refer to us.britax.com/support/frequently-asked-questions.
IMPORTANT: Always secure child in car seat harness when infant car seat is in use with the stroller.
IMPORTANT: Use only with an infant car seat until child has sufficient head and neck control.
Using a Compatible Britax Infant Car Seat
Attaching the Infant Car Seat
- Press both brake pedals down to lock the parking brake.
NOTE: After setting the brake, check that the brake is set properly by attempting to roll the stroller forward and backward. If the stroller will not roll, the brake is set properly.
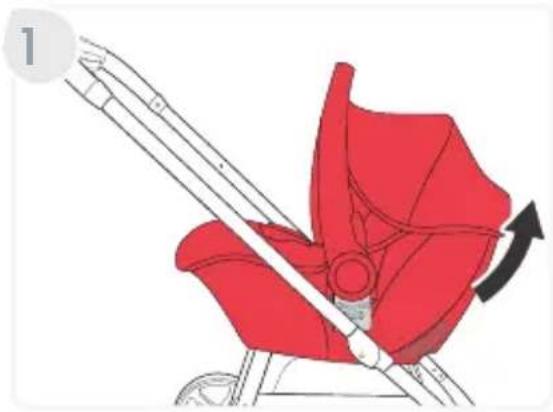
-
Remove the toddler seat.
-
Align the car seat receivers with the stroller adapters and push onto the frame until a click is heard.
NOTE: Seat attaches forward or parent facing/rear-facing.
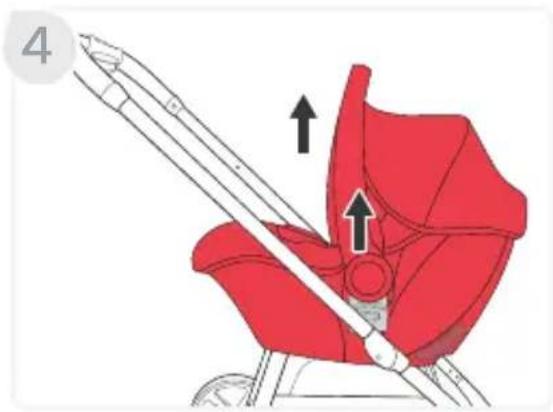
- Pull up on both sides of the infant car seat to ensure that it is secure.
natural_image
Illustration of a red car seatbelt with a diagonal guide and two arrows indicating movement or force (no text or symbols)Removing the Infant Car Seat
- Pull and hold the release lever on the back of the car seat and lift up to remove from stroller.
natural_image
Illustration of a red car seatbelt with a diagonal arrow indicating rotation (no text or symbols)Care and Maintenance
IMPORTANT: Before each use, check this stroller and its components to make sure they are in good condition and good working order.
General Maintenance
- If the stroller gets wet, wipe with a clean cloth or towel to prevent corrosion.
- DO NOT fold the stroller when wet or damp. Always make sure that the stroller is dry before storing.
- Wipe the frame with a damp cloth and mild soap. Use clean, dry cloth or towel to wipe away excess water and soap.
- DO NOT use abrasives, solvents, strong detergents, or household cleaners. These products can scratch, discolor, and weaken plastic or cause corrosion on metal surfaces.
- To prevent damage to plastic parts, store away from extreme heat.
- DO NOT stack other items on top of the stroller.
Parking Brake & Stroller Adapters
- Check that the parking brake works properly and locks both wheels securely.
- Clean out any dirt or debris that may prevent the brake or stroller adapters system from working.
Fabric & Harness
- For CozyFit™ insert, refer to product care label for wash instructions. If care label indicates machine washable, always refer to us.britax.com/faqs for important care information.
• DO NOT machine wash or dry. - Spot clean with cold water and mild soap. Air dry to prevent shrinking.
- DO NOT iron.
Warranty
This child restraint was manufactured by Britax Child Safety, Inc. ("Britax"). To the extent allowed by law, Britax warrants this product to the original retail purchaser as follows:
LIMITED TWO-YEAR WARRANTY
This product is warranted against defective materials or workmanship for two years from the date of original purchase. Proof of purchase is required for any warranty claims. Your exclusive remedy for this warranty is that Britax will, at its option, provide repair or replacement components to the original purchaser of this product. Britax reserves the right to discontinue or change fabrics, parts, models or products, or to make substitutions.
This warranty does not cover damages that arise from negligence, misuse or use not in accordance with the product instruction. Additionally, Britax products purchased from unauthorized retailers, online auction sites, or as second hand items are not covered under this warranty.
The use of non-Britax covers, inserts, toys, accessories, or tightening devices is not approved by Britax. Their use could cause this child restraint to fail safety standards. Their use also may void the Britax warranty.
To make a claim under this warranty, you must contact Britax Consumer Services at 1-888-427-4829 or 1-704-409-1699, or write to us using the address on the back cover of this User Guide.
DISCLAIMER OF WARRANTIES
The following disclaimer shall apply to you to the maximum extent permitted by applicable law. THE LIMITED WARRANTY SET FORTH ABOVE IS THE EXCLUSIVE WARRANTY MADE BY BRITAX. ALL OTHER WARRANTIES, WHETHER EXPRESS, IMPLIED, OR STATUTORY, INCLUDING WITHOUT LIMITATION THE IMPLIED WARRANTIES OF MERCHANTABILITY AND FITNESS FOR A PARTICULAR PURPOSE, ARE DISCLAIMED. Some states do not allow certain exclusions or limitations on warranties, so the above may not apply to you. This warranty gives you specific legal rights, and you may have other rights, which vary from state to state. Neither Britax, nor the retailer selling this product, authorizes any person to create for it any other warranty, obligation, or liability in connection with this product.
LIMITATION OF DAMAGES
The following limitation of damages shall apply to you to the maximum extent
permitted by applicable law. THE REMEDIES CONTAINED IN THE LIMITED WARRANTY SET FORTH ABOVE ARE THE EXCLUSIVE REMEDIES PROVIDED BY BRITAX. IN NO EVENT SHALL BRITAX BE LIABLE TO YOU FOR ANY INCIDENTAL, SPECIAL, PUNITIVE, EXEMPLARY, OR CONSEQUENTIAL DAMAGES ARISING OUT OF OR RELATING IN ANY WAY TO THE RELATIONSHIP BETWEEN YOU AND BRITAX (INCLUDING DISPUTES RELATED TO THE MARKETING OR SALE OF BRITAX PRODUCTS), ANY PROVISIONS IN THIS USER GUIDE, AND/OR YOUR PURCHASE OR USE OF ANY PRODUCTS DESIGNED, MANUFACTURED, DISTRIBUTED, MARKETED, OR SOLD BY BRITAX.
PLEASE COMPLETE AND MAIL THE OWNER REGISTRATION CARD WITHIN (30) DAYS OF PURCHASE
You may also register online at us.britax.com/registration.
Arbitration Agreement
MANDATORY ARBITRATION & CLASS ACTION WAIVER ("ARBITRATION AGREEMENT") PLEASE READ THIS SECTION CAREFULLY BECAUSE IT AFFECTS YOUR LEGAL RIGHTS, REQUIRES YOU TO ARBITRATE DISPUTES, AND LIMITS THE MANNER IN WHICH YOU CAN SEEK RELIEF.
Arbitration is a process in which persons with a dispute waive their rights to file a lawsuit and proceed in court and to have a jury trial to resolve their disputes and, instead, agree to submit their disputes to a neutral third person (an “arbitrator”) for a decision. Each party to the dispute has an opportunity to present some evidence to the arbitrator. Pre-arbitration discovery may be limited. Arbitration proceedings are private and less formal than court trials. The arbitrator will issue a final and binding decision resolving the dispute, which may be enforced as a court judgment. A court rarely overturns an arbitrator’s decision.
YOU AND BRITAX AGREE THAT ANY DISPUTE BETWEEN US, WHETHER BASED IN CONTRACT, TORT, STATUTE OR OTHERWISE, SHALL BE RESOLVED IN BINDING INDIVIDUAL ARBITRATION. For purposes of this Arbitration Agreement, the word "dispute" and "disputes" are given the broadest possible meaning and include, without limitation, all claims, disputes, and/or controversies arising out of or relating in any way to the relationship between you and Britax (including disputes related to the marketing or sale of Britax products), any provisions in this User Guide or this Arbitration Agreement (including the interpretation and scope of this Arbitration Agreement and the arbitrability of any dispute), and/
or your purchase or use of any products designed, manufactured, distributed, marketed, or sold by Britax. The Federal Arbitration Act ("FAA") and federal arbitration law apply to this Arbitration Agreement. Notwithstanding the foregoing, you and Britax each agree that you and Britax shall retain the rights to bring an individual suit in small claims court for disputes within the scope of such court's jurisdiction and/or to bring an individual suit in court to enjoin infringement or other misuse of intellectual property rights. In no way shall the foregoing sentence allow for an action to be brought on a class or collective basis.
YOU HAVE THE RIGHT TO OPT OUT OF THIS ARBITRATION AGREEMENT, BUT YOU MUST EXERCISE THIS RIGHT WITHIN THIRTY (30) DAYS OF YOUR PURCHASE OF A BRITAX PRODUCT. If you do not wish to be bound by this Arbitration Agreement, you must notify Britax by mailing or e-mailing a written opt-out notice, postmarked or electronically delivered within thirty (30) days of your purchase of a Britax product, to: ATTN: Legal Department, 4140 Pleasant Road, Fort Mill, South Carolina 29708. Your opt-out notice must include your full name, address and/or e-mail address, the model and serial numbers of the purchased product, a copy of your proof of purchase, and a statement that you intend to opt out of this Arbitration Agreement. If you do not opt out within thirty (30) days of your purchase, then this Arbitration Agreement will apply and you understand and agree that you are waiving your right to maintain other available resolution processes, such as a court action or administrative proceeding, to resolve your dispute with Britax.
The arbitration will be conducted confidentially by a single arbitrator and administered by the American Arbitration Association ("AAA") under its Consumer Arbitration Rules most recently in effect to the extent such rules and procedures do not contradict the express terms of this Arbitration Agreement. To learn more about the rules and how to begin an arbitration, you may call any AAA office or go to www.adr.org. If you demand arbitration, then at your request Britax will advance your portion of the expenses associated with the arbitration, including the filing, administrative, hearing and arbitrator's fees ("Arbitration Fees") to the extent such Arbitration Fees exceed \200. If Britax demands arbitration, then at your request Britax will advance your portion of the Arbitration Fees. For claims of \10,000 or less, you can choose whether you would like the arbitration carried out based only on documents submitted to the arbitrator or by a hearing in person or by telephone. The arbitration hearing will be conducted in the county of your residence, within 30 miles of such county, or in such place as shall be ordered by the arbitrator. Throughout
the arbitration, each party shall bear his, her or its own attorneys' fees and expenses, including any witness and expert witness fees. The arbitrator shall apply applicable substantive law consistent with the FAA, shall apply statutes of limitation, and shall honor claims of privilege recognized at law. The arbitrator shall decide, with or without a hearing, any motion that is substantially similar to a motion to dismiss for failure to state a claim or a motion for summary judgment. In conducting the arbitration proceeding, the arbitrator shall not apply any federal or state rules of civil procedure or evidence. The arbitrator shall not consolidate the claims of multiple parties unless you and Britax agree to do so. At the timely request of any party, the arbitrator shall provide a written explanation for the award. The arbitrator's award may be filed with any court having jurisdiction.
THIS ARBITRATION AGREEMENT DOES NOT ALLOW CLASS OR COLLECTIVE ARBITRATIONS EVEN IF THE AAA RULES OR PROCEDURES WOULD. IN OTHER WORDS, YOU AND BRITAX EACH AGREE THAT ALL DISPUTES SHALL BE ARBITRATED ON AN INDIVIDUAL BASIS AND WAIVE ANY RIGHT TO PROCEED IN A CLASS, CONSOLIDATED, OR REPRESENTATIVE FASHION. THE ARBITRATOR MAY AWARD MONEY OR INJUNCTIVE RELIEF ONLY IN FAVOR OF THE INDIVIDUAL PARTY SEEKING RELIEF AND ONLY TO THE EXTENT NECESSARY TO PROVIDE RELIEF WARRANTED BY THAT PARTY'S INDIVIDUAL CLAIM. NO CLASS, REPRESENTATIVE OR PRIVATE ATTORNEY GENERAL OR GENERAL INJUNCTIVE RELIEF THEORIES OF LIABILITY OR PRAYERS FOR RELIEF MAY BE MAINTAINED IN ANY ARBITRATION CONDUCTED PURSUANT TO THIS ARBITRATION AGREEMENT.
If the foregoing class action waiver and prohibition against class arbitration is determined to be invalid or unenforceable for any reason, then this entire Arbitration Agreement shall be void. If any portion of this Arbitration Agreement other than the class action waiver and prohibition against class arbitration is deemed to be invalid or unenforceable for any reason, it shall not invalidate the remaining portions of this Arbitration Agreement. If for any reason a dispute proceeds in court rather than in arbitration, you and Britax each waive any right to a jury trial.
Garniture CozyFit™ 21
Barre pare-chocs....24
natural_image
Technical line drawing of a mechanical device with no visible text or symbolsnatural_image
Simple line drawing of a seesaw with a lever and base (no text or symbols)natural_image
Line drawing of a curved mechanical part with mounting holes (no text or symbols)Barre pare-chocs
natural_image
Simple line drawing of a seat and two separate views (no text or symbols)yFit
natural_image
Two identical mechanical pulley systems with lever arms and wheels (no text or symbols)Roues avant

natural_image
Diagram of a two-dot mechanical assembly with wheels and shafts (no text or symbols)Roues arrière
natural_image
Line drawing of a baby stroller with two wheels and a canopy cover (no text or symbols)natural_image
Line drawing of a baby stroller with four wheels and a canopy cover (no text or symbols)natural_image
Line drawing of a baby stroller with two wheels and a handle (no text or symbols)natural_image
Line drawing of a baby stroller with four wheels and a handle (no text or symbols)natural_image
Diagram of a mechanical linkage mechanism with directional arrows indicating motion (no text or symbols)
natural_image
Diagram of a red lever mechanism with a curved arrow indicating motion (no text or symbols)natural_image
Illustration of a person using a wheeled cart to adjust a wheel rim (no text or symbols present)natural_image
Diagram of a mechanical linkage system with red components and rotational arrows indicating motion (no text or symbols)natural_image
Illustration of a red baby seatbelt device with two arrows indicating movement or positioning (no text or symbols present)Installation de la Capote
natural_image
Technical illustration of a stroller with a close-up inset showing the seatbelt mechanism (no text or symbols)natural_image
Illustration of a person performing a medical procedure on a device, showing force arrows and a red object (no text or symbols)
natural_image
Illustration of hands using a tool to adjust or install a mechanical component (no text or symbols visible)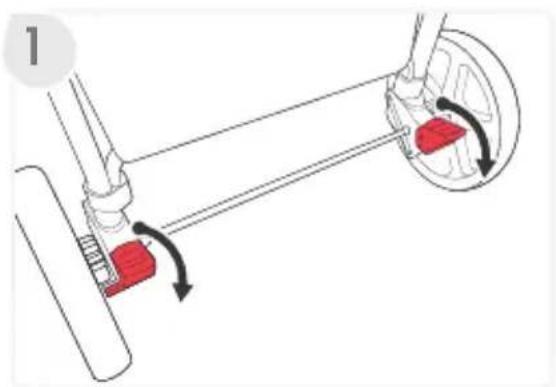
natural_image
Mechanical diagram showing a lever mechanism with red blocks and directional arrows indicating motion (no text or symbols)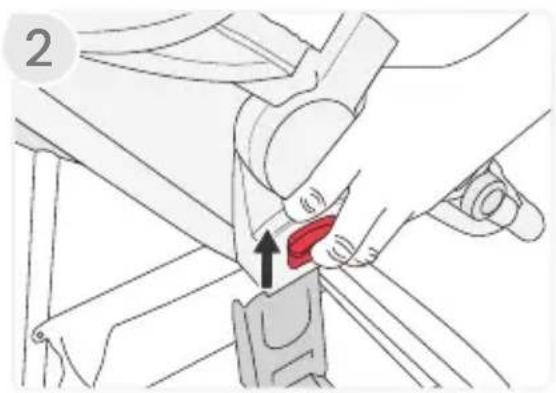
natural_image
Diagram showing a hand adjusting a red belt buckle with an arrow indicating the buckle's point (no text or symbols present)natural_image
Technical diagram of a mechanical assembly with a wheel and shaft, showing a hand operating a component (no text or symbols present)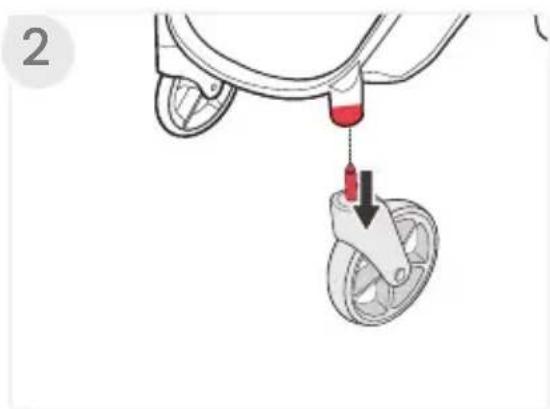
natural_image
Illustration of a bicycle suspension system with a red tool inserted into a wheel (no text or symbols)natural_image
Illustration of a stroller with red handle and black arrow indicating rotation (no text or symbols)natural_image
Diagram of a mechanical lever mechanism with directional arrows indicating motion (no text or symbols)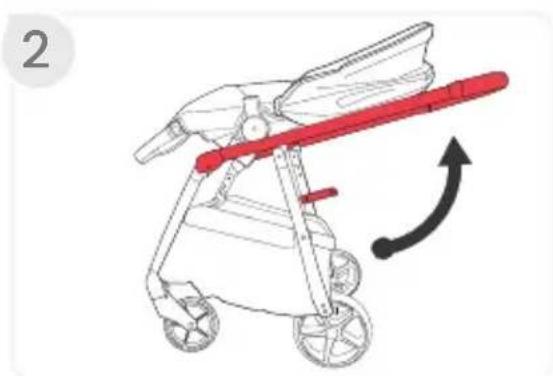
natural_image
Illustration of a baby stroller with a red handle and black arrow indicating rotation (no text or symbols)natural_image
Mechanical diagram showing a lever mechanism with red blocks and directional arrows indicating motion (no text or symbols)natural_image
Illustration of a hand adjusting a red circular component on a mechanical device (no text or symbols visible)natural_image
Diagram of a pelvic implant with red highlighted area and black arrows indicating force or movement (no text or symbols)
natural_image
Illustration of a red fabric seatbelt being adjusted for a hand, with an inset showing the angle of the seatbelt (no text or symbols present)natural_image
Illustration of hands operating a mechanical device with red components, no text or symbols present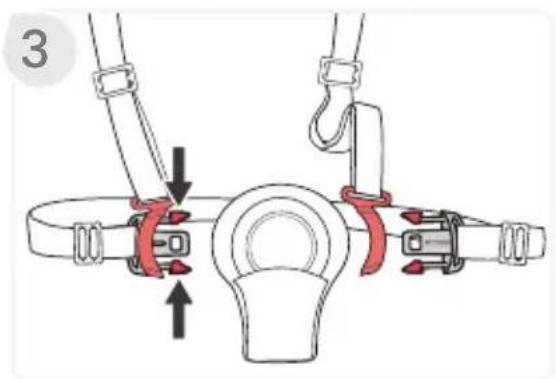
natural_image
Diagram of a mechanical lifting device with a red central component and attached pulleys (no text or symbols)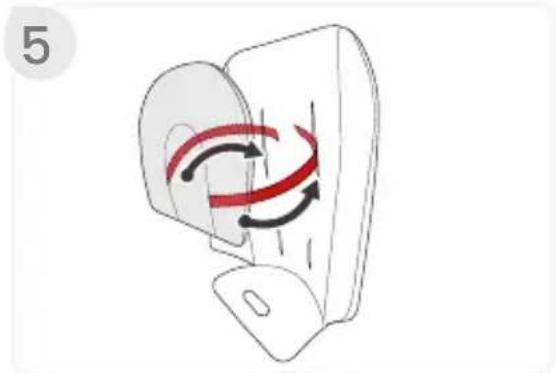
natural_image
Diagram of a device with red and black arrows indicating rotation or movement (no text or symbols)natural_image
Illustration of a red car seat with a curved roof and side panel, no text or symbols present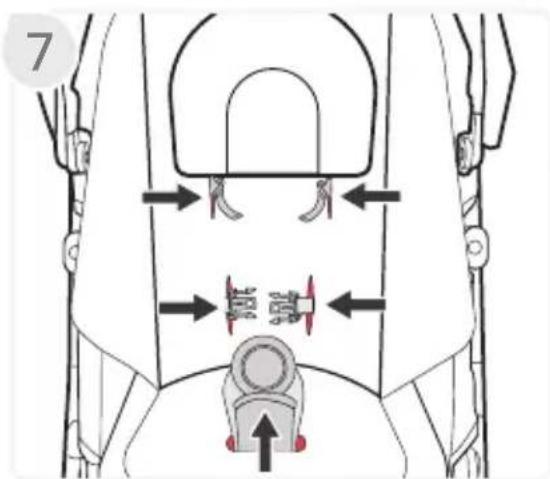
natural_image
Illustration of a hand using a tool to adjust or install a mechanical component, with no visible text or symbols.
natural_image
Illustration of a stroller with a red directional arrow indicating rotation or movement (no text or symbols present)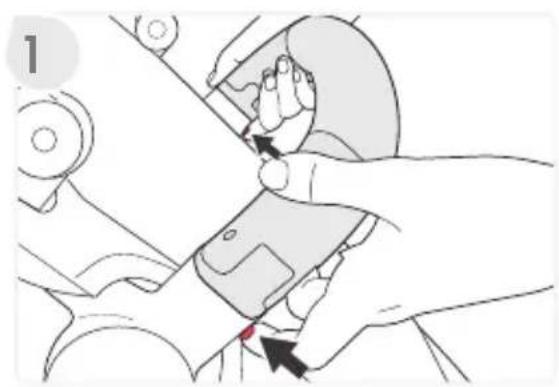
natural_image
Illustration of a hand using a tool to adjust or install a device, with no visible text or symbols.
natural_image
Illustration of a child in a car seatbelt being lifted by adult hands, showing the red belt being inserted (no text or symbols present)
natural_image
Illustration of a person's seatbelt buckle being adjusted, showing two hands and a highlighted seat (no text or symbols)- Ajustez le harnais.
natural_image
Diagram of a mechanical linkage system with red components and directional arrows indicating motion (no text or symbols)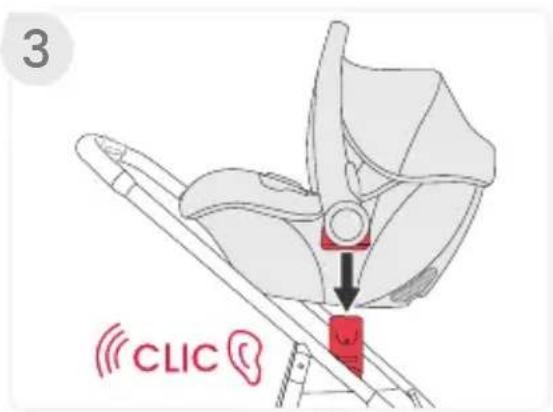
natural_image
Illustration of a red car seatbelt with a diagonal bar and two arrows indicating movement or force (no text or symbols)natural_image
Illustration of a red car seatbelt with a diagonal belt and arrow indicating rotation (no text or symbols)natural_image
Line drawing of a baby stroller with two wheels and a canopy cover (no text or symbols)natural_image
Line drawing of a baby stroller with wheels and a canopy cover (no text or symbols)natural_image
Line drawing of a baby stroller with two wheels and a handle (no text or symbols)natural_image
Line drawing of a baby stroller with two wheels and a handle (no text or symbols)natural_image
Diagram of a mechanical linkage mechanism with directional arrows indicating motion (no text or symbols)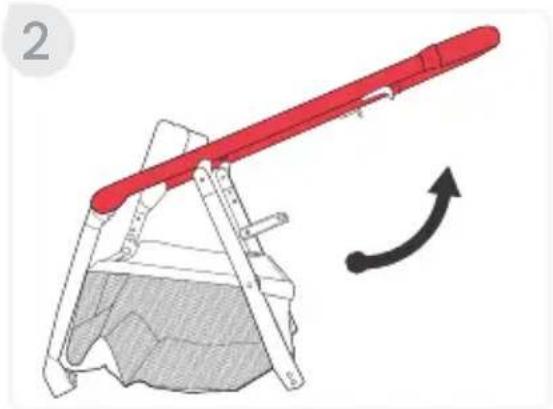
natural_image
Diagram of a red lever mechanism with a curved arrow indicating motion (no text or symbols)natural_image
Illustration of a person using a wheeled cart with a wheel, showing mechanical components and motion direction (no text or symbols)natural_image
Mechanical diagram showing a lever mechanism with red adjustment arrows indicating motion (no text or symbols)natural_image
Illustration of a red baby seatbelt with arrows indicating movement or positioning (no text or symbols)Cómo Instalar la Capota
natural_image
Illustration of a person performing a knee joint pressure technique (no text or symbols present)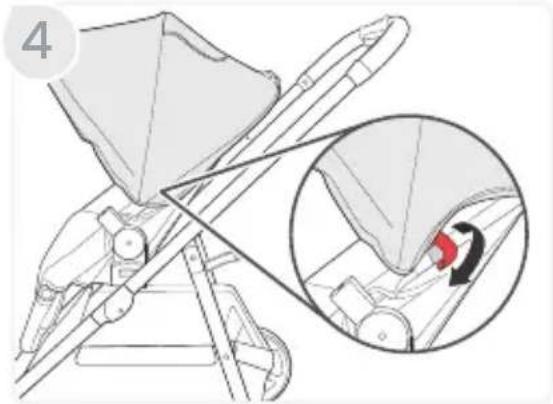
natural_image
Technical illustration of a mechanical device with an inset showing a close-up of a component being inserted (no text or symbols present)natural_image
Illustration of a person performing a medical procedure on a patient's abdomen, with arrows indicating movement (no text or symbols present)
natural_image
Illustration of hands using a tool to adjust a car's seatbelt (no text or symbols present)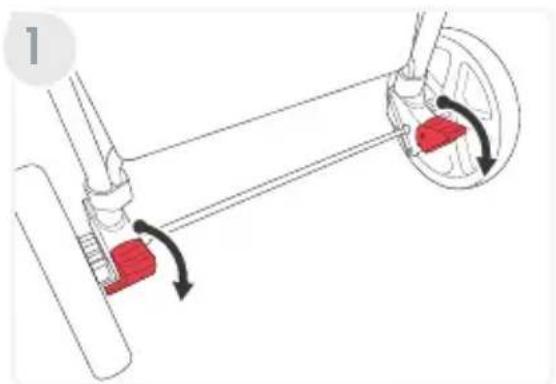
natural_image
Mechanical diagram showing a lever mechanism with red blocks and rotational arrows indicating motion (no text or symbols)
natural_image
Mechanical diagram showing a hand adjusting a red belt buckle (no text or symbols present)natural_image
Technical line drawing of a mechanical assembly with a wheel and shaft (no text or symbols)

natural_image
Illustration of a bicycle's wheel assembly with a red component inserted, showing a black arrow indicating the motion direction (no text or symbols present)natural_image
Line drawing of a baby stroller with a red handle and black arrow indicating rotation (no text or symbols)natural_image
Diagram of a mechanical linkage mechanism with directional arrows indicating motion (no text or symbols)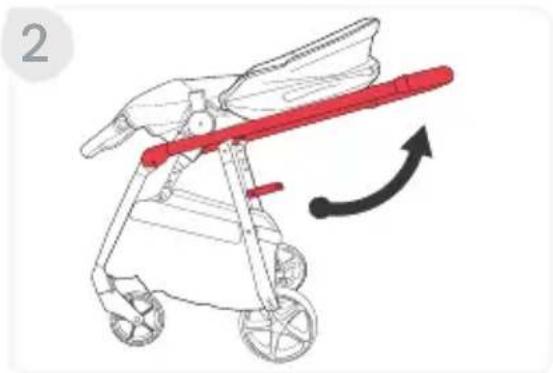
natural_image
Illustration of a stroller with red handle and black arrow indicating motion (no text or symbols)natural_image
Mechanical diagram showing a lever mechanism with red adjustment arrows indicating motion (no text or symbols)natural_image
Illustration of a hand adjusting a red circular component on a mechanical device (no text or symbols visible)Como Usar el Arnés
natural_image
Anatomical illustration of a pelvic implant with red highlighted area and black arrows indicating force or movement (no text or labels)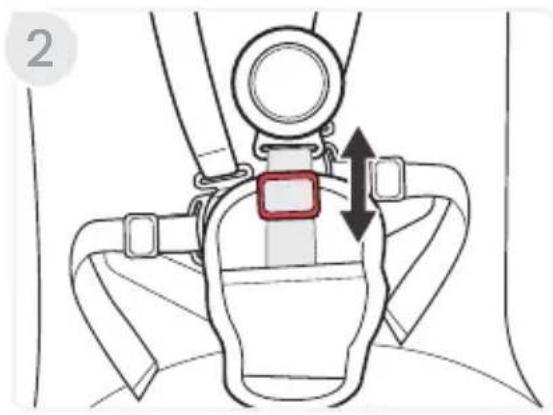
natural_image
Illustration of a red fabric or cloth device being adjusted for a small object, with an inset showing the hand holding a curved object (no text or symbols present)natural_image
Illustration of hands operating a mechanical device with red components, no text or symbols present

natural_image
Diagram of a mechanical lifting device with a red central component and attached pulleys (no text or symbols)
natural_image
Diagram of a device with red and black curved arrows indicating motion or rotation (no text or symbols)natural_image
Illustration of a red baby seat with a curved backrest and two side panels, no text or symbols present.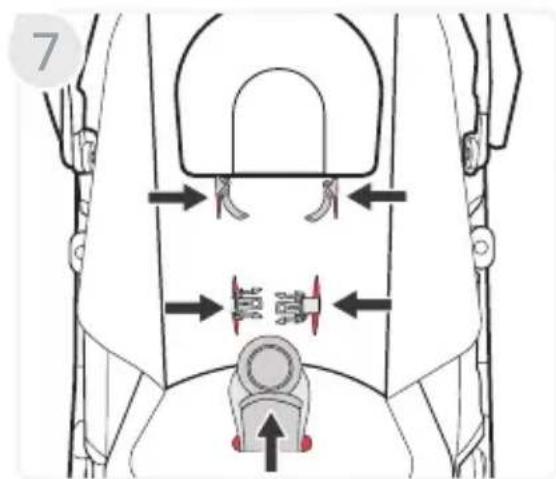
natural_image
Technical diagram of a mechanical assembly with directional arrows indicating movement or force (no text or symbols present)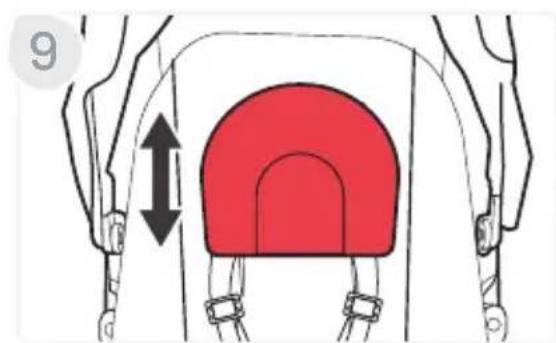
natural_image
Illustration of hands assembling a mechanical component with arrows indicating assembly (no text or symbols)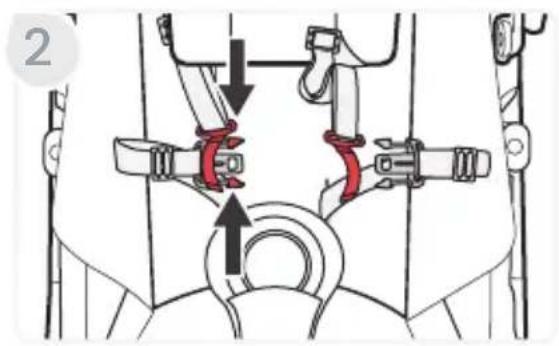

natural_image
Illustration of hands using a mechanical device to adjust a component (no text or symbols visible)
natural_image
Illustration of a stroller with a red belt and directional arrows indicating motion (no text or symbols)
natural_image
Illustration of hands using a mechanical device to adjust a component (no text or symbols visible)
natural_image
Illustration of a mechanical device with hands operating it, showing a red spring mechanism (no text or symbols)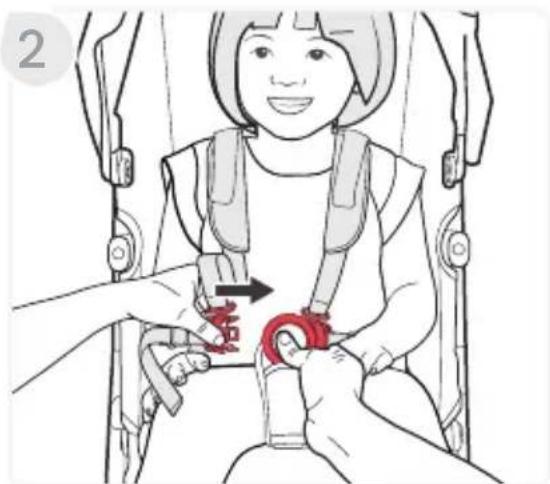
natural_image
Illustration of a child in a baby car seatbelt being lifted by adult hands, showing red belt insertion (no text or symbols)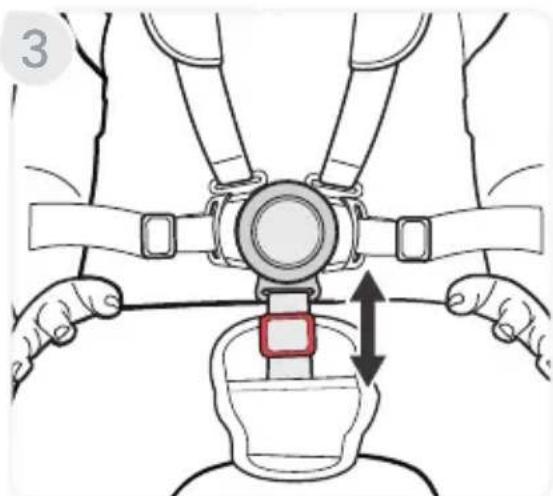
natural_image
Illustration of a person adjusting a seatbelt with arrows indicating movement (no text or symbols)- Ajuste el arnés.
natural_image
Diagram of a mechanical linkage system with red components and directional arrows indicating motion (no text or symbols)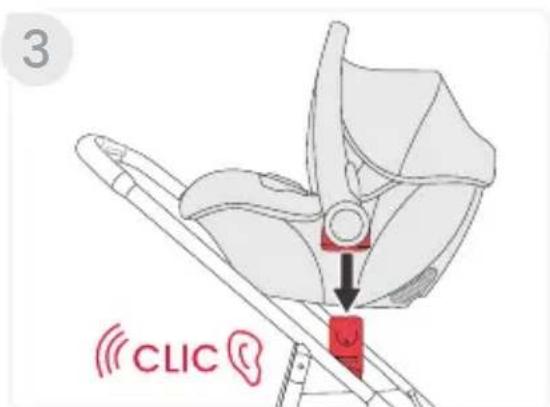
natural_image
Illustration of a red car seatbelt with two arrows indicating movement or positioning (no text or symbols)natural_image
Illustration of a red car seatbelt with a diagonal belt and arrow indicating rotation (no text or symbols)natural_image
Simple geometric shape: a black semicircle with a white inner circle, no text or symbols present.Britax Child Safety, Inc.

4140 Pleasant Road
Fort Mill, SC 29708 USA

1-888-427-4829
1-704-409-1699

A Britax Childcare company

us.Britax.com
- Grove™ Stroller
- IMPORTANT
- IMPORTANTE
- Safety Information
- WARNING!
- In The Box
- Stroller Overview
- Accessories Overview
- Bumper Bar
- CozyFit™ Insert
- Britax Stroller Modes
- ! WARNING!
- Toddler Seat Modes
- Infant Car Seat Modes
- Stroller Assembly
- Unfolding the Stroller Frame
- Installing the Front Wheels
- Installing the Rear Wheels
- Attaching the Toddler Seat
- Installing the Canopy
- Stroller Disassembly
- Removing the Canopy
- Removing the Toddler Seat
- Removing the Rear Wheels
- Removing the Front Wheels
- Stroller Operation
- Using the Stroller
- Folding the Stroller
- Unfolding the Stroller
- Using the Parking Brake
- Using the Front Wheel Swivel Locks
- Adjusting the Stroller
- Reclining the Seat
- Adjusting the Foot Rest
- Using the Harness
- Adjusting the Harness
- Adjusting the Buckle
- Grove Stroller Accessories
- Installing the CozyFit™ Insert
- Recline the seat.
- Removing the CozyFit™ insert
- Installing the Bumper Bar
- Rotating the Bumper bar
- Removing the Bumper Bar
- Securing Your Child
- Infant Car Seat Mode
- Removing the Infant Car Seat
- Care and Maintenance
- General Maintenance
- Parking Brake & Stroller Adapters
- Fabric & Harness
- Warranty
- LIMITED TWO-YEAR WARRANTY
- DISCLAIMER OF WARRANTIES
- LIMITATION OF DAMAGES
- Arbitration Agreement
- Installation de la Capote
- Cómo Instalar la Capota
- Como Usar el Arnés
- Britax Child Safety, Inc.
Brand : BRITAX
Model : Grove
Category : Stroller