HBN231S2, HBN231S4 - Built-in oven BOSCH - Free user manual and instructions
Find the device manual for free HBN231S2, HBN231S4 BOSCH in PDF.

| Product type | Built-in oven |
| Brand | BOSCH |
| Models | HBN231S2, HBN231S4 |
| Power supply | 220-240 V, 50/60 Hz |
| Total power | Approximately 3 kW |
| Oven volume | Approximately 60 L |
| Heating modes | Top/bottom heat, convection, large area grill, small area grill, convection + grill |
| Temperature range | 50-270 °C |
| Grill levels | 3 (low, medium, high) |
| Display | Digital with clock, timer, end of cooking |
| Interior lighting | 40 W bulb, replaceable |
| Door | Removable, detachable panes for cleaning |
| Safety | Child lock, automatic shut-off, cool door |
| Cleaning | Manual, enamel surfaces, removable racks |
| Included accessories | Metal rack, aluminum tray, universal drip pan |
| Available options | Extra rack, enamel tray, child safety kit (ref. 440651) |
| After-sales service | Spare parts available, repair by authorized technician |
| Certifications | Compliant with CE standards, EN 50304 |
| Installation | Built-in, requires professional installation |
Frequently Asked Questions - HBN231S2, HBN231S4 BOSCH
User questions about HBN231S2, HBN231S4 BOSCH
0 question about this device. Answer the ones you know or ask your own.
Ask a new question about this device
Download the instructions for your Built-in oven in PDF format for free! Find your manual HBN231S2, HBN231S4 - BOSCH and take your electronic device back in hand. On this page are published all the documents necessary for the use of your device. HBN231S2, HBN231S4 by BOSCH.
USER MANUAL HBN231S2, HBN231S4 BOSCH
Built-in oven HBN231.2
KipictipinreH dyxOBka kkaΦbI HBN231.2

BOSCH
[en] Instruction manual 3
[kk] PanaIaIaNHy HycKaayIbIFbl 21
en Table of contents
Important safety information. 3
Causes of damage 4
Your new oven 5
Control panel 5
Function selector 5
Buttons and Displays. 5
Temperature selector 6
Cooking compartment 6
Your accessories. 6
Inserting the accessories. 6
Optional accessories 7
Before using the oven for the first time. 7
Setting the clock 7
Heating up the oven 7
Cleaning the accessories 7
Setting the oven 8
Types of heating and temperature 8
The oven should switch off automatically. 8
The oven should switch on and off automatically. 8
Setting the clock. 9
Setting the timer 9
Childproof lock. 9
Oven. 9
Care and cleaning. 10
Cleaning agents 10
Detaching and refitting the rails. 10
Detaching and attaching the oven door. 11
Removing and installing the door panels 12
Troubleshooting 12
Malfunction table 12
Replacing the bulb in the oven ceiling light 12
Glass cover 13
After-sales service 13
E number and FD number. 13
Energy and environment tips. 13
Saving energy 13
Environmentally-friendly disposal. 13
Measures to be noted during transport 13
Tested for you in our cooking studio. 14
Cakes and pastries 14
Baking tips. 15
Meat, poultry, fish 16
Tips for roasting and grilling 17
Bakes, gratins, toast with toppings. 18
Preprepared products 18
Special dishes 18
Defrosting. 19
Drying. 19
Preserving 19
Acrylamide in foodstuffs 20
Test dishes 20
Baking 20
Grilling 20
Additional information on products, accessories, replacement parts and services can be found at www.bosch-home.com and in the online shop www.bosch-eshop.com
Important safety information
Read these instructions carefully. Only then will you be able to operate your appliance safely and correctly. Retain the instruction manual and installation instructions for future use or for subsequent owners.
This appliance is only intended to be fully fitted in a kitchen. Observe the special installation instructions.
Check the appliance for damage after unpacking it. Do not connect the appliance if it has been damaged in transport.
Only a licensed professional may connect appliances without plugs. Damage caused by incorrect connection is not covered under warranty.
This appliance is intended for domestic use only. The appliance must only be used for the preparation of food and drink. The appliance must be supervised during operation. Only use this appliance indoors.
This appliance may be used by children over the age of 8 years old and by persons with reduced physical, sensory or mental capabilities or by persons with a lack of experience or knowledge if they are supervised or are instructed by a person responsible for their safety how to use the appliance safely and have understood the associated hazards.
Children must not play with the appliance.
Children must not clean the appliance or carry out general maintenance unless they are at least 8 years old and are being supervised.
Keep children below the age of 8 years old at a safe distance from the appliance and power cable.
Always slide accessories into the cooking compartment correctly. See "Description of accessories in the instruction manual.
Risk of fire!
- Combustible items stored in the cooking compartment may catch fire. Never store combustible items in the cooking compartment. Never open the appliance door if there is smoke inside. Switch off the appliance and unplug it from the mains or switch off the circuit breaker in the fuse box.
A draught is created when the appliance door is opened. Greaseproof paper may come into contact with the heating element and catch fire. Do not place greaseproof paper loosely over accessories during preheating. Always weight down the greaseproof paper with a dish or a baking tin. Only cover the surface required with greaseproof paper. Greaseproof paper must not protrude over the accessories.
Risk of burns!
- The appliance becomes very hot. Never touch the interior surfaces of the cooking compartment or the heating elements. Always allow the appliance to cool down. Keep children at a safe distance.
- Accessories and ovenware become very hot. Always use oven gloves to remove accessories or ovenware from the cooking compartment.
- Alcoholic vapours may catch fire in the hot cooking compartment. Never prepare food containing large quantities of drinks with a high alcohol content. Only use small quantities of drinks with a high alcohol content. Open the appliance door with care.
Risk of scalding!
- The accessible parts become hot during operation. Never touch the hot parts. Keep children at a safe distance.
- When you open the appliance door, hot steam may escape. Open the appliance door with care. Keep children at a safe distance.
Water in a hot cooking compartment may create hot steam. Never pour water into the hot cooking compartment.
Risk of injury!
Scratched glass in the appliance door may develop into a crack. Do not use a glass scraper, sharp or abrasive cleaning aids or detergents.
Risk of electric shock!
Incorrect repairs are dangerous. Repairs may only be carried out by one of our trained after-sales engineers. If the
appliance is faulty, unplug the mains plug or switch off the fuse in the fuse box. Contact the after-sales service.
- The cable insulation on electrical appliances may melt when touching hot parts of the appliance. Never bring electrical appliance cables into contact with hot parts of the appliance.
Penetrating moisture may cause an electric shock. Do not use any high-pressure cleaners or steam cleaners. - When replacing the cooking compartment bulb, the bulb socket contacts are live. Before replacing the bulb, unplug the appliance from the mains or switch off the circuit breaker in the fuse box.
A defective appliance may cause electric shock. Never switch on a defective appliance. Unplug the appliance from the mains or switch off the circuit breaker in the fuse box. Contact the after-sales service.
Causes of damage
Caution!
- Accessories, foil, greaseproof paper or ovenware on the cooking compartment floor: do not place accessories on the cooking compartment floor. Do not cover the cooking compartment floor with any sort of foil or greaseproof paper. Do not place ovenware on the cooking compartment floor if a temperature of over 50^ has been set. This will cause heat to accumulate. The baking and roasting times will no longer be correct and the enamel will be damaged.
Water in a hot cooking compartment: do not pour water into the cooking compartment when it is hot. This will cause steam. The temperature change can cause damage to the enamel. - Moist food: do not store moist food in the cooking compartment when it is closed for prolonged periods This will damage the enamel.
- Fruit juice: when baking particularly juicy fruit pies, do not pack the baking tray too generously. Fruit juice dripping from the baking tray leaves stains that cannot be removed. If possible, use the deeper universal pan.
- Cooling with the appliance door open: only allow the cooking compartment to cool when it is closed. Even if the appliance door is only open a little, front panels of adjacent units could be damaged over time.
- Very dirty door seal: If the door seal is very dirty, the appliance door will no longer close properly when the appliance is in use. The fronts of adjacent units could be damaged. Always keep the door seal clean.
- Appliance door as a seat, shelf or worktop: Do not sit on the appliance door, or place or hang anything on it. Do not place any cookware or accessories on the appliance door.
- Inserting accessories: depending on the appliance model, accessories can scratch the door panel when closing the appliance door. Always insert the accessories into the cooking compartment as far as they will go.
- Carrying the appliance: do not carry or hold the appliance by the door handle. The door handle cannot support the weight of the appliance and could break.
Your new oven
Here you will learn about your new oven. The control panel and the individual operating controls are explained. You will find information on the cooking compartment and the accessories.
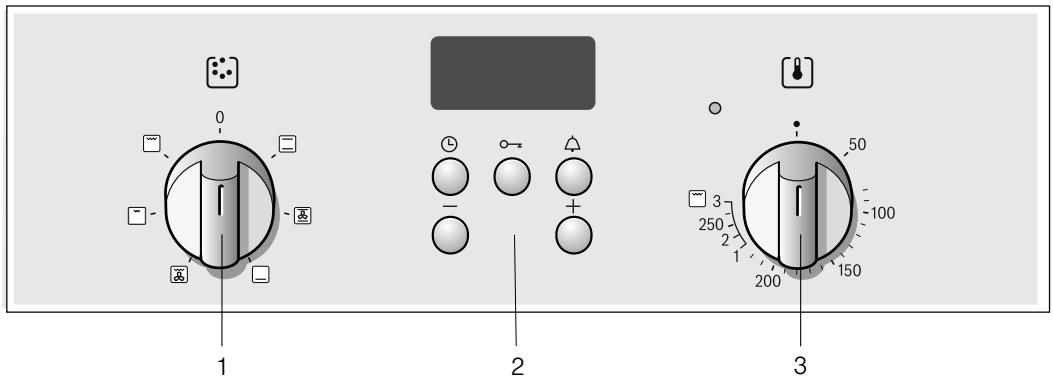
Control panel
Here you can see an overview of the control panel. The design depends on the respective appliance model.
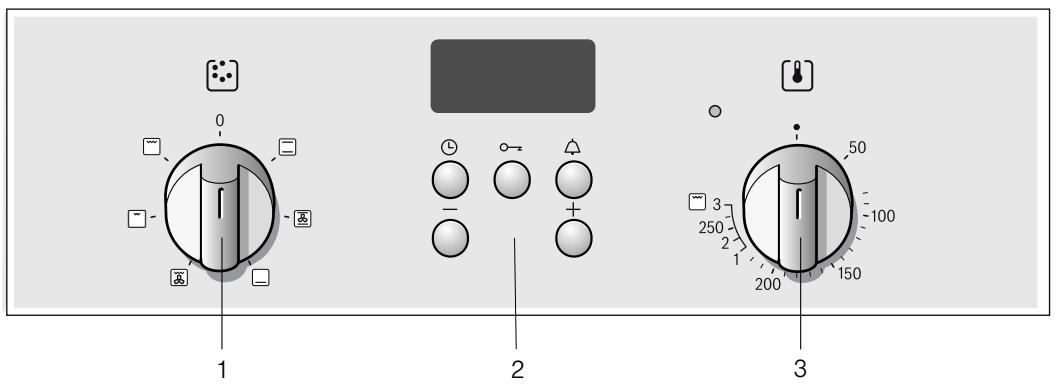
| Explanations | |
| 1 | Function selector |
| 2 | Operating switches and display panel |
| 3 | Temperature selector |
Function selector
With the function selector knob you can set the heating mode for the oven. The function selector knob can be rotated to the right or to the left.
When the required type of heating is set, the oven light lights up.
| Settings | Function | |
| 0 | Off | The oven is switched off. |
| Top/bottom heating | Baking, roasting or grilling is possi- ble on a single level only. This set- ting is well-suited for cakes and pizza in tins or on the baking tray, and for lean joints of beef, veal and game. Heat is emitted evenly from the top and bottom. | |
| Hot air* | Meringues and puff pastries can be baked on a single level. Small baked items, cookies and puff pastries can be baked at the same time on two levels. The fan on the rear side of the appli- ance takes the air that comes from above and below and distributes it evenly around the food. | |
| Bottom heating | You can use Bottom heating for the final baking stage and for browning meals from the bottom. The heat is emitted from below. | |
| Hot air grilling | Hot air grilling is particularly suitable for grilling fish, poultry and larger pieces of meat. The grill element and fan switch on and off alternately. The fan distributes the heated air around the food. | |
- Type of heating in accordance with energy efficiency class EN50304.
| Settings | Function | |
| ☐ | Radiant grill, small area | This type of heating is suitable for grilling small quantities of steak, sausages, fish, and toast. The centre part of the grill element is heated. |
| ☐ | Radiant grilling, large area | Can be used to grill a large number of beef steaks, sausages and fish, or to toast bread. The whole area below the grill heating element becomes hot. |
- Type of heating in accordance with energy efficiency class EN50304.
Buttons and Displays
The buttons can be used to set additional functions. The set values can be read from the displays.
| Button | Function | |
| Clock button | Use this button to set the time, ➔ Cooking time, and ➔ End time. | |
| Key button | Use this button to switch the child-proof lock on or off. | |
| Timer button | Use this button to set the timer. | |
| Minus button | Use this button to adjust the setting values downwards. | |
| Plus button | Use this button to adjust the setting values upwards. | |
Temperature selector
Use the temperature selector to set the temperature and the grill setting.
| Settings | Function | |
| 1 | Off | Oven not hot. |
| 50-270 | Temperature range | The temperature is specified in °C. |
| 1, 2, 3 | Grill settings | Grill settings for the grill, small and large surface. |
| Setting 1 = low | ||
| Setting 2 = medium | ||
| Setting 3 = high |
The small light above the temperature selector is lit when the oven is heating. It goes out during pauses in the heating. For some settings, it does not light up.
Grill settings
With Radiant grilling, use the temperature selector to set a grill setting.
Cooking compartment
The oven light is located in the cooking compartment. A cooling fan protects the oven from overheating.
Oven light
During oven operation, the oven light is on. By turning the function selector to any position, the oven light can also be switched on without the oven heating up.
Cooling fan
The cooling fan switches on and off as required. The hot air escapes above the door.
So that the cooking compartment cools down more quickly after operation, the cooling fan continues to run for a certain period afterwards.
Caution!
do not cover the ventilation slots. Otherwise the oven will overheat.
Your accessories
The accessories supplied with your appliance are suitable for making many meals. Ensure that you always insert the accessories into the cooking compartment the right way round.
There is also a selection of optional accessories, with which you can improve on some of your favourite dishes, or simply to make working with your oven more convenient.
Inserting the accessories
The accessories can be inserted in the oven at 4 different levels. Always insert the accessories as far as they can go to ensure that they do not touch the door glass.
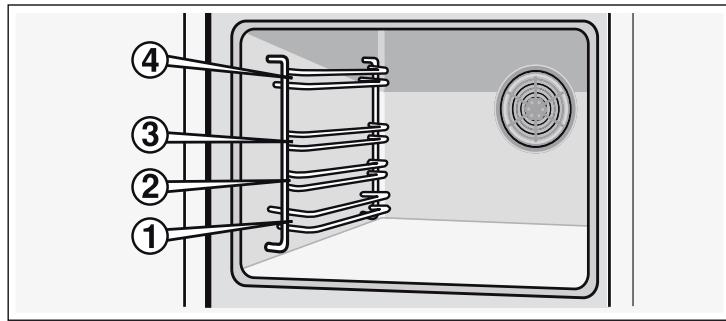
When the accessories are pulled approximately halfway out, they lock into position. This allows meals to be taken out easily.
When placing the accessories in the oven, check that the indentation is at the back. They can only lock correctly in place in this position.
Note: Heat may cause the accessories to deform. As soon as the accessories cool down, they regain their original shape. Their function is not impaired.
Hold the baking tray securely on the sides with both hands and push it parallel into the frame. Avoid movements to the right or left when pushing the baking tray in. Otherwise, it will be difficult to push the tray in and the enamelled surfaces could be damaged.
You can buy accessories from the after-sales service, from specialist retailers or online. Please specify the HEZ number.
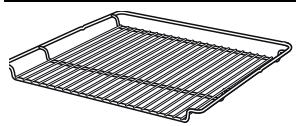
Wire rack
For ovenware, cake tins, roasts, grilling and frozen meals.
Slide the wire rack into the oven with the open side facing the oven door and the curvature pointing downwards

Aluminium baking tray
For cakes and biscuits.
Push the baking tray into the oven with the sloping edge facing towards the oven door.
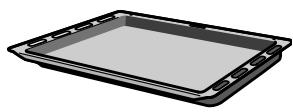
Universal pan
For moist cakes, pastries, frozen meals and large joints of meat. Can also be used under the wire rack to catch fat when grilling.
Push the baking tray into the oven with the sloping edge facing towards the oven door.
Optional accessories
You can buy optional accessories from your after-sales service or from specialist retailers. You will find a variety of suitable products for your oven in our brochures and on the Internet. The availability of optional accessories and the options for ordering them on the
internet vary depending on the country. Information regarding this can be found in the sales documents.
Not every optional accessory is suitable for every appliance. When purchasing, always quote the complete identification number (E no.) of your appliance.
| Optional accessories | HEZ number | Function |
| Wire rack | HEZ 434000 | For ovenware, cake tins, roasts, grilling and frozen meals. |
| Aluminium baking tray | HEZ 430001 | For cakes and biscuits. Place the baking tray in the oven with the sloping edge towards the oven door. |
| Enamel baking tray | HEZ 431001 | For cakes and biscuits. Place the baking tray in the oven with the sloping edge towards the oven door. |
| Universal pan | HEZ 432001 | For moist cakes, pastries, frozen meals and large roasts. Can also be used under the wire rack to catch fat or meat juices. Place the universal pan in the oven with the sloping edge towards the oven door. |
Oven door - Additional safety precautions
During long cooking times, the oven door may become very hot.
If you have small children, extra supervision is required during oven operation.
In addition, there is a safety device which prevents direct contact with the oven door. This optional accessory (440651) is available from the after-sales service.
Before using the oven for the first time
In this section, you can find out what you must do before using your oven to prepare food for the first time. First read the section on Safety information.
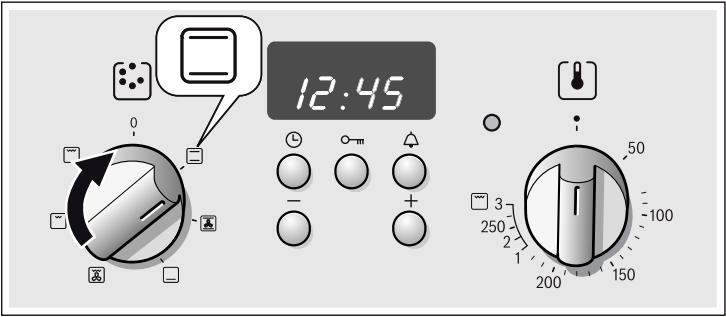
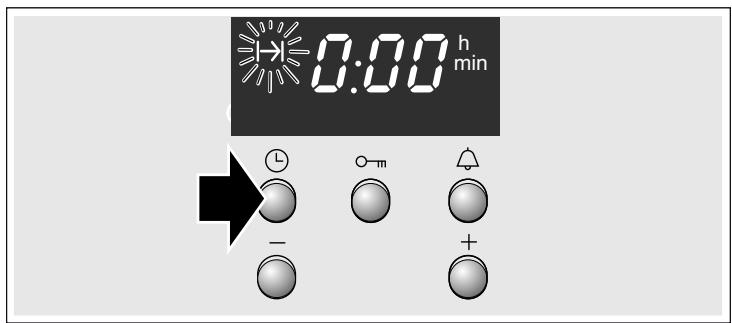
Setting the clock
After the oven has been connected, the symbol and three zeros light up in the display. Set the clock.
- Press the button.
The time 12:00 appears in the display and the symbol flashes. - Use the + or - button to change the clock.
After a few seconds, the time that has been set is adopted.
Heating up the oven
To remove the new cooker smell, heat up the oven when it is empty and closed. An hour of Top/bottom heating at 240^ is ideal for this purpose. Make sure that there are no remnants of packing in the cooking compartment.
1.Use the function selector to set Top/bottom heating.
- Set the temperature selector to 240^ .
After an hour, switch off the oven. Turn the function selector and temperature selector to the off position.
Cleaning the accessories
Before you use the accessories for the first time, clean them thoroughly with hot soapy water and a soft dish cloth.
Setting the oven
There are various ways in which you can set your oven. Here we will explain how you can select the desired type of heating and temperature or grill setting. You can select the cooking time and end time for your dish on the oven.
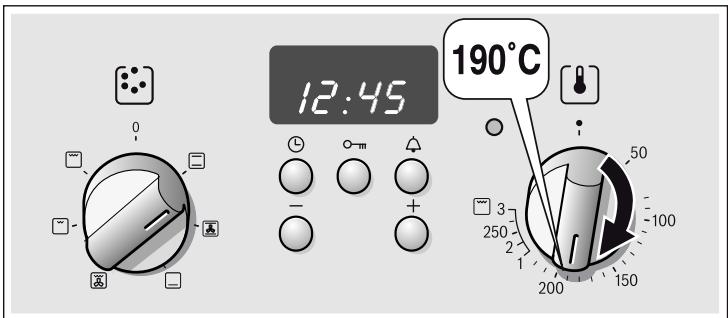
Types of heating and temperature
Example in picture: Top/bottom heating, 190^ .
1.Use the function selector to select the required type of heating.
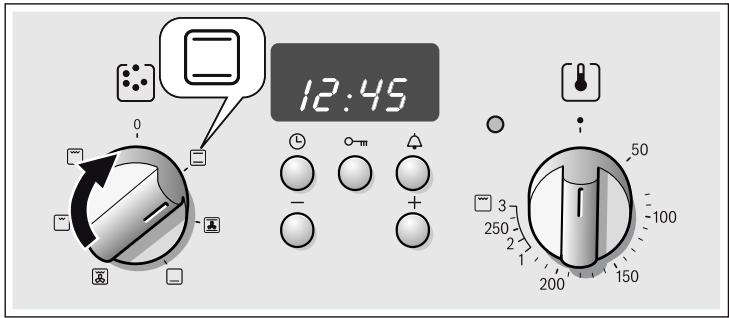
- Use the temperature selector to set the temperature or the grill setting.
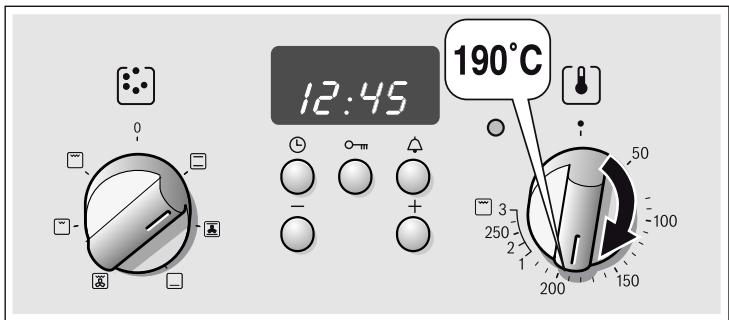
The oven heats up.
Switch off the oven
Turn the function selector to the off position.
Changing the settings
You can change the type of heating, temperature and grill setting as required.
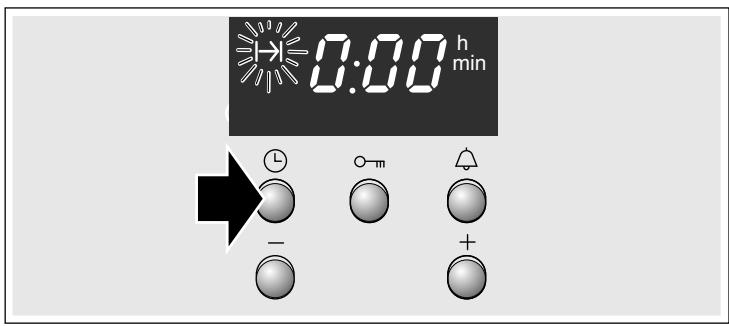
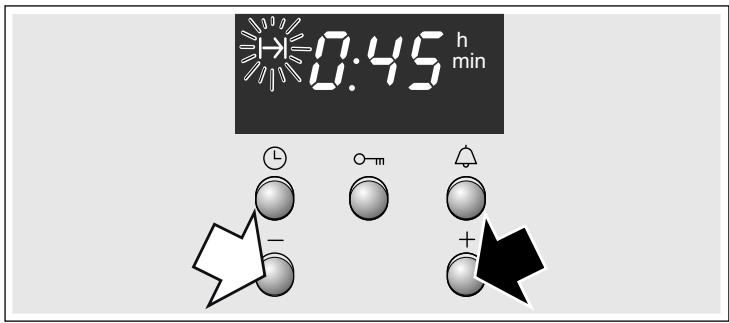
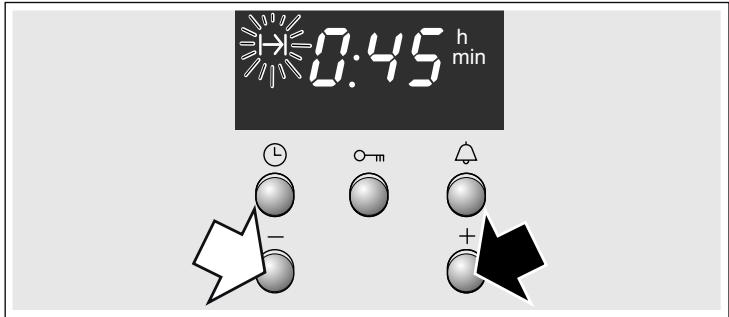
The oven should switch off automatically
Enter a cooking time for your dish.
Example in the picture: Top/bottom heat, 200^ , cooking time 45 minutes.
1.Use the function selector to select the required type of heating.
2. Use the temperature selector to set the temperature or the grill setting.
3. Press the clock button.
The Cooking time symbol flashes.
4.Use the ^+ or - button to set the cooking time.
Default value for ^+ button = 30 minutes
Default value for - button = 10 minutes
The cooking time has elapsed
A signal sounds. The oven switches off. Press the button twice and switch off the function selector.
Changing the setting
Press the Clock button. Use the + or - button to change the cooking time.
Cancelling the setting
Press the 5 Clock button. Press the - button until zero is shown on the display. Switch off the function selector.
Setting the cooking time if the clock is hidden
Press the Clock button twice and make your settings as described in point 4.
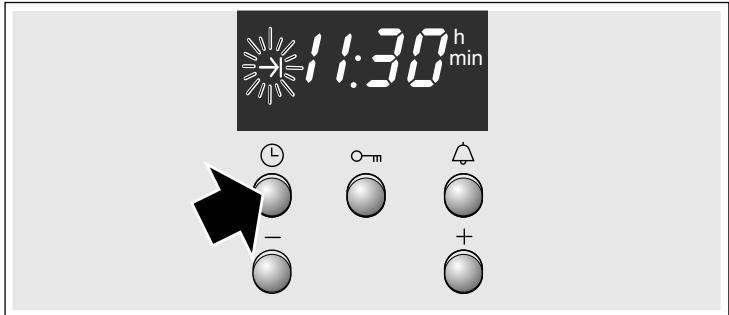
The oven should switch on and off automatically
Do not allow food to stand for too long in the oven. Meat and fish spoils easily if not kept chilled.
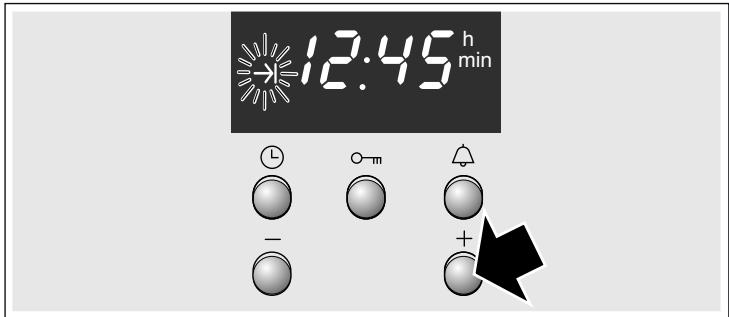
Example in the picture: Top/bottom heating , 200^ . It is 10:45. The meal takes 45 minutes to cook and should be ready at 12:45.
- Use the function selector to select the required type of heating.
- Use the temperature selector to set the temperature or the grill setting.
- Press the clock button.
The Cooking time symbol flashes.
4.Use the ^+ or - button to set the cooking time.
5. Press the Clock button repeatedly until the IEnd time symbol flashes.
You can see in the display when the meal will be ready.
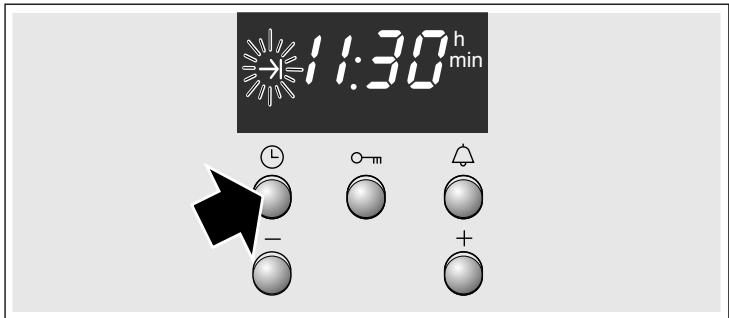
6.Use the ^+ button to set a later end time.
The setting is adopted after a few seconds.
The display shows the end time until the oven starts operating.
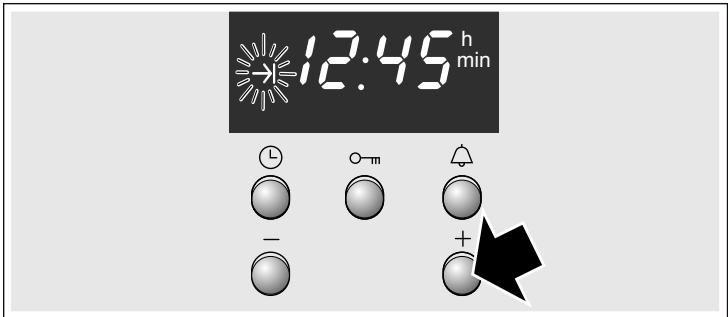
The cooking time has elapsed
A signal sounds. The oven switches off. Press the button twice and switch off the function selector.
Note: You can make changes as long as the symbol is flashing. When the symbol lights up, the setting has been adopted.
Setting the clock
When the appliance is connected for the first time or after a power cut, the symbol and three zeros flash in the display. Set the clock. The function selector must be switched off.
Setting procedure
- Press the 口 Clock button.
12.00 appears in the display and the symbol flashes.
- Use the + or - button to change the clock.
After a few seconds, the time is saved. The symbol goes out.
Changing from summer to winter time, for example
Press the Clock button twice and change the time using the + or - button.
Setting the timer
You can use the timer as a kitchen timer. It runs independently of the oven. The timer has a special signal. This means that you can tell whether the timer duration or the cooking time has elapsed. You can also set the timer if the childproof lock is active.
Setting procedure
- Press the Timer button.
The symbol flashes.
- Use the - or + button to change the timer duration.
Default value for ^+ button = 10 minutes
Default value for - button = 5 minutes
The timer starts after a few seconds. The symbol lights up in the display. You will see the time counting down.
When the time has elapsed
A signal sounds. Press the Timer button. The timer goes out.
Changing the timer duration
Press the Timer button. Use the + or - button to change the time.
Cancelling the setting
Press the Timer button. Press the - button until zero is shown on the display.
The timer and cooking time count down at the same time
Both symbols light up. You can see the timer duration counting down in the display.
To call up the I I remaining cooking time, I end time or 念 clock:
Press the Clock button repeatedly until the relevant symbol appears.
The value you are checking appears for several seconds on the display.
Childproof lock
Oven
The oven has a childproof lock to prevent children switching it on accidentally.
Switching the childproof lock on and off
The function selector must be switched off.
To switch on: press and hold the o-m key button until the o-m symbol appears in the display. This takes about 4 seconds.
To switch off: press and hold the o-m key button until the o-m symbol goes out.
Notes
You can set the timer and clock at any time.
If the childproof lock is active, it will be cancelled following a power cut.
Care and cleaning
With good care and cleaning, your oven will remain clean and fully-functioning for a long time to come. Here we will explain how to maintain and clean your oven correctly.
Notes
Slight differences in the colours on the front of the oven are caused by the use of different materials, such as glass, plastic and metal.
- Shadows on the door panel which look like streaks, are caused by reflections made by the oven light.
Enamel is baked on at very high temperatures. This can cause some slight colour variations. This is normal and does not affect their function. The edges of thin trays cannot be completely enamelled. As a result, these edges can be rough. This will not impair the anti-corrosion protection.
Cleaning agents
Damage to the various different surfaces caused by using the wrong cleaning agent can be avoided by observing the following instructions.
When cleaning the oven do not use
sharp or abrasive cleaning agents,
■ cleaning agent with a high alcohol content,
scouring pads,
high-pressure cleaners or steam jets.
- Do not clean individual parts in the dishwasher.
Wash new sponges thoroughly before first use.
| Stainless steel fronts | Wipe the appliance with plenty of water and some washing-up liquid. Always wipe parallel to the natural grain. Otherwise, you may scratch the surface. Dry with a soft cloth. Remove flecks of limescale, grease, starch and albumin (e.g. egg white) immediately. Do not use any abrasive materials, scouring sponges or rough cleaning cloths. The stainless steel fronts can be polished using a special care product. Follow the manufacturer's instructions. You can purchase special stainless steel cleaner from our after-sales service or from specialist retailers. |
| Enamel surfaces and lacquered surfaces | Wipe the appliance with some washing-up liq-uid and warm water. Dry with a soft cloth. |
| Knobs | Wipe the appliance with some washing-up liq-uid and warm water. Dry with a soft cloth. |
| Glass panel | Can be cleaned with glass cleaner. Do not use any abrasive cleaning agents or sharp metal objects. These could scratch and damage the surface of the glass panel. |
| Seal | Wipe with a damp cloth. Dry with a soft cloth. |
| Inside the oven | Clean with hot water or vinegar solution. For heavy soiling: Only use oven cleaner on cold surfaces. |
| Glass cover on the oven light | Wipe the appliance with some washing-up liq-uid and warm water. Dry with a soft cloth. |
| Accessories | Soak in hot soapy water. Clean with a brush or a sponge. |
| Aluminium baking tray (option) | Do not clean in the dishwasher. Never use oven cleaner. To avoid scratches, never touch the metal surfaces with a knife or similar sharp object. Clean horizontally with some washing-up liquid and a damp glass cleaning cloth or a microfibre cloth. Dry with a soft cloth. Do not use any abrasive materials, scouring sponges or rough cleaning cloths. They could scratch the baking tray |
| Childproof lock (option) | If a childproof lock has been fitted on the oven door, it must be removed before cleaning. Soak all plastic parts in hot soapy water and wash with a sponge. Dry with a soft cloth. If very dirty, the childproof lock will not work properly. |
| Hob | Information on care and cleaning can be found in the instruction manual for your hob. |
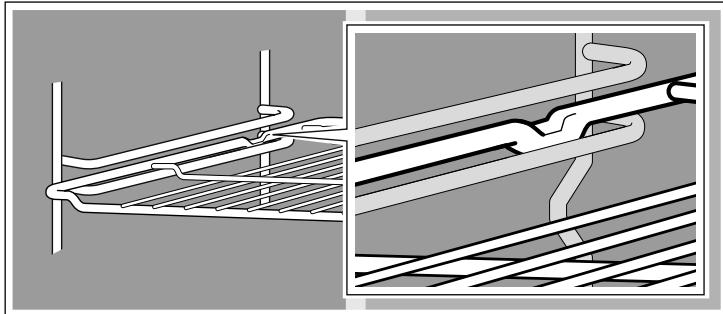
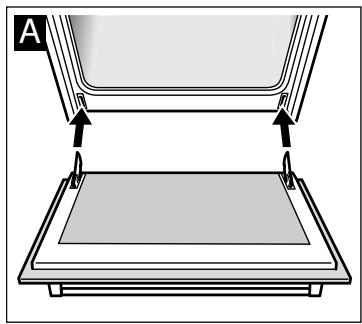
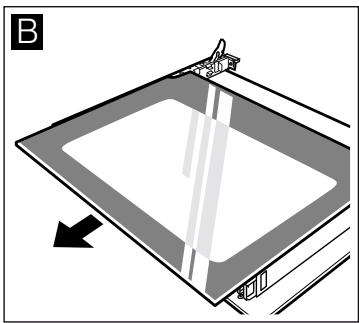
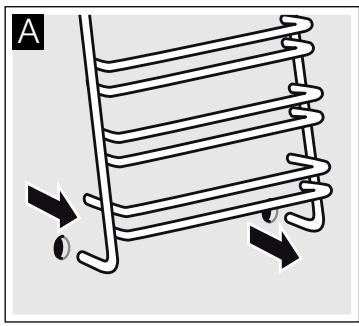
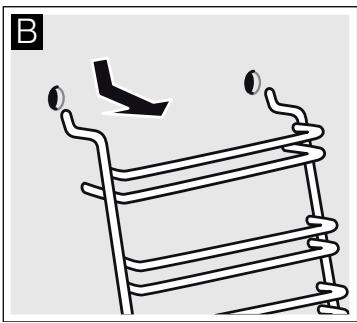
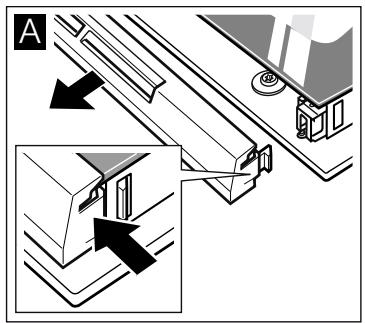
Detaching and refitting the rails
The rails can be removed for cleaning. The oven must have cooled down.
Unhooking the rails
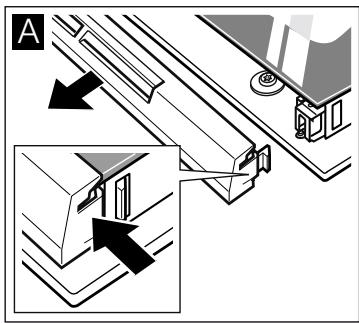
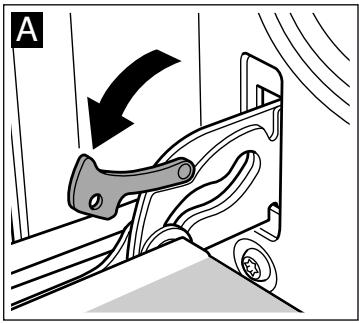
- Hold the shelf frames from underneath and pull slightly forward. Pull the extension pins at the bottom of the rails out of the mounting holes (Fig. A).
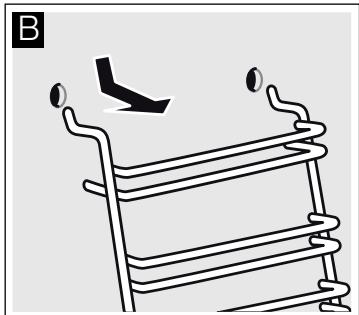
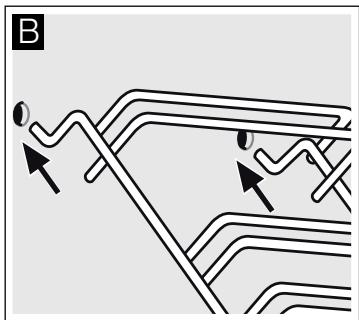
- Then fold the rails upwards and carefully remove them (Fig. B).
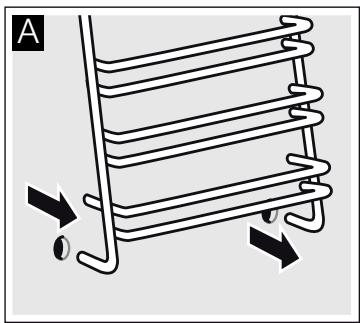
Clean the rails with washing-up liquid and a sponge. For stubborn deposits of dirt, use a brush.
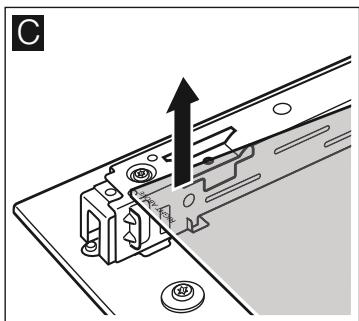
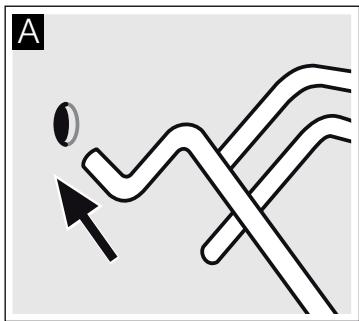
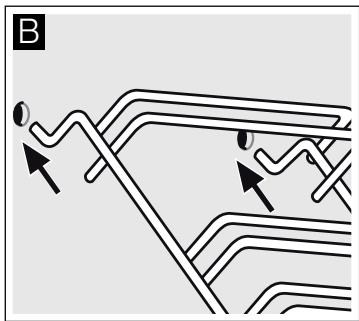
Installing the frames
1.Insert the two hooks carefully into the upper holes. (Figure A-B)


Incorrect assembly!
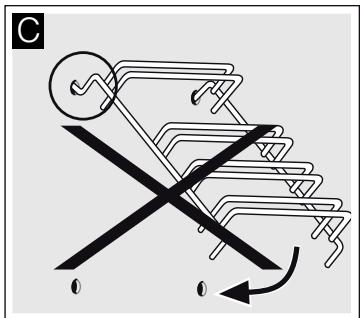
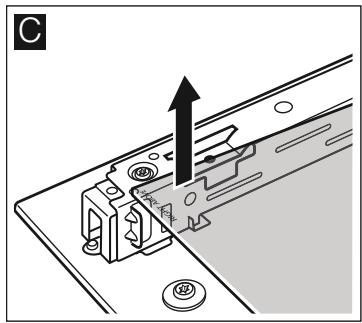
Never move the frame before the two hooks are fully anchored in the upper holes. The enamel could be damaged and may break (figure C).
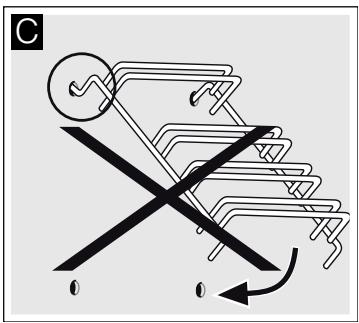
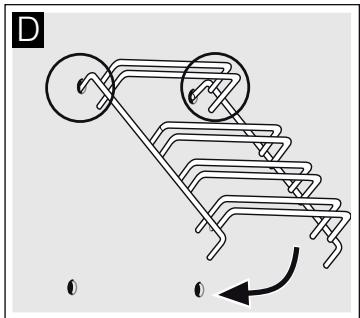
- the two hooks must be inserted fully into the upper holes. Now move the frame slowly and carefully downwards and insert in the lower holes (figure D).
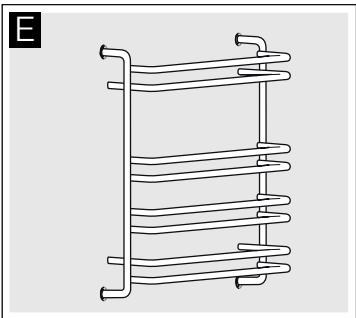
3.Insert both frames into the side walls of the oven (figure E).
If the rails are fitted correctly, the distance between the two upper shelf positions is greater.


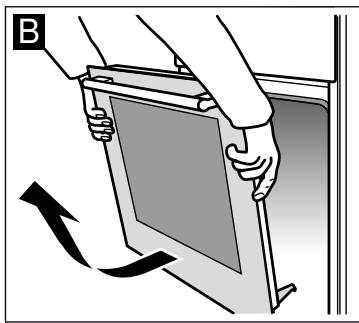
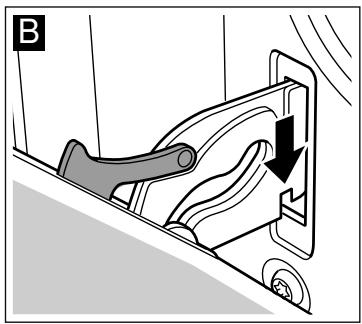
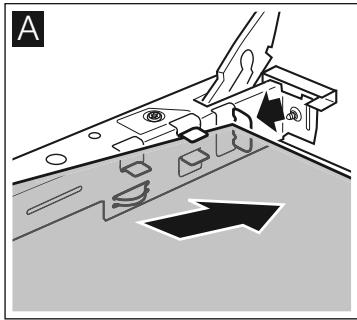
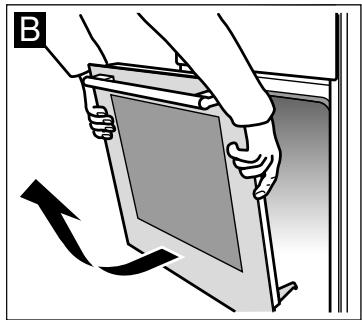
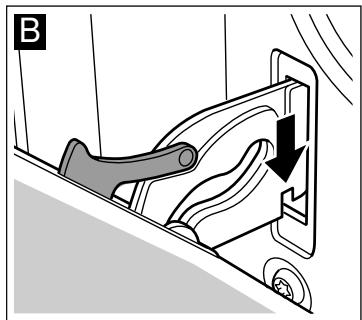
Detaching and attaching the oven door
For cleaning purposes and to remove the door panels, you can detach the oven door.
The oven door hinges each have a locking lever. When the locking levers are closed (figure A), the oven door is secured in place. It cannot be detached. When the locking levers are open in order to detach the oven door (Fig. B), the hinges are locked. They cannot snap shut.
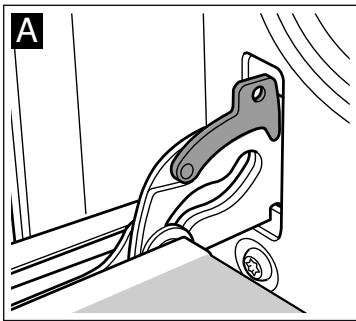
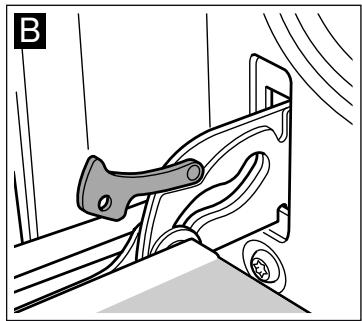

Risk of injury!
Whenever the hinges are not locked, they snap shut with great force. Ensure that the locking levers are always fully closed or, when detaching the oven door, fully open.
Detaching the door
- Open the oven door fully.
- Fold up the two locking levers on the left and right (figure A).
- Close the oven door as far as the limit stop. With both hands, grip the door on the left and right-hand sides. Close the door a little further and pull it out (figure B).
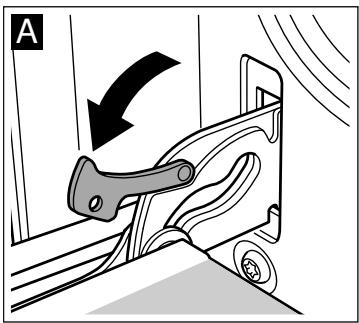
Attaching the door
Reattach the oven door in the reverse sequence to removal.
- When attaching the oven door, ensure that both hinges are inserted straight into the opening (figure A).
- The notch on the hinge must engage on both sides (figure B).
- Fold back both locking levers (figure C). Close the oven door.


Risk of injury!
If the oven door falls out accidentally or a hinge snaps shut, do not reach into the hinge. Call the after-sales service.
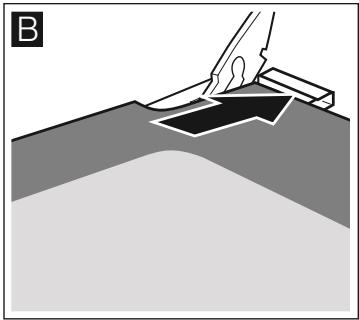
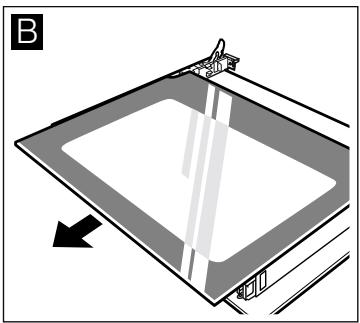
Removing and installing the door panels
To facilitate cleaning, you can remove the glass panels from the oven door.
Removal
-
Detach the oven door and lay it on a cloth with the handle facing down.
2.Pull off the cover at the top of the oven door. Press in the tabs on the left and right using your fingers (fig. A). -
Lift the top panel up and pull it out (fig. B).
4.Lift the panel up and pull it out (fig. C).
Clean the panels with glass cleaner and a soft cloth.

Risk of injury!
Scratched glass in the appliance door may develop into a crack. Do not use a glass scraper, sharp or abrasive cleaning aids or detergents.
Installation
During installation, make sure that the lettering "top right" is upside down at the bottom left.
1.Insert the panel at an angle towards the back (fig.A).
2. Insert the top panel at an angle towards the back into the brackets. The smooth surface must face outwards. (fig. B).
- Put the cover back in place and press on it.
- Attach the oven door.
Do not use the oven again until the panels have been correctly installed.
Troubleshooting
Malfunctions often have simple explanations. Refer to the table before calling the after-sales service as you may be able to remedy the fault yourself.
Malfunction table
If a dish doesn't turn out as well as you had hoped, refer to the section Tested for you in our cooking studio, where you will find plenty of cooking tips and tricks.

Risk of electric shock!
Incorrect repairs are dangerous. Repairs may only be carried out by one of our trained after-sales engineers.
| Problem | Possible cause | Remedy/information |
| The oven does not work. | The circuit breaker is defective. | Look in the fuse box and check that the circuit breaker is in working order. |
| Power cut | Check whether the kitchen light or other kitchen appliances are working. | |
| The clock display flashes. | Power cut | Reset the clock. |
| The oven does not heat up. | There is dust on the contacts. | Turn the control knobs back and forth several times. |
Caution!
If the supply cord is damaged, it must be replaced by the manufacturer, its service agent or similarly qualified persons in order to avoid a hazard.
Replacing the bulb in the oven ceiling light
If the bulb in the oven light fails, it must be replaced. Heat-resistant, 40 watt spare bulbs can be obtained from our after-sales service or a specialist retailer. Only use these bulbs.

Risk of electric shock!
Switch off the circuit breaker in the fuse box.
- Place a tea towel in the oven when it is cold to prevent damage.
- Unscrew the glass cover by turning it anti-clockwise.

-
Replace the bulb with one of the same type.
-
Screw the glass cover back in.
- Remove the tea towel and switch on the circuit breaker.
Glass cover
You must replace a damaged glass cover. Suitable glass covers may be obtained from the after-sales service. Please specify the E number and FD number of your appliance.
After-sales service
Our after-sales service is there for you if your appliance needs to be repaired. We will always find the right solution in order to avoid unnecessary visits from a service technician.
E number and FD number
When calling us, please give the product number (E no.) and the production number (FD no.) so that we can provide you with the correct advice. The rating plate containing these numbers is found on the side of the oven door. To save time, you can make a note of the number of your appliance and the telephone number of the after-sales service in the space below, should it be required.
E no.
FD no.
After-sales service
Please note that there will be a fee for a visit by a service technician in the event of a malfunction, even during the warranty period.
Please find the contact data of all countries in the enclosed customer service list.
To book an engineer visit and product advice
GB 0844 8928979
Calls from a BT landline will be charged at up to 3 pence per minute. A call set-up fee of up to 6 pence may apply.
IE 014502655
Trust the expertise of the manufacturer, and rest assured that the repair will be carried out by trained service technicians using original spare parts for your domestic appliance.
Energy and environment tips
Here you can find tips on how to save energy when baking and roasting and how to dispose of your appliance properly.
Saving energy
- Only preheat the oven if this is specified in the recipe or in the operating instruction tables.
- Use dark, black lacquered or enamelled baking tins. They absorb the heat particularly well.
- Open the oven door as infrequently as possible while you are cooking, baking or roasting.
It is best to bake several cakes one after the other. The oven is still warm. This reduces the baking time for the second cake. You can also place two loaf tins next to each other.
For longer cooking times, you can switch the oven off 10 minutes before the end of the cooking time and use the residual heat to finish cooking.
Environmentally-friendly disposal
Dispose of packaging in an environmentally-friendly manner.
This appliance is labelled in accordance with European Directive 2012/19/EU concerning used electrical and electronic appliances (waste electrical and electronic equipment - WEEE). The guideline determines the framework for the return and recycling of used appliances as applicable throughout the EU.
Measures to be noted during transport
Secure all mobile parts in and on the appliance using an adhesive tape that can be removed without leaving any traces. Push all accessories (e.g. baking tray) into the corresponding slots with cardboard at the edges, in order to avoid damaging the appliance. Place cardboard or similar between the front and rear side to prevent knocks against the inside of the door glass. Secure the oven door to the side walls of the appliance using adhesive tape.
Keep the original appliance packaging. Only transport the appliance in the original packaging. Observe the transport arrows on the packaging.
If the original packaging is no longer available
pack the appliance in protective packaging to guarantee sufficient protection against any transport damage.
Transport the appliance in an upright position. Do not hold the appliance by the door handle or the connections on the rear, as these could be damaged. Do not place any heavy objects on the appliance.
Tested for you in our cooking studio
Here you will find a selection of dishes and the ideal settings for them. We will show you which type of heating and which temperature are best suited for your dish. You can find information about suitable accessories and the height at which they should be inserted. There are also tips about cookware and preparation methods.
Notes
The values in the table always apply to dishes placed into the cooking compartment when it is cold and empty.
Only preheat the appliance if the table specifies that you should do so. Do not line the accessories with greaseproof paper until after they have been preheated.
- The times specified in the tables are guidelines only. They will depend on the quality and composition of the food.
- Use the accessories supplied. Additional accessories may be obtained as special accessories from specialist retailers or from the after-sales service.
Before using the oven, remove any unnecessary accessories and ovenware from the cooking compartment.
Always use oven gloves when taking hot accessories or ovenware out of the cooking compartment.
Cakes and pastries
Baking on one level
When baking cakes and tarts, the best results can be achieved using Top/bottom heating.
When baking with 2D Hot air, use the following shelf positions for the accessories:
Cake in a cake tin: Shelf position 2
Cake on a baking tray: Shelf position 3
Baking and roasting on two or more levels
Use Hot air.
Shelf positions for baking and roasting on 2 levels:
Universal pan: Shelf position 3
Baking tray: Shelf position 1
Dishes that are put in the oven at the same time do not have to be ready at the same time.
The tables contain a selection of dishes.
Baking tins
It is best to use dark-coloured metal baking tins.
Baking times are increased when light-coloured baking tins made of thin metal or glass dishes are used, and cakes do not brown so evenly.
If you wish to use silicone baking tins, use the information and recipes provided by the manufacturer as a guide. Silicone baking tins are often smaller than normal tins. The amount of mixture and recipe instructions may differ.
Tables
The tables show the ideal type of heating for the various cakes and pastries. The temperature and baking time depend on the amount and composition of the mixture. This is why temperature ranges are given in the tables. You should try the lower temperature first, since a lower temperature results in more even browning. You can increase the temperature next time if necessary.
If you preheat the oven, the baking time is shortened by 5 to 10 minutes.
Additional information can be found in the Baking tips section following the tables.
| Cake in a mould | Tin | Level | Type of heat- ing | Temperature, °C | Cooking time in minutes |
| Sponge cake, simple | Rectangular cake mould/tin | 2 | \( \square \) | 160-180 | 50-60 |
| Sponge cake, delicate (e.g. pound cake) | Rectangular cake mould/tin | 2 | \( \square \) | 155-175 | 65-75 |
| Shortcrust pastry base with crust | Springform cake tin | 1 | \( \square \) | 160-180 | 30-40 |
| Sponge flan base | Flan-base cake tin | 2 | \( \square \) | 160-180 | 25-35 |
| Sponge cake | Springform cake tin | 2 | \( \square \) | 160-180 | 30-40 |
| Fruit tart or cheesecake, shortcrust pastry* | Dark springform cake tin | 1 | \( \square \) | 170-190 | 70-90 |
| Delicate fruit flan, sponge | Springform cake tin | 2 | \( \square \) | 150-170 | 55-65 |
| Savoury cakes* (e.g. quiche/onion tart) | Springform cake tin | 1 | \( \square \) | 180-200 | 50-60 |
- Allow cakes to cool in the appliance for approx. 20 minutes.
| Cakes on trays | Accessories | Level | Type of heating | Temperature, °C | Cooking time in minutes |
| Sponge mixture or yeast dough with dry topping | Universal pan: | 3 | □ | 160-180 | 25-35 |
| Sponge mixture or yeast dough with moist topping | Universal pan: | 3 | □ | 140-160 | 40-50 |
| Swiss roll (preheat) | Universal pan: | 2 | □ | 170-190 | 15-20 |
| Plaited loaf, 500 g flour | Universal pan: | 3 | □ | 150-170 | 25-35 |
| Stollen, 500 g flour | Universal pan: | 3 | □ | 160-180 | 50-60 |
| Stollen, 1 g flour | Universal pan: | 3 | □ | 150-170 | 90-100 |
| Strudel, sweet | Universal pan: | 2 | □ | 180-200 | 55-65 |
| Pizza | Universal pan: | 3 | □ | 180-200 | 20-30 |
If not specified otherwise, always preheat the oven for baking bread.
Bread and bread rolls
| Bread and bread rolls | Accessories | Level | Type of heat- ing | Temperature, °C | Cooking time in minutes |
| Yeast bread, 1.2 kg flour | Universal pan: | 2 | □ | 270 | 8 |
| 190 | 35-45 | ||||
| Sourdough bread, 1.2 kg flour | Universal pan: | 2 | □ | 270 | 8 |
| 190 | 35-45 | ||||
| Bread rolls (e.g. rye rolls) | Universal pan: | 2 | □ | 200-220 | 20-30 |
| Small baked products | Accessories | Level | Type of heat- ing | Temperature in °C | Cooking time in minutes |
| Biscuits | Universal pan | 3 | ☐ | 150-170 | 10-20 |
| Aluminium baking tray + universal pan* | 1+3 | ☐ | 130-150 | 25-35 | |
| Meringue | Universal pan | 3 | ☐ | 70-90 | 125-135 |
| Cream puffs | Universal pan | 2 | ☐ | 200-220 | 30-40 |
| Macaroons | Universal pan | 3 | ☐ | 110-130 | 30-40 |
| Aluminium baking tray + universal pan* | 1+3 | ☐ | 100-120 | 35-45 | |
| Puff pastry | Universal pan | 3 | ☐ | 180-200 | 20-30 |
| Aluminium baking tray + universal pan* | 1+3 | ☐ | 180-200 | 30-40 |
- When baking on two levels, always place the universal pan in the upper level.
Baking tips
| You wish to bake according to your own recipe. | Use similar items in the baking tables as a guide. |
| How to tell whether sponge cake is baked through: | Approx. 10 minutes before the end of the baking time stated in the recipe, insert a cocktail stick into the cake at its deepest point. If the cocktail stick comes out clean, the cake is ready. |
| The cake collapses. | Use less fluid next time or set the oven temperature 10 degrees lower. Observe the speci-fied mixing times in the recipe. |
| The cake has risen in the middle but is lower around the edge. | Do not grease the edge of the springform cake tin. After baking, loosen the cake carefully with a knife. |
| The cake goes too dark on top. | Place the cake lower in the oven and bake at a lower temperature for slightly longer. |
| The cake is too dry. | Make tiny holes in the finished cake using a cocktail stick. Then drizzle fruit juice or an alco-holic drink over it. Next time, set the temperature 10 degrees higher and reduce the baking time. |
| The bread or cake (e.g. cheesecake) looks good, but is soggy on the inside (sticky, with streaks of water). | Use slightly less fluid next time and bake for slightly longer at a lower temperature. For cakes with a moist topping, bake the base first. Cover the base with almonds or bread-crumbs first and then apply the topping. Take care to follow recipes and baking times. |
| The pastries are not evenly browned. | Select a slightly lower temperature to ensure that the cake is baked more evenly. Bake deli-cate pastries on one level using Top/bottom heating. Protruding greaseproof paper can affect the air circulation. For this reason, always trim greaseproof paper to fit the baking tray. |
| The bottom of a fruit cake is too light. | Place the cake one level lower the next time. |
| The fruit juice overflows. | Next time, use the deeper universal pan (if available). |
| The pieces of dough are sticking together when the yeast rolls are baked. | There must be a distance of about 2 cm between the bread rolls. This gives enough space for the bread rolls to expand and bake evenly on all sides. |
| You want to bake on two levels: | Always use Hot air to bake on more than one level. Dishes that are put in the oven at the same time do not have to be ready at the same time. |
| Condensation forms when you bake moist cakes. | Steam can form during baking, which escapes via the door. The steam may settle and form water droplets on the control panel or on the fronts of adjacent units. This is a natural pro-ess. |
Meat, poultry, fish
Overware
You may use any heat-resistant ovenware. The universal pan is suitable for large roasts.
Glass ovenware is the most suitable. Ensure that the lid of the roasting dish fits well and closes properly.
Add a little more liquid when using enamelled roasting dishes.
With roasting dishes made of stainless steel, browning is not so intense and the meat may be somewhat less well cooked. Increase the cooking times.
Information in the tables:
Ovenware without a lid = open
Ovenware with a lid = closed
Always place the ovenware in the centre of the wire rack.
Place hot glass ovenware on a dry mat after cooking. The glass could crack if placed on a cold or wet surface.
Roasting
Add in a little liquid if the meat is lean. Cover the base of the ovenware with approx. 12 cm of liquid.
Add liquid generously for pot roasts. Cover the base of the ovenware with approx. 1 - 2 cm of liquid.
The amount of liquid depends on the type of meat and the material the ovenware is made of. If preparing meat in an enamelled roasting dish, it will need a little more liquid than if cooked in glass ovenware.
Roasting dishes made from stainless steel are not ideal. The meat cooks more slowly and browns less fully. Use a higher temperature and/or a longer cooking time.
Tips for grilling
Always grill with the oven door closed.
Heat the grill for approximately 3 minutes before placing the food to be grilled on the wire rack.
Place the food to be grilled directly on the wire rack. If you are grilling a single piece, the best results are achieved by placing it in the centre of the wire rack. The universal pan should also be inserted at level 1. The meat juices are collected in the pan, keeping the oven cleaner.
Do not insert the baking tray or universal pan at level 4. They may become deformed at high temperatures and damage the cooking compartment when they are removed.
If possible, grill items should be of equal thickness. This will allow them to brown evenly and remain succulent and juicy. Only add salt to steaks once they have been grilled.
Turn grilled items after 2/3 of the specified time.
The grill element switches on and off intermittently. This is normal. The grill setting determines how frequently this occurs.
Meat
Turn pieces of meat halfway through the cooking time.
When the roast is ready, turn off the oven and allow it to rest for an additional 10 minutes. This allows better distribution of the meat juices.
After cooking, wrap sirloin in aluminium foil and leave it to rest for 10 minutes in the oven.
For roast pork with a rind, score the rind in a crossways pattern, then lay the roast in the dish with the rind at the bottom.
| Meat | Weight | Accessories and ovenware | Level | Type of heating | Temperature °C, grill setting | Cooking time in minutes |
| Beef | ||||||
| Joint of beef | 1.0 kg | Covered | 2 | ☐ | 200-220 | 120 |
| 1.5 kg | 2 | ☐ | 190-210 | 140 | ||
| 2.0 kg | 2 | ☐ | 180-200 | 160 | ||
| Tenderloin, medium rare | 1.0 kg | Uncovered | 1 | ☐ | 210-230 | 70 |
| 1.5 kg | 1 | ☐ | 200-220 | 80 | ||
| Sirloin, medium rare | 1.0 kg | Uncovered | 1 | 宽 | 230-250 | 50 |
| Steaks, 3 cm, medium rare | Wire rack + univer-sal pan | 4+1 | ☐ | 3 | 15 | |
| Veal | ||||||
| Joint of veal | 1.0 kg | Uncovered | 1 | ☐ | 200-220 | 100 |
| 1.5 kg | 1 | ☐ | 190-210 | 120 | ||
| 2.0 kg | 1 | ☐ | 180-200 | 140 | ||
| Pork | ||||||
| without rind (e.g. neck) | 1.0 kg | Uncovered | 1 | 宽 | 190-210 | 120 |
| 1.5 kg | 1 | 宽 | 180-200 | 150 | ||
| 2.0 kg | 1 | 宽 | 170-190 | 170 | ||
| with rind (e.g. shoulder) | 1.0 kg | Uncovered | 1 | 宽 | 180-200 | 130 |
| 1.5 kg | 1 | 宽 | 190-210 | 160 | ||
| 2.0 kg | 1 | 宽 | 170-190 | 190 | ||
| Smoked pork on the bone | 1.0 kg | Covered | 1 | ☐ | 210-230 | 80 |
| Lamb | ||||||
| Leg of lamb, boned, medium | 1.5 kg | Uncovered | 1 | 宽 | 170-190 | 120 |
| Minced meat | ||||||
| Meat loaf | approx. 750 g | Uncovered | 1 | 高温 | 180-200 | 70 |
| Sausage | ||||||
| Sausage | Wire rack + univer-sal pan | 4+1 | □ | 3 | 15 | |
Poultry
The values in the table apply to dishes placed in a cold oven.
The weights indicated in the table are for unstuffed poultry that is ready for roasting.
If you are grilling directly on the wire rack, you should also insert the universal pan at level 1.
When cooking duck or goose, pierce the skin on the underside of the wings to allow the fat to escape.
Place the bird onto the wire rack with the breast side facing downwards. Turn the whole bird when two thirds of the cooking time has elapsed.
Poultry will turn out particularly crispy and brown if you baste it towards the end of the roasting time with butter, salted water or orange juice.
| Poultry | Weight | Accessories and ovenware | Level | Type of heating | Temperature °C, grill setting | Cooking time in minutes |
| Chicken halves, 1-4 pieces | 400g each | Wire rack | 2 | 窝 | 210-230 | 40-50 |
| Chicken pieces | 250 g each | Wire rack | 3 | 窝 | 210-230 | 30-40 |
| Chicken, whole, 1-4 pieces | per 1 kg | Wire rack | 2 | 窝 | 200-220 | 55-85 |
| Duck, whole | 1.7 kg | Wire rack | 2 | 窝 | 170-190 | 80-100 |
| Goose, whole | 3.0 kg | Wire rack | 2 | 窝 | 160-180 | 110-130 |
| Small turkey, whole | 3.0 kg | Wire rack | 2 | 窝 | 180-200 | 80-100 |
| 2 turkey drumsticks | 800g each | Wire rack | 2 | 窝 | 180-200 | 80-100 |
Fish
Turn the pieces of fish after 13 of the specified time.
Whole fish do not need to be turned. Place the whole fish in the oven in swimming position with the dorsal fin facing upwards. To
ensure that the fish remains in position, place half a potato or a small, ovenproof container into the stomach cavity.
If you are grilling directly on the wire rack, also insert the universal pan at level 1. The fish juices are collected in the pan and the oven is kept cleaner.
| Fish | Weight | Accessories and ovenware | Level | Type of heating | Temperature °C, grill setting | Cooking time in minutes |
| Fish, whole | 300 g each | Wire rack | 3 | □ | 2 | 20-25 |
| 1.0 kg | Wire rack | 2 | □ | 190-210 | 40-50 | |
| 1.5 kg | Wire rack | 2 | □ | 180-200 | 60-70 | |
| Fish, in slices (e.g. steaks) | 300 g each | Wire rack | 4 | □ | 2 | 20-25 |
Tips for roasting and grilling
| The table does not contain information for the weight of the joint. | Select the next lowest weight from the instructions and extend the time. |
| How to tell when the roast is ready. | Use a meat thermometer (available from specialist shops) or carry out a “spoon test”. Press down on the roast with a spoon. If it feels firm, it is ready. If the spoon can be pressed in, it needs to be cooked for a little longer. |
| The roast is too dark and the crackling is partly burnt. | Check the shelf height and temperature. |
| The roast looks good but the juices are burnt. | Next time, use a smaller roasting dish or add more liquid. |
| The roast looks good but the juices are too clear and watery. | Next time, use a larger roasting dish and use less liquid. |
| Steam rises from the roast when basted. | This is normal and due to the laws of physics. The majority of the steam escapes through the steam outlet. It may settle and form condensation on the cooler switch panel or on the fronts of adjacent units. |
Bakes, gratins, toast with toppings
If you are grilling directly on the wire rack, the universal pan should also be inserted at level 1. This keeps the oven cleaner.
Always place the ovenware on the wire rack.
How well cooked the bake is will depend on the size of the dish and the height of the bake. The figures in the table are only average values.
| Dish | Accessories and ovenware | Level | Type of heat- ing | Temperature, °C | Cooking time in minutes |
| Bakes | |||||
| Bake, sweet | Ovenproof dish | 2 | ☐ | 170-190 | 50-60 |
| Pasta bake | Ovenproof dish | 2 | ☐ | 210-230 | 25-35 |
| Gratin | |||||
| Potato gratin made using raw ingredients, Max. 2 cm deep | Ovenproof dish | 2 | 英 | 150-170 | 50-60 |
| Toast | |||||
| Toasting bread, 4 slices | Wire rack | 4 | ☐ | 3 | 6-7 |
| Toasting bread, 12 slices | Wire rack | 4 | ☐ | 3 | 4-5 |
| Toast, with topping, 4 slices | Wire rack | 3 | ☐ | 3 | 7-10 |
| Toast, with topping, 12 slices | Wire rack | 3 | ☐ | 3 | 5-8 |
Preprepared products
Observe the instructions on the packaging.
If you line the accessories with greaseproof paper, make sure that the paper is suitable for these temperatures. Make sure the paper is a suitable size for the dish to be cooked.
The cooking result greatly depends on the quality of the food. Prebrowning and irregularities can sometimes even be found on the raw product.
| Dish | Accessories | Level | Type of heat- ing | Temperature, °C | Cooking time in minutes |
| Strudel with fruit filling | Universal pan: | 3 | ⓷ | 180-200 | 40-50 |
| Chips | Universal pan: | 3 | ⓹ | 210-230 | 25-30 |
| Pizza | Wire rack | 2 | ⓺ | 200-220 | 15-20 |
| Pizza baguette | Wire rack | 2 | ⓻ | 190-210 | 15-20 |
Note
The universal pan may warp when cooking frozen dishes. The reason for this is the large temperature differences that the accessory is subjected to. The deformation disappears as early as during the cooking process.
Special dishes
At low temperatures, you can make creamy yoghurt or light yeast dough.
First, remove accessories, hook-in racks or telescopic shelves from the cooking compartment.
Preparing yoghurt
- Bring 1 litre of milk (3.5% fat) to the boil and cool down to 40^ .
- Stir in 150g of yoghurt (chilled).
-
Pour into cups or small screw-top jars and cover with cling film.
-
Preheat the cooking compartment as indicated.
- Place the cups or jars on the cooking compartment floor and incubate as indicated.
Proving dough
- Prepare the dough as usual, place it in a heat-resistant ceramic dish and cover.
- Preheat the cooking compartment as indicated.
- Switch off the oven, place the dough in the cooking compartment and leave it to prove.
| Dish | Ovenware | Type of heat- ing | Temperature | Cooking time |
| Yoghurt | Cups or screw-top jars | on the cooking com- ▽ partment floor | 100 °C preheat | 15 mins |
| Only switch on the oven light | 8 hrs | |||
| Proving dough | Heat-resistant dish | on the cooking com- ▽ partment floor | 50 °C preheat | 5-10 mins |
| Switch off the appliance and place the yeast dough in the cooking compartment | 20-30 mins |
Defrosting
The defrosting time depends on the amount and type of food.
Observe the instructions on the packaging.
Take food out of its packaging and place in suitable ovenware on the wire rack.
Place poultry with the breast side to the plate.
| Frozen food | Accessories | Level | Type of heating | Temperature |
| e.g. cream cakes, buttercream cakes, gateaux with chocolate or sugar icing, fruit, chicken, sausage and meat, bread and bread rolls, cakes and other baked items | Wire rack | 2 | £ | The temperature selector remains switched off |
Drying
Use undamaged fruit and vegetables only and wash them thoroughly.
Drain off any excess water from fruit and vegetables and dry them.
The universal pan must be inserted at level 3, and the wire rack is placed at level 1.
Line the universal pan and the wire rack with greaseproof or parchment paper.
Turn very juicy fruit or vegetables several times. Remove fruit and vegetables from the paper as soon as they have dried.
| Fruit and vegetables | Level | Type of heating | Temperature, °C | Cooking time, hours |
| 600 g apple rings | 1+3 | £ | 80 | approx. 5 |
| 800 g pear slices | 1+3 | £ | 80 | approx. 8 |
| 1.5 kg damsons or plums | 1+3 | £ | 80 | approx. 8-10 |
| 200 g herbs, washed | 1+3 | £ | 80 | approx. 1½ |
Preserving
For preserving, the jars and rubber seals must be clean and intact. If possible, use jars of the same size. The information in the table is for round, one-litre jars.
Caution!
Do not use jars that are larger or taller than this. The lids could crack.
Only use fruit and vegetables in good condition. Wash them thoroughly.
The times given in the tables are a guide only. The time will depend on the room temperature, number of jars, and the quantity and temperature of the contents. Before you switch off the appliance or change the cooking mode, check whether the contents of the jars are bubbling as they should.
Preparation
- Fill the jars, but not to the top.
- Wipe the rims of the jars, as they must be clean.
-
Place a damp rubber seal and a lid on each jar.
-
Seal the jars with the clips.
Place no more than six jars in the cooking compartment.
Making settings
- Insert the universal pan at level 2. Arrange the jars on it so that they do not touch each other.
- Pour 12 litre of hot water (approx. 80^ ) into the universal pan.
3.Close the oven door. - Set Bottom heating.
- Set the temperature to between 170 and 180^ .
Preserving
Fruit
After approx. 40 to 50 minutes, small bubbles begin to form at short intervals. Switch off the oven.
After 25 to 35 minutes of residual heat, remove the preserving jars from the cooking compartment. If they are allowed to cool for longer in the cooking compartment, germs could multiply, promoting acidification of the preserved fruit.
| Fruit in one-litre jars | When it starts to bubble | Residual heat |
| Apples, redburrants, strawberries | Switch off | approx. 25 minutes |
| Cherries, apricots, peaches, gooseberries | Switch off | approx. 30 minutes |
| Apple purée, pears, plums | Switch off | approx. 35 minutes |
Vegetables
As soon as bubbles begin to form in the jars, set the temperature back to between 120 and 140^ . Depending on the type of
vegetable, heat for approx. 35 to 70 minutes. Switch off the oven after this time and use the residual heat.
| Vegetables with cold cooking water in one-litre jars | When it starts to bubble | Residual heat |
| Gherkins | - | approx. 35 minutes |
| Beetroot | approx. 35 minutes | approx. 30 minutes |
| Brussels sprouts | approx. 45 minutes | approx. 30 minutes |
| Beans, kohlrabi, red cabbage | approx. 60 minutes | approx. 30 minutes |
| Peas | approx. 70 minutes | approx. 30 minutes |
Taking out the jars
After preserving, remove the jars from the cooking compartment.
Caution!
Do not place the hot jars on a cold or wet surface. They could suddenly burst.
Acrylamide in foodstuffs
Acrylamide is mainly produced in grain and potato products prepared at high temperatures, such as potato crisps, chips,
toast, bread rolls, bread or fine baked goods (biscuits, gingerbread, cookies).
| Tips for keeping acrylamide to a minimum when preparing food | |
| General | ■ Keep cooking times to a minimum. ■ Cook meals until they are golden brown, but not too dark. ■ Large, thick pieces of food contain less acrylamide. |
| Baking | With top/bottom heating max. 200 °C. With 3D hot air or hot air max.180 °C. |
| Biscuits | With top/bottom heating max. 190 °C. With 3D hot air or hot air max. 170 °C. Egg or egg yolk reduces the production of acrylamide. |
| Oven chips | Spread evenly over the baking tray, in a single layer. Bake at least 400 g per baking tray so that the chips do not dry out |
Test dishes
These tables have been produced for test institutes to facilitate the inspection and testing of the various appliances. In accordance with EN 50304/EN 60350 (2009) and IEC 60350.
Baking
Baking on 2 levels: Always insert the universal pan above the baking tray.
Piped cookies (such as Spritz cookies in sugar syrup):
Dishes that are put in the oven at the same time do not have to be ready at the same time.
German apple pie, level 1
Change the position of the dark springform cake tin, slide in diagonally.
German apple pie, level 2
Change the position of the dark springform cake tin.
Cakes in a metal springform cake tin:
Bake on level 1 with Top/bottom heating Place the springform cake tin on the universal pan instead of on the wire rack.
| Dish | Accessories and ovenware | Level | Type of heating | Temperature in °C | Cooking time in minutes |
| Viennese whirls | Universal pan | 3 | ☐ | 150-170 | 20-30 |
| Aluminium baking tray + univer-sal pan** | 1+3 | ☑ | 140-160 | 30-40 | |
| Small cakes | Universal pan | 3 | ☐ | 150-170 | 25-35 |
| Small cakes, preheat | Aluminium baking tray + univer-sal pan** | 1+3 | ☑ | 140-160 | 25-35 |
| Hot water sponge cake | Springform cake tin | 2 | ☐ | 160-180 | 30-40 |
| German apple pie | Universal pan + 2 springform cake tins, dia. 20 cm*** | 1 | ☐ | 190-210 | 70-80 |
| 2 wire racks* + 2 springform cake tins, dia. 20 cm*** | 1+3 | ☑ | 180-200 | 70-80 |
- Additional baking trays and wire racks can be obtained as an optional accessory from the after-sales service or specialist retailers.
When baking on two levels, always place the universal pan above the baking tray.
* Place the cake tins diagonally on the accessories.
Grilling
If you are grilling food directly on the wire rack, the universal pan should also be inserted at level 1. The liquid is then collected, keeping the oven cleaner.
| Dish | Accessories and ovenware | Level | Type of heat- ing | Grill setting | Cooking time in minutes |
| Browning toast | Wire rack | 4 | ☐ | 3 | 1/2-2 |
| Preheat for 10 mins | |||||
| Beefburgers, 12 pieces* | Wire rack + universal pan | 4+1 | ☐ | 3 | 25-30 |
| No preheating |
- Turn over after 2/3 of the cooking time.
Kayinci3diK TexHHKacbI TypaIbMaHb3db Hyckaynap. 21
3aKbIMdapdbH ce6enTepi 22
KaHa duXOBka uKaΦbHb3 23
Bacapy TaKTacbl. 23
KbI3MeTIn TaHday 23
TymeJep XHe HndkaTopnap 23
Temnepatypa petteriui 23
Kymbic kamepacbi 24
KypaIapbIbI3 24
KypaIbI opHaJacTbIpy 24
Aρнайы Кураллар 24
Akaaybik 6ap 6oJca He icTey KepeK? 30
MHyda backapy TaKtacbHa WOnydbI aIacbI3. KoHpyaunca KeKec KpyJIbI TyPiE baJaNaHbICTbl.
| TyciHKTemenep | |
| 1 | Функциялар aybICTbIPbIN-KOCKbIbbl |
| 2 | Баckaу туймени ржане диспец |
| 3 | Темература ретTERiш |
Kb3MeTIn TaHday
Функця TaHdayuBcblapKbIbIneWtH Kbl3bTyTpyIH TaHdaCbl3. Функця TaHdayuBcblH OHFa HEmece coJFa bypay MymKiH.
KaKeTTi Kbl3bity Tpy opHaTbilFaHHa coH neWte Wam KaHaAbI.
| Рenteу | Функциа | |
| 0 | Θшік | Пeш eшірінді. |
| Жоларсы/төмehri Кызытuy | Писірі мeн Күлірі бір рага Deнг'rede МУМкін. Бүл орнати пішін'dergі HeMEce Та\-б\-а\-ы\-ы\-Бə\-ліш пeн пішіа у\-шін кэн Мал,Бүэay etɪнeн кэнeжэne кэ\-б\-ы\-ы Күстap etɪнeн Мañ\-с\-ы\-З Kүл\-р\-дak Бэл ekтepi у\-шіn apHA\-fən. Kү\-ы\-ы\-ы buip Ка\-ы\-пітɑ охо\-р\-ы мeн Тэмeннeн Бол\-дь. | |
| ыlstык aya* | Бір Deнг'reide 6еze мeн Ka\-бәt\-Ка\-бәt Кam\-ы\-р\-ді Nicіру MUMKін. Кіші neчENE\-berepdi, neчENE\-berep мeн Ка\-бәt\-Ка\-бәt Ka\-ы\-р\-ді ekі Deнг'rede Бір у\-ы\-ы\-пі Nicіру MUMKін. Күр\-ы\-р\-ді aptында\-ыБеHTɪŋAmpo ЖоFар\-ын Hээп Tэмeннeн KeleɪtiH Біctыкты buip Ka\-ы\-пTA TaMaK, aɪHaɪa\-səbɪdə Tarətaɪdə. | |
| Төмehri Кызытuy | Төмeн'deri Kүл3ытuy apkblы Та\-мakтар\-ы Tэмeннeн Kocbɪmɪsa nicipy кээн Күл\-з\-apTy MUMKɪN. TemnepaTypa Tэмeннeн Keleɪdi. | |
| Айhalatын ayameh грILAIDE nicipy | Айhalatын ayamēn grpɪnbDE nicipy Ба\-ы\-k, Tay\-bɪk кээн у\-лken et ТілɪmɪdɛрɪN nicipyre сə. Грɪь Кыз\-ы\-р\-fblʌЭлeмeNTɪ MeH ВeHTɪŋAmpo aycblɪng Kocblɪn ülledi. ВeHTɪŋAmpo Kыз\-ыɪn ayaɪbɪ Тамakтapfa tarətaɪdə. | |
| Жалпak grpɪnbDE nicipy, kɪsi ai\-mək | Бүл nicipy typi kişi кэлe mEpderdi Стěк, с淼cka, bə\-blɪk кээн тocTtap У\-шɪn сə\-нec. Грɪь Күл3\-ы\-р\-fblʌ элeмeNTɪHɪN optrə bənliri Kү\-ы\-dɪ. | |
Biphewe cekyHdTan KeiH opHaTbIINFaYaKbIT Ka6blnDaHaDbI.
ДуховkaшкakbIH peTTey
DyXOBKa 1kaΦbH peTeydiH eP TypiI MymKiHdiKTei 6ap. OcbHa KaKeT Kbi3dbpy TyPi, TempePaTypaHbI Hemece rpiNb peXIMiH opHaTy JoJIb TyciHdpiJeI. TaMaKTbI e3ipNeY y3aKTbIFbH JHe DxyOBKa 1kaΦbI JxMblcBiHbI aAHTaIy yaKbTIbH opHaTyFa 6oJaBbI.
Kb3byTy TpyJIepi MeH TemNepaTpa
CypeTteriMbican:KofapFbI/TemHeHri Kbl3bity 190 °C.
1.ФункциТандayшьсbl apKьлbl KaЖeTTi Kbl3bI Ty Tpy H opHaTy MymkiH.
- TemnepaTypa peTreyuici apkblb TemnepaTypaHb HeMece rnilbde nicipy baskbUbH petTey MymKiH.
PeW Kbl3nIbI.
DyXOBka WkaΦbIH KbI3DbIpy
KaHa KpybIfblHbH NiC HcKtipy yuH 6oc dYxOBka WkaΦbH Kbl3dbIpbHb3. ByJ KaFdaJaWkaΦTbX KoFapFb/TeMeHri bICTbIK peKmIHDe 240 ^ C TempeaTypacbHda KbI3bpy TamaHa Weiim 6oJIbTIa6JIaJIb. Kymbc KaMepacbHda opama KaIbIKTapbl 6oImaybH KaIaFaIaHbI3.
1.ФункциларaybICTbIPIN-KOCKbIbHbIH KemerimEn JxofapFbI/ TEmeHri bICTbIKpeKIMHe opHaTbHbI3.
2. TemnepaIpa peTteriuiH IN KEmerImeH 240 ^ C MmHIn opHaTbIHb3. Bip caraTah Kein dYxOBka WkaΦbIn eWipiH3. FyHKunnap aybCTbIPbIN-KOCKblBn HKeHe TemnpaTypa aybcTbIPbIN-KOCKblBn HJI KyHHe opHaTbIHb3.
KypanapbTa3aay
KypaJIbI bipihpi pet naJaIaNHa6aT TypbIn BICTBiK Ca6bIHbI CymeH KHe JyMcaK Wy6epeKeNeh MyKnrt Ta3AnaHbI3.
DyXOBka uKaΦbIn eUipy
ФункцяларaybICTbIpyH-KOCKblWbHнелКиИHeOpHaTbIbI3.
Perteynepi e3repty
KaKer 6oIca, Kbi3dbpy TypiH, TeMnepaTypaHbI XeHe rpnJIb DeHrein TaHdayfa 6oIaDbI.
Духова abTomaTbI Tpyde eShy i KepeK
TamaK yuH (e3ipney) yaKbIbH eHri3iHi3.
CypeTteriMbicaJ:KofapFbl/Temehri Kbl3y , 200 ^ C ,yaKblT-45 MNHyT.
1.ФункциларaybICTbIpbIN-KOCKbIbIbIHbIH KEmeRIMeH KbI3dIpy DeHReiH opHaTbIHbI3.
2. TemnepaTypa petTeriuiHIN KemerimHe TemnepaTypaHbI HeMece rnilb DeHreiiH opHaTbIbI3.
3.CaFat ⊕ TyMeciH 6acbHbI3. YaKbIT I→I TaH6acbi KbInblbIKTaB6actaTbI.
-
- Hemece - TyMeciH KEmerIme YaKbITbI opHaTbHbI3.
+TyMeci/ ycbHbIaNtBmHi=30 MNHyT
-TyMeci/ycbHbIaTbH MəHi=10 MNHyT
- Hemece - TyMeciH KEmerIme YaKbITbI opHaTbHbI3.
Ozipney yakbblte 0Tti
Ib6bICtBk CnHaJI ShbFaBb. IyXOBKa WkaΦbI eWei. TymecH eki pe 6acblb3 XeHe yHKunJap aybcTbipBn-KOCKblbH eWipH3.
Perteydi e3repty
«CaFAT» ⊕ TyMeciH 6acbHb3. + TyMeciHiH Hemece - TyMeciHiH KEmerImeH yaKbITbI e3reptiHi3.
PeTeydi eWipy
“CaFAT” ⊕ TyMeciH 6acbIb3. - TyMeciH INDnKaTOp HJIre KeJrHeHwe 6acbIb3. ΦyHKUJap aybcTbIpbN-KOCKblbH eWipipiH3.
CaFat KacbIpbH Ke3iHne e3ipJe yakbTbH opHaTy
“CaFAT” 口 TyMecin eki pet 6acbHb3 JHe 4 TapMaFbIHda CnNaTtAlFaHdAn opHaTbHb3.
IyXOBka aBTOMaTTb TpyDe KocblnybJxHe eShyikepek
Tamak eHIMdepin TBIM Ken KoYbIN KOImaHbI3. CaNkbIHdaTbIrfan et neh 6aJIbIK OHai 6yliinei.
CypeTeri MbicaI: KofapFbl/Temehri Kbl3y 200°C. Ka3ipri yaKbIt 10:45. Θ3ipney 45 MInHy t anaDbI XeHe 12:45 yaKbITbIHda aKaTalaDbI.
1.ФункциларaybICtblpbIN-KOCKblHbIH KEmeIImeH KbI3dIpy DeHreIH opHaTbHbI3.
2. TemnepaTypa petTeriWiHIn KEmerImeH TemnepaTypaHbI HeMece rPnJIb DeHreinOpHaTbIHbI3.
3.CaFat TMyMeciH 6acbHbI3. YaKbIT I> TaH6acbI XbInbIbIKTaB6actaYdbl.
4. + Hemece - TyMeciHiKemerimeH yaKbItbI opHaTbHb3.
5.CaFat TMyMeciH cohbl →I taH6acbl KblbIbKtaB 6actaFaHwa 6acblHb3.
1ncnneDe TaMaK KaWah DaBH 6oNaTbHbH Kepeci3.
-
- TyMeciH IN KEMERImeH aAKTaJy yaKbITbIH KeUipeK yaKbITKa XblNkbITbIHbI3.
BipheWe MInHyTTaH KeiH petTey Ka6blJaHaIbI.
IcnneJe 3zipNeYdiAraKTany yaKbITbI dYXOBKa JxMbIC icTei
6bactaFaHwa typaBl.
Oaipney yakbItb eTti
Ib6b1cTbIK CnHAn IbIfaBb. DxyOBKa IkaΦbI eWei. Tymecin ekipet 6acbHb3Xe He yHKunrnap aybcTbipbn-KockblshIn eWipipiH3.
Hycay: TaH6a KblbIbIKtan TypFaHa, e3repicTepe hri3yre 6oJa. TaH6a KaHbIn Tpyca, petrey Ka6blJaHdbI.
CaFaTbI opHaTy
Bipinpi pet Kocuyan Hemece Kyat ewydeh KeiH dncnneJe 念 TaHbAcbl XHe YHJ HN XbInbIbIKTaIbI. CaFaTbI opHaTbIbI3. FyHKunnap aybCTbIPbn-Kockblu bEwipnyoBnykepeK.
KeIeIeI peTTeH3
- «CaFat» ⊕ Tymecih 6acbHb3.
Диспелдe 12.00 yaKbIbIжHe Tash6acblжblJIbIKTaIbI.
-
- TyMeciHHeMeCe - TyMeciHKeMerieMeH yaKbTTbOpHaTbHb3.
BipHeWe ceKyuHdTan KeiH yaKbIT Ka6blHaHaDbI. TaH6acbl eweDi.
MbicaJIb, Kbickbl yaKbITbI Jha3fbl yaKbITka e3repTy
“CaFAT” 日 TyMeciH eki pet 6acbIb3 KHe + TyMeciH Hemece - TyMeciH KEmerImeH e3reptiH3.
OaTKbIuTbI opHaTy
OaTbIbIbI acxHa Taimepi petIHne naIanaHfyfa 6onaDbI. OJ dYxOBka 6kaΦbHa TeyeICi3 JyMbic ICTeiDi. OaTbIbTIbI epeKue cnHaIbI 6ap. OcIIaNua OaTbIbTIbI cTeIN TyPfAblHbI3DbI HeMece dYxOBkaIa 3sipNey yaBtIbI eTKehIN bineci3. OaTbIbTIbI 6aIanapdaH KopFay 6aFapnAmacbl KocBlnFaH 6oNca da peTteyre 6onaDbI.
KeIeciJe peTTeHi3
- «ОТКыш» TуМecinб acbHbI3.
TaH6acbI KbInbIbIKTaIbI. -
- TyMeciHHeMeCe - TyMeciHKeMeIeH ORTKbIu yaKbITbH opHaTbHb3.
- TVUmeCi YcbHbIaTbIH MəHi = 10 MHyT
-TYIMeci YcblHbIaTbIH MHi=5MnHyT
Biphee ceKyHdTah KeiH ORTkblx Kymblc icTei bactaIbI. DnCnneJe TaHbAcbl XaHaDbI. YaKbIT eTe bactaHaBl KeiHei.
YaKbIt eTKeHne
Ib6bICtbk CnHAn IbfaDb. «OATKbI» Tymecin 6acbHb3.
OaTbIu HndKApToPbI eWeJI.
OATKbIyakbltbH e3repTy
<ÖTKBIIU> TyMeciH 6acbHb3. + TyMeciH Hemece - TymeciH KemerimeH yaKbTTb e3reptHi3.
Petteydi bcbipy
«ÖTKBIù» TǔMeciH 6acbIbI3. - TǔMeciH INDnKaTOp HŋIg KeIŋReHηe 6acbIbI3.
ORTKbI HxHe 3ipney yaBtB6ip yaBtTa eTe 6actaDbI
Tah6anap JkaHaDbI. DnCnneJde ORTkbIw yaKbITbI eTin JxatKaHbI KepiHeDi.
KaIFaH yaKbITbI I ,aAHTany yaKbITbIH I Hemece caFaTTbl Cypay:
CypalfamMnHdnncnneidebiphewecekyndka naia6oanabl.
Балалардан кор Fay
Духовka
BanaIap Ke3deicocKocnaybI yuH nyXOBka uKafo 6anaIapdaH 6yFaTayMeH Ka6DbIKTaIHaH.
BananapdAn KopfaydbI Kocy HHe eWipy
ФункцларaybICTbipn-Kockblwbeiwipnyi bonykepek.
Kocy: Kint O-TyImecin DInCnneJe O-TaHbAcBj XaHFaHwa 6acbHb3. ByI WAmameH 4 cekyHdka co3blnaDbI.
Θwipy: KiT O- TymeciHO-TaH6acbI eWKeHwe 6acbIbI3.
Hycaynap
OATKbIITbJxHe cafTaKe3 KeIreH yaKbITa opHaTyFa 6oNaIbI.
Kyat eWKeHHe KeiH opHaTbIINFaH 6aIapdAn KopFay 6afapnaMaCbl EeDi.
KγTy JxHe Ta3aJay
MkyTKe He Ta3aJaC, DyXOBKa uKaΦb y3aK yAkBt 60nbl KbltpbH KHe FyHKUHOHaJbIbIbH CaKaTaNbl. DyXOBKa uKaΦb H dyPbc KyTy TypaNb OcbHda 6ineci3.
Hycaynap
LbHb, nactKxHe MetaJIcNkTbI eTpIi MaTePnIap naJaHaBnIFaHbIKTaH, dYXOBKa WkaΦbHbI aIbHbIbI naHeJIiHi TyciHde a3FaHTaI aIbIPMaWbJIbIKTap 6Olyb MyMKiH.
EciK 乌HbCbHdaFb cy i3depi cnaKTb6oJIbN KePiHtIN KeJIeHKeJIep dYxOBKa WkaΦbHdaFb WaMHaH WaFbIbICaH JapbIKTaH 60JaDbI.
Te KofapbI TemnepaTpyanapda 3MaJIb JkaHbIN KeTyi MymKIn. OcbHbH candapbHaH 3MaJIb TyciHne a3FaHTaN aiBypMaUbJIbIKTap 6OlybMyMKiH. Byk KaBbITbJ KHe H Kbl3MeT eTyre acep etNeiDi. KyKa Ta6aHbIH XKeKTEpi 3MaJIbMeH ToJIbIFMeH Ka6bJIIMaFaH. CoHbIKTaH onAp KaTnapbl 6OlaDbI. ByI Koppo3raDaH KopfahbIka acep etNeiDi.
Xyfb1w 3aTTap
BettepDpybE mec Ta3aIay 3aTAPMeH 3aKbIMdaJImMaybI yuIH KeNeci aKnapaTka Ha3ap aydapbIHbI3.
DyXOBKaHbTa3aIaFaHa
arpeccnBti Hemece a6pa3nBti Ta3anaFbIu 3aTTap
KypambHdca cnpt Ken e6bip JyfbI 3aTAPdbI,
eW6ip KblpflbUaTapbl,
eW6ip KbICMbI JXOFapbl Ta3anaFbIHTapDbI Hemece 6y Ta3anaFbIHTapBn naDanaHyf a6oJMaJdbI.
XKeKeIeReH 3IeMeHTepDi bIbIC Kyy MaunHaCbIHDa Ta3aJAmHaB3.
Bipinpi pet naandaanbai typbin khaHa ry6kanapdbIMyknrt KyyibHbI3.
| TOT 6acnaytBuH 6oJatTah JHacalfAH 6eTep | KUpblfBbHbCyMeH JxHe a3FaHTaJyFbIi 3aT MOnlWepeIMeH JyBbHb3. ΘpKaaHaan TeKCTypaIbIK cypTeKe napallenb cypTiH3. ΘηTnece cbI3aTtap paJa 6oJyBb MyMKIn. KUpfa 6yBepeKpeH KUpfAByHb3. ΘK, JxAnyap MaIb, KpXAm JxHe aKybI3 daKTapbH bipDen KeTipH3. A6pa3NBTi Ta3aJALbH 3aTtAPDb, cbI3aT TycipeTih ry6kAlapDbI HeMece Ta3aJALayFa apHalfAa KaTbI 5y6epeKterdi NaIdaIaNbHb3. Tot 6acnaytBuH 6oJatTah JxacalfAH 6eTepDi KytYe apHalfAa apHaIb 3aTtAPMeH JxblbPaTyFa 6oJaDbI. ΘHdipywi HcyKayLapbH opbIHdaHb3. Tot 6acnayTbH 6oJaTka apHalfAa apHaIbI Ta3aJALfBb 6I3DIn cepBvctIK Kbl3MeTTeh HeMece apHaIbI dYKeHHEN catbI anlyFa 6oJaDbI. |
| 3MaJIbDaIfAH JxHe JaKTaJIfAH 6eTep | KUpflb 3aTbH a3FaHTa MOnlWepeIMeH JxHe Jxblb CyMeH JyBbHb3. KUpFAK 6yBepeKpeH KUpfAByHb3. |
| TMyMeIep | KUpflb 3aTbH a3FaHTa MOnlWepeIMeH JxHe Jxblb CyMeH JyBbHb3. KUpFAK 6yBepeKpeH KUpfAByHb3. |
| 3IiHeK TaKta | ΘIHeKtePre apHaIfAH JxFbIi 3aTneH ta3aJAYFa 6oJaDbI. KUStI Ta3aJALbH 3aTtAPDbI HeMece yUkip MeTaal 3aTtAPDbI naIdaIaNbHb3. Olap 3IiHeKtiH 6eTIH 3aKbIMdaybI JxHe cbI3aT Tycipyi MymKIn. |
TbIfbI3daBbIbIblrfaIbI cyrrimeH cyptiHi. Kypfak wSy6epeKeH KypfAaHbI3.
| Духовский iшк iжавы | Таза,Жылblc yMuMeH HeMece cípke cybl KocbIqanfachyme. KaTbI NaCTaIraHaJa:ДуховскийapfaraPahalran Ta3aIaNbIw 3aTTapDbI Tek cybfan6betterpe naIaIaNbIbIbI3. |
| Духовский шkaФындыfы шamHybIn ZhbIbI плafоны | ЖуБbls 3aTbHn a3FaHTaMmIePIMeH JxHeJxblc yMuMeH JyBbl3. KypFak ShybepeKneH KypFAtbIbIbI3. |
| Куралар | Жыlblc ca6bHdbI cyda xizitih3. LTeKameh Hemece ry6kAmen Ta3aIaNbIbI3. |
| АлOMHHa ta6a (onuzn) | bldlicxuy MaunHacbIHa Ta3aIaNAMbIbI. Ewhaan DyOBKaFa apHalran TazalaFbIbITbI naIaIaNb6aHbI3. CbIaTAPdbI 6oIbIbIPmay yuHIn metaII 6etTepre nbIaKpeH Hemece coI cnAaKtbl yUkip 3atpen TImeHIs. XyFbIb 3aTbHn a3FaHtai MolsepiHem xHe bIaNaIbI bIy6epeKneH cypTlH3. XyMcak cIyRimEn KypFAtbIbIbI3. A6pa3NtTa3aIaNbIbI 3aTAPdbI, cblaTay Tycipetin ry6kAnapDbI Hemece 6yDip Ta3aIaNbIbIbCyrinepeDi naIaNaIaNb6aHbI3. Tabara cbl3aTucedi |
| Балanapdah kopfay (onuzn) | Духовский ecirihde balaIapdah Kopfay opHaTbIbFan 6oIca, onbl Ta3aIaNMaT pybI np any Kepek. Bykil nIaTnK 6eIweKterdi xblbI ca6bHdbI cyda xizitih3 xzHe ry6kAmen KyzbHbI3. KypFak ShybepeKneH KypFAtbIbIbI3. KaTbI naCTaIca, balaIapdah KopFay dYpbIC KbI3MeT eTe anMaIbIbI. |
| эзир ley 6etI | KtyxHe Ta3aIay TpyaIbI HysckaynapDbI KypbIbHbIbH naiDaIaHny HysckaylbIbHda Ta6yfa 6oIaDbI. |
AcnalbI 3JeMeHnTepdi any JxHe Ta3aJIay
AcnalbI 3nemeHTepDi Ta3anay yuIH anyfa 6oJaB. IyXOBka uKaΦbl caJIbH 6OlybKepeK.
Cepenepni any
- Cepeni Temei TapbHb3 Kehe a3dan anFa wifapbHb3. CepenH TemeHri 6eirihderi y3bH wTNΦTepDi wifapbHb3 (A cypeTi).
- KaHbIHdaFbI cpeHi KOFapbI KeTepiH3 XHe KaJlan WbIFapbIHb3 (B cypet).
AcnalbI 3neMeHTepDi Ta3aJAY 3aTbHbIH KHe r6KaHbIH KEmerimEH Ta3aHaBb3. KaTbI kip 6oNca 5eTKaHbI naJaTaHaBbHb3.
Cepenepdiiny
- Eki inrekti kaian JokapbI teciktepre Kipri3iH3. (A-B cypeTepi)
Дурбемocopnaty!
Ewkaan eki inreK teciktepeTToBik 6ekitireHse cepeni KblkbltnaHbI. 3MaNb 3aKbIMdanybi JxHe cbHybIMyMKiH (C cypeti).
- Eki inreK korapfbl TecikTrepre TObIFbIMeH KipreH 6OlybKepeK. EHHi cepehi bary Jxhe Jxan TEm H KblNkbTbH3 XHe TEmHri TecikTrepre iniH3 (D cypeti).
- Eki cepeni de dyxobkaHBn 6yniipnIK ka6bipfanaibaHa iJIiH3 (E cypet).
Cepenep dypbic opHaTbIraH 6onca, eKJ KOFapfbl Oyblk apacbiHdafb KaBbIKbIK Ke6ipeK 6oJaBl.
DyXOBka uKaΦbHbH eciirH any JeHe opHaTy
Tasaay He demontaay yuih dyxobka ukaibih ecirih anyfa 6oana.
EciKTiH eT oTncacbl 6yFaTTay niHTiperIMeH Jka6bIKtaJfAH. BfATay niHTipeKTEpi opHaTyIb Ke3de (A cypet), dyXOBKa IkaΦbIHbIH eciri 6yFaTTayJIb 60aIbI. OHbl any MymKiH eMec. BfATay niHTipeKTEpi KaIbIpcA (B cypet), tonCanap 6yFaTTanaIbI. EciKTi Jka6bMy MymKiH eMec 60aIbI.


J Kapakat any kayni 6ap!
ToncaIap 6yfattanMaca,ecik Te3 Ka6bIybl MymKIn. Ophaty iHtipeKTEpi ToIbIFbIMeH opHaTbJFaH 6OlybH, an ecIKti anFaHda ToIbIFbIMeH KaIbPbIJFaH 6OlybH KaJaFaHaHaB13.
Eciktri any
1.DyXOBkaUkaΦbHbIHeciriHToJIbFbIMeH aIbIbI3.
2. OH KaKTaFb JxHe coJ KaKTaFb 6yFaTTay iHtipeKTepeiH ekeyIH De KaHbIPbIH3 (A cypet).
3.Духовkaшафын eciriH coьиHa DeiH Jka6bHbI. Obl eki KOIMeH coJ KaKTah JHe OH JkaKTaH yCTaHbI. Tafti bipa3 JkaaybIn, ecikTi shIFapbHbI3 (B cypeti).
Ecikri ophaty
EciKti anyfa kepi peTneh opHaTBiHbI3.
1.Духовkaшкабын eciriHToNCanapdbH ekeyi De TecikTepre Typa Kapama-Kapсbl opHaIacatbHdAn opHaTbHb3 (A cypeTi).
2. TOncaIaIaI cHbIaayIeI kAfbHaH 6eKity KepeK (B cypeti).

- Byfattay nihipekteripinH ekeyiH de xabHBi3 (C cypeTi). Dyxobka uKaBHBiEciH XabHBi3.


KapakatanyKayni6ap!
Духовka Шаьи eciri Tycin Калca HeMece TOnca cbHaHahBn KaIca, TOncaFa TImeHi3. CepBntiK bI3MeTKe xa6apIacbHbI3.
EciK uHbCbH any XeHe KOIO
EH JkaKcb Ta3aay yuih dYXOBKa 1kaΦb eciriH uBbCbH anyFa 6oJaBl.
Eckri any
1.DyXOBka uKaΦbIbIH eCiRiH aIbIbI3 KHe CyIriHi TyTKblTbI TEmeH KaPaTbI KOJIbIbI3.
2.ДуховkaшkaфыecirihinKopfafbiHnaHInaXbipaTbHb3.Byn yuHcOJxheOHxakTaBbNHTepDi6ypanabHb3(Acypeti).
3. Kofapfbl 6eikti a3dAn KeTePin, UbHbHbI TapTbIn UbIfapbHbI3 (B cypeti).
4.A3an KeTeepin, 乌bHbHbTapTbIn 乌bIfapbHbI3 (C cypeti).
LbHbnapdbI bHbTa3aayFa apHaFah KymcaK y6epeKeNeh Ta3anaHb3.

Kapakat any kayni 6ap!
KypbIfbl eciriHin cbI3at TcYCKe HbIHbcI cbHybl MyMKiH. LlbuHbifa apHaIFaH KbIPfblTb, KyTI HeMece a6pa3nBTi XyfbI 3aTTapDb naJaIah6aHbI3.
LbHbIaPdbI opHaTy
Ophaty Ke3iHne TeMeHne coJ KaKta KypbIINFbIHbIHΦnpMa 6enrici opHaIacByIH KaJaFaIaHbI3.
1.LbHbHbApTkaKeIbey Kynde opHaTbHb3 (A cypeti).
2. Kofapfbl 6eNirih KeNbey Kynde caIbHb3 XHe eKi XaFbHaH 6ekitih3.Teric 6et cbiptbHa 6onybKepek.(B cypeti).
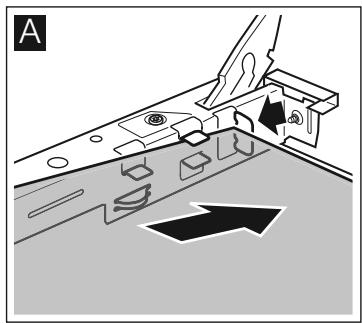
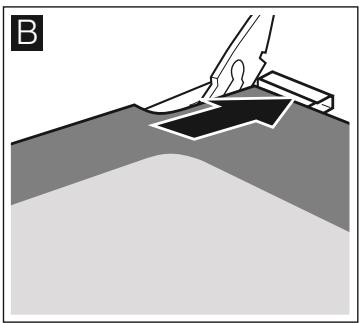
- Kopfafbln naheIbI opHaTbHbI 3 He6eKiTiH3.
4.Духовkaшkaфын ecirih opHaTBHbI3.
DyXOBKa ⅢKaΦbIH ⅢbHbIaPdbI dypbc OpHaTKaHHaH KeiH FaHa KaTaNJaIaHa aIacbI3.
AkaayIbIK 6ap 6oIca He icTey KepeK?
Kni akaybiktbH ce6bi 60JMaBb Hpce 60aDb. CepBnctIK Kbl3MeTKe KObIpay cokn Tpybn KcTeRe KapaHb3. MyMki h aKaybiktbE3 6etIH3we JKO anaTbH WbIFapcb3.
AkaayIbIKtap keCTeci
TamaK OHsa JkaKcb 60lmM WbIKca, Bi3 ci3 ywiH acXaHaJa cbHaKTap eTKi3dik TapatyBn H KapaBbI. OHa TaMaKaTbI e3ipJeY tpaJIb KeN KeHeCTep MeH HycKaynap TaAbcI3.
Tok cory kayni 6ap!
EiikTi eMec MaaHHbIH KHeHdeyi KayinTi. KHeHdeYdi TEK 6i3iH KIneHTepre Kbl3Met KepcTeTih TxKipN6eli TexHnKTePdih 6ipeyi FaHa opbldai aIaDbI.
| Акayльк | ыктумал себен | Жю/hускayлар |
| Духовka shkaфы ЖуMbIC ICTeMeiDi. | Сактындырfbiiш akayы. | Сактындырfbiiштар 6логында сактындырfbiiш akayы IMec Еkeин Текерін3. |
| Жение керney жOK. | Аханада жарык kocьлады Ма жэne backa TурмьICTbIK Курьнлгылар жуMbIC icten Tур Мa, осыларды Текерін3. | |
| Са fat Инданкаторы Жынлбiktайды | Жение керney жOK. | Са fatын kaйтадан opнатын3. |
| Духовka shkaфы Кыздырмайды. | Туиспелерre шаньин Жиналуы. | Ауысыт彬л-КOCKыш ТуTKаларды бірhoe рет алга-apтka 6уразыз. |
HasapayadapbHb3
KyaT cbIMb 3aKbIMdAnca, OHb EHNipyWHiH cepBnCTIK KbI3Meti Hemece 6iikTi MaMaH aybICTpby KepeK.
DyXOBka ⅢKaΦbIHdAflI ⅢaMblaybictbipy
DyXOBkaJaTaBlaam Kyin KeTce aybictbpyKepeK. Xofapbl TeMnepaTypanapFa Te3imDi,40 Bt waMdpbl cepBnctik KbImMeTTHe Hemece apHaBla DyKeHHeH catbln anyfa 6oJaDbI. Tek ocbl WaMdpbl naJaDaHaHbIHbI3.
Tok cory kayni 6ap!
CaKaTaNDbIpbfIbIbTap 6JorBtIbHdAfbI cKaTaHDbIpbfIbIbTbI eWipiH3.
1.3aKbIMdapdb6oJdbIpMay yuHcAnkbH dYXOBKa uKaΦbHa acxaha cyIrciH cAblb3.
2.LbHbI pnafoHNbI caFt Tinihe Kepi 6ypan aIbHbI3.
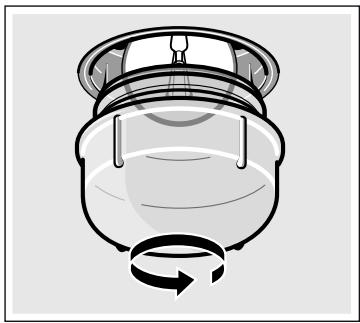
3.LJaMbI Typi 6ipJeu WaMaFa aybIcTBpBlHbI3.
4.LbHbI InafoHdb6ypan6ekitih3.
5.CyIinHbIFapbIn,caKtaHdbipFbIITbIKocbHbI3.
WbHbI piaΦOH
3aKbIMdAnFaH bHbI IaafoHdbI aybICTbpy KepeK. JkapamblbHbI
IIafoHapdbI cepBnCTIK KbImTeTcAcbIN aIyfa 60naDbI.
KypblfHbIH KypblfHbI Hemipih (E-Hemip) XeHe 3aybITbIK Hemipih
(FD-Hemip) aIbHbI3.
CepBnCTiK KbI3MeT
Erep KpybIINfbHb IxehDey Kepek 6oJca, 6i3iH cepBnCTIK Kbl3MeT ci3 yuiH JacaJFaH. B3 texHnKTePdH KaKeT Emec KenyIepiH 6oJIbIpMaY uH HApKaaHaJ KapaTbH WeuImDi TaabMbI3.
ΘHIM HεMipi JxHe 3aybITbIK HεMip
CepBnCTIK Kbl3MeTKe KOHbIpay WaIfAHa, 6i3 ci3re caIaNbI Kbl3MeT KepcTe anybIMbI 3 yuHIn eHIM Hemipin (E-Nr.) XaHe 3aytBtIK HEmipDi (FD-Nr.) xaBapnaHbI. Hemipnep 6ap ynrinik TaKtaWda DyXOBKa WkaFb ecirih 6yniPiHde opHaIacKaH. KaKeT 6oNFaHda KeY aKbIT i3dMeY uHIN KpybIbIbHb3DbH DepeKTePimEn CepBicTik Kb13MeT TelefoH Hemipin OcbI KepeJe Ka3y MymkIH.
*BaniWti wam.20 MInHyT KpybIfblda cyblty.
Hah Xhe WaFbH 6eJIkeIep
ErepnicypytpaBb6ackaHcyckaynap6oMaaca,epkaaHaDyXOBKaHb aIdbH aIa Kbl3DbipHb3.
Ewkaaah bictbik dyxOBKaFa cy KyMaHbI3.
KaKNaFbI JOK bIDbc = aWbIK
KaNaFbI 6ap bIdbc= Ka6bIK
bldbictbepkaaah TopbIH opTaBHa KOBbHbI3.
blCTbIK bIbHI bIbIbICTb Kypfak KoIbIiKa KoIbIb3. KoIbIiBbIaJIbI HeMece cybK 6oJCa, bIbHI cbIHbMyMkIH.
Kybipy
Maicb3 etke a3fahTa CyibkTbK KocbHb3. bIbictbH Ty6iH KaibHdbIfbI WaMaMeH 1/2 cm Cy KaabtmeH Ka6y KepeK.
Kybipfah Ke3eJe KKeTIkiKiTc cybIKTBik MmIeepIH Kocblb3. bIDbc Ty6iH KaJIbIHdbIFb1 - 2 cm cy Ka6aTbImEH Ka6y KepeK.
CydbH MeJIwepi et copTbHa JHe bIDbc MaTePnAbHa 6aJInaHbCTb. ETTI 3MaJIbDaIFaH bIDbCTa a3ipNeceHi3, bHbI bIDbICTa a3FaHTa Ke6ipeK cybIKtBk KocbHbI3.
Tot 6acnaiTbH 60anTtAn JacaIFaH bIbIc KybIpy yIiH OHwa KojaiJIbI eMec. Et a3bpak KbI3apaIbI JxHe 6aIybpak 3ipNeHdi. OhJ KofapbIpaK TemnepaTypada JxHe/Hemce y3aFbIpaK yaKbIT e3ipneHi3.
PnIbIe e3ipIey HcykayIbIbI
TpIbTe Te kDyXOBka UkaΦbIHbH eciri Ka6bIK Ke3e De 3ipNeH3.
Topra rpnIbRe apHanfah 6eJIkTepDi KoIma Tpybln rpnIbdi
waamameH 3 MInHyT 6ObI KbI3DbipblHb3.
IpnJIbRe apHAnfAH 6eJIkTepeT iKeJe TOpFa KoBbHb3.KeKe 6eJIkTeP TODbIH optacBaHa KoJa eH JaKaCbI BoJIn 8oJIn 8oJIn 8oJIn 8oJIn 8oJIn 8oJIn 8oJIn 8oJIn 8oJIn 8oJIn 8oJIn 8oJIn 8oJIn 8oJIn 8oJIn 8oJIn 8oJIn 8oJIn 8oJIn 8oJIn 80JIn 80JIn 80JIn 80JIn 80JIn 80JIn 80JIn 80JIn 80JIn 80JIn 80JIn 80JIn 80JIn 80JIn 80JIn 80JIn 80JIn 80JIn 80JIn 80JIn 8OJIaBbI JxHe DyXOBKa IkaΦb Ta3apak BonaIbI.
Iicipy Ta6acbH JxHe eM6e6an Ta6aHb 4-DeHreRe opHaTyfa 6oImaIdb. XofapbTemnepaTpaIapdaa OnapbH niuhi e3repy i MymKIn JxHe aIFaHda JxMbIC KaMepacbH 3aKbIMdayb MymKiH.
MymkiHirihwe eIwemi6ipde rpnbte aphanfah 6eiktepdi TaHaB3. Ocb JkaFdaJa onap Kb3apaDbJ KHe cJI KaJaDbI. CTeiKtepDi rpnbde 3eipnerHHen Kein FaHa Tz3aHb3.
Bolikterpi 2 % 6enriri 6ip yaKbIT eTKeHHHe KeiH ayapbHbI3.
TpInbDin Kbl3dbpy 3neMeHti Ke3eHdi Tpyde KocbIaNbJxHe eWedeJI. ByKanblntb JkaFdai.MyHbIH opbIH any KniiripHaTbIFaH rpInb peKIMHe 6aIaNbHcTbI.
Et
3zipney yaKbIbHbH JkapTbcHda et 6eJIikTepiH ayapblb13.
KybipdaKa DaibH 6oJFaHa, dyXOBkaHbI eUpiH3 KHe KOcbIMwa 10 MInHy Tpyfb3bHb3. ByI eT ceniH JkaKcbpaK tapanybHa MyMKiHdk bepedi.
3zipyden Keiin cybehi anHomnH foIbrafopaHb3 JHe dYxOBkada 10 MNHTKa KaIdbipHb3.
Tepici 6ap Kybipblfah loowka eti ysiH tephi aiKac Tpyde KeciH3, coaH KeHH KybpdaKTbl tepicih TEmeH Kapatbn TaakcaIbHbI3.
| Ет | Салмak | Куралдар жени ыдьс | Дени | Кыздир у typi | Temmerpatура °C, релль denгей | Уakсы, минут |
| Сиьр ETI | ||||||
| Сиьр etīнен жасалган Кублар | 1,0 кr | жабек | 2 | □ | 200-220 | 120 |
| 1,5 кr | 2 | □ | 190-210 | 140 | ||
| 2,0 кr | 2 | □ | 180-200 | 160 | ||
| Балык субесi, Кызfvлт | 1,0 кr | ашек | 1 | □ | 210-230 | 70 |
| 1,5 кr | 1 | □ | 200-220 | 80 | ||
| Ростбиф, Кызfvлт | 1,0 кr | ашек | 1 | 窝 | 230-250 | 50 |
| Сөөнтөр, 3 см, Кызfvлт | Top + Amбебан таба | 4+1 | □ | 3 | 15 | |
| Бүүүүү | ||||||
| Бүүүүүл徳н жасалган Кублар | 1,0 кr | ашек | 1 | □ | 200-220 | 100 |
| 1,5 кr | 1 | □ | 190-210 | 120 | ||
| 2,0 кr | 1 | □ | 180-200 | 140 | ||
| Шошka ETI | ||||||
| Терici жок (Мысалы . Моьин) | 1,0 кr | ашек | 1 | 窝 | 190-210 | 120 |
| 1,5 кr | 1 | 窝 | 180-200 | 150 | ||
| 2,0 кr | 1 | 窝 | 170-190 | 170 | ||
| Терici бар (Мысалы, Каяврbing) | 1,0 кr | ашек | 1 | 窝 | 180-200 | 130 |
| 1,5 кr | 1 | 窝 | 190-210 | 160 | ||
| 2,0 кr | 1 | 窝 | 170-190 | 190 | ||
| Сүй金融机构 суренгэн tec | 1,0 кr | жабек | 1 | □ | 210-230 | 80 |
| Коий ETI | ||||||
| Сүйэрì жок коь ортоша Кубрылган | 1,5 кr | ашек | 1 | 窝 | 170-190 | 120 |
| Фарш | ||||||
| Ет рунeti | шамамен 750 r | ашек | 1 | 窝 | 180-200 | 70 |
| Шаыншхьлтар | ||||||
| Шаыншхьлтар | Top + Amбебан таба | 4+1 | □ | 3 | 15 | |
Kyc
KecTeJe 6epiJreH MEnIep caJIbIH dYXOBKaFa caJIbIHFaH TaMaKTapFa KaTbICTbl.
KecTeeri canMaK depeKeTepi KybipaTBiH, iwiHe fapu caBih6aFaH Kyc yiwI dypbic.
Tikenei Topda KybipcaHb3, 66an TaabHb1-HeReRe KoibHb3.
YipeKti HemeCe Ka3dbI nicipreHde MaJ aFbIn 1uBfA anybI yUHH KaHaTtApDbH actbIHdAfbI TepiHi Tecih3.
KcytbI TopFa Tcein TeMeH KapaTbIN KOHyBbI3. TyTac KcytbI yaKbITbIH yWTeH eki 6eNirI etKeHne de aydapbHbI3.
AaKtanydah 6ipHeWe MNHyT 6pybH MaJ JkaKca HeMece a3an Ty3 KocblfAH cy HeMece anelbcnH sbipbHaH cenCe, Kyc JkaKcbI Kb3apbln nicei.
| Kус | Салмak | Куралдар көнө ыдьс | Дeнгей | Кыздыр тур i | Temnepatypa °C, р inpь дeнгей | Уakсыт, минүт |
| Тayыктын karлбы, 1-4 дana | шамамен 400 r | Top | 2 | 图 | 210-230 | 40-50 |
| Тayык бeлikтerei | шамамен 250 r | Top | 3 | 图 | 210-230 | 30-40 |
| Тayык, түтас 1-4 дana | шамамен 1 кr | Top | 2 | 图 | 200-220 | 55-85 |
| YüPEC, түтас | 1,7 кr | Top | 2 | 图 | 170-190 | 80-100 |
| Каз, түтас | 3,0 кr | Top | 2 | 图 | 160-180 | 110-130 |
| Жас курketayын, түтас | 3,0 кr | Top | 2 | 图 | 180-200 | 80-100 |
| 2 курketayын,aясы | шамамен 800 r | Top | 2 | 图 | 180-200 | 80-100 |
Benrini 6ip yaKbI 2 / 3 etKeHHe KeiH 6aJIk 6eJIkTePi ayapbHbI3.
TyTac 6aIbIKtby aydapy KaKet eMec. TyTac 6aJIbIKtby dYXOBKaFa apKa KaHaTbH XOFapBi KapaTbIn calbHb3. KapTONTbH JxAPtbcB
Hemece WafbH bIbICTbl KypcaK KybcHa caIbHb3, coHdaa 6aIbIK TpyakTb TYpaDbI.
Tikenei Topda Kybipfahda 6yfaH KocbIMwa eM6eBn Ta6aHb1 6nIKtiriHe opHaTbIHb3. BaIbK ceni JHHanaDbj XHe dYxOBKa Ta3apak 6oIaBl.
Балык
KemeiTeP, rpaTeHep, TocTtap
Tikenei TopJa KybIpcAh3,Am6e6an Ta6aHb1 1-DeHreIre KoIbHbI3. LyxOBka WkaΦbTa3apak BoIbIn KanaAbI.
blnbictbepkaaahTopFa KoibHbI3.
Kemei t3zipney yakblb dlbchtih enlmeHHe xhe KemeiTin 6nIKirHe 6aIahbictbl. Kecteepderi mHdep 6oJxalbl 6oBln Ta6blabbl.
| Тамak | Куралдар кени bдыс | Денгей | Кьздир typi | Temnéратура, °C | Уakсыт, мнунт |
| Кемшер | |||||
| Тати Кемш | Кемш калblбы | 2 | ☐ | 170-190 | 50-60 |
| Мakарон Кемшi | Кемш калblбы | 2 | ☐ | 210-230 | 25-35 |
| Гразен | |||||
| Шпійнг体现在төрдөн касалfaxн karтоŋ rратeni, En улken 6иiktirī 2 см | Кемш калblбы | 2 | ☐ | 150-170 | 50-60 |
| TOCT | |||||
| Тостарди Кызэрү, 4 дana | Top | 4 | ☐ | 3 | 6-7 |
| Тостарди Кызэрү, 12 дana | Top | 4 | ☐ | 3 | 4-5 |
| Тостарди nicipi, 4 дana | Top | 3 | ☐ | 3 | 7-10 |
| Toast, überbacken, 12 дana | Top | 3 | ☐ | 3 | 5-8 |
Даын eHIMdep
EhnpuyiHIn opamaIaBHyckayIapbIOpbHaIbI3.
Erep KypaIapFa nicipyre apHaIFaH KaFa3dbI TeceTih 6oIcaHbI3, KaFa3dbIH OcbI TeMnpaTypaFa JapaTbIHn KaJaFanaHbI3. KaFa3 eIwemi TaMaK eIwemHe caN 6onybKepeK.
3zipney hətnkeci eHimdepin CanacbHa 6aJnhaICTb. LInki eHimde Kapa daKTap JhHe 6ipKeIkeEmec TycTap 6aKaNybl MyMKIN.