
HBN331E3B - Built-in oven BOSCH - Free user manual and instructions
Find the device manual for free HBN331E3B BOSCH in PDF.


| Product Type | Built-in Oven |
| Brand | Bosch |
| Model | HBN331E3B |
| Energy Type | Electric |
| Oven Capacity | 71 L |
| Energy Efficiency Class | A+ |
| Dimensions (H x W x D) | 595 x 595 x 548 mm |
| Net Weight | 38 kg |
| Power Consumption (Conventional) | 0.85 kWh |
| Power Consumption (Fan Forced) | 0.65 kWh |
| Heating Functions | 7 modes: Conventional, Top Heat, Bottom Heat, Grill, Fan-Forced, Pizza, Keep Warm |
| Grill Power | 2.7 kW |
| Temperature Range | 50 °C – 270 °C |
| Cleaning System | EasyClean enamel coating |
| Safety Features | Child lock, Cool door, Auto shut-off |
| Display | LED with touch control |
| Inner Light | Yes, halogen |
| Number of Oven Cavities | 1 |
| Door Type | Cool front, drop-down |
| Telescopic Runners | Standard on one shelf |
| Repairability Index | 8.0 / 10 |
| Spare Parts Availability | 10 years |
| Installation Type | Built-in under counter or in column |
Frequently Asked Questions - HBN331E3B BOSCH
User questions about HBN331E3B BOSCH
0 question about this device. Answer the ones you know or ask your own.
Ask a new question about this device
Download the instructions for your Built-in oven in PDF format for free! Find your manual HBN331E3B - BOSCH and take your electronic device back in hand. On this page are published all the documents necessary for the use of your device. HBN331E3B by BOSCH.
USER MANUAL HBN331E3B BOSCH
Register your new Bosch now: www.bosch-home.com/welcome

Built-in oven HBN331.3B

BOSCH
[en] Instruction manual
Table of contents
Important safety information....3
Causes of damage 4
Your new oven ....5
Control panel 5
Function selector....5
Buttons and display....5
Temperature selector ....6
Cooking compartment 6
Your accessories ....6
Inserting the accessories ....6
Optional accessories ....7
Before using the oven for the first time....7
Setting the clock 7
Heating up the oven....7
Cleaning the accessories....7
Setting the oven....8
Types of heating and temperature 8
If the oven is to switch off automatically ....8
If the oven is to switch on and off automatically ....9
Setting the clock....9
Setting the timer 9
Childproof lock ....10
Oven 10
Care and cleaning ....10
Cleaning agents 10
Detaching and refitting the rails 11
Detaching and attaching the oven door.... 11
Removing and installing the door panels 12
Troubleshooting ....13
Malfunction table.... 13
Replacing the bulb in the oven ceiling light 13
Glass cover 13
After-sales service ....13
E number and FD number 13
Energy and environment tips....14
Saving energy.... 14
Environmentally-friendly disposal.... 14
Measures to be noted during transport.... 14
Tested for you in our cooking studio 14
Cakes and pastries 14
Baking tips 15
Meat, poultry, fish....16
Tips for roasting and grilling.... 17
Special dishes 17
Defrosting 17
Drying.... 18
Acrylamide in foodstuffs ....18
Test dishes ....19
Baking 19
Grilling.... 19
Additional information on products, accessories, replacement parts and services can be found at www.bosch-home.com and in the online shop www.bosch-eshop.com
⚠️ Important safety information
Read these instructions carefully. Only then will you be able to operate your appliance safely and correctly. Retain the instruction manual and installation instructions for future use or for subsequent owners.
This appliance is only intended to be fully fitted in a kitchen. Observe the special installation instructions.
Check the appliance for damage after unpacking it. Do not connect the appliance if it has been damaged in transport.
Only a licensed professional may connect appliances without plugs. Damage caused by incorrect connection is not covered under warranty.
This appliance is intended for domestic use only. The appliance must only be used for the preparation of food and drink. The appliance must be supervised during operation. Only use this appliance indoors.
This appliance is intended for use up to a maximum height of 2000 metres above sea level.
This appliance may be used by children over the age of 8 years old and by persons with reduced physical, sensory or mental capabilities or by persons with a lack of experience or knowledge if they are supervised or are instructed by a person responsible for their safety how to use the appliance safely and have understood the associated hazards.
Children must not play with, on, or around the appliance. Children must not clean the appliance or carry out general maintenance unless they are at least 8 years old and are being supervised.
Keep children below the age of 8 years old at a safe distance from the appliance and power cable.
Always slide accessories into the cooking compartment correctly. See "Description of accessories" in the instruction manual.
Risk of fire!
- Combustible items stored in the cooking compartment may catch fire. Never store combustible items in the cooking compartment. Never open the appliance door if there is smoke inside. Switch off the appliance and unplug it from the mains or switch off the circuit breaker in the fuse box. A draught is created when the appliance door is opened. Greaseproof paper may come into contact with the heating element and catch fire. Do not place greaseproof paper loosely over accessories during preheating. Always weight down the greaseproof paper with a dish or a baking tin. Only cover the surface required with greaseproof paper. Greaseproof paper must not protrude over the accessories.
Risk of burns!
■ The appliance becomes very hot. Never touch the interior surfaces of the cooking compartment or the heating elements. Always allow the appliance to cool down. Keep children at a safe distance. ■ Accessories and ovenware become very hot. Always use oven gloves to remove accessories or ovenware from the cooking compartment. ■ Alcoholic vapours may catch fire in the hot cooking compartment. Never prepare food containing large quantities of drinks with a high alcohol content. Only use small quantities of drinks with a high alcohol content. Open the appliance door with care.
Risk of scalding!
■ The accessible parts become hot during operation. Never touch the hot parts. Keep children at a safe distance. - When you open the appliance door, hot steam may escape. Open the appliance door with care. Keep children at a safe distance. ■ Water in a hot cooking compartment may create hot steam. Never pour water into the hot cooking compartment.
Risk of injury!
Scratched glass in the appliance door may develop into a crack. Do not use a glass scraper, sharp or abrasive cleaning aids or detergents.
Risk of electric shock!
- Incorrect repairs are dangerous. Repairs may only be carried out by one of our trained after-sales engineers. If the appliance is faulty, unplug the mains plug or switch off the fuse in the fuse box. Contact the after-sales service. ■ The cable insulation on electrical appliances may melt when touching hot parts of the appliance. Never bring electrical appliance cables into contact with hot parts of the appliance.
- Do not use any high-pressure cleaners or steam cleaners, which can result in an electric shock.
- When replacing the cooking compartment bulb, the bulb socket contacts are live. Before replacing the bulb, unplug the appliance from the mains or switch off the circuit breaker in the fuse box.
- A defective appliance may cause electric shock. Never switch on a defective appliance. Unplug the appliance from the mains or switch off the circuit breaker in the fuse box. Contact the after-sales service.
Causes of damage
Caution!
■ Accessories, foil, greaseproof paper or ovenware on the cooking compartment floor: do not place accessories on the cooking compartment floor. Do not cover the cooking compartment floor with any sort of foil or greaseproof paper. Do not place ovenware on the cooking compartment floor if a temperature of over 50 °C has been set. This will cause heat to accumulate. The baking and roasting times will no longer be correct and the enamel will be damaged. ■ Water in a hot cooking compartment: do not pour water into the cooking compartment when it is hot. This will cause steam. The temperature change can cause damage to the enamel. ■ Moist food: do not store moist food in the cooking compartment when it is closed for prolonged periods. This will damage the enamel. - Fruit juice: when baking particularly juicy fruit pies, do not pack the baking tray too generously. Fruit juice dripping from the baking tray leaves stains that cannot be removed. If possible, use the deeper universal pan. ■ Cooling with the appliance door open: only allow the cooking compartment to cool when it is closed. Even if the appliance door is only open a little, front panels of adjacent units could be damaged over time.
■ Very dirty door seal: If the door seal is very dirty, the appliance door will no longer close properly when the appliance is in use. The fronts of adjacent units could be damaged. Always keep the door seal clean. ■ Appliance door as a seat, shelf or worktop: Do not sit on the appliance door, or place or hang anything on it. Do not place any cookware or accessories on the appliance door.
- Inserting accessories: depending on the appliance model, accessories can scratch the door panel when closing the appliance door. Always insert the accessories into the cooking compartment as far as they will go.
- Carrying the appliance: do not carry or hold the appliance by the door handle. The door handle cannot support the weight of the appliance and could break.
Your new oven
Here you will learn about your new oven. The control panel and the individual operating controls are explained. You will find information on the cooking compartment and the accessories.
Control panel
Here you can see an overview of the control panel. The design depends on the respective appliance model.
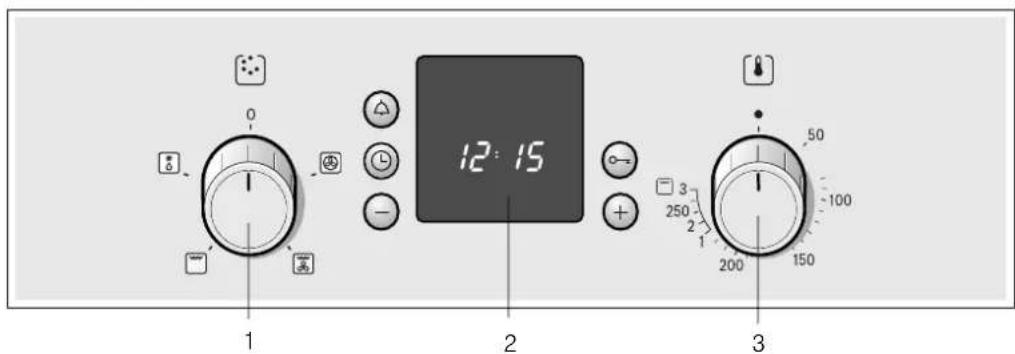
Explanations
| 1 Function selector |
| 2 Operating switches and display panel |
| 3 Temperature selector |
Control knobs
The control knobs can be pushed in and remain pressed down when they are in the "out" position. Press down on the control knob again to release it back up.
Function selector
With the function selector knob you can set the heating mode for the oven. The function selector knob can be rotated to the right or to the left.
When the required type of heating is set, the oven light lights up.
Positions Function
| o | Off The oven is switched off. |
| 3D hot air* You can bake cakes, pizza, biscuits, small cakes and puff pastry on two levels at the same time.A fan with a ring heating element on the back panel of the oven ensures that the heated air is distributed evenly. | |
| Hot air grilling Hot air grilling is particularly suitable for grilling fish, poultry and larger pieces of meat. The grill element and fan switch on and off alternately. The fan distributes the heated air around the food. |
* Type of heating in accordance with energy efficiency class EN50304.
Positions Function
| Radiant grilling, large area | Can be used to grill a large number of beef steaks, sausages and fish, or to toast bread. The whole area below the grill heating element becomes hot. | |
| Defrosting Example: meat, poultry, bread and tarts.The fan distributes the heated air around the food. | ||
| * Type of heating in accordance with energy efficiency class EN50304. | ||
Buttons and display
You can use the buttons to set various additional functions. You can read the values that you have set in the display.
Button Use
| ⚠️ | Timer button This is used to set the timer. | |
| ➊ | Clock button | This is used to set the Clock, |→| Oven cooking time and →| End time. |
| - | Minus button Use this button to decrease the setting values. | |
| ○→ | Key button This is used to switch the child-proof lock on and off. | |
| + | Plus button Use this button to increase the setting values. | |
Temperature selector
Use the temperature selector to set the temperature and the grill setting.
Positions Function
| Zero position Oven not hot. | |
| 50-270 Temperature range | Temperature in °C. |
| 1, 2, 3 Grill settings The grill settings for "Grill, large □ area".Setting 1 = lowSetting 2 = mediumSetting 3 = high | |
While the oven is heating up, the ⚡ temperature symbol lights up in the display. It switches off during pauses in heating. For some settings, it does not light up.
Grill settings
With ☐ Radiant grilling, use the temperature selector to set a grill setting.
Your accessories
The accessories supplied with your appliance are suitable for making many meals. Ensure that you always insert the accessories into the cooking compartment the right way round.
There is also a selection of optional accessories, with which you can improve on some of your favourite dishes, or simply to make working with your oven more convenient.
Inserting the accessories
The accessories can be inserted in the oven at 4 different levels. Always insert the accessories as far as they can go to ensure that they do not touch the door glass.

When the accessories are pulled approximately halfway out, they lock into position. This allows meals to be taken out easily.
When placing the accessories in the oven, check that the indentation is at the back. They can only lock correctly in place in this position.

Cooking compartment
The oven light is located in the cooking compartment. A cooling fan protects the oven from overheating.
Oven light
During oven operation, the oven light is on. By turning the function selector to any position, the oven light can also be switched on without the oven heating up.
Cooling fan
The cooling fan switches on and off as required. The hot air escapes above the door.
So that the cooking compartment cools down more quickly after operation, the cooling fan continues to run for a certain period afterwards.
Caution!
Do not cover the ventilation slots. Otherwise the oven will overheat.
Note: Heat may cause the accessories to deform. As soon as the accessories cool down, they regain their original shape. Their function is not impaired.
Hold the baking tray securely on the sides with both hands and push it parallel into the frame. Avoid movements to the right or left when pushing the baking tray in. Otherwise, it will be difficult to push the tray in and the enamelled surfaces could be damaged.
You can buy accessories from the after-sales service, from specialist retailers or online. Please specify the HEZ number.

Wire rack
For ovenware, cake tins, joints, grilled items and frozen meals. Insert the wire rack with the open side facing the oven door and the curvature pointing downwards.

Insert grid
For roasting.
Place the wire insert in the universal pan with the legs facing downwards. This ensures that dripping fat and meat juices are collected.

Universal pan
For moist cakes, pastries, frozen meals and large roasts. It can also be used to catch dripping fat when you are grilling directly on the wire rack.
Slide in the universal pan with the sloping edge facing the oven door.
Optional accessories
You can buy optional accessories from your after-sales service or from specialist retailers. You will find a variety of suitable products for your oven in our brochures and on the Internet. The availability of optional accessories and the options for ordering them on the internet vary depending on the country.
Information regarding this can be found in the sales documents.
Not every optional accessory is suitable for every appliance. When purchasing, always quote the complete identification number (E no.) of your appliance.
Optional accessories HEZ number Function
| Wire rack HEZ 434000 For ovenware, cake tins, roasts, grilling and frozen meals. | |
| Aluminium baking tray HEZ 430001 For cakes and biscuits. | Place the baking tray in the oven with the sloping edge towards the oven door. |
| Enamel baking tray HEZ 431001 For cakes and biscuits. | Place the baking tray in the oven with the sloping edge towards the oven door. |
| Universal pan HEZ 432001 For moist cakes, pastries, frozen meals and large roasts. Can also be used under the wire rack to catch fat or meat juices. | Place the universal pan in the oven with the sloping edge towards the oven door. |
Oven door - Additional safety precautions
During long cooking times, the oven door may become very hot.
If you have small children, extra supervision is required during oven operation.
In addition, there is a safety device which prevents direct contact with the oven door. This optional accessory (440651) is available from the after-sales service.
Before using the oven for the first time
In this section, you can find out what you must do before using your oven to prepare food for the first time. First read the section on Safety information.
Setting the clock
After the oven has been connected, the ⏻ symbol and three zeros light up in the display. Set the clock.
- Press the ⏻ button. The time 12:00 appears in the display and the ⏻ symbol flashes.
- Use the + or - button to change the clock. After a few seconds, the time that has been set is adopted.
Heating up the oven
To remove the new cooker smell, heat up the oven when it is empty and closed. An hour of 3D hot air at 240 °C is suitable for this purpose. Ensure that no packaging material has been left in the cooking compartment.
Keep the kitchen ventilated the whole time the oven is on.
- Use the function selector to select the 3D hot air type of heating.
- Use the temperature selector to set the temperature to 240 °C. After an hour, switch off the oven. Turn the function and temperature selector clockwise to the off position.
Cleaning the accessories
Before you use the accessories for the first time, clean them thoroughly with hot soapy water and a soft dish cloth.
Setting the oven
There are various ways in which you can set your oven. Here we will explain how you can select the desired type of heating and temperature or grill setting. You can select the cooking time and end time for your dish on the oven.
Types of heating and temperature
Example in the picture: 3D hot air heating, 190 °C.
- Use the function selector to select the required type of heating.

- Use the temperature selector to set the temperature or the grill setting.

The oven heats up.
Switch off the oven
Turn the function selector to the off position.
Changing the settings
You can change the type of heating, temperature and grill setting as required.
If the oven is to switch off automatically
Set the cooking time for your meal.
Example in the picture: 3D hot air, 200 °C, cooking time 45 minutes.
- The function selector is used to set the type of heating.
- The temperature selector is used to set the temperature or grill setting.
- Press the ⏻ Clock button.
The I→I Cooking time symbol flashes.
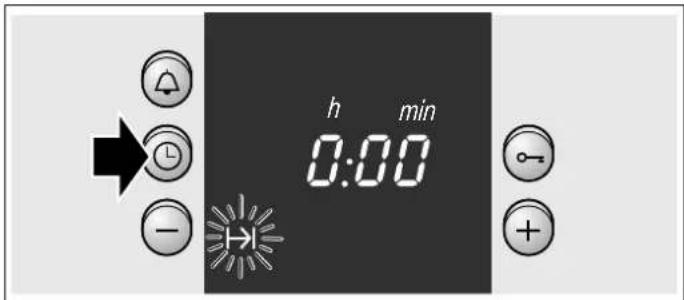
- Use the + or - button to set the cooking time.
Default value for the + button = 30 minutes
Default value for the - button = 10 minutes

The cooking time has elapsed
A signal sounds. The oven switches off. Press the ⏻ button twice and switch off the function selector.
Changing the setting
Press the ⏻ Clock button. Use the + or - button to change the cooking time.
Cancelling the setting
Press the ⏻ Clock button. Press the - button until zero is shown on the display. Switch off the function selector.
Setting the cooking time if the clock is hidden
Press the ⏻ Clock button twice and make your settings as described in point 4.
If the oven is to switch on and off automatically
Please remember that easily spoiled foods must not be allowed to remain in the cooking compartment for too long.
Example in the picture: 3D hot air 📐, 200 °C. It is 10:45. The meal takes 45 minutes to cook and should be ready at 12:45.
- The function selector is used to set the type of heating.
- The temperature selector is used to set the temperature or grill setting.
- Press the ⏻ Clock button.
- Use the + or - button to set the cooking time.
- Press the ⏻ Clock button repeatedly until the →I End symbol flashes.
You can see in the display when the meal will be ready.

- Use the + button to set a later end time.
The setting is adopted after a few seconds.
The end time is shown in the display until the oven starts.

The cooking time has elapsed
A signal sounds. The oven switches off. Press the ⏻ button twice and switch off the function selector.
Note: You can make changes as long as the symbol is flashing. When the symbol lights up, the setting has been adopted.
Setting the clock
When the appliance is connected for the first time or after a power cut, the ⏻ symbol and three zeros flash in the display. Set the clock. The function selector must be switched off.
Setting procedure
- Press the ⏻ Clock button.
12.00 appears in the display and the Ⓛ symbol flashes.
- Use the + or - button to change the clock.
After a few seconds, the time is saved. The ⏻ symbol goes out.
Changing from summer to winter time, for example
Press the ⏻ Clock button twice and change the time using the + or - button.
Setting the timer
You can use the timer as a kitchen timer. It runs independently of the oven. The timer has a special signal. This means that you can tell whether the timer duration or the cooking time has elapsed. You can also set the timer if the childproof lock is active.
Setting procedure
- Press the 🔒 Timer button.
The ⚠ symbol flashes.
- Use the - or + button to change the timer duration.
Default value for + button = 10 minutes
Default value for - button = 5 minutes
The timer starts after a few seconds. The △ symbol lights up in the display. You will see the time counting down.
When the time has elapsed
A signal sounds. Press the 🔒 Timer button. The timer goes out.
Changing the timer duration
Press the 🔒 Timer button. Use the + or - button to change the time.
Cancelling the setting
Press the 🔒 Timer button. Press the - button until zero is shown on the display.
The timer and cooking time count down at the same time
Both symbols light up. You can see the timer duration counting down in the display.
To call up the remaining cooking time, end time or clock:
Press the Ⓛ Clock button repeatedly until the relevant symbol appears.
The value you are checking appears for several seconds on the display.
Childproof lock
Oven
The oven has a childproof lock to prevent children switching it on accidentally.
Switching the childproof lock on and off
The function selector must be switched off.
To switch on: press and hold the 0-π key button until the 0-π symbol appears in the display. This takes about 4 seconds.
To switch off: press and hold the 0-π key button until the 0-π symbol goes out.
Notes
■ You can set the timer and clock at any time. If the childproof lock is active, it will be cancelled following a power cut.
Care and cleaning
With good care and cleaning, your oven will remain clean and fully-functioning for a long time to come. Here we will explain how to maintain and clean your oven correctly.
Notes
■ Slight differences in the colours on the front of the oven are caused by the use of different materials, such as glass, plastic and metal. ■ Shadows on the door panel which look like streaks, are caused by reflections made by the oven light. Enamel is baked on at very high temperatures. This can cause some slight colour variations. This is normal and does not affect their function. The edges of thin trays cannot be completely enamelled. As a result, these edges can be rough. This will not impair the anti-corrosion protection.
Cleaning agents
Damage to the various different surfaces caused by using the wrong cleaning agent can be avoided by observing the following instructions.
When cleaning the oven do not use
■ sharp or abrasive cleaning agents, ■ cleaning agent with a high alcohol content, ■ scouring pads, ■ high-pressure cleaners or steam jets. ■ Do not clean individual parts in the dishwasher.
Wash new sponges thoroughly before first use.
| The control panel | Hot soapy water: Clean with a dish cloth and dry with a soft cloth. Do not use glass cleaners or glass scrapers for cleaning. |
| Stainless-steel surfaces | Clean with warm soapy water and a soft cloth. On stainless-steel surfaces, always wipe parallel to the natural grain. Otherwise, you may scratch the surface. Dry with a soft cloth. Remove flecks of limescale, grease, starch and albumin (e.g. egg white) immediately. Do not use any abrasive materials, scouring sponges or rough cleaning cloths. The stainless-steel fronts can be polished using a special care product. Follow the manufacturer's instructions. You can purchase special stainless-steel cleaner from our after-sales service or from specialist retailers. |
| Enamel surfaces and lacquered surfaces | Wipe with a damp cloth and some washing-up liquid. Dry with a soft cloth. |
Rotary knobs Wipe with a damp cloth and some washing-up liquid. Dry with a soft cloth.
| Glass panel Clean using glass cleaner. Do not use any abrasive cleaning agents or sharp metal objects. These could scratch and damage the surface of the glass panel. | |
| Seal Wipe with a damp cloth. Dry with a soft cloth. | |
| Oven interior Warm soapy water or a vinegar solution. If there are heavy deposits of dirt, only use oven cleaner on cold surfaces. | |
| Glass cover for the oven light | Wipe with a damp cloth and some washing-up liquid. Dry with a soft cloth. |
| Accessories Soak in warm soapy water. Clean with a brush or sponge. | |
| Aluminium baking tray (optional) | Do not clean in the dishwasher. Never use oven cleaner. To avoid scratches, never touch the metal surfaces with a knife or a similar sharp object. Clean horizontally with some washing-up liquid and a damp glass cleaning cloth or a microfibre cloth – do not press too hard. Dry with a soft cloth. Do not use any abrasive materials, scouring sponges or rough cleaning cloths. Otherwise, you may scratch the surface |
| Childproof lock (optional) | If a childproof lock has been fitted on the oven door, it must be removed before cleaning. Soak all plastic parts in warm soapy water and wash with a sponge. Dry with a soft cloth. If very dirty, the childproof lock will not work properly. |
| Hob Refer to the hob instruction manual for information about care and cleaning. | |
Detaching and refitting the rails
The rails can be removed for cleaning. The oven must have cooled down.
Unhooking the rails
- Hold the shelf frames from underneath and pull slightly forward. Pull the extension pins at the bottom of the rails out of the mounting holes (Fig. A).
- Then fold the rails upwards and carefully remove them (Fig. B).


Clean the rails with washing-up liquid and a sponge. For stubborn deposits of dirt, use a brush.
Installing the frames
- Insert the two hooks carefully into the upper holes. (Figure A-B)


Incorrect assembly!
Never move the frame before the two hooks are fully anchored in the upper holes. The enamel could be damaged and may break (figure C).

- The two hooks must be inserted fully into the upper holes. Now move the frame slowly and carefully downwards and insert in the lower holes (figure D).
- Insert both frames into the side walls of the oven (figure E). If the rails are fitted correctly, the distance between the two upper shelf positions is greater.


Detaching and attaching the oven door
For cleaning purposes and to remove the door panels, you can detach the oven door.
The oven door hinges each have a locking lever. When the locking levers are closed (figure A), the oven door is secured in place. It cannot be detached. When the locking levers are open in order to detach the oven door (Fig. B), the hinges are locked. They cannot snap shut.


Risk of injury!
Whenever the hinges are not locked, they snap shut with great force. Ensure that the locking levers are always fully closed or, when detaching the oven door, fully open.
Detaching the door
- Open the oven door fully.
- Fold up the two locking levers on the left and right (figure A).
- Close the oven door as far as the limit stop. With both hands, grip the door on the left and right-hand sides. Close the door a little further and pull it out (figure B).


Attaching the door
Reattach the oven door in the reverse sequence to removal.
- When attaching the oven door, ensure that both hinges are inserted straight into the opening (figure A).
- The notch on the hinge must engage on both sides (figure B).
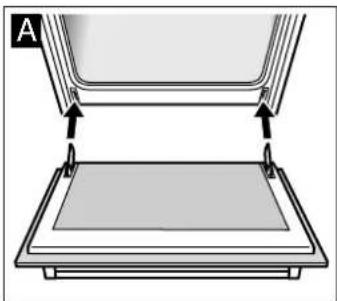

- Fold back both locking levers (figure C). Close the oven door.

Risk of injury!
If the oven door falls out accidentally or a hinge snaps shut, do not reach into the hinge. Call the after-sales service.
Removing and installing the door panels
To facilitate cleaning, you can remove the glass panels from the oven door.
Removal
- Detach the oven door and lay it on a cloth with the handle facing down.
- Pull off the cover at the top of the oven door. Press in the tabs on the left and right using your fingers (fig. A).
- Lift the top panel up and pull it out (fig. B).

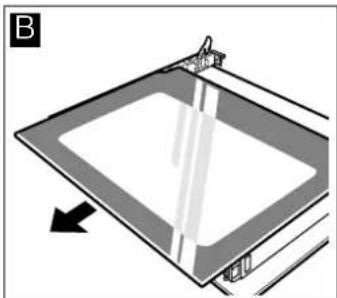
- Lift the panel up and pull it out (fig. C).

Clean the panels with glass cleaner and a soft cloth.
Risk of injury!
Scratched glass in the appliance door may develop into a crack. Do not use a glass scraper, sharp or abrasive cleaning aids or detergents.
Installation
During installation, make sure that the lettering "top right" is upside down at the bottom left.
- Insert the panel at an angle towards the back (fig. A).
- Insert the top panel at an angle towards the back into the brackets. The smooth surface must face outwards. (fig. B).


- Put the cover back in place and press on it.
- Attach the oven door.
Do not use the oven again until the panels have been correctly installed.
Troubleshooting
Malfunctions often have simple explanations. Refer to the table before calling the after-sales service as you may be able to remedy the fault yourself.
Malfunction table
If a dish doesn't turn out as well as you had hoped, refer to the section Tested for you in our cooking studio, where you will find plenty of cooking tips and tricks.

Risk of electric shock!
Incorrect repairs are dangerous. Repairs may only be carried out by one of our trained after-sales engineers.
Problem Possible cause Remedy/information
| The oven does not work. | The circuit breaker is defective. | Look in the fuse box and check that the circuit breaker is in working order. |
| Power cut Check whether the kitchen light or other kitchen appliances are working. | ||
| The clock display flashes. | Power cut Reset the clock. | |
| The oven does not heat up. | There is dust on the contacts. | Turn the control knobs back and forth several times. |
Caution!
If the supply cord is damaged, it must be replaced by the manufacturer, its service agent or similarly qualified persons in order to avoid a hazard.
Replacing the bulb in the oven ceiling light
If the bulb in the oven light fails, it must be replaced. Heat-resistant, 40 watt spare bulbs can be obtained from our after-sales service or a specialist retailer. Only use these bulbs.

Risk of electric shock!
Switch off the circuit breaker in the fuse box.
- Place a tea towel in the oven when it is cold to prevent damage.
- Unscrew the glass cover by turning it anti-clockwise.

- Replace the bulb with one of the same type.
- Screw the glass cover back in.
- Remove the tea towel and switch on the circuit breaker.
Glass cover
You must replace a damaged glass cover. Suitable glass covers may be obtained from the after-sales service. Please specify the E number and FD number of your appliance.
After-sales service
Our after-sales service is there for you if your appliance needs to be repaired. We will always find the right solution in order to avoid unnecessary visits from a service technician.
E number and FD number
When calling us, please give the product number (E no.) and the production number (FD no.) so that we can provide you with the correct advice. The rating plate containing these numbers is found on the side of the oven door. To save time, you can make a note of the number of your appliance and the telephone number of the after-sales service in the space below, should it be required.
E no.
FD no.
After-sales service
Please note that there will be a fee for a visit by a service technician in the event of a malfunction, even during the warranty period.
Please find the contact data of all countries in the enclosed customer service list.
To book an engineer visit and product advice
GB 0344 892 8979
Calls charged at local or mobile rate.
IE 01450 2655
0.03 € per minute at peak. Off peak 0.0088 € per minute.
Rely on the professionalism of the manufacturer. You can therefore be sure that the repair is carried out by trained service technicians who carry original spare parts for your appliances.
Energy and environment tips
Here you can find tips on how to save energy when baking and roasting and how to dispose of your appliance properly.
Saving energy
■ Only preheat the oven if this is specified in the recipe or in the operating instruction tables. ■ Use dark, black lacquered or enamelled baking tins. They absorb the heat particularly well. - Open the oven door as infrequently as possible while you are cooking, baking or roasting. It is best to bake several cakes one after the other. The oven is still warm. This reduces the baking time for the second cake. You can also place two loaf tins next to each other. For longer cooking times, you can switch the oven off 10 minutes before the end of the cooking time and use the residual heat to finish cooking.
Environmentally-friendly disposal
Dispose of packaging in an environmentally-friendly manner.
This appliance is labelled in accordance with European Directive 2012/19/EU concerning used electrical and electronic appliances (waste electrical and electronic equipment - WEEE). The guideline determines the framework for the return and recycling of used appliances as applicable throughout the EU.
Measures to be noted during transport
Secure all mobile parts in and on the appliance using an adhesive tape that can be removed without leaving any traces. Push all accessories (e.g. baking tray) into the corresponding slots with cardboard at the edges, in order to avoid damaging the appliance. Place cardboard or similar between the front and rear side to prevent knocks against the inside of the door glass. Secure the oven door to the side walls of the appliance using adhesive tape.
Keep the original appliance packaging. Only transport the appliance in the original packaging. Observe the transport arrows on the packaging.
If the original packaging is no longer available
pack the appliance in protective packaging to guarantee sufficient protection against any transport damage.
Transport the appliance in an upright position. Do not hold the appliance by the door handle or the connections on the rear, as these could be damaged. Do not place any heavy objects on the appliance.
Tested for you in our cooking studio
Here you will find a selection of dishes and the ideal settings for them. We will show you which type of heating and which temperature are best suited for your dish. You can find information about suitable accessories and the height at which they should be inserted. There are also tips about cookware and preparation methods.
Notes
■ The values in the table always apply to dishes placed into the cooking compartment when it is cold and empty. Only preheat the appliance if the table specifies that you should do so. Do not line the accessories with greaseproof paper until after they have been preheated. ■ The times specified in the tables are guidelines only. They will depend on the quality and composition of the food. ■ Use the accessories supplied. Additional accessories may be obtained as special accessories from specialist retailers or from the after-sales service. Before using the oven, remove any unnecessary accessories and ovenware from the cooking compartment. ■ Always use oven gloves when taking hot accessories or ovenware out of the cooking compartment.
Cakes and pastries
Baking on one level
When baking with ⚙️ 3D hot air, use the following shelf heights for the accessory:
■ Cakes in tins: level 2
■ Cakes on trays: level 3
Baking and roasting on two or more levels
Use 3D hot air.
Shelf positions for baking and roasting on 2 levels:
■ Universal pan: Shelf position 3
■ Baking tray: Shelf position 1
Dishes that are put in the oven at the same time do not have to be ready at the same time.
The tables contain a selection of dishes.
Baking tins
It is best to use dark-coloured metal baking tins.
Baking times are increased when light-coloured baking tins made of thin metal or glass dishes are used, and cakes do not brown so evenly.
If you wish to use silicone baking tins, use the information and recipes provided by the manufacturer as a guide. Silicone baking tins are often smaller than normal tins. The amount of mixture and recipe instructions may differ.
Tables
The tables show the ideal type of heating for the various cakes and pastries. The temperature and baking time depend on the amount and composition of the mixture. This is why temperature ranges are given in the tables. You should try the lower temperature first, since a lower temperature results in more even browning. You can increase the temperature next time if necessary.
If you preheat the oven, the baking time is shortened by 5 to 10 minutes.
Additional information can be found in the Baking tips section following the tables.
Note: Do not place food directly onto the aluminium baking tray. Line the aluminium baking tray with greaseproof paper.
| Food Dish Shelf | position | Type of heating | Temperature in °C | Time in minutes | |
| Victoria sandwich Wire rack + 2 x ∅ 20 cm tins 1 | ☒ | 160 20-30 | |||
| Light fruit cake Wire rack + high ∅ 20 cm tin 2 | ☒ | 160 80-90 | |||
| Rich fruit cake Wire rack + ∅ 23 cm high round tin or 20 cm square tin | 2 | ☒ | 140 180-190 | ||
| Fruit crumble Wire rack + flat glass dish 3 | ☒ | 160 35-45 | |||
| Sponge cake (fatless) Wire rack + baking tin (dark coated) 1 | ☒ | 160-180 30-40 | |||
| Swiss roll* Wire rack + swiss roll tin 2 | ☒ | 170 10-12 | |||
| Tart Universal pan + ∅ 20 cm plate or pie tin 1 | ☒ | 190 40-50 | |||
| Quiche Wire rack + quiche tin (dark coated) 2 | ☒ | 180 40-50 | |||
| (White) Bread Wire rack + loaf tin (1 x 900 g or 2 x 450 g) 1 | ☒ | 200 25-35 | |||
| Scones* | Baking tray | 1 | ☒ | 180 15-20 | |
| Biscuits | Baking tray | 1 | ☒ | 170 15-20 | |
| Small cakes* | Baking tray | 2 | ☒ | 150-170 20-30 | |
| Jam tarts* | Wire rack + 12-cup tin | 1 | ☒ | 180 15-20 | |
| Meringues | Universal pan | 3 | ☒ | 80 | 100-150 |
| Pavlova** | Universal pan | 3 | ☒ | 150+100 | 100-150 |
| Soufflé* | Wire rack + 1,2 l soufflé dish | 1 | ☒ | 160 40-50 | |
| Pie | Wire rack + pie dish | 3 | ☒ | 180 45-55 | |
| Yorkshire pudding* | Wire rack + 12-cup tin | 3 | ☒ | 180 25-35 | |
| Jacket potatoes | Universal pan | 2 | ☒ | 170 60-70 | |
| Pizza (homemade) | Universal pan | 3 | ☒ | 180 20-30 | |
* Preheat. ** Preheat at a higher temperature, then reduce and insert food.
| Food Dish Shelf | position | Type of heating | Temperature in °C | Time in minutes | |
| Victoria sandwich, 2 levels | 2 wire racks** + 4 x ∅ 20 cm tins | 3+1 | 160 30-40 | ||
| Scones*, 2 levels | 2 wire racks** + 2 baking trays** | 3+1 | 170 20-30 | ||
| Biscuits, 2 levels | Universal pan*** + wire rack with baking tray** | 3+1 | 170 20-25 | ||
| Small cakes*, 2 levels | Universal pan*** + wire rack with baking tray** | 3+1 | 150-170 25-35 | ||
| Meringues, 2 levels | 2 wire racks** + 2 baking trays** | 3+1 | 80 | 100-150 | |
| Jacket potatoes, 2 levels | 2 wire racks** | 3+1 | 160 60-80 | ||
| Full meal, 2 levels | 2 wire racks** | 3+1 | 180 75-85 | ||
* Preheat. ** Additional baking trays and racks may be obtained as optional accessories from specialist shops. *** When baking on two levels, use the universal pan provided, at shelf position three.
Baking tips
| You wish to bake according to your own recipe. | Use similar items in the baking tables as a guide. |
| How to establish whether sponge cake is baked through. | Approximately 10 minutes before the end of the baking time specified in the recipe, stick a cocktail stick into the cake at the highest point. If the cocktail stick comes out clean, the cake is ready. |
| The cake collapses. | Use less fluid next time or set the oven temperature 10 degrees lower. Observe the specified mixing times in the recipe. |
| The cake has risen in the middle but is lower around the edge. | Do not grease the sides of the springform cake tin. After baking, loosen the cake carefully with a knife. |
| The cake goes too dark on top. | Place it lower in the oven, select a lower temperature and bake the cake for a little longer. |
| The cake is too dry. | When it is done, make small holes in the cake using a cocktail stick. Then drizzle fruit juice or an alcoholic beverage over it. Next time, select a temperature 10 degrees higher and reduce the baking time. |
| The bread or cake (e.g. cheesecake) looks good, but is soggy on the inside (sticky, streaked with water). | Use slightly less fluid next time and bake for slightly longer at a lower temperature. For cakes with a moist topping, bake the base first. Sprinkle it with almonds or bread crumbs and then place the topping on top. Please follow the recipe and baking times. |
| The cake is unevenly browned. Select a slightly lower temperature to ensure that the cake is baked more evenly. Pro-truding greaseproof paper can affect the air circulation. For this reason, always cut greaseproof paper to fit the baking tray. | |
| The bottom of a fruit cake is too light. Place the cake one level lower the next time. | |
| The fruit juice overflows. Next time, use the deeper universal pan, if you have one. | |
| Small baked items made out of yeast dough stick to one another when baking. | There should be a gap of approx. 2 cm around each item. This gives enough space for the baked items to expand well and turn brown on all sides. |
| You were baking on several levels. The items on the top baking tray are darker than that on the bottom baking tray. | Always use 3D hot air to bake on more than one level. Baking trays that are placed in the oven at the same time will not necessarily be ready at the same time. |
| Condensation forms when you bake moist cakes. | Baking may result in the formation of water vapour, which escapes above the door. The steam may settle and form water droplets on the control panel or on the fronts of adjacent units. This is a natural process. |
Meat, poultry, fish
Ovenware
You may use any heat-resistant ovenware. The universal pan is suitable for large roasts.
Glass ovenware is the most suitable. Ensure that the lid of the roasting dish fits well and closes properly.
Add a little more liquid when using enamelled roasting dishes.
With roasting dishes made of stainless steel, browning is not so intense and the meat may be somewhat less well cooked. Increase the cooking times.
Information in the tables:
Ovenware without a lid = open
Ovenware with a lid = closed
Always place the ovenware in the centre of the wire rack.
Place hot glass ovenware on a dry mat after cooking. The glass could crack if placed on a cold or wet surface.
Roasting
The roasting result depends on the type and quality of meat.
Add 2 to 3 soup spoons of liquid to lean meat, and 8 to 10 soup spoons of liquid to pot roasts, depending on the size.
Meat should be turned half way through the cooking time.
When the roast is ready, switch off the oven and leave the roast to stand for 10 minutes with the oven door closed. This allows the meat juices to distribute more favourably.
Grilling
Always close the oven door when grilling.
If possible, use pieces of meat which are of the same thickness. They should be at least 2 to 3 cm thick. Such pieces will be browned evenly and stay juicy and soft in the middle. Only salt the steaks after they have been grilled.
Place the pieces of meat directly onto the wire grill. If you are grilling just one piece of meat, it will turn out best if you place it in the centre of the wire grill. You should also insert the universal pan at level 1. The meat juices are collected here and the oven is kept clean.
Turn the pieces of meat and poultry after half of the cooking time indicated but turkey has to be placed breast side up and not to be turned!.
The grill element automatically switches itself off and back on again. This is normal. The number of times this happens depends on the grill setting you have selected.
Roasting
| Food Dish Shelf | position | Type of heating | Temperature in °C | Time, min. per 1 lb + add. time |
| Beef | ||||
| Beef rare Universal pan with wire insert 1 | ☒ | 210-230 15+20 | ||
| Beef medium Universal pan with wire insert 1 | ☒ | 210-230 25+25 | ||
| Beef well done Universal pan with wire insert 1 | ☒ | 210-230 30+30 | ||
| Beef fillet Universal pan with wire insert 1 | ☒ | 210-230 25+25 | ||
| Lamb | ||||
| Lamb medium Universal pan with wire insert 1 | ☒ | 160-180 20+20 | ||
| Lamb well done Universal pan with wire insert 1 | ☒ | 160-180 25+35 | ||
| Pork | ||||
| Pork Universal pan with wire insert 1 | ☒ | 180-200 35+35 | ||
| Poultry | ||||
| Chicken, Duck, Goose up to 5 kilo | Universal pan with wire insert 1 | ☒ | 150-190 17+20 | |
| Large Turkey up to 7 kilo | Universal pan with wire insert 1 | ☒ | 170-190 10+20 | |
| Chops and chicken joints | Universal pan with wire insert 2 | ☒ | 210-230 45 | |
Grilling
| Food Dish Shelf posi- | tion | Type of heating | Grill setting Time in minutes |
| Meat steaks Wire rack + universal pan 4+1 | 2 or 3 15-20 | ||
| Sausages Wire rack + universal pan 3+1 | 3 15-20 | ||
| Fish Wire rack + universal pan 4+1 | 2 25-30 | ||
| Toast Wire rack + universal pan 3+1 | 3 5-8 |
Tips for roasting and grilling
| The table does not contain information for the weight of the joint. | Select the next lowest weight from the instructions and extend the time. |
| How to tell when the roast is ready. | Use a meat thermometer (available from specialist shops) or carry out a “spoon test”. Press down on the roast with a spoon. If it feels firm, it is ready. If the spoon can be pressed in, it needs to be cooked for a little longer. |
| The roast is too dark and the crackling is partly burnt. | Check the shelf height and temperature. |
| The roast looks good but the juices are burnt. | Next time, use a smaller roasting dish or add more liquid. |
| The roast looks good but the juices are too clear and watery. | Next time, use a larger roasting dish and use less liquid. |
| Steam rises from the roast when basted. | This is normal and due to the laws of physics. The majority of the steam escapes through the steam outlet. It may settle and form condensation on the cooler switch panel or on the fronts of adjacent units. |
Special dishes
At low temperatures, 3D hot air is equally useful for producing creamy yoghurt as it is for proving light yeast dough. First, remove accessories, hook-in racks or telescopic shelves from the cooking compartment.
Preparing yoghurt
- Bring 1 litre of milk (3.5 % fat) to the boil and cool down to 40 °C.
- Stir in 150 g of yoghurt (at refrigerator temperature).
- Pour into cups or small screw-top jars and cover with cling film.
- Preheat the cooking compartment as indicated.
- Place the cups or jars on the cooking compartment floor and incubate as indicated.
Proving dough
- Prepare the dough as usual, place it in a heat-resistant ceramic dish and cover.
- Preheat the cooking compartment as indicated.
- Switch off the oven and place the dough in the cooking compartment and leave it to prove.
| Dish | Ovenware | Type of heating | Temperature | Cooking time | |
| Yoghurt | Cups or screw-top jars | on the cooking compartment floor | 50 °C Preheat | 5 mins | |
| 50 °C | 8 hrs | ||||
| Proving dough | Heat-resistant dish | on the cooking compartment floor | 50 °C Preheat | 5-10 mins | |
| Switch off the appliance and place the yeast dough in the cooking compartment | 20-30 mins | ||||
Defrosting
The defrosting time depends on the amount and type of food. Observe the instructions on the packaging.
Take food out of its packaging and place in suitable ovenware on the wire rack. Place poultry with the breast side to the plate.
| Frozen food | Accessories | Level | Type of heating | Temperature |
| e.g. cream cakes, buttercream cakes, gateaux with chocolate or sugar icing, fruit, chicken, sausage and meat, bread and bread rolls, cakes and other baked items | Wire rack | 2 | The temperature selector remains switched off |
Drying
With 3D hot air, you can dry foods brilliantly.
Use unblemished fruit and vegetables only and wash them thoroughly.
Drain off the excess water, then dry them.
Line the universal pan and the wire rack with greaseproof or parchment paper.
Turn very juicy fruit or vegetables several times.
Remove fruit and vegetables from the paper as soon as they have dried.
| Fruit and herbs Accessories Level Type of | heating | Temperature Cooking time |
| 600 g apple rings Universal pan + rack 3+1 | 80 °C 5 hrs (approx.) | |
| 800 g pear slices Universal pan + rack 3+1 | 80 °C 8 hrs (approx.) | |
| 1.5 kg damsons or plums Universal pan + rack 3+1 | 80 °C 8-10 hrs(approx.) | |
| 200 g herbs, washed Universal pan + rack 3+1 | 80 °C 1 1/2 hrs (approx.) |
Acrylamide in foodstuffs
Acrylamide is mainly produced in grain and potato products prepared at high temperatures, such as potato crisps, chips,
toast, bread rolls, bread or fine baked goods (biscuits, gingerbread, cookies).
Tips for keeping acrylamide to a minimum when preparing food
| General | ■ Keep cooking times to a minimum.■ Cook meals until they are golden brown, but not too dark.■ Large, thick pieces of food contain less acrylamide. |
| Baking With top/bottom heating max. 200 °C. | |
| With 3D hot air or hot air max.180 °C. | |
| Biscuits With top/bottom heating max. 190 °C. | |
| With 3D hot air or hot air max. 170 °C.Egg or egg yolk reduces the production of acrylamide. | |
| Oven chips | Spread evenly over the baking tray, in a single layer. Bake at least 400 g per baking tray so that the chips do not dry out |
Test dishes
These tables have been produced for test institutes to facilitate the inspection and testing of the various appliances.
In accordance with EN 50304/EN 60350 (2009) and IEC 60350.
Baking
Baking on 2 levels:
Always insert the universal pan above the baking tray.
Piped cookies (such as Spritz cookies in sugar syrup):
Dishes that are put in the oven at the same time do not have to be ready at the same time.
German apple pie, level 1
Change the position of the dark springform cake tin, slide in diagonally.
German apple pie, level 2
Change the position of the dark springform cake tin.
Cakes in a metal springform cake tin:
Place the springform cake tin on the universal pan instead of on the wire rack.
| Food Dish Shelf | position | Type of heating | Temperature in °C | Time in minutes |
| Small cakes (preheat oven) Baking tray* 2 | ◎ | 150-170 20-30 | ||
| Small cakes (preheat oven) Universal pan** + Baking tray* 3+1 | ◎ | 150-170 25-35 | ||
| Fatless sponge cake Wire rack + baking tin (dark coated) 1 | ◎ | 160-180 30-40 | ||
| Apple Pie Universal pan + 2 Springform cake tins∅ 20 cm*** | 2 | ◎ | 170-190 65-75 | |
| 2 Wire racks* + 2 Springform cake tins∅ 20 cm*** | 3+1 | ◎ | 170-190 70-80 |
* Additional baking trays and wire racks can be obtained as an optional accessory from specialist shops. ** When baking on two levels, always place the universal pan above the baking tray. ***Place the cake tins diagonally on the accessories.
Grilling
If you are grilling food directly on the wire rack, the universal pan should also be inserted at level 1. The liquid is then collected, keeping the oven cleaner.
| Dish Accessories and oven-ware | Level | Type of heating | Grill setting | Cooking time in minutes | |
| Browning toastPreheat for 10 mins | Wire rack | 4 | 3 | 1/2 -2 | |
| Beefburgers, 12 pieces*No preheating | Wire rack + universal pan | 4+1 | 3 | 25-30 | |
* Turn over after 2/3 of the cooking time.


- TABLE OF CONTENTS
- ⚠️ IMPORTANT SAFETY INFORMATION
- RISK OF FIRE
- RISK OF BURNS
- RISK OF SCALDING
- RISK OF INJURY
- RISK OF ELECTRIC SHOCK
- CAUSES OF DAMAGE
- CAUTION
- YOUR NEW OVEN
- CONTROL PANEL
- CONTROL KNOBS
- FUNCTION SELECTOR
- BUTTONS AND DISPLAY
- TEMPERATURE SELECTOR
- GRILL SETTINGS
- YOUR ACCESSORIES
- INSERTING THE ACCESSORIES
- COOKING COMPARTMENT
- OVEN LIGHT
- COOLING FAN
- WIRE RACK
- INSERT GRID
- UNIVERSAL PAN
- OPTIONAL ACCESSORIES
- OVEN DOOR - ADDITIONAL SAFETY PRECAUTIONS
- BEFORE USING THE OVEN FOR THE FIRST TIME
- SETTING THE CLOCK
- HEATING UP THE OVEN
- CLEANING THE ACCESSORIES
- SETTING THE OVEN
- TYPES OF HEATING AND TEMPERATURE
- SWITCH OFF THE OVEN
- CHANGING THE SETTINGS
- IF THE OVEN IS TO SWITCH OFF AUTOMATICALLY
- THE COOKING TIME HAS ELAPSED
- CHANGING THE SETTING
- CANCELLING THE SETTING
- SETTING THE COOKING TIME IF THE CLOCK IS HIDDEN
- IF THE OVEN IS TO SWITCH ON AND OFF AUTOMATICALLY
- SETTING PROCEDURE
- CHANGING FROM SUMMER TO WINTER TIME, FOR EXAMPLE
- SETTING THE TIMER
- WHEN THE TIME HAS ELAPSED
- CHANGING THE TIMER DURATION
- THE TIMER AND COOKING TIME COUNT DOWN AT THE SAME TIME
- CHILDPROOF LOCK
- OVEN
- SWITCHING THE CHILDPROOF LOCK ON AND OFF
- NOTES
- CARE AND CLEANING
- CLEANING AGENTS
- WHEN CLEANING THE OVEN DO NOT USE
- DETACHING AND REFITTING THE RAILS
- UNHOOKING THE RAILS
- INSTALLING THE FRAMES
- INCORRECT ASSEMBLY
- DETACHING AND ATTACHING THE OVEN DOOR
- DETACHING THE DOOR
- ATTACHING THE DOOR
- REMOVING AND INSTALLING THE DOOR PANELS
- REMOVAL
- INSTALLATION
- TROUBLESHOOTING
- MALFUNCTION TABLE
- REPLACING THE BULB IN THE OVEN CEILING LIGHT
- GLASS COVER
- AFTER-SALES SERVICE
- E NUMBER AND FD NUMBER
- TO BOOK AN ENGINEER VISIT AND PRODUCT ADVICE
- ENERGY AND ENVIRONMENT TIPS
- SAVING ENERGY
- ENVIRONMENTALLY-FRIENDLY DISPOSAL
- MEASURES TO BE NOTED DURING TRANSPORT
- IF THE ORIGINAL PACKAGING IS NO LONGER AVAILABLE
- TESTED FOR YOU IN OUR COOKING STUDIO
- CAKES AND PASTRIES
- BAKING ON ONE LEVEL
- BAKING AND ROASTING ON TWO OR MORE LEVELS
- BAKING TINS
- TABLES
- MEAT, POULTRY, FISH
- OVENWARE
- ROASTING
- GRILLING
- SPECIAL DISHES
- PREPARING YOGHURT
- PROVING DOUGH
- DEFROSTING
- DRYING
- ACRYLAMIDE IN FOODSTUFFS
- TEST DISHES
- BAKING
Brand : BOSCH
Model : HBN331E3B
Category : Built-in oven