
One+ PBLSV747 - Vacuum Cleaner RYOBI - Free user manual and instructions
Find the device manual for free One+ PBLSV747 RYOBI in PDF.

| Product Type | Cordless Wet/Dry Stick Vacuum |
| Brand | RYOBI |
| Model | One+ PBLSV747 |
| Power Supply | 18 V lithium-ion battery (not included) |
| Usage | Sealed hard surfaces only (hardwood, tile, vinyl, laminate) |
| Main Features | Dry and wet vacuuming, MAX mode, solution pump, roller self-cleaning |
| Clean water tank capacity | Approx. 0.5 L (estimated) |
| Dirty water tank capacity | Approx. 0.4 L (estimated) |
| Filter | Washable, replacement filter model: A32SV747F |
| Roller | Removable and washable, 2 roller bars included |
| LED Indicators | Battery level, MAX mode, solution pump, tank full, roller jam |
| Safety Shut-off | Float shut-off for wet vacuuming, automatic shut-off if roller jams |
| Package Contents | Vacuum, 2 roller bars, 2 filters, cleaning solution, self-cleaning dock, user manual |
| Weight | Approx. 4.5 kg (estimated) |
| Warranty | 3-year limited |
| Repairability | Spare parts available, authorized repair centers |
Frequently Asked Questions - One+ PBLSV747 RYOBI
User questions about One+ PBLSV747 RYOBI
0 question about this device. Answer the ones you know or ask your own.
Ask a new question about this device
Download the instructions for your Vacuum Cleaner in PDF format for free! Find your manual One+ PBLSV747 - RYOBI and take your electronic device back in hand. On this page are published all the documents necessary for the use of your device. One+ PBLSV747 by RYOBI.
USER MANUAL One+ PBLSV747 RYOBI
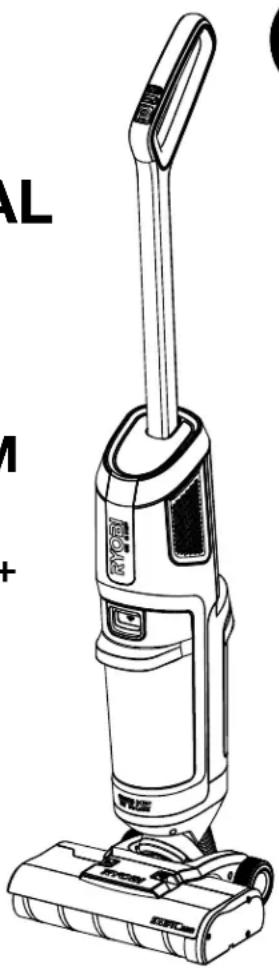
ONE+ 18V SWIFTCLEAN WET/DRY STICK VACUUM
ASPIRATEUR SEC/HUMIDE EAU SWIFTCLEAN DE 18 V ONE+
ASPIRADORA EN HÚMEDO/SECO DE ONE+ SWIFTCLEAN 18 V
PBLSV747 / A32CS747
natural_image
Line drawing of a vacuum cleaner with attached circuit board (no text or symbols)
REGISTER YOUR TOOLS
http://register.ryobitools.com
1-800-525-2579
EN MEXICO:
INCLUDES: Wet/Dry Stick Vacuum, (2) Roller Bars, (2) Filters, Cleaning Solution, Self-cleaning stand, Operator's Manual
TABLE OF CONTENTS
**********************************************************************
■ Important Safety Instructions...... 2-3
■ Symbols......4
■ Assembly....5
■ Operation.... 5-7
■ Maintenance......8
■ Illustrations 9-11
■ Parts Ordering and Service ....Back page

WARNING: To reduce the
risk of injury, the user must read and understand the operator's manual before using this product.
SAVE THIS MANUAL FOR FUTURE REFERENCE
IMPORTANT SAFETY INSTRUCTIONS
SAVE THESE INSTRUCTIONS
When using an electrical appliance, basic precautions should always be followed, including the following:

WARNING!
READ AND UNDERSTAND ALL INSTRUCTIONS. Failure to follow all instructions listed below, may result in electric shock, fire and/or serious personal injury.
READ ALL INSTRUCTIONS BEFORE USING THIS APPLIANCE

WARNING:
To reduce the risk of electric shock DO NOT expose to rain. Store indoors.
■ Dress properly. Do not wear loose clothing or jewelry. Contain long hair. Keep your hair, loose clothing, fingers, and all parts of the body and clothing, away from openings and moving parts. Loose clothes, jewelry, or long hair can be caught in internal moving parts.
■ Do not overreach. Keep proper footing and balance at all times. Proper footing and balance enables better control of the product in unexpected situations. Do not use on a ladder or unstable support.
■ Use safety equipment. Dust mask must be used for appropriate conditions.
■ Do not allow children to operate product or play with product as a toy. Close attention is necessary when used by or near children.
■ Use this product ONLY for its intended use as described in this manual. Use only the attachments recommended in this manual.
If product is not working properly, has been dropped, damaged, left outdoors, or dropped into water, return to your nearest service center.
■ Do not handle charger plug or product with wet hands.
■ Do not put any objects in ventilation openings. Do not use with any opening blocked. Keep openings free of dust, lint, hair, and anything that may reduce air flow.
■ NEVER vacuum materials that are burning or smoking, such as hot coals, cigarette butts, matches, burning or smoking ashes, etc.
■ DO NOT use to pick up flammable or combustible liquids, such as gasoline, or use in areas where they may be present.
■ Do not use without dust bowl or filter in place.
■ Use extra care when using on stairs.
■ Do not use to pick up hard objects such as nails, screws, coins, etc. Damage or injury could result.
■ Do not incinerate this appliance even if it is severely damaged. The batteries can explode in a fire.
■ Product does not have to be plugged into an electrical outlet, therefore it is always in operating condition. Be aware of possible hazards when using the product or when changing accessories.
■ Use battery only with charger listed. For use with 18 V lithium-ion battery packs, see tool/appliance/battery pack/charger correlation supplement 987000-432. Do not use charger outdoors.
■ When battery pack is not in use, keep it away from other metal objects like: paper clips, coins, keys, nails, screws, or other small metal objects that can make a connection from one terminal to another. Shorting the battery terminals together may cause sparks, burns, or a fire.
■ Always remove battery pack from your tool when you are assembling parts, making adjustments, cleaning, or when not in use. Removing battery pack will prevent accidental starting that could cause serious personal injury.
■ Do not use a battery pack that is damaged or modified. Damaged or modified batteries may exhibit unpredictable behavior resulting in fire, explosion or risk of injury.
■ Do not modify or attempt to repair a battery pack that has been damaged.
■ Batteries can explode in the presence of a source of ignition, such as excessive heat or a pilot light. To reduce the risk of serious personal injury, never use any cordless product in the presence of an open flame or temperature above 265^ F. An exploded battery can propel debris and chemicals. If exposed, flush with water immediately.
■ Prevent unintentional starting. Ensure the switch is in the off-position before connecting to power source and/or battery pack, picking up or carrying the product. Carrying battery products with your finger on the switch or energizing battery products that have the switch on invites accidents.
■ Under abusive conditions, liquid may be ejected from the battery; avoid contact. If contact accidentally occurs, flush with water. If liquid contacts eyes, additionally seek medical help. Liquid ejected from the battery may cause irritation or burns.
IMPORTANT SAFETY INSTRUCTIONS
■ Protect your lungs. Wear a face or dust mask if the operation is dusty. Following this rule will reduce the risk of serious personal injury.
- Check for misalignment or binding of moving parts, breakage of parts, and any other condition that may affect the product's operation. If damaged, have the product serviced before using. Many accidents are caused by poorly maintained products.
■ Use only accessories that are recommended by the manufacturer for your model. Accessories that may be suitable for one product may create a risk of injury when used on another product.
■ Always turn off this appliance before connecting or disconnecting motorized nozzle.
■ Follow all charging instructions and do not charge the battery pack or appliance outside of the temperature range specified in the instructions. Charging improperly or at temperatures outside of the specified range may damage the battery and increase the risk of fire.
■ Do not let gasoline, oils, petroleum-based products, etc., come in contact with plastic parts. They contain chemicals that can damage, weaken, or destroy plastic.
■ Have servicing performed by a qualified repair person using only identical replacement parts. This will ensure that the safety of the product is maintained.
■ This product contains no serviceable parts.
■ Save these instructions. Refer to them frequently and use them to instruct others who may use this product. If you loan someone this product, loan them these instructions also.
■ Do not charge battery in a damp or wet location. Do not use, store, or charge battery packs or products in locations where the temperature is less than 50^ F or more than 100^ F. Do not store outside or in vehicles.
■ Recharge only with the charger specified by the manufacturer. A charger that is suitable for one type of battery pack may create a risk of fire when used with another battery pack.
Use appliances only with specifically designated battery packs. Use of any other battery packs may create a risk of injury and fire.
■ Do not expose a battery pack or appliance to fire or excessive temperature. Exposure to fire or temperature above 265°F may cause explosion.
Do not put hands or objects inside of floor nozzle attachment as this could cause a malfunction of the tool or risk of injury may occur.
■ This product is intended for use on hard surfaces only. Do not use on carpet.
WARNING:
To reduce the risk of fire and electric shock - use only RYOBI brand cleaning products intended for use with this machine.
SYMBOLS
| The following signal words and meanings are intended to explain the levels of risk associated with this product. SYMBOL SIGNAL MEANING | ||
 | DANGER: | Indicates a hazardous situation, which, if not avoided, will result in death or serious injury. |
 | WARNING: | Indicates a hazardous situation, which, if not avoided, could result in death or serious injury. |
 | CAUTION: | Indicates a hazardous situation, that, if not avoided, may result in minor or moderate injury. |
| NOTICE: | (Without Safety Alert Symbol) Indicates information considered important, but not related to a potential injury (e.g. messages relating to property damage). | |
| Some of the following symbols may be used on this product. Please study them and learn their meaning. Proper interpretation of these symbols will allow you to operate the product better and safer. SYMBOL NAME DESIGNATION/EXPLANATION | ||
 | Safety Alert Indicates a potential personal injury hazard. | |
 | Read Operator's Manual | To reduce the risk of injury, user must read and understand operator's manual before using this product. |
 | Eye Protection | Always wear eye protection with side shields marked to comply with ANSI Z87.1. |
 | Wet Conditions Alert | Do not expose to rain or use in damp locations. |
 | Long Hair Risk of long hair being drawn into air inlet. | |
 | Collection Container Lid | Do not run unit while dirty tank lid is unsecured. |
 | Recycle Symbol | This product uses lithium-ion (Li-ion) batteries. Local, state or federal laws may prohibit disposal of batteries in ordinary trash. Consult your local waste authority for information regarding available recycling and/or disposal options. |
| V Volts Voltage | ||
| min Minutes Time | ||
| --- | Direct Current Type of a characteristic of current | |
| n_0 | No Load Speed Rotational speed, at no load | |
| .../min | Per Minute Revolution's, strokes, surface speed, orbits etc., per minute | |
This is a “household type” product which means it is intended for household use.
ASSEMBLY
UNPACKING
This product requires assembly.
■ Carefully remove the tool and any accessories from the box. All items listed in the Includes section must be included at the time of purchase.

WARNING:
Items in this Assembly section are not assembled to the product by the manufacturer and require customer installation. Use of a product that may have been improperly assembled could result in serious personal injury.
■ If any parts are damaged or missing, please call 1-800-525-2579 for assistance.

WARNING:
If any parts are damaged or missing do not operate this product until the parts are replaced. Use of this product with damaged or missing parts could result in serious personal injury.

WARNING:
Do not attempt to modify this product or create accessories or attachments not recommended for use with this product. Any such alteration or modification is misuse and could result in a hazardous condition leading to possible serious personal injury.
INSTALLING/REMOVING THE VACUUM HANDLE
See Figure 1, page 9.
To install the handle:
■ Remove the battery pack.
■ Insert handle into slot on top of vacuum as shown.
■ Press until you hear a click.
The handle can be removed for storage if desired.
To remove the handle:
■ Use a small, blunt tool such as a screwdriver to press the detent at handle base.
■ Pull handle up and out of vacuum.
OPERATION

WARNING:
Do not allow familiarity with this product to make you careless. Remember that a careless fraction of a second is sufficient to inflict serious injury.

WARNING:
Always remove battery pack from the tool when you are assembling parts, making adjustments, cleaning, or when not in use. Removing battery pack will prevent accidental starting that could cause serious personal injury.

WARNING:
Always wear eye protection with side shields marked to comply with ANSI Z87.1. Failure to do so could result in objects being thrown into your eyes and other possible serious injuries.

WARNING:
Do not use any attachments or accessories not recommended by the manufacturer of this product. The use of attachments or accessories not recommended can result in serious personal injury.

WARNING:
NEVER IMMERSE OR EXPOSE YOUR BATTERY PACK TO CORROSIVE OR CONDUCTIVE FLUIDS OR ALLOW THESE FLUIDS TO FLOW INSIDE THE BATTERY PACK.
APPLICATIONS
You may use this product for the following purpose:
■ Vacuuming of wet and dry debris
■ Mopping/washing/cleaning of sealed hard surfaces including, but not limited to, hardwood, tile, vinyl, laminate, etc.
OPERATION
INSTALLING/REMOVING BATTERY PACK
See Figure 2, page 9.
■ Insert the battery pack into the product as shown.
■ Make sure the latches on each side of the battery pack snap into place and that battery pack is secured in the product before beginning operation.
■ Depress the latches to remove the battery pack.
For complete charging instructions, see the operator's manuals for your battery pack and charger.
REMOVING AND FILLING THE CLEAN TANK
See Figure 3, page 9.
Use the included cleaning formula to fill the clean tank.
NOTICE:
Use only RYOBI Hard Surface Cleaning formula. Do not use other chemicals as this may damage the internal parts of the unit and void your warranty.
■ Remove the battery pack.
■ Push clean tank release button to remove tank from back of the vacuum.
■ Lift the door on top of the tank and fill with water up to the water fill line.
■ Add the RYOBI Hard Surface Cleaning formula until the water solution reaches the formula fill line.
NOTE: Wipe off any excess solution that may have spilled onto the outside of the tank.
■ Close the clean tank door.
■ Insert tank back into vacuum and click into place.
NOTE: Be sure the tank is installed properly to avoid any leakage.
STARTING/STOPPING THE WET/DRY STICK VACUUM
See Figure 4, page 9.

WARNING:
To reduce the risk of fire or explosion, do not leave the product running while unattended. Immediately stop the unit if it shows signs of abnormal operation such as loss of suction, liquid or debris in the exhaust, or any abnormal motor noises.
To start the vacuum:
■ Depress the ON/OFF button to turn on the vacuum.
■ Step on the vacuum roller head and recline the vacuum handle back to start dispensing the solution on the roller bar.
To stop the vacuum:
■ Depress the ON/OFF button to turn off the vacuum.
■ Return the handle to the upright position.
MAX SUCTION BUTTON
See Figure 4, page 9.
■ Press the MAX button to increase the amount of suction.
■ Press the MAX button a second time to return the suction to normal operation.
■ Press the solution pump button to stop the water solution from being dispensed on the roller bar.
■ Press the solution pump button a second time to restart dispensing the solution on the roller bar.
USING THE WET/DRY STICK VACUUM
See Figures 5 -6, page 10.
This product is intended for use on hard surfaces only. Do not use on carpet.
■ Roll the vacuum to the item or surface you want to clean.
■ Insert the battery pack and start the vacuum.
■ Select the appropriate mode for the surface you are cleaning.
NOTE: If necessary, step on the back of the floor head and pull back on the handle to recline and begin cleaning.
■ When cleaning is complete, stop the unit and remove the battery pack.
DRY VACUUMING
See Figure 7, page 10.
Vacuum only items small enough to fit through the vacuum hose. The performance of the wet/dry vacuum will decrease with a full dirty tank. When emptying the dirty tank, check to see if the filter needs cleaning.

CAUTION:
In low relative humidity conditions, vacuuming fine debris with the wet/dry vacuum can cause a static charge resulting in static shock. To reduce static shock while using, add moisture to the air with a humidifier.
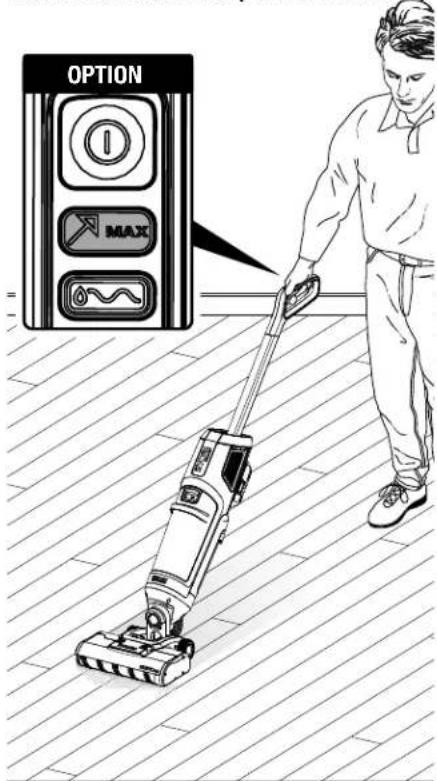
WET VACUUMING
See Figure 8, page 10.
When wet vacuuming, be aware that the wet/dry vacuum is equipped with a water float inside the filter unit housing. This water float is designed to shut off the suction when the dirty tank reaches full wet capacity. When the dirty tank is full, turn the wet/dry vacuum OFF and empty the dirty tank.
OPERATION
EMPTYING THE DIRTY TANK
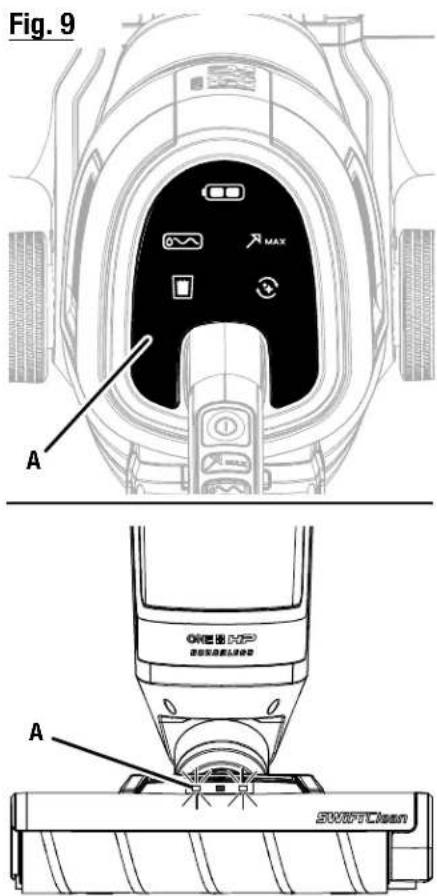
See Figures 9 - 11, page 11.
■ Push dirty tank release button to remove tank from front of vacuum.
■ Pull filter unit housing up and out of dirty tank.
■ Empty dirty tank.
■ Replace filter unit housing.
■ Insert tank back into vacuum and click into place.
NOTE: Be sure the tank is installed properly to avoid any leakage.

WARNING:
When vacuuming liquid, make sure the wet/dry vacuum or battery does not get submerged or doused in liquid, which could cause shock, vacuum failure, or personal injury.

CAUTION:
Do not allow liquid pick up to remain in the dirty tank for extended periods of time. Moisture can develop in the motor compartment and shorten the life of the motor.

CAUTION:
Do not turn unit upside down, as liquid may enter the motor unit.
LED LIGHT FUNCTIONS
When a charged battery pack is installed in the appliance, the LED lights will indicate the status of the appliance when the appliance is powered on.
| STATUS LED ACTION | |||
| Power ON Green LEDs, #1 and #2 ON | |||
| Battery < 50% | Green LED, #1 ON | ||
| Battery Low Red LED, #1 ON | |||
| Self-clean Mode | + | Self-clean and Solution Pump LEDs ON | |
| Overspin | Red Tank Full LED Blinks 6 Times, Then | Shutdown | |
| Dirty tank Full | Red Tank Full LED Blinks 6 Times, Then | Shutdown | |
| MAX Suction Mode | MAX | White MAX Mode LED | ON |
| Solution Pump ON | White Solution Pump LED | ON | |
| Roller Bar Jam | Red Roller Housing LED | ON, Roller Shutdown | |
MAINTENANCE

WARNING:
When servicing, use only identical replacement parts. Use of any other part could create a hazard or cause product damage.
GENERAL MAINTENANCE
Avoid using solvents when cleaning plastic parts. Most plastics are susceptible to damage from various types of commercial solvents and can be damaged by their use. Use clean cloths to remove dirt, dust, oil, grease, etc.

WARNING:
Do not at any time let brake fluids, gasoline, petroleum-based products, penetrating oils, etc., come in contact with plastic parts. Chemicals can damage, weaken or destroy plastic which could result in serious personal injury.

WARNING:
NEVER IMMERSE OR EXPOSE YOUR BATTERY PACK TO CORROSIVE OR CONDUCTIVE FLUIDS OR ALLOW THESE FLUIDS TO FLOW INSIDE THE BATTERY PACK.

CAUTION:
To Reduce The Risk Of Injury From Moving Parts – Remove Battery Before Servicing.

CAUTION:
Risk Of Injury. Brush May Start Unexpectedly. Remove Battery Before Cleaning or Servicing.
CLEANING AND STORAGE
■ Empty and clean the clean tank and dirty tank with warm water and mild soap. Allow to completely dry before storage.
■ The dirty tank should be disinfected as needed and before prolonged storage.
■ Store indoors in a place that is inaccessible to children. Keep away from corrosive agents such as garden chemicals and de-icing salts.
CLEANING THE FILTER
See Figure 12, page 11.
■ Remove the battery pack.
■ Push dirty tank release button to remove tank from front of vacuum.
■ Lift filter tab to remove filter from filter unit housing.
■ Lightly shake any dust or dirt off the filter.
■ Wash with clean, fresh water.
■ Place filter in filter slot of self-cleaning stand to dry.
NOTE: Allow 24 hours for parts to dry completely.
To replace:
■ Replace dry filter back into the filter unit housing.
NOTE: Make sure the filter is seated properly.
When purchasing a replacement filter, request recommended A32SV747F.
USING THE SELF-CLEANING FEATURE
See Figure 13, page 11.
■ Place vacuum into the self-cleaning stand as shown.
NOTE: The electrical connection in the self-cleaning stand must fit into the port on the bottom of the vacuum.
■ Push the self-clean pedal with your foot to begin vacuum self-cleaning feature.
NOTE: The roller will spin for 60 seconds in the tray before coming to a stop.
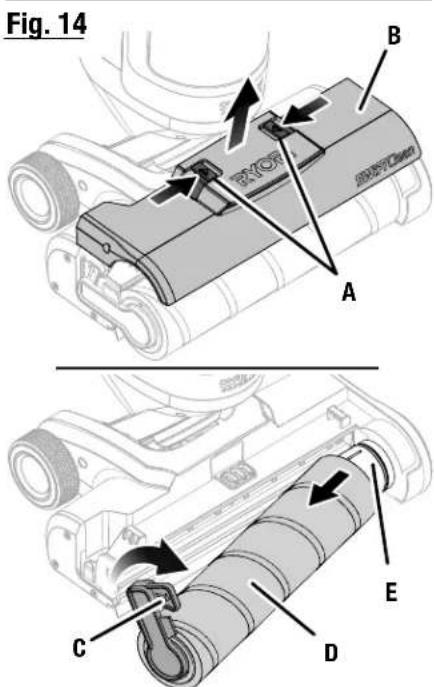
REMOVING THE ROLLER
See Figure 14, page 11.
■ Remove the battery pack.
■ Squeeze roller housing buttons together to remove cover of roller housing.
■ Pull roller lever up and remove roller from vacuum.
■ Rinse roller bar if needed.
■ Place roller bar in roller bar slot of self-cleaning stand to dry.
NOTE: Allow 24 hours for parts to dry completely.
To replace:
■ Place roller bar onto roller cogwheel.
■ Lower roller lever to lock roller onto vacuum.
■ Snap roller bar housing cover back into place.
NOTE: ILLUSTRATIONS START ON PAGE 9 AFTER FRENCH AND SPANISH LANGUAGE SECTIONS.
INSTRUCTIONS IMPORTANTES CONCERNANT LA SÉCURITÉ
CONSERVER CES INSTRUCTIONS
natural_image
Line drawing of a vacuum cleaner with an inset showing the foot and legs (no text or symbols present)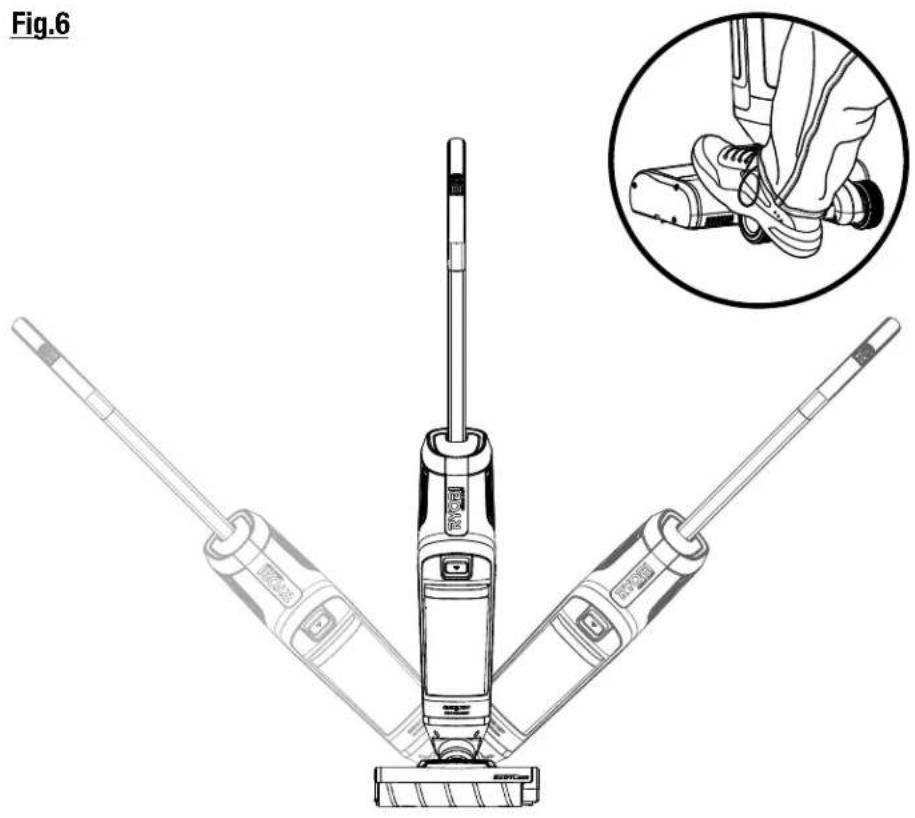
natural_image
Line drawing of a vacuum cleaner with three blades, showing internal components and a close-up inset of the handle (no text or symbols)Fig. 7Fig. 5
DRY VACUUMING
ASPIRATION À SEC
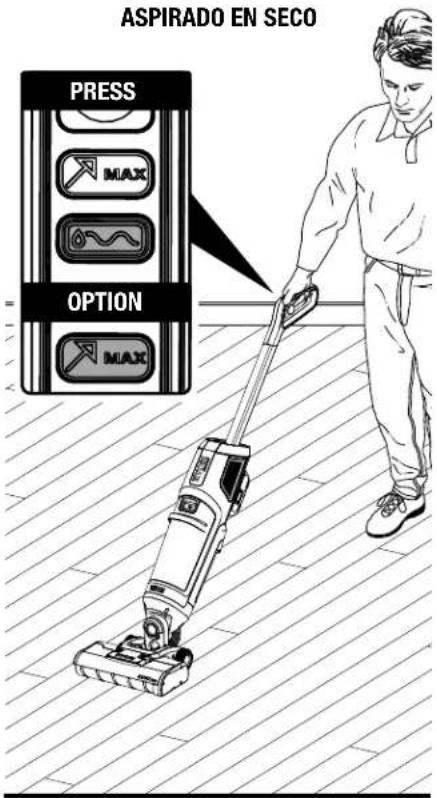
Fig. 8
WET VACUUMING (DEFAULT)
ASPIRATION HUMIDE (DÉFAUT)
ASPIRADO EN HÚMEDO (PREDETERMINADO)
A - Dirty tank (réservoir d'eau sale, tanque sucio) B - Release button (bouton de dégagement, botón de liberación) C - Filter (filtre, filtro) D - Tab (languette, lengüeta)
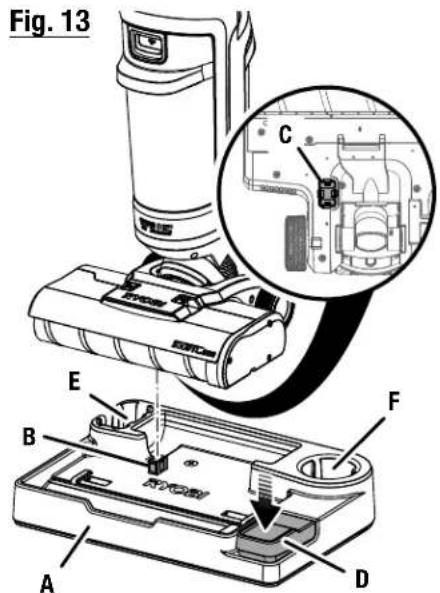
A - Self-cleaning stand (support autonettoyant, soporte de autolimpieza) B - Electrical connection (connexion électrique, conexión eléctrica) C - Port (port, puerto) D - Self-clean pedal (pédale autonettoyante, pedal de autolimpieza) E - Filter slot (fente du filtre, ranura de filtro) F - Roller bar slot (fente pour barre à rouleaux, ranura de la barra de rodillos)
To request service, purchase replacement parts,
locate an Authorized Service Center or obtain Customer or Technical Support:
Visit www.ryobitools.com or call 1-800-525-2579
If any parts or accessories are damaged or missing, do not return this product to the store.
Call 1-800-525-2579 for immediate service.
Please obtain your model and serial number from the product data plate.
This product is covered under a 3-year limited Warranty. Proof of purchase is required.
MODEL NUMBER* ____ SERIAL NUMBER ____
*Model number on product may have additional letters at the end. These letters designate manufacturing information and should be provided when calling for service.
RYOBI is a trademark of Ryobi Limited and is used pursuant to a license granted by Ryobi Limited.