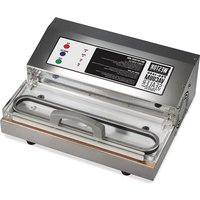
VC14 - Vacuum packaging machines Weston - Free user manual and instructions
Find the device manual for free VC14 Weston in PDF.


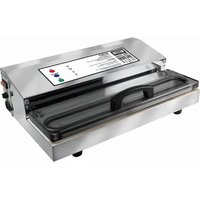
| Product Type | Vacuum Sealer |
| Brand | Weston |
| Model | VC14 |
| Power Supply | 120 V ~ 60 Hz |
| Fuse | 10 amp, Buss type |
| Dimensions (approx.) | 40 x 20 x 15 cm |
| Weight (approx.) | 3.5 kg |
| Main Functions | Automatic and manual vacuum, automatic and manual sealing, emergency stop, built-in cooling |
| Control Buttons | START (green), MANUAL SEAL (blue), STOP (red) |
| Indicator Lights | POWER, VACUUM, SEAL, COOL |
| Compatible Bag Type | 3-5 mil vacuum bags or rolls with embossed or textured lining |
| Sealing Width | Approximately 30 cm (depending on the width of the vacuum channel) |
| Sealing Cycle | Approximately 4 seconds, followed by 10 seconds of cooling |
| Cooling Fan | Built-in, continuous operation when the appliance is on |
| Overload Protection | Automatic power cut-off in case of overload |
| Safety Switch | Prevents activation of the sealing bar if the lid is open |
| Maintenance and Cleaning | Clean with a damp cloth, do not immerse, do not use abrasive cleaners |
| Replaceable Parts | Tape strips (15 mm and 10 mm), oval gaskets for the vacuum channel, fuse |
| Warranty | 2-year limited |
| Usage | Household use only |
Frequently Asked Questions - VC14 Weston
User questions about VC14 Weston
0 question about this device. Answer the ones you know or ask your own.
Ask a new question about this device
Download the instructions for your Vacuum packaging machines in PDF format for free! Find your manual VC14 - Weston and take your electronic device back in hand. On this page are published all the documents necessary for the use of your device. VC14 by Weston.
USER MANUAL VC14 Weston
When using electrical appliances, basic safety precautions should always be followed to reduce the risk of fire, electric shock, and/or injury to persons, including the following:
- Read all instructions.
- This appliance is not intended for use by persons with reduced physical, sensory, or mental capabilities, or lack of experience and knowledge, unless they are closely supervised and instructed concerning use of the appliance by a person responsible for their safety.
- This appliance should not be used by children. Keep the appliance and its cord out of reach of children.
- Close supervision is necessary when any appliance is used near children. Children should be supervised to ensure that they do not play with the appliance.
- Never let the vacuum sealer run unattended. Disconnect the vacuum sealer from the power source before leaving the work area.
- To protect against risk of electric shock, do not immerse cord, plug, or vacuum sealer in water or other liquid.
- Turn the appliance OFF (O then unplug from outlet when not in use, before putting on or taking off parts, and before cleaning. To unplug, grasp the plug and pull from the outlet. Never pull from the power cord.
- Do not operate the appliance with a damaged cord or in the event the appliance has been dropped or
damaged or there are visible signs of damage or it is leaking. To avoid the risk of electric shock, do not disassemble the appliance. Supply cord replacement and appliance repairs must be conducted by a qualified serviceman or the manufacturer. Incorrect assembly might result in a risk of electric shock when the appliance is used after reassembly. Contact Customer Service for information on examination, repair, or adjustment as set forth in the Limited Warranty.
- The use of accessory attachments not recommended by the appliance manufacturer may cause injuries.
- Do not use outdoors.
- Do not let cord hang over edge of table or counter, or touch hot surfaces, including stove.
- Do not disassemble this appliance. Doing so may result in personal injury.
- Do not place on or near a hot gas or electric burner, or in a heated oven.
- Do not use appliance for other than intended purpose.
- CAUTION Burn Hazard. Upper and lower seal bar tape are hot after sealing cycle. Avoid touching while loading bags into chamber seal.
- WARNING Burn Hazard. Operating without seal bar tape in position may cause burns. Never operate without seal bar tape installed.
SAVE THESE INSTRUCTIONS
Other Consumer Safety Information
This appliance is intended for household use only.
WARNING Electrical Shock Hazard: This appliance is provided with a grounded
(3-prong) plug to reduce the risk of electric shock. The plug fits only one way into a grounded outlet. Do not defeat the safety purpose of the plug by modifying the plug in any way or by using an adapter. If the plug does not fit into the outlet, have an electrician replace the outlet.
The length of the cord used on this appliance was selected to reduce the hazards of becoming tangled in or tripping over a longer cord. If a longer cord is necessary, an approved extension cord may be used. The electrical rating of the extension cord must be equal to or greater than the rating of the appliance. The extension cord must be a grounding-type, 3-wire cord. Care must be taken to arrange the extension cord so that it will not drape over the countertop or tabletop where it can be pulled on by children or accidentally tripped over.
To avoid an electrical circuit overload, do not use another high-wattage appliance on the same circuit with this appliance.
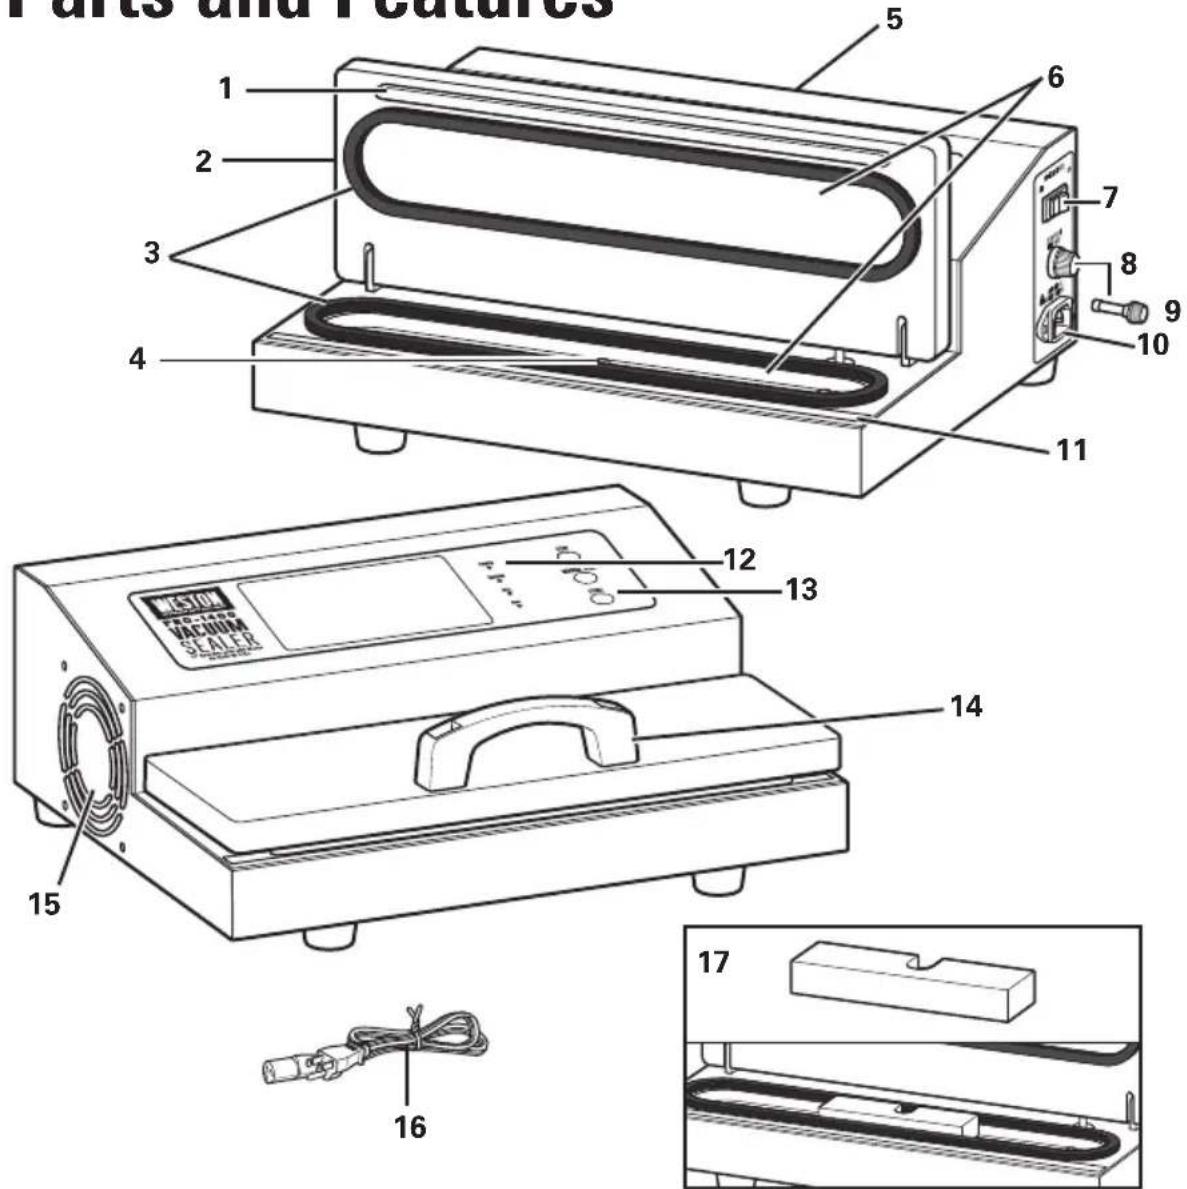
Parts and Features
| # PART DESCRIPTION | |
| 1 Vacuum Lid Seal Bar (covered by 10 mm wide Seal Bar Tape, replaceable) | |
| 2 Vacuum Chamber Lid | |
| 3 Oval Vacuum Chamber Seal (2) | |
| 4 Vacuum Port | |
| 5 Power Cord Storage (back of Vacuum Sealer) | |
| 6 Vacuum Chamber | |
| 7 | Power (ON/OFF [I/O] Indicator Switch |
| 8 Fuse Holder | |
| 9 10-Amp Buss Fuse | |
| # PART DESCRIPTION | |
| 10 Power Cord Port | |
| 11 Lower Seal Bar: a) Lower Seal Bar Tape - 15 mm wide, replaceable; covers (b) b) Seal Heater (5 mm wide ribbon heater, replaceable) | |
| 12 4 Indicator Lights: POWER, VACUUM, SEAL, and COOL | |
| 13 3 Buttons: Red: STOP; Blue: MANUAL SEAL; Green: START | |
| 14 Vacuum Chamber Lid Handle | |
| 15 Internal Cooling Fan | |
| 16 | Power Cord (store on back of Vacuum Sealer) |
| 17 | Spacer |
If any components of this unit are broken, the unit does not operate properly, or you need a replacement instruction manual, visit us on the web at WestonBrands.com.
Protective Tape
There are two (2) factory-installed strips of Seal Bar Tape on the Vacuum Sealer. DO NOT REMOVE THE TAPE!

Figure 1
Seal Bar Tape DO NOT REMOVE!
Oval Vacuum Chamber Seals DO NOT REMOVE!
The Lower Seal Bar and Vacuum Lid Seal Bar are each covered with Seal Bar Tape to protect vacuum bags during sealing (Figure 1). DO NOT remove the Seal Bar Tape. See the "Service Instructions" section of this manual for information on replacing the Seal Bar Tape, if necessary.
Vacuum Bags and Rolls
DO NOT USE HOUSEHOLD BAGS! The Vacuum Sealer is ONLY intended to be used with vacuum bags or rolls 3 mil to 5 mil thick. For best results, only use the recommended vacuum bags or rolls with an embossed or mesh lining for out of chamber sealers. Visit WestonBrands.com to order vacuum bags or rolls.
Any other uses of the Vacuum Sealer not described in this booklet could damage the unit and void the warranty.
Vacuum Chamber Seals
There are two factory-installed Oval Vacuum Chamber Seals on the Vacuum Sealer. When the Vacuum Chamber Lid is closed and downward force applied, they form an airtight seal so the Vacuum Chamber can be evacuated.
To prevent the Oval Vacuum Chamber Seals from deforming when the unit is not in use, ALWAYS store with the Spacer in Vacuum Chamber and the Vacuum Chamber Lid closed. DO NOT store anything on top of Vacuum Sealer.
The Oval Vacuum Chamber Seals may wear over time and require replacement. See the "Service Instructions" section on page 8 of this manual for information on replacing the Oval Vacuum Chamber Seals.
Cooling Fan
The Vacuum Sealer has an Internal Cooling Fan that runs whenever the unit is plugged in and turned ON (I), allowing for repetitive use. To save energy, turn the unit OFF (O) and unplug the Power Cord when not in use.
Current Overload Protection
The Vacuum Sealer is provided with current overload protection and will automatically interrupt the power supply if an overload occurs.
Limit Switch
The Vacuum Sealer is equipped with a switch to prevent actuation of the Seal Heater in manual mode when the Vacuum Chamber Lid is open.
Control Buttons
STOP Button
Press the STOP Button to stop the vacuuming and/or sealing process (Figure 2).
MANUAL SEAL Button
Press the MANUAL SEAL Button during the vacuuming process to initiate the seal (before the preset vacuum pressure is reached, Figure 2).
- The Manual Seal will only work if START is pushed first.
- Press down on the Handle. The Lid must be firmly compressed to prevent overheating Seal Bars.
NOTE: Sealing will start immediately, but the vacuum pump will still be running to ensure the Lid is fully compressed and prevent damage to the Seal Bars.
START Button
Press the START Button to initiate the vacuuming process (the Vacuum Sealer will automatically seal the bag when preset vacuum pressure is reached, Figure 2).
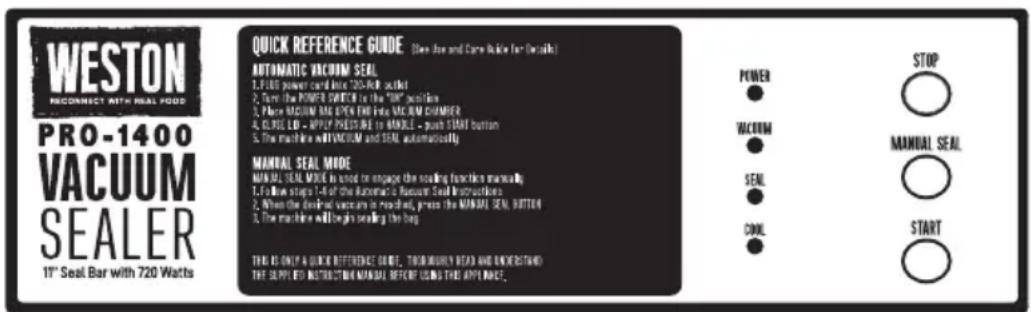
Figure 2
Operating Instructions
WARNING Electrical Shock Hazard. Before cleaning, assembling, or disassembling the vacuum sealer, make sure the vacuum sealer is unplugged.
CAUTION Burn Hazard. The lower seal bar and vacuum lid seal bar get hot. Avoid touching them. Be careful while loading bags into the vacuum chamber.
Tips for Best Results
- Seal Bars remain hot for a brief period after each cycle. Do not touch when hot.
- To prevent premature sealing of the bag, do not place a new bag in the unit when the Seal Bars are still hot.
DO NOT allow liquids, powder, or other small substances to be sucked into the Vacuum Port or it may damage the unit. - Press STOP Button to terminate the vacuuming and/or sealing mode.
- For food with high moisture content, select MANUAL SEAL after vacuum process has started. Press the MANUAL SEAL Button to seal the bag before liquids enter the Vacuum Chamber.
-
When MANUAL SEAL is selected, the unit will continue to pull a vacuum while sealing to ensure a good seal.
-
Remove Spacer from Vacuum Chamber.
- Make sure the Power Indicator Switch is in the OFF (position).
-
Plug the Power Cord into an outlet. Turn the Power Indicator Switch to ON (I). The POWER Light on the Control Panel and the Power Indicator Switch will both illuminate, and the Internal Cooling Fan will run.
-
Open the Vacuum Chamber Lid.
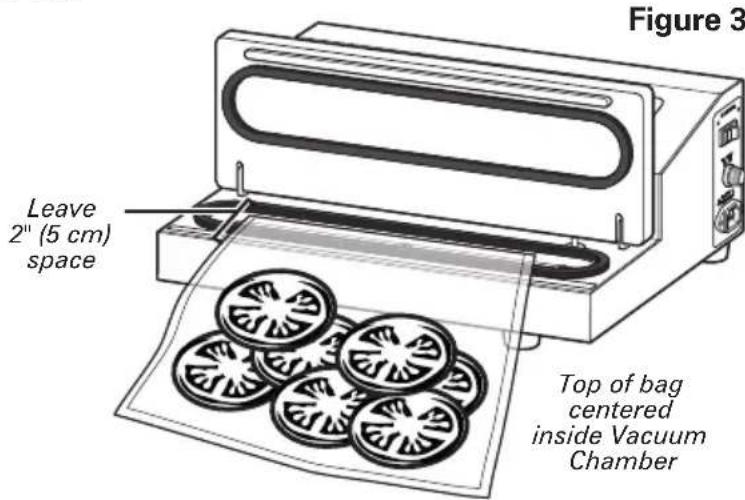
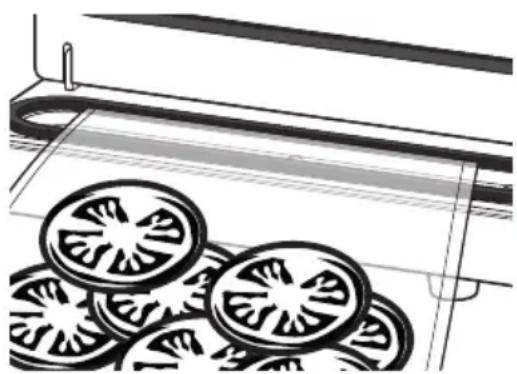
- Fill a vacuum bag with the product you want to seal. Leave at least 2 (5 cm) of space between the open end of the bag and product (Figure 3).
-
Load the open end of the bag into the center of the Vacuum Chamber. Place the bag close to, but do not cover, the Vacuum Port. Be careful not to touch either of the Seal Bars which may be hot from a previous heating cycle.
-
Close the Vacuum Chamber Lid. Make sure there are no folds or creases in the bag in the sealing area.
Operating Instructions (cont.)
- Press down on the Vacuum Lid Handle to form a tight seal.
- Press the START Button to initiate the vacuuming process (the VACUUM Light will illuminate). Release the Vacuum Lid Handle at the first sign of bag collapse. The Vacuum Sealer will automatically seal the bag when preset vacuum pressure is reached in the Vacuum Chamber. Sealing lasts for 4 seconds (the SEAL Light will illuminate).
- To manually seal a bag, press the MANUAL SEAL Button at any time during the vacuuming process. MANUAL SEAL is used for delicate items, making bags, and to seal before liquid enters the Vacuum Chamber.
- You can stop the vacuuming and sealing process at any time by pressing the STOP Button.
- Sealing is complete when you hear the audible release of the vacuum from the Vacuum Chamber (the COOL Light illuminates). The cycle includes a cooling period of approximately 10 seconds (the COOL Light will flash). DO NOT try to open the Vacuum Chamber before the vacuum is released or unit damage may occur. NOTE: For best performance, allow 20 seconds between cycles to avoid overheating the unit.
- Open the Vacuum Chamber Lid and remove the bag.
- Turn the Power Indicator Switch OFF (D) and unplug the Power Cord when you are done.
Preparing Vac Bags From a Roll
- Make sure the Power Indicator Switch is in the OFF (position. Plug the Power Cord into an outlet.
- Turn the Power Indicator Switch ON (I). The POWER Light on the display and Power Indicator Switch both will illuminate and the Internal Cooling Fan will run.
- Cut a vacuum bag to the length you want from a roll.
- Open the Vacuum Chamber Lid.
- Place either open end of the bag in the Vacuum Chamber.
- Close the Vacuum Chamber Lid. The bag end should be sandwiched between the Vacuum Lid Seal Bar and Lower Seal Bar. Make sure there are no wrinkles or creases in the bag in the sealing area.
- Press and hold the Vacuum Lid Handle down. You may need to continue holding the bag.
- Press the START Button (this will engage the pump). Press the MANUAL SEAL Button to seal the vacuum bag.
- Sealing is complete when you hear the audible release of the vacuum from the Vacuum Chamber (the COOL Light illuminates). The cycle includes a cooling period of approximately 10 seconds (the COOL Light will flash). DO NOT try to open the Vacuum Chamber before the vacuum is released or unit damage may occur.
NOTE: For best performance, allow 20 seconds between cycles to avoid overheating the unit.
Preparing Vac Bags From a Roll (cont.)
- Open the Vacuum Lid and remove the bag.
- Turn the Power Indicator Switch OFF (O) and unplug the Power Cord when you are done.
Care and Cleaning
WARNING Electrical Shock Hazard. Before cleaning, assembling, or disassembling the vacuum sealer, make sure the vacuum sealer is unplugged.
NEVER IMMERSE the Vacuum Sealer in water or other liquid.
- Make sure the Vacuum Sealer has completely cooled before cleaning it.
- Wipe clean all outside surfaces including the plastic Vacuum Chamber and Vacuum Lid with a damp cloth or paper towel. Most household spray cleaners are safe to use. Avoid spraying directly into the Internal Cooling Fan on the left side of the unit. DO NOT use abrasive cleansers! Abrasive cleansers will spoil the clarity of the Vacuum Lid.
- Be careful while cleaning not to peel or damage the strips of Seal Bar Tape covering the Lower Seal Bar and Vacuum Lid Seal Bar.
- Dry all surfaces and close the Vacuum Chamber Lid before storing the Vacuum Sealer.
- To prevent Oval Vacuum Chamber Seals from deforming, ALWAYS store with Spacer in Vacuum Chamber and Vacuum Chamber Lid closed.
- DO NOT store anything on top of Vacuum Sealer.
Service Instructions
WARNING Electrical Shock Hazard. Before cleaning, assembling, or disassembling the vacuum sealer, make sure the vacuum sealer is unplugged. Some parts of the Vacuum Sealer may need replacing after extensive use. A Vacuum Sealer Maintenance Kit (sold separately) may be necessary for the Vacuum Sealer to properly function.
REPLACING THE OVAL VACUUM CHAMBER SEALS:
- Make sure Power Indicator Switch is in OFF (O) position and unplug the Power Cord from the electrical outlet.
- Make sure the unit is completely cool.
- Open the Vacuum Chamber Lid.
- Remove the Oval Vacuum Chamber Seal from the groove on the underside of the Vacuum Chamber Lid.
- Remove the Oval Vacuum Chamber Seal from the groove in the lower Vacuum Chamber.
- Position a new Oval Vacuum Chamber Seal on the groove in the Vacuum Chamber Lid. Work Seal into the groove. Repeat the process on the lower Vacuum Chamber.
Service Instructions (cont.)
REPLACING THE SEAL BAR TAPE:
-
Make sure Power Indicator Switch is in OFF (O) position and remove the Power Cord from the electrical outlet.
-
Make sure the unit is completely cool and unit is unplugged.
-
Open the Vacuum Chamber Lid.
-
At either end of the Seal Bar Tape, carefully pull up the Tape covering the Seal Heater. Grasp the loose end and slowly pull the Seal Bar Tape back over itself until fully removed.
-
Repeat step 4 for the Seal Bar Tape covering Vacuum Lid Seal Bar. DO NOT remove the Vacuum Lid Seal Bar.
-
Remove the backing from a new 15mm wide strip of Seal Bar Tape for the Seal Heater. Be careful not to allow the Seal Bar Tape to contact anything, including itself, while the adhesive side is exposed.
-
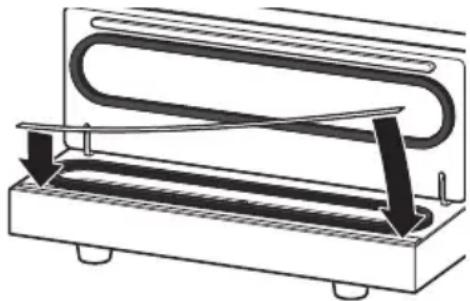
Hold one end of the Seal Bar Tape in each hand. Stick the left end of the Seal Bar Tape to the flat area on the white plastic housing, starting just left of the Seal Heater. Apply the Seal Bar Tape from left to right over the Seal Heater until done. Make sure there are no wrinkles or folds in the Seal Bar Tape once applied. The Seal Bar Tape should fully cover the entire opening and the Seal Heater.
-
Remove the backing from a new narrow 10mm wide strip of Seal Bar Tape for the Vacuum Lid Seal Bar. Stick the left end of the Seal Bar Tape onto the left end of the Seal Bar. The Seal Bar Tape and seal ends should be flush. Apply the Seal Bar Tape from left to right over the Vacuum Lid Seal Bar until done. Make sure there are no wrinkles or folds in the Seal Bar Tape once applied. The Seal Bar Tape should fully cover the Vacuum
Replacing the Fuse
If the Vacuum Sealer does not operate when it is plugged in and turned on, try any or all of the following:
-
Make sure the 10-Amp Buss Fuse is not blown. The Fuse is located on the right side of the unit directly above the Power Cord Port (Figure 4). Turn OFF and unplug the Vacuum Sealer. Twist off and remove the Fuse Holder. Remove and check the Fuse. The thin metal band in the center of the Fuse should be clean and unbroken. If it is burned and/or broken, replace it with a new 10-Amp Fuse. Replace the Fuse Holder.
-
Make sure the connector at the end of the Power Cord is plugged completely into the Power Cord Port.
-
Make sure the Power Cord is not damaged. DO NOT use a damaged Power Cord. Contact Customer Service for information on part replacement.
-
Try connecting the Power Cord plug to another electrical outlet.
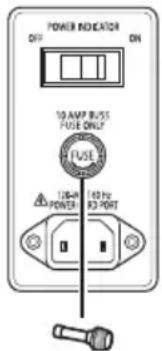
Figure 4
Storage Lifespan Guidelines
IMPORTANT: Vacuum packaging is NOT a substitute for refrigeration. Vacuum-packed perishable foods still require refrigeration.
- NEVER thaw frozen foods at room temperature. Thaw frozen foods in a refrigerator or microwave oven.
- In general, the colder the temperature at which foods are stored, the longer the shelf life.
- Handle vacuum sealer bags with care. Avoid damaging them. A damaged bag will not hold a seal.
- Only use information in the following chart as a guideline. Refer to the Operating Instructions section of this manual. Actual storage life spans may vary. Check all food for spoilage before use.
| FOOD TYPE | STORAGE LOCATION NORMAL SHELF LIFE | VACUUM-PACKED SHELF LIFE | |
| LARGE CUTS OF MEAT GROUND MEAT FISH | Freezer Freezer Freezer | 6 months 4 months 6 months | 2-3 years 1 year 2 years |
| For best results, freeze meats & fish for 1-2 hours before vacuum packing to help prevent moisture and juices from interfering with the seal of the vacuum bag. | |||
| COFFEE BEANS COFFEE BEANS FLOUR, RICE, SUGAR | Room temperature Freezer Room Temperature | 4 weeks 6-9 months 6 months | 16 months 2-3 years 1-2 years |
| For best results, powder or grainy substances should be kept in their original container or bag, then placed in a vacuum bag for sealing to prevent interfering with the seal of the vacuum bag. | |||
| BERRIES strawberries, raspberries, blackberries BERRIES cranberries, huckleberries, blueberries | Refrigerator Refrigerator | 1-3 days 3-6 days | 1 week 2 weeks |
| To prevent berries from being crushed by the Vacuum Sealer, it is best to freeze items before packing. Spread the berries out on a cookie sheet to allow them to freeze individually. Berries frozen in a large block will be difficult to vacuum seal due to the many small air pockets that would form between the berries. | |||
| CHEESE Refrigerator 1-2 weeks 4-8 weeks If vacuum-packed cheese is used often, make sure the vacuum bag is long enough to allow for repeated sealing. For shredded cheese, place a paper towel inside the vacuum bag, on top of the cheese to prevent the cheese from being sucked into the Vacuum Sealer or interfering with the sealing of the bag. | |||
| COOKIES, CRACKERS, BREADS with periodical opening | Room Temperature 1 | 2 weeks 3-6 weeks | |
| Freeze soft, airy foods for 1-2 hours prior to vacuum packing, to retain shape & texture. | |||
| PASTA, GRAINS, DRIED BEANS NUTS | Room Temperature Room Temperature | 6 months 6 months | 1-1/2 years 2 years |
| Dried foods with sharp edges should be wrapped in a paper towel or similar material to prevent the sharp edges from puncturing the vacuum bag. | |||
| LETTUCE Refrigerator 3-6 days 2 weeks Wash & thoroughly dry leafy vegetables before vacuum packaging. | |||
| VEGETABLES Freezer 8 months 2-1/2 years | |||
| To maximize the taste of vegetables, blanch them before vacuum packaging. Blanching cooks the vegetables very briefly, sealing in the flavor, color and texture, leaving the vegetables cooked but still crisp. Vegetables can be blanched in boiling water in the microwave; most vegetables only require 2-3 minutes (corn on the cob requires 6-11 minutes). Then immerse the vegetables in cold water to stop the cooking process. Dry the vegetables, then vacuum pack. Table adapted from Dr. G.K.York, Dept. of Food Science & Tech, U of California, Davis. | |||

Two-Year Limited Warranty
This warranty applies to products purchased and used in the U.S. and Canada. This is the only express warranty for this product and is in lieu of any other warranty or condition.
This product is warranted to be free from defects in material and workmanship for a period of two (2) years from the date of original purchase. During this period, your exclusive remedy is repair or replacement of this product or any component found to be defective, at our option. If the product or component is no longer available, we will replace with a similar one of equal or greater value. This warranty does not cover unauthorized repairs or service to products, products sold "as-is" by retailers, glass, filters, wear from normal use, use not in conformity with the printed directions, or damage to the product resulting from accident, alteration, abuse, or misuse. This warranty extends only to the original consumer purchaser or gift recipient and is not transferable. Keep the original sales receipt, as proof of purchase is required to make a warranty claim. This warranty is void if the product is subjected to any voltage and waveform other than as specified on the rating label (e.g., 120V 60Hz ).
We exclude all claims for special, incidental and consequential damages caused by breach of express or implied warranty. All liability is limited to the amount of the purchase price. Every implied warranty, including any statutory warranty or condition of merchantability or fitness for a particular purpose, is disclaimed except to the extent prohibited by law, in which case such warranty or condition is limited to the duration of this written warranty.
This warranty gives you specific legal rights. You may have other legal rights that vary depending on where you live. Some states or provinces do not allow limitations on implied warranties or special, incidental, or consequential damages, so the foregoing limitations may not apply to you.
To make a warranty claim, do not return this appliance to the store. In the U.S. and Canada, please visit WestonBrands.com, email customer.service@westonbrands.com, or write Weston Brands, LLC, 261 Yadkin Road, Southern Pines, NC 28387. For faster service, locate the model, type, and series numbers on your appliance.
PRECAUTIONS IMPORTANTES
NE PAS ENLEVER CES BANDES!

Figure 1
Bande de ruban
NE PAS ENLEVER!
Garnitures ovales du canal d'aspiration NE PAS ENLEVER!
Touche MANUAL SEAL (scellage manuel)
Mixcoac, Benito Juarez,
"Y" y/o "MX" y/o "MXY" y/o "Z".
ATTENTION!
PLEASE INSPECT THIS PACKAGE THOROUGHLY FOR MISSING PARTS OR ANY PRODUCT DAMAGE. IF YOUR PRODUCT CONTAINS SHIPPING DAMAGE, PLEASE CONTACT RETAILER FOR ASSISTANCE.
For all other questions regarding product usage, missing parts, product damage, difficulty or warranty activation, please contact the Weston Brands Customer Service Team:
Customer-service@WestonBrands.com
U.S. Residents Customer Service Line: 1-800-814-4895 (Outside U.S. Call: 001-216-901-6801)
Weston Brands, LLC, 261 Yadkin Rd., Southern Pines, NC 28387
WestonBrands.com
Please DO NOT return this item to the retailer before contacting
Weston Brands Customer Service.
SAVE THESE INSTRUCTIONS!
Refer to them often and use them to instruct others.
ATTENTION!
VEUILLEZ INSPECTER CET EMBALLAGE AVEC SOIN POUR Y DETECTOR
TOUTE PIECE MANQUANTE OU ENDOMMAGEE.
SI DES PIECES ONT ETÉ ENDOMMAGEES PENDANT LE TRANSPORT, VEUILLEZ
COMMUNIQUE AVEC LE DETAILLANT POUR OBTENIR DE L'AIDE.
Customer-service@WestonBrands.com
Weston Brands, LLC, 261 Yadkin Rd., Southern Pines, NC 28387
WestonBrands.com
Customer-service@WestonBrands.com
Weston Brands, LLC, 261 Yadkin Rd., Southern Pines, NC 28387
WestonBrands.com


- SAVE THESE INSTRUCTIONS
- OTHER CONSUMER SAFETY INFORMATION
- PROTECTIVE TAPE
- VACUUM BAGS AND ROLLS
- VACUUM CHAMBER SEALS
- COOLING FAN
- CURRENT OVERLOAD PROTECTION
- LIMIT SWITCH
- CONTROL BUTTONS
- STOP BUTTON
- MANUAL SEAL BUTTON
- START BUTTON
- OPERATING INSTRUCTIONS
- TIPS FOR BEST RESULTS
- OPERATING INSTRUCTIONS (CONT.)
- PREPARING VAC BAGS FROM A ROLL
- PREPARING VAC BAGS FROM A ROLL (CONT.)
- CARE AND CLEANING
- SERVICE INSTRUCTIONS
- REPLACING THE OVAL VACUUM CHAMBER SEALS
- SERVICE INSTRUCTIONS (CONT.)
- REPLACING THE SEAL BAR TAPE
- REPLACING THE FUSE
- STORAGE LIFESPAN GUIDELINES
- TWO-YEAR LIMITED WARRANTY
- PRECAUTIONS IMPORTANTES
- TOUCHE MANUAL SEAL (SCELLAGE MANUEL)
- ATTENTION
Brand : Weston
Model : VC14
Category : Vacuum packaging machines