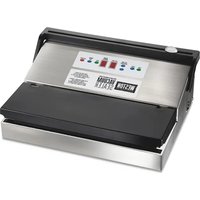
PRO-1100 - Vacuum packaging machines Weston - Free user manual and instructions
Find the device manual for free PRO-1100 Weston in PDF.


| Product Type | Vacuum Sealer |
| Brand | Weston |
| Model | PRO-1100 |
| Power Supply | 120 V, 60 Hz, 8 A |
| Fuse | 8 A time-delay |
| Vacuum Pump | 2 pistons, powerful suction |
| Operating Modes | Automatic, manual, pulse, accessory |
| Sealing Time Adjustment | Yes, in one-second increments |
| Digital Display | LED for vacuum cycle and sealing time |
| Roll Holder and Bag Cutter | Integrated, for bags up to 28 cm wide |
| Vacuum Chamber Seals | Two replaceable oval seals |
| Sealing Bar Tape | Protective, replaceable via maintenance kit |
| Thermal Protection | Automatic shutdown in case of overheating |
| Safety | Safety switch, grounding |
| Material | Sturdy plastic, stainless steel (bar) |
| Dimensions (W x D x H) | Approximately 45 x 25 x 15 cm |
| Weight | Approximately 4.5 kg |
| Included Accessories | Power cord, user guide |
| Warranty | 2 years (parts and labor) |
| Maintenance | Clean with a damp cloth, replace seals and tape if necessary |
Frequently Asked Questions - PRO-1100 Weston
User questions about PRO-1100 Weston
0 question about this device. Answer the ones you know or ask your own.
Ask a new question about this device
Download the instructions for your Vacuum packaging machines in PDF format for free! Find your manual PRO-1100 - Weston and take your electronic device back in hand. On this page are published all the documents necessary for the use of your device. PRO-1100 by Weston.
USER MANUAL PRO-1100 Weston
RECONNECT WITH REAL FOOD
PRO-1100 STAINLESS STEEL
VACUUM SEALER
65-0601-W
DUE TO CONSTANT FACTORY IMPROVEMENTS, THE PRODUCT PICTURED MIGHT DIFFER SLIGHTLY FROM THE PRODUCT IN THIS BOX. 020915
GENERAL SAFETY RULES 3
COMPONENT LIST 4-5
PROTECTIVE TAPE 6
COOLING FAN 6
VACUUM CHAMBER SEALS 7
LIMIT SWITCH 7
THERMAL OVERLOAD PROTECTOR 7
ASSEMBLY 7
GROUNDING 8
CLEANING....B
CONTROL PANEL 9
USING THE ROLL HOLDER & CUTTER 10
INITIAL TESTING OF THE BAG SEAL 11
AUTOMATIC MODE OPERATION 12
MANUAL MODE OPERATION 13
MAINTENANCE KIT INSTRUCTIONS 14
TROUBLESHOOTING 15-16
REPLACING THE FUSE 17
STORAGE LIFESPAN GUIDELINES 18
VACUUM PACKAGING GUIDELINES 19
FOOD SAFETY 20
WARRANTY INFORMATION 22
FONCTIONNEMENT EN MODE MANUEL 57
DIRECTIVES POUR LA TROUSSE D'ENTRETIEN 58
DEPANNAGE 59-60
REMPLACEMENT SU FUSIBLE 61
GUIDE DE CONSERVATION DES ALIMENTS EMBALLÉS 62
GUIDE D'EMBALLAGE SOUS VIDE 63
SECURITE ALIMENTAIRE 64
INFORMATION SUR LA GARANTIE 66
GENERAL SAFETY RULES
READ AND FULLY UNDERSTAND ALL INSTRUCTIONS AND WARNINGS PRIOR TO USING THIS UNIT. YOUR SAFETY IS MOST IMPORTANT! FAILURE TO COMPLY WITH PROCEDURES AND SAFE GUARDS MAY RESULT IN SERIOUS INJURY OR PROPERTY DAMAGE. REMEMBER: YOUR PERSONAL SAFETY IS YOUR RESPONSIBILITY!
- ALWAYS DISCONNECT Vacuum Sealer from power source before servicing, changing accessories or cleaning the unit.
- Plug the Vacuum Sealer into a standard 120 Volt, 60 Hz wall outlet. Avoid using extension cords.
- DO NOT USE the Vacuum Sealer if the Power Cord, Plug or any other parts are damaged. If the Power Cord or the Vacuum Sealer is damaged, call Customer Service. DO NOT ATTEMPT TO REPLACE THE CORD. Be sure to not allow the Power Cord to drape into your work area. Check that all parts are operating properly, and perform the intended functions. Check for any other conditions that may affect the operation.
- NEVER use any accessories or parts from other manufacturers. Doing so will VOID YOUR WARRANTY and may cause fire, electrical shock or injury.
- Reduce risk of unintentional starting. Make sure the Power Switch is in the "OFF" position before attaching to the power source.
- KEEP FINGERS CLEAR of the Heat Sealing Bar and Seal Bar Tape AT ALL TIMES, these areas become HOT. Doing so may cause serious injury.
- DO NOT take this appliance apart; doing so will VOID YOUR WARRANTY and may result in personal injury.
8 TO PROTECT AGAINST RISK OF ELECTRICAL SHOCK: DO NOT SUBMERGE THE VACUUM SEALER INTO WATER OR LIQUID. BE SURE THE VACUUM SEALER IS DISCONNECTED FROM THE POWER SOURCE BEFORE CLEANING. Follow the "Cleaning Instructions" in this booklet. NEVER rinse appliance Vacuum Sealer under tap.
9. NEVER LEAVE THE VACUUM SEALER UNATTENDED. Be safe, DISCONNECT the Vacuum Sealer from power source before leaving the work area. Close supervision is necessary when any appliance is used near children. This appliance is NOT to be used by children.
10. DO NOT let the Power Cord hang over edge of work surface.
11. Be sure the Vacuum Sealer is on a stable work surface. Be sure all the Vacuum Sealer Feet are stable.
12. DO NOT use the Vacuum Sealer outdoors.
13. DO NOT use the Vacuum Sealer while under the influence of drugs, medications or alcohol.
14. The Vacuum Sealer is ONLY intended to be used with VACUUM BAGS. For best results, only use the recommended vacuum bags. DO NOT USE HOUSEHOLD BAGS! Any other uses of the Vacuum Sealer, other than the uses described in this booklet, could potentially damage the appliance and void the warranty!
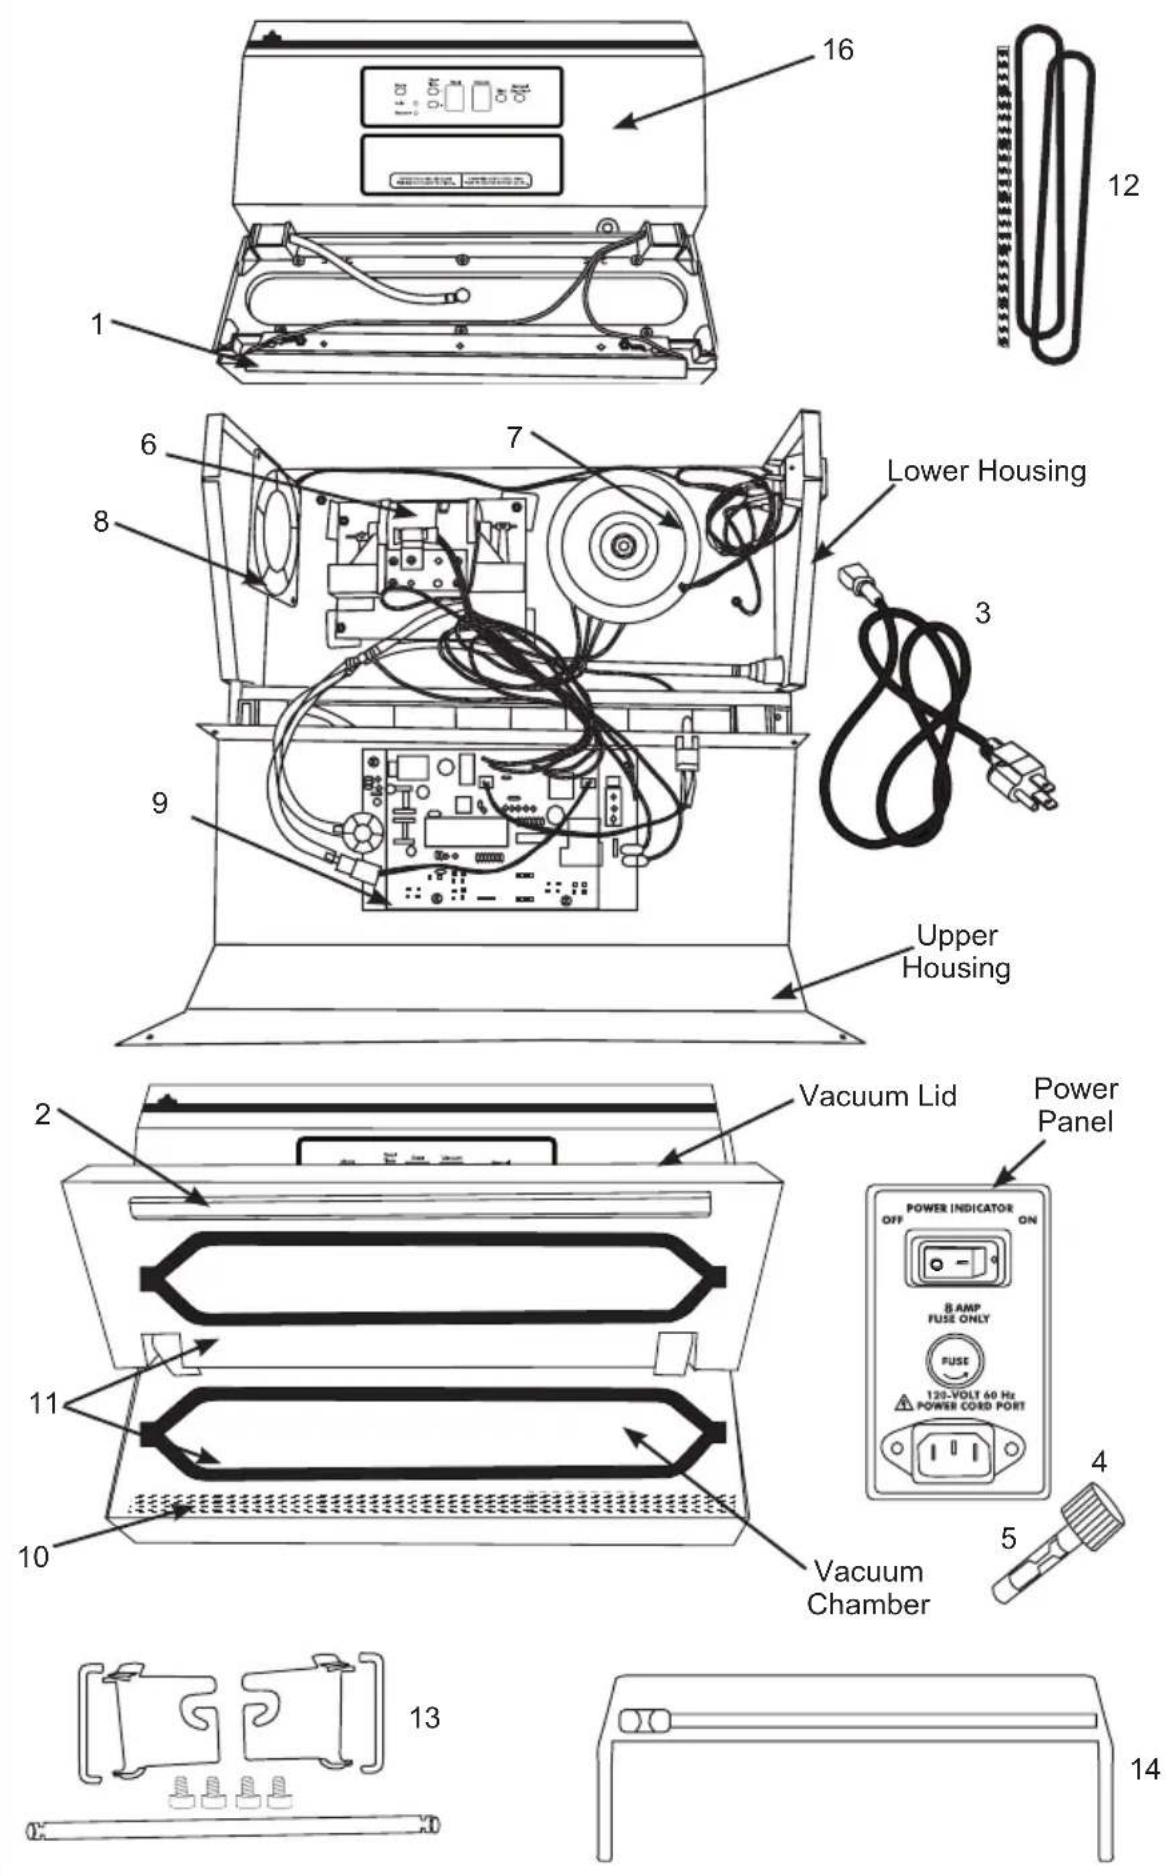
COMPONENT LIST
| DIAGRAM NUMBER PART DESCRIPTION PART NUMBER | ||
| 1 SEAL WIRE 08-0627 | ||
| 2 SEAL BAR INSULATOR 08-0625 | ||
| 3 POWER CORD 08-0402 | ||
| 4 FUSE HOLDER 08-0604 | ||
| 5 8-AMP FUSE 08-0605 | ||
| 6 VACUUM PUMP 08-0639 | ||
| 7 TRANSFORMER 08-0641 | ||
| 8 | FAN | 08-0643 |
| 9 CIRCUIT BOARD | 65-0638 | |
| VACUUM SENSOR | 65-0643 | |
| 10 | SEAL BAR TAPE (BLACK) | SEE MAINTENANCE KIT |
| 11 | CHAMBER SEAL (2) | SEE MAINTENANCE KIT |
| 12 | VACUUM SEALER MAINTENANCE KIT: SEAL BAR TAPE (BLACK) CHAMBER SEALS(2) | 65-0701 |
| 13 | ROLL HOLDER KIT INCLUDES: ROLL HOLDER ROD ROD HOLDING ARMS (2) BRACKETS WITH SCREWS (2 BRACKETS, 4 SCREWS) | 65-0639 |
| 14 | BAG CUTTER KIT INCLUDES: BLADE BLADE HOLDER | 65-0640 |
| 15 | BLADE | 65-0641 |
| 16 | CONTROL PANEL | 65-0642 |
If any components of this unit are broken, the unit does not operate properly or you need a replacement instruction manual, visit us on the web at
WestonProducts.com
Or call Weston Products LLC Toll Free at 1-800-814-4895
Monday thru Friday 8:00am-5:00pm ET. Outside the U.S. call 001-440-638-3131
BEFORE YOU START BAG SEALING
Before using the Vacuum Sealer, familiarize yourself with the bag sealing functions. A vacuum bag is sealed when the Seal Bar Heating Element is activated and heats the bag to its melting point, which then permanently welds the bag layers together, sealing the bag shut. This appliance comes pre-set from the factory to engage the Seal Bar Heating Element for 3 seconds. This is the correct amount of time required to fully seal Vacuum Bags. Different brands of vacuum bags may require slightly more or slightly less sealing time.
Test seal a couple of bags to be sure that the Seal Time is set properly. The Seal Time may need to be increased (+) or decreased (-) to optimally seal a bag.
PROTECTIVE TAPE
There is one factory installed strip of Seal Bar Tape on the Vacuum Sealer. DO NOT REMOVE THE TAPE!
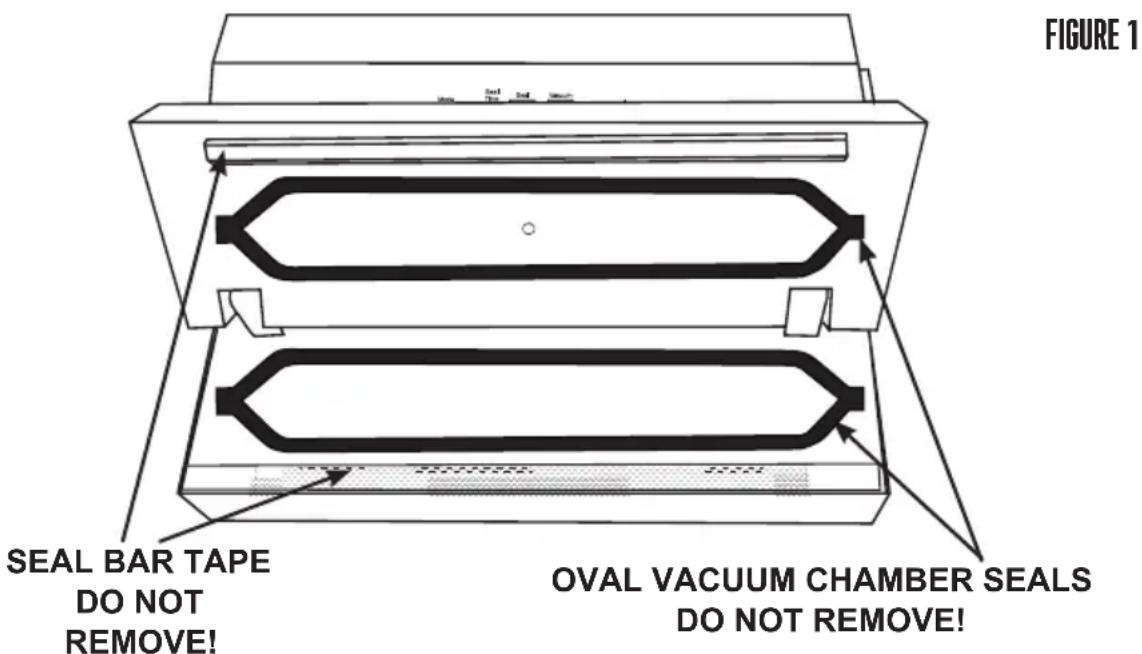
The Seal Bar Heating Element is covered with Seal Bar Tape to protect vacuum bags during sealing (Figure 1). DO NOT remove the Seal Bar Tape. See the “Maintenance Kit” section of this manual for information on replacing the Seal Bar Tape, if necessary.
COOLING FAN
The Vacuum Sealer has an Internal Cooling Fan that runs whenever the unit is plugged in and turned on. To save energy, turn the unit "OFF" and unplug the Power Cord when not in use.
VACUUM CHAMBER SEALS
There are two factory-installed Oval Vacuum Chamber Seals on the Vacuum Sealer. When the Vacuum Lid is closed and downward force applied, they form an airtight seal so the Vacuum Chamber can be evacuated.
The Oval Vacuum Chamber Seals may wear over time and require replacement. See the “Maintenance Kit” section of this manual for information on replacing the Oval Vacuum Chamber Seals, if necessary.
LIMIT SWITCH
The Vacuum Sealer is equipped with a switch to prevent actuation of the Seal Bar Heating Element in manual mode when the Vacuum Lid is open. When the Vacuum Lid is closed, heat made by the Seal Bar Heating Element is absorbed by the vacuum bag and Vacuum Lid Seal.
When the Vacuum Lid is open, there is no means to dissipate the heat and unit damage may occur.
THERMAL OVERLOAD PROTECTOR
The Vacuum Sealer will automatically shut down if it overheats. If this occurs, turn the unit off and open the Vacuum Lid. Resume normal operation after the unit cools or about 20 minutes.
To help prevent overheating, wait at least 20 seconds between cycles with the Vacuum Lid open. Avoid touching the Seal Bar Tape. The Seal Bar Tape will remain hot for a brief period of time after each sealing cycle.
ASSEMBLY
- Place the Vacuum Sealer on a flat, dry surface.
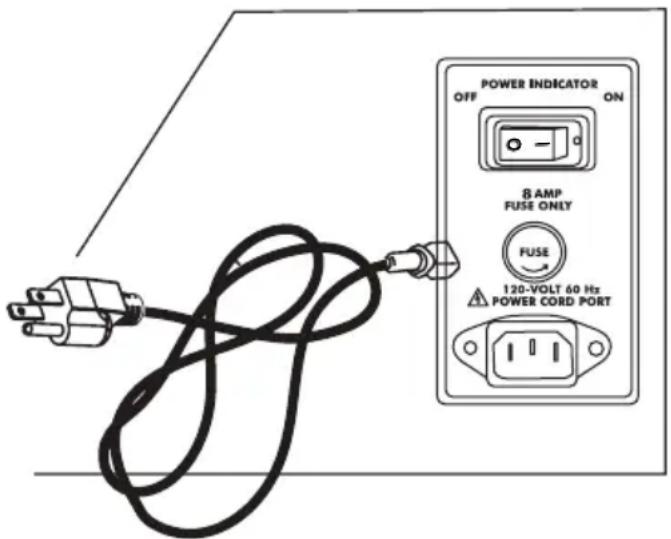
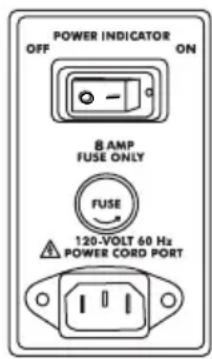
- Plug the female end of the Power Cord into the Power Supply Port on the right side of the appliance (Figure 2).
- Plug the male end of the Power Cord into a standard, grounded 120-volt household electrical outlet. DO NOT attempt to modify the plug to fit into an unsuitable outlet.
FIGURE 2
NOTE: The Vacuum Sealer is ONLY intended to be used with VACUUM BAGS. For best results, only use the recommended vacuum bags with an embossed or mesh lining. DO NOT USE HOUSEHOLD BAGS! Any other uses of the Vacuum Sealer, other than the uses described in this booklet, could potentially damage the appliance and void the warranty!
GROUNDING INSTRUCTIONS
GROUNDING
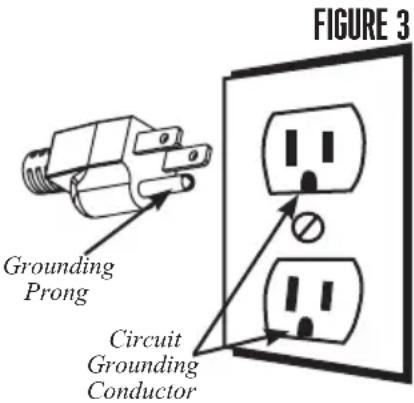
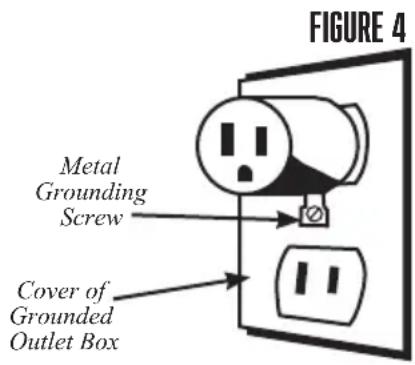
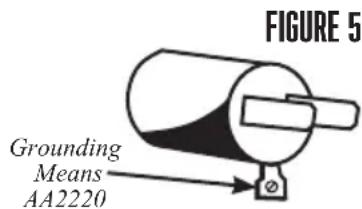
This appliance must be grounded while in use to protect the operator from electrical shock. The appliance is equipped with a 3-conductor cord and a 3-prong grounding type plug to fit the proper grounding-type receptacle. The appliance has a plug that looks like Figure 3. An adapter, Figure 4, should be used for connecting Figure 3 plugs to two-prong receptacles. The grounding tab which extends from the adapter must be connected to a permanent ground such as a properly grounded outlet box as shown in Figure 5 using a metal screw.
EXTENSION CORDS
Use only 3-wire extension cords which have 3-prong grounding-type plugs and a 3-pole cord connector that accepts the plug from the appliance. Use only extension cords having an electrical rating not less than the rating of the appliance. Do not use damaged extension cords. Examine extension cord before using and replace if damaged. Do not abuse extension cord and do not yank on any cord to disconnect. Keep cord away from heat and sharp edges.
CLEANING INSTRUCTIONS
- NEVER IMMERSE the Vacuum Sealer in water or other liquid.
- Make sure the Vacuum Sealer has completely cooled before cleaning it.
- Wipe clean all outside surfaces including the Plastic Vacuum Chamber and Vacuum Lid with a damp cloth or paper towel. Most household spray cleaners are safe to use. Avoid spraying directly into the vent on the left side of the unit. DO NOT use abrasive cleansers!
- Be careful while cleaning not to peel or damage the strip of Seal Bar Tape covering the Seal Bar Heating Element.
- Dry all surfaces and close the Vacuum Lid before storing the Vacuum Sealer.
WARNING! Before cleaning, assembling or disassembling the appliance, make sure the appliance is OFF and the PLUG IS REMOVED FROM THE OUTLET/POWER SOURCE!
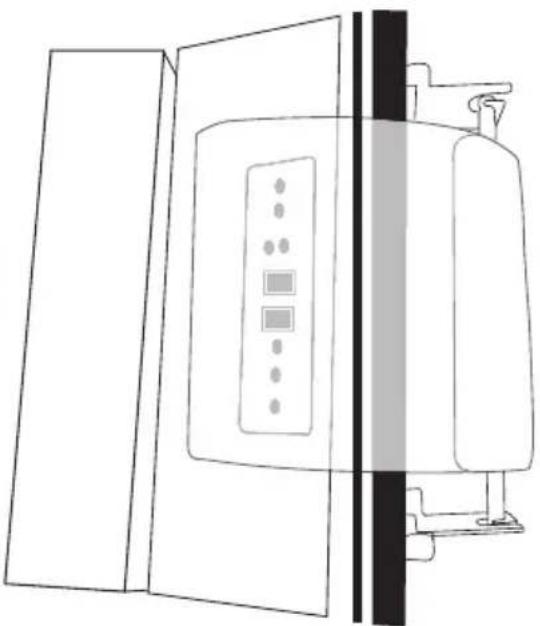
CONTROL PANEL
- Start Button: The Start Button starts the 2-Piston Vacuum Pump, which engages the air evacuation process.
- Cancel Button: This button is used to stop the vacuum cycle at any time.
- Seal Time + and - Buttons: The Seal Time Button adjusts the number of seconds that the Sealing Bar will apply heat to create the bag's seal. The optimal time for different brands of bags can be adjusted using the Plus (+) or Minus (-) Buttons. See the “Bag Sealing” section in this booklet for further information on sealing vacuum bags.
- Seal Window: The numeric LED Seal Window indicates the number of seconds that the Sealing Bar will be activated to apply heat to the bag that creates the seal. Once the Seal Bar is activated, the display will countdown to "0". See the "Bag Sealing" section in this booklet for further information on sealing vacuum bags.
- Vacuum Window: The numeric LED Vacuum Window indicates the level of vacuum that the Vacuum Sealer has attained. The display will count up from "0" to "9".
- Pulse Button: The pulse button is for sealing liquids or delicate items, lettnig you control the vacuum process. When the bag is prepared, press the pulse button as many times as necessary until you have eliminated the desired amount of air. Press the manual seal button to seal the bag.
- Manual Bag Seal Button: This button will start the Seal Bar at any time in Manual Mode. More information about the Manual Mode can be found in the "Manual Mode" section of his booklet.
- Accessory Button: Press the Accessory Button when using vacuum canisters (sold separately) to vacuum and seal items stored in a canister.


SEAL TIME ADJUSTMENT


SEAL TIME

VACUUM
PROGRESS

PII SF

MANUAL SEAL

ACCESSORY

NOTE: The Vacuum Sealer is ONLY intended to be used with VACUUM BAGS. For best results, only use the recommended vacuum bags with an embossed or mesh lining. DO NOT USE HOUSEHOLD BAGS! Any other uses of the Vacuum Sealer, other than the uses described in this booklet, could potentially damage the appliance and void the warranty!
-
To create bags using the roll holder, remove the roll holder rod from the cilps at the back of the vacuum sealer (FIGURE 6).
-
Slide the rod through the center opening of the roll (will hold bags up to 11" wide).
-
Fold the roll holder arms out and rest the rod in the slots on the roll holder arms, carefully lining up the notches in the rod with the slots in the arms.
-
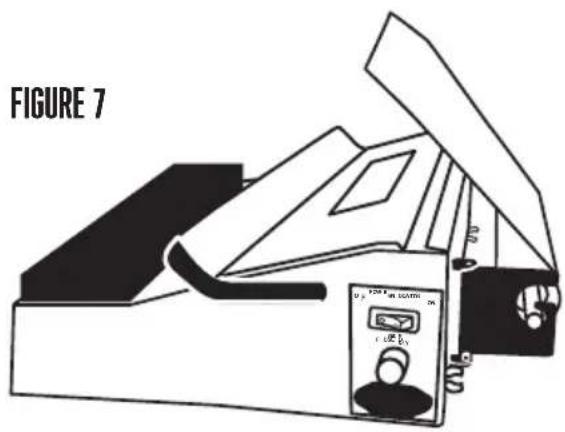
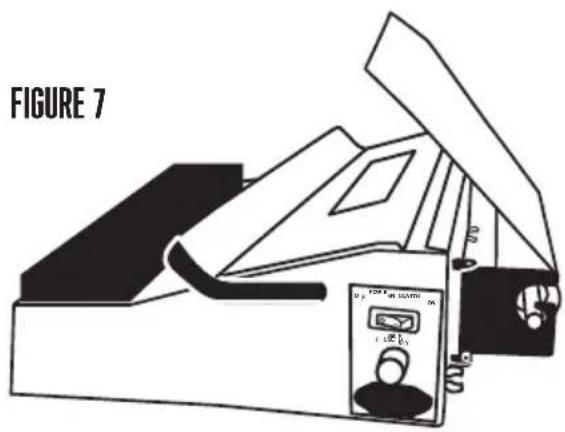
It is easier to cut bags from the roll when the bags are rolled over the roll (as opposed to under the roll) (FIGURE 7).
-
Move the bag cutter towards the lid and pull the vacuum bag over the cutter slot until you have reached the desired length.
-
Move the bag cutter back over the top of the bag roll, making sure the blade is to one side.
-
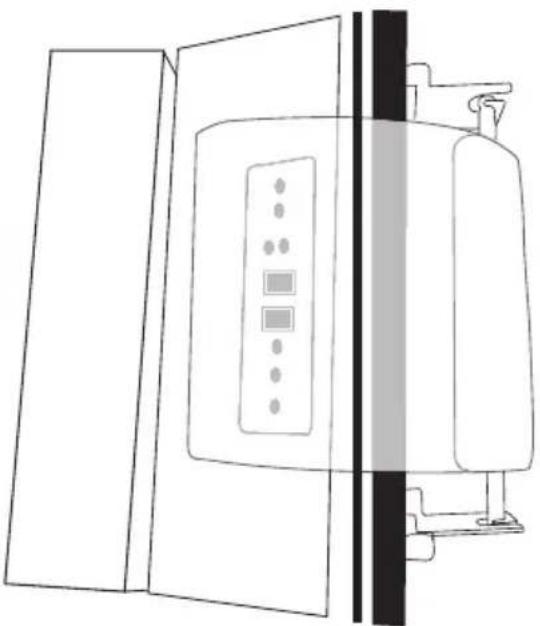
Slide the blade across the bag roll to cut your roll into your custom bag size (FIGURE 8).
FIGURE 6
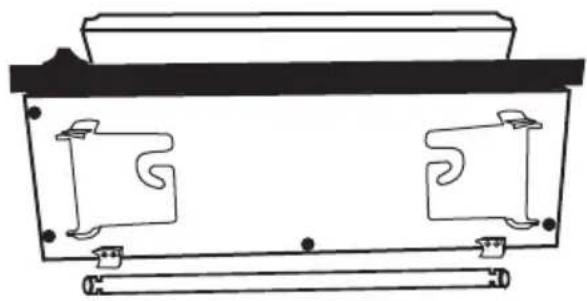
FIGURE 8
INITIAL TESTING OF THE BAG SEAL
- ALWAYS allow the sealing bar to cool for approximately 20 seconds between bags. Leave the Vacuum Lid OPEN between uses, this allows the Heating Element to cool more quickly between bags.
- Place one end of the bag onto the Sealing Bar, leaving about 2" (5 cm) of the empty part of the bag beyond the inside edge of the Sealing Bar.
- Be sure not to cover the Vacuum Port with the bag. Covering the Vacuum Port prevents the proper vacuuming of air from the bag.
- Close the Vacuum Lid while holding the bag in place. Press down on both sides of the lid to lock the lid in place. You will hear each side "click" when it is secured. NOTE: If both sides are NOT securely locked, the lid will NOT release automatically. To resolve this issue, press down on both sides of the lid twice to release the locks.
- Press the Start Button engaging the Vacuum Pump (the Vacuum Pump must be on for the Seal Bar to heat up).
- Press the Manual Seal Button immediately after the Vacuum Pump starts. (Press down on the Vacuum Lid to contact the Sealing Bar.)
- After the Seal Window counts down to zero (0) the unit will automatically release the vacuum and enable the Vacuum Lid to open.
- Remove the bag and inspect the seal. The seal should appear smooth and consistent all the way across the bag. The seal SHOULD NOT melt through the bag at any point. Be sure there are no creases or wrinkles that may allow air to leak into the bag. A properly sealed bag will not pull apart, the bag must be cut open.
- Do not form side seals on the bags, the sides are already sealed.
- If the seal is good, proceed with vacuum packaging. Otherwise: If the seal is melted through the bag trim off the bad seal with scissors and adjust the Seal Time Down (-) in one second increments and try the test process again.
- If the seal has not fully welded the bag closed, trim off the bad seal with scissors and adjust the Seal Time Up (+) in one second increments and try the test process again.
WARNING! Before cleaning, assembling or disassembling the appliance, make sure the appliance is OFF and the PLUG IS REMOVED FROM THE OUTLET/POWER SOURCE!
DO NOT force the Lid Open! Wait for the vacuum to release.
Allow this Unit to COOL for at least 20 seconds between cycles.
NOTE: The Vacuum Sealer is ONLY intended to be used with VACUUM BAGS. For best results, only use the recommended vacuum bags with an embossed or mesh lining. DO NOT USE HOUSEHOLD BAGS! Any other uses of the Vacuum Sealer, other than the uses described in this booklet, could potentially damage the appliance and void the warranty!
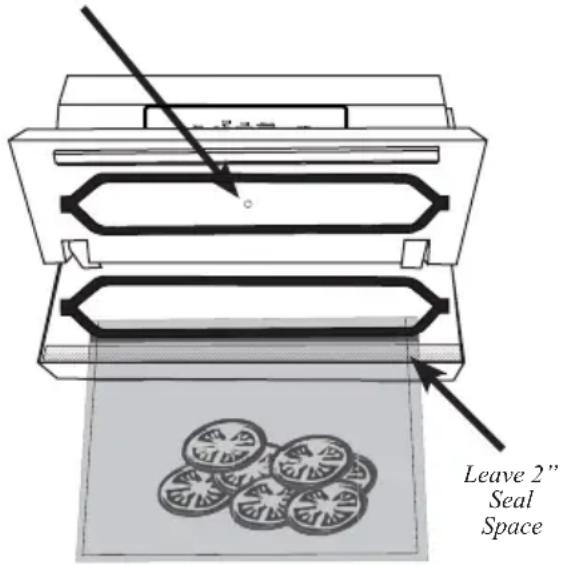
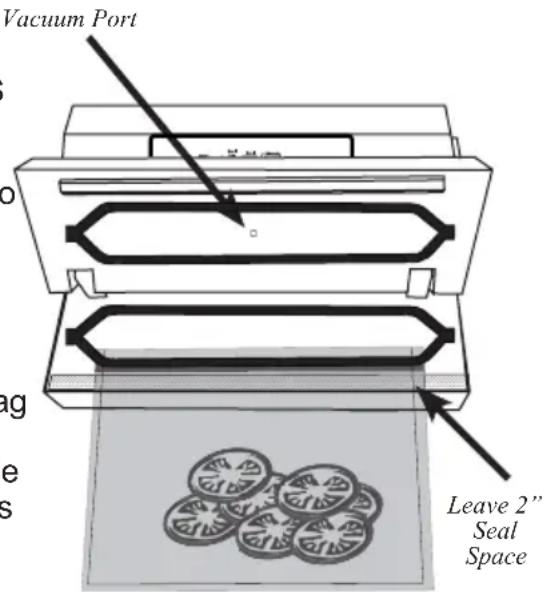
- Place the items to be vacuum sealed into a vacuum bag. Allow at least 2" (5 cm) at the open end of the bag in order to create enough seal space. Be sure not to cover the Vacuum Port (FIGURE 9).
- Close the Vacuum Lid while holding the bag in place. Press down on both sides of the lid to lock the lid in place. You will hear each side "click" when it is secured. NOTE: If both sides are NOT securely locked, the lid will NOT release
automatically. To resolve this issue, press down on both sides of the lid twice to release the locks.
Vacuum Port
FIGURE 9
- Press and release the Start Button. The 2-Piston Vacuum Pump will begin removing air from the bag while the LED Vacuum Window begins to count up. You may need to apply light pressure to the Vacuum Lid during the count-up process. The LED Vacuum Window will count up starting at the number "1" and going thru to the number "9", before automatically engaging the bag sealing process. These numbers represent stages, not seconds.
- Once the LED Vacuum Window displays the number "9", the sealing process will begin by counting down from your chosen setting to "0" on the LED Seal Window.
- Once the LED Seal Window has reached "0", the Vacuum Sealer will automatically stop the 2-Piston Vacuum Pump and release the vacuum pressure moments later. DO NOT ATTEMPT TO PULL THE VACUUM LID OPEN BEFORE THE VACUUM HAS BEEN RELEASED, SEVERE DAMAGE TO THE SEALING BAR WILL RESULT.
-
Place the items to be vacuum sealed into a vacuum bag. Allow at least 2" (5 cm) at the open end of the bag in order to create enough seal space. Be sure not to cover the Vacuum Ports (Figure 10).
-
Close the Vacuum Lid while holding the bag in place. Press down on both sides of the lid to lock the lid in place. You will hear each side "click" when it is secured. NOTE: If both sides are NOT securely locked, the lid will NOT release automatically. To resolve this issue, press down on both sides of the lid twice to release the locks.
-
While monitoring the vacuum bag, press and release START Button. The 2-Piston Vacuum Pump will begin removing air from the bag. When the desired level of air has been evacuated from the bag, press and release the Manual Bag Seal Button. It will start the sealing bag process.
Note: You may need to apply light pressure to the Vacuum Lid during this process.
Note: It requires some vacuum pressure in the bag to get good seal for the bag.
- Once the LED Seal Window has reached "0", the Vacuum Sealer will automatically stop the Vacuum Pump and release the vacuum pressure moments later. DO NOT ATTEMPT TO PULL THE VACUUM LID OPEN BEFORE THE VACUUM HAS BEEN RELEASED, SEVERE DAMAGE TO THE SEALING BAR WILL RESULT.
WARNING! Before cleaning, assembling or disassembling the appliance, make sure the appliance is OFF and the PLUG IS REMOVED FROM THE OUTLET/POWER SOURCE!
DO NOT force the Lid Open! Wait for the vacuum to release.
Allow this Unit to COOL for at least 20 seconds between cycles.
NOTE: The Vacuum Sealer is ONLY intended to be used with VACUUM BAGS. For best results, only use the recommended vacuum bags with an embossed or mesh lining. DO NOT USE HOUSEHOLD BAGS! Any other uses of the Vacuum Sealer, other than the uses described in this booklet, could potentially damage the appliance and void the warranty!
FIGURE 10
MAINTENANCE KIT INSTRUCTIONS
Some parts of the Vacuum Sealer may need replacing after repeated use. The Vacuum Sealer Maintenance Kit will be necessary for the Vacuum Sealer to properly function.
REPLACING THE OVAL VACUUM CHAMBER SEALS:
- Turn "OFF" the Vacuum Sealer and remove the Power Cord from the electrical outlet.
- Make sure the unit is completely cool.
- Open the Vacuum Lid.
- Remove the Oval Vacuum Chamber Seal from the groove on the underside of the Vacuum Lid.
- Remove the Oval Vacuum Chamber Seal from the groove in the Plastic Vacuum Chamber.
- Set a new Oval Vacuum Chamber Seal on the groove in the Plastic Vacuum Chamber. Work the seal into the groove with your fingers until done.
- Position a new Oval Vacuum Chamber Seal into the groove in the Vacuum Lid. Work the seal into the groove with your fingers until done.
REPLACING THE SEAL BAR TAPE:
-
Turn "OFF" the Vacuum Sealer and remove the Power Cord from the electrical outlet.
-
Make sure the unit is completely cool.
-
Open the Vacuum Lid.
-
Pick at either end of the Seal Bar Tape covering the Seal Bar Heating Element with a fingernail until it lifts slightly. Grasp the loose end and slowly pull the Seal Bar Tape back over itself until fully removed.
-
Remove the backing from a new strip of Seal Bar Tape. Be careful not to allow the Seal Bar Tape to contact anything including itself while the adhesive side is exposed.
-
Hold one end of the Seal Bar Tape in each hand. Stick the left end of the Seal Bar Tape to the flat area on the Plastic Vacuum Chamber just left of the Seal Bar Heating Element. Apply the Seal Bar Tape from left to right over the Seal Bar Heating Element until done. Make sure there are no wrinkles or folds in the Seal Bar Tape once applied. The Seal Bar Tape should fully cover the Seal Bar Heating Element.
Q: NOTHING HAPPENS WHEN THE POWER BUTTON IS PRESSED!
- Make sure that the Power Cord is not damaged in any way.
- Be sure that the female end of the Power Cord is plugged completely into the Power Supply Port of the Vacuum Sealer, and that the male end of the Power Cord is firmly plugged into the wall outlet (Figure 11).
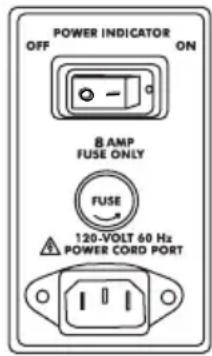
- If the Vacuum Sealer is properly plugged in, and the Power Button still does not work, check the Fuse, located above the Power Supply Port, on the right side of the Vacuum Sealer. Twist the Fuse Holder off, then look at the clear tube to see if the Fuse is darkened. If the Fuse is darkened, it will need to be replaced with a standard 8-Amp Fuse.
- If the Fuse does not need to be replaced, you will need to be sure the electrical wall outlet is properly working. Plug in another appliance to see if that appliance works from the wall outlet. USE ONLY TIME-DELAY FUSES.
Q: MY VACUUM SEALER SHUT OFF AND WILL NOT START AGAIN.
- The Thermal Overload Protector may have been activated. In this case, allow the Vacuum Sealer to cool by opening the Vacuum Lid for approximately 20 minutes. Be sure to leave the Vacuum Lid open between bag sealing.
- Be sure that the female end of the Power Cord is plugged completely into the Power Supply Port of the Vacuum Sealer, and that the male end of the Power Cord is firmly plugged into the wall outlet.
- If the Vacuum Sealer is properly plugged in, and the Power Button still does not work, check the Fuse, located above the Power Supply Port, on the right side of the Vacuum Sealer. Twist the Fuse Cap off, then look at the clear tube to see if the Fuse is darkened. If the Fuse is darkened, it will need to be replaced with a standard 8-Amp Fuse (Figure F).
- If the Fuse does not need to be replaced, you will need to be sure the electrical wall outlet is properly working. Plug in another appliance to see if that appliance works from the wall outlet.
FIGURE 11
Check to see if the Fuse is darkened.

Q: THE VACUUM PUMP STARTS, BUT NO AIR IS BEING REMOVE FROM THE VACUUM BAG.
- For the best results, always use Weston brand vacuum bags.
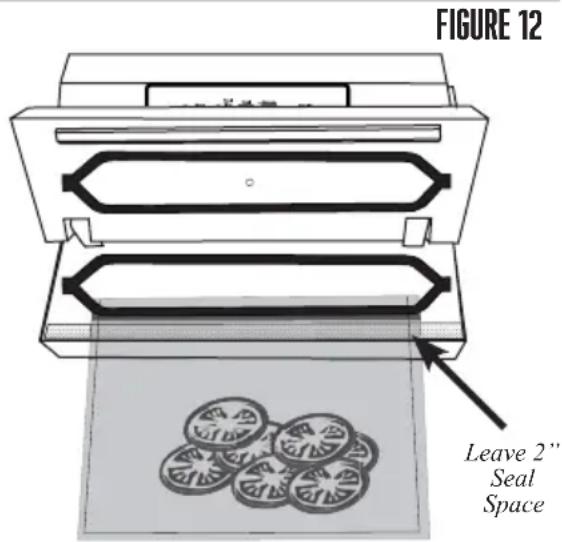
- Be sure that the bag is inserted properly. Be sure not to cover the Vacuum Port opening (Figure 12).
- The bag may have a leak. If there is a leak in the bag, air will be pulled into the bag from the outside. Check for tears or punctures. If you are using a bag that was made from a roll of material, double check that the seal on the end of the bag is welded closed.
Q: THE SEALING BAR MELTS THROUGH THE BAG.
- The Vacuum Sealer is only intended to be used with vacuum sealing bags. For best results, Weston Vacuum Bags should be used. DO NOT USE HOUSEHOLD BAGS with the Vacuum Sealer.
- Check the condition of the Seal Bar Tape strips. Replace if needed.
- Open the Vacuum Lid and allow the sealing bar to cool for 5-10 minutes. Always leave the Vacuum Lid open between bags, and allow at least 20 seconds between cycles.
- The Sealing Bar time may need to be lowered. Adjust the Seal Time Down (-) in one second increments and try the test process again. Refer to the "Initial Testing of the Bag Seal" instructions in this booklet for more information.
Q: THE BAG SEAL PULLS APART.
- If the seal has not fully welded the bag closed, trim off the bad seal with scissors and adjust the Seal Time Up (+) in one second increments and try the test process again.
- The Vacuum Sealer is only intended to be used with vacuum sealing bags. For best results, Weston Vacuum Bags should be used. DO NOT USE HOUSEHOLD BAGS with the Vacuum Sealer.
- The seal of the bag may be incomplete. If the seal has a crease in it, or if a liquid or powder has been trapped between the layers of the bag, the layers may not have been welded together properly. Cut the seal off and wipe the inside of the bag clean. Then, try to vacuum seal the package again. When sealing a moist or powdery food, insert a paper towel into the bag above the food before vacuum packaging. The paper towel will prevent the food from interfering with the seal. See the "Vacuum Packaging Guidelines" in this booklet for helpful tips.
REPLACING THE FUSE
If the Vacuum Sealer does not operate when it is plugged in and turned on, try any or all of the following:
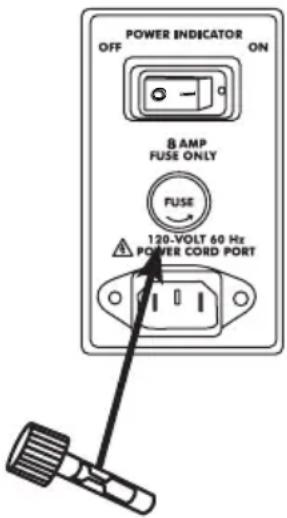
- Make sure the Fuse is not blown. The Fuse is located on the right side of the unit directly above the Power Cord Port. Turn "OFF" and unplug the Vacuum Sealer. Twist off and remove the Fuse Holder. Remove and check the Fuse. The thin metal band in the center of the Fuse should be clean and unbroken. If it is burned and/or broken, replace it with a new Fuse (8 Amp). Replace the Fuse Holder.
- Make sure the Connector at the end of the Power Cord is plugged completely into the Power Cord Port.
- Make sure the Power Cord is not damaged. DO NOT use a damaged Power Cord. Call the Customer Service line for information on part replacement.
- Try connecting the Power Cord Plug to another electrical outlet.
FIGURE 13

WARNING! Before cleaning, assembling or disassembling the Vacuum Sealer, make sure the Vacuum Sealer is OFF and the PLUG IS REMOVED FROM THE OUTLET/POWER SOURCE!
STORAGE LIFESPAN GUIDELINES
. IMPORTANT NOTE: Vacuum packaging is NOT a substitute for refrigeration. Vacuum packed perishable foods still require refrigeration.
. NEVER thaw frozen foods at room temperature. Thaw frozen foods in a refrigerator or microwave oven.
. In general, the colder the temperature at which foods are stored, the longer the shelf life.
. Handle vacuum sealer bags with care. Avoid damaging them. A damaged bag will not hold a seal.
. Only use information in the following chart as a guideline! Refer to the “Vacuum Packaging Guidelines” and “Food Safety” sections of this manual. Actual storage life spans may vary. Check all food for spoilage before use.
| FOOD TYPE | STORAGE LOCATION | NORMAL LIFE | VACUUM PACKED LIFE |
| LARGE CUTS OF MEAT Freezer 6 months 2-3 yearsGROUND MEAT Freezer 4 months 1 yearFISH Freezer 6 months 2 yearsFor best results, freeze meats & fish for 1-2 hours before vacuum packing to help prevent moisture and juices from interfering with the seal of the vacuum bag. | |||
| COFFEE BEANS Room temperature 4 weeks 16 monthsCOFFEE BEANS Freezer 6-9 months 2-3 yearsFLOUR, RICE, SUGAR Room Temperature 6 months 1-2 yearsFor best results, powder or grainy substances should be kept in their original container or bag, then placed in a vacuum bag for sealing to prevent interfering with the seal of the vacuum bag. | |||
| BERRIES strawberries, raspberries, blackberries Refrigerator 1-3 days 1 weekBERRIES cranberries, huckleberries, blueberries Refrigerator 3-6 days 2 weeksTo prevent berries from being crushed by the vacuum sealer, it is best to freeze item before packing. Spread the berries out on a cookie sheet to allow them to freeze individually. Berries frozen in a large block will be difficult to vacuum seal due to the many small air pockets that would form between the berries. | |||
| CHEESE If vacuum packed cheese is used often, make sure the vacuum bag is long enough to allow for repeated sealing. For shredded cheese, place a paper towel inside the vacuum bag, on top of the cheese to prevent the cheese from being sucked into the Vacuum Sealer or interfering with the sealing of the bag. | |||
| COOKIES, CRACKERS, BREADS with periodical opening Room Temperature 1-2 weeks 3-6 weeksFreeze soft airy foods for 1-2 hours prior vacuum packing, to retain shape & texture. | |||
| PASTA, GRAINS, DRIED BEANS NUTS Room Temperature 6 months 1-1/2 yearsRoom Temperature 6 months 2 yearsDried foods with sharp edges should be wrapped in a paper towel or other matter to prevent the sharp edges from puncturing the vacuum bag. | |||
| LETTUCE Refrigerator 3-6 days 2 weeksWash & thoroughly dry leafy vegetables before vacuum packaging. | |||
| VEGETABLES Freezer 8 months 2 1/2 yearsTo maximize the taste of vegetables, blanch them before vacuum packaging. Blanching cooks the vegetables very briefly, sealing in the flavor, color and texture, leaving the vegetables cooked but still crisp. Vegetables can be blanched in boiling water in the microwave, most vegetables only require 2-3 minutes (corn on the cob requires 6-11 minutes). Then immerse the vegetables in cold water to stop the cooking process. Dry the vegetables, then vacuum pack. | |||
Table adapted from Dr. G.K. York, Dept. of Food Science & Tech, U of California, Davis.
VACUUM PACKAGING GUIDELINES
Powdery Items: When vacuum sealing powdery items, like flour, it is best to keep them in their original packaging before putting them into the vacuum bags.
Sharp or Pointed Items: When vacuum sealing sharp or pointy items, it is best to cushion the edges so they do not puncture the bag during the vacuum process.
YEAST & BACTERIA
For best results in extending the life of foods, it is important to vacuum package foods that are fresh. Once food has begun to deteriorate, vacuum packaging may only slow the deterioration process. Vacuum sealing cannot completely prevent the growth of mold. Other disease causing microorganisms can still grow in low oxygen environments and may require further measures to be eliminated.
Yeast: The development of yeast can be slowed by refrigeration and completely stopped by freezing food at 0° F ( -18° C). Yeast causes fermentation, which will give food an identifiable smell.
Bacteria: Freezing cannot eliminate bacteria, but their growth can be stopped. The growth of bacteria can be easily identified by an offensive odor and sometimes a slimy texture. Some bacteria, like the one that causes botulism, can grow in low oxygen environments and cannot be detected by smell, taste or color. Botulism is very rare, but dangerous. Be sure that all foods are stored and cooked properly before eating.
COOKING & HEATING
- Before microwaving vacuum-packed foods, puncture or open the bag to allow hot airto escape while heating.
• Vacuum-packed foods can be thawed or cooked in boiling water.
• Vacuum-packed perishable foods like meats, vegetables and cheeses must be refrigerated (at or below 34° F (1.1°C)) or frozen, especially acid-free or low-acid foods.
This is important because although vacuum packaging removes most air from the bag, bacteria like Clostridium Botulinum, which produces a toxin that causes the illness botulism, is anaerobic and grows in the absence of oxygen. Refrigeration and freezing slow the growth of bacteria. It is also important to maintain a clean working area to reduce the likelihood of packaging harmful bacteria with the food.
FOOD SAFETY
There are basic rules to follow when handling food. They are COOK, SEPARATE, CLEAN, and CHILL.
COOK
It's crucial to cook food to a safe internal temperature to destroy bacteria that is present. The safety of hamburgers and other foods made with ground meat has been receiving a lot of attention lately, and with good reason. When meat is ground, the bacteria present on the surface is mixed throughout the ground mixture. If this ground meat is not cooked to at least 160°F to 165°F (71°C to 74°C), bacteria will not be destroyed and there's a good chance you will get sick.
Solid pieces of meat like steaks and chops don't have dangerous bacteria like E. coli on the inside, so they can be served more rare. Still, any beef cut should be cooked to an internal temperature of at least 145°F (63°C) (medium rare). The safe temperature for poultry is 165°F (75°C) and solid cuts of pork should be cooked to 145°F (63°C).
SEPARATE
Foods that will be eaten uncooked and foods that will be cooked before eating MUST ALWAYS be separated. Cross-contamination occurs when raw meats or eggs come in contact with foods that will be eaten uncooked. This is a major source of food poisoning. Always double-wrap raw meats and place them on the lowest shelf in the refrigerator so there is no way juices can drip onto fresh produce. Then use the raw meats within 1-2 days of purchase, or freeze for longer storage. Defrost frozen meats in the refrigerator, not on the counter.
When grilling or cooking raw meats or fish, make sure to place the cooked meat on a clean platter. Don't use the same platter you used to carry the food out to the grill. Wash the utensils used in grilling after the food is turned for the last time on the grill, as well as spatulas and spoons used for stir-frying or turning meat as it cooks.
Make sure to wash your hands after handling raw meats or raw eggs. Washing hands with soap and water, or using a pre-moistened antibacterial towelette is absolutely necessary after you have touched raw meat or raw eggs. Not washing hands and surfaces while cooking is a major cause of cross-contamination.
CLEAN
Wash your hands and work surfaces frequently when you are cooking. Washing with soap and warm water for at least 15 seconds, then dry with a paper towel.
CHILL
Chilling food is very important. The danger zone where bacteria multiply is between 40° F and 140° F ( 4° C and 6° C). Your refrigerator should be set to 40° F ( 4° C) or below; your freezer should be 0° F (-17°C) or below. Simple rule: serve hot foods hot, cold foods cold. Use chafing dishes or hot plates to keep food hot while serving. Use ice water baths to keep cold foods cold. Never let any food sit at room temperature for more than 2 hours - 1 hour if the ambient temperature is 90° F ( 32° C) or above. When packing for a picnic, make sure the foods are already chilled when they go into the insulated hamper. The hamper won't chill food - it just keeps food cold when properly packed with ice. Hot cooked foods should be placed in shallow containers and immediately refrigerated so they cool rapidly. Make sure to cover foods after they are cool.
NOTE: Special considerations must be made when using venison or other wild game, since it can become heavily contaminated during field dressing. Venison is often held at temperatures that could potentially allow bacteria to grow, such as when it is being transported. Refer to the USDA Meat and Poultry Department for further questions or information on meat and food safety.
WESTON WARRANTY INFORMATION
SAVE THIS WARRANTY INFORMATION FOR YOUR RECORDS!
Weston Brands LLC warrants to the ORIGINAL RETAIL PURCHASER of this product that if operated in accordance with the printed instruction accompanying it, then for a period of 2 year from the date of purchase, the product shall be free from defects in material and workmanship.
The Warranty Card, along with a copy of the original receipt, must be received by Weston Brands LLC within 30 days from purchase date for the warranty to apply. Failure to send the completely filled out Warranty Card, along with a copy of the original receipt, will void the warranty.
The product must be delivered to or shipped freight prepaid to Weston Brands LLC for warranty services, in either its original packaging or similar packaging affording an equal degree of protection. Damage due to shipping is not the responsibility of the company. Weston Brands LLC charges a \$35.00 per hour bench charge. NOTE: No repairs will be started without the authorization of the customer. The return shipping cost to the customer will be added to the repair invoice.
Prior to returning the product for Warranty Repair, the product must be thoroughly cleaned and free from any food particles or other debris. Failure of the purchaser to comply with this standard will result in the unit being returned without repair. In some cases, a \$50 cleaning surcharge may apply.
Weston Brands LLC will repair (or at its discretion, replace) the product free of charge, if in the judgment of the company, it has been proven to be defective as to seller's labor and material, within the warranty period.
New or rebuilt replacements for factory defective parts will be supplied for two (2) year from the date of purchase. Replacement parts are warranted for the remainder of the original warranty period.
For non-warranty repairs, contact Weston Brands LLC's Customer Service at 1-800-814-4895 M-F 8am-5pm ET (outside of the United States 001-440-638-3131) to obtain a Return Merchandise Authorization Number (RMA Number).
Weston Brands LLC will refuse all returns that do not contain this number. DO NOT RETURN THE UNIT WITHOUT PROPER AUTHORIZATION FROM WESTON BRANDS LLC.
LIMITATIONS: The warranty is void if the product is used for any purpose other than that for which it is designed.
The product must not have been previously altered, repaired, or serviced by anyone else other than Weston Brands LLC. If applicable, the serial number must not have been altered or removed. The product must not have been subjected to accident in transit or while in the customer's possession, misused, abused, or operated contrary to the instructions contained in the instruction manual. This includes failure caused by neglect of reasonable and necessary maintenance, improper line voltage and acts of nature. This warranty is not transferable and applies only to U.S. and Canadian sales. Except to the extent prohibited by applicable law, no other warranties whether expressed or implied, including warranty merchantability and fitness for a particular purpose, shall apply to this product. Under no circumstances shall Weston Brands LLC be liable for consequential damages sustained in connection with said product and Weston Brands LLC neither assumes nor authorizes any representative or other person to assume for it any obligation or liability other than such as is expressly set forth herein. Any applicable implied warranties are also limited to the two (2) year period of the limited warranty.
This warranty covers only the product and its specific parts, not the food or other products processed in it. Weston is not responsible for missing or damaged parts on discounted/clearance, resale or final sale items where the seller may not be able to guarantee full functionality or completeness of the unit.
CUT ALONG THE DOTTED LINE AND SEND THE WARRANTY CARD ALONG WITH A COPY OF YOUR ORIGINAL PURCHASE RECEIPT TO:
Weston Brands LLC / WARRANTY
20365 Progress Drive, Strongsville, OH 44149 USA
WESTON WARRANTY CARD
SEND THIS CARD ALONG WITH A COPY OF YOUR ORIGINAL PURCHASE RECEIPT TO: WESTON BRANDS LLC / WARRANTY, 20365 PROGRESS DRIVE, STRONGSVILLE, OH 44149 USA
Customer Name:
Address:
City/State/Zip/Country:
Telephone Number:
E-Mail Address:
Original Date of Purchase:
Product Model #:
Serial # (if applicable):
I have read the warranty information. Initial here:
Copy of Receipt Included
The image contains a single, solid horizontal line, which is a stylistic or background element (like a rule line on paper). According to Rule 2, such lines must be ignored by the OCR result. Therefore, the corrected OCR text is:
[Empty]

WESTON
RECONNECT WITH REAL FOOD
PRO-1100
PRO-1100 SELLADOR A VACÍO
DE ACERO INOXIDABLE
65-0601-W
DEBIDO A CONSTANTES MEJORAS EN LA FÁBRICA, EL PRODUCTO QUE SE MUESTRA PUEDE SER LIGERAMENTE DIFERENTE DEL PRODUCTO EN ESTA CAJA. 020915
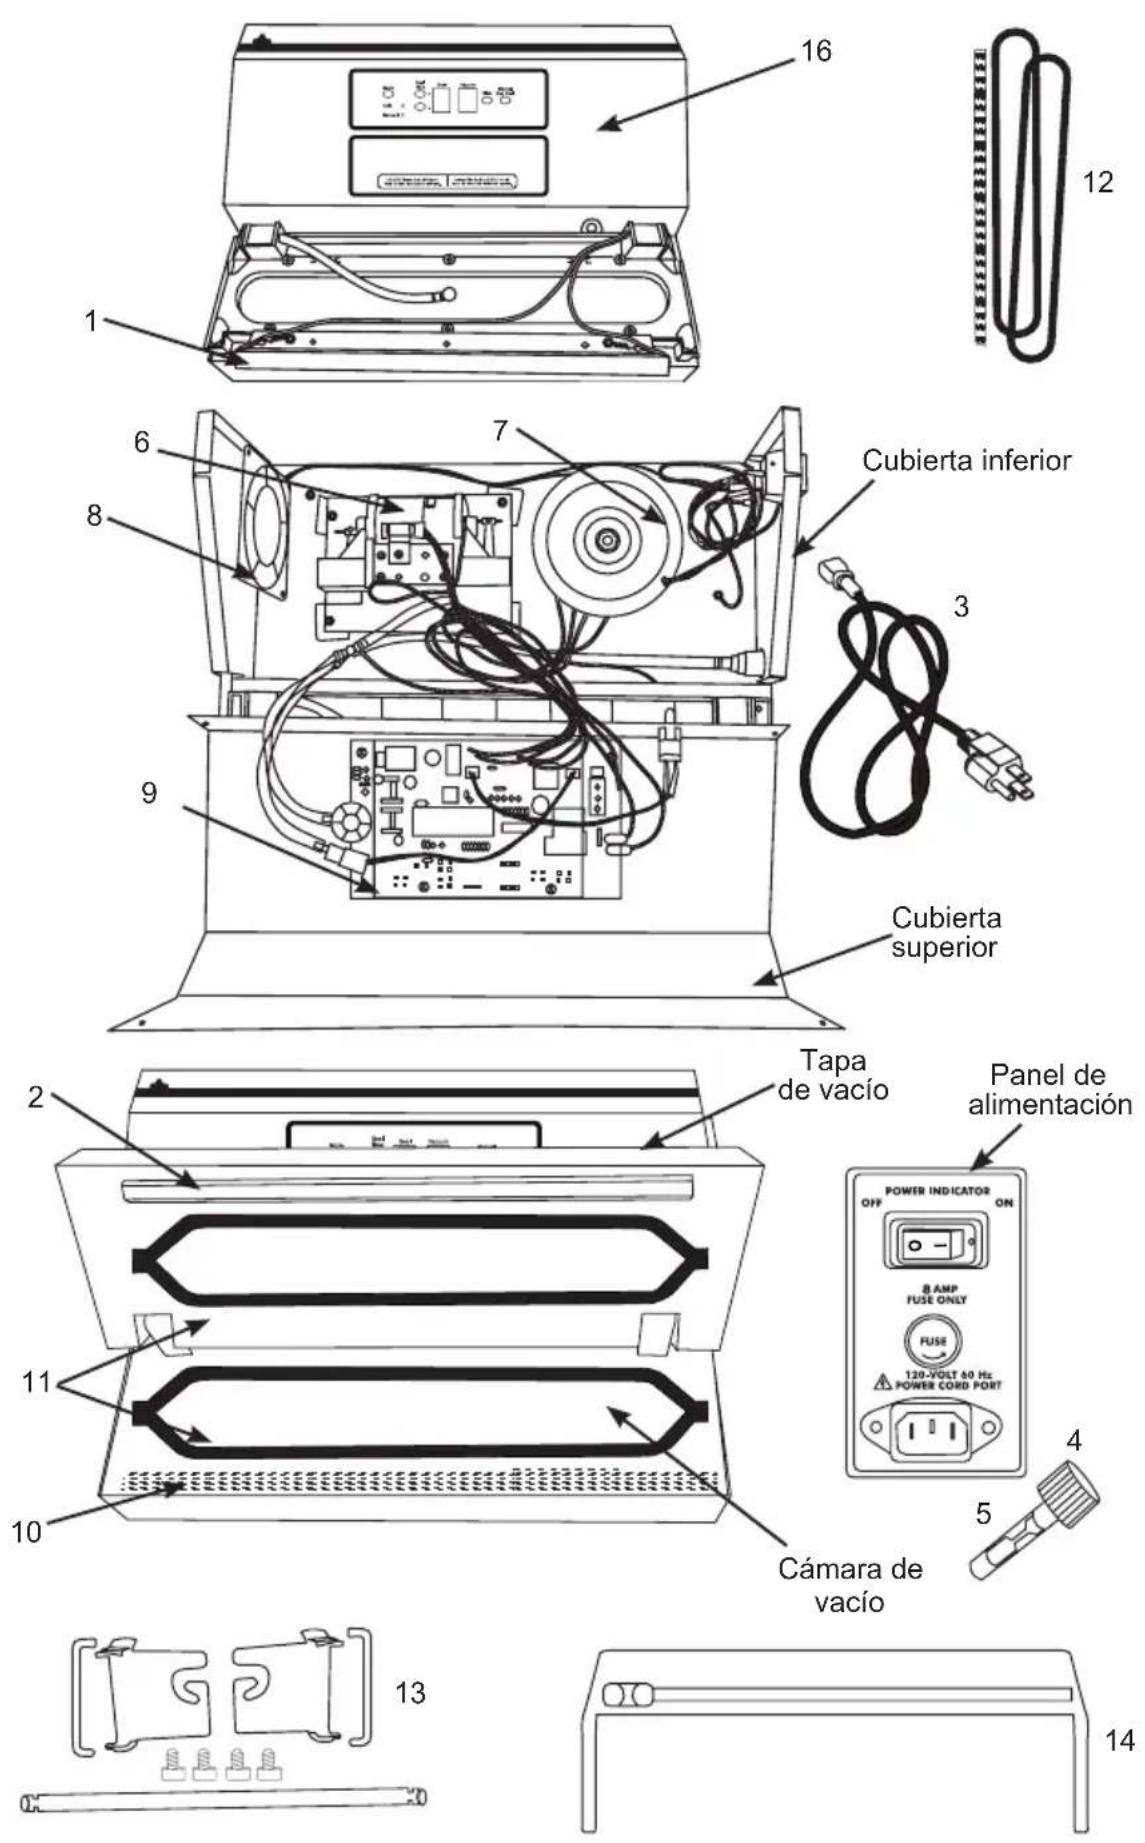
FIGURA 8

WARNING! Before cleaning, assembling or disassembling the Vacuum Sealer, make sure the Vacuum Sealer is OFF and the PLUG IS REMOVED FROM THE OUTLET/POWER SOURCE!
Weston Brands, LLC / WARRANTY
20365 Progress Drive, Strongsville, OH 44149 USA
TARJETA DE GARANTÍA WESTON
ENVÍE ESTA TARJETA JUNTO CON UNA COPIA DE SU RECIBO DE COMPRA ORIGINAL A: WESTON BRANDS, LLC/WARRANTY, 20365 PROGRESS DRIVE. STRONGSVILLE, OH 44149 USA
RECONNECT WITH REAL FOOD
PRO-1100
SOUS VIDE
ACIER INOXYDABLE
APPAREIL D-EMBALLAGE
65-0601-W
PARCE QUE NOS PRODUITS BÉNÉFICIENT DE PERFECTIONNEMENTS CONSTANTS APPORTÉS EN USINE, LES ILLUSTRATIONS PRÉSENTES PEUVENT ÊTRE LÉGÈREMENT DIFFÉRENTES DU PRODUIT REÇU. 020915
⚠️ IMPORTANTES RÈGLES DE SÉCURITÉ
LIRE ET COMPRENDRE COMPLÈTEMENT TOUTES LES DIRECTIVES ET AVERTISSEMENTS AVANT D'UTILISER CE PRODUIT. LE PLUS IMPORTANT EST VOTRE SÉCURITÉ! LE DÉFAUT D'OBSERVER LES PROCÉDURES ET MISES EN GARDE PEUT ENTRAINER DES BLESSURES GRAVES OU DES DOMMAGES MATÉRIELS. N'OUBLIEZ PAS : VOTRE SECURITÉ PERSONNELLE EST VOTRE RESPONSABILITE!
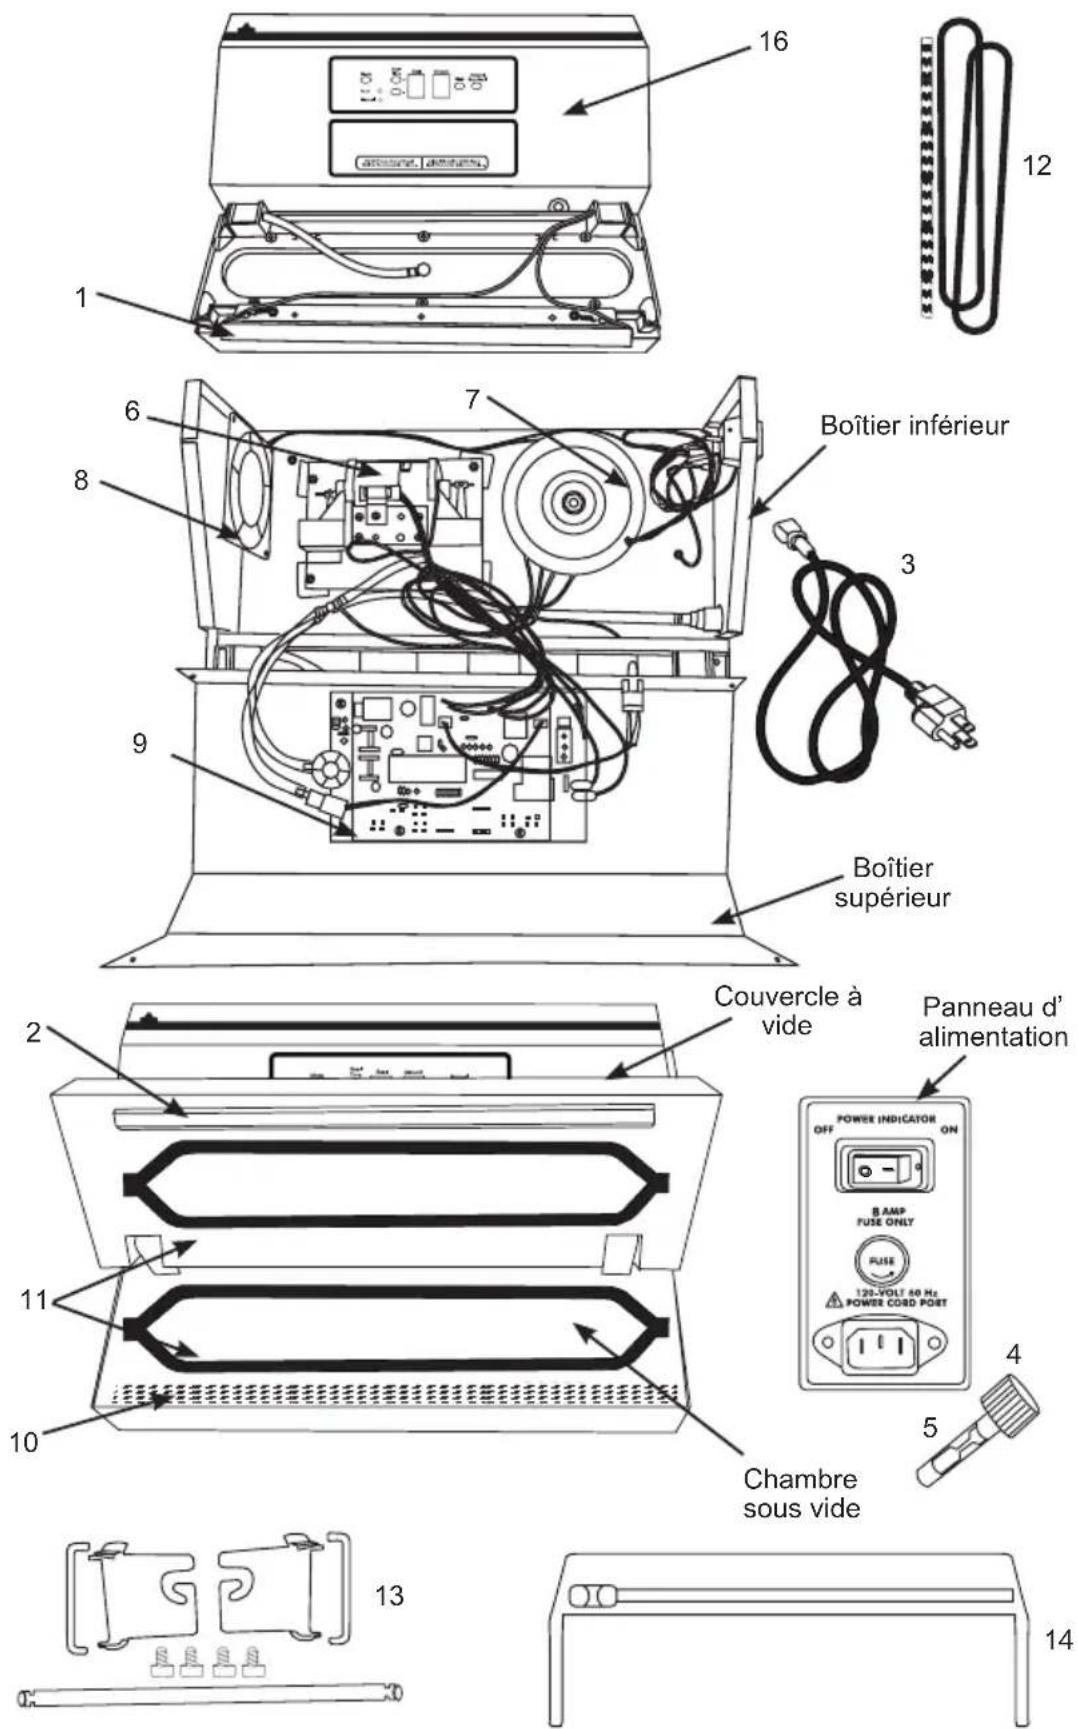
DESCRIPTION DE LA PIÈCE
| NUMÉRO DE SCHÉMA DESCRIPTION DE LA PIÉCE NUMÉRO DE LA PIÉCE | ||
| 1 FONCTIONNEMENT EN MODE MANUEL 08-0627 | ||
| 2 ISOLATEUR LA BARRE SCELLANTE 08-0625 | ||
| 3 CORDON D'ALIMENTATION 08-0402 | ||
| 4 PORTE-FUSIBLE 08-0604 | ||
| 5 FUSIBLE 8 A 08-0605 | ||
| 6 POMPE À VIDE 08-0639 | ||
| 7 TRANSFORMATEUR 08-0641 | ||
| 8 | VENTILATEUR | 08-0643 |
| 9 | CARTE DE CIRCUITS IMPRIMÉS | 65-0638 |
| CAPTEUR DE VIDE | 65-0643 | |
| 10 | RUBAN DE LA BARRE SCELLANTE (NOIR) | VOIR LE KIT DE MAINTENANCE |
| 11 | JOINT DE LA CHAMBRE (2) | VOIR LE KIT DE MAINTENANCE |
| 12 | KIT DE MAINTENANCE DE LA SCELLEUSE SOUS VIDE, RUBAN DE LA BARRE SCELLANTE (NOIR), JOINTS DE LA CHAMBRE (2) | 65-0701 |
| 13 | ENSEMBLE PORTE-ROULEAU COMPREND: UNE TIGE DE PORTE-ROULEAU, DES BRAS DE PORTE-TIGE (2), DES SUPPORTS AVEC VIS (2 SUPPORTS, 4 VIS) | 65-0639 |
| 14 | UN ENSEMBLE COUPE-SAC COMPREND: UNE LAME, UN PORTE-LAME | 65-0640 |
| 15 | LAME | 65-0641 |
| 16 | PANNEAU DE COMMANDE 65-0642 | |
SEAL TIME ADJUSTMENT


SEAL TIME

VACUUM PROGRESS

PULSE

MANUAL SEAL

ACCESSORY

FIGURE 8
TEST INITIAL DU SCELLEMENT D'UN SAC
FONCTIONNEMENT EN MODE MANUEL
AVANT D' EFFECTUER UN EMBALLAGE SOUS VIDE, S'ASSURER QUE L'APPAREIL D'EMBALLAGE SOUS VIDE EST INSTALLÉ CONFORMÉMENT À TOUTES LES PRÉCAUTIONS DE SÉCURITÉ FIGURANT DANS LE PRÉSENT LIVRET.
FIGURE 11
Check to see if the Fuse is darkened.

Q: LA POMPE À VIDE SE MET EN MARCHE, MAIS IL N'Y A PAS D'AIR RETIRÉ DU SAC À VIDE.
INFORMATION SUR LA GARANTIE
CONSERVEZ CETTE INFORMATION SUR LA GARANTIE POUR VOS DOSSIERS!
Weston Brands LLC / WARRANTY
20365 Progress Drive, Strongsville, OH 44149 USA
CARTE DE GARANTIE
ENVOYEZ CETTE CARTE DE GARANTIE AVEC UNE COPIE DE VOTRE REÇU D'ACHAT ORIGINAL À: WESTON BRANDS LLC / WARRANTY, 20365 PROGRESS DRIVE, STRONGSVILLE, OH 44149 USA
Nom du Client:
Adresse:
Province/Code postal/Région: ____
PLEASE INSPECT THIS PACKAGE THOROUGHLY FOR MISSING PARTS OR ANY PRODUCT DAMAGE. IF YOUR PRODUCT CONTAINS SHIPPING DAMAGE, PLEASE CONTACT RETAILER FOR ASSISTANCE.
For all other questions regarding product usage, missing parts, product damage, difficulty or warranty activation, please contact the Weston Brands Customer Service Team: 8:00 am to 5:00 pm ET, Monday thru Friday
CustomerService@WestonProducts.com
U.S. Residents Customer Service Line: 1-800-814-4895 (Outside U.S. Call: 001-440-638-3131)
Weston Brands LLC, 20365 Progress Drive, Strongsville, Ohio 44149
WestonProducts.com
Please DO NOT return this item to the retailer before contacting Weston Brands Customer Service.
SAVE THESE INSTRUCTIONS!
Refer to them often and use them to instruct others.
ATTENTION!
VEUILLEZ INSPECTER CÊT EMBALLAGE AVEC SOIN POUR Y DÉTECTER
TOUTE PIÈCE MANQUANTE OU ENDOMMAGÉE.
SI DES PIÈCES ONT ÉTÉ ENDOMMAGÉES PENDANT LE TRANSPORT, VEUILLEZ
COMMUNIQUER AVEC LE DÉTAILLANT POUR OBTENIR DE L'AIDE.


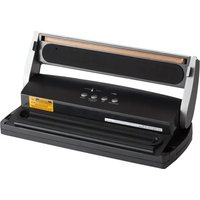
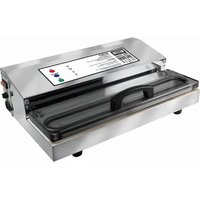
- PRO-1100 STAINLESS STEEL
- VACUUM SEALER
- 65-0601-W
- GENERAL SAFETY RULES
- BEFORE YOU START BAG SEALING
- PROTECTIVE TAPE
- THERE IS ONE FACTORY INSTALLED STRIP OF SEAL BAR TAPE ON THE VACUUM SEALER. DO NOT REMOVE THE TAPE
- COOLING FAN
- VACUUM CHAMBER SEALS
- LIMIT SWITCH
- THERMAL OVERLOAD PROTECTOR
- ASSEMBLY
- GROUNDING INSTRUCTIONS
- GROUNDING
- EXTENSION CORDS
- CLEANING INSTRUCTIONS
- CONTROL PANEL
- INITIAL TESTING OF THE BAG SEAL
- MAINTENANCE KIT INSTRUCTIONS
- REPLACING THE OVAL VACUUM CHAMBER SEALS
- REPLACING THE SEAL BAR TAPE
- Q: NOTHING HAPPENS WHEN THE POWER BUTTON IS PRESSED
- Q: MY VACUUM SEALER SHUT OFF AND WILL NOT START AGAIN
- Q: THE VACUUM PUMP STARTS, BUT NO AIR IS BEING REMOVE FROM THE VACUUM BAG
- Q: THE SEALING BAR MELTS THROUGH THE BAG
- Q: THE BAG SEAL PULLS APART
- REPLACING THE FUSE
- STORAGE LIFESPAN GUIDELINES
- VACUUM PACKAGING GUIDELINES
- YEAST & BACTERIA
- COOKING & HEATING
- FOOD SAFETY
- COOK
- SEPARATE
- CLEAN
- CHILL
- WESTON WARRANTY INFORMATION
- SAVE THIS WARRANTY INFORMATION FOR YOUR RECORDS
- WESTON WARRANTY CARD
- WESTON
- PRO-1100 SELLADOR A VACÍO
- TARJETA DE GARANTÍA WESTON
- SOUS VIDE
- APPAREIL D-EMBALLAGE
- ⚠️ IMPORTANTES RÈGLES DE SÉCURITÉ
- TEST INITIAL DU SCELLEMENT D'UN SAC
- FONCTIONNEMENT EN MODE MANUEL
- Q: LA POMPE À VIDE SE MET EN MARCHE, MAIS IL N'Y A PAS D'AIR RETIRÉ DU SAC À VIDE
- INFORMATION SUR LA GARANTIE
- CARTE DE GARANTIE
- SAVE THESE INSTRUCTIONS
- ATTENTION
Brand : Weston
Model : PRO-1100
Category : Vacuum packaging machines