R8.0 - Indoor bike trainer Horizon - Free user manual and instructions
Find the device manual for free R8.0 Horizon in PDF.


| Product Type | Indoor bike (bicycle trainer) |
| Model | R8.0 |
| Brand | Horizon |
| Dimensions (L x W x H) | 120 x 55 x 134 cm |
| Net weight | 38 kg |
| Gross weight | 43.5 kg |
| Max user weight | 136 kg |
| Power supply | Power adapter (power cord) |
| Display | LCD with backlight |
| Training programs | 16 programs: Constant Watts, Interval Watts, Manual, Intervals, Game, Fitness Test, Weight Loss, Weight Loss Plus, Rolling, Cadence, Random, THR Zone, % THR, Strength Builder, Custom 1, Custom 2 |
| Resistance | Magnetic, electronically adjustable |
| Sensors | Heart rate grip handles, compatible with chest strap |
| Connectivity | Wi-Fi, Bluetooth (Passport), ViewFit |
| Audio | Built-in speakers, MP3 audio input jack |
| Device holder | Smartphone/tablet holder |
| Bottle holder | Yes |
| Transport wheels | Yes |
| Maintenance | Clean with a damp cloth, check bolts regularly |
| Safety | Emergency stop, keep children away, do not use if damaged |
| Spare parts | Available from local dealer |
| Warranty | See provided warranty card |
Frequently Asked Questions - R8.0 Horizon
User questions about R8.0 Horizon
0 question about this device. Answer the ones you know or ask your own.
Ask a new question about this device
Download the instructions for your Indoor bike trainer in PDF format for free! Find your manual R8.0 - Horizon and take your electronic device back in hand. On this page are published all the documents necessary for the use of your device. R8.0 by Horizon.
USER MANUAL R8.0 Horizon
Read the BIKE GUIDE before using this OWNER'S MANUAL.
SAVE THESE INSTRUCTIONS
When using an exercise product, basic precautions should always be followed, including the following: Read all instructions before using this exercise bike. It is the responsibility of the owner to ensure that all users of this exercise bike are adequately informed of all warnings and precautions. If you have any questions after reading this owner's manual, contact your local dealer.


WARNING
READ AND SAVE ALL INSTRUCTIONS BEFORE ASSEMBLING OR USING THIS EXERCISE BIKE. IT IS STRONGLY RECOMMENDED TO TAKE THE FOLLOWING SAFETY INSTRUCTIONS.
- CAUTION: If you experience chest pains, nausea, dizziness or shortness of breath, stop exercising immediately and consult your physician before continuing.
- Use this exercise bike for its intended purpose as described in this manual. Do not use attachments that have not been recommended by the manufacturer.
- Never operate the exercise bike if it is not working properly, or if it has been damaged. Contact the authorized dealers for examination and repair.
- Do not use the exercise bike without proper footwear. NEVER operate the exercise bike with bare feet.
- Do not wear any clothing that might catch on any moving parts of this exercise bike.
- Keep hands and feet clear at all times from moving parts to avoid injury. Never turn the pedal cranks by hand.
- Do not dismount the exercise bike until the pedals are at a complete STOP.
- Do not attempt to ride the exercise bike in a standing position at high RPMs until you have practiced at slower speeds.
- Do not insert any object, hands or feet into any openings, or expose hands, arms or feet to the drive mechanism or other potentially moving part of the exercise bike.
- Do not operate where aerosol (spray) products are being used or when oxygen is being administered.
- Close supervision is necessary when used near children, invalids or disabled people.
- When the exercise bike is in use, young children and pets should be kept at least 3 meters / 10 feet away.
- Ensure that adjustment levers (seat and handlebar fore-and-aft) are properly secured and do not interfere with range of motion during exercise.
• This application is for home and indoor use only.
• This application with speed independent system. - If any of the adjustment devices are left projecting, they could interfere with the user's movement.
- WARNING! Heart rate monitoring systems may be inaccurate. Over exercising may result in serious injury or death. If you feel faint stop exercising immediately.
ASSEMBLY

WARNING
There are several areas during the assembly process that special attention must be paid. It is very important to follow the assembly instructions correctly and to make sure all parts are firmly tightened. If the assembly instructions are not followed correctly, the exercise bike could have parts that are not tightened and will seem loose and may cause irritating noises. To prevent damage to the exercise bike, the assembly instructions must be reviewed and corrective actions should be taken.
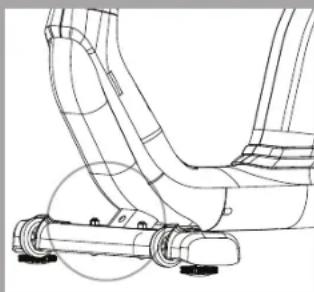
Before proceeding, find your exercise bike's serial number located on the front stabilizer tube and enter it in the space provided below.
ENTER YOUR SERIAL NUMBER AND MODEL NAME IN THE BOX BELOW:
SERIAL NUMBER:

MODEL NAME: HORIZON

» Refer to the SERIAL NUMBER and MODEL NAME when calling for service.
SERIAL NUMBER LOCATION
natural_image
Technical line drawing of a mechanical assembly with no visible text or symbols
text_image
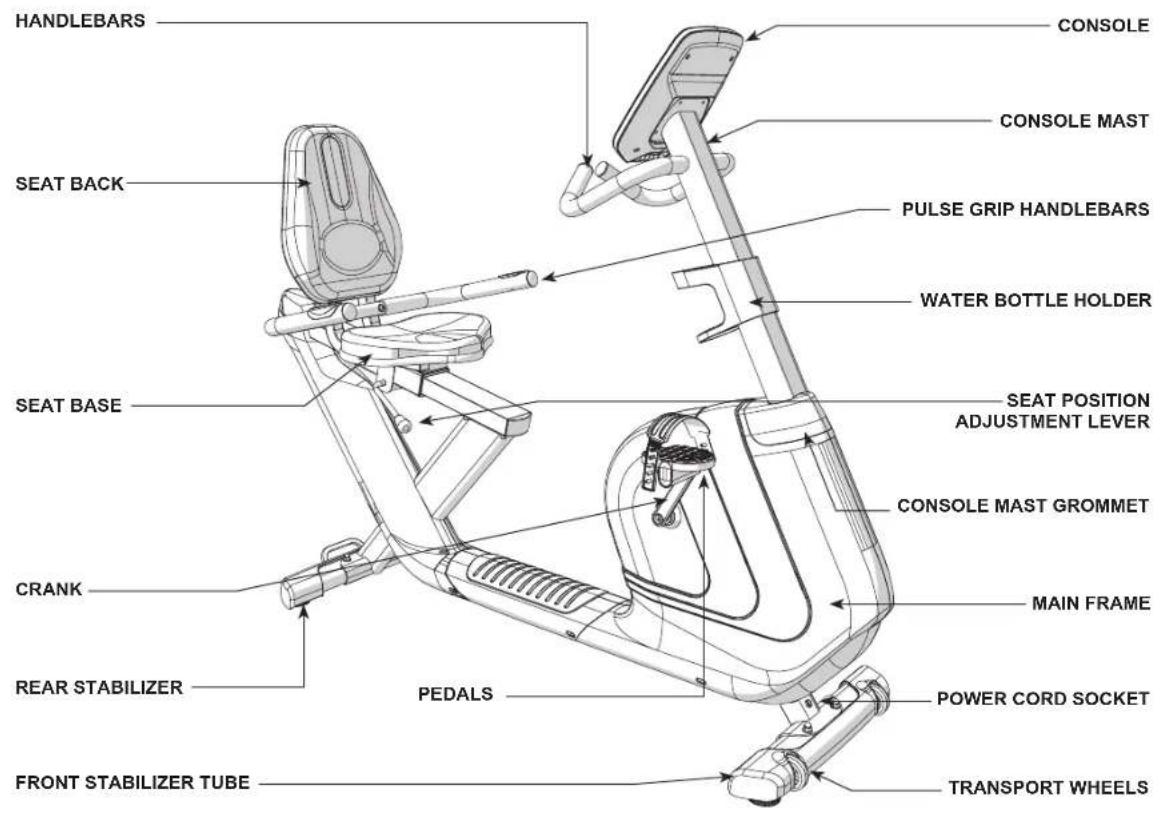
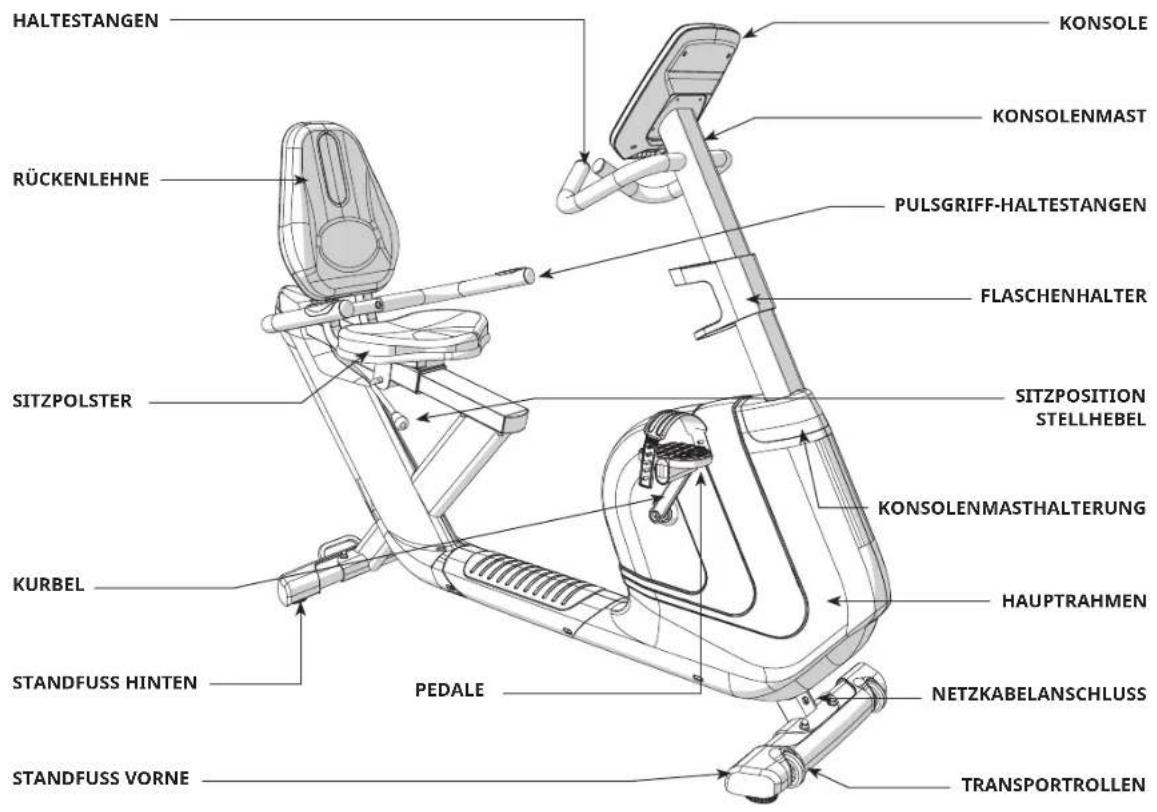
HANDLEBARS CONSOLE CONSOLE MAST SEAT BACK PULSE GRIP HANDLEBARS WATER BOTTLE HOLDER SEAT BASE SEAT POSITION ADJUSTMENT LEVER CONSOLE MAST GROMMET CRANK MAIN FRAME REAR STABILIZER PEDALS POWER CORD SOCKET FRONT STABILIZER TUBE TRANSPORT WHEELSTOOLS REQUIRED:
☐ 13/15mm Flat Wrench/Screwdriver
5mm L-Wrench
6mm L-Wrench
PARTS INCLUDED:
1 Main Frame
1 Console
□ 1 Console Mast
□ 1 Console Mast Grommet
□ 1 Water Bottle Holder
□ 1 Front Stabilizer Tube
□ 1 Rear Stabilizer Tube
□ 1 Seat Base
□ 1 Seat Back
□ 1 Seat Frame
□ 1 Seat Frame Cover
□ 1 Pulse Grip Handlebars
□ 2 Pedals with Straps
□ 1 Audio Adapter Cable
□ 1 Power Cord
□ 1 Hardware Kit
RECUMBENT BIKE PRE ASSEMBLY
UNPACKING
Unpack the product where you will be using it. Place the bike carton on a level flat surface. It is recommended that you place a protective covering on your floor. Never open box when it is on its side.
IMPORTANT NOTES
During each assembly step, ensure that ALL nuts and bolts are in place and partially threaded. It is recommended you complete the full assembly of your unit before completely tightening any ONE bolt.
Several parts have been pre-lubricated to aid in assembly and usage. Please do not wipe this off. If you have difficulty, a light application of lithium bike grease is recommended.
NEED HELP?
If you have questions or if there are any missing parts, contact your local dealer. Contact information may be located on the back panel of your manual or on the warranty card.
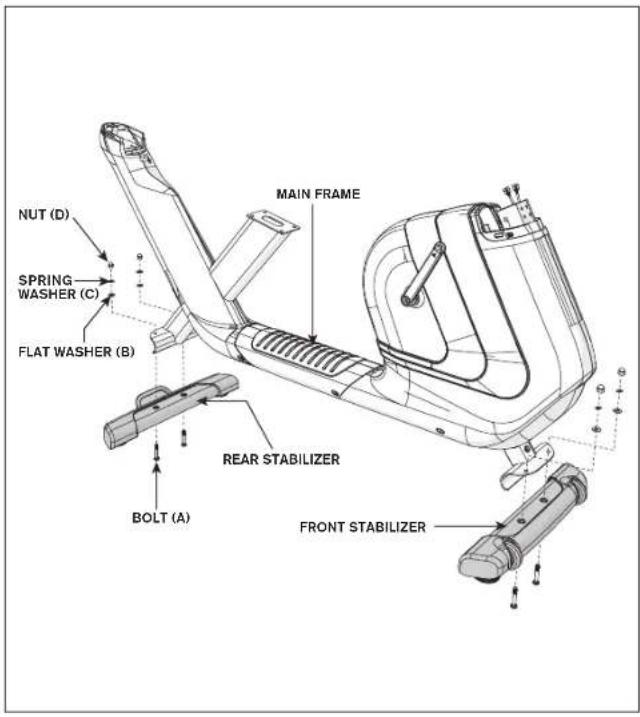
RECUMBENT BIKE ASSEMBLY STEP 1
text_image
NUT (D) SPRING WASHER (C) FLAT WASHER (B) MAIN FRAME REAR STABILIZER BOLT (A) FRONT STABILIZERHARDWARE FOR STEP 1
text_image
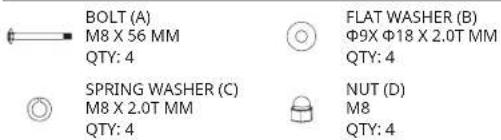
BOLT (A) M8 X 56 MM QTY: 4 SPRING WASHER (C) M8 X 2.0T MM QTY: 4 FLAT WASHER (B) Φ9X Φ18 X 2.0T MM QTY: 4 NUT (D) M8 QTY: 4A Open HARDWARE FOR STEP 1.
B Attach the REAR STABILIZER to the MAIN FRAME using 2 BOLTS (A), 2 FLAT WASHERS (B), 2 SPRING WASHERS (C) and 2 NUTS (D).
C Attach the FRONT STABILIZER to the MAIN FRAME using 2 BOLTS (A), 2 FLAT WASHERS (B), 2 SPRING WASHERS (C) and 2 NUTS (D).
Note: Lifting up the machine will help your assembly. First put in place the stabilizer and then insert the bolts will also make your assembly easier.
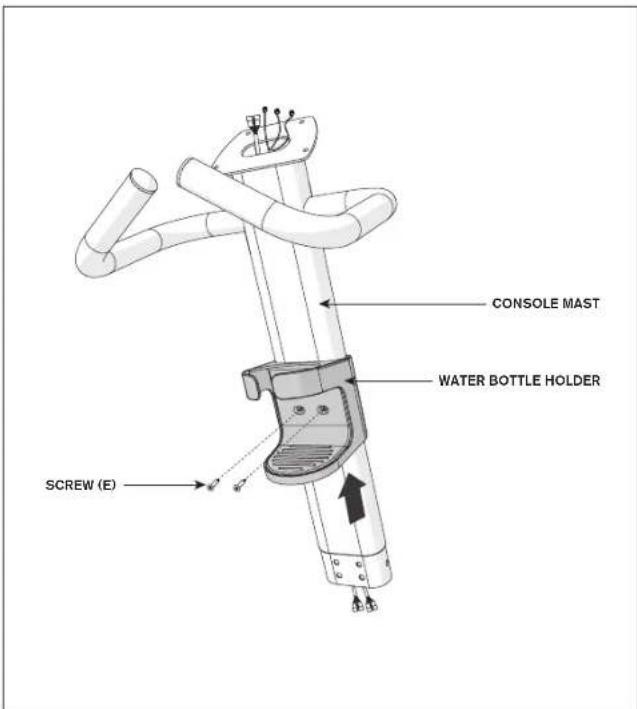
RECUMBENT BIKE ASSEMBLY STEP 2
text_image
CONSOLE MAST WATER BOTTLE HOLDER SCREW (E)HARDWARE FOR STEP 2

SCREW (E) M4 X 12 MM QTY: 2
A Open HARDWARE FOR STEP 2.
B Slide WATER BOTTLE HOLDER up CONSOLE MAST and align screw holes in WATER BOTTLE HOLDER with holes in CONSOLE MAST.
C Attach the WATER BOTTLE HOLDER using 2 SCREWS (E).

omfort R8.0
RECUMBENT BIKE ASSEMBLY STEP 3
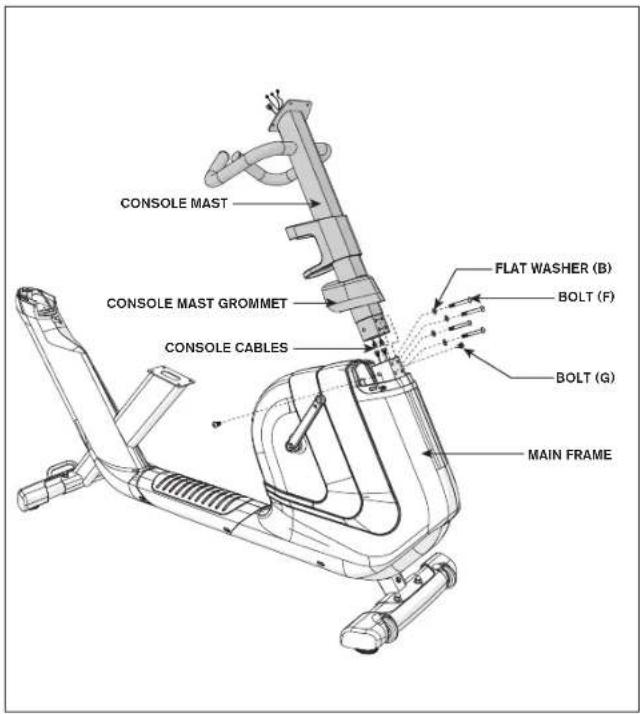
text_image
CONSOLE MAST CONSOLE MAST GROMMET CONSOLE CABLES FLAT WASHER (B) BOLT (F) BOLT (G) MAIN FRAMEHARDWARE FOR STEP 3
text_image
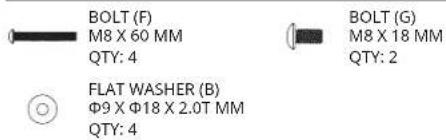
BOLT (F) M8 X 60 MM QTY: 4 FLAT WASHER (B) Φ9 X Φ18 X 2.0T MM QTY: 4 BOLT (G) M8 X 18 MM QTY: 2A Open HARDWARE FOR STEP 3.
B Slide CONSOLE MAST GROMMET from the bottom up the CONSOLE MAST.
C Attach CONSOLE CABLES and carefully tuck all cables into MAIN FRAME. Slide CONSOLE MAST into MAIN FRAME.
D Attach the CONSOLE MAST using 2 BOLTS (G) from the sides and 4 BOLTS (F) and 4 FLAT WASHERS (B) from the front.
E Slide CONSOLE MAST GROMMET down over MAIN FRAME.
RECUMBENT BIKE ASSEMBLY STEP 4
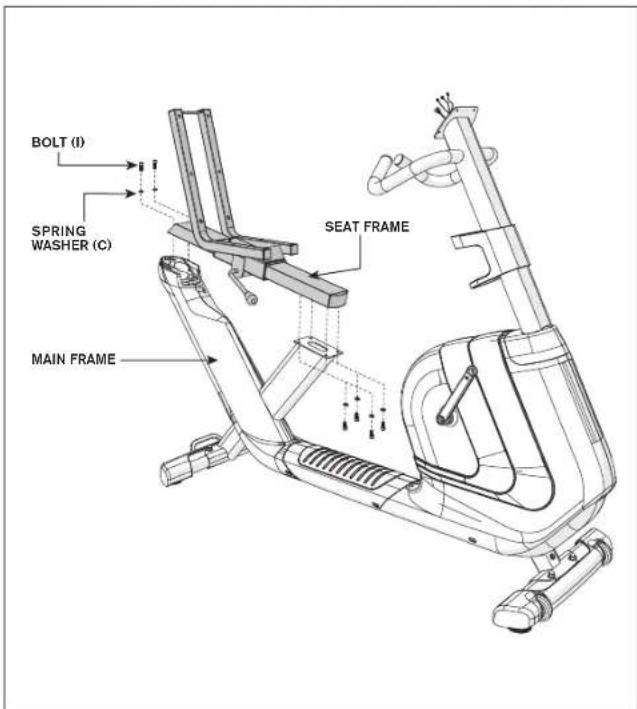
text_image
BOLT (I) SPRING WASHER (C) MAIN FRAME SEAT FRAMEHARDWARE FOR STEP 4

BOLT (I) M8 X 18 MM QTY: 6

SPRING WASHERS (C) M8 X 2.0T MM QTY: 6
A Open HARDWARE FOR STEP 4.
B Attach SEAT FRAME to the MAIN FRAME using 6 SOCKET HEAD CAP SCREWS (I) and 6 SPRING WASHERS (C) as shown.
RECUMBENT BIKE ASSEMBLY STEP 5

text_image
SEAT BACK SEAT BASE BOLT (J) FLAT WASHER (B) SEAT FRAMEHARDWARE FOR STEP 5

BOLT (J)
M8 X 45 MM
QTY: 8

FLAT WASHER (B)
Φ9 XΦΦ18 X 2.0T MM
QTY: 8
A Open HARDWARE FOR STEP 5.
B Attach SEAT BASE to SEAT FRAME using 4 BOLTS (J) and 4 FLAT WASHERS (B).
C Attach SEAT BACK to SEAT FRAME using 4 BOLTS (J) and 4 FLAT WASHERS (B).
RECUMBENT BIKE ASSEMBLY STEP 6
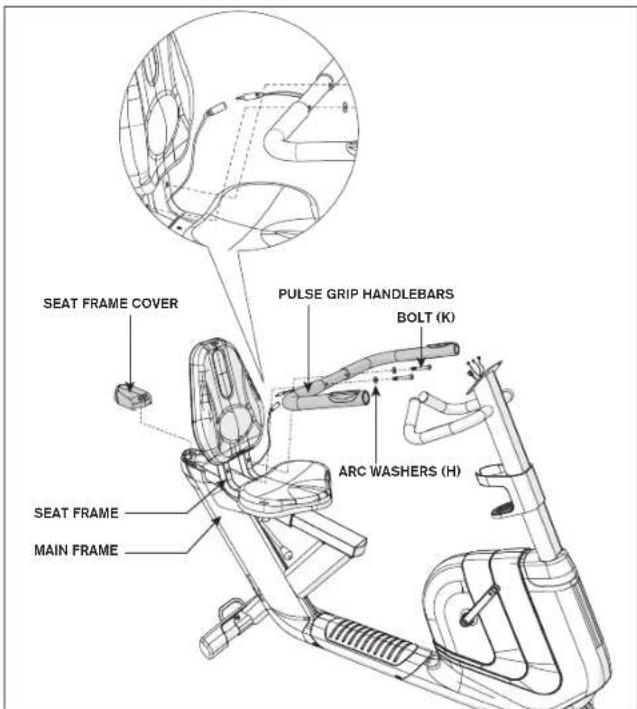
text_image
SEAT FRAME COVER PULSE GRIP HANDLEBARS BOLT (K) ARC WASHERS (H) SEAT FRAME MAIN FRAMEHARDWARE FOR STEP 6
A Open HARDWARE FOR STEP 6.
B Attach PULSE GRIP HANDLEBARS to the SEAT FRAME using 2 BOLTS (K) and 2 ARC WASHERS (H).
C Attach SEAT FRAME COVER to MAIN FRAME as shown.
D Attach the heart rate wires from the PULSE GRIP HANDLEBARS to the heart rate wires on the MAIN FRAME.
Note: Before assembly the handle make sure the handle is in right position with heart rate grip facing up and cable down.
RECUMBENT BIKE ASSEMBLY STEP 7
text_image
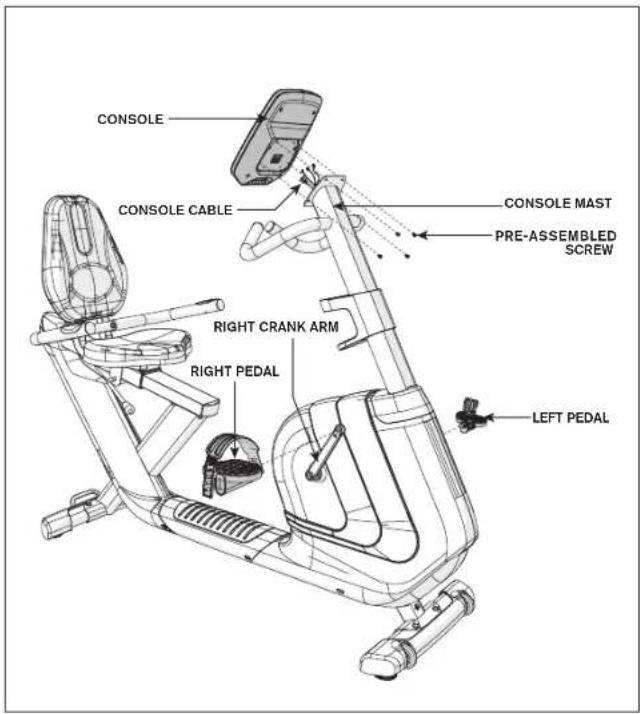
CONSOLE CONSOLE CABLE CONSOLE MAST PRE-ASSEMBLED SCREW RIGHT CRANK ARM RIGHT PEDAL LEFT PEDALHARDWARE FOR STEP 7

PRE-ASSEMBLED
SCREW
M5×7MM
QTY: 4
A HARDWARE FOR STEP 7 is pre-installed.
B Attach the RIGHT PEDAL to the RIGHT CRANK ARM, tightening it clockwise with the provided 13mm/15mm flat wrench.
C Attach the LEFT PEDAL onto the left crank arm, tightening it counter-clockwise with the provided 13mm/15mm flat wrench. (NOTE: The left crank arm is reversed threaded so it is very important that it is tightened counter-clockwise. Tightening it the opposite way can damage the pedal or the crank arm or both.)
D Connect the CONSOLE CABLE and carefully tuck into the CONSOLE MAST.
E Attach the CONSOLE to the CONSOLE MAST using 4 PRE-ASSEMBLED SCREWS.
Note: You may need a 15mm wrench to assemble the pedal. Please be care not to pinch yourself when assembling.
RECUMBENT BIKE ASSEMBLY
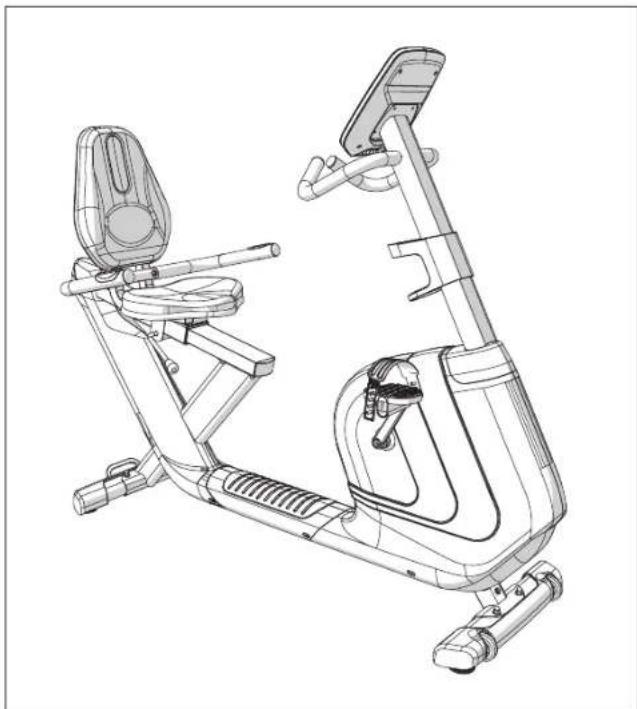
natural_image
Line drawing of a stationary exercise bike with seat, legs, and front-mounted arm (no text or symbols)ASSEMBLY COMPLETE!
Comfort R8.0
Overall Dimension: 165 x 64 x 135 cm
Net Weight: 49.5 kg / 109 lbs.
Gross Weight: 56.5 kg / 124 lbs.
Max. User Weight: 136 kg / 300 lbs.
text_image
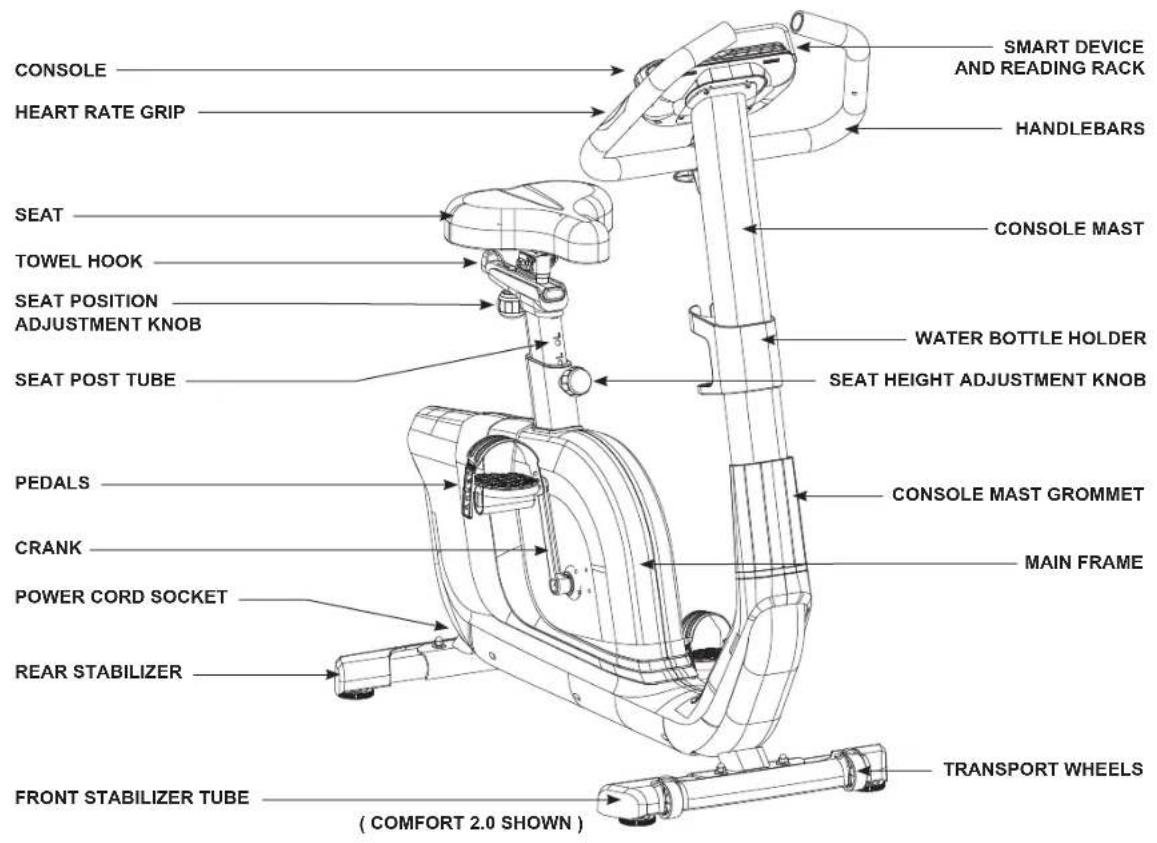
CONSOLE HEART RATE GRIP SEAT TOWEL HOOK SEAT POSITION ADJUSTMENT KNOB SEAT POST TUBE PEDALS CRANK POWER CORD SOCKET REAR STABILIZER FRONT STABILIZER TUBE (S COMFORT 2.0 SHOWN ) SMART DEVICE AND READING RACK HANDLEBARS CONSOLE MAST WATER BOTTLE HOLDER SEAT HEIGHT ADJUSTMENT KNOB CONSOLE MAST GROMMET MAIN FRAME TRANSPORT WHEELSTOOLS REQUIRED:
☐ 13/15mm Flat Wrench/Screwdriver
6mm L-Wrench
PARTS INCLUDED:
□ 1 Main Frame
□ 1 Console
□ 1 Console Mast
□ 1 Console Mast Grommet
□ 1 Water Bottle Holder
□ 1 Front Stabilizer
□ 1 Rear Stabilizer
1 Seat
□ 1 Seat Post Tube
☐ 2 Pedals with Straps
□ 1 Audio Adapter Cable
□ 1 Power Cord
□ 1 Hardware Kit
UPRIGHT BIKE PRE ASSEMBLY
UNPACKING
Unpack the product where you will be using it. Place the bike carton on a level flat surface. It is recommended that you place a protective covering on your floor. Never open box when it is on its side.
IMPORTANT NOTES
During each assembly step, ensure that ALL nuts and bolts are in place and partially threaded. It is recommended you complete the full assembly of your unit before completely tightening any ONE bolt.
Several parts have been pre-lubricated to aid in assembly and usage. Please do not wipe this off. If you have difficulty, a light application of lithium bike grease is recommended.
NEED HELP?
If you have questions or if there are any missing parts, contact your local dealer. Contact information may be located on the back panel of your manual or on the warranty card.

Comfort Upright Bike
A Open HARDWARE FOR STEP 1.
B Attach the REAR STABILIZER to the MAIN FRAME using 2 BOLTS (A), 2 FLAT WASHERS (B), 2 SPRING WASHER (I) and 2 NUTS (C).
C Attach the FRONT STABILIZER to the MAIN FRAME using 2 BOLTS (A), 2 FLAT WASHERS (B), 2 SPRING WASHER (I) and 2 NUTS (C).
Note: Lifting up the machine will help your assembly. First put in place the stabilizer and then insert the bolts will also make your assembly easier.
Note: There is no hardware needed at this step.
A Attach the SEAT to the SEAT POST TUBE and tighten the SEAT NUTS by using 13mm wrench. (You may need additional 13mm wrench to make the seat assembly more easier.)
B Loosen the SEAT HEIGHT ADJUSTMENT KNOB by turning it two half turns counter-clockwise.
C Then pull the SEAT HEIGHT ADJUSTMENT KNOB outward while sliding the SEAT POST TUBE into the MAIN FRAME.
Note: While assembling the SEAT please make sure the seat is in right position. Tilt up the front of the SEAT might help you gain a more stable riding experience.

Comfort Upright Bike
A Open HARDWARE FOR STEP 3.
B Slide WATER BOTTLE HOLDER up CONSOLE MAST and align screw holes in WATER BOTTLE HOLDER with holes in CONSOLE MAST.
C Attach the WATER BOTTLE HOLDER using 2 SCREWS (D).
Note: Be careful not to pinch any cable while assembling.
A Open HARDWARE FOR STEP 4.
B Slide CONSOLE MAST GROMMET from the bottom up the CONSOLE MAST with the small POSITIONING NOTCH facing forward.
C Attach CONSOLE CABLES and carefully tuck all cables into MAIN FRAME. Slide CONSOLE MAST into MAIN FRAME.
D Attach the CONSOLE MAST using 2 BOLTS (G) from the sides and 4 BOLTS (E), 4 FLAT WASHERS (B), 4 NUTS (H).
E Slide CONSOLE MAST GROMMET down over MAIN FRAME.

comfort
pright
Bike

Comfort Upright Bike
A Open HARDWARE FOR STEP 5.
B Holding HANDLEBAR close to CONSOLE MAST and feed the HANDLBAR WIRES through the hole in the CONSOLE MAST and out the top of the CONSOLE MAST.
C Attach handlebar to CONSOLE MAST using 1 T KNOB (F).
Note: You may need extra help to route the heart rate cable and tighten the handlebar.
Note: There is no hardware needed at this step.
A HARDWARE is pre-installed.
B Attach the RIGHT PEDAL to the RIGHT CRANK ARM, tightening it clockwise with the provided 13mm/15mm flat wrench.
C Attach the LEFT PEDAL onto the left crank arm, tightening it counter-clockwise with the provided 13mm/15mm flat wrench. (NOTE: The left crank arm is reversed threaded so it is very important that it is tightened counter-clockwise. Tightening it the opposite way can damage the pedal or the crank arm or both.)
D Connect the CONSOLE CABLE and carefully tuck into the CONSOLE MAST.
E Attach the CONSOLE to the CONSOLE MAST using 4 PRE-INSTALLED SCREWS.
Note: You may need a 15mm wrench to assemble the pedal. Please be care not to pinch yourself when assembling.

Comfort Upright Bike
natural_image
Line drawing of a stationary exercise bike with adjustable arms and legs (no text or symbols)COMFORT 2.0 SHOWN
ASSEMBLY COMPLETE!
Comfort 2.0
Overall Dimension: 120 x 55 x 134 cm
Net Weight: 35.5 kg / 78 lbs.
Gross Weight: 41 kg / 90 lbs.
Max. User Weight: 136 kg / 300 lbs.
Comfort 4.0
Overall Dimension: 120 x 55 x 134 cm
Net Weight: 38 kg / 84 lbs.
Gross Weight: 43.5 kg / 96 lbs.
Max. User Weight: 136 kg / 300 lbs.
Comfort 8.1
Overall Dimension: 120 x 55 x 134 cm
Net Weight: 38 kg / 84 lbs.
Gross Weight: 43.5 kg / 96 lbs.
Max. User Weight: 136 kg / 300 lbs.
BIKE OPERATION
This section explains how to use your bike's console and programming.

text_image
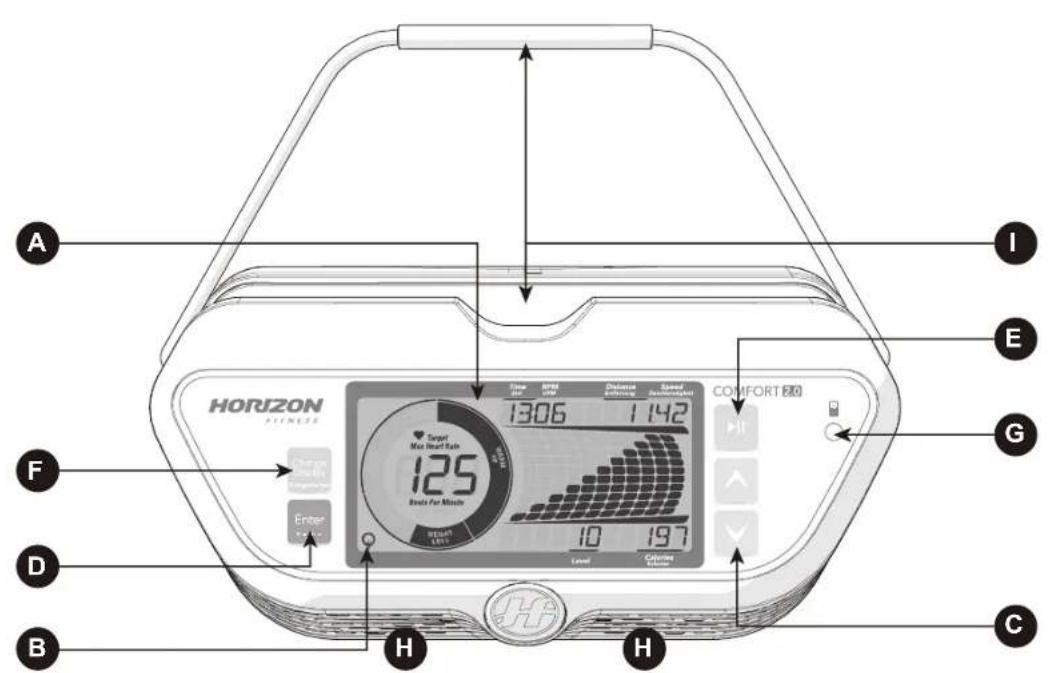
A I E HORIZON PIONEER 1306 1142 Target Max Heart Bath 125 Beds For Minute 10 197 COMFORT BOX Enter Entry B C H HNote: There is a thin protective sheet of clear plastic on the overlay of the console that should be removed before use.
A) LCD DISPLAY WINDOWS: Time, Distance, Calories, Speed, RPM, Resistance Level, Heart Rate, Calories, HR Wheel, Workout Profile.
B) ENERGY SAVER: to minimize energy consumption, your machine will enter energy saver mode automatically (after entering stand-by mode for 15 mins) and can be quickly woken up with a press of a button.
C) ▼▲ ARROW BUTTONS: used up and down arrow button to select program, set up your console or change resistance while exercising.
D) ENTER BUTTON: used to confirm setting of workout program or user profile.
E) ▶II START AND STOP BUTTON: press to begin exercising, pause your workout or resume exercising after pause. Hold for 3 seconds to reset the console.
F) CHANGE DISPLAY BUTTON: used to scroll through display modes and workout feedbacks. Press to switch display column and change between profile display mode for resistance(upper bar displayed) or watt profile for your current workout watt.(lower bar displayed)
G) AUDIO IN JACK: use to connect with your cellphone or MP3 to play your workout music with integrated speaker.
H) SPEAKER: play music through speakers when connected to your media player.
I) SMART DEVICE AND READING RACK: holds your smart phone, tablet or reaing materials.

omfort 2.0
text_image
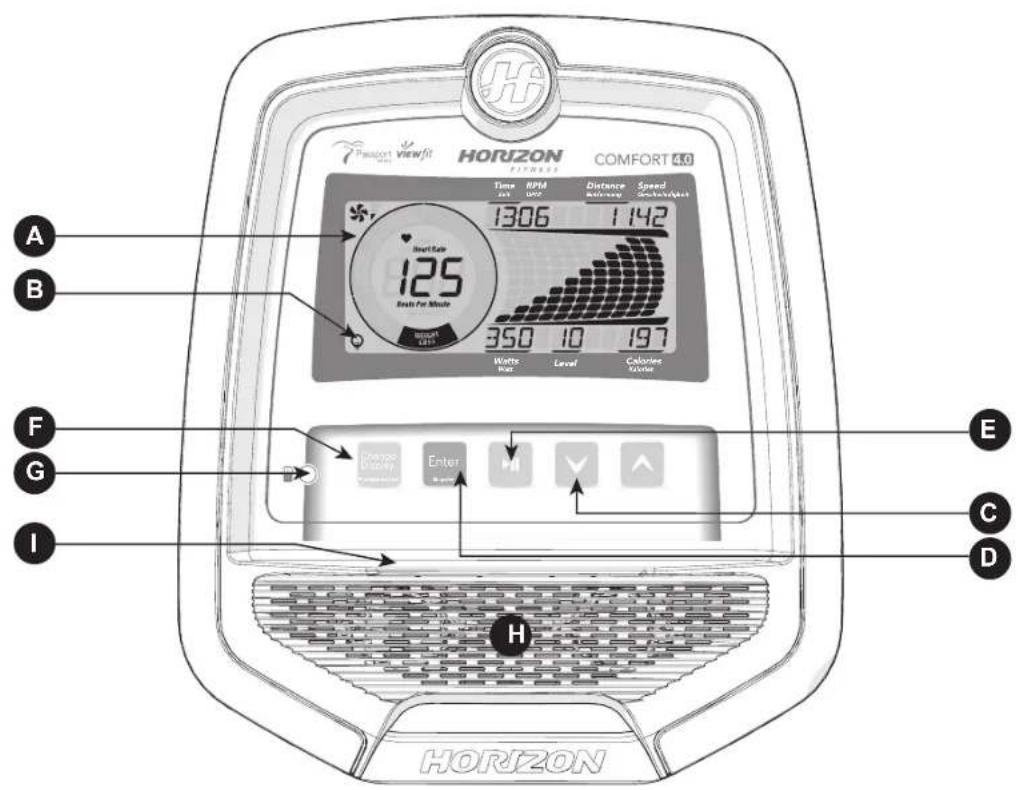
HORIZON VIEW FIT COMFORT 4.0 Time RPM Distance Speed 1306 1142 Heart Rate 125 Rough Per Minute 350 10 197 Watts Run Level Calories Output Enter I H E C D A B F G H HORIZONNote: There is a thin protective sheet of clear plastic on the overlay of the console that should be removed before use.
A) LCD DISPLAY WINDOWS: Time, Distance, Calories, Speed, RPM, Resistance Level, Heart Rate, Calories, Watts, HR Wheel, Profile.
B) ENERGY SAVER: to minimize energy consumption, your machine will enter energy saver mode automatically (after entering stand-by mode for 15 mins) and cab be quickly woken up with a touch of a button.
C) ▼▲ ARROW BUTTONS: used up and down arrow button to select program, set up your console or change resistance while exercising.
D) ENTER BUTTON: used to confirm setting of workout program or user profile.
E) START AND STOP BUTTON: press to begin exercising, pause your workout or resume exercising after pause. Hold for 3 seconds to reset the console.
F) CHANGE DISPLAY BUTTON: used to scroll through display modes and workout feedbacks. Press to switch display column and change between profile display mode for resistance(upper bar displayed) or watt profile for your current workout watt (lower bar displayed).
(Note: use with arrow button up to activate Passport sync process, see page 50 for more details).
G) AUDIO IN JACK: use to connect with your cellphone or MP3 to play your workout music with integrated speaker.
H) SPEAKER: play music through speakers when connected to your media player.
I) SMART DEVICE AND READING RACK: holds your smart phone, tablet or reaing materials.

text_image
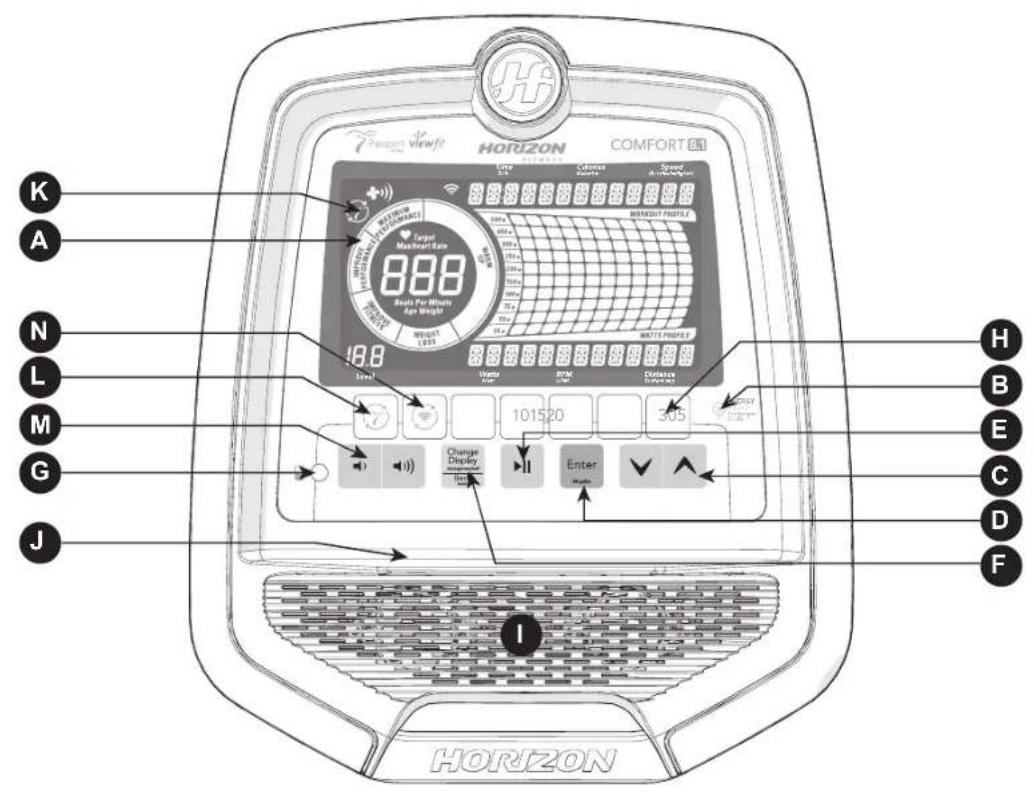
HORIZON COMFORT® K A N L M G J 18.8 Level Volume Speed Air Condition Target Mushroom Rate 888 Sound For Minute Air Weight WEIGHT LPS WATER SUN Distance DISTANCE Change Display Enter HORIZONCOMFORT 8.1 / R8.0 CONSOLE OPERATION
Note: There is a thin protective sheet of clear plastic on the overlay of the console that should be removed before use.
A) LCD DISPLAY WINDOWS: Time, Distance, Speed, RPM, Resistance Level, Heart Rate, Calories, Watts, HR Wheel, Resistance Profile, Passport Connection.
B) ENERGY SAVER: to minimize energy consumption, your machine will enter energy saver mode automatically (after entering stand-by mode for 15 mins) and can be quickly woken up with a press of a button.
C) ▼▲ ARROW BUTTONS: used up and down arrow button to select program, set up your console or change resistance while exercising.
D) ENTER BUTTON: used to confirm setting of workout program or user profile.
E) ▶II START AND STOP BUTTON: press to begin exercising, pause your workout or resume exercising after pause. Hold for 3 seconds to reset the console.
F) CHANGE DISPLAY / BACK BUTTON : used to scroll through display modes and workout feedbacks. Press to switch display column and change between profile display mode for resistance(upper bar displayed) or watt profile for your current workout watt (lower bar displayed).
also used to navigate back to the user setup progress.
G) AUDIO IN JACK: use to connect with your cellphone or MP3 to play your workout music with integrated speaker.
H) RESISTANCE DIRECT BUTTON: use the direct button to chose your desired workout resistance.
I) SPEAKER: play music through speakers when connected to your media player.
J) SMART DEVICE AND READING RACK: holds your smart phone, tablet or reading materials.
K) PASSPORT: It will show on the screen when the machine is connected to Passport.
L) PASSPORT QUICK KEY: used to connect to Passport. Press and sync with Passport.
M) VOLUME BUTTON: used to turn up and turn down the volume.
N) WI-FI CONNECT & SYNC & TIMEZONE: press to reset and connect your wireless internet connection and set time zone. See Page 36 for more info.
COMFORT 2.0 / 4.0 DISPLAYS
text_image
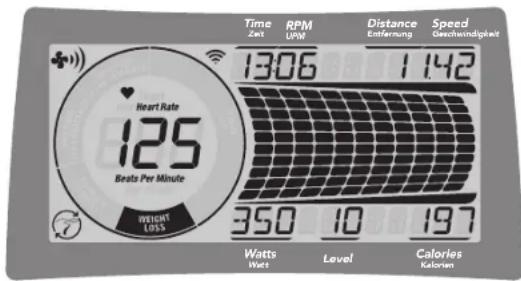
Time Zert RPM UPM Distance Entfernung Speed Geschwindigkeit 1306 1 142 Heart Rate 125 Beats Per Minute WEIGHT LOSS 350 10 197 Watts Wets Level Calories KalotienDISPLAY WINDOWS
• TIME: Shown as minutes: seconds. View the time remaining or the time elapsed in your workout.
- RPM: Revolutions Per Minute.
- DISTANCE: Shown as km. Indicates distance traveled or distance remaining during your workout.
- SPEED: Shown as KM/H. Indicates how fast the wheels are moving.
- WATTS (COMFORT 4.0 ONLY): Displays current user power output. Your workout watt performance will also be calculated and shown as dot-matrix profile at right hand side.
- LEVEL: Shows the current level of resistance.
• CALORIES: Total calories burned during your workout.
- HEART RATE: Shown as BPM (beats per minute). Used to monitor your heart rate.
- MAXIMUM HEART RATE: Shows your maximum heart rate. The Change Display button switches between your MAXIMUM HEART RATE and your current HEART RATE. The MAXIMUM HEART RATE is calculated as (220-age) x 0.85.
- HEART RATE WHEEL: Displays your current activity zone during your workout. With this Heart rate wheel you can be certain if your exercise level fits your workot goal. WARM UP: 0-60% of maximum heart rate.
WEIGHT LOSS: 60-70% of maximum heart rate.
IMPROVE FITNESS: 70-80% of maximum heart rate.
IMPROVE PERFORMANCE: 80-90% of maximum heart rate.
MAXIMUM PERFORMANCE: 90-100% of maximum heart rate.
- ENERGY SAVER: Indicates when the machine is in Energy Saver mode to conserve power consumption(see page 51 for more detail information.
- PASSPORT (COMFORT 4.0 ONLY): Indicates when the machine is in Passport mode to sync with Passport.
COMFORT 8.1 / R8.0 DISPLAYS
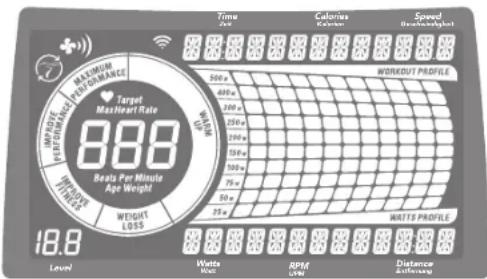
gauge
| Metric | Value | | --- | --- | | Level | 18.8 | | Time (min) | 600 | | Calories (kcal) | 200 | | Speed (km/h/minute) | 150 | | Fitness Loss | 75 | | Watts (Watt) | 340 | | RPM (L/min) | 200 | | Distance (km/h) | 150 |DISPLAY WINDOWS
• TIME: Shown as minutes : seconds. View the time remaining or the time elapsed in your workout.
- RPM: Revolutions Per Minute.
- DISTANCE: Shown as km. Indicates distance traveled or distance remaining during your workout.
- SPEED: Shown as KM/H. Indicates how fast the wheels are moving.
- WATTS: Displays current user power output.
- LEVEL: Shows the current level of resistance.
• CALORIES: Total calories burned during your workout.
- HEART RATE: Shown as BPM (beats per minute). Used to monitor your heart rate.
- MAXIMUM HEART RATE: Shows your maximum heart rate. The Change Display button switches between your MAXIMUM HEART RATE and your current HEART RATE. The MAXIMUM HEART RATE is calculated as (220-age) x 0.85.
-
HEART RATE WHEEL: Displays your current activity zone during your workout. With this Heart rate wheel you can be certain if your exercise level fits your workot goal.
WARM UP: 0-60% of maximum heart rate.
WEIGHT LOSS: 60-70% of maximum heart rate.
IMPROVE FITNESS: 70-80% of maximum heart rate.
IMPROVE PERFORMANCE: 80-90% of maximum heart rate.
MAXIMUM PERFORMANCE: 90-100% of maximum heart rate. -
WATT SCALE AND PROFILE DISPLAY: shows your current workout watt. ex. 50W dot will light up to show when reaching or selecting 25-50 watt. You may use change display key to switch back to workout profile display. Note: Scale will only show up to 400w in Watts programs to reflect your target watt range of 25-400 watt.
- ENERGY SAVER: Indicates when the machine is in Energy Saver mode to conserve power consumption(see page 51 for more detail information.
- PASSPORT: Indicates when the machine is in Passport mode to sync with Passport.
- WI-FI: Indicates wireless connection is present and the strength (low, medium, high).

SET UP XID ACCOUNT FOR VIEWFIT CONNECTIVITY
Creating an xID account will allow you to save and share workout data online at viewfit.com Up to four users can be saved on a machine. This process is the first step in connecting your equipment. It must be done from a computer, tablet, or mobile device.
1) Visit the web site: viewfit.com
2) Once at the web site, select the CONNECT YOUR EQUIPMENT option on the top menu bar.
3) The first step in connecting your equipment will to be creating your xID account. This will be your login to ViewFit.
4) Enter your phone number or another easy-to-remember 10-14 digit number. This will be your account number.
5) Fill in your profile information to finish the xID account set up process. You will be asked to provide an email address not associated with any other xID account. Check your email after the set-up process for a link to validate your account.
CONNECT WI-FI
Once you have created your xID account, you will be able to move on to activating the Wi-Fi on your equipment. Reminder, this requires you to use your computer, tablet, or mobile device that is connected to the internet.
1) Press and hold 📞 for 3-5 seconds you can use up/down button to set your time zone, please refer to time zone code in the last page, then press enter button you will see the message ACTIVATED on your screen.
2) On your computer or other device, go to your Wi-Fi settings. You should select the "ViewFit" network. Doing this enables you to connect your equipment to your wireless network.
3) A new window will pop up with the list of wireless networks your equipment can see. Select your home Wi-Fi network and connect.
4) The remaining step is to reconnect your computer or other device back to your Wi-Fi network. Go to your settings again and connect as you normally would.
Congratulations! You are now connected and ready to get started.
GETTING STARTED
QUICK START
1) Make sure the power is on.
2) Press START / STOP ▶II to start exercise in MANUAL mode.
3) Press ▲▼to adjust resistance level during the workout.
START YOUR WORKOUT
1) Select guest / user1 / user2 / user3 / user4.
2) Select your desired program.
3) Select your gender (required only under Fit-Test program).
4) Select the program settings, time, level, etc.
5) Press Start/Stop ▶II to start your workout.
TO CLEAR SELECTION/RESET THE CONSOLE
Hold START/STOP▶ for 3 seconds.

When your workout is complete, the bike will stop and beep. You can unplug the machine or it will enter Energy Saver Mode in 15 mins.

PROGRAM INFORMATION
Comfort 2.0: 11 Programs (Manual / Intervals / Game / Weight Loss / Rolling / Cadence / Random / THR Zone / %THR / Custom 1 / Custom 2)
Comfort 4.0: 14 Programs (Constant Watts / Manual / Intervals / Game / Fitness Test / Weight Loss / Weight Loss Plus / Rolling / Cadence / Random / THR Zone / % THR / Custom 1 / Custom 2)
Comfort 8.1: 16 Programs (Constant Watts / Interval Watts / Manual / Intervals / Game / Fitness Test / Weight Loss / Weight Loss Plus / Rolling / Cadence / Random / THR Zone / %THR / Strength Builder / Custom 1 / Custom 2)
Comfort R8.0: 16 Programs (Constant Watts / Interval Watts / Manual / Intervals / Game / Fitness Test / Weight Loss / Weight Loss Plus / Rolling / Cadence / Random / THR Zone / %THR / Strength Builder / Custom 1 / Custom 2)
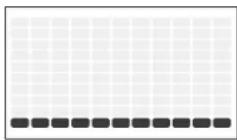
1) MANUAL: Allows you to adjust the resistance level to your preference, without a preset program. Adjust your resistance manually during your workout. User sets time and resistance using (up/down arrow) and ENTER.
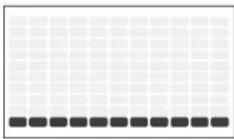
2) INTERVALS: Improves your strength, speed, and endurance by raising and lowering the resistance levels throughout your workout to involve both your heart and muscles. Time based program with 16 levels to choose from. User sets time and level using (up/down arrows) and ENTER.
(Comfort 2.0)
| INTERVALS | |||||||||||||||||||||||||
| Warm Up Program Segments - Repeat Cool down | |||||||||||||||||||||||||
| Seconds 60 | 60 | 60 | 60 | 60 | 30 | 40 | 60 | 30 | 30 | 60 | 50 | 60 | 60 | 30 | 30 | 60 | 60 | 60 | 60 | 60 | |||||
| Segment 1 | 2 | 3 | 4 | 5 | 6 | 7 | 8 | 9 | 10 | 11 | 12 | 13 | 14 | 15 | 16 | 17 | 18 | 19 | 20 | ||||||
| Level 1 1 | 2 | 2 | 3 | 5 | 1 | 5 | 5 | 1 | 5 | 1 | 5 | 5 | 1 | 3 | 2 | 2 | 1 | ||||||||
| Level 2 1 | 2 | 2 | 3 | 6 | 2 | 2 | 6 | 6 | 2 | 6 | 6 | 6 | 2 | 3 | 2 | 2 | 1 | ||||||||
| Level 3 1 | 2 | 2 | 4 | 7 | 3 | 7 | 7 | 3 | 7 | 3 | 7 | 3 | 4 | 2 | 2 | 1 | |||||||||
| Level 4 1 | 2 | 2 | 5 | 8 | 4 | 4 | 8 | 4 | 8 | 4 | 8 | 8 | 4 | 5 | 2 | 2 | 1 | ||||||||
| Level 5 2 | 3 | 5 | 6 | 9 | 5 | 9 | 9 | 5 | 9 | 5 | 9 | 9 | 5 | 6 | 3 | 2 | |||||||||
| Level 6 2 | 3 | 5 | 7 | 10 | 6 | 6 | 10 | 10 | 6 | 10 | 6 | 6 | 10 | 10 | 6 | 7 | 5 | 3 | 2 | ||||||
| Level 7 | 2 | 3 | 5 | 8 | 11 | 7 | 7 | 11 | 11 | 7 | 11 | 7 | 8 | ||||||||||||
| Level 8 2 | 3 | 5 | 9 | 12 | 8 | 8 | 12 | 12 | 8 | 8 | 12 | 12 | 8 | 9 | 5 | 3 | 2 | ||||||||
| Level 9 3 | 4 | 5 | 10 | 13 | 9 | 9 | 13 | 9 | 13 | 9 | 9 | 9 | 13 | 9 | 10 | 5 | 4 | 3 | |||||||
| Level 10 3 | 4 | 8 | 11 | 14 | 10 | 10 | 14 | 14 | 10 | 14 | 10 | 10 | 10 | 14 | 14 | 10 | 11 | 8 | 4 | 3 | |||||
| Level 11 | 3 | 6 | 10 | 12 | 15 | 11 | 11 | 15 | 15 | 11 | 15 | 15 | 12 | ||||||||||||
| Level 12 3 | 6 | 10 | 13 | 16 | 12 | 12 | 16 | 16 | 12 | 16 | 12 | 16 | 12 | 16 | 16 | 12 | 13 | 10 | 6 | 3 | |||||
(Comfort 4.0, 8.1, R8.0)
| INTERVALS | |||||||||||||||||||||||||||||||||||||||||||||||||||||||||||||||||||||||||||||||||||||||||||||||||||||||||||||||||||||||||
| Warm Up Program Segments - Repeat Cool down | |||||||||||||||||||||||||||||||||||||||||||||||||||||||||||||||||||||||||||||||||||||||||||||||||||||||||||||||||||||||||
| Seconds | 60 | 60 | 60 | 60 | 60 | 30 | 40 | 60 | 30 | 30 | 60 | 60 | 60 | 60 | 30 | 30 | 60 | 60 | 60 | 60 | 60 | 60 | 60 | 60 | 60 | 60 | 60 | 60 | 60 | 60 | 60 | 60 | 60 | 60 | 60 | 60 | 60 | 60 | 60 | 60 | 60 | 60 | 60 | 60 | 60 | 60 | 60 | 60 | 60 | 61 | 61 | 61 | 61 | 61 | 61 | 61 | 61 | 61 | 61 | 61 | 61 | 61 | 61 | 61 | 61 | 61 | 61 | 61 | 61 | 61 | 61 | 61 | 61 | 61 | 61 | 61 | 61 | 61 | 61 | 61 | 61 | 61 | 61 | ||||||||||||||||||||||||||||||||||||||
| Segment | 1 | 2 | 3 | 4 | 5 | 6 | 7 | 8 | 9 | 10 | 1 | 11 | 12 | 13 | 14 | 15 | 16 | 17 | 18 | 19 | 20 | ||||||||||||||||||||||||||||||||||||||||||||||||||||||||||||||||||||||||||||||||||||||||||||||||||||
| Level 1 | 1 | 3 | 3 | 4 | 7 | 1 | 1 | 7 | 7 | 1 | 7 | 1 | 17 | 7 | 1 | 4 | 3 | 3 | 1 | ||||||||||||||||||||||||||||||||||||||||||||||||||||||||||||||||||||||||||||||||||||||||||||||||||||||
| Level 2 | 1 | 3 | 3 | 4 | 9 | 3 | 3 | 9 | 9 | 3 | 9 | 3 | 3 | 9 | 9 | 3 | 4 | 3 | 1 | ||||||||||||||||||||||||||||||||||||||||||||||||||||||||||||||||||||||||||||||||||||||||||||||||||||||
| LEVEL 3 | 1 | 3 | 3 | 6 | 10 | 4 | 4 | 10 | 10 | 4 | 4 | 10 | 4 | 4 | 10 | 4 | 10 | 4 | 6 | 3 | 3 | 1 | |||||||||||||||||||||||||||||||||||||||||||||||||||||||||||||||||||||||||||||||||||||||||||||||||||
| Level 4 | 1 | 3 | 3 | 7 | 12 | 6 | 6 | 12 | 12 | 6 | 6 | 12 | 12 | 6 | 6 | 12 | 12 | 6 | 7 | 3 | 3 | 1 | |||||||||||||||||||||||||||||||||||||||||||||||||||||||||||||||||||||||||||||||||||||||||||||||||||
| LEVEL 5 | 3 | 4 | 7 | 9 | 13 | 7 | 7 | 13 | 13 | 7 | 13 | 7 | 13 | 7 | 13 | 7 | 13 | 7 | 9 | 7 | 4 | 3 | |||||||||||||||||||||||||||||||||||||||||||||||||||||||||||||||||||||||||||||||||||||||||||||||||||
| LEVEL 6 | 3 | 4 | 7 | 10 | 15 | 9 | 9 | 15 | 15 | 9 | 15 | 9 | 15 | 9 | 15 | 9 | 15 | 15 | 9 | 10 | 7 | 4 | 3 | ||||||||||||||||||||||||||||||||||||||||||||||||||||||||||||||||||||||||||||||||||||||||||||||||||
| LEVEL 7 | 3 | 4 | 7 | 12 | 16 | 10 | 10 | 16 | 16 | 10 | 16 | 10 | 10 | 16 | 10 | 10 | 10 | 16 | 16 | 10 | 12 | 7 | 4 | 3 | |||||||||||||||||||||||||||||||||||||||||||||||||||||||||||||||||||||||||||||||||||||||||||||||||
| LEVEL 8 | 3 | 4 | 7 | 13 | 18 | 12 | 12 | 18 | 18 | 12 | 18 | 12 | 12 | 18 | 18 | 12 | 13 | 7 | 4 | 3 | |||||||||||||||||||||||||||||||||||||||||||||||||||||||||||||||||||||||||||||||||||||||||||||||||||||
| LEVEL 9 | 4 | 6 | 7 | 15 | 19 | 13 | 13 | 19 | 9 | 13 | 19 | 13 | 13 | 19 | 19 | 13 | 15 | 7 | 6 | 4 | |||||||||||||||||||||||||||||||||||||||||||||||||||||||||||||||||||||||||||||||||||||||||||||||||||||
| LEVEL 10 | 4 | 6 | 12 | 16 | 21 | 15 | 15 | 15 | 21 | 21 | 15 | 21 | 15 | 15 | 21 | 21 | 15 | 16 | 12 | 6 | 4 | ||||||||||||||||||||||||||||||||||||||||||||||||||||||||||||||||||||||||||||||||||||||||||||||||||||
| LEVEL 11 | 4 | 9 | 15 | 18 | 22 | 16 | 16 | 22 | 22 | 16 | 22 | 22 | 16 | 16 | 22 | 22 | 16 | 18 | 15 | 9 | 4 | ||||||||||||||||||||||||||||||||||||||||||||||||||||||||||||||||||||||||||||||||||||||||||||||||||||
| LEVEL 12 | 4 | 9 | 15 | 19 | 24 | 18 | 18 | 24 | 24 | 24 | 18 | 24 | 18 | 18 | 24 | 24 | 18 | 19 | 15 | 9 | 4 | ||||||||||||||||||||||||||||||||||||||||||||||||||||||||||||||||||||||||||||||||||||||||||||||||||||
| LEVEL 13 | 7 | 13 | 19 | 21 | 25 | 15 | 19 | 25 | 25 | 19 | 25 | 19 | 25 | 19 | 25 | 25 | 19 | 21 | 19 | 13 | 7 | ||||||||||||||||||||||||||||||||||||||||||||||||||||||||||||||||||||||||||||||||||||||||||||||||||||
| LEVEL 14 | 7 | 13 | 19 | 22 | 27 | 21 | 21 | 27 | 27 | 21 | 27 | 21 | 21 | 27 | 27 | 27 | 21 | 22 | 19 | 13 | 7 | ||||||||||||||||||||||||||||||||||||||||||||||||||||||||||||||||||||||||||||||||||||||||||||||||||||
| LEVEL 15 | 7 | 13 | 19 | 24 | 28 | 22 | 22 | 28 | 28 | 22 | 28 | 22 | 22 | 28 | 28 | 28 | 22 | 24 | 19 | 13 | 7 | ||||||||||||||||||||||||||||||||||||||||||||||||||||||||||||||||||||||||||||||||||||||||||||||||||||
| LEVEL 16 | 7 | 13 | 19 | 25 | 30 | 24 | 24 | 30 | 30 | 24 | 30 | 24 | 24 | 30 | 30 | 24 | 25 | 19 | 13 | 7 | |||||||||||||||||||||||||||||||||||||||||||||||||||||||||||||||||||||||||||||||||||||||||||||||||||||


3) GAME: This warm up game simulates a Car Racing Game. To control the car up and down, you pedal faster or slower. Try to avoid those barriers and keep on track. Your remaining chances will be shown on upper LCD with 10 dots and each time you fit a barrier one dot will be removed. You only have 11 chances to complete the circuit, so be careful.
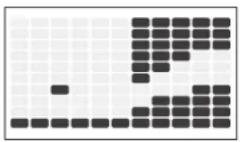
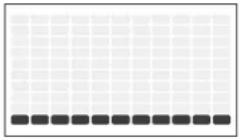
4) FITNESS TEST: Test your current level of physical condition. Keep RPM between 60 and 80 during test, program will change resistance automatically during test per an embedded chart. Try to keep your RPM until you can not go any further. Console will look up the table and give you your current physical condition estimation.
| Scores Results | ||
| 1-4 | Very Poor | |
| 5-6 | Poor | |
| 7-8 | Average | |
| 9-10 | Good | |
| >10 | Excellent | |
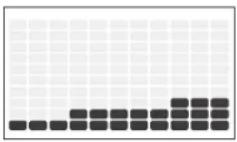
5) WEIGHT LOSS: Promotes weight loss by raising and lowering the resistance level, while keeping you in your fat burning zone. Time based program with 16 levels to choose from. User sets time and level using (up/down arrows) and ENTER. Please drink enough water while and after doing exercise to enhance the weight loss results.
(Comfort 2.0)
| WEIGHT LOSS | ||||||||||||||||||||||||||||||||||||||||||||||||||||||||||||||||||||||||||||||||||||||||||||||||||||||||||||||||||||||||||||||||||||||
| Warm Up Program Segments - Repeat Cool down | ||||||||||||||||||||||||||||||||||||||||||||||||||||||||||||||||||||||||||||||||||||||||||||||||||||||||||||||||||||||||||||||||||||||
| Seconds | 60 | 60 | 60 | 60 | 60 | 60 | 60 | 60 | 60 | 60 | 60 | 60 | 60 | 60 | 60 | 60 | 60 | 60 | 60 | 60 | 60 | 60 | 60 | 60 | 60 | 60 | 60 | 60 | 60 | 60 | 60 | 60 | 60 | 60 | ||||||||||||||||||||||||||||||||||||||||||||||||||||||||||||||||||||||||||||||||||||||||||||||||||||
| Segment | 1 | 2 | 3 | 4 | 5 | 6 | 7 | 8 | 9 | 10 | 11 | 12 | 13 | 14 | 15 | 16 | 17 | 18 | 19 | 20 | ||||||||||||||||||||||||||||||||||||||||||||||||||||||||||||||||||||||||||||||||||||||||||||||||||||||||||||||||||
(Comfort 4.0, 8.1, R8.0)
| WEIGHT LOSS | ||||||||||||||||||||||||||||||||||||||||||||||||||||||||||||||||||||||||||||||||||||||||||||||||||||||||||||||||||||||||||||||||||||||
| Warm Up Program Segments - Repeat Cool down | ||||||||||||||||||||||||||||||||||||||||||||||||||||||||||||||||||||||||||||||||||||||||||||||||||||||||||||||||||||||||||||||||||||||
| Seconds 60 | 60 | 60 | 60 | 60 | 60 | 60 | 60 | 60 | 60 | 60 | 60 | 60 | 60 | 60 | 60 | 60 | 60 | 60 | 60 | 60 | 60 | 60 | 60 | 60 | 60 | 60 | 60 | 60 | 60 | 60 | 60 | 60 | 60 | 1 | ||||||||||||||||||||||||||||||||||||||||||||||||||||||||||||||||||||||||||||||||||||||||||||||||||||
| Segment 1 | 23 | 4 | 5 | 6 | 7 | 8 | 9 | 10 | 11 | 12 | 13 | 14 | 15 | 16 | 17 | 18 | 19 | 20 | ||||||||||||||||||||||||||||||||||||||||||||||||||||||||||||||||||||||||||||||||||||||||||||||||||||||||||||||||||||
| Level 1 1 | 33 | 4 | 4 | 6 | 6 | 7 | 7 | 7 | 7 | 6 | 6 | 4 | 4 | 3 | 3 | 1 | ||||||||||||||||||||||||||||||||||||||||||||||||||||||||||||||||||||||||||||||||||||||||||||||||||||||||||||||||||||||

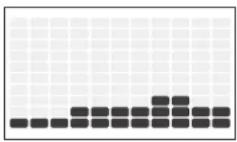
6) WEIGHT LOSS PLUS: Promotes weight loss by increasing and decreasing the resistance, while keeping you in your fat burning zone. Time based program with 15 levels to choose from and greater intensity than the weight loss program. User sets time and level using (up/down arrows) and ENTER.Please drink enough water while and after doing exercise to enhance the weight loss results.
(Comfort 4.0, 8.1, R8.0)
| WEIGHT LOSS PLUS | ||||||||||||||||||||
| Warm Up Program Segments - Repeat Cool Down | ||||||||||||||||||||
| Seconds 60 | 60 | 60 | 60 | 60 | 60 | 60 | 60 | 60 | 60 | 60 | 60 | 60 | 60 | 60 | 60 | 60 | 60 | |||
| Segment 1 | 23 | 45 | 67 | 89 | 101 | 112 | 1314 | 1516 | 1718 | 1920 | ||||||||||
| Level 1 1 | 33 | 46 | 67 | 74 | 69 | 97 | 64 | 33 | 1 | |||||||||||
| Level 2 3 | 44 | 47 | 97 | 99 | 67 | 1010 | 97 | 64 | 43 | |||||||||||
| Level 3 3 | 46 | 69 | 710 | 107 | 912 | 1212 | 109 | 76 | 64 | 3 | ||||||||||
| Level 4 3 | 66 | 710 | 910 | 1212 | 910 | 1313 | 1210 | 97 | 66 | 3 | ||||||||||
| Level 5 4 | 67 | 912 | 1012 | 1313 | 1010 | 1215 | 1513 | 1210 | 97 | 64 | ||||||||||
| Level 6 4 | 79 | 913 | 1213 | 1515 | 1213 | 1316 | 1615 | 1312 | 99 | 74 | ||||||||||
| Level 7 6 | 910 | 1015 | 1315 | 1616 | 1618 | 1518 | 1818 | 1615 | 1310 | 109 | ||||||||||
| Level 8 6 | 910 | 1216 | 1516 | 1818 | 1815 | 1619 | 1918 | 1815 | 1210 | 96 | ||||||||||
| Level 9 6 | 1012 | 1318 | 1618 | 1919 | 1916 | 2121 | 2119 | 1816 | 1312 | 106 | ||||||||||
| Level 10 7 | 1013 | 1319 | 1819 | 2121 | 2118 | 1922 | 2221 | 1918 | 1313 | 107 | ||||||||||
| Level 11 7 | 1213 | 1521 | 1921 | 2222 | 2219 | 2424 | 2222 | 2119 | 1513 | 127 | ||||||||||
| Level 12 9 | 1315 | 1622 | 2122 | 2424 | 2421 | 2225 | 2524 | 2221 | 1615 | 139 | ||||||||||
| Level 13 9 | 1316 | 1824 | 2224 | 2525 | 2224 | 2727 | 2525 | 2422 | 1816 | 139 | ||||||||||
| Level 14 9 | 1516 | 1825 | 2425 | 2727 | 2425 | 2828 | 2727 | 2524 | 1816 | 159 | ||||||||||
| Level 15 10 | 1518 | 1927 | 2527 | 2828 | 2527 | 3030 | 2827 | 2525 | 1918 | 1510 | ||||||||||
7) ROLLING: Maintains weight by gradually raising and lowering the resistance level to gradually raise and lower your heart rate.
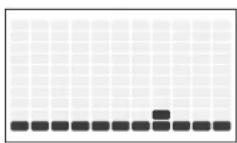
(Comfort 2.0)
| ROLLING | ||||||||||||||||||||||||||||||||||||||||||||||||||||||||||||||||||||||||||||||||||||||||||||||||||||||||||||||||||||||
| Warm Up Program segments Cool Down | ||||||||||||||||||||||||||||||||||||||||||||||||||||||||||||||||||||||||||||||||||||||||||||||||||||||||||||||||||||||
| Seconds | 60 | 60 | 60 | 60 | 60 | 30 | 30 | 30 | 30 | 30 | 30 | 30 | 30 | 30 | 30 | 30 | 30 | 30 | 30 | 30 | 30 | 60 | 60 | 60 | 60 | 60 | 60 | 60 | 60 | 60 | 60 | 60 | 60 | 60 | 60 | 60 | 60 | 60 | 60 | 60 | 60 | 60 | 60 | 60 | 60 | 60 | 60 | 60 | 60 | 60 | 60 | 60 | 60 | 60 | 61 | 61 | 61 | 61 | 61 | 61 | 61 | 61 | 61 | 61 | 61 | 61 | 61 | 61 | 61 | 61 | 61 | 61 | 61 | 61 | 61 | 61 | 61 | 61 | 61 | 61 | 61 | 61 | 61 | 61 | 61 | 61 | 61 | 61 | ||||||||||||||||||||||||||||||
| Segment | 1 | 2 | 3 | 4 | 5 | 6 | 7 | 8 | 9 | 10 | 11 | 12 | 13 | 14 | 15 | 16 | 17 | 18 | ||||||||||||||||||||||||||||||||||||||||||||||||||||||||||||||||||||||||||||||||||||||||||||||||||||
| Level | 1 | 1 | 2 | 2 | 1 | 2 | 3 | 4 | 3 | 2 | 1 | 2 | 3 | 2 | 1 | 1 | 1 | |||||||||||||||||||||||||||||||||||||||||||||||||||||||||||||||||||||||||||||||||||||||||||||||||||||
| Level | 2 | 1 | 2 | 2 | 3 | 2 | 3 | 4 | 5 | 4 | 3 | 2 | 1 | 2 | 3 | 2 | 1 | 1 | ||||||||||||||||||||||||||||||||||||||||||||||||||||||||||||||||||||||||||||||||||||||||||||||||||||
| level | 3 | 2 | 2 | 3 | 3 | 4 | 5 | 6 | 7 | 8 | 7 | 6 | 5 | 4 | 2 | 1 | 1 | |||||||||||||||||||||||||||||||||||||||||||||||||||||||||||||||||||||||||||||||||||||||||||||||||||||
| Level | 4 | 2 | 3 | 3 | 4 | 4 | 5 | 6 | 7 | 8 | 9 | 8 | 7 | 6 | 5 | 3 | 1 | 1 | ||||||||||||||||||||||||||||||||||||||||||||||||||||||||||||||||||||||||||||||||||||||||||||||||||||
| Level 5 | 3 | 4 | 4 | 5 | 6 | 7 | 8 | 9 | 10 | 9 | 8 | 7 | 6 | 3 | 3 | 2 | 1 | |||||||||||||||||||||||||||||||||||||||||||||||||||||||||||||||||||||||||||||||||||||||||||||||||||||
| 6 | 3 | 5 | 4 | 5 | 6 | 7 | 8 | 9 | 10 | 10 | 10 | 9 | 8 | 7 | 4 | 3 | 2 | 1 | ||||||||||||||||||||||||||||||||||||||||||||||||||||||||||||||||||||||||||||||||||||||||||||||||||||
| Level 7 | 4 | 5 | 5 | 5 | 7 | 7 | 8 | 8 | 9 | 10 | 10 | 9 | 8 | 4 | 3 | 2 | 1 | |||||||||||||||||||||||||||||||||||||||||||||||||||||||||||||||||||||||||||||||||||||||||||||||||||||
| level 8 | 4 | 5 | 5 | 5 | 8 | 8 | 9 | 9 | 10 | 10 | 11 | 11 | 10 | 9 | 4 | 3 | 2 | 1 | ||||||||||||||||||||||||||||||||||||||||||||||||||||||||||||||||||||||||||||||||||||||||||||||||||||
| Level 9 | 4 | 5 | 5 | 5 | 9 | 9 | 10 | 10 | 11 | 11 | 12 | 12 | 12 | 11 | 10 | 5 | 4 | 3 | 1 | |||||||||||||||||||||||||||||||||||||||||||||||||||||||||||||||||||||||||||||||||||||||||||||||||||
| Level 10 | 4 | 5 | 6 | 6 | 10 | 10 | 11 | 11 | 12 | 12 | 13 | 13 | 12 | 11 | 6 | 5 | 4 | 1 | ||||||||||||||||||||||||||||||||||||||||||||||||||||||||||||||||||||||||||||||||||||||||||||||||||||
| Level 11 | 4 | 5 | 7 | 7 | 11 | 11 | 12 | 12 | 13 | 13 | 14 | 14 | 13 | 12 | 6 | 5 | 4 | 1 | ||||||||||||||||||||||||||||||||||||||||||||||||||||||||||||||||||||||||||||||||||||||||||||||||||||
| Level 12 | 4 | 5 | 8 | 8 | 12 | 12 | 13 | 13 | 14 | 14 | 15 | 15 | 14 | 13 | 7 | 6 | 5 | 1 | ||||||||||||||||||||||||||||||||||||||||||||||||||||||||||||||||||||||||||||||||||||||||||||||||||||
| Level 13 | 4 | 5 | 9 | 9 | 13 | 13 | 14 | 14 | 15 | 15 | 16 | 16 | 15 | 14 | 7 | 6 | 5 | 1 | ||||||||||||||||||||||||||||||||||||||||||||||||||||||||||||||||||||||||||||||||||||||||||||||||||||
| Level 14 | 4 | 5 | 9 | 9 | 14 | 14 | 15 | 15 | 16 | 16 | 17 | 17 | 16 | 15 | 8 | 7 | 6 | 1 | ||||||||||||||||||||||||||||||||||||||||||||||||||||||||||||||||||||||||||||||||||||||||||||||||||||
(Comfort 4.0, 8.1, R8.0)
| ROLLING | |||||||||||||||||||
| Warm Up Program segments Cool Down | |||||||||||||||||||
| Seconds 60 | 60 | 60 | 60 | 60 | 30 | 30 | 30 | 30 | 30 | 30 | 30 | 30 | 60 | 60 | 60 | ||||
| Segment 1 | 3 4 | 6 7 | 9 | 10 | 12 | 13 | 15 | 16 | 18 | 19 | 21 | 22 | 24 | 25 | 27 | ||||
| Level 1 1 | 1 | 3 3 | 1 | 3 4 | 6 | 4 | 3 | 1 3 | 4 | 3 1 | 1 | 1 | |||||||
| Level 2 1 | 3 | 3 4 | 3 | 4 6 | 7 | 6 | 4 | 3 1 | 3 | 4 3 | 1 | 1 | |||||||
| Level 3 3 | 3 | 4 4 | 4 | 6 7 | 9 | 10 | 12 | 10 | 9 | 7 | 6 | 3 | 1 | 1 | |||||
| Level 4 3 | 4 | 4 6 | 6 | 7 9 | 10 | 12 | 13 | 12 | 10 | 9 | 7 | 4 | 1 | 1 | |||||
| Level 5 4 | 5 | 6 6 | 7 | 9 | 10 | 12 | 13 | 15 | 13 | 12 | 10 | 9 | 4 | 4 | 3 | ||||
| Level 6 4 | 7 | 6 7 | 9 | 10 | 12 | 13 | 15 | 15 | 13 | 13 | 12 | 10 | 6 | 4 | 3 | ||||
| Level 7 6 | 7 | 7 7 | 10 | 10 | 12 | 12 | 13 | 13 | 15 | 15 | 13 | 12 | 6 | 4 | 3 | ||||
| Level 8 6 | 7 | 7 7 | 12 | 12 | 13 | 13 | 15 | 15 | 16 | 16 | 15 | 13 | 6 | 4 | 3 | ||||
| Level 9 6 | 7 | 7 7 | 13 | 13 | 15 | 15 | 16 | 16 | 18 | 18 | 16 | 15 | 7 | 6 | 4 | ||||
| Level 10 6 | 7 | 9 9 | 15 | 15 | 16 | 16 | 18 | 18 | 19 | 19 | 18 | 16 | 9 | 7 | 6 | ||||
| Level 11 6 | 7 | 10 | 10 | 16 | 16 | 18 | 18 | 19 | 19 | 21 | 21 | 19 | 18 | 9 | 7 | 6 | |||
| Level 12 6 | 7 | 12 | 12 | 18 | 18 | 19 | 19 | 21 | 21 | 22 | 22 | 21 | 19 | 10 | 9 | 7 | |||
| Level 13 6 | 7 | 13 | 13 | 19 | 19 | 21 | 21 | 22 | 22 | 24 | 24 | 22 | 21 | 10 | 9 | 7 | |||
| Level 14 6 | 7 | 13 | 13 | 21 | 21 | 22 | 22 | 24 | 24 | 25 | 25 | 24 | 22 | 12 | 10 | 9 | |||


8) CADENCE: Special bike training program to build your stamina and increase endurance. This program will gradually increases resistance level and prompt you to pedal at a low speed (L), medium speed (M), or high speed (H) to help you reach your fitness goal.
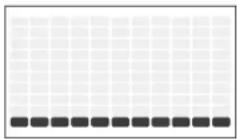
(Comfort 2.0)
| CADENCE | ||||||||||||||||||||
| Warm up L M L H M L H M L H M L Cool down | ||||||||||||||||||||
| Seconds 60 60 60 60 90 45 90 30 45 90 30 45 90 45 90 60 60 60 60 60 | ||||||||||||||||||||
| Segment 1 2 3 4 5 6 7 8 9 10 11 12 13 14 15 16 17 18 19 20 | ||||||||||||||||||||
| Level 1 2 1 1 2 3 2 3 1 2 3 1 2 3 2 1 1 1 | ||||||||||||||||||||
| Level 2 1 1 1 2 4 3 4 2 3 4 2 3 4 2 3 4 2 1 1 1 | ||||||||||||||||||||
| Level 3 1 1 1 2 5 4 5 3 4 5 3 4 5 3 4 5 2 1 1 1 | ||||||||||||||||||||
| Level 4 1 1 1 3 6 5 6 4 5 6 4 5 6 3 1 1 1 | ||||||||||||||||||||
| Level 5 1 2 3 3 7 8 7 5 6 7 5 6 7 3 3 2 1 | ||||||||||||||||||||
| Level 6 1 2 3 4 8 7 8 6 7 8 6 7 8 4 3 2 1 | ||||||||||||||||||||
| Level 7 1 2 3 4 9 8 9 7 8 9 7 8 9 4 3 2 1 | ||||||||||||||||||||
| Level 8 1 2 3 5 10 9 10 8 9 10 8 9 10 8 9 10 5 3 2 1 | ||||||||||||||||||||
| Level 9 | 1 | 1 | 1 | 2 | 11 | 10 | 11 | 9 | 10 | 11 | 9 | 10 | 11 | 9 | 10 | 11 | 2 | 1 | 1 | 1 |
| Level 10 | 1 | 1 | 1 | 2 | 12 | 11 | 12 | 10 | 11 | 12 | 10 | 11 | 12 | 10 | 11 | 12 | 2 | 1 | 1 | 1 |
| Level 11 | 2 | 2 | 2 | 3 | 13 | 12 | 13 | 11 | 12 | 13 | 11 | 12 | 13 | 11 | 12 | 13 | 2 | 1 | 1 | 1 |
| Level 12 3 3 3 4 14 13 14 12 13 14 12 13 14 3 1 1 1 | ||||||||||||||||||||
| Level 13 3 4 4 5 15 14 15 13 14 15 13 14 15 13 3 2 1 | ||||||||||||||||||||
| Level 14 3 4 5 6 16 15 16 4 15 16 14 15 16 14 15 16 4 3 2 1 | ||||||||||||||||||||
(Comfort 4.0, 8.1, R8.0)
| CADENCE | |||||||||||||||||||||
| Warm up L M | L H M L H | M L H M L Cool down | |||||||||||||||||||
| Seconds 60 | 60 | 60 | 60 | 60 | 90 | 45 | 90 | 30 | 45 | 90 | 30 | 45 | 90 | 30 | 45 | 90 | 60 | 60 | 60 | ||
| Segment 1 | 2 | 3 | 4 | 5 | 6 | 7 | 8 | 9 | 10 | 11 | 12 | 13 | 14 | 15 | 16 | 17 | 18 | 19 | 20 | ||
| Level 13 | 1 | 1 | 3 | 4 | 3 | 4 | 1 | 3 | 4 | 1 | 3 | 4 | 3 | 1 | |||||||
| Level 21 | 1 | 1 | 3 | 6 | 4 | 6 | 3 | 4 | 6 | 3 | 4 | 6 | 3 | 1 | 1 | ||||||
| Level 31 | 1 | 1 | 3 | 7 | 6 | 7 | 4 | 6 | 7 | 4 | 6 | 7 | 3 | 1 | 1 | ||||||
| Level 41 | 1 | 1 | 4 | 9 | 7 | 9 | 6 | 7 | 9 | 6 | 7 | 9 | 4 | 1 | 1 | ||||||
| Level 51 | 3 | 4 | 4 | 10 | 9 | 10 | 7 | 9 | 10 | 7 | 9 | 10 | 7 | 9 | 10 | 4 | 4 | 3 | 1 | ||
| Level 61 | 3 | 4 | 6 | 12 | 10 | 12 | 9 | 10 | 12 | 9 | 10 | 12 | 9 | 10 | 12 | 6 | 4 | 3 | 1 | ||
| Level 71 | 3 | 4 | 6 | 13 | 12 | 13 | 10 | 12 | 13 | 10 | 12 | 13 | 10 | 12 | 13 | 6 | 4 | 3 | 1 | ||
| Level 81 | 3 | 4 | 7 | 15 | 13 | 15 | 12 | 13 | 15 | 12 | 13 | 15 | 12 | 13 | 15 | 7 | 4 | 3 | 1 | ||
| Level 91 | 1 | 1 | 3 | 16 | 15 | 16 | 13 | 15 | 16 | 13 | 15 | 16 | 13 | 15 | 16 | 3 | 1 | 1 | |||
| Level 101 | 1 | 1 | 3 | 18 | 16 | 18 | 15 | 16 | 18 | 15 | 16 | 18 | 15 | 16 | 18 | 3 | 1 | 1 | |||
| Level 113 | 3 | 3.4 | 3 | 19 | 18 | 19 | 16 | 18 | 19 | 16 | 18 | 19 | 16 | 18 | 19 | 3 | 1 | 1 | |||
| Level 124 | 4 | 4 | 6 | 21 | 19 | 21 | 18 | 19 | 21 | 18 | 19 | 21 | 18 | 19 | 21 | 4 | 1 | 1 | |||
| Level 134 | 6 | 6 | 7 | 22 | 21 | 22 | 19 | 21 | 22 | 19 | 21 | 22 | 19 | 21 | 22 | 4 | 4 | 3 | 1 | ||
| Level 144 | 6 | 7 | 9 | 24 | 22 | 24 | 21 | 22 | 24 | 21 | 22 | 24 | 21 | 22 | 24 | 6 | 4 | 3 | 1 | ||
| Level 154 | 7 | 9 | 10 | 25 | 24 | 25 | 22 | 24 | 25 | 22 | 24 | 25 | 22 | 24 | 25 | 6 | 4 | 3 | 1 | ||
| Level 166 | 9 | 10 | 12 | 27 | 25 | 27 | 24 | 25 | 27 | 24 | 25 | 27 | 24 | 25 | 27 | 7 | 4 | 3 | 1 | ||
9) RANDOM: Special designed chart based program that will simulate resistance being changed randomly.
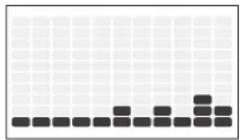
(Comfort 2.0)
| RANDOM | |||||||||||||||||||
| Warm Up Program segments Cool Down | |||||||||||||||||||
| Seconds 60 | 60 | 60 | 60 | 60 | 60 | 60 | 60 | 60 | 60 | 60 | 60 | 60 | 60 | 60 | 60 | 60 | |||
| Segment 1 | 2 | 3 | 4 | 5 | 6 | 7 | 8 | 9 | 10 | 11 | 12 | 13 | 14 | 15 | 16 | 17 | 18 | ||
| Level 1 1 | 1 | 2 | 2 | 1 | 3 | 5 | 2 | 4 | 7 | 2 | 3 | 6 | 1 | 1 | 1 | 1 | |||
| Level 2 1 | 2 | 2 | 3 | 2 | 4 | 6 | 3 | 5 | 3 | 3 | 4 | 7 | 2 | 2 | 1 | 1 | |||
| Level 3 2 | 2 | 3 | 3 | 3 | 5 | 7 | 4 | 6 | 9 | 4 | 5 | 8 | 3 | 2 | 1 | 1 | |||
| Level 4 2 | 3 | 3 | 4 | 4 | 6 | 8 | 5 | 7 | 10 | 5 | 6 | 9 | 4 | 3 | 1 | 1 | |||
| Level 5 3 | 4 | 4 | 4 | 5 | 7 | 9 | 6 | 8 | 11 | 6 | 7 | 10 | 5 | 3 | 3 | 2 | 1 | ||
| Level 6 3 | 5 | 4 | 5 | 6 | 8 | 10 | 7 | 9 | 12 | 7 | 8 | 11 | 6 | 4 | 3 | 2 | 1 | ||
| Level 7 4 | 5 | 5 | 5 | 7 | 9 | 11 | 8 | 10 | 13 | 8 | 9 | 12 | 7 | 4 | 3 | 2 | 1 | ||
| Level 8 4 | 5 | 5 | 5 | 8 | 10 | 12 | 9 | 11 | 14 | 9 | 10 | 13 | 8 | 4 | 3 | 2 | 1 | ||
| Level 9 4 | 5 | 5 | 5 | 9 | 11 | 13 | 10 | 12 | 15 | 10 | 11 | 14 | 9 | 5 | 4 | 3 | 1 | ||
| Level 10 4 | 5 | 5 | 6 | 10 | 12 | 14 | 11 | 13 | 16 | 11 | 12 | 15 | 10 | 5 | 4 | 3 | 1 | ||

(Comfort 4.0, 8.1, R8.0)
| RANDOM | ||||||||||||||||||||||||||||||||||||||||||||||||||||||||||||||||||||||||||||||||||||||||||||||||||||||||||||||||||||||||||||||||||||||||||||||||||||||||||||||||||||||||||||||||||||||||||||||||||||||||||||||||||||||||||||||||||||||||||||||||||||||||||||||||||||||||||||||||||||||||||||||||||||||||||||||||||||||||||||||||||||||||||||||||||||||||||||||||||||||||||||||||||||||||||||||||||||||||||||||||||||||||||||||||||||||||||||||||||||||||||||||||||||||||||||||||||||||||||||||||||||||||||||||||||||||||||||||||||||||||||||||||||||||||||||||||||||||||||||||||||||||||||||||||||||||||||||||||||||||||||||||||||
| Warm Up Program segments Cool Down | ||||||||||||||||||||||||||||||||||||||||||||||||||||||||||||||||||||||||||||||||||||||||||||||||||||||||||||||||||||||||||||||||||||||||||||||||||||||||||||||||||||||||||||||||||||||||||||||||||||||||||||||||||||||||||||||||||||||||||||||||||||||||||||||||||||||||||||||||||||||||||||||||||||||||||||||||||||||||||||||||||||||||||||||||||||||||||||||||||||||||||||||||||||||||||||||||||||||||||||||||||||||||||||||||||||||||||||||||||||||||||||||||||||||||||||||||||||||||||||||||||||||||||||||||||||||||||||||||||||||||||||||||||||||||||||||||||||||||||||||||||||||||||||||||||||||||||||||||||||||||||||||||||
| Seconds | 60 | 60 | 60 | 60 | 60 | 60 | 60 | 60 | 60 | 60 | 60 | 60 | 60 | 60 | 60 | 60 | 60 | 60 | 60 | 60 | 60 | 60 | 60 | 60 | 60 | 60 | 60 | 60 | 60 | 60 | 60 | 60 | 60 | 60 | ||||||||||||||||||||||||||||||||||||||||||||||||||||||||||||||||||||||||||||||||||||||||||||||||||||||||||||||||||||||||||||||||||||||||||||||||||||||||||||||||||||||||||||||||||||||||||||||||||||||||||||||||||||||||||||||||||||||||||||||||||||||||||||||||||||||||||||||||||||||||||||||||||||||||||||||||||||||||||||||||||||||||||||||||||||||||||||||||||||||||||||||||||||||||||||||||||||||||||||||||||||||||||||||||||||||||||||||||||||||||||||||||||||||||||||||||||||||||||||||||||||||||||||||||||||||||||||||||||||||||||||||||||||||||||||||||||||||||||||||||||||||||||||||||
| Segment | 1 | 2 | 3 | 4 | 5 | 6 | 7 | 8 | 9 | 10 | 11 | 12 | 13 | 14 | 15 | 16 | 17 | 18 | 1 | |||||||||||||||||||||||||||||||||||||||||||||||||||||||||||||||||||||||||||||||||||||||||||||||||||||||||||||||||||||||||||||||||||||||||||||||||||||||||||||||||||||||||||||||||||||||||||||||||||||||||||||||||||||||||||||||||||||||||||||||||||||||||||||||||||||||||||||||||||||||||||||||||||||||||||||||||||||||||||||||||||||||||||||||||||||||||||||||||||||||||||||||||||||||||||||||||||||||||||||||||||||||||||||||||||||||||||||||||||||||||||||||||||||||||||||||||||||||||||||||||||||||||||||||||||||||||||||||||||||||||||||||||||||||||||||||||||||||||||||||||||||||||||||||||||||||||||||||
| Level | 1 | 1 | 3 | 3 | 1 | 4 | 7 | 3 | 6 | 10 | 3 | 4 | 9 | 1 | 1 | 1 | 1 | 1 | 1 | 1 | 1 | 1 | 1 | 1 | 1 | 1 | 1 | 1 | 1 | 1 | 1 | 1 | 1 | 1 | 1 | 1 | 1 | 1 | 1 | 1 | 1 | 1 | 1 | 1 | 1 | 1 | 1 | 1 | 1 | 1 | 1 | 1 | 1 | 1 | 1 | 1 | 1 | 1 | 1 | 1 | 1 | 1 | 1 | 1 | 1 | 1 | 1 | 2 | 2 | 2 | 2 | 2 | 2 | 2 | 2 | 2 | 2 | 2 | 2 | 2 | 2 | 2 | 2 | 2 | 2 | 2 | 2 | 2 | 2 | 2 | 2 | 2 | 2 | 2 | 2 | 2 | 2 | 2 | 2 | 2 | 2 | 2 | 2 | 2 | 2 | 2 | 2 | 2 | 2 | 2 | 2 | 2 | 2 | 2 | 2 | 2 | 2 | 1 | 1 | 1 | 1 | 1 | 1 | 1 | 1 | 1 | 1 | 1 | 1 | 1 | 1 | 1 | 1 | 1 | 1 | 1 | 1 | 1 | 1 | 1 | 1 | 1 | 1 | 1 | 1 | 1 | 1 | 1 | 1 | 1 | 1 | 1 | 1 | 1 | 1 | 1 | 1 | 1 | 1 | 1 | 1 | 1 | 1 | 1 | 1 | 1 | 0 | 0 | 0 | 0 | 0 | 0 | 0 | 0 | 0 | 0 | 0 | 0 | 0 | 0 | 0 | 0 | 0 | 0 | 0 | 0 | 0 | 0 | 0 | 0 | 0 | 0 | 0 | 0 | 0 | 0 | 0 | 0 | 0 | 0 | 0 | 0 | 0 | 0 | 0 | 0 | 0 | 0 | 0 | 0 | 0 | 0 | 0 | 0 | 0 | 0 | 1 | 1 | 1 | 1 | 1 | 1 | 1 | 1 | 1 | 1 | 1 | 1 | 1 | 1 | 1 | 1 | 1 | 1 | 1 | 1 | 1 | 1 | 1 | 1 | 1 | 1 | 1 | 1 | 1 | 1 | 1 | 1 | 1 | 1 | 1 | 1 | 1 | 1 | 1 | 1 | 1 | 1 | 1 | 1 | 1 | 1 | 1 | 1 | 1 | 3 | 3 | 3 | 3 | 3 | 3 | 3 | 3 | 3 | 3 | 3 | 3 | 3 | 3 | 3 | 3 | 3 | 3 | 3 | 3 | 3 | 3 | 3 | 3 | 3 | 3 | 3 | 3 | 3 | 3 | 3 | 3 | 3 | 3 | 3 | 3 | 3 | 3 | 3 | 3 | 3 | 3 | 3 | 3 | 3 | 3 | 3 | 3 | 3 | 3 | 4 | 4 | 4 | 4 | 4 | 4 | 4 | 4 | 4 | 4 | 4 | 4 | 4 | 4 | 4 | 4 | 4 | 4 | 4 | 4 | 4 | 4 | 4 | 4 | 4 | 4 | 4 | 4 | 4 | 4 | 4 | 4 | 4 | 4 | 4 | 4 | 4 | 4 | 4 | 4 | 4 | 4 | 4 | 4 | 4 | 4 | 4 | 4 | 4 | 4 | 3 | 3 | 3 | 3 | 3 | 3 | 3 | 3 | 3 | 3 | 3 | 3 | 3 | 3 | 3 | 3 | 3 | 3 | 3 | 3 | 3 | 3 | 3 | 3 | 3 | 3 | 3 | 3 | 3 | 3 | 3 | 3 | 3 | 3 | 3 | 3 | 3 | 3 | 3 | 3 | 3 | 3 | 3 | 3 | 3 | 3 | 3 | 3 | 3 | 2 | 2 | 2 | 2 | 2 | 2 | 2 | 2 | 2 | 2 | 2 | 2 | 2 | 2 | 2 | 2 | 2 | 2 | 2 | 2 | 2 | 2 | 2 | 2 | 2 | 2 | 2 | 2 | 2 | 2 | 2 | 2 | 2 | 2 | 2 | 2 | 2 | 2 | 2 | 2 | 2 | 2 | 2 | 2 | 2 | 2 | 2 | 2 | 2 | 0 | 0 | 0 | 0 | 0 | 0 | 0 | 0 | 0 | 0 | 0 | 0 | 0 | 0 | 0 | 0 | 0 | 0 | 0 | 0 | 0 | 0 | 0 | 0 | 0 | 0 | 0 | 0 | 0 | 0 | 0 | 0 | 0 | 0 | 0 | 0 | 0 | 0 | 0 | 0 | 0 | 0 | 0 | 0 | 0 | 0 | 0 | 0 | 0 | ||||||||||||||||||||||||||||||||||||||||||||||||||||||||||||||||||||||||||||||||||||||||||||||||||

10) CONSTANT WATTS: This workout automatically adjusts the resistance to keep you within a set Watts range and maintains your desired level of exercise intensity.
1) Select Constant Watts program using ▲ and press ENTER.
2) Set time using ▲ and press ENTER.
3) Select desired watts using ▲ end press ENTER.
4) Press START▶lo being the program.
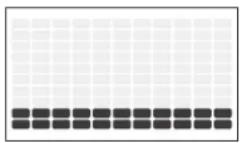
11) INTERVAL WATT PROGRAM: Allows you to choose a high WATTs value and a low WATTs value. The interval program will switch between High and Low WATTs values, making for a very intense and effective workout.
1) Select Constant Watts program using and press enter.
2) Set time using and press enter.
3) Select your desired low watts target and press enter.
4) Select your desired high watts target and press enter.
5) Press START ▶II to being the program.

Note: The watts programs is RPM related. Resistance will change automatically according to your pedaling speed and make sure you keep your workout in your target watt. Please do not pedal too slow or too fast. If you are out of the target zone LCD will show arrow sign beside RPM column to tell you to adjust your speed. Upper arrow for speed up your RPM and arrow down for slowing down your workout.
12) THR ZONE: Simulate the intensity of your favorite sport as the program resistance automatically adjusts to maintain a set Target Heart Rate range. (Suggest to use chest belt with this program. You may purchase chest belt separately from your dealer)
1) Select THR Zone program using ▲▼ and press ENTER.
2) Select TIME using ▲▼ and press ENTER.
3) The HEART RATE window will flash showing the default target heart rate of 80 beats per minute. Select your target heart rate (from heart rate training chart) using ▲ and press ENTER.
4) Press START ▶ to begin.
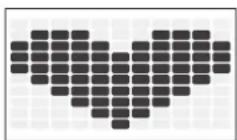
13)% THR: Benefits weight loss by maintaining an optimum exercise level to burn fat, while adjusting the resistance to keep you in your target heart rate zone. First set up your personal data (your machine will automatically calculate your maximum workout heart rate) and select the percentage you wish to workout base on your maximum heart rate. (Suggest to use chest belt with this program. You may purchase chest belt separately from your dealer)
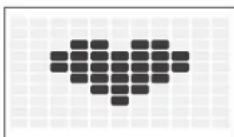
Note: The heart rate program is base on your heart rate target. Resistance will change automatically according to your pedaling speed and make sure you keep your workout in your target heart rate. Please do not pedal too slow or too fast. If you are out of the target zone LCD will show arrow sign beside RPM column to tell you to adjust your speed. Upper arrow for speed up your RPM and arrow down for slowing down your workout.


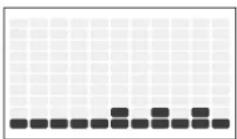
14) STRENGTH BUILDER: Help you gradually increase your muscle strength with a preset workout program. Time based program with 20 levels to choose from. User sets time and level using (up/down arrows) and ENTER.
(Comfort 4.0, 8.1, R8.0)
| STRENGTH BUILDER | |||||||||||||||||||
| Warm Up Program Segments - Repeat Cool Down | |||||||||||||||||||
| Seconds | 60 | 60 | 60 | 60 | 60 | 60 | 60 | 60 | 60 | 60 | 60 | 60 | 60 | 60 | 60 | 60 | 60 | 60 | 60 |
| Segment | 1 | 2 | 3 | 4 | 5 | 6 | 7 | 8 | 9 | 10 | 11 | 12 | 13 | 14 | 15 | 16 | 17 | 18 | 19 |
| Level 1 | 1 | 3 | 3 | 4 | 4 | 4 | 4 | 4 | 4 | 1 | 4 | 4 | 4 | 3 | 3 | 1 | 1 | ||
| Level 2 | 1 | 3 | 3 | 3 | 4 | 3 | 6 | 3 | 4 | 3 | 6 | 3 | 6 | 3 | 3 | 1 | 1 | ||
| Level 3 | 1 | 3 | 3 | 4 | 4 | 3 | 4 | 4 | 4 | 3 | 4 | 4 | 3 | 3 | 3 | 1 | 1 | ||
| Level 4 | 1 | 3 | 3 | 4 | 6 | 6 | 3 | 6 | 6 | 6 | 6 | 6 | 3 | 4 | 3 | 3 | 1 | ||
| Level 5 | 3 | 4 | 4 | 4 | 4 | 7 | 4 | 7 | 4 | 7 | 4 | 7 | 4 | 4 | 4 | 3 | |||
| Level 6 | 3 | 4 | 6 | 6 | 6 | 9 | 6 | 9 | 6 | 9 | 6 | 9 | 6 | 6 | 4 | 3 | |||
| Level 7 | 4 | 6 | 7 | 9 | 9 | 12 | 7 | 12 | 9 | 10 | 7 | 12 | 9 | 10 | 7 | 12 | 9 | 7 | 6 |
| Level 8 | 4 | 6 | 7 | 9 | 12 | 12 | 9 | 12 | 12 | 9 | 12 | 12 | 9 | 9 | 7 | 6 | 4 | ||
| Level 9 | 6 | 9 | 10 | 10 | 12 | 15 | 2 | 15 | 12 | 15 | 12 | 15 | 12 | 15 | 12 | 15 | 10 | 10 | 9 |
| Level 10 | 6 | 9 | 10 | 10 | 15 | 15 | 2 | 15 | 15 | 12 | 15 | 15 | 12 | 15 | 15 | 12 | 10 | 10 | 9 |
| Level 11 | 6 | 10 | 12 | 13 | 15 | 18 | 15 | 18 | 15 | 18 | 15 | 18 | 15 | 18 | 15 | 13 | 12 | 10 | 6 |
| Level 12 | 6 | 10 | 12 | 13 | 18 | 18 | 15 | 18 | 18 | 15 | 18 | 18 | 15 | 18 | 18 | 15 | 13 | 12 | 6 |
| Level 13 | 7 | 12 | 15 | 15 | 18 | 21 | 18 | 21 | 18 | 21 | 18 | 21 | 18 | 21 | 18 | 21 | 15 | 13 | 7 |
| Level 14 | 7 | 12 | 15 | 15 | 21 | 21 | 18 | 21 | 21 | 18 | 21 | 21 | 18 | 21 | 21 | 18 | 15 | 13 | 7 |
| Level 15 | 9 | 13 | 16 | 18 | 21 | 24 | 21 | 24 | 21 | 24 | 21 | 24 | 21 | 24 | 21 | 24 | 18 | 16 | 9 |
| Level 16 | 9 | 13 | 16 | 18 | 24 | 24 | 21 | 24 | 24 | 21 | 24 | 24 | 21 | 24 | 24 | 21 | 18 | 16 | 9 |
| Level 17 | 9 | 15 | 16 | 18 | 25 | 25 | 22 | 25 | 25 | 22 | 25 | 25 | 22 | 25 | 25 | 22 | 18 | ||
| Level 18 | 10 | 15 | 18 | 19 | 27 | 27 | 24 | 27 | 27 | 24 | 27 | 27 | 24 | 27 | 27 | 24 | 19 | 18 | 10 |
| Level 19 | 10 | 16 | 19 | 21 | 28 | 28 | 25 | 28 | 28 | 25 | 28 | 28 | 25 | 28 | 28 | 25 | 21 | 19 | 16 |
| Level 20 | 12 | 18 | 21 | 22 | 30 | 30 | 25 | 30 | 30 | 25 | 30 | 30 | 25 | 30 | 30 | 25 | 22 | 21 | 18 |
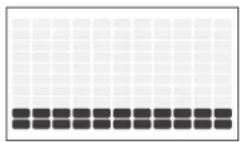
15) CUSTOM 1 & 2: Customized workout, time defaults to 15 minutes. (Comfort 3 does not have Custom 2)
1) First enter the program setting and profile display will guide you through all the workout column.
2) Use upper and lower arrow to change the resistance and press enter to confirm. Console will display your current segment number and guide you through segment 1 to segment 15.
3) After finish all setting press START▶II to begin.
HEART RATE TRAINING
The first step in knowing the right intensity for your training is to find out your maximum heart rate (max HR = 220 – your age). The age-based method provides an average statistical prediction of your max HR and is a good method for the majority of people, especially those new to heart rate training. The most precise and accurate way of determining your individual max HR is to have it clinically tested by a cardiologist or exercise physiologist through the use of a maximal stress test. If you are over the age of 40, overweight, have been sedentary for several years, or have a history of heart disease in your family, clinical testing is recommended. This chart gives examples of the heart rate range for a 30 year old exercising at 5 different heart rate zones. For example, a 30-year-old's max HR is 220 – 30 = 190 bpm and 90% max HR is 190 × 0.9 = 171 bpm.
| Target Heart Rate Zone | Workout Duration | Example THR Zone (age 30) | Your THR Zone | Recommended For |
| VERY HARD90 – 100% | < 5 MIN | 171 – 190BPM | Fit persons and for athletic training | |
| HARD80 – 90% | 2 – 10 MIN | 152 – 171BPM | Shorter workouts | |
| MODERATE70 – 80% | 10 – 40 MIN | 133 – 152BPM | Moderately long workouts | |
| LIGHT60 – 70% | 40 – 80 MIN | 114 – 133BPM | Longer and frequently repeated shorter exercises | |
| VERY LIGHT50 – 60% | 20 – 40 MIN | 104 – 114BPM | Weight management and active recovery |


USING YOUR MEDIA PLAYER

1) Connect the included AUDIO ADAPTOR CABLE to the AUDIO IN JACK on the console and the headphone jack on your media player.
2) Use your media player buttons to adjust song settings.
3) Remove the AUDIO ADAPTOR CABLE when not in use.
SYNCING BIKE WITH PASSPORT (COMFORT 2.0 IS NOT INCLUDED)
1) Using the arrow key on the passport remote control to scroll to the setup icon and press the Select.
2) Follow the on-screen prompt to press and hold 📄 on the equipment's console for 3-5 seconds.
3) Once your sync is successful, your bike message bar will change from RF Sync to Passport Ready.
4) The message displayed on-screen will notify you if the sync was successful or failed.
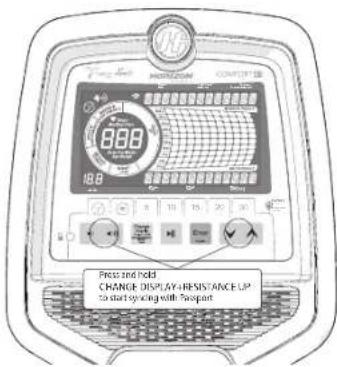
text_image
888 10.8 Press and hold CHANGE DISPLAY/RESISTANCE UP to start following with PassportENERGY SAVER MODE
This machine is equipped with Energy Saver mode. When Energy Saver mode is activated, the display will automatically enter standby mode (Energy Saver mode) after 15 minutes of inactivity. This feature saves energy by disabling most power to the machine until a key is pressed on the console. You may switch this function on and off using engineering menu.
ENGINEERING MODE:
To enter the engineering menu, press and hold the ▲ and for 3-5 seconds.
SWITCHING BETWEEN BRITISH AND METRIC MODE
Use the ▲ and ▼ arrow keys to navigate to Eng2 and press Enter. Use the Enter key to navigate to P1. Use the ▲ and ▼ arrow keys to switch between STANDARD (BRITISH) and METRIC.
SWITCHING DISPLAY LANGUAGE
Use the ▲ and ▼ arrow keys to navigate to Eng2 and press Enter. Use the Enter key to navigate to P2 Press ENTER to select language mode, use arrow keys to select the language you desire.
Press and hold STOP ▶|| for 3-5 seconds to exit ENG2. Press and hold STOP ▶|| again for 3-5 seconds to exit the engineering menu.
SWITCHING ON/OFF THE ENGERGY SAVER FUNCTION
Use the ▲ and ▼ arrow keys to navigate to Eng2 and press Enter. Use the Enter key to navigate to P5.
Press ENTER to select Energy Saver mode, use the ▲ and ▼arrow keys to select ENRGY SAVE ON or OFF. Press and hold STOP ▶ for 3-5 seconds to exit ENG2. Press and hold STOP ▶ again for 3-5 seconds to exit the engineering menu.

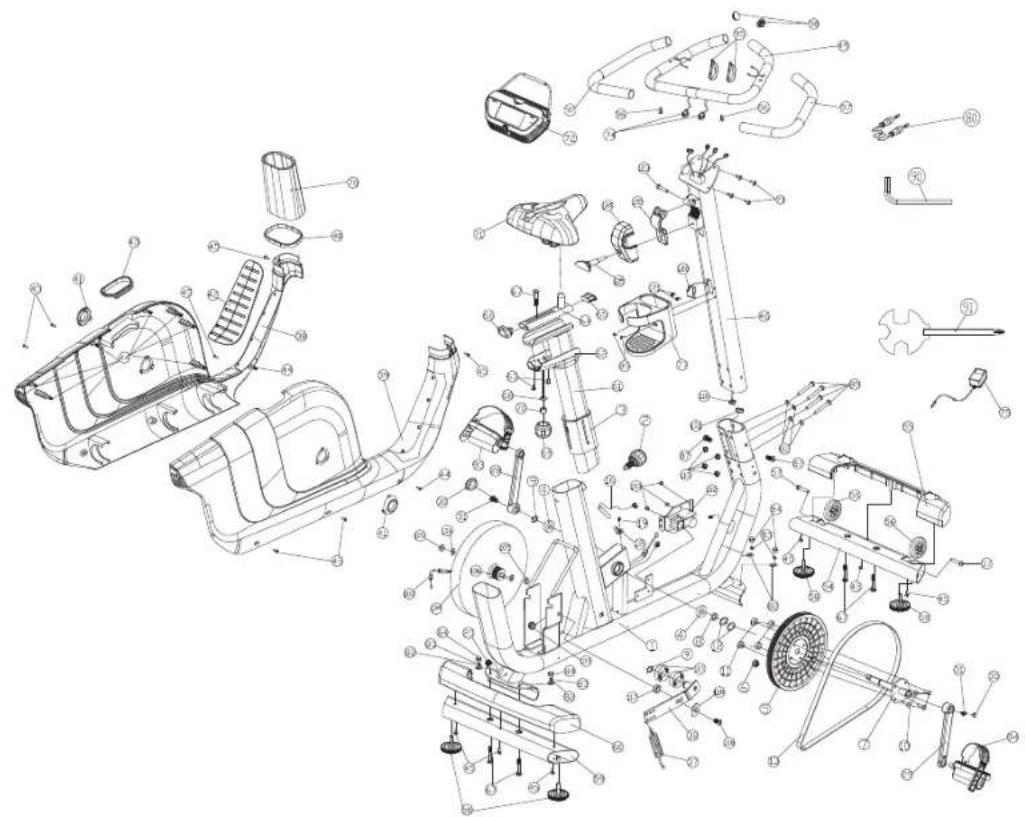
COMFORT 2.0 EXPLODED VIEW
text_image
Exploded view diagram of a vehicle's internal components with numbered parts and labeled partsCOMFORT 2.0 PARTS LIST
| NO. | DESCRIPTION | QTY |
| 1 MAIN FRAME 1 | ||
| 2 POP-PIN 1 | ||
| 3 INNER BUSHING 1 | ||
| 4 BEARING 2 | ||
| 5 DRIVE PULLEY 1 | ||
| 6 MAGNET 1 | ||
| 7 TRANSMISSION SHAFT 1 | ||
| 8 SPACER 1 | ||
| 9 C-CLIP 1 | ||
| 9 C-CLIP 1 | ||
| 10 ALLEN HEX SCREW 4 | ||
| 11 NYLON NUT | 4 | |
| 12 WAVE WASHER | 2 | |
| 13 BELT | 1 | |
| 16 SENSOR CABLE | 1 | |
| 18 ROUND SENSOR FIXING PLASTIC | 1 | |
| 19 ROUND HEAD PHILIPS DRILLING SELF TAPPING | 1 | |
| 20 POWER CORD | 1 | |
| 28 LEFT CRANK | 1 | |
| 29 RIGHT CRANK | 1 | |
| 30 CRANK COVER | 2 | |
| 31 HEX FLANGE SCREW | 2 | |
| 32 IDLE WHEEL FIXING PLATE | 1 | |
| 37 IDLE WHEEL FLEXING SPRING | 1 | |
| 38 LEFT SHROUD | 1 | |
| NO. | DESCRIPTION | QTY |
| 39 RIGHT SHROUD | 1 | |
| 40 CONSOLE MAST DECORATIVE RING | 1 | |
| 41 CRANK DECORATIVE RING | 2 | |
| 42 RUBBER STEP-THROUGH PAD | 1 | |
| 43 SEAT POST SUPPORT TUBE PAD | 1 | |
| 44 CLIP | 8 | |
| 45 TRUSS PHILIPS SELF TAPPING SCREW | 14 | |
| 46 CONSOLE MAST 1 | ||
| 54 FRONT STABILIZER | 1 | |
| 55 FRONT STABILIZER COVER | 1 | |
| 56 TRANSPORTATION WHEEL | 2 | |
| 57 TRUSS HEX SCREW | 2 | |
| 58 LEVELER 4 | ||
| 59 REAR STABILIZER | 1 | |
| 60 REAR STABILIZER COVER | 1 | |
| 61 SEAT POST | 1 | |
| 62 SEAT POST COVER | 1 | |
| 63 ROUND HEAD PHILIPS SCREW | 2 | |
| 64 SEAT SUPPORTING SHAFT | 1 | |
| 65 END CAP | 1 | |
| 66 TOWEL HOOK | 1 | |
| 67 CARRIAGE SCREW | 9 | |
| 68 FLAT WASHER | 1 | |
| 69 KNOB | 1 | |
| 70 SPACER 1 |
COMFORT 2.0 PARTS LIST
| NO. | DESCRIPTION | QTY |
| 71 SEAT PAD 1 | ||
| 72 CONSOLE 1 | ||
| 73 TRUSS PHILIPS SCREW 4 | ||
| 74 HAND GRIP HR SENSOR CABLE 2 | ||
| 75 POWER ADAPTOR 1 | ||
| 77 BOTTLE HOLDER B 1 | ||
| 78 CONSOLE MAST GROMMET 1 | ||
| 80 AUDIO CABLE 1 | ||
| 82 FLAT WASHER 20 | ||
| 83 SPRING WASHER 12 | ||
| 84 NUT 12 | ||
| 85 TRUSS HEX SCREW | 8 | |
| 87 TRUSS HEX SCREW | 4 | |
| 89 COUNTER SINK PHILIPS SCREW | 4 | |
| 90 HEX WRENCH | 2 | |
| 91 "PLUS" WRENCH | 2 | |
| 93 LEFT PEDAL | 1 | |
| 94 RIGHT PEDAL | 1 | |
| 95 HAND GRIP HR SENSOR | 2 | |
| 96 TRUSS PHILIPS SELF TAPPING SCREW ST4X25 | 2 | |
| 97 FOAM GRIP | 1 | |
| 98 TRUSS END CAP | 2 | |
| 100 | ADJUSTMENT CABLE | 1 |
| 101 | LOWER CONSOLE CABLE | 1 |
| 102 | MOTOR | 1 |
| NO. | DESCRIPTION | QTY |
| 103 | ROUND HEAD PHILIPS SCREW | 3 |
| 104 | FLY WHEEL | 1 |
| 105 | ALLEN FLANGE SCREW NUT | 2 |
| 106 | WASHER | 2 |
| 107 | BEARING | 2 |
| 108 | FLAT HEAD HEX SCREW | 1 |
| 109 | NYLON NUT | 1 |
| 110 | MIDDLE CONSOLE CABLE | 1 |
| 113 | NYLON NUT | 4 |
| 117 | SPACER | 1 |
| 118 | FLAT WASHER | 1 |
| 120 | WIRELESS HAND PULSE RECEIVER | 1 |
| 121 | COUNTER SINK PHILIPS SELF TAPPING SCREW | 2 |
| 49+97 | HAND GRIP+FOAM GRIP | 1 |
| 122 | CLAMPII | 1 |
| 123 | SCKT-HD CAP SCREW | 1 |
| 124 | HANDLE BAR COVER | 1 |
| 125 | TSHAPE KNOB | 1 |
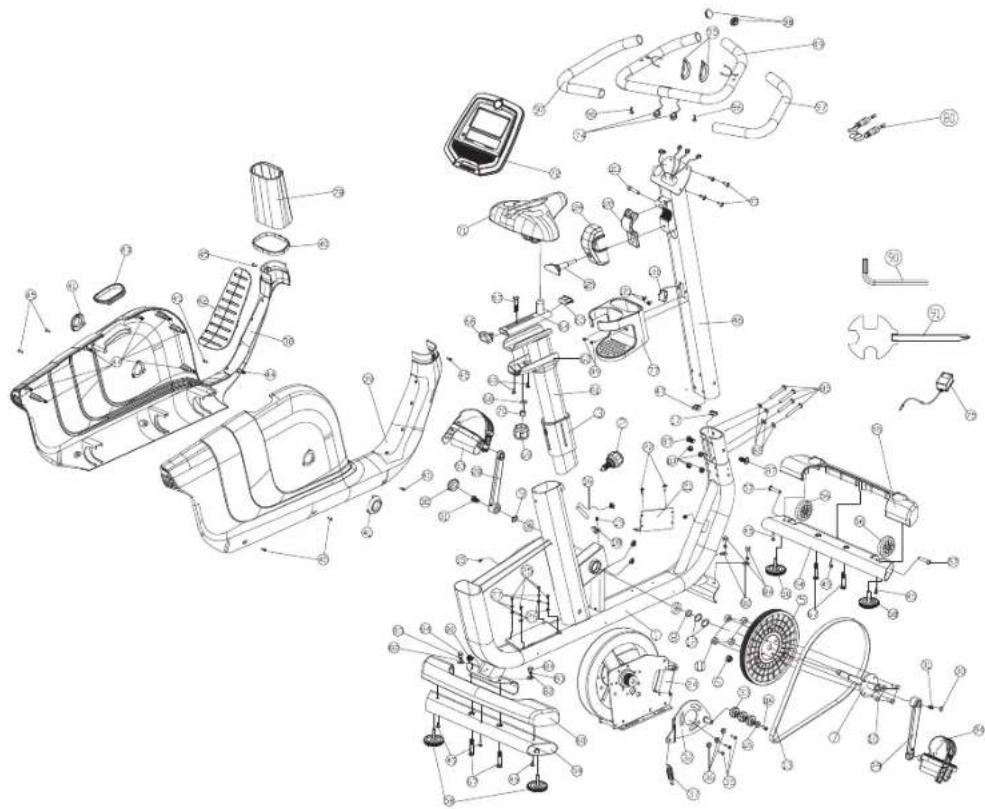
COMFORT 4.0 / 8.1 EXPLODED VIEW
text_image
Exploded view diagram of a stationary exercise machine with labeled components and partsCOMFORT 4.0 / 8.1 PARTS LIST
| NO. | DESCRIPTION | QTY |
| 2 | POP-PIN | 1 |
| 3 | INNER BUSHING | 1 |
| 4 | BEARING 1 | |
| 5 | DRIVE PULLEY | 1 |
| 6 | MAGNET | 1 |
| 7 | TRANSMISSION SHAFT;NEW; | 1 |
| 8 | SPACER;NEW; 1 | |
| 9 | C-CLIP | 1 |
| 10 ALLEN HEX SCREW;NEW; | 1 | |
| 11 | NYLON NUT | 1 |
| 12 WAVE WASHER | 1 | |
| 13 BELT | 1 | |
| 15 INDUCTION LOWER CONTROLLER CONNECT- | 1 | |
| 16 SENSOR CABLE | 1 | |
| 17 LOWER CONSOLE CABLE | 1 | |
| 18 ROUND SENSOR FIXING PLASTIC | 1 | |
| 19 ROUND HEAD PHILIPS DRILLING SELF TAPPING | 1 | |
| 20 POWER CORD | 1 | |
| 21 LOWER CONTROL BOARD | 1 | |
| 22 TRUSS PHILIPS SELF TAPPING SCREW | 1 | |
| 24 INDUCTION FLY WHEEL | 1 | |
| 25 ROUND HEAD HEX SCREW | 1 | |
| 26 WASHER | 1 | |
| 27 SPRING WASHER | 1 | |
| 28 LEFT CRANK | 1 |
| NO. | DESCRIPTION | QTY |
| 29 RIGHT CRANK 1 | ||
| 30 CRANK COVER 1 | ||
| 31 HEX FLANGE SCREW 1 | ||
| 32 IDLE WHEEL FIXING PLATE;NEW; 1 | ||
| 33 BEARING 1 | ||
| 35 COUNTER SINK PHILIPS SCREW 1 | ||
| 36 SLEEVE 1 | ||
| 37 IDLE WHEEL FLEXING SPRING 1 | ||
| 38 LEFT SHROUD 1 | ||
| 39 RIGHT SHROUD 1 | ||
| 40 CONSOLE MAST DECORATIVE RING 1 | ||
| 41 CRANK DECORATIVE RING | 1 | |
| 42 RUBBER STEP-THROUGH PAD 1 | ||
| 43 SEAT POST SUPPORT TUBE PAD | 1 | |
| 44 CLIP | 1 | |
| 45 TRUSS PHILIPS SELF TAPPING SCREW | 1 | |
| 46 CONSOLE MAST | 1 | |
| 47 MIDDLE CONSOLE CABLE | 1 | |
| 49+97 | HAND GRIP | 1 |
| 54 FRONT STABILIZER | 1 | |
| 55 FRONT STABILIZER COVER | 1 | |
| 56 TRANSPORTATION WHEEL | 1 | |
| 57 TRUSS HEX SCREW | 1 | |
| 58 LEVELER 1 | ||
| 59 REAR STABILIZER | 1 | |
| 60 REAR STABILIZER COVER 1 | ||
| 61 SEAT POST 1 | ||
| 62 SEAT POST COVER 1 | ||
| 63 ROUND HEAD PHILIPS SCREW 1 | ||
| 64 SEAT SUPPORTING SHAFT 1 | ||
| 65 END CAP 1 | ||
| 66 TOWEL HOOK 1 | ||
| 67 CARRIAGE BOLT 2 | ||
| 68 FLAT WASHER 1 | ||
| 69 KNOB 1 | ||
| 70 SPACER 1 | ||
| 71 SEAT | 1 | |
| 72 CONSOLE | 1 | |
| 73 TRUSS PHILIPS SCREW | 1 | |
| 74 HAND GRIP HR SENSOR CABLE | 2 | |
| 75 ADAPTOR | 1 | |
| 77 BOTTLE HOLDER B | 1 | |
| 78 CONSOLE MAST GROMMET | 1 | |
| 80 AUDIO CABLE 1 | ||
| 82 FLAT WASHER 3 | ||
| 83 SPRING WASHER | 2 | |
| 84 NUT | 2 | |
| 85 TRUSS HEX SCREW | 2 | |
| 87 TRUSS HEX SCREW | 12 | |
| 89 COUNTER SINK PHILIPS SCREW | 1 | |
| NO. | DESCRIPTION | QTY |
| 90 HEX WRENCH | 1 | |
| 91 "PLUS" WRENCH | 1 | |
| 93 LEFT PEDAL | 1 | |
| 94 RIGHT PEDAL | 1 | |
| 95 HAND GRIP HR SENSOR | 2 | |
| 96 TRUSS PHILIPS SELF TAPPING SCREW | 2 | |
| 97 FOAM--HANDLE BAR | 1 | |
| 98 TRUSS END CAP | 2 | |
| 113 | NYLON NUT | 2 |
| 115 | WASHER | 1 |
| 116 | COUNTER SINK PHILIPS SCREW | 1 |
| 120 | WIRELESS HAND PULSE RECEIVER | 1 |
| 121 | COUNTER SINK PHILIPS SELF TAPPING SCREW | 2 |
| 1-1 | MAIN FRAME;NEW | 1 |
| 122 | CLAMPII | 1 |
| 123 | SCKT-HD CAP SCREW | 1 |
| 124 | HANDLE BAR COVER | 1 |
| 125 | TSHAPE KNOB | 1 |
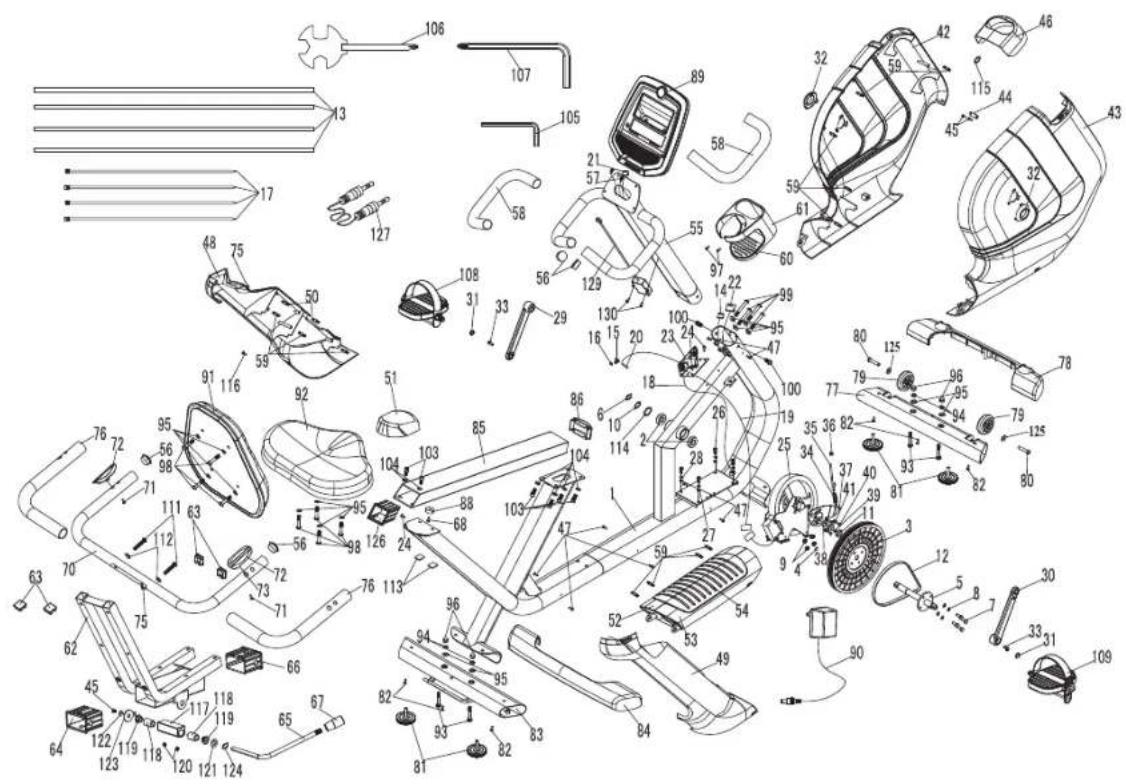
COMFORT R8.0 EXPLODED VIEW
text_image
Technical diagram of a mechanical device with numbered components and exploded view, likely for assembly or manufacturing purposes.COMFORT R8.0 PARTS LIST
| NO. | DESCRIPTION | QTY |
| 1 MAIN FRAME 1 | ||
| 2 BEARING 2 | ||
| 3 DRIVE PULLEY 1 | ||
| 4 MAGNET 1 | ||
| 5 TRANSMISSION SHAFT 1 | ||
| 6 C-CLIP 1 | ||
| 7 ALLEN HEX SCREW 4 | ||
| 8 SPRING WASHER 4 | ||
| 9 NYLON NUT 4 | ||
| 10 WAVE WASHER 1 | ||
| 11 | BUSHING | 1 |
| 12 BELT | 1 | |
| 13 TWIST TIE | 4 | |
| 14 HAND PULSE WIRE FOR FRAME | 1 | |
| 15 ROUND SENSOR FIXING PLASTIC | 1 | |
| 16 ROUND HEAD PHILIPS DRILLING SELF TAPPING | 1 | |
| 17 ZIP TIE | 4 | |
| 18 POWER CORD | 1 | |
| 20 SPEED SENSOR CABLE | 1 | |
| 21 MIDDLE CONSOLE CABLE | 1 | |
| 22 LOWER CONSOLE CABLE | 1 | |
| 23 LOWER CONTROL BOARD | 1 | |
| 24 ALLEN HEX FLANGE SLIP SCREW NUT | 3 | |
| 24 TRUSS SELF TAPPING SCREW | 1 | |
| 25 INDUCTION FLY WHEEL | 1 | |
| NO. | DESCRIPTION | QTY |
| 26 HEX SCREW | 4 | |
| 27 WASHER | 4 | |
| 28 SPRING WASHER 4 | ||
| 29 LEFT CRANK | 1 | |
| 30 RIGHT CRANK | 1 | |
| 31 CRANK COVER | 1 | |
| 31 CRANK COVER | 1 | |
| 32 CRANK DECORATIVE RING | 2 | |
| 33 ALLEN HEX FLANGE SLIP SCREW | 1 | |
| 33 ALLEN HEX FLANGE SLIP SCREW | 1 | |
| 34 IDLE WHEEL FLEXING SPRING | 1 | |
| 35 ADJUSTMENT SCREW | 1 | |
| 36 FLANGE SCREW | 1 | |
| 37 IDLE WHEEL FIXING PLATE | 1 | |
| 38 BEARING 3 | ||
| 39 C-CLIP 1 | ||
| 40 COUNTER SINK PHILIPS SCREW | 3 | |
| 41 BUSHING | 3 | |
| 42 LEFT SHROUD | 1 | |
| 43 RIGHT SHROUD | 1 | |
| 44 CONNECTING PLATE | 1 | |
| 45 TRUSS PHILIPS SCREW | 1 | |
| 45 TRUSS PHILIPS SCREW | 2 | |
| 46 CONSOLE MAST GROMMET | 1 | |
| 47 TRUSS PHILIPS SELF TAPPING SCREW | 4 |
COMFORT R8.0 PARTS LIST
| NO. | DESCRIPTION | QTY |
| 47 TRUSS PHILIPS SELF TAPPING SCREW | 4 | |
| 48 REAR SUPPORT TUBE LEFT COVER | 1 | |
| 49 REAR SUPPORT TUBE RIGHT COVER | 1 | |
| 50 CLIP-SHORT | 2 | |
| 51 REAR SUPPORT TUBE TOP COVER | 1 | |
| 52 BASE TUBE LEFT COVER | 1 | |
| 53 BASE TUBE RIGHT COVER | 1 | |
| 54 RUBBER STEP-THROUGH PAD | 1 | |
| 55 CONSOLE MAST | 1 | |
| 56 TRUSS END CAP | 2 | |
| 56 TRUSS END CAP | 2 | |
| 57 UPPER HAND GRIP HR CABLE | 1 | |
| 58 FOAM GRIP-FRONT | 2 | |
| 59 CLIP-SHORT | 5 | |
| 60 BOTTLE HOLDER A | 1 | |
| 62 SEAT FRAME BASE ASSEMBLY | 1 | |
| 63 END CAP | 4 | |
| 64 BUSHING | 1 | |
| 65 SEAT ADJUSTMENT HANDLE | 1 | |
| 66 BUSHING | 1 | |
| 67 HANDLE PLASTIC CAP | 1 | |
| 68 TRUSS PHILIPS SELF TAPPING SCREW | 1 | |
| 70 REAR HANDLEBAR WELDING SET | 1 | |
| 71 TAPPING SCREW | 2 | |
| 72 HAND GRIP HR SENSOR | 2 |
| NO. | DESCRIPTION | QTY |
| 73 HAND GRIP HR SENSOR CABLE FOR THE 1 | ||
| 75 CORD CAP 1 | ||
| 75 CORD CAP 1 | ||
| 76 FOAM GRIP 2 | ||
| 77 FRONT STABILIZER ASSEMBLY 1 | ||
| 78 FRONT STABILIZER COVER 1 | ||
| 79 TRANSPORTATION WHEEL 2 | ||
| 80 TRUSS HEX SCREW 2 | ||
| 81 LEVELER 2 | ||
| 81 LEVELER 2 | ||
| 82 TRUSS PHILIPS SCREW 6 | ||
| 83 REAR STABILIZER ASSEMBLY 1 | ||
| 84 REAR STABILIZER COVER 1 | ||
| 85 SEAT RAIL | 1 | |
| 86 ARC END CAP | 1 | |
| 88 SEAT STOP | 1 | |
| 89 CONSOLE | 1 | |
| 90 ADAPTOR | 1 | |
| 91 BACKREST PAD | 1 | |
| 92 SEAT PAD | 1 | |
| 93 CARRIAGE SCREW | 8 | |
| 94 SPRING WASHER | 8 | |
| 95 FLAT WASHER | 32 | |
| 96 NUT | 8 | |
| 97 TRUSS PHILIPS SELF TAPPING SCREW | 4 | |
| 98 TRUSS HEX SCREW 16 | ||
| 99 TRUSS HEX SCREW 8 | ||
| 100 TRUSS HEX SCREW 4 | ||
| 103 CKS HEX SCREW 12 | ||
| 104 SPRING WASHER 6 | ||
| 105 HEX WRENCH 2 | ||
| 106 "PLUS" WRENCH 2 | ||
| 107 HEX WRENCH 2 | ||
| 108 LEFT PEDAL 1 | ||
| 109 RIGHT PEDAL 1 | ||
| 111 COUNTER SINK HEX SCREW 4 | ||
| 112 ARC WASHER | 4 | |
| 114 FLAT WASHER | 2 | |
| 115 PLASTIC PAD | 1 | |
| 116 ROUND HEAD SELF TAPPING SCREW | 1 | |
| 125 FLAT WASHER | 2 | |
| 126 BUSHING | 1 | |
| 127 SOUND SOURCE WIRE | 1 | |
| 129 WIRELESS HAND PULSE RECEIVER | 1 | |
| 130 COUNTER SINK PHILIPS SELF TAPPING SCREW | 2 | |
| 42-1 | LEFT SHROUD | 1 |
| 43-1 | RIGHT SHROUD | 1 |
| 46-1 | CONSOLE MAST GROMMET | 1 |
| 48-1 | REAR SUPPORT TUBE LEFT COVER | 1 |
| 49-1 | REAR SUPPORT TUBE RIGHT COVER | 1 |
Eng: Waste Disposal
VISION Fitness / HORIZON Fitness / TEMPO Fitness / TREO Fitness products are recyclable. At the end if its useful life please dispose of this article correctly and safely (local refuse sites).
natural_image
Technical line drawing of a mechanical assembly with no visible text or symbols
text_image
HALTESTANGEN RÜCKENLEHNE SITZPOLSTER KURBEL STANDFUSS HINTEN STANDFUSS VORNE PEDALE KONSOLE KONSOLENMAST PULSGRIFF-HALTESTANGEN FLASCHENHALTER SITZPOSITION STELLHEBEL KONSOLENMASTHALTERUNG HAUPTRAHMEN NETZKABELANSCHLUSS TRANSPORTROLLEN□ 5 mm L-Schraubenschlüssel
□ 6 mm L-Schraubenschlüssel
IM LIEFERUMFANG ENTHALTENE TEILE:
SCHRAUBE (A) M8 X 56 MM MENGE: 4

SCHRAUBE (E) M4 X 12 MM MENGE: 2
text_image
BOLT (I) SPRING WASHER (C) MAIN FRAME SEAT FRAMESCHRAUBE (I) M8 X 18 MM MENGE: 6

SCHRAUBE (J) M8 X 45 MM MENGE: 8

SCHRAUBE (K) M10 X 65 MM MENGE: 2

natural_image
Line drawing of a stationary exercise bike with seat, legs, and front-mounted arms (no text or symbols)□ 13/15 mm Gabelschlüssel/
□ 6 mm L-Schraubenschlüssel
IM LIEFERUMFANG ENTHALTENE TEILE:
SCHRAUBE (A) M8 X 56 MM MENGE: 4

MUTTER (C) M8 MENGE: 4

Comfort Upright Bike

Comfort Upright Bike
SCHRAUBE (D) M4 X 12 MM MENGE: 2
Comfort Upright Bike
Comfort Upright Bike
T-KNOPF (F) M8 X 64 X 32 MENGE: 1
Comfort Upright Bike

Comfort Upright Bike
UPRIGHT BIKE AUFBAU
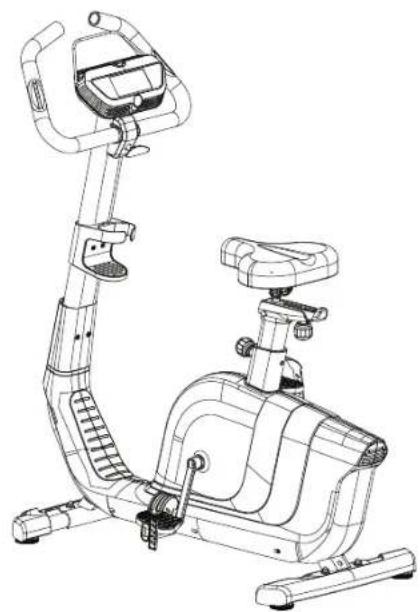
natural_image
Line drawing of a stationary exercise bike with adjustable arms and legs (no text or symbols)PROGRAMMINFORMATIONEN
text_image
PRESS AND HOLD CHANGE DISPLAY/RESISTANCE UP to start following with PostpartENERGIESPARMODUS
text_image
Exploded view diagram of a vehicle's internal components with numbered parts for identificationCOMFORT 2.0 TEILELISTE
| NR. | BESCHREIBUNG | MENGE |
| 1 MAIN FRAME 1 | ||
| 2 POP-PIN 1 | ||
| 3 INNER BUSHING 1 | ||
| 4 BEARING 2 | ||
| 5 DRIVE PULLEY 1 | ||
| 6 MAGNET 1 | ||
| 7 TRANSMISSION SHAFT 1 | ||
| 8 SPACER 1 | ||
| 9 C-CLIP 1 | ||
| 9 C-CLIP 1 | ||
| 10 ALLEN HEX SCREW 4 | ||
| 11 NYLON NUT 4 | ||
| 12 WAVE WASHER 2 | ||
| 13 BELT 1 | ||
| 16 SENSOR CABLE | 1 | |
| 18 ROUND SENSOR FIXING PLASTIC | 1 | |
| 19 ROUND HEAD PHILIPS DRILLING SELF TAPPING | 1 | |
| 20 POWER CORD | 1 | |
| 28 LEFT CRANK 1 | ||
| 29 RIGHT CRANK | 1 | |
| 30 CRANK COVER | 2 | |
| 31 HEX FLANGE SCREW | 2 | |
| 32 IDLE WHEEL FIXING PLATE | 1 | |
| 37 IDLE WHEEL FLEXING SPRING | 1 | |
| 38 LEFT SHROUD | 1 | |
| NR. | BESCHREIBUNG | MENGE |
| 39 RIGHT SHROUD | 1 | |
| 40 CONSOLE MAST DECORATIVE RING | 1 | |
| 41 CRANK DECORATIVE RING | 2 | |
| 42 RUBBER STEP-THROUGH PAD | 1 | |
| 43 SEAT POST SUPPORT TUBE PAD | 1 | |
| 44 CLIP | 8 | |
| 45 TRUSS PHILIPS SELF TAPPING SCREW | 14 | |
| 46 CONSOLE MAST | 1 | |
| 54 FRONT STABILIZER | 1 | |
| 55 FRONT STABILIZER COVER | 1 | |
| 56 TRANSPORTATION WHEEL | 2 | |
| 57 TRUSS HEX SCREW | 2 | |
| 58 LEVELER | 4 | |
| 59 REAR STABILIZER | 1 | |
| 60 REAR STABILIZER COVER | 1 | |
| 61 SEAT POST | 1 | |
| 62 SEAT POST COVER | 1 | |
| 63 ROUND HEAD PHILIPS SCREW | 2 | |
| 64 SEAT SUPPORTING SHAFT | 1 | |
| 65 END CAP 1 | ||
| 66 TOWEL HOOK | 1 | |
| 67 CARRIAGE SCREW | 9 | |
| 68 FLAT WASHER | 1 | |
| 69 KNOB | 1 | |
| 70 SPACER | 1 |
COMFORT 2.0 TEILELISTE
| NR. | BESCHREIBUNG | MENGE |
| 71 SEAT PAD 1 | ||
| 72 CONSOLE 1 | ||
| 73 TRUSS PHILIPS SCREW 4 | ||
| 74 HAND GRIP HR SENSOR CABLE 2 | ||
| 75 POWER ADAPTOR 1 | ||
| 77 BOTTLE HOLDER B 1 | ||
| 78 CONSOLE MAST GROMMET 1 | ||
| 80 AUDIO CABLE 1 | ||
| 82 FLAT WASHER 20 | ||
| 83 SPRING WASHER 12 | ||
| 84 NUT 12 | ||
| 85 TRUSS HEX SCREW 8 | ||
| 87 TRUSS HEX SCREW 4 | ||
| 89 COUNTER SINK PHILIPS SCREW 4 | ||
| 90 HEX WRENCH 2 | ||
| 91 "PLUS" WRENCH | 2 | |
| 93 LEFT PEDAL | 1 | |
| 94 RIGHT PEDAL | 1 | |
| 95 HAND GRIP HR SENSOR | 2 | |
| 96 TRUSS PHILIPS SELF TAPPING SCREW ST4X25 | 2 | |
| 97 FOAM GRIP | 1 | |
| 98 TRUSS END CAP | 2 | |
| 100 | ADJUSTMENT CABLE | 1 |
| 101 | LOWER CONSOLE CABLE | 1 |
| 102 | MOTOR | 1 |
| NR. | BESCHREIBUNG | MENGE |
| 103 | ROUND HEAD PHILIPS SCREW | 3 |
| 104 | FLY WHEEL | 1 |
| 105 | ALLEN FLANGE SCREW NUT | 2 |
| 106 | WASHER | 2 |
| 107 | BEARING | 2 |
| 108 | FLAT HEAD HEX SCREW | 1 |
| 109 | NYLON NUT | 1 |
| 110 | MIDDLE CONSOLE CABLE | 1 |
| 113 | NYLON NUT | 4 |
| 117 | SPACER | 1 |
| 118 | FLAT WASHER 1 | |
| 120 | WIRELESS HAND PULSE RECEIVER | 1 |
| 121 | COUNTER SINK PHILIPS SELF TAPPING SCREW | 2 |
| 49+97 | HAND GRIP+FOAM GRIP | 1 |
| 122 | CLAMPII | 1 |
| 123 | SCKT-HD CAP SCREW | 1 |
| 124 | HANDLE BAR COVER | 1 |
| 125 | TSHAPE KNOB | 1 |
COMFORT 4.0 / 8.1 EXPLOSIONSANSICHT
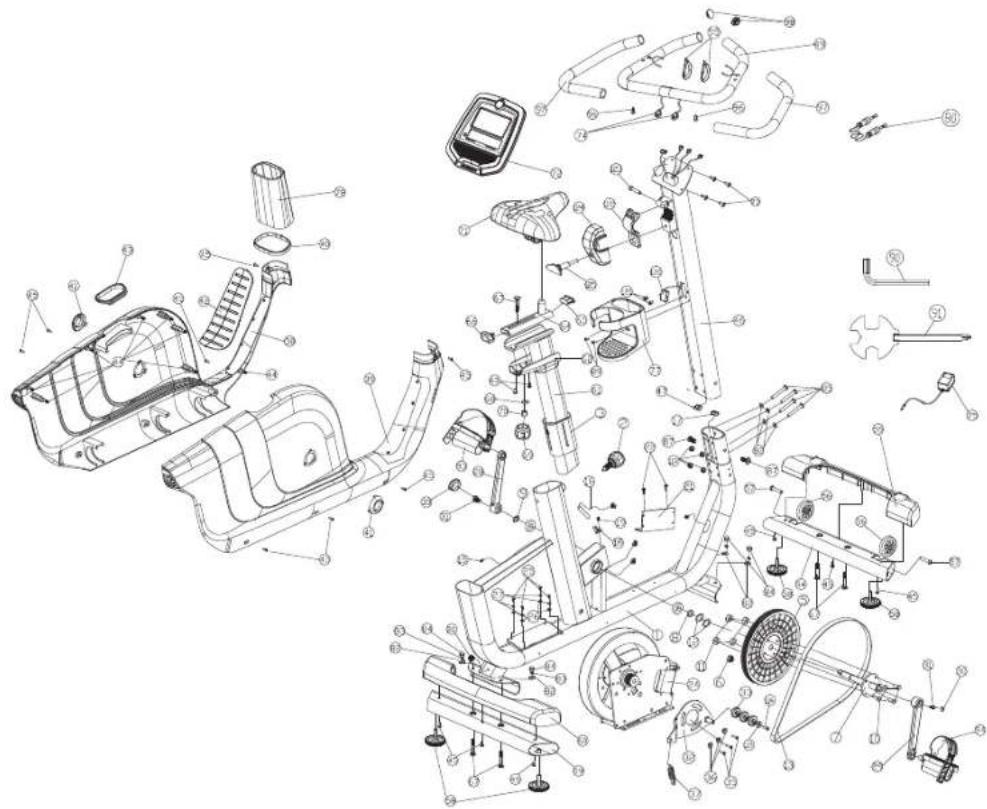
text_image
Exploded view diagram of a stationary exercise machine with labeled components and numbered partsCOMFORT 4.0 / 8.1 TEILELISTE
| NR. | BESCHREIBUNG | MENGE |
| 2 | POP-PIN | 1 |
| 3 | INNER BUSHING | 1 |
| 4 | BEARING 1 | |
| 5 | DRIVE PULLEY | 1 |
| 6 | MAGNET | 1 |
| 7 | TRANSMISSION SHAFT;NEW; | 1 |
| 8 | SPACER;NEW; | 1 |
| 9 | C-CLIP | 1 |
| 10 ALLEN HEX SCREW;NEW; | 1 | |
| 11 NYLON NUT | 1 | |
| 12 WAVE WASHER | 1 | |
| 13 BELT | 1 | |
| 15 INDUCTION LOWER CONTROLLER CONNECTING WI | 1 | |
| 16 SENSOR CABLE | 1 | |
| 17 LOWER CONSOLE CABLE | 1 | |
| 18 ROUND SENSOR FIXING PLASTIC | 1 | |
| 19 ROUND HEAD PHILIPS DRILLING SELF TAPPING | 1 | |
| 20 POWER CORD 1 | ||
| 21 LOWER CONTROL BOARD | 1 | |
| 22 TRUSS PHILIPS SELF TAPPING SCREW | 1 | |
| 24 INDUCTION FLY WHEEL | 1 | |
| 25 ROUND HEAD HEX SCREW | 1 | |
| 26 WASHER | 1 | |
| 27 SPRING WASHER | 1 | |
| 28 LEFT CRANK | 1 |
| NR. | BESCHREIBUNG | MENGE |
| 29 RIGHT CRANK 1 | ||
| 30 CRANK COVER 1 | ||
| 31 HEX FLANGE SCREW 1 | ||
| 32 IDLE WHEEL FIXING PLATE;NEW; 1 | ||
| 33 BEARING 1 | ||
| 35 COUNTER SINK PHILIPS SCREW 1 | ||
| 36 SLEEVE 1 | ||
| 37 IDLE WHEEL FLEXING SPRING 1 | ||
| 38 LEFT SHROUD 1 | ||
| 39 RIGHT SHROUD 1 | ||
| 40 CONSOLE MAST DECORATIVE RING 1 | ||
| 41 CRANK DECORATIVE RING 1 | ||
| 42 RUBBER STEP-THROUGH PAD 1 | ||
| 43 SEAT POST SUPPORT TUBE PAD 1 | ||
| 44 CLIP 1 | ||
| 45 TRUSS PHILIPS SELF TAPPING SCREW | 1 | |
| 46 CONSOLE MAST | 1 | |
| 47 MIDDLE CONSOLE CABLE | 1 | |
| 49+97 HAND GRIP | 1 | |
| 54 FRONT STABILIZER | 1 | |
| 55 FRONT STABILIZER COVER | 1 | |
| 56 TRANSPORTATION WHEEL | 1 | |
| 57 TRUSS HEX SCREW | 1 | |
| 58 LEVELER | 1 | |
| 59 REAR STABILIZER | 1 | |
| 60 REAR | STABILIZER COVER 1 | |
| 61 SEAT | POST 1 | |
| 62 SEAT | POST COVER 1 | |
| 63 ROUND | HEAD PHILIPS SCREW 1 | |
| 64 SEAT | SUPPORTING SHAFT 1 | |
| 65 END | CAP 1 | |
| 66 TOWEL | HOOK 1 | |
| 67 CARRIAGE | BOLT 2 | |
| 68 FLAT | WASHER 1 | |
| 69 KNOB | 1 | |
| 70 SPACER | 1 | |
| 71 SITZ | 1 | |
| 72 CONSOLE | 1 | |
| 73 TRUSS | PHILIPS SCREW 1 | |
| 74 HAND | GRIP HR SENSOR CABLE | 2 |
| 75 ADAPTOR | 1 | |
| 77 BOTTLE | HOLDER B | 1 |
| 78 CONSOLE | MAST GROMMET | 1 |
| 80 AUDIO | CABLE 1 | |
| 82 FLAT | WASHER 3 | |
| 83 SPRING | WASHER | 2 |
| 84 NUT | 2 | |
| 85 TRUSS | HEX SCREW | 2 |
| 87 TRUSS | HEX SCREW | 12 |
| 89 COUNTER | SINK PHILIPS SCREW | 1 |
| NR. | BESCHREIBUNG | MENGE |
| 90 HEX WRENCH | 1 | |
| 91 "PLUS" WRENCH | 1 | |
| 93 LEFT PEDAL | 1 | |
| 94 RIGHT PEDAL | 1 | |
| 95 HAND GRIP HR SENSOR | 2 | |
| 96 TRUSS PHILIPS SELF TAPPING SCREW | 2 | |
| 97 FOAM-HANDLE BAR | 1 | |
| 98 TRUSS END CAP | 2 | |
| 113 | NYLON NUT | 2 |
| 115 | WASHER | 1 |
| 116 | COUNTER SINK PHILIPS SCREW | 1 |
| 120 | WIRELESS HAND PULSE RECEIVER | 1 |
| 121 | COUNTER SINK PHILIPS SELF TAPPING SCREW | 2 |
| 1-1 | MAIN FRAME;NEW | 1 |
| 122 | CLAMPII | 1 |
| 123 | SCKT-HD CAP SCREW | 1 |
| 124 | HANDLE BAR COVER | 1 |
| 125 | TSHAPE KNOB | 1 |
COMFORT R8.0 EXPLOSIONSANSICHT
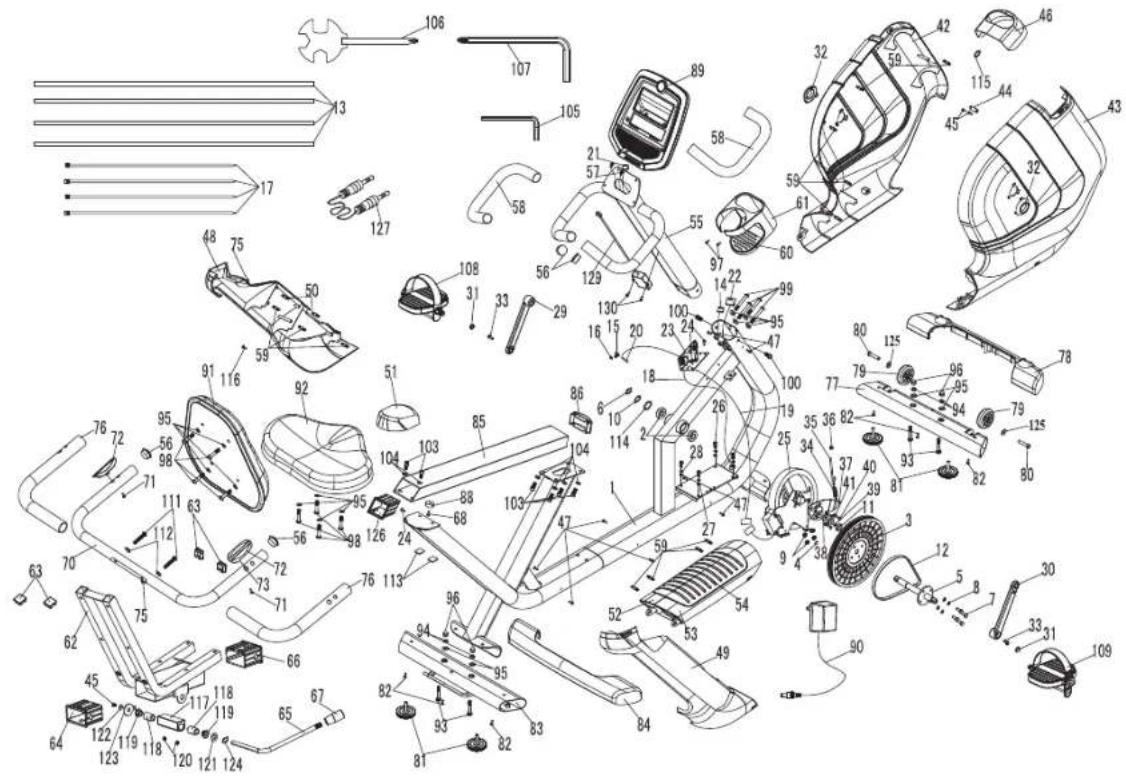
text_image
Technical diagram of a car body assembly with numbered components and labeled partsCOMFORT R8.0 TEILELISTE
| NR. | BESCHREIBUNG | MENGE |
| 1 MAIN FRAME 1 | ||
| 2 BEARING 2 | ||
| 3 DRIVE PULLEY 1 | ||
| 4 MAGNET 1 | ||
| 5 TRANSMISSION SHAFT 1 | ||
| 6 C-CLIP 1 | ||
| 7 ALLEN HEX SCREW 4 | ||
| 8 SPRING WASHER 4 | ||
| 9 NYLON NUT 4 | ||
| 10 WAVE WASHER 1 | ||
| 11 BUSHING 1 | ||
| 12 BELT 1 | ||
| 13 TWIST TIE 4 | ||
| 14 HAND PULSE WIRE FOR FRAME | 1 | |
| 15 ROUND SENSOR FIXING PLASTIC | 1 | |
| 16 ROUND HEAD PHILIPS DRILLING SELF TAPPING | 1 | |
| 17 ZIP TIE | 4 | |
| 18 POWER CORD | 1 | |
| 20 SPEED SENSOR CABLE | 1 | |
| 21 MIDDLE CONSOLE CABLE | 1 | |
| 22 LOWER CONSOLE CABLE | 1 | |
| 23 LOWER CONTROL BOARD | 1 | |
| 24 ALLEN HEX FLANGE SLIP SCREW NUT | 3 | |
| 24 TRUSS SELF TAPPING SCREW | 1 | |
| 25 INDUCTION FLY WHEEL | 1 | |
| NR. | BESCHREIBUNG | MENGE |
| 26 HEX | SCREW 4 | |
| 27 WASHER | 4 | |
| 28 SPRING WASHER 4 | ||
| 29 LEFT CRANK 1 | ||
| 30 RIGHT CRANK | 1 | |
| 31 CRANK COVER | 1 | |
| 31 CRANK COVER | 1 | |
| 32 CRANK DECORATIVE RING | 2 | |
| 33 ALLEN HEX FLANGE SLIP SCREW | 1 | |
| 33 ALLEN HEX FLANGE SLIP SCREW | 1 | |
| 34 IDLE WHEEL FLEXING SPRING | 1 | |
| 35 ADJUSTMENT SCREW | 1 | |
| 36 FLANGE SCREW | 1 | |
| 37 IDLE WHEEL FIXING PLATE | 1 | |
| 38 BEARING 3 | ||
| 39 C-CLIP 1 | ||
| 40 COUNTER SINK PHILIPS SCREW | 3 | |
| 41 BUSHING 3 | ||
| 42 LEFT SHROUD | 1 | |
| 43 RIGHT SHROUD | 1 | |
| 44 CONNECTING PLATE | 1 | |
| 45 TRUSS PHILIPS SCREW | 1 | |
| 45 TRUSS PHILIPS SCREW | 2 | |
| 46 CONSOLE MAST GROMMET | 1 | |
| 47 TRUSS PHILIPS SELF TAPPING SCREW | 4 | |
COMFORT R8.0 TEILELISTE
| NR. | BESCHREIBUNG | MENGE |
| 47 TRUSS PHILIPS SELF TAPPING SCREW | 4 | |
| 48 REAR SUPPORT TUBE LEFT COVER | 1 | |
| 49 REAR SUPPORT TUBE RIGHT COVER | 1 | |
| 50 CLIP-SHORT | 2 | |
| 51 REAR SUPPORT TUBE TOP COVER | 1 | |
| 52 BASE TUBE LEFT COVER | 1 | |
| 53 BASE TUBE RIGHT COVER | 1 | |
| 54 RUBBER STEP-THROUGH PAD | 1 | |
| 55 CONSOLE MAST | 1 | |
| 56 TRUSS END CAP | 2 | |
| 56 TRUSS END CAP | 2 | |
| 57 UPPER HAND GRIP HR CABLE | 1 | |
| 58 FOAM GRIP-FRONT | 2 | |
| 59 CLIP-SHORT | 5 | |
| 60 BOTTLE HOLDER A | 1 | |
| 62 SEAT FRAME BASE ASSEMBLY | 1 | |
| 63 END CAP | 4 | |
| 64 BUSHING | 1 | |
| 65 SEAT ADJUSTMENT HANDLE | 1 | |
| 66 BUSHING | 1 | |
| 67 HANDLE PLASTIC CAP | 1 | |
| 68 TRUSS PHILIPS SELF TAPPING SCREW | 1 | |
| 70 REAR HANDLEBAR WELDING SET | 1 | |
| 71 TAPPING SCREW | 2 | |
| 72 HAND GRIP HR SENSOR | 2 |
| NR. | BESCHREIBUNG | MENGE |
| 73 HAND GRIP HR SENSOR CABLE FOR THE HANDLE 1 | ||
| 75 CORD CAP 1 | ||
| 75 CORD CAP 1 | ||
| 76 FOAM GRIP 2 | ||
| 77 FRONT STABILIZER ASSEMBLY 1 | ||
| 78 FRONT STABILIZER COVER 1 | ||
| 79 TRANSPORTATION WHEEL 2 | ||
| 80 TRUSS HEX SCREW 2 | ||
| 81 LEVELER 2 | ||
| 81 LEVELER 2 | ||
| 82 TRUSS PHILIPS SCREW 6 | ||
| 83 REAR STABILIZER ASSEMBLY 1 | ||
| 84 REAR STABILIZER COVER 1 | ||
| 85 SEAT RAIL 1 | ||
| 86 ARC END CAP 1 | ||
| 88 SEAT STOP 1 | ||
| 89 CONSOLE | 1 | |
| 90 ADAPTOR | 1 | |
| 91 BACKREST PAD | 1 | |
| 92 SEAT PAD | 1 | |
| 93 CARRIAGE SCREW | 8 | |
| 94 SPRING WASHER | 8 | |
| 95 FLAT WASHER | 32 | |
| 96 NUT | 8 | |
| 97 TRUSS PHILIPS SELF TAPPING SCREW | 4 | |
| 98 TRUSS HEX SCREW 16 | ||
| 99 TRUSS HEX SCREW 8 | ||
| 100 TRUSS HEX SCREW 4 | ||
| 103 CKS HEX SCREW 12 | ||
| 104 SPRING WASHER 6 | ||
| 105 HEX WRENCH 2 | ||
| 106 "PLJS" WRENCH 2 | ||
| 107 HEX WRENCH 2 | ||
| 108 LEFT PEDAL 1 | ||
| 109 RIGHT PEDAL 1 | ||
| 111 COUNTER SINK HEX SCREW 4 | ||
| 112 UNTERLEGSCHEIBE (GEBOGEN) 4 | ||
| 114 FLAT WASHER 2 | ||
| 115 PLASTIC PAD 1 | ||
| 116 ROUND HEAD SELF TAPPING SCREW 1 | ||
| 125 FLAT WASHER 2 | ||
| 126 BUSHING | 1 | |
| 127 SOUND SOURCE WIRE | 1 | |
| 129 WIRELESS HAND PULSE RECEIVER | 1 | |
| 130 COUNTER SINK PHILIPS SELF TAPPING SCREW | 2 | |
| 42-1 | LEFT SHROUD | 1 |
| 43-1 | RIGHT SHROUD | 1 |
| 46-1 | CONSOLE MAST GROMMET | 1 |
| 48-1 | REAR SUPPORT TUBE LEFT COVER | 1 |
| 49-1 | REAR SUPPORT TUBE RIGHT COVER | 1 |
EN: Waste Disposal
VISION Fitness / HORIZON Fitness / TEMPO Fitness / TREO Fitness products are recyclable. At the end if its useful life please dispose of this article correctly and safely (local refuse sites).
natural_image
Technical line drawing of a mechanical assembly with no visible text or symbols
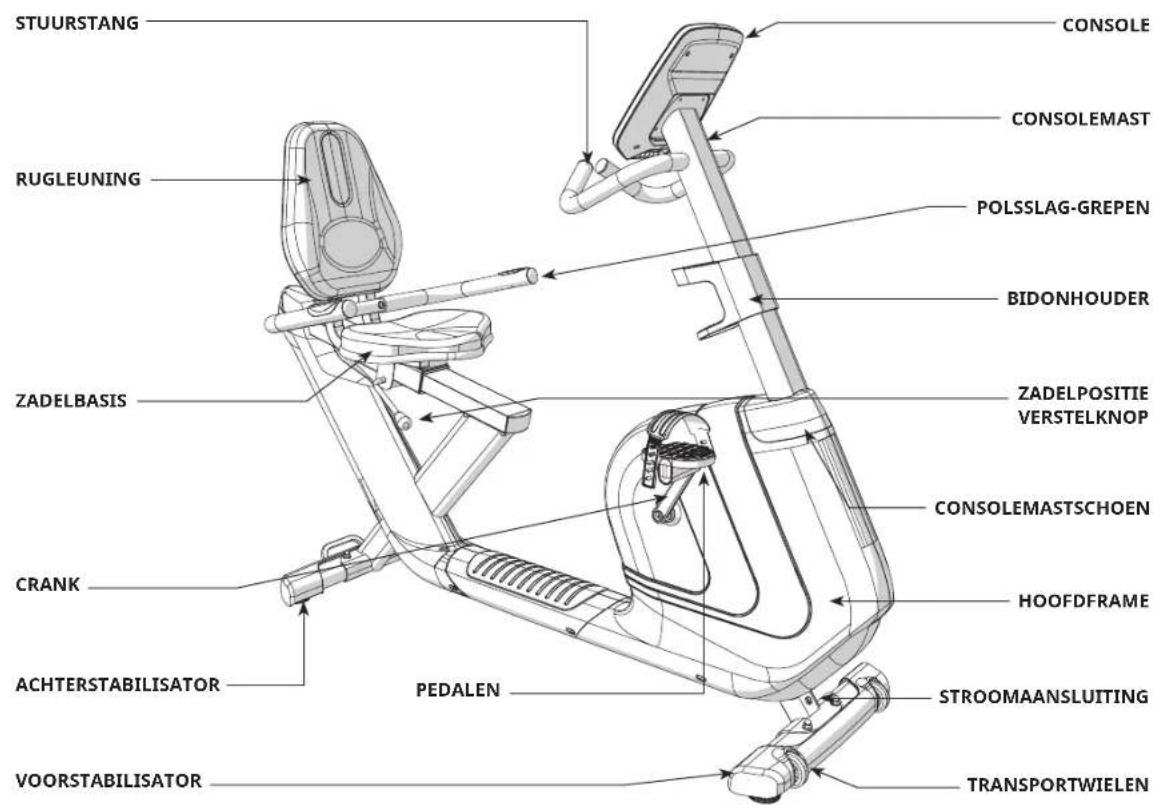
text_image
STUURSTANG RUGLEUNING ZADELBASIS CRANK ACHTERSTABILISATOR VOORSTABILISATOR PEDALEN CONSOLE CONSOLEMAST POLSSLAG-GREPEN BIDONHOUDER ZADELPOSITIE VERSTELKNOP CONSOLEMASTSCHOEN HOOFDFRAME STROOMAANSLUITING TRANSPORTWIELENBENODIGD GEREEDSCHAP:
text_image
BOLT (I) SPRING WASHER (C) MAIN FRAME SEAT FRAMEMONTAGEMATERIAAL VOOR STAP 4
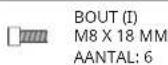

VEERRINGEN (C)
M8 X 2,0T MM
AANTAL: 6
natural_image
Line drawing of a stationary exercise bike with seat, legs, and front-mounted arms (no text or symbols)MONTAGE VOLTOOID!
Comfort R8.0
Totale afmetingen: 165 x 64 x 135 cm
Netto Gewicht: 49,5 kg / 109 lbs.
natural_image
Line drawing of a stationary exercise bike with adjustable arms and legs (no text or symbols)COMFORT 2.0 GETOOND
MONTAGE VOLTOOID!
Comfort 2.0
text_image
HORIZON COMFORT® K A N L M G J 18.8 Level Volume Speed Air Condition Target Mushroom Rate 888 Stairs For Minutes Air Weight WEIGHT LPS WATER SUN Distance DISTANCE Change Display Enter HORIZONCOMFORT 8.1 / R8.0 CONSOLEBEDIENING
other
WEIGHT | Metric | Value | | :--- | :--- | | Time (s) | 200 | | Duration (minutes) | 240 | | Calorie (g/kcal) | 250 | | Speed (km/h) | 150 | | Workout Profile | 200 | | WMTS Profile | 20 | | Distance Efficiency | 18.8 | | Weight Loss | - | | Maximum Heart Rate (beats per minute Age Weight) | 8.88 | Level: 18.8DISPLAYVENSTERS
PROGRAMMA-INFORMATIE
Comfort 2.0: 11 programma's (Handmatig / Intervallen / Spel / Gewichtsverlies / Rollende heuvels / Kadans / Willekeurig / THR-zone / %THR / Aangepast 1 / Aangepast 2)
Comfort 4.0: 14 programma's (Constant watts/ Handmatig / Intervallen / Spel / Fitnesstest / Gewichtsverlies / Gewichtsverlies Plus / Rollende heuvels / Kadans / Willekeurig / THR-zone / %THR / Aangepast 1 / Aangepast 2)
Comfort 8.1: 16 programma's (Constant watts / Interval watt / Handmatig / Intervallen / Spel / Fitnesstest / Gewichtsverlies / Gewichtsverlies Plus / Rollende heuvels / Kadans / Willekeurig / THR Zone / %THR / Krachtopbouw / Aangepast 1 / Aangepast 2)
Comfort R8.0: 16 programma's (Constant watts / Interval watt / Handmatig / Intervallen / Spel / Fitnesstest / Gewichtsverlies / Gewichtsverlies Plus / Rollende heuvels / Kadans / Willekeurig / THR Zone / %THR / Krachtopbouw / Aangepast 1 / Aangepast 2)
text_image
888 10.0 Press and hold. CHANGE DISPLAY-RESISTANCE UP to start using a ProgramENERGIESPAARSTAND
text_image
Exploded view diagram of a vehicle's internal components with numbered parts and labeled partsCOMFORT 2.0 ONDERDELENLIJST
| NR. | OMSCHRIJVING | AANTAL |
| 1 HOO | FDFRAME 1 | |
| 2 POP | PEN 1 | |
| 3 BINN | ENBUS 1 | |
| 4 LAGER | 2 | |
| 5 AANDRIJFPOELIE | 1 | |
| 6 MAG | NEET 1 | |
| 7 TRANSMISSIEAS | 1 | |
| 8 AFST | ANDSBUS 1 | |
| 9 C-CLIP | 1 | |
| 9 C-CLIP | 1 | |
| 10 BINN | ENZESKANTSCHROEF 4 | |
| 11 NYLON | MOER 4 | |
| 12 GEG | OLFDE RING 2 | |
| 13 RIEM | 1 | |
| 16 SENS | ORKABEL 1 | |
| 18 RON | DE SENSOR KUNSTSTOF BEVESTIGING 1 | |
| 19 RON | DE PHILIPS SCHROEF ZELFTAPPEND | 1 |
| 20 NETS | SNOER | 1 |
| 28 LINKER | CRANK | 1 |
| 29 RECHTER | CRANK 1 | |
| 30 CRANKAFDEKKING | 2 | |
| 31 HEX | FLENSSCHROEF | 2 |
| 32 VRIJ | LOOP WIELBEVESTIGINGSPLAAT | 1 |
| 37 VRIJ | LOOP WIEL SPANVEER | 1 |
| 38 BESCH | CHERMKRAAG LINKS | 1 |
| NR. | OMSCHRIJVING | AANTAL |
| 39 BESCHERMKRAAG RECHTS | 1 | |
| 40 DECORATIEVE RING CONSOLEMAST | 1 | |
| 41 DECORATIEVE RING CRANK | 2 | |
| 42 RUBBER STAP-PAD | 1 | |
| 43 ZADELPEN ONDERSTEUNING-PAD | 1 | |
| 44 CLIP | 8 | |
| 45 TRUSS PHILIPS ZELFTAPPENDE SCHROEF | 14 | |
| 46 CONSOLEMAST | 1 | |
| 54 VOORSTABILISATOR | 1 | |
| 55 AFDEKKING VOORSTABILISATOR | 1 | |
| 56 TRANSPORTWIEL | 2 | |
| 57 TRUSS ZESKANTSCHROEF | 2 | |
| 58 STELVOET 4 | ||
| 59 ACHTERSTABILISATOR | 1 | |
| 60 AFDEKKING ACHTERSTABILISATOR | 1 | |
| 61 ZADELPEN | 1 | |
| 62 ZADELPEN AFDEKKING | 1 | |
| 63 RONDE PHILIPSSCHROEF | 2 | |
| 64 ZADEL ONDERSTEUNINGSAS | 1 | |
| 65 EINDKAP 1 | ||
| 66 HANDOEKHAAK | 1 | |
| 67 SLEDESCHROEF | 9 | |
| 68 SLUITRING | 1 | |
| 69 KNOP | 1 | |
| 70 AFSTANDSBUS 1 |
COMFORT 2.0 ONDERDELENLIJST
| NR. | OMSCHRIJVING | AANTAL |
| 71 ZADELPAD 1 | ||
| 72 CONSOLE 1 | ||
| 73 TRUSS PHILIPSSCHROEF 4 | ||
| 74 HANDGREEP HR-SENSORKABEL 2 | ||
| 75 NETVOEDING 1 | ||
| 77 BIDONHOUDER B 1 | ||
| 78 CONSOLEMASTSCHOEN 1 | ||
| 80 AUDIOKABEL 1 | ||
| 82 SLUITRING 20 | ||
| 83 VEERRING 12 | ||
| 84 MOER 12 | ||
| 85 TRUSS ZESKANTSCHROEF 8 | ||
| 87 TRUSS ZESKANTSCHROEF 4 | ||
| 89 CONTRA PHILIPSSCHROEF 4 | ||
| 90 HEX-SLEUTEL 2 | ||
| 91 "PLUS"-SLEUTEL 2 | ||
| 93 PEDAAL LINKS | 1 | |
| 94 RECHTER PEDAAL | 1 | |
| 95 HANDGREEP HR-SENSOR | 2 | |
| 96 | TRUSS PHILIPS ZELFTAPPENDE SCHROEF ST4X25 | 2 |
| 97 SCHUIMGREEP | 1 | |
| 98 TRUSS EINDKAP 2 | ||
| 100 | VERSTELKABEL | 1 |
| 101 | ONDERSTE CONSOLEKABEL | 1 |
| 102 | MOTOR | 1 |
| NR. | OMSCHRIJVING | AANTAL |
| 103 | RONDE PHILIPSSCHROEF | 3 |
| 104 | VLIEGWIEL 1 | |
| 105 | BINNENZESKANT FLENSMOER | 2 |
| 106 | SLUITRING | 2 |
| 107 | LAGER | 2 |
| 108 | PLATKOP ZESKANTSCHROEF | 1 |
| 109 | NYLON MOER | 1 |
| 110 | MIDDEN CONSOLEKABEL | 1 |
| 113 | NYLON MOER | 4 |
| 117 | AFSTANDSBUS | 1 |
| 118 | SLUITRING | 1 |
| 120 | DRAADLOZE HANDPULSONTVANGER | 1 |
| 121 | CONTRA VERZONKEN PHILIPS ZELFTAPPENDE SCHROEF | 2 |
| 49+97 | HANDGREEP MET SCHUIMGREEP | 1 |
| 122 | KLEM | 1 |
| 123 | BINNENZESKANT CAP-SCHROEF | 1 |
| 124 | HANDGREEPAFDEKKING | 1 |
| 125 | T-KNOP | 1 |
COMFORT 4.0/8.1 ONDERDELENDIAGRAM
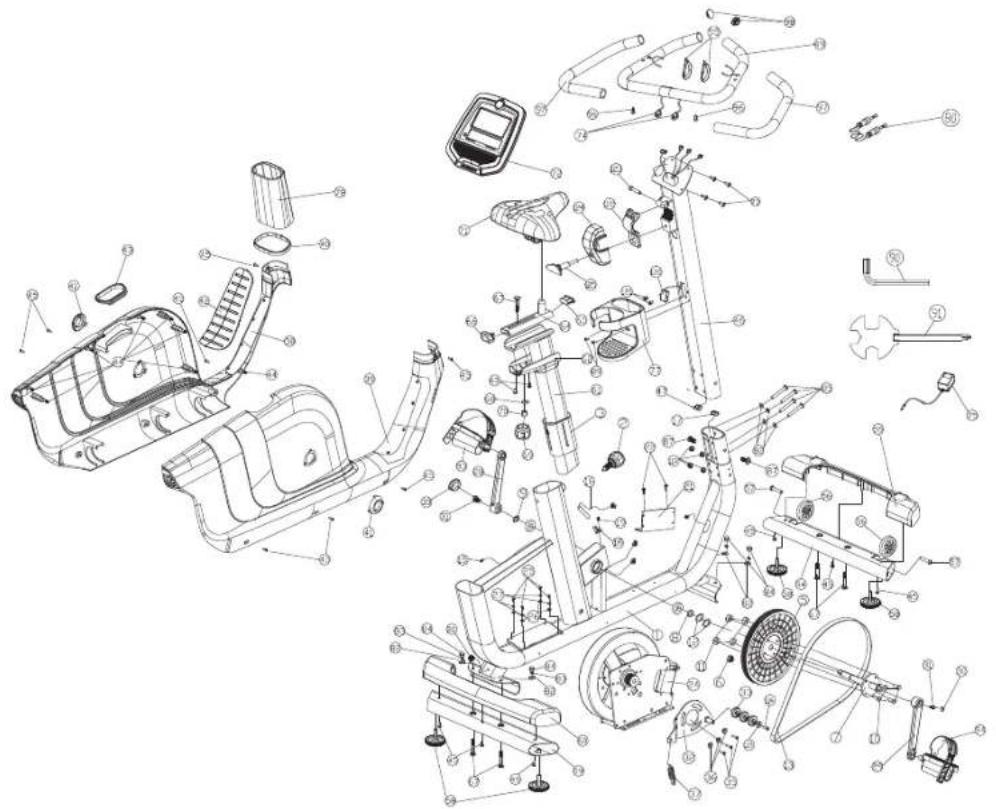
text_image
Exploded view diagram of a stationary exercise machine with labeled components and numbered partsCOMFORT 4.0/8.1 ONDERDELENLIJST
| NR. | OMSCHRIJVING | AANTAL |
| 2 | POP-PEN | 1 |
| 3 | BINNENBUS | 1 |
| 4 | LAGER 1 | |
| 5 | AANDRIJFPOELIE | 1 |
| 6 | MAGNEET | 1 |
| 7 | TRANSMISSIEAS; NIEUW; | 1 |
| 8 | AFSTANDSBUS; NIEUW; | 1 |
| 9 | C-CLIP 1 | |
| 10 | BIN NENZESKANTSCHROEF; NIEUW; | 1 |
| 11 | NYLON MOER | 1 |
| 12 | GEGOLFDE RING 1 | |
| 13 | RIEM | 1 |
| 15 | INDUCTIE-ONDERSTE REGELAAR | 1 |
| 16 | SENSORKABEL | 1 |
| 17 | ONDERSTE CONSOLEKABEL | 1 |
| 18 | RONDE SENSOR KUNSTSTOF BEVESTIGING | 1 |
| 19 | RONDE PHILIPS SCHROEF ZELFTAPPEND | 1 |
| 20 | NETSNOER | 1 |
| 21 | ONDERSTE REGELPANEEL | 1 |
| 22 | TRUSS PHILIPS ZELFTAPPENDE SCHROEF | 1 |
| 24 | INDUCTIE VLIEGWIEL | 1 |
| 25 | RONDKOP ZESKANTSCHROEF | 1 |
| 26 | SLUITRING | 1 |
| 27 | VEERRING | 1 |
| 28 | LINKER CRANK | 1 |
| NR. | OMSCHRIJVING | AANTAL |
| 29 RECHTER CRANK 1 | ||
| 30 CRANKAFDEKKING 1 | ||
| 31 HEX FLENSSCHROEF 1 | ||
| 32 VRIJLOOP WIELBEVESTIGINGSPLAAT; NIEUW; 1 | ||
| 33 LAGER 1 | ||
| 35 CONTRA PHILIPSSCHROEF 1 | ||
| 36 HULS 1 | ||
| 37 VRIJLOOP WIEL SPANVEER 1 | ||
| 38 BESCHERMKRAAG LINKS 1 | ||
| 39 BESCHERMKRAAG RECHTS 1 | ||
| 40 DECORATIEVE RING CONSOLEMAST 1 | ||
| 41 DECORATIEVE RING CRANK 1 | ||
| 42 RUBBER STAP-PAD 1 | ||
| 43 ZADELPEN ONDERSTEUNING-PAD 1 | ||
| 44 CLIP 1 | ||
| 45 TRUSS PHILIPS ZELFTAPPENDE SCHROEF | 1 | |
| 46 CONSOLEMAST | 1 | |
| 47 MIDDEN CONSOLEKABEL | 1 | |
| 49+97 HANDGREEP | 1 | |
| 54 VOORSTABILISATOR 1 | ||
| 55 AFDEKKING VOORSTABILISATOR | 1 | |
| 56 TRANSPORTWIEL | 1 | |
| 57 TRUSS ZESKANTSCHROEF | 1 | |
| 58 STELVOET | 1 | |
| 59 REAR STABILIZER | 1 | |
| 60 AFDEKKING ACHTERSTABILISATOR 1 | ||
| 61 ZADELPEN 1 | ||
| 62 ZADELPEN AFDEKKING 1 | ||
| 63 RONDE PHILIPSSCHROEF 1 | ||
| 64 ZADEL ONDERSTEUNINGSAS 1 | ||
| 65 EINDKAP 1 | ||
| 66 HANDOEKHAAK 1 | ||
| 67 SLEDEBOUT 2 | ||
| 68 SLUITRING 1 | ||
| 69 KNOP 1 | ||
| 70 AFSTANDSBUS 1 | ||
| 71 ZADEL 1 | ||
| 72 CONSOLE 1 | ||
| 73 TRUSS PHILIPSSCHROEF 1 | ||
| 74 HANDGREEP HR-SENSORKABEL | 2 | |
| 75 ADAPTER | 1 | |
| 77 BIDONHOUDER B | 1 | |
| 78 CONSOLEMASTSCHOEN | 1 | |
| 80 AUDIOKABEL | 1 | |
| 82 SLUITRING 3 | ||
| 83 VEERRING | 2 | |
| 84 MOER | 2 | |
| 85 TRUSS ZESKANTSCHROEF | 2 | |
| 87 TRUSS ZESKANTSCHROEF | 12 | |
| 89 CONTRA PHILIPSSCHROEF | 1 | |
| NR. | OMSCHRIJVING | AANTAL |
| 90 HEX- | SLEUTEL1 | |
| 91 "PLUS"-SLEUTEL | 1 | |
| 93 PEDAAL LINKS | 1 | |
| 94 RECHTER PEDAAL | 1 | |
| 95 HANDGREEP HR-SENSOR | 2 | |
| 96 TRUSS PHILIPS ZELFTAPPENDE SCHROEF | 2 | |
| 97 SCHUIM HANDGREEP | 1 | |
| 98 TRUSS EINDKAP | 2 | |
| 113 | NYLON MOER | 2 |
| 115 | SLUITRING 1 | |
| 116 | CONTRA PHILIPSSCHROEF | 1 |
| 120 | DRAADLOZE HANDPULSONTVANGER | 1 |
| 121 | CONTRA VERZONKEN PHILIPS ZELFTAPPENDE SCHROEF | 2 |
| 1-1 | HOOFDFRAME; NIEUW | 1 |
| 122 | KLEM | 1 |
| 123 | BINNENZESKANT CAP-SCHROEF | 1 |
| 124 | HANDGREEPAFDEKKING | 1 |
| 125 | T-KNOP | 1 |
COMFORT R8.0 ONDERDELENDIAGRAM
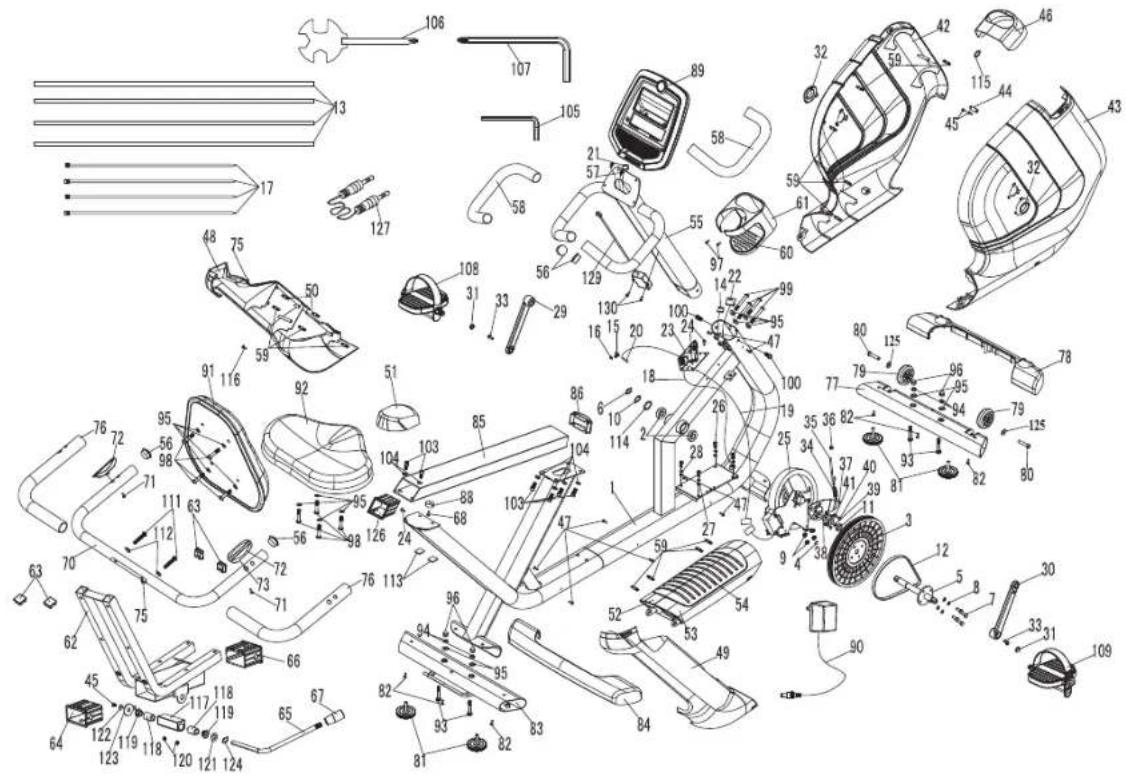
text_image
Technical diagram of a car body assembly with numbered components and labeled partsCOMFORT R8.0 ONDERDELENLIJST
| NR. | OMSCHRIJVING | AANTAL |
| 1 HOO FDFRAME 1 | ||
| 2 LAGER 2 | ||
| 3 AANDRIJFPOELIE 1 | ||
| 4 MAGNEET 1 | ||
| 5 TRANSMISSIEAS 1 | ||
| 6 C-CLIP 1 | ||
| 7 BINNENZESKANTSCHROEF 4 | ||
| 8 VEERRING 4 | ||
| 9 NYLON MOER 4 | ||
| 10 GEGOLFDE RING 1 | ||
| 11 BUS 1 | ||
| 12 RIEM 1 | ||
| 13 TWIST-TIE 4 | ||
| 14 HANDPULSKABEL VOOR FRAME 1 | ||
| 15 RON DE SENSOR KUNSTSTOF BEVESTIGING | 1 | |
| 16 RON DE PHILIPS SCHROEF ZELFTAPPEND | 1 | |
| 17 ZIP-TIE | 4 | |
| 18 NETSNOER | 1 | |
| 20 SNELHEIDSSENSORKABEL | 1 | |
| 21 MIDDEN CONSOLEKABEL | 1 | |
| 22 ONDERSTE CONSOLEKABEL | 1 | |
| 23 ONDERSTE REGELPANEEL | 1 | |
| 24 BINNENZESKANT SLIP-FLENSMOER | 3 | |
| 24 TRUSS ZELFTAPPENDE SCHROEF | 1 | |
| 25 INDUCTIE VLIEGWIEL | 1 | |
| NR. | OMSCHRIJVING | AANTAL |
| 26 ZESKANTSCHROEF | 4 | |
| 27 SLUITRING | 4 | |
| 28 VEERRING 4 | ||
| 29 LINKER CRANK | 1 | |
| 30 RECHTER CRANK 1 | ||
| 31 CRANKAFDEKKING | 1 | |
| 31 CRANKAFDEKKING | 1 | |
| 32 DECORATIEVE RING CRANK | 2 | |
| 33 BINNENZESKANT SLIP-FLENSSCHROEF | 1 | |
| 33 BINNENZESKANT SLIP-FLENSSCHROEF | 1 | |
| 34 VRIJLOOP WIEL SPANVEER | 1 | |
| 35 VERSTELSCHROEF | 1 | |
| 36 FLENSSCHROEF | 1 | |
| 37 VRIJLOOP WIELBEVESTIGINGSPLAAT | 1 | |
| 38 LAGER 3 | ||
| 39 C-CLIP 1 | ||
| 40 CONTRA PHILIPSSCHROEF | 3 | |
| 41 BUS 3 | ||
| 42 BESCHERMKRAAG LINKS | 1 | |
| 43 BESCHERMKRAAG RECHTS | 1 | |
| 44 VERBINDINGSPLAAT | 1 | |
| 45 TRUSS PHILIPSSCHROEF | 1 | |
| 45 TRUSS PHILIPSSCHROEF | 2 | |
| 46 CONSOLEMASTSCHOEN | 1 | |
| 47 TRUSS PHILIPS ZELFTAPPENDE SCHROEF | 4 |
COMFORT R8.0 ONDERDELENLIJST
| NR. | OMSCHRIJVING | AANTAL |
| 47 TRUSS PHILIPS ZELFTAPPENDE SCHROEF | 4 | |
| 48 AFDEKKING ONDERSTEUNINGSBUIS LINKSACHTER | 1 | |
| 49 AFDEKKING ONDERSTEUNINGSBUIS RECHTSACHTER | 1 | |
| 50 CLIP KORT | 2 | |
| 51 | AFDEKKING ONDERSTEUNINGSBUIS BOVEN, ACHTER | 1 |
| 52 BASISBUISAFDEKKING LINKS | 1 | |
| 53 BASISBUISAFDEKKING RECHTS | 1 | |
| 54 RUBBER STAP-PAD | 1 | |
| 55 CONSOLEMAST | 1 | |
| 56 TRUSS EINDKAP | 2 | |
| 56 TRUSS EINDKAP | 2 | |
| 57 BOVENHANDGREEP HR-KABEL | 1 | |
| 58 SCHUIMGREEP VOOR | 2 | |
| 59 CLIP KORT | 5 | |
| 60 BIDONHOUDER A | 1 | |
| 62 ZADELFRAME BASISSYSTEEM | 1 | |
| 63 EINDKAP | 4 | |
| 64 BUS | 1 | |
| 65 ZADELVERSTELHENDEL | 1 | |
| 66 BUS | 1 | |
| 67 KUNSTSTOP KAP HENDEL | 1 | |
| 68 TRUSS PHILIPS ZELFTAPPENDE SCHROEF | 1 | |
| 70 HANDGREEP ACHTER LASSET | 1 | |
| 71 TAPSCHROEF | 2 | |
| 72 HANDGREEP HR-SENSOR | 2 |
| NR. | OMSCHRIJVING | AANTAL |
| 73 HANDGREEP HR-SENSORKABEL VOOR HENDEL 1 | ||
| 75 KABELKAP 1 | ||
| 75 KABELKAP 1 | ||
| 76 SCHUIMGREEP 2 | ||
| 77 VOORSTABILISATOR, COMPLEET 1 | ||
| 78 AFDEKKING VOORSTABILISATOR 1 | ||
| 79 TRANSPORTWIEL 2 | ||
| 80 TRUSS ZESKANTSCHROEF 2 | ||
| 81 STELVOET 2 | ||
| 81 STELVOET 2 | ||
| 82 TRUSS PHILIPSSCHROEF 6 | ||
| 83 ACHTERSTABILISATOR, COMPLEET 1 | ||
| 84 AFDEKKING ACHTERSTABILISATOR 1 | ||
| 85 ZADELRAIL 1 | ||
| 86 BOOGEINDKAP 1 | ||
| 88 ZADELSTOP 1 | ||
| 89 CONSOLE | 1 | |
| 90 ADAPTER | 1 | |
| 91 RUGLEUNINGPAD | 1 | |
| 92 ZADELPAD | 1 | |
| 93 SLEDESCHROEF | 8 | |
| 94 VEERRING | 8 | |
| 95 SLUITRING | 32 | |
| 96 MOER | 8 | |
| 97 TRUSS PHILIPS ZELFTAPPENDE SCHROEF | 4 | |
| 98 TRUSS ZESKANTSCHROEF 16 | ||
| 99 TRUSS ZESKANTSCHROEF 8 | ||
| 100 TRUSS ZESKANTSCHROEF 4 | ||
| 103 CKS ZESKANTSCHROEF 12 | ||
| 104 VEERRING 6 | ||
| 105 HEX-SLEUTEL 2 | ||
| 106 "PLJS"-SLEUTEL 2 | ||
| 107 HEX-SLEUTEL 2 | ||
| 108 PEDAAL LINKS 1 | ||
| 109 RECHTER PEDAAL 1 | ||
| 111 CONTRA VERZONKEN ZESKANTSCHROEF 4 | ||
| 112 GEGOLFDE VEERRING 4 | ||
| 114 SLLITRING 2 | ||
| 115 KUNSTSTOF PAD 1 | ||
| NR. | OMSCHRIJVING | AANTAL |
| 116 RONDE ZELFTAPPENDE SCHROEF 1 | ||
| 125 SLUITRING 2 | ||
| 126 BUS | 1 | |
| 127 AUDIOBRONKABEL | 1 | |
| 129 DRAADLOZE HANDPULSONTVANGER | 1 | |
| 130 CONTRA VERZONKEN PHILIPS ZELFTAPPENDE SCHROEF | 2 | |
| 42-1 | BESCHERMKRAAG LINKS | 1 |
| 43-1 | BESCHERMKRAAG RECHTS | 1 |
| 46-1 | CONSOLEMASTSCHOEN | 1 |
| 48-1 | AFDEKKING ONDERSTEUNINGSBUIS LINKSACHTER | 1 |
| 49-1 | AFDEKKING ONDERSTEUNINGSBUIS RECHTSACHTER | 1 |
natural_image
Technical line drawing of a mechanical assembly with no visible text or symbolstext_image
BOLT (I) SPRING WASHER (C) MAIN FRAME SEAT FRAMEMATÉRIEL POUR L'ÉTAPE 4

BOULON (I) M8 X 18 MM QTÉ : 6

RONDELLES ÉLASTIQUES (C) M8 X 2.0T MM QTÉ : 6
natural_image
Line drawing of a stationary exercise bike with seat, legs, and front-mounted arms (no text or symbols)L'ASSEMBLAGE EST TERMINÉ!
Comfort R8.0
natural_image
Line drawing of a stationary exercise bike with adjustable arm and seat (no text or symbols on the diagram itself)L'ASSEMBLAGE EST TERMINÉ !
Comfort 2.0
text_image
K A N L M G J HORIZON HORIZON COMFORT 81 888 888 Level Volume SPR Distance OFFICE 1015 20 305 Change Display Enter HORIZON Target Max/Min/Rate Best for White per WeightFONCTIONNEMENT DE LA CONSOLE COMFORT 8.1 / R8.0
text_image
888 10.0 Press and hold CHANGE DISPLAY/RESISTANCE UP to start following with PassportMODE ÉCONOMIE D'ÉNERGIE
text_image
Exploded view diagram of a mechanical assembly with numbered components for identificationLISTE DES PIÈCES COMFORT 2.0
| N° | DESCRIPTION | QTÉ |
| 1 CHÂSSIS PRINCIPAL 1 | ||
| 2 BROCHE À ENFONCER 1 | ||
| 3 BAGUE INTÉRIEURE 1 | ||
| 4 ROULEMENT 2 | ||
| 5 POULIE D'ENTRAÎNEMENT 1 | ||
| 6 AIMANT 1 | ||
| 7 ARBRE DE TRANSMISSION 1 | ||
| 8 ESPACEUR 1 | ||
| 9 C-CLIP 1 | ||
| 9 C-CLIP 1 | ||
| 10 VIS ALLEN HEXAGONALE 4 | ||
| 11 ÉCROU NYLON 4 | ||
| 12 RONDELLE ONDULÉE 2 | ||
| 13 COURROIE 1 | ||
| 16 CÂBLE DE CAPTEUR 1 | ||
| 18 PLASTIQUE DE FIXATION DE CAPTEUR ROND | 1 | |
| 19 AUTO-TARAUDAGE POUR FORAGE CRUCIFORMEÀ TÊTE RONDE | 1 | |
| 20 CORDON D'ALIMENTATION | 1 | |
| 28 MANIVELLE GAUCHE | 1 | |
| 29 MANIVELLE DROITE | 1 | |
| 30 COUVERCLE DE MANIVELLE | 2 | |
| 31 VIS À BRIDE HEXAGONALE 2 | ||
| 32 PLAQUE DE FIXATION DE ROUE FOLLE | 1 | |
| 37 RESSORT DE FLEXION DE ROUE FOLLE | 1 | |
| 38 CARÉNAGE GAUCHE | 1 |
| N° | DESCRIPTION | QTÉ |
| 39 CARÉNAGE DROIT | 1 | |
| 40 BAGUE DÉCORATIVE DE MÂT DE CONSOLE | 1 | |
| 41 BAGUE DÉCORATIVE DE MANIVELLE | 2 | |
| 42 COUSSINET DE CADRE OUVERT EN CAOUTCHOUC | 1 | |
| 43 COUSSINET DE TUBE DE SUPPORT POUR MONTANT DE SELLE | 1 | |
| 44 CLIP | 8 | |
| 45 | VIS AUTO-TARAUDEUSE CRUCIFORME DE STRUCTURE | 14 |
| 46 MÂT DE CONSOLE | 1 | |
| 54 STABILISATEUR AVANT | 1 | |
| 55 CACHE STABILISATEUR AVANT | 1 | |
| 56 ROUE DE TRANSPORT | 2 | |
| 57 VIS HEXAGONALE DE STRUCTURE | 2 | |
| 58 NIVELLEUR | 4 | |
| 59 STABILISATEUR ARRIÈRE | 1 | |
| 60 CACHE STABILISATEUR ARRIÈRE | 1 | |
| 61 TIGE DE SELLE | 1 | |
| 62 CACHE TIGE DE SELLE | 1 | |
| 63 VIS CRUCIFORME À TÊTE RONDE | 2 | |
| 64 ARBRE DE SUPPORT DE SELLE | 1 | |
| 65 EMBOUT D'EXTRÉMITÉ | 1 | |
| 66 CROCHET À SERVIETTES | 1 | |
| 67 VIS DE TRANSPORT | 9 | |
| 68 RONDELLE PLATE | 1 | |
| 69 BOUTON | 1 | |
| 70 ESPACEUR 1 |
LISTE DES PIÈCES COMFORT 2.0
| N° | DESCRIPTION | QTÉ |
| 71 COUSSINET DE SELLE 1 | ||
| 72 CONSOLE 1 | ||
| 73 VIS CRUCIFORME DE STRUCTURE 4 | ||
| 74 CÂBLE DE CAPTEUR FC AVEC POIGNÉE 2 | ||
| 75 ADAPTATEUR SECTEUR 1 | ||
| 77 PORTE-BIDON B 1 | ||
| 78 CEILLET DE MÂT DE CONSOLE 1 | ||
| 80 CÂBLE AUDIO 1 | ||
| 82 RON DELLE PLATE 20 | ||
| 83 RON DELLE ÉLASTIQUE 12 | ||
| 84 ÉCROU 12 | ||
| 85 VIS HEXAGONALE DE STRUCTURE 8 | ||
| 87 VIS HEXAGONALE DE STRUCTURE 4 | ||
| 89 VIS CRUCIFORME FRAISÉE 4 | ||
| 90 CLÉ HEXAGONALE 2 | ||
| 91 CLÉ « PLUS » 2 | ||
| 93 PÉDALE GAUCHE | 1 | |
| 94 PÉDALE DROITE | 1 | |
| 95 CAPTEUR FC AVEC POIGNÉE | 2 | |
| 96 VIS AUTO-TARAUDEUSE CRUCIFORME DE STRUCTURE ST4X25 | 2 | |
| 97 POIGNÉE EN MOUSSE | 1 | |
| 98 EMB OUT D'EXTRÉMITÉ DE STRUCTURE | 2 | |
| 100 CÂBLE DE RÉGLAGE | 1 |
| N° | DESCRIPTION | QTÉ |
| 101 | CÂBLE CONSOLE INFÉRIEUR | 1 |
| 102 | MOTEUR | 1 |
| 103 | VIS CRUCIFORME À TÊTE RONDE | 3 |
| 104 | VOLANT | 1 |
| 105 | ÉCROU À VIS À BRIDE ALLEN | 2 |
| 106 | RONDELLE | 2 |
| 107 | ROULEMENT | 2 |
| 108 | VIS HEXAGONALE À TÊTE PLATE | 1 |
| 109 | ÉCROU NYLON | 1 |
| 110 | CÂBLE CONSOLE DU MILIEU | 1 |
| 113 | ÉCROU NYLON | 4 |
| 117 | ESPACEUR | 1 |
| 118 | RONDELLE PLATE | 1 |
| 120 | RÉCEPTEUR D'IMPULSIONS À MAIN SANS FIL | 1 |
| 121 | VIS AUTO-TARAUDEUSE CRUCIFORME FRAISÉE | 2 |
| 49+97 | POIGNÉE À MAIN + POIGNÉE EN MOUSSE | 1 |
| 122 | CLAMPII | 1 |
| 123 | VIS D'ASSEMBLAGE SCKT-HD | 1 |
| 124 | CACHE GUIDON | 1 |
| 125 | BOUTON EN FORME DE T | 1 |
VUE ÉCLATÉE COMFORT 4.0 / 8.1

text_image
Exploded view diagram of a stationary exercise machine with labeled components and numbered partsLISTE DES PIÈCES COMFORT 4.0 / 8.1
| N° | DESCRIPTION | QTÉ |
| 2 | BROCHE À ENFONCER | 1 |
| 3 | BAGUE INTÉRIEURE | 1 |
| 4 | ROULEMENT 1 | |
| 5 | POULIE D'ENTRAÎNEMENT 1 | |
| 6 | AIMANT | 1 |
| 7 | ARBRE DE TRANSMISSION ; NOUVEAU ; | 1 |
| 8 | ESPACEUR ; NOUVEAU ; | 1 |
| 9 | C-CLIP | 1 |
| 10 VIS ALLEN HEXAGONALE ; NOUVEAU ; | 1 | |
| 11 ÉCROU NYLON | 1 | |
| 12 RON DELLE ONDULÉE | 1 | |
| 13 COURROIE | 1 | |
| 15 FIL DE CONNEXION DU CONTRÔLEUR INFÉRIEUR À INDUCTION | 1 | |
| 16 CÂBLE DE CAPTEUR | 1 | |
| 17 CÂBLE CONSOLE INFÉRIEUR | 1 | |
| 18 PLASTIQUE DE FIXATION DE CAPTEUR ROND | 1 | |
| 19 AUTO-TARAUDAGE POUR FORAGE CRUCIFORME À TÊTE RONDE | 1 | |
| 20 CORDON D'ALIMENTATION | 1 | |
| 21 PANNEAU DE COMMANDE INFÉRIEUR | 1 | |
| 22 VIS AUTO-TARAUDEUSE CRUCIFORME DE STRUCTURE | 1 | |
| 24 VOLANT À INDUCTION | 1 | |
| 25 VIS HEXAGONALE À TÊTE RONDE | 1 | |
| 26 RON DELLE | 1 | |
| N° | DESCRIPTION | QTÉ |
| 27 RON | DELLE ÉLASTIQUE 1 | |
| 28 MANIVELLE GAUCHE 1 | ||
| 29 MANIVELLE DROITE 1 | ||
| 30 COUVERCLE DE MANIVELLE 1 | ||
| 31 VIS À BRIDE HEXAGONALE 1 | ||
| 32 PLAQUE DE FIXATION DE ROUE FOLLE ; NOUVEAU ; 1 | ||
| 33 ROULEMENT 1 | ||
| 35 VIS CRUCIFORME FRAISÉE 1 | ||
| 36 MANCHE 1 | ||
| 37 RESSORT DE FLEXION DE ROUE FOLLE 1 | ||
| 38 CARÉNAGE GAUCHE 1 | ||
| 39 CARÉNAGE DROIT 1 | ||
| 40 BAGUE DÉCORATIVE DE MÂT DE CONSOLE 1 | ||
| 41 BAGUE DÉCORATIVE DE MANIVELLE 1 | ||
| 42 COUSSINET DE CADRE OUVERT EN CAOUTCHOUC 1 | ||
| 43 COUSSINET DE TUBE DE SUPPORT POUR MONTANT DE SELLE | 1 | |
| 44 CLIP | 1 | |
| 45 VIS AUTO-TARAUDEUSE CRUCIFORME DE STRUCTURE 1 | ||
| 46 MÂT DE CONSOLE 1 | ||
| 47 CÂBLE CONSOLE DU MILIEU 1 | ||
| 49+97 | POIGNÉE À MAIN | 1 |
| 54 STABILISATEUR AVANT 1 | ||
| 55 CACHE STABILISATEUR AVANT 1 | ||
| 56 ROULE DE TRANSPORT 1 | ||
| 57 VIS HEXAGONALE DE STRUCTURE 1 | ||
| 58 NIVELLEUR 1 | ||
| 59 | REAR STABILIZER | 1 |
| 60 CACHE STABILISATEUR ARRIÈRE 1 | ||
| 61 TIGE DE SELLE 1 | ||
| 62 CACHE TIGE DE SELLE 1 | ||
| 63 VIS CRUCIFORME À TÊTE RONDE 1 | ||
| 64 ARBRE DE SUPPORT DE SELLE 1 | ||
| 65 EMBOUT D'EXTRÉMITÉ 1 | ||
| 66 CROCHET À SERVIETTES 1 | ||
| 67 ÉCROU DE TRANSPORT 2 | ||
| 68 RONDELLE PLATE 1 | ||
| 69 BOUTON 1 | ||
| 70 ESPACEUR 1 | ||
| 71 SELLE 1 | ||
| 72 CONSOLE | 1 | |
| 73 VIS CRUCIFORME DE STRUCTURE | 1 | |
| 74 CÂBLE DE CAPTEUR FC AVEC POIGNÉE | 2 | |
| 75 ADAPTATEUR | 1 | |
| 77 PORTE-BIDON B | 1 | |
| 78 CEILLET DE MÂT DE CONSOLE | 1 | |
| 80 CÂBLE AUDIO | 1 | |
| 82 RONDELLE PLATE 3 | ||
| 83 RONDELLE ÉLASTIQUE | 2 | |
| N° | DESCRIPTION | QTÉ |
| 84 ÉCROU | 2 | |
| 85 VIS HEXAGONALE DE STRUCTURE 2 | ||
| 87 VIS HEXAGONALE DE STRUCTURE | 12 | |
| 89 VIS CRUCIFORME FRAISÉE | 1 | |
| 90 CLÉ HEXAGONALE | 1 | |
| 91 CLÉ « PLUS » | 1 | |
| 93 PÉDALE GAUCHE | 1 | |
| 94 PÉDALE DROITE | 1 | |
| 95 CAPTEUR FC AVEC POIGNÉE | 2 | |
| 96 VIS AUTO-TARAUDEUSE CRUCIFORME DE STRUCTURE | 2 | |
| 97 MOUSSE - GUIDON | 1 | |
| 98 EMBOUT D'EXTRÉMITÉ DE STRUCTURE | 2 | |
| 113 | ÉCROU NYLON | 2 |
| 115 | RONDELLE | 1 |
| 116 | VIS CRUCIFORME FRAISÉE | 1 |
| 120 | RÉCEPTEUR D'IMPULSIONS À MAIN SANS FIL | 1 |
| 121 | VIS AUTO-TARAUDEUSE CRUCIFORME FRAISÉE | 2 |
| 1-1 | CHÂSSIS PRINCIPAL ; NOUVEAU | 1 |
| 122 | CLAMPII | 1 |
| 123 | VIS D'ASSEMBLAGE SCKT-HD | 1 |
| 124 | CACHE GUIDON | 1 |
| 125 | BOUTON EN FORME DE T | 1 |
VUE ÉCLATÉE COMFORT R8.0
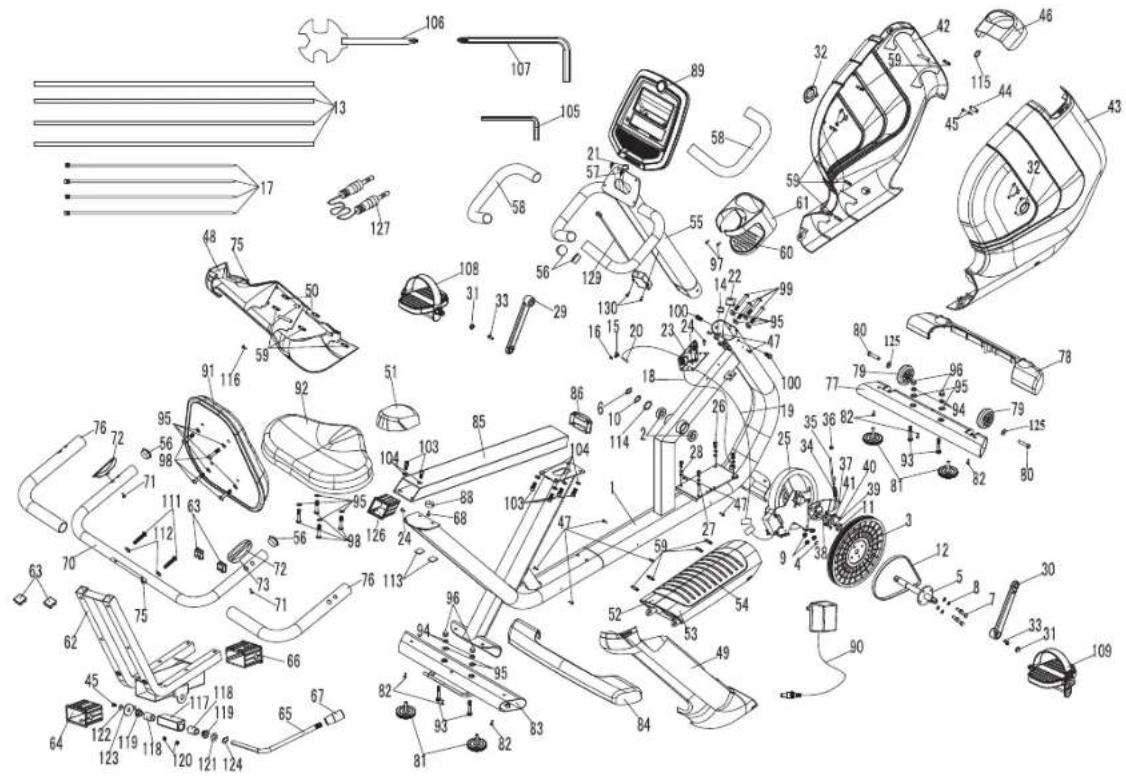
text_image
Technical diagram of a car body assembly with numbered components and labeled partsLISTE DES PIÈCES COMFORT R8.0
| N° | DESCRIPTION | QTÉ |
| 1 CHÂSSIS PRINCIPAL 1 | ||
| 2 ROULEMENT 2 | ||
| 3 POULIE D'ENTRAÎNEMENT 1 | ||
| 4 AIMANT 1 | ||
| 5 ARBRE DE TRANSMISSION 1 | ||
| 6 C-CLIP 1 | ||
| 7 VIS ALLEN HEXAGONALE 4 | ||
| 8 RONDELLE ÉLASTIQUE 4 | ||
| 9 ÉCROU NYLON 4 | ||
| 10 RONDELLE ONDULÉE 1 | ||
| 11 BAGUE 1 | ||
| 12 COURROIE 1 | ||
| 13 RUBAN À FERMETURE PAR TORSADE 4 | ||
| 14 FIL DE CAPTEUR DE POULS POUR CADRE | 1 | |
| 15 PLASTIQUE DE FIXATION DE CAPTEUR ROND | 1 | |
| 16 AUTO-TARAUDAGE POUR FORAGE CRUCIFORMEÀ TÊTE RONDE | 1 | |
| 17 COLLIER DE SERRAGE | 4 | |
| 18 CORDON D'ALIMENTATION | 1 | |
| 20 CÂBLE DE CAPTEUR DE VITESSE | 1 | |
| 21 CÂBLE CONSOLE DU MILIEU | 1 | |
| 22 CÂBLE CONSOLE INFÉRIEUR | 1 | |
| 23 PANNEAU DE COMMANDE INFÉRIEUR | 1 | |
| 24 | ÉCROU À VIS COULISSANTE À BRIDE HEXAGONALE ALLEN | 3 |
| 24 VIS AUTO-TARAUDEUSE DE STRUCTURE | 1 | |
| 25 VOLANT À INDUCTION | 1 | |
| N° | DESCRIPTION | QTÉ |
| 26 VIS HEXAGONALE | 4 | |
| 27 RONDELLE | 4 | |
| 28 RONDELLE ÉLASTIQUE | 4 | |
| 29 MANIVELLE GAUCHE | 1 | |
| 30 MANIVELLE DROITE | 1 | |
| 31 COUVERCLE DE MANIVELLE | 1 | |
| 31 COUVERCLE DE MANIVELLE | 1 | |
| 32 BAGUE DÉCORATIVE DE MANIVELLE | 2 | |
| 33 VIS COULISSANTE À BRIDE HEXAGONALE ALLEN | 1 | |
| 33 VIS COULISSANTE À BRIDE HEXAGONALE ALLEN | 1 | |
| 34 RESSORT DE FLEXION DE ROUE FOLLE | 1 | |
| 35 VIS DE RÉGLAGE | 1 | |
| 36 VIS À BRIDE 1 | ||
| 37 PLAQUE DE FIXATION DE ROUE FOLLE | 1 | |
| 38 ROULEMENT | 3 | |
| 39 C-CLIP | 1 | |
| 40 VIS CRUCIFORME FRAISÉE | 3 | |
| 41 BAGUE | 3 | |
| 42 CARÉNAGE GAUCHE | 1 | |
| 43 CARÉNAGE DROIT | 1 | |
| 44 PLAQUE DE RACCORDEMENT | 1 | |
| 45 VIS CRUCIFORME DE STRUCTURE | 1 | |
| 45 VIS CRUCIFORME DE STRUCTURE | 2 | |
| 46 CEILLET DE MÂT DE CONSOLE | 1 | |
| 47 VIS AUTO-TARAUDEUSE CRUCIFORME DE STRUCTURE | 4 |
LISTE DES PIÈCES COMFORT R8.0
| N° | DESCRIPTION | QTÉ |
| 47 VIS AUTO-TARAUDEUSE CRUCIFORME DE STRUCTURE | 4 | |
| 48 CACHE GAUCHE DU TUBE DE SUPPORT ARRIÈRE | 1 | |
| 49 CACHE DROIT DU TUBE DE SUPPORT ARRIÈRE | 1 | |
| 50 CLIP-COURT | 2 | |
| 51 CACHE SUPÉRIEUR DU TUBE DE SUPPORT ARRIÈRE | 1 | |
| 52 CACHE GAUCHE DU TUBE DE BASE | 1 | |
| 53 CACHE DROIT DU TUBE DE BASE | 1 | |
| 54 COUSSINET DE CADRE OUVERT EN CAOUTCHOUC | 1 | |
| 55 MÂT DE CONSOLE | 1 | |
| 56 EMBOUT D'EXTRÉMITÉ DE STRUCTURE 2 | ||
| 56 EMBOUT D'EXTRÉMITÉ DE STRUCTURE 2 | ||
| 57 CÂBLE FC DE POIGNÉE SUPÉRIEURE | 1 | |
| 58 POIGNÉE EN MOUSSE- AVANT | 2 | |
| 59 CLIP-COURT | 5 | |
| 60 PORTE-BIDON A | 1 | |
| 62 ENSEMBLE DE BASE DE CADRE DE SELLE | 1 | |
| 63 EMBOUT D'EXTRÉMITÉ | 4 | |
| 64 BAGUE | 1 | |
| 65 POIGNÉE DE RÉGLAGE DE LA SELLE | 1 | |
| 66 BAGUE | 1 | |
| 67 BOUCHON PLASTIQUE DE POIGNÉE | 1 | |
| 68 VIS AUTO-TARAUDEUSE CRUCIFORME DE STRUCTURE | 1 | |
| 70 ENSEMBLE DE SOUDURE DE GUIDON ARRIÈRE | 1 | |
| 71 VIS DE TARAUDAGE | 2 | |
| 72 CAPTEUR FC AVEC POIGNÉE | 2 |
| N° | DESCRIPTION | QTÉ |
| 73 CÂB | LE DE CAPTEUR FC À POIGNÉE POUR LE GUIDON 1 | |
| 75 CAP | UCHON DE CORDON 1 | |
| 75 CAP | UCHON DE CORDON 1 | |
| 76 POIGNÉE EN MOUSSE 2 | ||
| 77 ASSEMBLAGE STABILISATEUR AVANT 1 | ||
| 78 CAC | HE STABILISATEUR AVANT 1 | |
| 79 ROUE | DE TRANSPORT 2 | |
| 80 VIS | HEXAGONALE DE STRUCTURE 2 | |
| 81 NIVELLEUR 2 | ||
| 81 NIVELLEUR 2 | ||
| 82 VIS | CRUCIFORME DE STRUCTURE 6 | |
| 83 ASSEMBLAGE | STABILISATEUR ARRIÈRE 1 | |
| 84 CAC | HE STABILISATEUR ARRIÈRE 1 | |
| 85 RAIL | DE SELLE 1 | |
| 86 EMB | OUT D'EXTRÉMITÉ ARC 1 | |
| 88 BUTÉE | DE SELLE 1 | |
| 89 CON | SOLE | 1 |
| 90 ADAPTATEUR | 1 | |
| 91 COL | SSINET DE DOSSIER | 1 |
| 92 COL | SSINET DE SELLE | 1 |
| 93 VIS | DE TRANSPORT | 8 |
| 94 RON | DELLE ÉLASTIQUE | 8 |
| 95 RON | DELLE PLATE | 32 |
| 96 ÉCROU | 8 | |
| 97 VIS | AUTO-TARAUDEUSE CRUCIFORME DE STRUCTURE | 4 |
| 98 VIS | HEXAGONALE DE STRUCTURE 16 | |
| 99 VIS | HEXAGONALE DE STRUCTURE 8 | |
| 100 VIS | HEXAGONALE DE STRUCTURE 4 | |
| 103 VIS | HEXAGONALE CKS 12 | |
| 104 RONDELLE ÉLASTIQUE 6 | ||
| 105 CLÉ | HEXAGONALE 2 | |
| 106 CLÉ | « PLUS » 2 | |
| 107 CLÉ | HEXAGONALE 2 | |
| 108 PÉD | ALE GAUCHE 1 | |
| 109 PÉD | ALE DROITE 1 | |
| 111 VIS | HEXAGONALE FRAISÉE 4 | |
| 112 RONDELLE EN ARC 4 | ||
| 114 RONDELLE PLATE 2 | ||
| 115 COUSSINET EN PLASTIQUE 1 | ||
| 116 VIS | AUTO-TARAUDEUSE À TÊTE RONDE 1 | |
| 125 RONDELLE PLATE 2 | ||
| 126 BAGUE | 1 | |
| 127 FIL | DE SOURCE SONORE 1 | |
| 129 RÉCEPTEUR D'IMPULSIONS À MAIN SANS FIL | 1 | |
| 130 VIS | AUTO-TARAUDEUSE CRUCIFORME FRAISÉE 2 | |
| 42-1 | CARÉNAGE GAUCHE | 1 |
| 43-1 | CARÉNAGE DROIT | 1 |
| 46-1 | ŒILLET DE MÂT DE CONSOLE | 1 |
| 48-1 | CACHE GAUCHE DU TUBE DE SUPPORT ARRIÈRE | 1 |
| 49-1 | CACHE DROIT DU TUBE DE SUPPORT ARRIÈRE | 1 |
EN : Waste Disposal
VISION Fitness / HORIZON Fitness / TEMPO Fitness / TREO Fitness products are recyclable. At the end if its useful life please dispose of this article correctly and safely (local refuse sites).
| 2017 | 2016 | |
| Cost of sales | 3,459 | 3,380 |
| Gross margin | 1.4% | 1.4% |

natural_image
Completely blank white image with no visible content, text, or symbols.
natural_image
Completely blank white image with no visible content, text, or symbols.
natural_image
Completely blank white image with no visible content, text, or symbols.
natural_image
Completely blank white image with no visible content, text, or symbols.
natural_image
Completely blank white image with no visible content, text, or symbols.
natural_image
Completely blank white image with no visible content, text, or symbols.
natural_image
Completely blank white image with no visible content, text, or symbols.
natural_image
Completely blank white image with no visible content, text, or symbols.
natural_image
Completely blank white image with no visible content, text, or symbols.
natural_image
Completely blank white image with no visible content, text, or symbols.
natural_image
Completely blank white image with no visible content, text, or symbols.
natural_image
Completely blank white image with no visible content, text, or symbols.Horizon Comfort 2.0 / 4.0 / 8.1 / R8.0 | Rev. 1.0 A ©2020 Johnson Health Tech