EPREPKIT - Radio MIDLAND - Free user manual and instructions
Find the device manual for free EPREPKIT MIDLAND in PDF.

| Brand | Midland |
| Model | EPREPKIT (WR120) |
| Product Type | Digital Weather Radio with S.A.M.E. Alert |
| Dimensions (approx.) | 15 x 10 x 5 cm |
| Weight (with batteries) | approximately 500 g |
| Power | 3 AA batteries (not included) or 5V AC adapter (included) |
| Display | LCD screen with adjustable backlight |
| Weather Reception | NOAA / Weather channels (7 presets) |
| S.A.M.E. Alerts | Single or multiple county programming (up to 25 codes) |
| Alert Types | Display, Voice (3 min), or Tone (3 min) |
| Alert Memory | Up to 10 recent alerts |
| Built-in Alarm | Yes, with snooze function (8 min) |
| Available Languages | English, Spanish, French |
| Care and Cleaning | Wipe with a soft dry cloth. Do not use abrasive products. Avoid moisture. |
| Safety | Use only the provided adapter. Do not expose to water or flames. Keep out of reach of children. |
| Spare Parts and Repairability | External antenna available as an option. Standard AC adapter. Repair by manufacturer or authorized center. |
| Warranty | 1 year (parts and labor) for manufacturing defects |
| General Information | NOAA-certified digital weather radio. Ideal for weather and safety alerts. Programmable countries: United States and Canada. |
Frequently Asked Questions - EPREPKIT MIDLAND
User questions about EPREPKIT MIDLAND
0 question about this device. Answer the ones you know or ask your own.
Ask a new question about this device
Download the instructions for your Radio in PDF format for free! Find your manual EPREPKIT - MIDLAND and take your electronic device back in hand. On this page are published all the documents necessary for the use of your device. EPREPKIT by MIDLAND.
USER MANUAL EPREPKIT MIDLAND
Quick Start Instructions:
- Set the ON/ OFF switch located on the right side of the radio to the ON position.
- Pull out antenna and extend to its full length.
- Insert three AA batteries (not included).
- Plug the AC adapter into the POWER jack on the back of the radio and the other end into a standard wall outlet.
-
Navigate using and to move through options and SELECT to choose the desired option.
-
The radio will first display WELCOME, and then SET LANGUAGE.
-
To SET LANGUAGE press the SELECT button:
-
Choose your language by pressing or , then SELECT.
-
To SET LOCATION press the SELECT button:
-
Press or until SINGLE is displayed, then press SELECT.
- Press SELECT to program your country for position 01:
- Press or to choose your country, then press SELECT.
- Press or to choose your state or province, then press SELECT.
-
Press or to choose your county or area, then press SELECT.
-
To SET TIME press the SELECT button:
- Set the time using and then press SELECT.
- To SET CHANNEL press the SELECT button:
- Tune the channel to the desired broadcast using or .
-
To SET VOLUME press the VOLUME UP or VOLUME DOWN buttons.
-
To complete set-up, press the SELECT button.
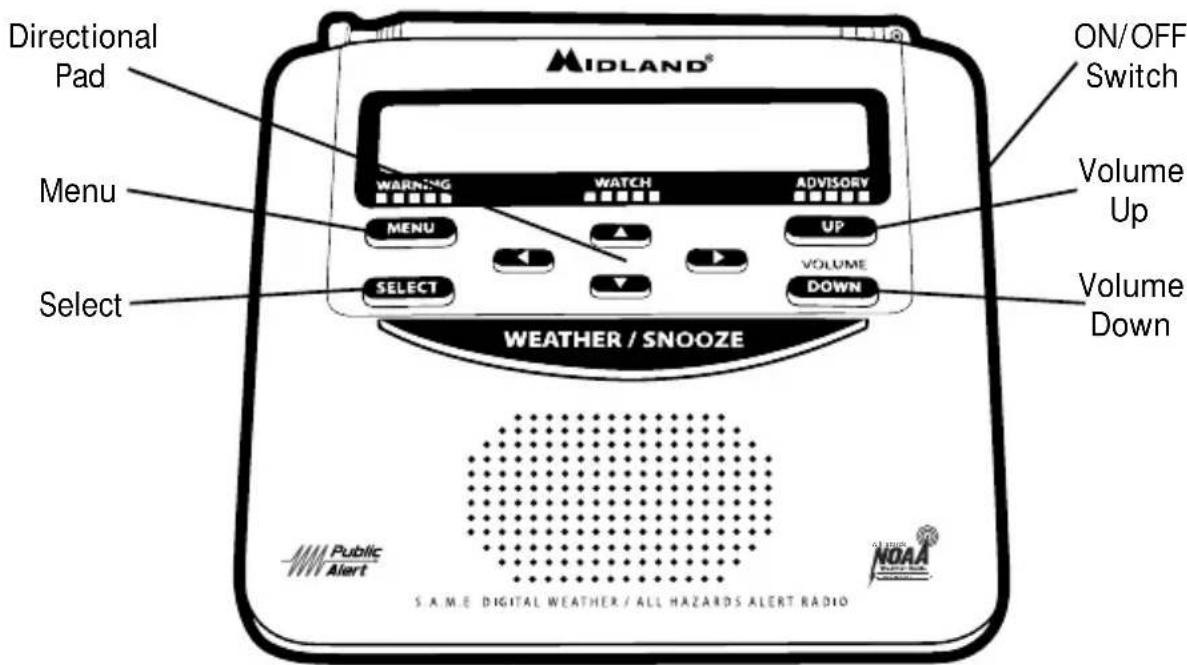
Table of Contents
S.A.M.E. (Specific Area Message Encoding) Codes 3
For USA 3
For Canada. 3
Getting to Know Your Weather Radio 4
WR120 Features 4
Icons on the Display 4
Accessory Jacks 4
Setting Up Your Weather Radio 5
Set Time. 5
Set Alarm 5
Set Language. 5
Programming the Radio for Your Area 5
"Single" County (S.A.M.E.) Code 6
"Multiple" County Code 6
Set Alert Type (Display, Voice or Tone) 6
Responding to Alerts 7
Reviewing Recent Alerts 7
Alert Volume 7
Alert Test 7
Set Channel/ Volume 8
Backlight 9
Set Events. 9
Edit Events. 9
Troubleshooting 10
One-Year Limited Warranty 11
Service 11
S.A.M.E. (Specific Area Message Encoding) Codes
To get the S.A.M.E code for your area, call 1-888-697-7263 or visit https://www.weather.gov/nwr/counties
For Canada, call 1-877-789-7733 or visit
https://bit.ly/3SQ6xzo (www.canada.ca)
FCC COMPLIANCE INFORMATION
MIDLAND (NOAA) Weather Radio Model WR120, "S.A.M.E. Digital Weather/Hazard Alert Radio". This device complies with part 15 of the FCC Rules. Operation is subject to the following two conditions: (1) This device may not cause harmful interference; (2) This device must accept any interference received including interference that may cause undesired operation.
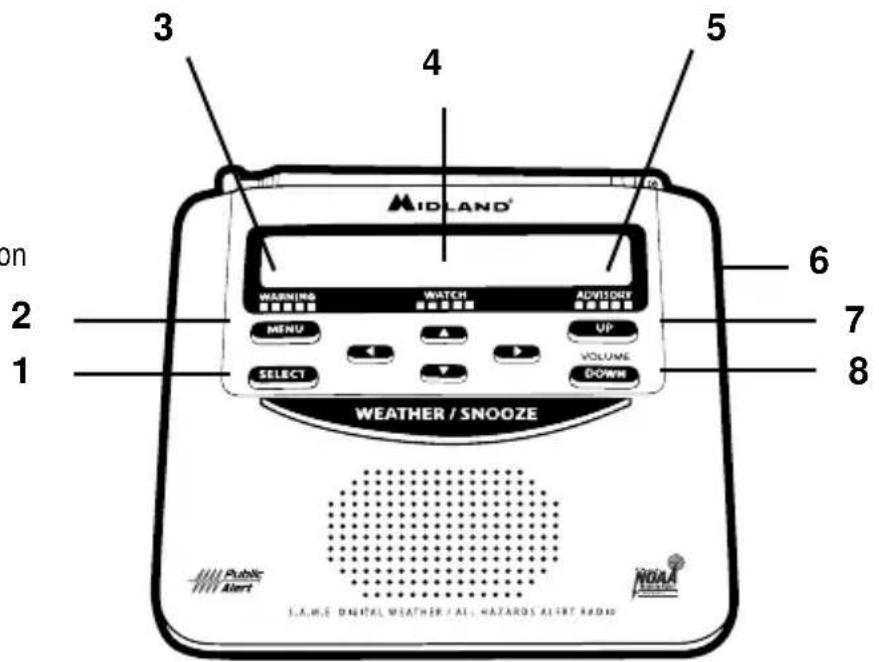
Getting to Know Your Weather Radio
WR120 Features
- Select Button
- Menu Button
- Warning Light
- Watch Light
- Advisory Light
- ON/OFF Switch
- Volume Up Button
- Volume Down Button
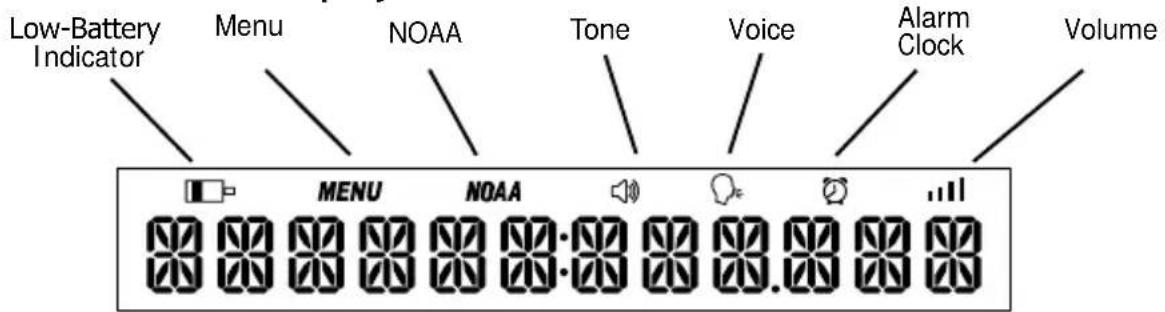
I cons on the Display
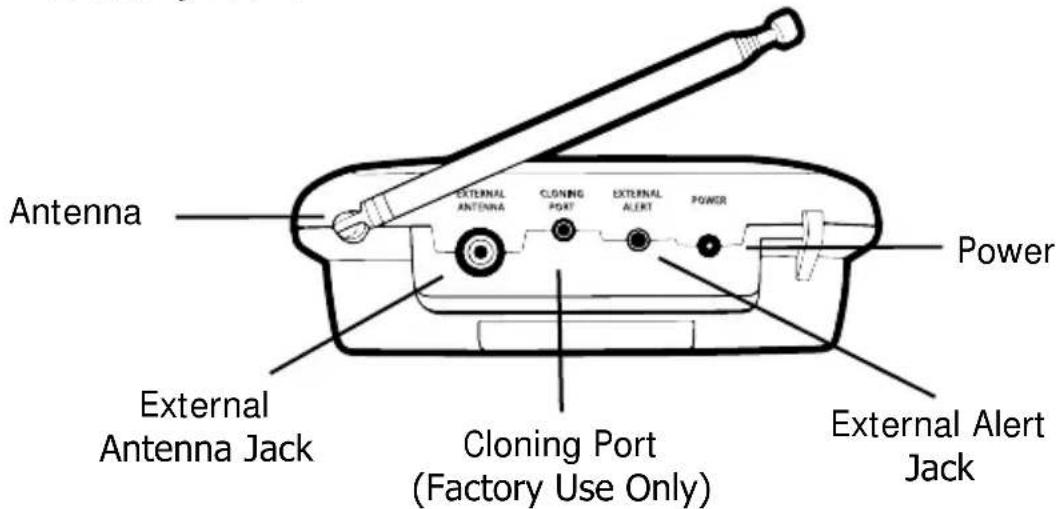
Accessory Jacks
Setting Up Your Weather Radio
Set Time:
- Press MENU to open menu options.
- Press to scroll through menu to SET TIME.
- Press SELECT (hour option will begin flashing).
- Press until current hour is displayed. (Note: AM/PM changes as you scroll through the hours.)
- Press to save current hour and advance to minute settings.
- Program both minute digits the same way.
- Press SELECT to store the current time.
- Press MENU to exit menu mode.
Set Alarm (Clock):
- Press MENU to open menu options.
- Press to scroll through menu to SET ALARM, then press SELECT.
- Press to display ON. Press SELECT.
- Press until the hour you want is displayed.
(Note: AM/PM changes as you scroll through the hours.)
- Press to save alarm hour and advance to alarm minutes. Program both minute digits the same way.
- Press SELECT to save the alarm time.
- Press MENU to exit menu mode.
Note: To snooze alarm for eight minutes, press the WEATHER / SNOOZE button. To silence the alarm for the day, press the MENU button.
Set Language:
- Press MENU to open menu options.
- Press to scroll through menu to SET LANGUAGE, then press SELECT.
- Press▲to choose ENGLISH, ESPANOL or FRANCAIS, then press SELECT.
- Press MENU to exit menu mode.
Programming the Radio for Your Area:
Your WR120 All Hazards Weather Alert Radio comes preprogrammed to receive weather and hazard alert transmissions for all S.A.M.E. codes within range of the transmitter of the selected channel. Follow these simple instructions to program your radio to receive alerts just for your county.
"Single" County Code:
- Press MENU to open menu options.
- Press to scroll through menu to SET LOCATION, then press SELECT.
- Press to SINGLE then press SELECT.
- 01 EMPTY will be displayed. Press SELECT.
- Press or to select the desired country, then press SELECT.
- Press or to select the desired state/province, then press SELECT.
- Press or to select the desired county/area, then press SELECT.
- Press or to choose a county/area partition, then press SELECT.
- Press MENU to exit menu mode.
Select WHOLE COUNTY, unless you know Partial County Alerting is supported in your area AND you know the correct partition for your area.
"Multiple" County Code:
For multiple counties, follow the above instructions. At step three, press until MULTIPLE is displayed. Press SELECT, then press to display 02 EMPTY. Press SELECT and follow steps 5 - 8 to program the 02 County Code. You can program up to 25 different location codes (in memory locations 01 - 25).
Note: To manually enter a FIPS code, press while # # LOCATION is displayed. Then, use and to enter the code. Press SELECT when finished.
Set Alert Type (Display, Voice or Tone):
- Press MENU to open menu options.
- Press to scroll through menu to ALERT TYPE, then press SELECT.
- Press to choose VOICE, TONE or DISPLAY, then press SELECT.
- Press MENU to exit menu mode.
Except for individual alert events that have been turned off (see Set Events section), the radio will respond to alerts according to the selected Alert Type in the table.
| Alert Type Description | |
| Display | When the DISPLAY alert type is chosen, external alert devices will be activated and a text alert will scroll on the display. There will be no audible alarm. |
| Voice | When the VOICE alert type is chosen, external alert devices will be activated, the alert tone will sound for eight seconds, then you will hear the weather broadcast voice. |
| Tone | When the TONE alert type is chosen, external alert devices will be activated and the alert tone will sound for up to three minutes. |
Responding to Alerts:
When a new alert has been received, pressing the WEATHER/ SNOOZE button will stop any active alert tones, will deactivate any external alert devices, and will turn on the NOAA broadcast for listening.
Pressing any other button "acknowledges" you are finished with the new alert. The radio stops any active alert tones and external alerting devices, then returns to the normal radio display and operation.
Reviewing Recent Alerts:
You can review up to 15 stored alerts still in effect by pressing to scroll through the active alert memory on your weather radio. A double beep indicates the end of the list. "NOMESSAGE" will be displayed if no alerts are active.
ON/OFF - Weather Radio:
Moving the ON/OFF switch to OFF completely disables weather radio functions, including listening to NOAA broadcasts and receiving alerts. Use this switch with care - it can be a quick and convenient way to temporarily silence alerting tones, but you must remember to move the switch back to ON in order to receive alerts.
Alert Volume:
- Press MENU to open menu options.
- Press to scroll through menu to ALERT VOLUME, then press SELECT.
- Press to choose LOW, MEDIUM, or HIGH VOLUME, then press SELECT.
- Press MENU to exit menu mode.
Alert Test:
- Press MENU to open menu options.
- Press to scroll through menu to ALERT TEST.
- Press SELECT to demonstrate how the alert siren and connected external alert devices will operate for a Warning with the current Alert Type settings.
- Press MENU or WEATHER/ SNOOZE to stop the ALERT TEST, then press MENU to exit menu mode.
Note: Ensure ON/OFF switch is in the ON position.
NOTE: While testing with VOICE and TONE alert types, you can adjust the alert volume using the and .
Set Channel/ Volume:
- Press MENU to open menu options.
- Press to scroll through menu to SET CHANNEL, then press SELECT.
- *Tune the channel to the desired broadcast by using ▲ or ▼.
Find the channel for your area by visiting
https://www.weather.gov/nwr/station_search and reviewing the corresponding frequency and channel for your area using the chart below.
- **Adjust the volume to a comfortable level by using VOLUME UP or VOLUME DOWN.
-
Press MENU to exit menu mode.
-
Press the button scan to the next available channel
^ 其 Ensure ON/OFF switch is in the ON position
| Channels Preset on the Weather Radio | Broadcast Frequency (MHz) |
| 1 162.400 | |
| 2 162.425 | |
| 3 162.450 | |
| 4 162.475 | |
| 5 162.500 | |
| 6 162.525 | |
| 7 162.550 |
Backlight:
- Press MENU to open menu options.
- Press to scroll through menu to BACKLIGHT, then press SELECT.
- Press to choose BLT NORM, BLT ON, BLT OFF, then press SELECT.
- Press MENU to exit menu mode.
| Backlight Type | Description |
| BLT NORM | The backlight turns on whenever any button is pressed and will turn off after five seconds. |
| BLT ON The backlight is always on. | |
| BLT OFF The backlight is always off. | |
Set Events:
- Press MENU to open menu options.
- Press to scroll through menu to SET EVENTS, then press SELECT.
- Press to scroll through the options ALL ON, ALL OFF, ALL DEFAULT, EDIT EVENTS then press SELECT.
- Press MENU to exit menu mode.
| Description | |
| ALL ON | Enables audible tone and external alert activation for all selectable events. |
| All DEFAULT | Returns all selectable events settings to default. |
| ALL OFF | Defeats the audible tone and external alert activation for all selectable events. |
| EDIT EVENTS | Allows alert tone and external alert to be enabled or disabled for individually selectable events. |
- For a complete list of selectable events, please visit our website at midlandusa.com **Not all alerts are selectable. Non-selectable alerts do not appear on display screen.
Edit Events:
- Press MENU to open menu options.
- Press to scroll through menu to SET EVENTS, then press SELECT.
- Press to scroll to EDIT EVENTS, then press SELECT.
- Press to choose the desired alert, then press SELECT.
- Press to toggle ON/OFF the audible notification for the selected alert, then press SELECT to save selection.
- Press MENU to exit menu mode.
Troubleshooting:
| Problem Suggestion | |
| No Power Make sure the | power adapter is securely plugged into the back of the weather radio and into the wall outlet. Make sure batteries are installed in case of a power failure. |
| No Sound Check VOLUME | control to ensure volume is turned up to an audible level. |
| No Weather broadcast when you press the WEATHER/SNOOZE button | Ensure the telescoping antenna is up and fully extended. If you are using an external antenna, ensure it is connected properly. Ensure the radio is set to the NWS weather channel responsible for alerting your area. Contact the NWS to ensure they are presently broadcasting. If in a metal structure, make sure you are close to a window. If in a weak signal area, you may need an external antenna. |
| The radio is not responding properly to weather alert broadcasts, or the INVALID SAME message is displayed" | Check that you have selected the correct S.A.M.E. code(s). https://www.weather.gov/nwr/counties Check that the station on your selected channel is broadcasting AND issues alerts for your selected SAME code(s). https://www.weather.gov/nwr/station_search |
| CHECK RECEPTION Display + audible beeps | Check that you have selected the best channel for your area, and that the station on your selected channel is broadcasting. To manually reset the error display and beeps, move the ON/OFF Switch to OFF then back to ON. |
To reset the radio to the factory defaults, press and hold the WEATHER / SNOOZE button while powering on the unit.
LIMITED WARRANTY
Midland Radio Corporation will repair or replace, at its option without charge, any Midland GMRS transceiver which fails due to a defect in material or workmanship within three years following the initial consumer purchase.
This warranty does not apply to water damage, battery leak or abuse.
Accessories have a 90-day warranty from date of purchase, including any antennas, chargers, or earphones.
This warranty does not include the cost of labor for removal or re-installation of the product in a vehicle or other mounting.
For Product Purchased in the USA:
Performance of any obligation under this warranty may be obtained by returning the warranted product, prepaid freight, and proof of purchase to:
Midland Radio Corporation
Warranty Service Department
5900 Parretta Drive
Kansas City, MO 64120
This warranty gives you specific legal rights, and you may also have other rights, which vary from state to state.
Note: The above warranty applies only to merchandise purchased in the United States of America or any of the territories or possessions thereof, or from a U.S. Military exchange.
For Product Purchased in Canada:
Performance of any obligation under this warranty may be obtained by returning the warranted product and proof of purchase to your dealer in Canada.
This warranty gives you specified legal rights. Additional warranty rights may be provided by law in some areas.
Warranty Service Department
5900 Parretta Drive
Kansas City, MO 64120
Warranty Service Department
5900 Parretta Drive
Kansas City, MO 64120
We'd love to hear from you! Let us know what you think of your new Midland product at


or by visiting us at midlandusa.com
Note: Features & Specifications are subject to change without notice. MIDLAND is not responsible for unintentional errors or omissions on its packaging.