
NC-HU301 - Electric kettle PANASONIC - Free user manual and instructions
Find the device manual for free NC-HU301 PANASONIC in PDF.

| Product type | Electric thermopot (Thermo Pot) |
| Brand | Panasonic |
| Model | NC-HU301 |
| Power supply | 120 V ~ 60 Hz |
| Power consumption | 925 W |
| Nominal capacity | 3.0 L |
| Dimensions (W × D × H) | 24.5 × 32.6 × 28.9 cm |
| Weight | 3.1 kg |
| Cord length | 1.0 m |
| Interior coating | Fluorine with diamond particles and Bincho charcoal |
| Water dispensing | 4 flow levels, cordless dispensing possible |
| Timer | 4 / 6 / 8 / 10 hours |
| Keep-warm temperatures | 208 °F (98 °C), 190 °F (88 °C), 180 °F (82 °C) |
| Healthy tea mode | Alkalizes water for better extraction of catechins |
| Energy saving | Automatic heater shutoff outside usage hours |
| Reboil function | Yes (Long Boil/Reboil button) |
| Chlorine reduction | Extended boiling for about 6 minutes |
| Safety | Dry-boil protection, automatic dispensing lock, auto shutoff |
| Maintenance | Cleaning with citric acid (model SAN-80N) recommended every 2-3 months |
| Replacement parts | Rubber gasket (APH65-613-0S), metal filter (APB97-480-0U) |
| Warranty | For household use only, repair by authorized center |
Frequently Asked Questions - NC-HU301 PANASONIC
User questions about NC-HU301 PANASONIC
0 question about this device. Answer the ones you know or ask your own.
Ask a new question about this device
Download the instructions for your Electric kettle in PDF format for free! Find your manual NC-HU301 - PANASONIC and take your electronic device back in hand. On this page are published all the documents necessary for the use of your device. NC-HU301 by PANASONIC.
USER MANUAL NC-HU301 PANASONIC
Operating Instructions
使用說明書
natural_image
Line drawing of a modern rice cooker with control panel and door (no text or symbols)Thank you for purchasing the Panasonic product.
Please read these instructions carefully and follow safety precautions when using this product.
Before using this product please give your special attention to "IMPORTANT SAFEGUARDS" (P. 4\~5). This product is intended for household use only.
感謝您購買Panasonic產品。
Main Features ...... 10
Safety Precautions ......11
Part Names and Handling Instructions .... 14
Preparation before Using 15
How to Use 16
Convenient use methods 18
Care & Cleaning 20
Troubleshooting 22
Replacement of Parts 23
Specifications ....Back cover
目錄
重要的安全措施....6
主要特點....24
安全注意事項 25
各部分名稱和操作方法.... 28
使用前的準備工作.... 29
使用方法.... 30
方便的使用方法 32
保養和清洗.... 34
故障排除.... 36
更換易耗品.... 37
規格 ....封底
Sommaire
Précautions Importantes 8
When using electrical appliances, basic safety precautions should always be followed, including the following:
- Read all instructions.
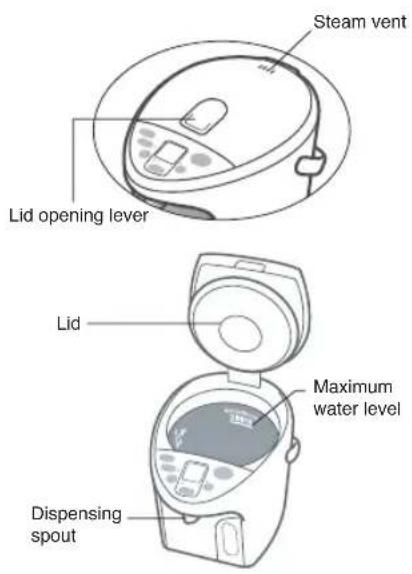
- Do not touch hot surfaces, especially the steam vent. Use handles or knobs.
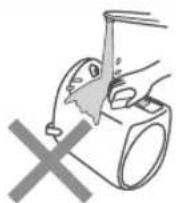
- To protect against fire, electric shock and personal injury, do not immerse cord, plugs, or Thermo Pot in water or other liquid.
Do not splash water or other liquid over them.
- Do not pour water directly from the tap.
- Do not put the unit in a sink or allow it to get wet.
-
Do not turn the unit upside down when the bottom is wet.
-
Close supervision is necessary when any appliance is used by or near children.
- Do not allow children and persons unfamiliar with the appliance to use it.
Do not leave the unit within the reach of infants.
- You must pay special attention to prevent infants from putting the body plug into their mouth.
- Unplug from outlet when not in use and before cleaning. Allow to cool before putting on or taking off parts, and before cleaning the appliance.
- When unplugging, pull by the power plug - not the cord.
-
Do not operate any appliance with a damaged cord or plug or after the appliance malfunctions, or has been damaged in any manner. Return appliance to the nearest authorized service center for examination, repair or adjustment.
-
Never disassemble, repair, or modify the unit.
-
If the supply cord is damaged, it must be replaced by a special cord available from the manufacturer or its service agent.
-
The use of accessory attachments not recommended by the appliance manufacturer may result in fire, electric shock or personal injury.
- Do not use outdoors.
- Do not let cord hang over edge of table or counter, or touch hot surfaces.
- Do not place on or near a hot gas or electric burner, or in a heated oven.
Do not place on unstable surfaces or surfaces that can be affected by heat, or near walls or furniture.
- Extreme caution must be used when moving an appliance containing hot liquids.
- When carrying the unit, do not touch the lid opening lever.
-
Always attach plug to appliance first, then plug cord into the wall outlet.
-
Make sure the power plug is correctly inserted in to the wall outlet when in use.
-
Do not connect or disconnect the power plug or the body plug with wet hands.
-
Use a single outlet that matches the power rating of the unit.
-
Clean dust from the power plug or the body plug regularly.
- A build-up of dust on the plug will attract condensation, which could cause cable damage resulting in fire. Remove the plugs and clean them with a dry cloth.
*The shape of plug differs according to region.
- Do not allow small metal parts near the body plug.
- Only use the power cord designed specifically for the unit. Do not use a different cord and do not use this cord with any other device.
- Do not let the unit fall over.
Do not lift, tilt, or shake the unit or carry it by the lid.
- Even when the dispense key is locked, hot water may leak through the dispensing spout and the steam vent, causing burns, if the unit falls over or is tilted.
- Close the lid securely, and not by force.
- Do not throw away remaining hot water while the lid is attached.
- When opening the lid, keep hands away from the steam.
- Do not open the lid or dispense hot water while boiling.
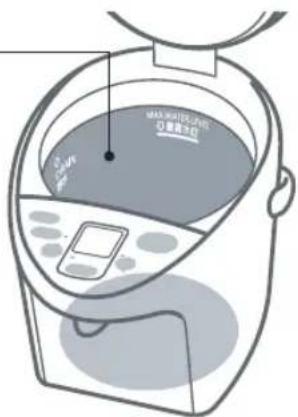
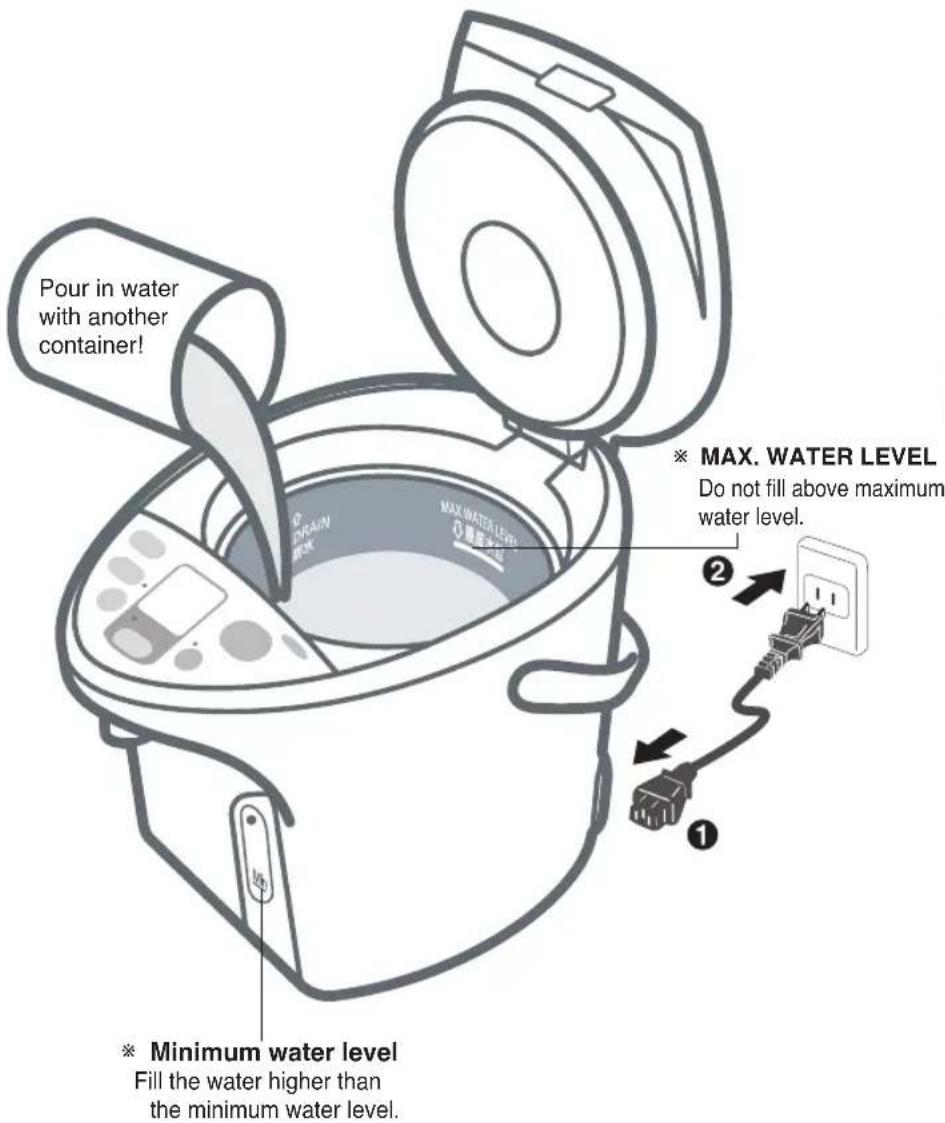
- Do not fill above maximum water level.
- Do not block the steam vent.
- Do not rotate the unit while dispensing hot water.
- Do not use appliance for other than intended use.
- Do not use to store ice. Condensation will occur, creating a potential source of electric shock and malfunction.
- Do not heat tea bags, tea leaves, milk, alcohol or anything other than water. Such items may spurt out and cause burns. The water tube may also get clogged, the inner container may burn or corrode, and the fluororesin insulating coating may peel off.
SAVE THESE INSTRUCTIONS
Notes:
A. A short cord is provided to reduce the risk of entanglement or tripping over a longer cord.
B. Extension cords are available and may be used if care is exercised in their use.
C. If extension cord is used,
1) the marked electrical rating of the extension cord should be at least as great as the electrical rating of the appliance, and
2) the cord should be arranged so that it will not drape over the countertop or tabletop where it can be pulled on by children or tripped over unintentionally.
D. This appliance has a polarized plug (one blade is wider than the other). As a safety feature, this plug will fit in a polarized outlet only one way. If the plug does not fit fully in the outlet, reverse the plug. If it still does not fit, contact a qualified electrician.
Do not modify the plug in any way.
重要的安全措施
Boiling with diamond fluorine and BINCHO charcoal.
- Particles of diamond and ground BINCHO charcoal are mixed with fluorine and used for inner container. Color, taste and aroma of tea can be maintained.
Healthy tea mode
(How to use, refer to P.19)
- Boiled water is alkalified, and promotes easy extraction of tea component such as catechin.
Convenient
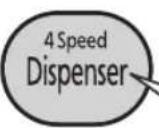
Hot water is dispensed in 4 levels
(How to use, refer to P.17)
- Dispense volume of hot water varies depending on degree of pressing and dispensing time.
Cordless dispensing of hot water
(How to use, refer to P.17)
- Hot water can be dispensed even if cord is removed or during a power failure/interruption.
natural_image
Line drawing of a cooking pot with a hand operating it, no text or symbols presentEconomy use
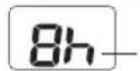
• 4 Timer selections
4 / 6 / 8 / 10 hour Timer can be selected. (See "Setting the timer" on P.19)
- Energy saving
Heater is controlled to suit the purpose of use. Power is saved automatically by only boiling during dispensing hours and cutting the heater at all other times.
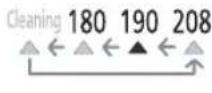
• 3 Keep-warm temperature selections
208 / 190 / 180 keep-warm temperature can be selected.
(See "Keep-warm function" on P.19)
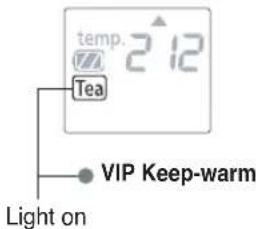
• U-VIP Keep-warm
The heat insulator maintains the hot water temperature, saving electricity.
natural_image
Line drawing of a rice cooker with control panel and buttons (no text or symbols)Safety Precautions
Please observe these precautions fully
For safety and in order to prevent property damage and hazards to users and others, please read the following instructions strictly.
■ The signals indicate harm and damage when the product is used wrongly.

WARNING
Indicating "it may cause severe injuries and death."

CAUTION
Indicating "the user may get injured or the product may cause property damage."
■ The symbols indicate specified items that must be followed.

This symbol indicates prohibition. This symbol indicates mandatory.

WARNING
To Prevent Burns

This appliance is not intended for use by persons (including children) with reduced physical, sensory or mental capabilities, or lack of experience and knowledge, unless they have been given supervision or instruction concerning use of the appliance by a person responsible for their safety.
Children should be supervised to ensure that they do not play with the appliance.
Do not let the unit fall over. Do not lift, tilt or shake the unit or carry it by the lid.
Even when the dispense key is locked, hot water may leak through the dispensing spout and the steam vent, causing burns, if the unit falls over or is tilted.
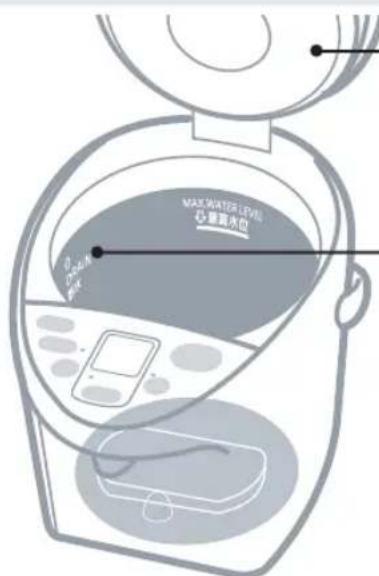
Do not pour in water above the maximum water level indication line. If the appliance is overfilled, boiling water may be ejected.
Hot water can spill causing burns.
Do not close the lid by force.
Hot water can spill causing burns.
Do not boil anything other than water.
Do not heat tea bags, tea leaves, milk, alcohol or anything other than water which may cause it to spurt out hot liquid or steam and cause burns. The water tube may also get clogged, the inner container may burn or corrode, and the fluoro resin insulating coating may peel off.
Do not block the steam vent.
Hot water can overflow causing burns.
Do not dump the remaining hot water while the lid is attached.
If the lid comes off, hot water may splash causing burns.
Do not touch the steam vent.
This may cause burns. Take special care to prevent infants from touching the steam vent.

Close the lid securely.
If the unit topples, hot water may spill out causing burns.
Safety Precautions
Please observe these precautions fully

WARNING
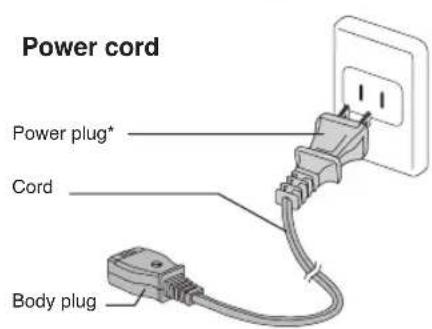
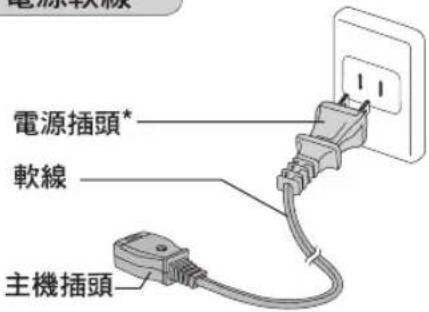
Power Cord

Never do anything that might cause damage to the cord, power plug or body plug, such as damage them, modify them, place hot objects near to them, bend them, twist them, stretch them, place heavy objects on them, or bundle them together. If the unit is used when damaged, electrical short circuit or fire may result.
- If the supply cord is damaged, it must be replaced by a special cord available from the manu facturer or its service agent.
Do not connect or disconnect the power plug or the body plug with wet hands. This may result in electric shock.
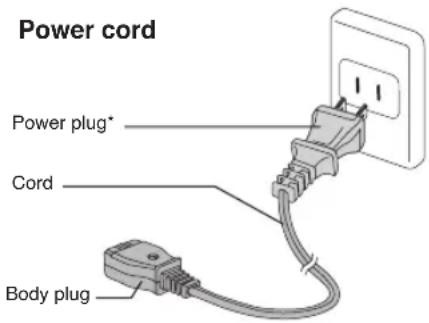
*The shape of plug differs according to region.
Do not allow infants access the body plug.
You must pay special attention to prevent infants from putting the body plug into their mouth. This may result in electric shock or injury.
Do not place small metal parts near the body plug.
This may result in electric shock, electrical short circuit or fire.

Make sure the power plug is correctly inserted into the wall outlet.
If the plug is inserted improperly it may cause electric shock or generate heat resulting in fire.
- Do not use a damaged plug or a connection in a loose outlet.
Clean dust from the power plug or the body plug regularly.
A build-up of dust on the plug will attract condensation, which could cause cable damage and the deterioration of insulation resulting in fire.
- Remove the plugs and clean them with a dry cloth.
Use a dedicated outlet that matches the power rating of the unit.
Heat generated when plugging in multiple appliances into one outlet may result in fire.
During use
Do not immerse the unit in water or splash water over it.
- Do not supply water directly from the tap or place the unit in a sink where the bottom may get wet.
- Do not turn the unit upside down when the bottom is wet. It may cause a short circuit and may result in electric shock. If water overflows from the pot and it enters the electrical parts built into the main unit, it may cause a malfunction.
Never disassemble, repair or modify the unit.
Any attempt to do so may cause the unit to operate abnormally and may result in fire or injury.
- If in need of repair (except for the replacement parts), please contact an authorized Service Center.
Do not use to store ice.
Condensation will occur, creating a potential source of electric shock and malfunction.

CAUTION
To Prevent Burns
Do not place the unit on an unstable surface.
The appliance may topple over causing burns.
Do not open the lid or dispense hot water while boiling.
Splashing hot water or steam may cause burns.
Do not rotate the unit while dispensing hot water.
Splashing hot water may cause burns.
Do not touch the hot parts of the unit during use or shortly after use.
This may cause burns.

When carrying the unit, do not touch the lid opening lever.
The lid may open causing burns and other injury.
Wait until the unit is cooled down before maintenance.
A hot appliance may cause burns.
- When disposing hot water, be careful not to get burned.
When opening or closing the lid, keep hands away from the steam.
Steam can cause burns.
Power Cord
Do not use a different cord and do not use this cord with any other device.
(Do not use a power cord other than the one designed specifically for the unit.)
It may cause a malfunction or fire.

When the unit is not in use, unplug the power plug from the wall outlet.
Deteriorating insulation may result in electric shock and/or fire.
When unplugging the unit, pull by the power plug - not the cord.
Electric shock and short circuit may result in fire.
During use
Do not use the unit on surfaces that can be affected by heat for a long time.
The unit may get discolored or break.
Do not place near walls or furniture.
Steam and heat could damage walls and furniture, causing a change in color and shape.
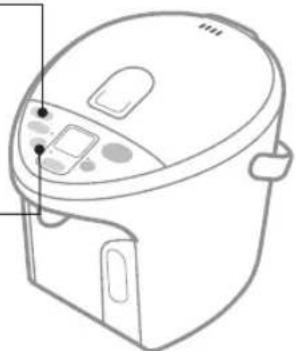
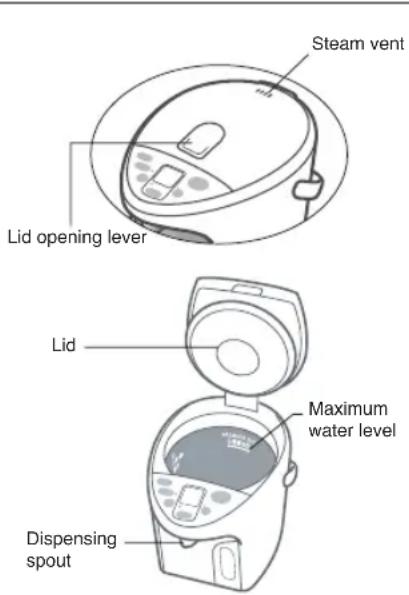
Part Names and Handling Instructions
Part Names and Handling Instructions
Operation panel
If the protective film is still covering the surface of the operation panel, peel it off before using the operation panel.
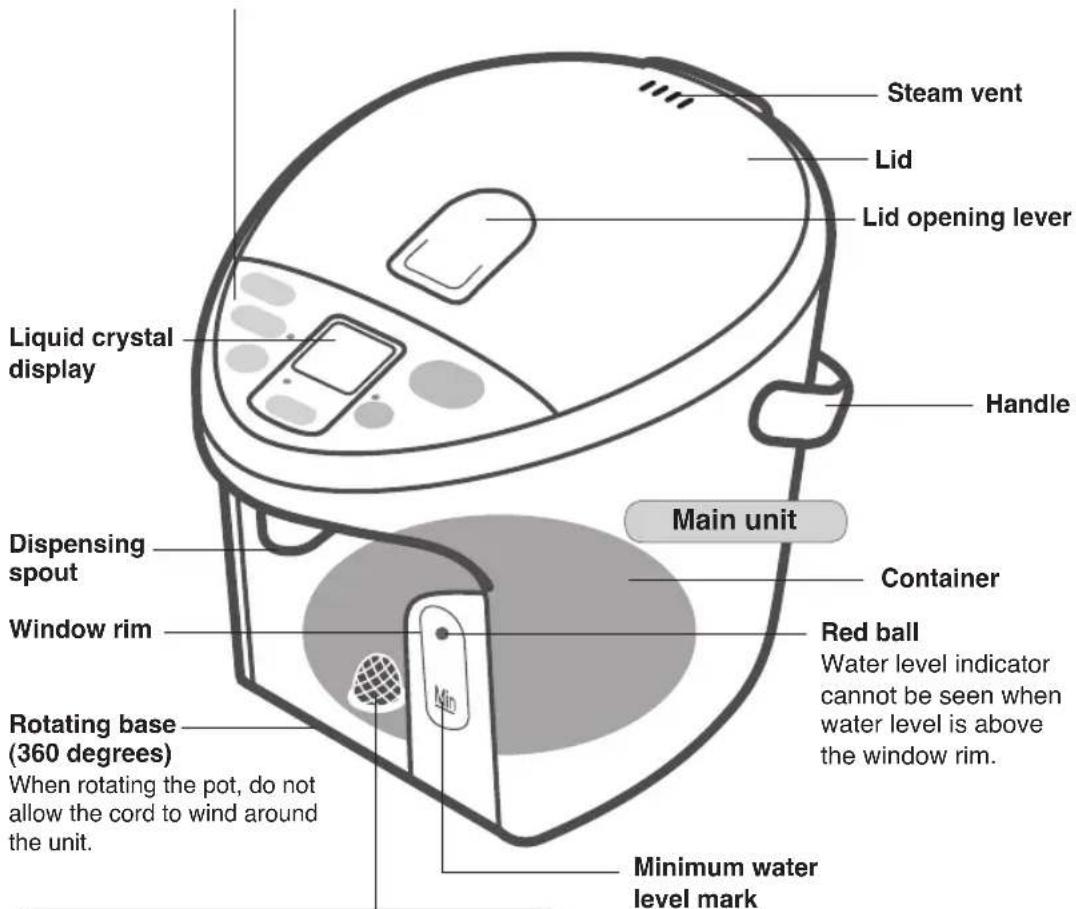
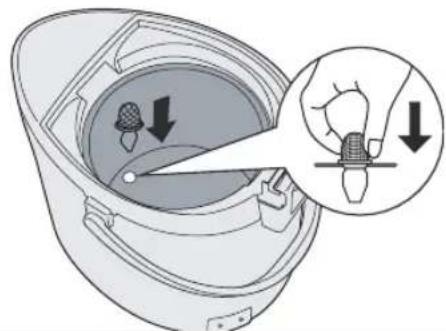
Mesh filter
(Replaceable part)
It may have come off from the bottom of the container. Push it completely into the correct position. (See P.23)
Power cord
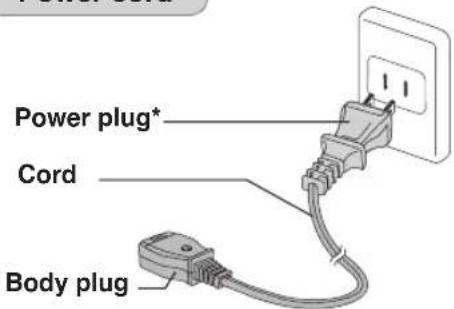
*The shape of plug differs according to region.
Preparation before using
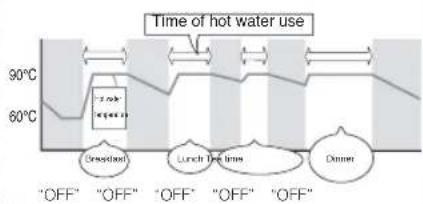
Energy Saving Timer
Economy use
Auto save power ( P.18)
- Control heater per use method. Heat during the period of hot water supply, and automatically cut off heater beyond the period of hot water supply to save the warm-keeping power.
- From the beginning of use, save "the period of hot water supply". - Within the first week for use, automatically raise water temperature to warm-keeping temperature based on "the period of hot water supply". One week later, automatically heat water according to all of the "period of hot water supply" of the previous week.
flowchart
graph LR
    A["60°C"] --> B["OFF"]
    B --> C["OFF"]
    C --> D["OFF"]
    D --> E["OFF"]
    E --> F["OFF"]
    F --> G["Off"]
    G --> H["Off"]
    H --> I["Off"]
    I --> J["Off"]
    J --> K["Off"]
    K --> L["Off"]
    L --> M["Off"]
    M --> N["Off"]
    N --> O["Off"]
    O --> P["Off"]
    P --> Q["Off"]
    Q --> R["Off"]
    R --> S["Off"]
    S --> T["Off"]
    T --> U["Off"]
    U --> V["Off"]
    V --> W["Off"]
    W --> X["Off"]
    X --> Y["Off"]
    Y --> Z["Off"]
    Z --> AA["Off"]
    AA --> AB["Off"]
    AB --> AC["Off"]
    AC --> AD["Off"]
    AD --> AE["Off"]
    AE --> AF["Off"]
    AF --> AG["Off"]
    AG --> AH["Off"]
    AH --> AI["Off"]
    AI --> AJ["Off"]
    AJ --> AK["Off"]
    AK --> AL["Off"]
    AL --> AM["Off"]
    AM --> AN["Off"]
    AN --> AO["Off"]
    AO --> AP["Off"]
    AP --> AQ["Off"]
    AQ --> AR["Off"]
    AR --> AS["Off"]
    AS --> AT["Off"]
    AT --> AU["Off"]
    AU --> AV["Off"]
    AV --> AW["Off"]
    AW --> AX["Off"]
    AX --> AY["Off"]
    AY --> AZ["Off"]
    AZ --> BA["Off"]
    BA --> BB["Off"]
    BB --> BC["Off"]
    BC --> BD["Off"]
    BD --> BE["Off"]
    BE --> BF["Off"]
    BF --> BG["Off"]
    BG --> BH["Off"]
    BH --> BI["Off"]
    BI --> BJ["Off"]
    BJ --> BK["Off"]
    BK --> BL["Off"]
    BL --> BM["Off"]
    BM --> BN["Off"]
    BN --> BO["Off"]
    BO --> BP["Off"]
    BP --> BQ["Off"]
    BQ --> BR["Off"]
    BR --> BS["Off"]
    BS --> BT["Off"]
    BT --> BU["Off"]
    BU --> BV["Off"]
    BV --> BW["Off"]
    BW --> BX["Off"]
    BX --> BY["Off"]
    BY --> BZ["Off"]
    BZ --> CA["Off"]
    CA --> CB["Off"]
    CB --> CC["Off"]
    CC --> CD["Off"]
    CD --> CE["Off"]
    CE --> CF["Off"]
    CF --> CG["Off"]
    CG --> CH["Off"]
    CH --> CI["Off"]
    CI --> CJ["Off"]
    CJ --> CK["Off"]
    CK --> CL["Off"]
    CL --> CM["Off"]
    CM --> CN["Off"]
    CN --> CO["Off"]
    CO --> CP["Off"]
    CP --> CQ["Off"]
    CQ --> CR["Off"]
    CR --> CS["Off"]
    CS --> CT["Off"]
    CT --> CU["Off"]
    CU --> CV["Off"]
    CV --> CW["Off"]
    CW --> CX["Off"]
    CX --> CY["Off"]
    CY --> CZ["Off"]
    CZ --> DA["Off"]
    DA --> DB["Off"]
    DB --> DC["Off"]
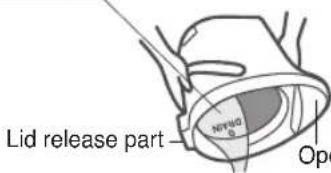
How to Remove the Lid
① Press the depression, open the lid and lift up the knob.
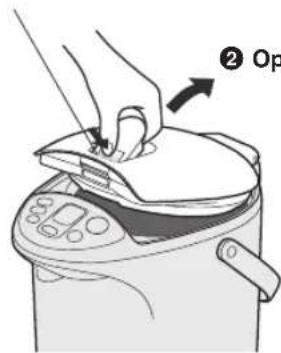
How to close : Press down on lid until it clicks.
② Pull it up diagonally.
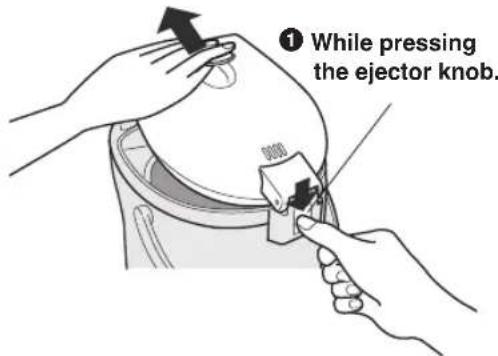
How to set : Insert the lid at an angle.
Before you use this pot for the first time
Boil water in it to clean the thermo pot container and the sections through which the hot water is dispensed.
1 Boil some water.
2 Dispense the hot water.
3 Empty the container via "DRAIN" mark.
How to Use
Boiling water
Dispense
How to Use
Boiling water
(
Dispense
Long Boil: To reduce the chlorine in the water
Press Long Roll Reboil key to make the indicator light flash.
(Press one time while water is being boiled, and press twice while water is being kept warm.
Extends the boiling time by about 6 minutes to reduce the chlorine in the water by about 80%.
- Press Long Hall Reboil key again to boil.
Reboil: Or keeping water warm
There may be a case where boiling does not start automatically.

Press one time and it will light up.
Connect the power plug after filling with water and close the lid. (① → ②)
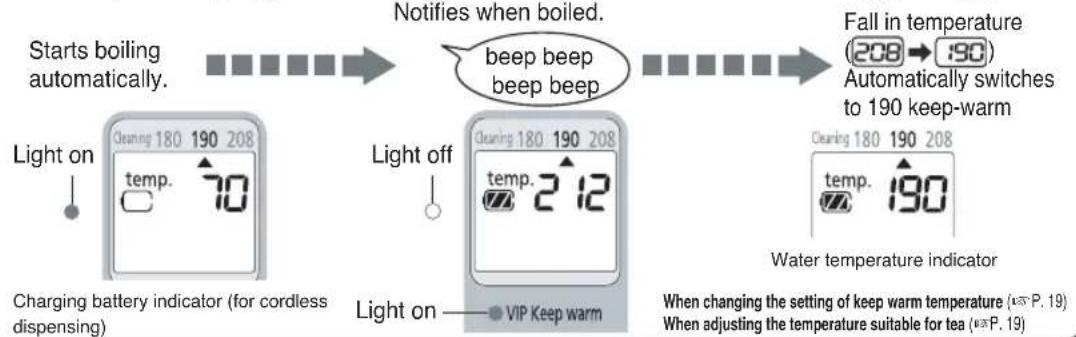
flowchart
graph LR
    A["Starts boiling automatically"] --> B["Notifies when boiled."]
    B --> C["Fall in temperature (208→190) Automatically switches to 190 keep-warm"]
    D["Light on Charging battery indicator (for cordless dispensing)"] --> E["Light off"]
    E --> F["VIP Keep warm"]
    G["When changing the setting of keep warm temperature (P.19)<br>When adjusting the temperature suitable for tea (P.19)"] --> H["Clearing 180 190 208 temp. 70"]
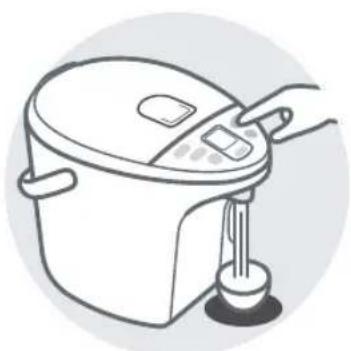
Press

Press
Press to Pour
Automatically locked in 10 seconds after dispensing is finished.
Charging battery indicator. (for cordless dispensing)
Guideline for dispensing volume
| Battery charge volume | Dispensing volume |
 | Approx. 3L or more (4.0L type) Almost full volume (3.0L types) * 1 |
 | 1.5L or less |
Dispensing speed of hot water varies depending on degree of pressing and dispensing time.
| Dispensing period (Amount of time to press continuously) | |||
| Less than 5 seconds | From 5 to 12 seconds | More than 12 seconds | |
| Press slightly | LEVEL | ||
| Press strongly | LEVEL | LEVEL | LEVEL |
※ Be careful of hot water splashing if pressed too strongly
With cordless dispensing, and before the water boils, there are only two speeds

※1 Full water volume may not be indicated if dispensed frequently.
- Indication lights off and cannot dispense hot water after 8-10 hours even if not dispensed.
Water temperature falls about 194^(90^) in 3 hours after boiling. (3.0L type) at room temperature 68^(20^)
※ Temperature falls quicker if water volume is less.
When the unit is not in use
Unplug, and remove the lid. Pour out any remaining hot water slowly via
the

Cautions
- Do not pour out water too quickly. If water is splashed over lid release section or operation panel, it may cause a malfunction.
- Do not leave water standing in the container. It may cause the container to corrode or smell.
Convenient use methods
Timer
Energy Saving
Convenient use methods
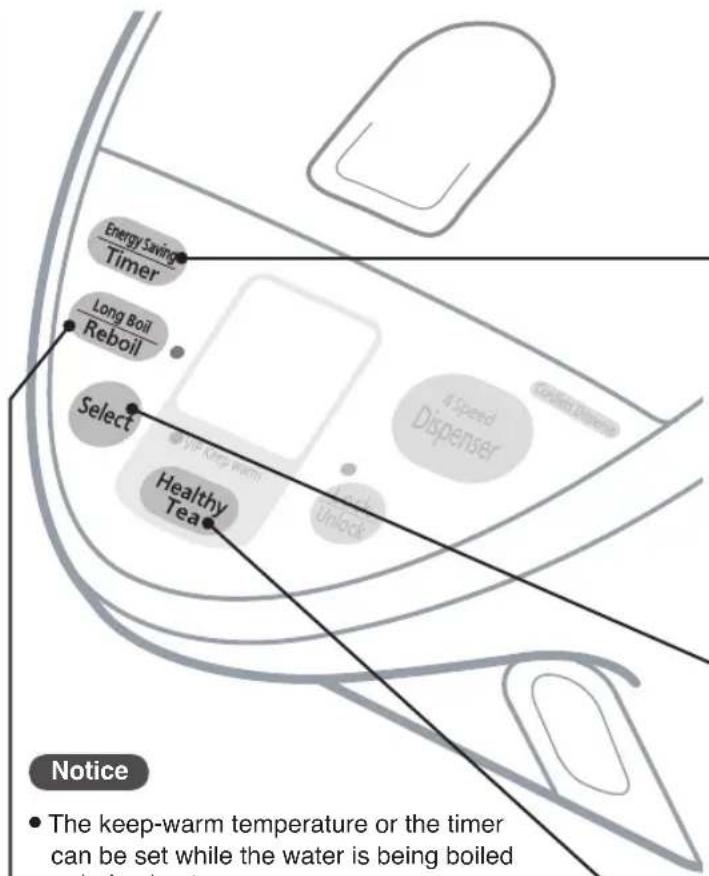
Notice
- The keep-warm temperature or the timer can be set while the water is being boiled or being kept warm.
- After power is restored in the event of a power and display failure the keep-warm temperature will be automatically set to 190, even if the timer or the "208" or "180" keep-warm function was previously selected.
Reboil
- It is ideal to use boiling water for making coffee / green tea / instant cup noodles etc.
Time required for the reboil procedure From 208 keep-warm : approx. 4-5 min. From 190 keep-warm : approx. 6-7 min. From 180 keep-warm : approx. 8.5-11 min.
(Amount of water: Maximum Room temperature: 68°F(20°C))
Press the (Long Boil) key to reboil water that is being kept warm.

After a few minutes, water will be boiled.
- The keep-warm temperature setting is left unchanged.
When the unit will not be used for a short time, such as when you go out for a day...
Setting the timer
- While setting the timer, the electrification of heater stops.
Save Energy Setting
- Power is saved automatically by only boiling during dispensing hours and cutting the heater at all other times.
- This is recommended If dispense time is regularly fixed.
Keep-warm Function
- It is ideal to use 180 keep-warm for making green tea.
- Energy can be saved if keep-warm temperature is lower.
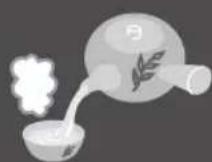
- Approx. 176°F(80°C) of water is the most suitable for natural leaf tea.
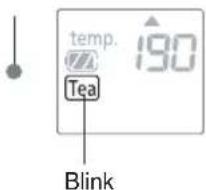
Make the water optimal for tea. (Healthy tea mode)
F
Lor
(
S
S
W
Keep-warm Function
Reboil
Healthy Tea
When the water will be boiled 8 hours later
Each time the LadyTimer key is pressed the light will shift to the next choice.

(Will return to the temperature indication)
Remaining time will be indicated on 1 hour basis.

To cancel the timer press the LeftTimer key again
8 hours later, timer will go off and water starts boiling
When the water is brought up to boiling temperature, keep-warm at the settled temperature.
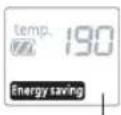
If set up "Energy saving"
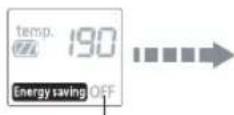
Boiling started before dispensing time and kept at preset temperature.
"OFF" is displayed when not dispensed. "OFF" lights off.
Caution
While Energy saving is set, boiling starts automatically at dispensing time.
Circuit breaker may be tripped if used together with other equipment in a same line.
Each time the (lkt) key is pressed, "▲" mark will shift to the next choice and change the keep-warm temperature.
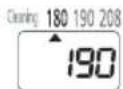
Time required to reach the settled keep-warm temperature
190→180 keep-warm:approx.2-4 hour
208→190 keep-warm:approx.0.5-2.5 hour
Amount of water: Maximum Room temperature: 68°F(20°C)
Previous keep-warm setting: 190
After a short time, water will be kept warm at approx. 176°F(80°C)
Press
Long Boil/Reboil: Light on

For notification when boiled
(Setting of keep warm temperature does not vary.)
beep beep beep beep
Time for boiling
After filled water : approx. 32 - 38 min.
From 208 keep warm: approx. 13 - 14 min.
From 190 keep warm: approx. 16.5 - 17.5 min.
From 180 keep warm: approx. 18.5 - 20.5 min.
Amount of water: Maximum Room temperature: 68°F(20°C)
Notice
Setting is erased when water is added while lights on.( lights off)
Setting will be erased when 📄, 🐃 and 🐃 tea buttons are pressed
while blinks.
Caution
A lot of steam may occasionally be released
Care & Cleaning
Daily Maintenance
Clean with Citric Acid
⚠️ Cautions Before cleaning, be sure to disconnect the plug from outlet, dispense water and allow the unit to cool.
Main unit and lid
Clean with a damp, well-wrung cloth.
- Do not wet or soak the main unit in water.
If water enters the main unit from the bottom or from the dispensing spout, it can get into the electrical components in the main unit and may cause a malfunction. - Do not use detergents.
- Do not use benzine or thinner.
(They may leave an odor.) (They may damage the surface.)
Inner container
Clean with a wet sponge.
- Do not use abrasives such as polishing powder, a scrub brush or a nylon brush. They fluororesin finish of the
About "Scale"
While you are using this unit, minerals contained in the water (like calcium) can get stuck on the inner container or on the mesh filter. This is called "scale", and it is harmless.
- Milky-white gritty surface (caused by calcium)
- White or glittering floating material (crystals of minerals)
● Discoloration in the finish like dark brown, gray, or green areas
(metallic ion formed on the fluororesin covering)
This is not discoloration or corrosion of the inner container itself, nor is it flakes from the fluororesin covering.

Clean the inner container using citric acid. (See P.21)
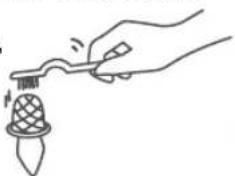
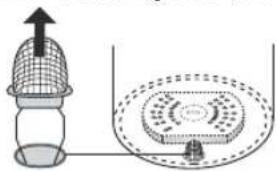
Mesh filter
Clean the filter with a brush.
When filter is clogged, water does not flow smoothly.
* After cleaning the filter, be sure to reattach it to the inner container.
natural_image
Line drawing of a hand using a tool to press a decorative object (no text or symbols)Before storing the unit
- Dry it thoroughly.
- Put it into a plastic bag and seal the bag.
Removing scale. (Once every two or three months)
The citric acid is available from an authorized dealer. (Model No: SAN-80N)
* Follow the directions for cleaning printed on the citric acid package.
* Since the citric acid used for cleaning is a food additive, it is harmless to humans.
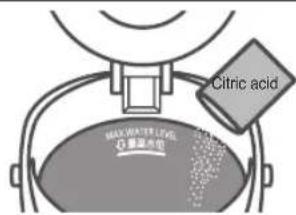
How to clean with citric acid
1 Make sure that the mesh filter is attached to the container.
2 Put citric acid in the inner container.
- Amount of citric acid to be used at one time: 80 g (two packages) or seven level tablespoons.
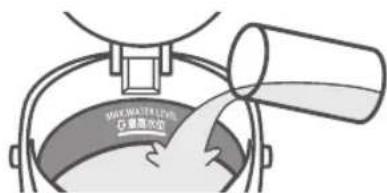
3 Add water to the maximum water level mark, and mix the citric acid and water well. Close the lid.
4 Connect the plug, and choose Closing. Select
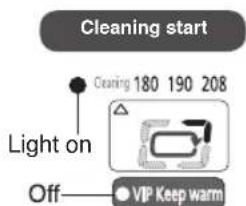
Liquid crystal indication will be rotated during cleaning.

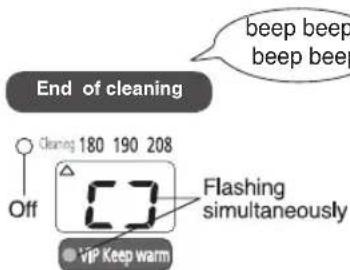
Indications will indicate cleaning end.
5 Unplug, remove the lid and empty the hot water via the "DRAIN" mark.
6 Refill with water and boil it to remove the smell of the citric acid or lemons. Then throw the hot water away in the same manner as 5.
- To remove any discoloration from the area above the maximum water level, rub the inside lightly with a wet non-abrasive sponge.
- If the discoloration cannot be removed by rubbing, clean the inner container several times using citric acid or lemons.
- When washed without removing charcoal filter, wash the active charcoal filter, fix it in the inner container and throw out the initial boiled water before use.
Cautions
• Make sure to only use citric acid for thermo pot washing.
- Do not fill with water above maximum water level.
- Fill the container only with tap water (do not fill with hot water). Hot water may spout out causing burns.
Troubleshooting
Before calling a service supplier, please check the following possible causes/solutions
Troubleshooting
If... Solution
White or glittering flakes floating in the hot water.
Boiling sounds become louder.
Hot water has odors of chlorine.
Hot water has an unpleasant odor.
Hot water comes out by itself.
Hot water does not flow out smoothly.
Hot water does not dispense.
Possible cause
- The cause of this is "scale". (See P.20) It is not flakes of fluororesin.
* Water with a large content of minerals in it such as mineral water or ionised water, is more likely to cause a scale or white layer in the hot water.
- When “scale” has adhered, boiling sounds become louder.
- Odors of chlorine remain depending on the amount of chlorine in tap water.
- When the unit is new, resin used in the manufacturing may give off a mild odor. This will disappear with use.
- If the unit is placed on surfaces such as a vinyl sheet, the odor may be carried over into the water.
- Water has been added above maximum water level.
- The mesh filter may be clogged with "scale". (See P.20)
- The automatic lock has been engaged.
- Clean the inner container with a wet sponge. (See P.20)
- If the “scale” still remains, clean with citric acid. (See P.21)
- Press the "Long Boil/Reboil" key to reduce the chlorine. (See P.16)
- Lower the water level.
- Clean the filter with a brush. - If the "scale" cannot be removed, replace the filter. (See P.23)
- Press the "Lock/Unlock" key.
- Fill the water higher than water supply level, close the lid and press Long Bell
No-water boiling prevention function
● To prevent failure by overheating, this is activated when no water remains.
- Is water filled higher than water supply level?
- Is lid left open when water is filled?
- It may light on:
- when hot water is added.
● depending on filling method of water.
- Is citric acid settled at the bottom of container while citric acid washing?
- Press Long Bo Rebo
- Once plug is disconnected, mix with chopsticks and wash after citric acid is distributed. (See P.21)
If boiled empty, odor is caused or the color of fluorine resin changes.
The unit doesn't turn on.

- You poured in water directly from a tap.

- You put the unit on the sink.

- You turned the unit upside down with its bottom wet.

- You washed the unit in water.
- If the electric components get wet, the unit must be repaired. Contact the store where you purchased the unit for repair.
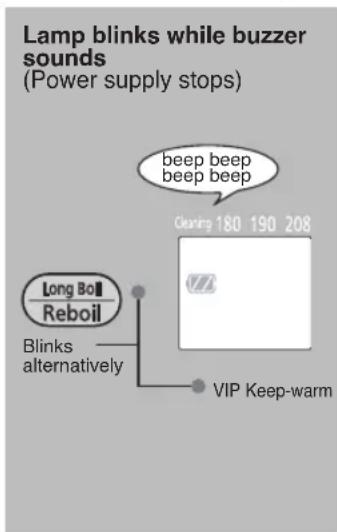
- If the problem cannot be resolved, or if you think something is still wrong with the unit, disconnect the plug, reconnect after 30 seconds and operate it again.
- Inside lid may turn yellow, but operation will not be affected.
- "Clickety-clack" sound caused when open and close the lid is the sound caused by the valve swing to prevent the hot water run off.
- Outside body becomes 113^(45^) while warm keep if the room temperature is high.
The indicator lights flash alternately and displays H I

- This is a malfunction of the sensor. Contact the retailer where you purchased the unit.
Replacement of Parts
Rubber gasket set
Replace gaskets if they crack, lose their pliancy or, for any other reasons which allow steam to escape from between the container and the lid.
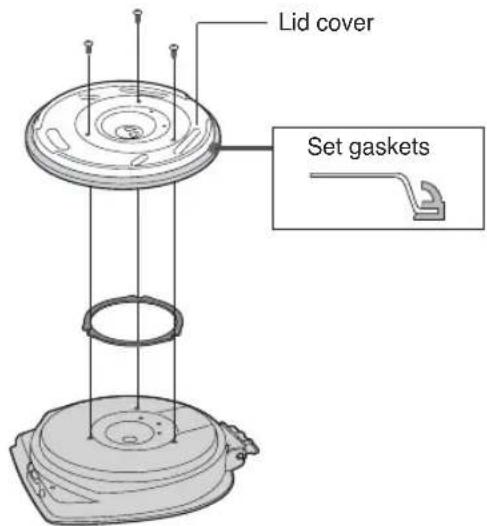
Remove lid, unscrew 3 tapping screws and remove the lid cover. Exchange the gaskets and then place the lid cover back and secure with the tapping screws.
Mesh filter
Replace the filter if foreign materials which clog the filter cannot be removed even after you scrub with a cleaning brush, etc.
natural_image
Diagram showing a gas stove with an upward arrow and a circular vent, no text or symbols presentConsumable parts are available from an authorized dealer.
| Part name Part No. | |
| Rubber gasket set | APH65-613-0S |
| Mesh filter | APB97-480-0U |
主要特點
美味
使用金剛氟和備長炭燒水。
natural_image
Line drawing of a cooking pot with a hand operating it, no text or symbols present使用經濟
- 4個定時器選擇
natural_image
Line drawing of a rice cooker with control panel and buttons (no text or symbols)安全注意事項
務必遵守
電源軟線
定時器
能源節省
指示燈亮起
煮沸時間
加入水後:大約32-38分鐘
208保温:大约13-14分鐘
natural_image
Diagram showing a container with a mesh structure and a circular vent system inside, connected by a pipe (no text or symbols)請在經銷店購買易耗品。
natural_image
Line drawing of a kitchen appliance with a hand operating the lid (no text or symbols)Écono-énergie
natural_image
Line drawing of a rice cooker with control panel and buttons (no text or symbols)natural_image
Line drawing of a hand using a tool to apply a small object to a textured surface (no text or symbols)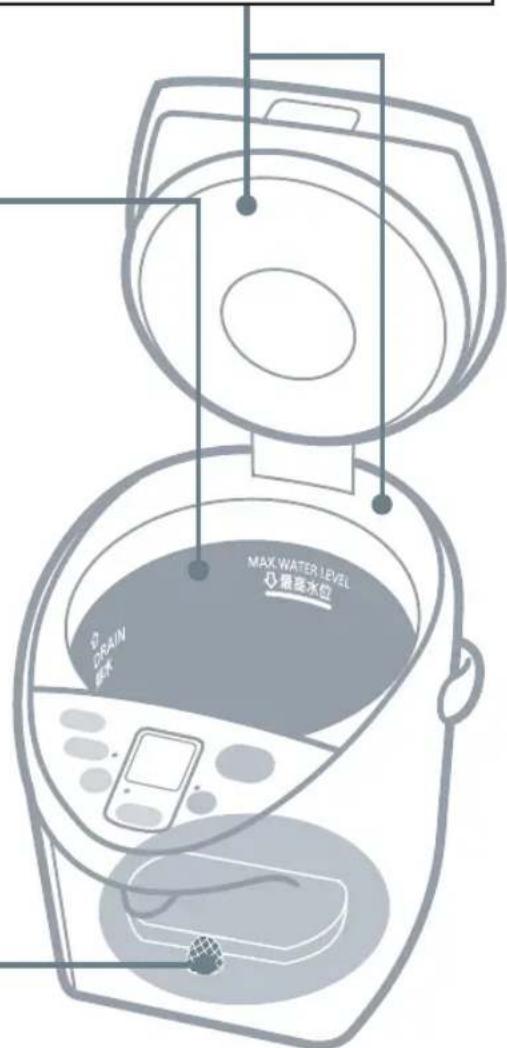
natural_image
Diagram showing a device with a top-down view and its internal structure, no text or symbols present.| NC-HU401P NC-HU3D1P | |||
| Power | 120V a.c. | ||
| Power consumption | 925 W | ||
| Power consumption while keep warm *1 (per hour) | 208 warm keeping | 21 Wh 20 Wh | |
| 190 warm keeping | 18 Wh 17 Wh | ||
| 180 warm keeping | 15 Wh 14 Wh | ||
| Dimensions (approx.) (where handle is turned.) | Width | 9.6 in (24.5 cm) 9.6 in (24.5 cm) | |
| Depth | 12.8 in (32.6 cm) | 12.8 in (32.6 cm) | |
| Height | 13.3 in (33.8 cm) | 11.3 in (28.9 cm) | |
| Weight (approx.) | 7.3 lb (3.3 kg) | 6.8 lb (3.1 kg) | |
| Rated capacity | 4.2 qt (4.0 L) | 3.2 qt (3.0 L) | |
| Cord length | 39.4 in (1.0 m) | ||
| Motor pump | Power consumption 1.5 W/Rated time 3 min. | ||
| Overheating prevention unit | Thermal fuse | ||
| Boiling time *2 (approx.) | 29.0 min. 23.0 min. | ||
| Cleaning time with citric acid | 42.0 min. 36.0 min. | ||
*1 : Full of water, where room temperature is 68°F(20°C).
*2 : Full of water, where room and water temperature are 68°F(20°C).
• Prescribed performance may not be maintained in particular areas such as highland or extremely cold region.
- Drain water if not used such as during winter. Remaining water may freeze and damage parts.
規格
