
CoolMatic CRD 50S - Fridge DOMETIC - Free user manual and instructions
Find the device manual for free CoolMatic CRD 50S DOMETIC in PDF.

| Product type | Refrigerator with freezer compartment (category 5) |
| Brand | Dometic |
| Model | CoolMatic CRD 50S |
| Net weight | 19 kg |
| Supply voltage | 12 V--- / 24 V--- (direct current) |
| Rated current | 5.9 A (12 V) / 2.5 A (24 V) |
| Average power consumption | 31.2 Ah/24h |
| Total useful capacity | 46.7 L |
| Freezer compartment capacity | 6 L |
| Temperature range (refrigerator) | +2 °C to +12 °C |
| Temperature range (freezer) | -15 °C to -7 °C |
| Climate class | ST (ambient +16 °C to +38 °C) |
| Maximum relative humidity | 90 % |
| Maximum tilt angle (short term) | 30° |
| Noise level | 46 dBA |
| Refrigerant | R134a (55 g) |
| Global warming potential (GWP) | 1430 |
| Included accessories | Instruction manual |
| Optional accessories | Mains adapter MPS35 (ref. 9103555825) |
| Integrated safety | Protection against reverse polarity, short circuit, automatic shut-off on low battery (10.4 V at 12 V / 22.8 V at 24 V) |
| Intended use | Motorhomes, caravans, boats (max heel angle 30°) |
Frequently Asked Questions - CoolMatic CRD 50S DOMETIC
User questions about CoolMatic CRD 50S DOMETIC
0 question about this device. Answer the ones you know or ask your own.
Ask a new question about this device
Download the instructions for your Fridge in PDF format for free! Find your manual CoolMatic CRD 50S - DOMETIC and take your electronic device back in hand. On this page are published all the documents necessary for the use of your device. CoolMatic CRD 50S by DOMETIC.
USER MANUAL CoolMatic CRD 50S DOMETIC
natural_image
Exterior view of a modern refrigerator with open lid and front panel (no visible text or symbols)CoolMatic CRD0050
EN
Refrigerator
Installation and Operating Manual.....8
DE
Kühlschrank
natural_image
Technical line drawing of a 3D rectangular structure with internal components and labeled parts (no text or symbols beyond basic labels)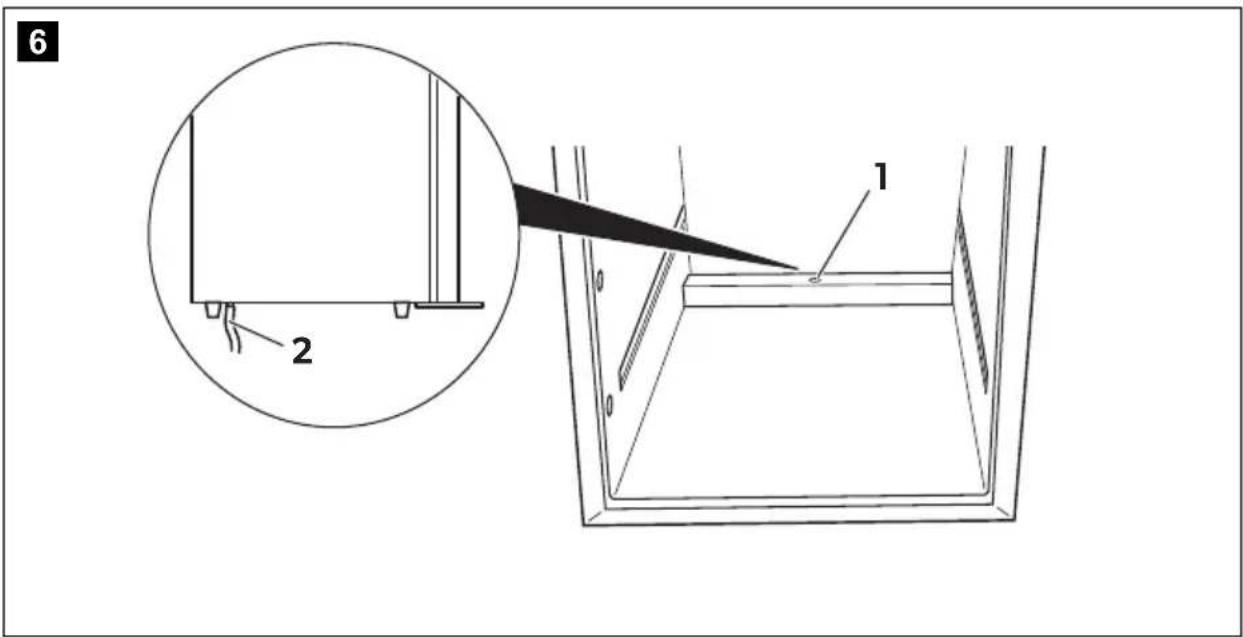
line
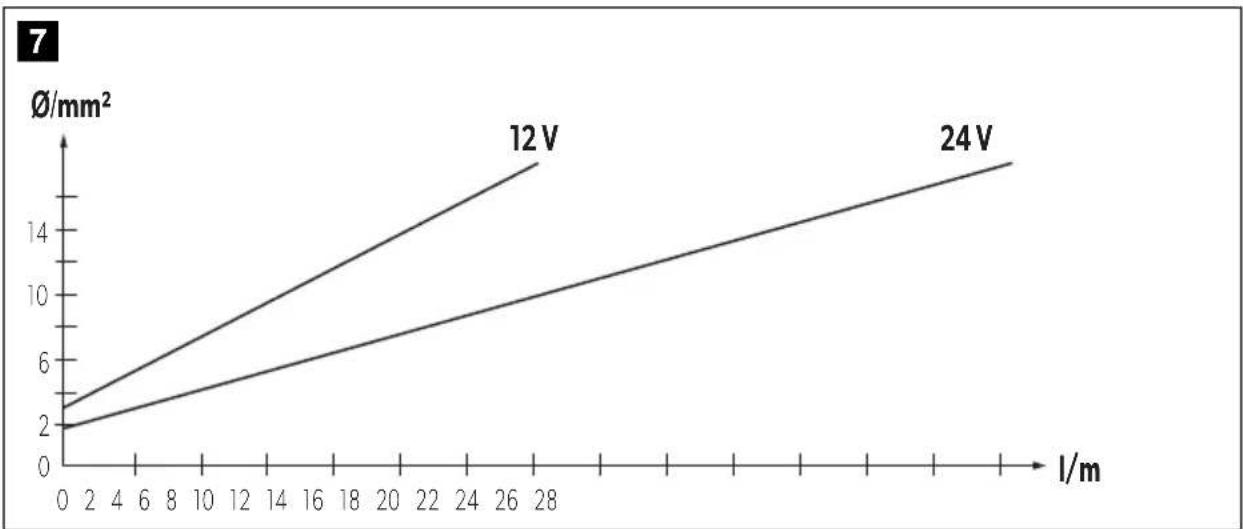
| I/m | 12 V (Ø/mm²) | 24 V (Ø/mm²) | | --- | ------------ | ------------ | | 0 | 2 | 2 | | 28 | 16 | 14 |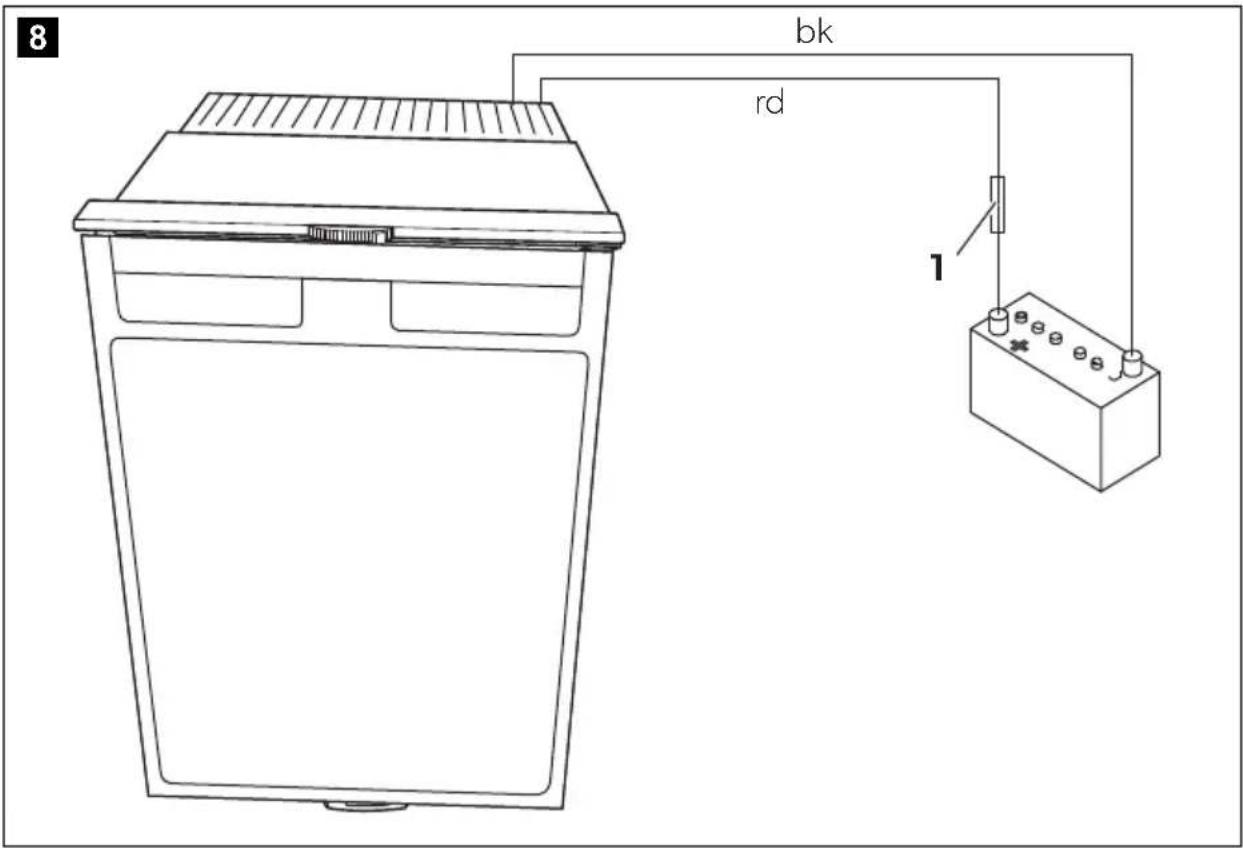
Please read this instruction manual carefully before installation and first use, and store it in a safe place. If you pass on the product to another person, hand over this instruction manual along with it.
Contents
1 Explanation of symbols....9
2 Safety instructions....9
3 Scope of delivery .....12
4 Accessories....12
5 Intended use ....12
6 Technical description ....12
7 Installing and connecting the refrigerator .....14
8 Using the refrigerator....18
9 Cleaning and care.... 22
10 Guarantee 22
11 Disposal.... 23
12 Troubleshooting 23
13 Technical data 26
1 Explanation of symbols
DANGER!
Safety instruction: Failure to observe this instruction will cause fatal or serious injury.

WARNING!
Safety instruction: Failure to observe this instruction can cause fatal or serious injury.

CAUTION!
Safety instruction: Failure to observe this instruction can lead to injury.

NOTICE!
Failure to observe this instruction can cause material damage and impair the function of the product.

NOTE
Supplementary information for operating the product.
2 Safety instructions
The manufacturer accepts no liability for damage in the following cases:
- Faulty assembly or connection
- Damage to the product resulting from mechanical influences and excess voltage
• Alterations to the product without express permission from the manufacturer - Use for purposes other than those described in the operating manual
2.1 General safety

DANGER!
- On boats: If the device is powered by the mains, ensure that the power supply has a residual current circuit breaker.

WARNING!
- Have a qualified technician perform the installation in wet rooms.
-
Do not operate the device if it is visibly damaged.
-
If this device's power cable is damaged, it must be replaced by the manufacturer, customer service or a similarly qualified person in order to prevent safety hazards.
- This device may only be repaired by qualified personnel. Inadequate repairs may cause serious hazards.
- This device can be used by children aged 8 years or over, as well as by persons with diminished physical, sensory or mental capacities or a lack of experience and knowledge, providing they are supervised, or have been taught how to use the device safely and are aware of the resulting risks.
- Cleaning and user maintenance must not be carried out by children without supervision.
- Children must be supervised to ensure that they do not play with the device.
- Always keep and use the device out of the reach of children under 8 years of age.
- Do not store any explosive substances, such as spray cans with propellants, in the device.

CAUTION!
- Danger of crushing! Do not put your fingers into the hinge.
- Foodstuff may only be stored in its original packaging or in suitable containers.

NOTICE!
- Check that the voltage specification on the type plate is the same as that of the power supply.
- Never pull the plug out of the socket by the connection cable.
- If the refrigerator is connected to the DC socket: Disconnect the refrigerator and other electric consumers from the battery before connecting the quick charging device.
- If the refrigerator is connected to the DC socket: Disconnect the refrigerator or switch it off when you turn off the engine. Otherwise you may discharge the battery.
- The refrigerator is not suitable for storing substances which are caustic or contain solvents.
- Keep the drainage outlet clean at all times.
-
Do not open the refrigerant circuit under any circumstances.
-
Never transport the device in a horizontal position, so that no oil can leak out of the compressor.
- Make sure that the refrigerator circuit is not damaged during transportation. The refrigerant in the refrigerator circuit is highly flammable. In the event of any damage to the refrigerator circuit:
– Avoid naked flames and sparks.
- Air the room well.
- Set up the device in a dry location where it is protected against splashing water.
2.2 Operating the device safely

DANGER!
- Do not touch exposed cables with your bare hands. This applies especially when operating the device from the AC mains.

CAUTION!
- Before starting the device, ensure that the power supply line and the plug are dry.
- If you connect the device to a battery, make sure that no food comes into contact with the battery acid.

NOTICE!
- Do not use electrical devices inside the cooling device unless they are recommended by the manufacturer for that purpose.
- Do not place it near naked flames or other heat sources (heaters, direct sunlight, gas ovens etc.)
• Danger of overheating!
Always ensure sufficient ventilation so that the heat generated during operation can dissipate. Make sure that the device is sufficiently far away from walls and other objects so that the air can circulate.
- Ensure that the ventilation vents are not covered.
- Do not fill the inner container with ice or fluid.
- Never immerse the appliance in water.
- Protect the appliance and the cable against heat and moisture.
• Make sure that foodstuffs do not touch the walls of the cooling area.
3 S c o p e o f d
Quantity Description
1 Refrigerator
1 Operating manual
4 A c c e s s o r i
Description Ref. no.
MPS35 mains adapter 9103555825
5 Intended use
The refrigerator is suitable for cooling and freezing foodstuffs.

NOTICE!
If you wish to cool medicines, please check if the cooling capacity of the refrigerator is suitable for the medicine in question.
An optimum cooling capacity is guaranteed at ambient temperatures between +16 °C and +38 °C and at a maximum air humidity of 90 %.
6 Technical description
CoolMatic CRD0050 can refrigerate goods and keep them cool. Products can be deep-frozen in the freezer compartment.
The refrigerator drawer can be pulled out by the handle and completely removed from the unit for cleaning purposes. Bottles or beverage packaging are separated with spacers to ensure they do not fall when pulled out.
The freezer compartment is detachable. This allows the refrigerator space to be extended if required.
All materials used in the refrigerator are compatible for use with foodstuffs. The refrigerant circuit is maintenance-free.
The refrigerator is suitable for use with a DC voltage of 12 V or 24 V (e.g. in camper vans, caravans or on boats).
With a rectifier (accessory), the 12 and 24 V refrigerators can be operated on an AC network:
- MPS35 rectifier: for use with a 100 – 240 V supply
You can use the continuously variable thermostat to set the desired temperature.
6.1 Overview
No. in fig. 1, page 3 Explanation
1 Freezer compartment (detachable)
2 Refrigerator drawer (detachable)
3 Fastening lever for the refrigerator drawer
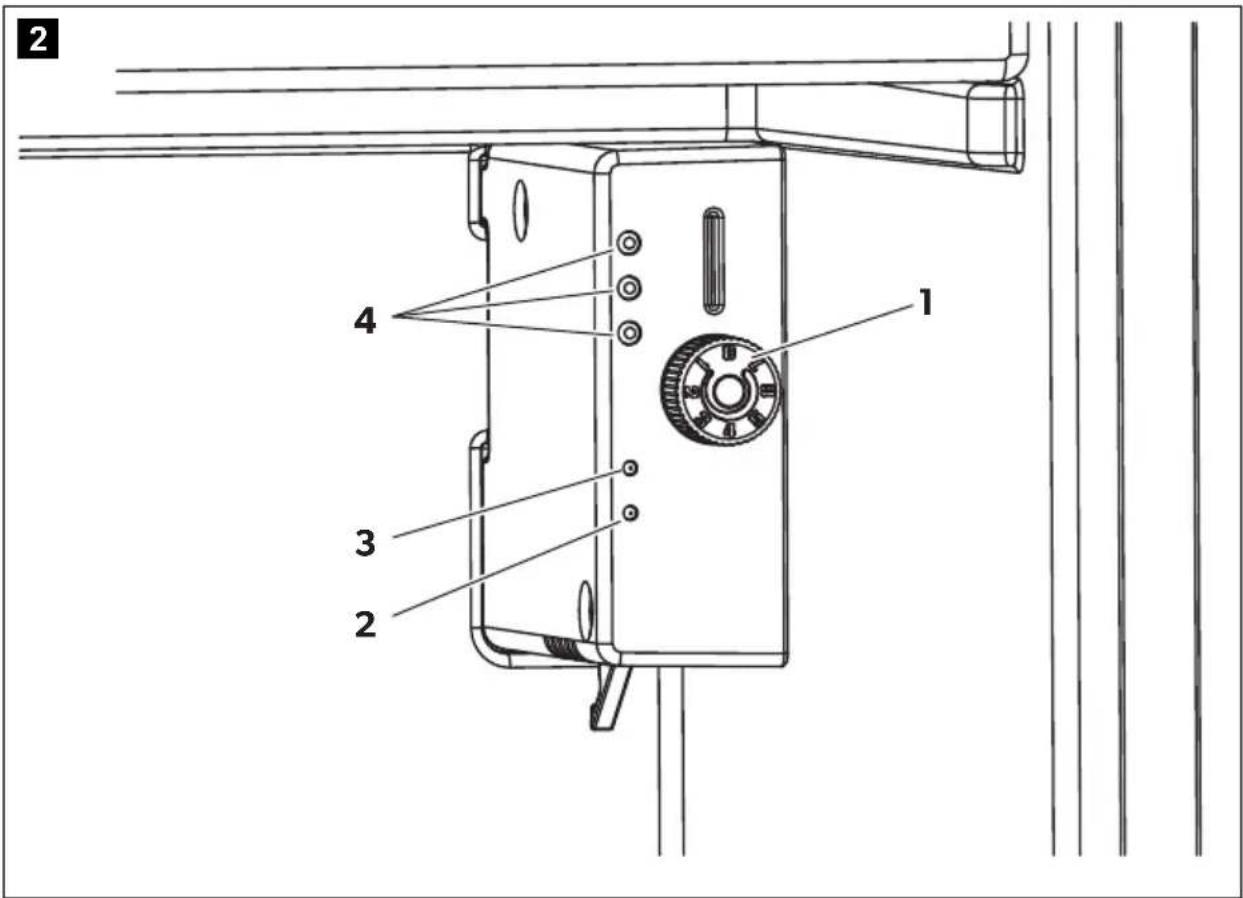
6.2 Control elements
No. in fig. 2, page 3 Explanation
1 Temperature controller
2 Green LED: operation
3 Red LED: fault
4 Interior lighting
7 Installing and connecting the refrigerator

NOTICE! Safety instructions for installation on boats
Please note the following instructions for installation on boats:
- The refrigerator is designed for short-term heeling of up to 30^ . When setting up the refrigerator, note that it must be fastened to take account of this. If you have any questions regarding installation, consult your specialist dealer.
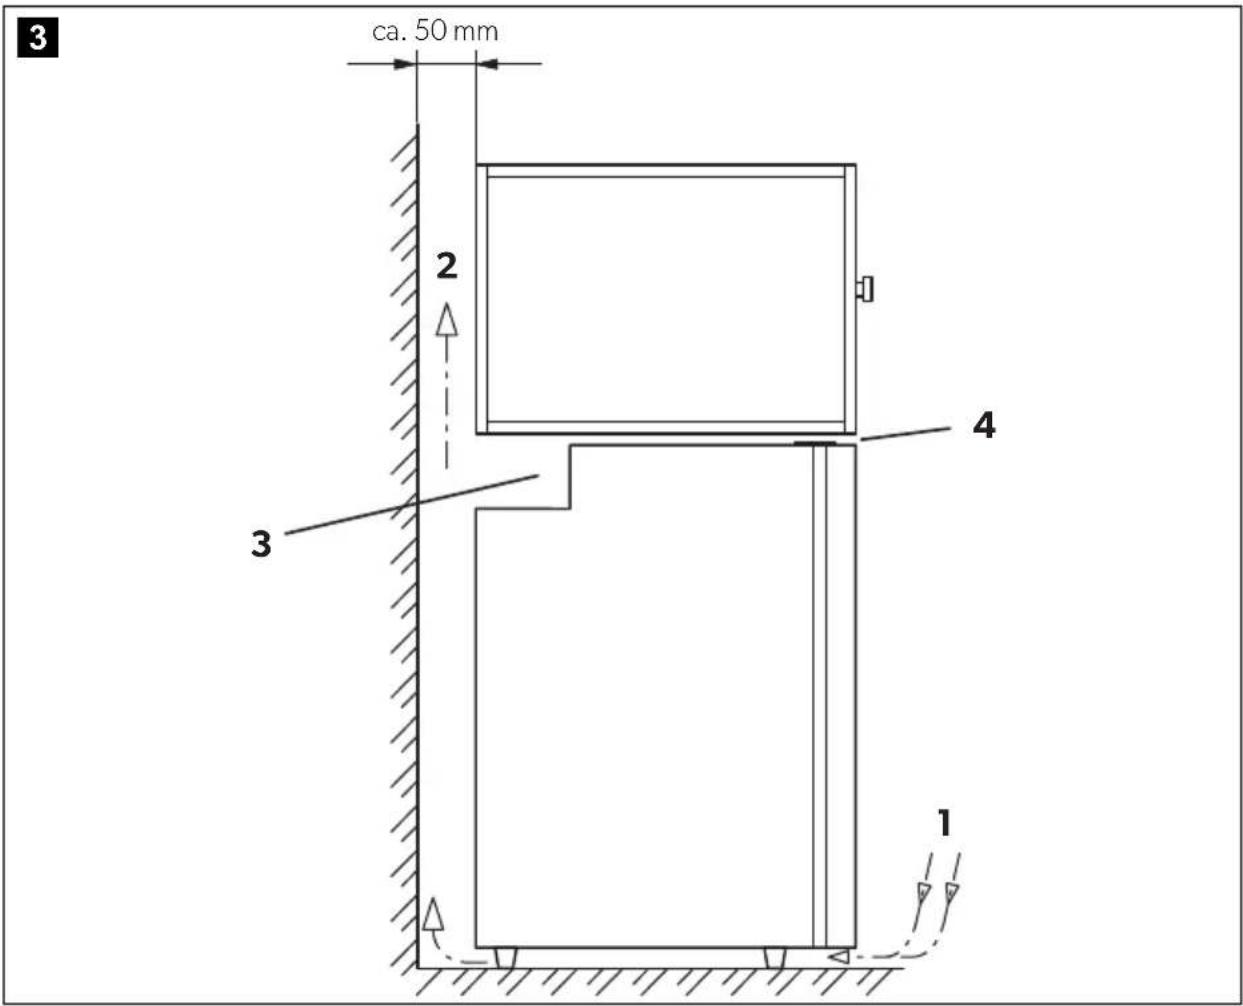
- Install the refrigerator so that the warm air produced can easily flow away (either upwards or to the sides, fig. 3, page 4).
- The refrigerator is designed for ambient temperatures between +16 °C and +38 °C.
- If the refrigerator is powered by the mains, ensure that the power supply has a residual current circuit breaker.
7.1 Installing the refrigerator

NOTICE!
- Fasten the refrigerator as described in the operating manual to prevent hazards.
- Keep objects clear of openings in the housing or mounting structure (such as ventilation slots).
- The refrigerator is only suitable for installation in a fitted niche. Once it is installed, only the front of the refrigerator may be accessible.
- If brakes are applied fully, then strong forces act in the direction of travel. In order to prevent damage to the refrigerator and the vehicle interior, the refrigerator should not be installed with the front facing the direction of travel.
The refrigerator is designed for ambient temperatures between +16 °C and +38 °C. In continuous operation, the air humidity may not exceed 90 %.
Set up the refrigerator in a dry, sheltered place. Avoid placing it near heat sources such as radiators, gas ovens, hot water pipes etc.
Install the refrigerator so that the warm air produced can easily flow away (either upwards or to the sides). Therefore make sure there is adequate ventilation (fig. 3, page 4).
| No. in fig. 3, page 4 | Explanation |
| 1 Cold intake air | |
| 2 Hot waste air | |
| 3 Condenser | |
| 4 Spacing above the refrigerator if insufficient air can circulate above or at the side | |
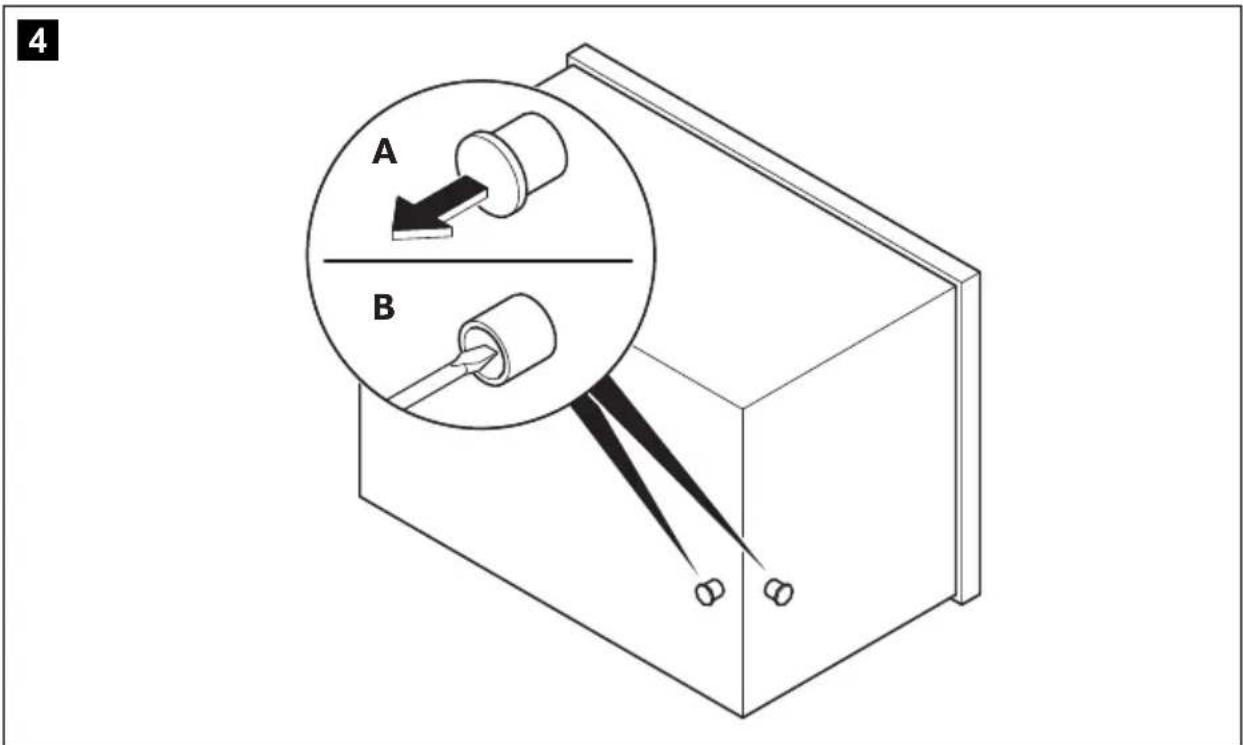
The condensation which forms during normal operation of the refrigerator can be drained off via two outlets on the refrigerator. For delivery purposes, these outlets are sealed. The two outlets are located on the rear and on the underside of the refrigerator (fig. 4, page 4).
▶ Choose the condensation outlet most suitable for the place of installation and remove its cap.
▶ Insert a sharp object (e.g. a screwdriver) approx. 25 to 30 mm into the outlet to pierce open the inside of the refrigerator.
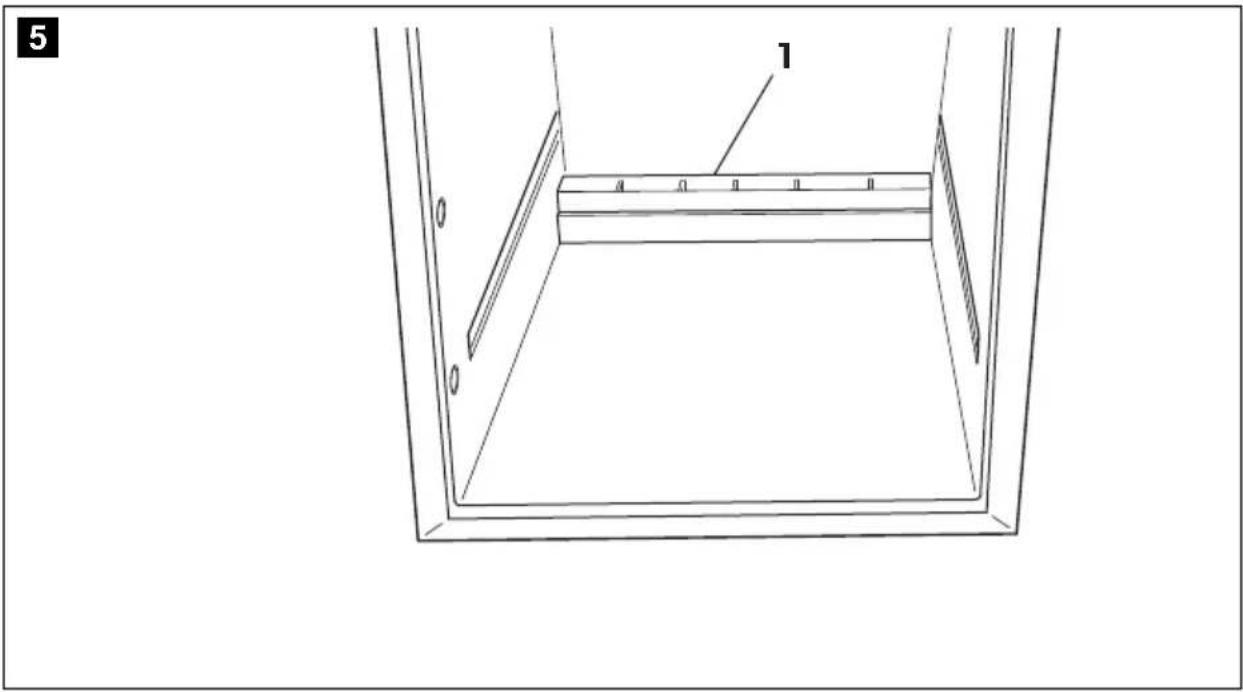
▶ Remove the drip-tray (fig. 5 1, page 5).
▶ Connect a hose (fig. 6 2, page 5) to the outlet connections (fig. 6 1, page 5).
7.2 Connecting the refrigerator
Connect the refrigerator to DC power
The refrigerators can be operated with 12 V--- or with 24 V---.

NOTICE!
To avoid voltage drops and loss of performance, keep the cable as short as possible and avoid joins.
For this reason avoid additional switches, plugs or multi-way adapters.
▶Determine the required cross section of the cable in relation to the cable length according to fig. 7, page 5.
Key for fig. 7, page 5
Co-ordinate axis Explanation Unit
| I Cable length m | |
| ∅ Cable cross section | mm^2 |

NOTICE!
Make sure that the polarity is correct.
▶ Before starting up the refrigerator for the first time, check whether the operating voltage and the battery voltage match (see type plate).
▶Connect the refrigerator
– as directly as possible to the poles of the battery or
-to a 12 or 24 V=socket.
Fit a fuse in the positive wire of 15 A (for 12 V) or 7.5 A (for 24 V) (fig. 8 1, page 6).
▶ Connect the red cable (fig. 8 rt, page 6) to the positive terminal of the battery.
▶ Connect the black cable (fig. 8 sw, page 6) to the negative terminal of the battery.

NOTICE!
Disconnect the refrigerator and other electric loads from the battery before connecting the battery to a quick charging device.
Overvoltage can damage the refrigerator electronics.
For safety reasons the refrigerator is equipped with an electronic system to prevent the polarity being reversed. This protects the refrigerator against reversed polarity when connecting to a battery and against short circuiting. To protect the battery, the refrigerator switches off automatically if the voltage is insufficient (see table below).
12 V 24 V
Cut-off voltage 10.4 V 22.8 V
Cut-in voltage 11.7 V 24.2 V
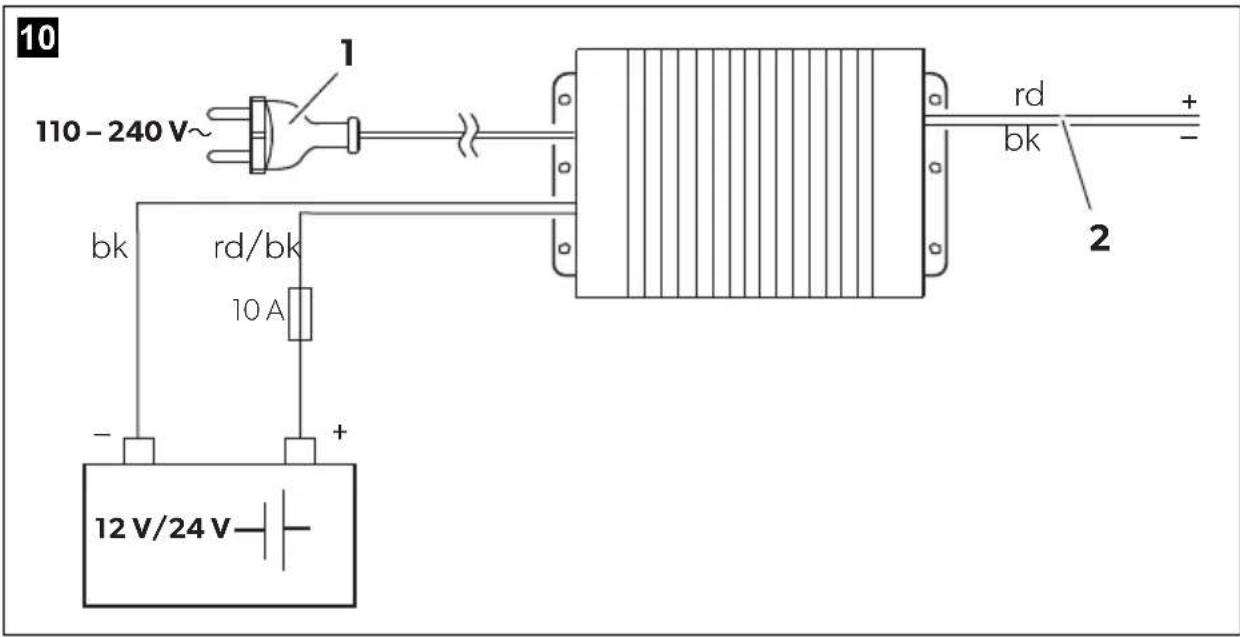
Connecting the refrigerator to AC power (accessory)
D
DANGER! Danger of fatal injury!
- Never handle plugs and switches with wet hands or if you are standing on a wet surface.
- If you are operating your refrigerator on board a boat with a mains connection of 230 V using a shore connection, you must install a residual current circuit breaker between the 230 V mains supply and the refrigerator.
Seek advice from a trained technician.
You can connect the refrigerator to 100 – 240 V AC power if you use the MPS35 rectifier (accessory).
The MPS35 features a priority circuit which conserves the battery connected. When a 100 – 240 Vw mains connection is used, the rectifier automatically switches from battery to mains operation.
When disconnected from the 100 – 240 Vw mains supply, the rectifier automatically switches back to battery operation. Mains operation using the rectifier always takes priority over battery operation.
Proceed as follows when you connect the refrigerator to the AC supply:
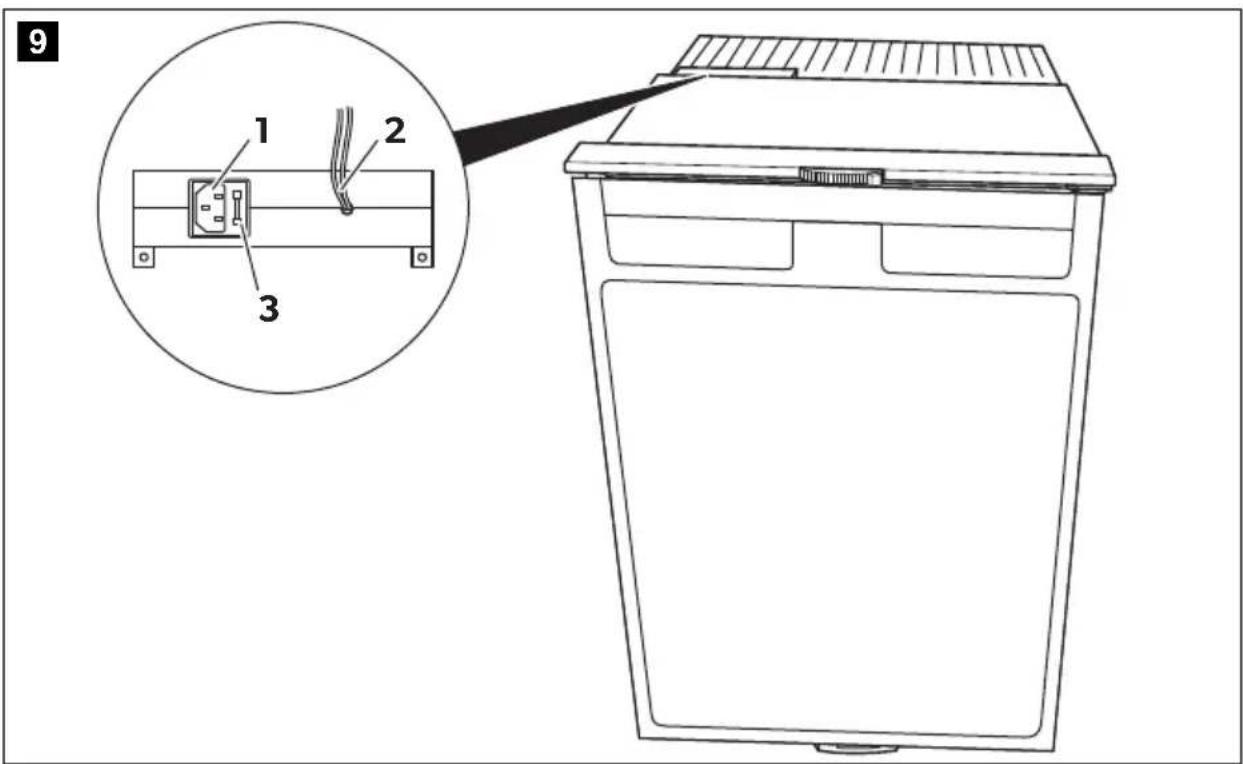
▶ Affix the rectifier in its intended position behind the refrigerator (fig. 9, page 6), as shown.
▶ Protect the AC circuit using a slow-blow fuse (250 V/4 A) (fig. 9 3, page 6).
▶ Connect the rectifier as shown in fig. 9, page 6.
▶ Connect the refrigerator to the rectifier (fig. 9 2, page 6):
- Red cable: positive battery terminal
- Black cable: negative battery terminal
▶ Plug the connector into the AC socket (fig. 9 1, page 6).
8 Using the refrigerator

NOTE
Before starting your new refrigerator for the first time, you should clean it inside and outside with a damp cloth for hygienic reasons (please also refer to the chapter "Cleaning and care" on page 22).
8.1 Energy saving tips
- Choose a well ventilated installation location which is protected against direct sunlight.
- Allow warm food to cool down first before placing it in the cooling device to keep cool.
- Do not open the cooling device more often than necessary.
- Do not leave the cooling device open for longer than necessary.
- Defrost your refrigerator as soon as a layer of ice forms.
- Avoid unnecessarily low temperature settings.
- Clean dust and dirt from the condenser at regular intervals.
8.2 Using the refrigerator
The refrigerator conserves fresh foodstuffs. The freezer compartment conserves frozen foodstuffs and freezes fresh foodstuffs.

NOTICE!
- Do not place any electrical devices inside the refrigerator. The only exceptions are devices approved for the purpose by the manufacturer.
- Ensure that food or liquids in glass containers are not excessively cooled. Liquids expand when they freeze and can thus destroy the glass containers.
- Food may only be stored in its original packaging or in suitable containers.
- Ensure that the objects placed in the refrigerator are suitable for cooling to the selected temperature.
▶ Switch the refrigerator on by turning the temperature control (fig. 2 1 page 3) clockwise.

NOTE
After switching on, the refrigerator requires approx. 60 s until the compressor starts up.
Setting the temperature
You can set the temperature to any level using the control knob.
▶ Switch the refrigerator on by turning the temperature control (fig. 2 1 page 3) clockwise.
The built-in thermostat regulates the temperature as follows:
- 1=least cooling
- 7 = most cooling

NOTE
The cooling capacity can be influenced by:
• the ambient temperature
• the amount of food to be conserved
- the frequency with which the door is opened.
Conserving foodstuffs
You can conserve foodstuffs in the refrigerator. The time for which the food can be conserved in this way is usually stated on the package.

NOTICE!
Do not conserve warm food in the refrigerator.
Do not place glass containers containing liquid in the freezer compartment.

NOTE
Food which can easily absorb tastes and odours and liquids and products with a high alcohol content should be conserved in air-tight containers.
▶ Observe the temperature information and best before date on the food packaging.
▶Observe the following when using the refrigerator:
- Never re-freeze products which have started defrosting or have been defrosted, but consume them as soon as possible.
- Wrap food in aluminium foil or cling film and shut in in a suitable box with a lid. This ensures that aromas, the shape and the freshness will be better conserved.
Detaching the refrigerator drawer
▶Pull out the refrigerator drawer all the way.
▶Push the fastening lever up to release the lock.
▶Pull out the refrigerator drawer.
Detaching the freezer compartment
▶Open the flap of the freezer compartment and position horizontally.
▶Remove the chain from the attachment.
▶Take out the flap. The base of the compartment also comes out.
Defrosting the refrigerator
The refrigerator has two options to remove the condensation resulting from operation:
• pass it directly outside:
Remove the drip-tray (fig. 5 1, page 5).
• collect in the drip-tray:
Empty the drip-tray (fig. 5 1, page 5) as required.
Connect a hose (fig. 6 2, page 5) to the outlet connections (fig. 6 1, page 5).
Defrosting the freezer compartment

NOTICE!
Never use mechanical tools to remove ice or to loosen objects stuck to the refrigerator.
To defrost the refrigerator, proceed as follows:
▶Take the contents out.
▶ If necessary, place the contents in another cooling appliance, to keep them cool.
▶ Set the temperature control knob (fig. 2 1 page 3) to "0".
▶Leave the door open.
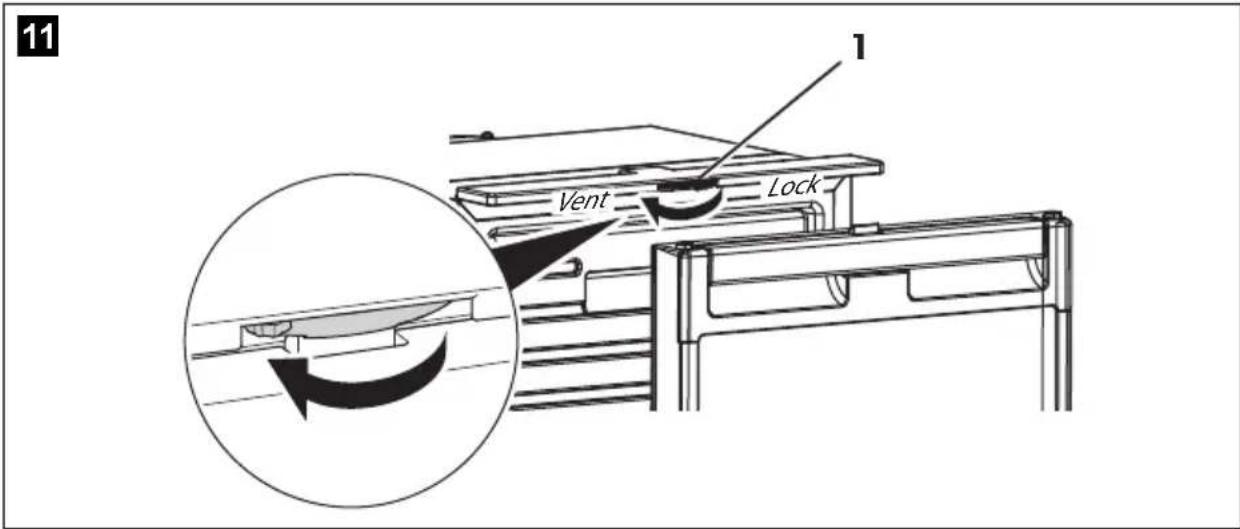
8.3 Undo the lock

NOTICE!
Only adjust the locking mechanism when the drawer is open. The unit will be damaged if this is adjusted when the drawer is closed.
The refrigerator has a locking mechanism (fig. 11 1, page 7) which is also used to protect it during transport. The following settings are possible:
- Lock (turn wheel clockwise all the way): The drawer is locked and secured.
To open the drawer, lift the handle up and lift the drawer out. - Vent (turn wheel anti-clockwise all the way): The drawer is slightly open, but fixed in position.
Use this position if you are not going to use the unit for a long time.
8.4 Switching off and storing the refrigerator
If you do not intend to use the refrigerator for a long time, proceed as follows:
▶ Set the temperature control knob (fig. 2 1 page 3) to level "0".
The cooling unit is only switched off when you hear a click.
▶ Disconnect the power cable from the battery or pull the AC cable plug out of the rectifier.
▶ Clean the refrigerator (see chapter "Cleaning and care" on page 22).
▶ Turn the locking wheel (fig. 11 1, page 7) anti-clockwise to the end stop ("Vent").
▶Close the door until it latches in.
√The door stays open thus preventing smells from arising.
9 Cleaning and care
WARNING!
Always disconnect the refrigerator from the mains before you clean and service it.

NOTICE! Risk of damage
- Never clean the refrigerator under running water or in dish water.
- Do not use abrasive cleaning agents or hard objects during cleaning as these can damage the refrigerator.
- Never use hard or pointed tools to remove ice or to loosen objects which have frozen in place.
▶As soon as the refrigerator becomes dirty, clean it with a damp cloth.
▶Make sure that no water drips into the seals. This can damage the electronics.
▶Wipe the refrigerator dry with a cloth after cleaning.
10 Guarantee
The statutory warranty period applies. If the product is defective, please contact the manufacturer's branch in your country (see the back of the instruction manual for the addresses) or your retailer.
For repair and guarantee processing, please include the following documents when you send in the device:
• A copy of the receipt with purchasing date
- A reason for the claim or description of the fault
11 Disposal

WARNING! Children beware!
Before disposing of your old refrigerator:
- Dismantle the drawers.
- Leave the shelves in the refrigerator so that children cannot climb inside.
▶ Place the packaging material in the appropriate recycling waste bins wherever possible.
If you wish to finally dispose of the product, ask your local recycling centre or specialist dealer for details about how to do this in accordance with the applicable disposal regulations.
12 Troubleshooting
The meaning of the red LED (fig. 2 3, page 3)
For operational faults it illuminates several times. The number of pulses depends on the type of fault.
Each flash lasts for one quarter of a second. After the series of impulses a pause follows. The sequence for the fault is repeated every four seconds.
| Number of flashes | Fault Possible cause | |
| 1 Supply voltage | The supply voltage is outside of the set range. | |
| 2 Excessive fan current | The fan loads the electronics unit with more than 1 A. | |
| 3 The motor doesn't start | The rotor is jammed. | The pressure difference in the cooling system is too high (>5 bar). |
| 4 Speed too low | If the cooling system is overloaded, the minimum speed of the motor of 1850 RPM cannot be maintained. | |
| 5 Overheating of the electronics unit | If the cooling system is loaded too heavily or the temperature is set too high, the electronics can overheat. | |
Interior temperature too low in control level "1"
| Fault Possible cause Remedy | ||
| Compressor runs constantly | Faulty thermostat Change the thermostat | |
| Compressor runs for a long time | Large quantities have been frozen in the freezer compartment | - |
Compressor does not run (battery connection)
| Fault Possible cause Remedy | ||
| U_Term=0V There is an int | erruption in the connection between the battery and the - electronics | Establish a connection |
| Main switch faulty (if installed) Replace | the main switch | |
| Additional supply line fuse has blown (if installed) | Replace the supply line fuse | |
| U_Term ≤ U_ON | Battery voltage is too low Charge the battery | |
| Start attempt with U_Term ≤ U_OFF | Loose cablesPoor contact (corrosion) | Establish a connection |
| Battery capacity too low Replace the battery | ||
| Cable cross section too small Replace | the cable (fig. 7, page 5) | |
| Start attempt with U_Term ≥ U_ON | Ambient temperature too high - | |
| Insufficient ventilation and/or air supply | Move the refrigerator to another location | |
| Condenser is dirty Clean the condenser | ||
| Electric circuit between the pins in the compressor interrupted | Defective compressor This can only be | repaired by an authorised customer services unit. |
U_Term Voltage between the positive and negative terminals of the electronics
U_ON Cut-in voltage of the electronics
U_OFF Cut-off voltage of the electronics
Compressor is not running (connected to AC supply)
| Fault Possible cause Remedy | ||
| No voltage Interruption in | the supply cable Establish a connection | |
| Main switch faulty (if installed) Replace | the main switch | |
| Additional supply line fuse has blown (if installed) | Replace the supply line fuse | |
| Voltage is present but the compressor doesn't run | Ambient temperature too high – | |
| Insufficient ventilation and/or air supply | Move the refrigerator to another location | |
| Condenser is dirty Clean the condenser | ||
| Electric circuit between the pins in the compressor interrupted | Defective compressor This can only be | repaired by an authorised customer services unit. |
Poor cooling, interior temperature increases
| Fault Possible cause Remedy | ||
| Compressor runs for a long time/continuously | Ambient temperature too high – | |
| Insufficient ventilation and/or air supply | Move the refrigerator to another location | |
| Condenser is dirty Clean the condenser | ||
| Faulty fan Replace the fan | ||
| Compressor runs intermittently | Battery capacity exhausted Charge the battery |
Unusual noises
| Fault Possible cause Remedy | ||
| Loud humming A component of the refrigerant circuit cannot move freely (touching the wall) | Bend the component carefully away from the obstruction | |
| Foreign body jammed between the cooling unit and the wall | Remove the foreign body | |
| Fan noise – |
13 Technical data
| CoolMatic CRD0050 | |
| Supply voltage: | 12 V---/24 V--- |
| Rated current: 5.9 A at 12 V--- | 2.5 A at 24 V--- |
| Cooling capacity: | |
| Refrigerator compartment: | +2 °C to +12 °C |
| Freezer compartment: | -15 °C to -7 °C |
| Category: with freezer compartment: Category 5 (refrigerator with two star compartment) without freezer compartment: Category 1 (refrigerator with one or more storage compartments) | |
| Power consumption: 31.2 Ah/24h | |
| Capacity: | 46.7 l |
| Freezer compartment: | 6 l |
| Climatic class: ST | |
| Ambient temperature: +16 °C to +38 °C | |
| Relative humidity: maximum 90 % | |
| Short-term inclination: max. 30° | |
| Noise emission: 46 dBA | |
| Refrigerant quantity: | 55 g |
| CO2 equivalent: | 0.079 t |
| Global warming potential (GWP): | 1430 |
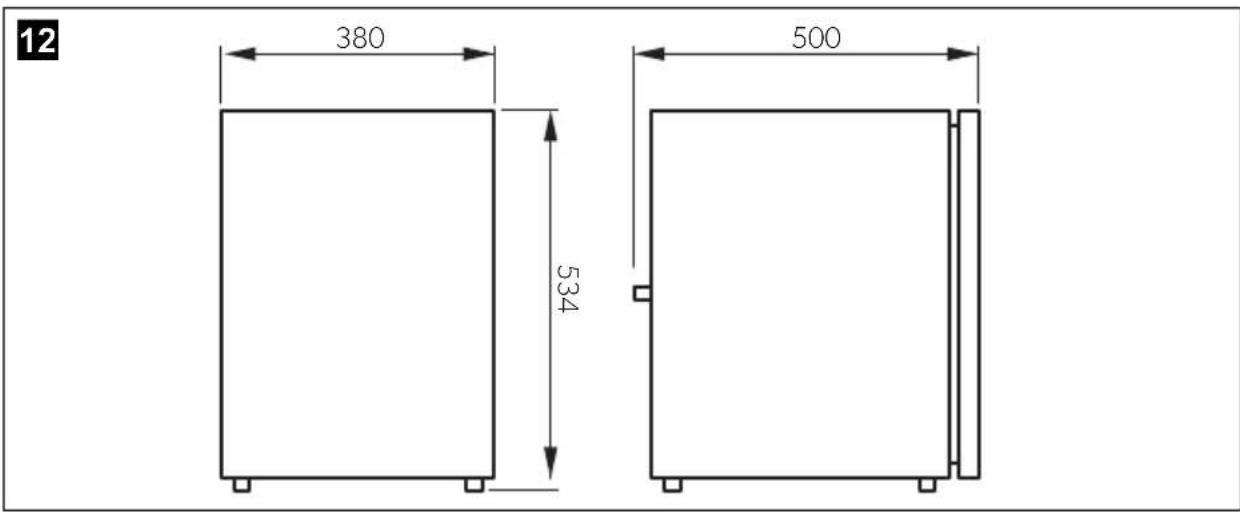
| Dimensions: | fig. 12, page 7 |
| Weight: | 19 kg |
| Test/certificates: |  |
The refrigerant circuit contains R134a.
Contains fluorinated greenhouse gases
Hermetically sealed equipment
6 Description technique
- Fare for overoppheting!
Avrime fryseromshyllen

PASS PÅ!
ADVARSEL! Farlig for barn!
Før ditt gamle kjøleskap skal avfallsbehandles:
Dometic Australia Pty. Ltd.
1 John Duncan Court
Varsity Lakes QLD 4227
1800 212121
+61 7 55076001
Mail: sales@dometic.com.au
AUSTRIA
Dometic Austria GmbH
Neudorferstraße 108
A-2353 Guntramsdorf
+43 2236 908070
+43 2236 90807060
Mail: info@dometic.at
BENELUX
Dometic Branch Office Belgium
Zincstraat 3
B-1500 Halle
+32 2 3598040
+32 2 3598050
Mail: info@dometic.be
BRAZIL
Dometic DO Brasil LTDA
Avenida Paulista 1754, conj. 111
SP 01310-920 Sao Paulo
+551132513352
+551132513362
Dometic Group Asia Pacific
Suites 2207-11 · 22/F · Tower 1
The Gateway · 25 Canton Road,
Tsim Sha Tsui · Kowloon
+852 2 4611386
+852 2 4665553
Mail: info@waeco.com.hk
HUNGARY
Dometic Zrt. Sales Office
Kerékgyártó u. 5.
H-1147 Budapest
+3614684400
+3614684401
Dometic Italy S.r.l.
Via Virgilio, 3
I-47122 Forlì (FC)
+39 0543 754901
+39 0543 754983
Mail: vendite@dometic.it
JAPAN
Dometic KK
Maekawa-Shibaura, Bldg. 2
2-13-9 Shibaura Minato-ku
Tokyo 108-0023
+81 3 5445 3333
+81354453339
Mail: info@dometic.jp
MEXICO
Circuito Médicos No. 6 Local 1
Colonia Ciudad Satélite
CP 53100 Naucalpan de Juárez
Estado de México
+52 55 5374 4108
+52 55 5393 4683
Mail: info@dometic.com.mx
NETHERLANDS
Dometic Benelux B.V.
Ecustraat 3
NL-4879 NP Etten-Leur
+31 76 5029000
+31 76 5029019
Mail: info@dometic.nl
NEW ZEALAND
Dometic New Zealand Ltd.
PO Box 12011
Penrose
Auckland 1642
+6496221490
+6496221573
Mail: customerservices@dometic.co.nz
NORWAY
Dometic Norway AS
∅sterøyveien 46
N-3232 Sandefjord
+47 33428450
+47 33428459
Mail: firmapost@dometic.no
POLAND
Dometic Poland Sp. z o.o.
Ul. Puławska 435A
PL-02-801 Warszawa
+48 22 414 3200
+48 22 414 3201
Mail: info@dometic.pl
PORTUGAL
Dometic Spain, S.L.
Komsomolskaya square 6-1
RU-107140 Moscow
+7 495 780 79 39
+7 495 916 56 53
Mail: info@dometic.ru
SINGAPORE
Dometic Pte Ltd
18 Boon Lay Way 06-140 Trade Hub 21
Singapore 609966
+65 6795 3177
+65 6862 6620
Mail: dometic@dometic.com.sg
SLOVAKIA
Dometic Slovakia s.r.o. Sales Office Bratislava
Nádražná 34/A
900 28 Ivánka pri Dunaji
/ +421 2 45 529 680
Mail: bratislava@dometic.com
SOUTH AFRICA
Dometic (Pty) Ltd.
Regional Office
South Africa & Sub-Saharan Africa
2 Avalon Road
West Lake View Ext 11
Modderfontein 1645
Johannesburg
+27114504978
+27114504976
Mail: info@dometic.co.za
SPAIN
Dometic Spain S.L.
Avda. Sierra del Guadarrama, 16
E-28691 Villanueva de la Cañada
Madrid
+34 91 833 60 89
+34 900 100 245
Mail: info@dometic.es
SWEDEN
Dometic Scandinavia AB
Gustaf Melins gata 7
Dometic Switzerland AG
Riedackerstrasse 7a
CH-8153 Rümlang
+41 44 8187171
+41 44 8187191
Mail: info@dometic.ch
UNITED ARAB EMIRATES
Dometic Middle East FZCO
P.O.Box17860
S-D 6, Jebel Ali Freezone
Dubai
+97148833858
+97148833868
Mail: info@dometic.ae
UNITED KINGDOM
Dometic UK Ltd.
Dometic House, The Brewery
Blandford St. Mary
Dorset DT11 9LS
+44 344 626 0133
+44 344 626 0143
Mail: customerservices@dometic.co.uk
USA
Dometic RV Division
1120 North Main Street
Elkhart, IN 46515
+1574-264-2131