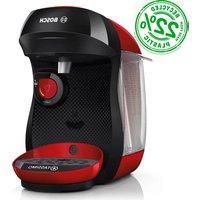
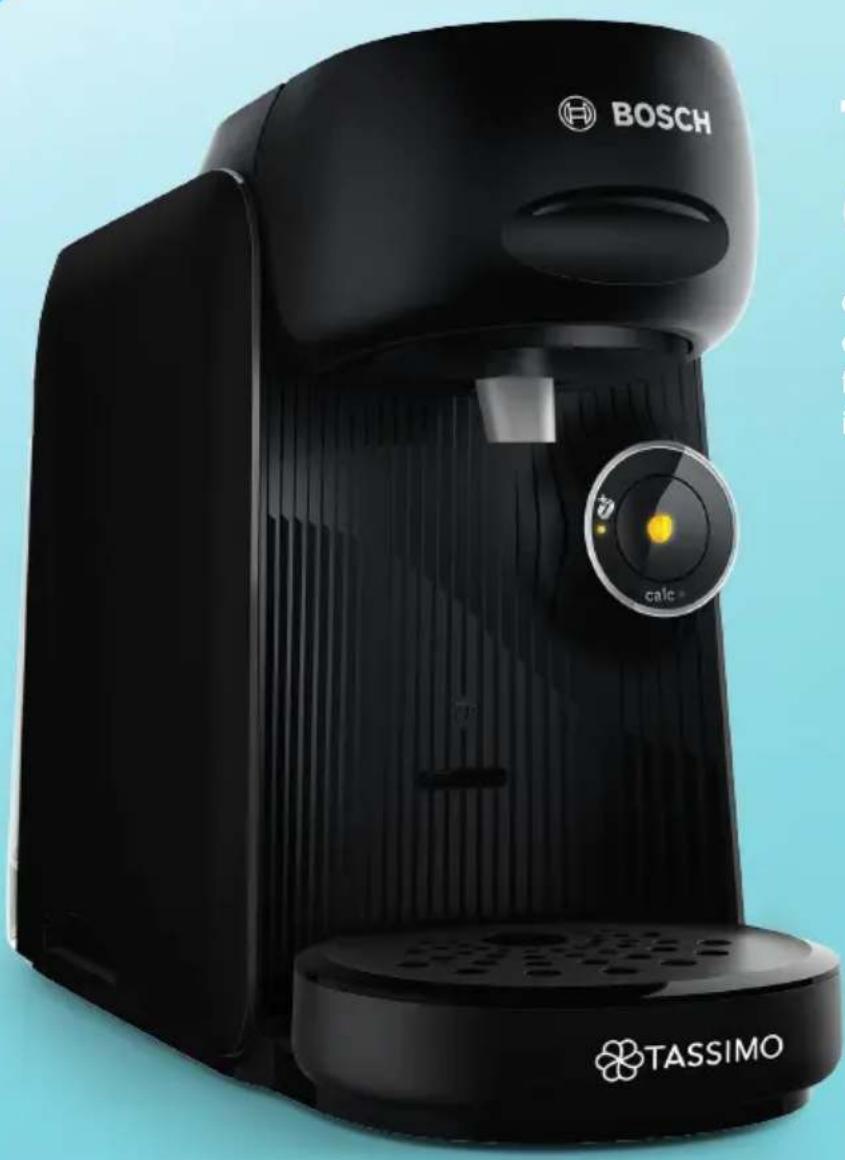
Tassimo Happy - Coffee machine BOSCH - Free user manual and instructions
Find the device manual for free Tassimo Happy BOSCH in PDF.

User questions about Tassimo Happy BOSCH
0 question about this device. Answer the ones you know or ask your own.
Ask a new question about this device
Download the instructions for your Coffee machine in PDF format for free! Find your manual Tassimo Happy - BOSCH and take your electronic device back in hand. On this page are published all the documents necessary for the use of your device. Tassimo Happy by BOSCH.
USER MANUAL Tassimo Happy BOSCH
natural_image
Abstract flower-like pattern composed of six colored petals on a blue background (no text or symbols)TASSIMO
finesse
friendly
natural_image
Black Bosch BOSCH self-service milk pump with TASSIMO branding, no visible text or symbols on the device itself.TAS16x GB/CH
de Gebrauchsanleitung en Information for Use fr Manuel d'utilisation it Manuale utente
text_image
QR code image containing encoded data, no visible human-readable text
[en] Scan the QR code or visit the website to open the Further Notices for Use. You can find additional information about your appliance or accessory here.
natural_image
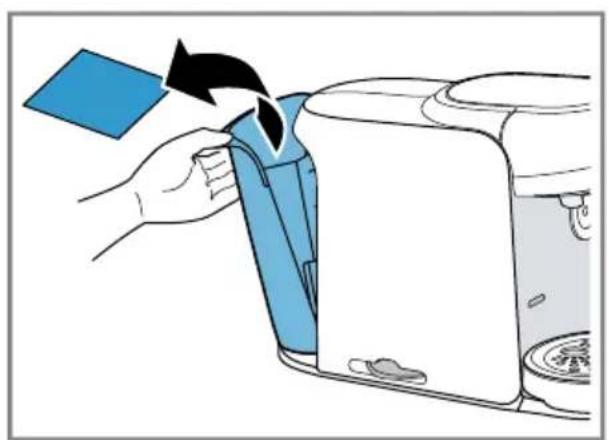
Illustration of a blue open box with black arrows indicating rotation or movement, no text or symbols present.2
natural_image
Illustration of a hand using a blue tool to clean or adjust a white appliance (no text or symbols visible)3
text_image
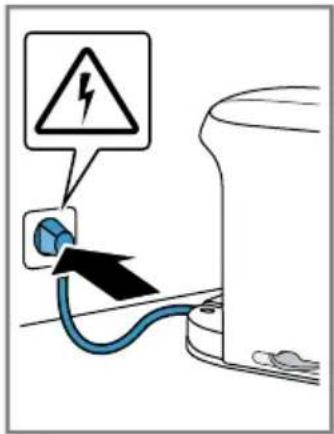
Diagram showing a blue plug inserted into a battery with a warning sign indicating electrical hazard.4
text_image
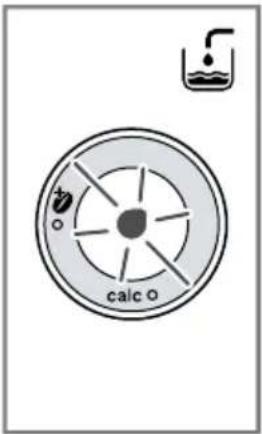
calc o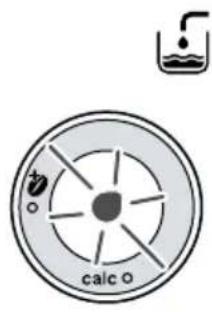
text_image
calc o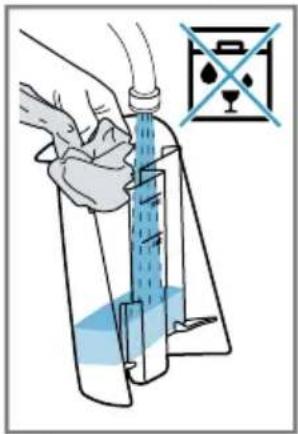
text_image
Diagram illustrating a hand pouring liquid into a container with a crosshair symbol indicating a stopcock or level.5
text_image
max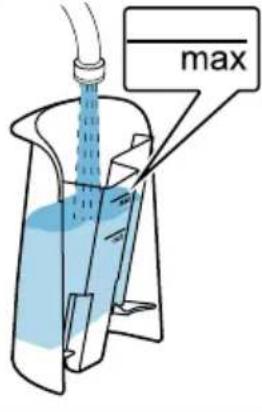
text_image
max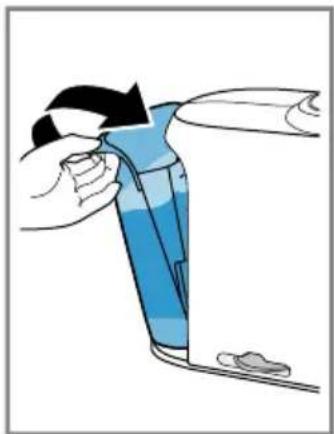
natural_image
Illustration of a hand holding a blue tool or device with a small object nearby (no text or symbols visible)6
text_image
calc o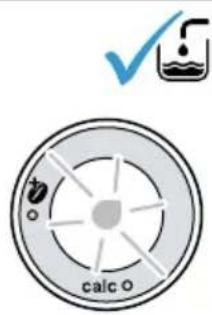
text_image
calc o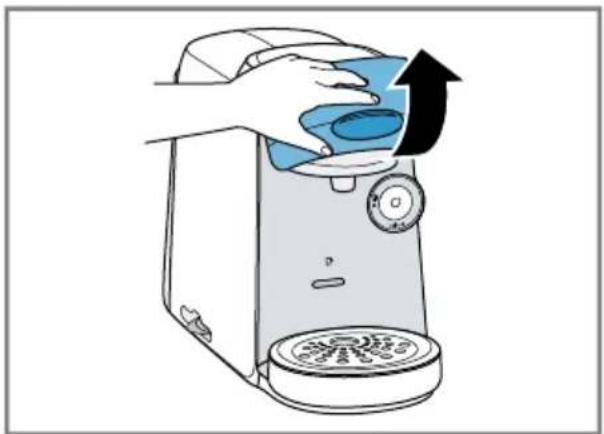
natural_image
Illustration of a hand pouring liquid into a digital washing machine (no text or symbols)7
text_image
Diagram illustrating a washing machine operation with checkmarks and X/√ symbols indicating selection or confirmation steps.8
natural_image
Illustration of a hand washing a blue appliance from a stainless steel kitchen machine (no text or symbols)9
text_image
CLICK[Non-Text]

text_image
min. 250 ml 9 fl.oz.10
flowchart
graph TD
    A["1: calc"] --> B["2: calc"]
    B --> C["3x"]
    C --> D["4: 3x"]
    D --> E["5: 3x"]
    E --> F["6: 3x"]
    F --> G["7: 3x"]
    G --> H["8: 3x"]
    H --> I["9: 3x"]
    I --> J["10: 3x"]
The image is too blurry to recognize any text content.
text_image
calc o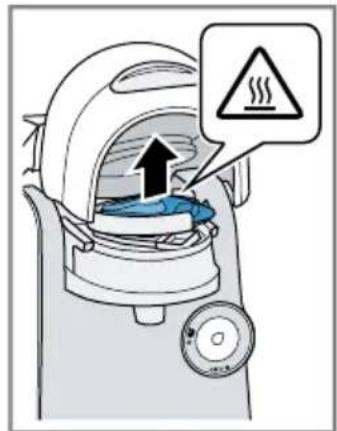
text_image
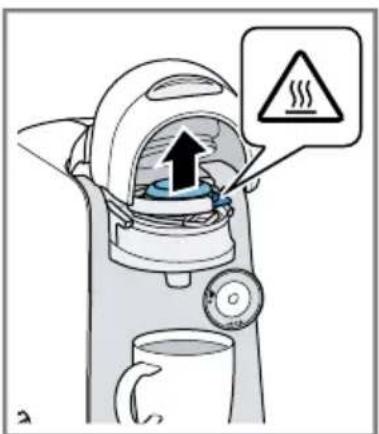
Diagram of a steam cooker with warning sign indicating heat release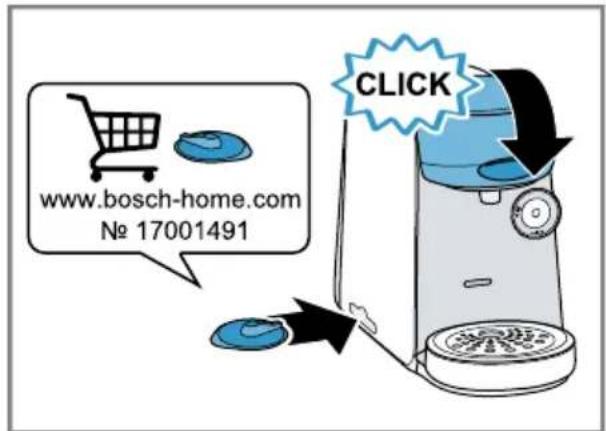
text_image
www.bosch-home.com No 17001491 CLICK12
natural_image
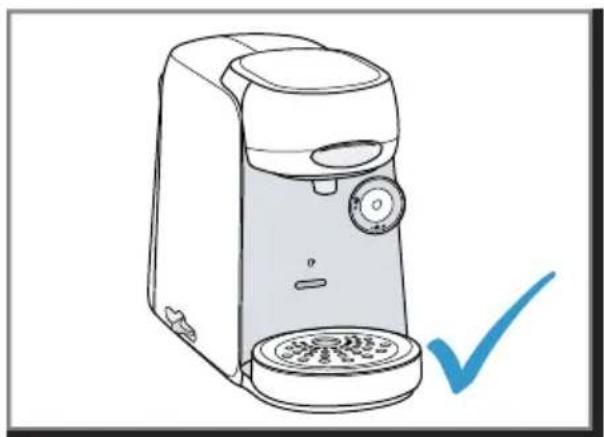
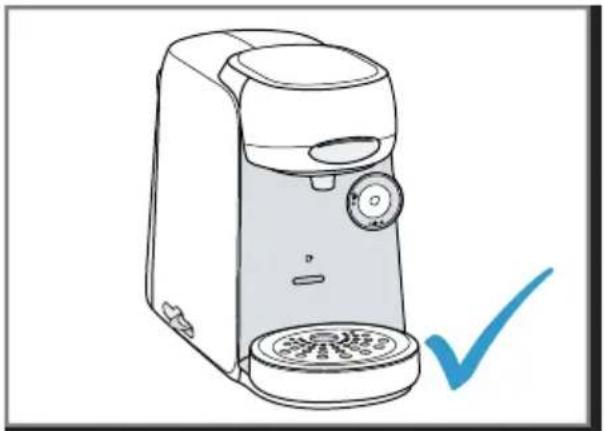
Line drawing of a coffee maker with a blue checkmark indicating inspection (no text or symbols)14

text_image
Diagram showing a cup and plug connected to a battery with warning symbol and text labels15
text_image
max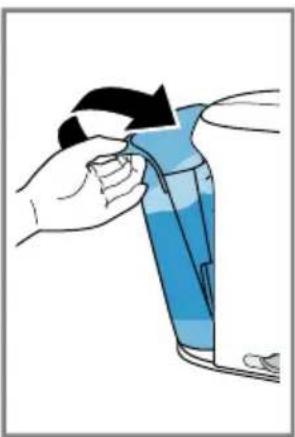
natural_image
Illustration of a hand holding a blue plastic container with a black handle, next to a smartphone (no text or symbols visible)16
text_image
Diagram illustrating the process of adding a blue liquid into a white blender, with three separate views showing different devices.The image is too blurry to recognize any text content.

natural_image
Illustration of a hand pouring blue liquid into a blue mug using a digital kitchen machine (no text or symbols)18
text_image
Illustration showing a hand using a coffee maker to adjust a coffee maker's size, with checkmarks indicating selection and cancellation.
text_image
CLICK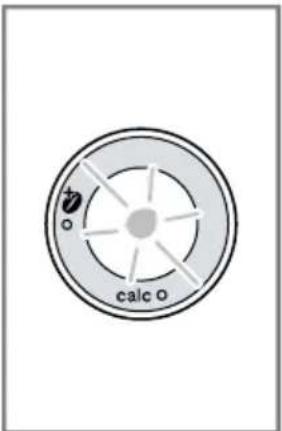
text_image
o calc o20
text_image
Standard calc
IntensityBoost


text_image
Diagram of a coffee maker with warning sign indicating heat release22
text_image
X calc oThe image is too blurry to recognize any text content.

text_image
Diagram illustrating the equivalence between a hand pressing a circular component and a coffee maker using a stop sign.24
text_image
Diagram showing a hand pressing a button on a circular device with pie chart icons for different devices.The image is too blurry to recognize any text content.

text_image
calc o26
text_image
Diagram of a coffee maker with warning sign indicating heat release, showing smoke and water flow arrows广力云智慧零售收银系统
natural_image
Illustration of a hand removing a trash bin into a trash can with a person symbol (no text or labels)27
natural_image
Line drawing of a handwashing machine with a mug and checkmark (no text or symbols)广力云智慧零售收银系统
text_image
Diagram showing food items including a trash bin, kitchen utensils, and a checkmark and cross symbol28
text_image
Safety warning diagram showing a hairbrush and plug with a warning symbol, next to an electric shock device.29
text_image
Diagram showing a handwashing device and its corresponding cleaning steps, with Chinese text labels.30
text_image
Diagram illustrating a washing machine operation with numbered steps and a blue safety symbol for cleaning.The image is too blurry to recognize any text content.

text_image
CLICK32
text_image
Safety warning illustration showing a blue mechanical component being adjusted to a circular button with a warning symbol and cross mark.The image is too blurry to recognize any text content.

text_image
CLICK CLICK34
natural_image
Illustration of two steps of cleaning a washing machine, showing hand placement and cleaning process (no text or symbols)The image is too blurry to recognize any text content.
flowchart
graph TD
    A["Start"] --> B["Step 1"]
    B --> C["Step 2"]
    C --> D["Step 3"]
    D --> E["End"]
text_image
CLICK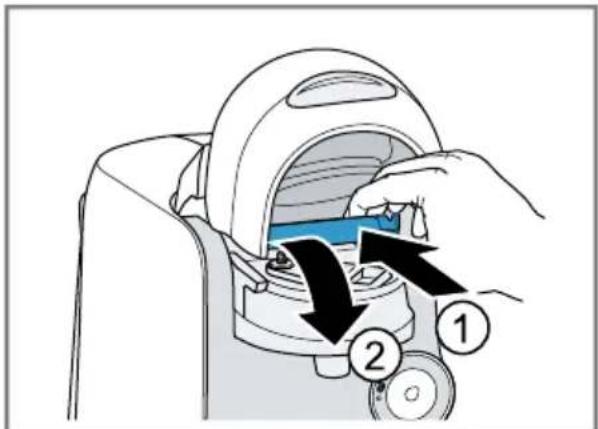
text_image
Diagram showing a hand inserting a device into a device with labeled parts 1 and 2, indicating a step in the process.36
text_image
Illustration showing a hand-drawn blender with a magnified view of its lid and a checkmark indicating removal or disassembly.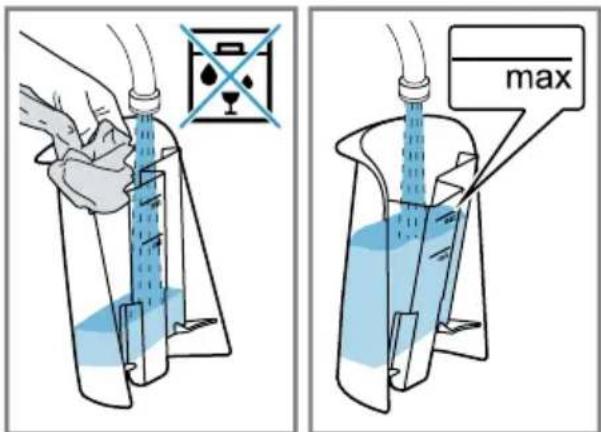
text_image
max38
text_image
Diagram illustrating a washing machine operation with checkmarks and X/XX labels indicating selection or confirmation steps.
text_image
CLICK min. 250 ml 9 fl.oz.40
text_image
Diagram showing a hand pressing a circular button with icons and text, indicating action or operation.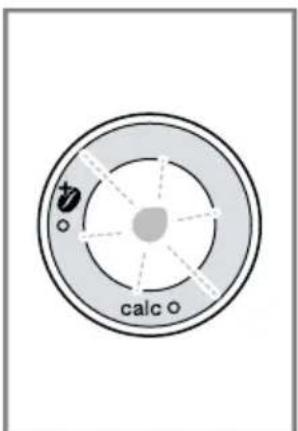
text_image
calc o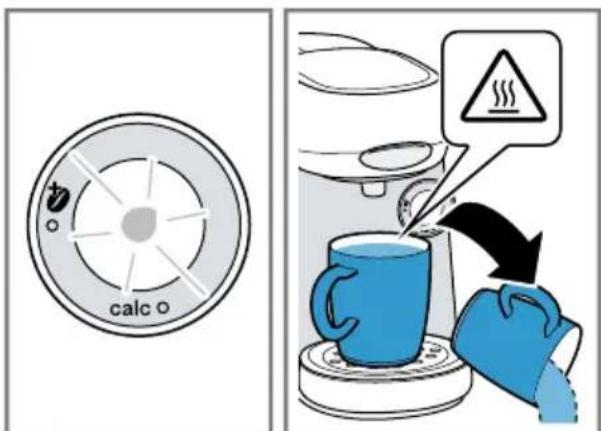
text_image
calc42
text_image
Diagram showing a device being tested with a warning sign and a checkmark indicating inspection or confirmation.44
text_image
calc calcm = 311

text_image
calc www.tassimo.com www.bosch-home.com No TCZ6004/ 00311909 No TCZ6008/ 0031224946
natural_image
Illustration of a hand washing a blue water dispenser into a white appliance (no text or symbols)The image is too blurry to recognize any text content.
text_image
Diagram illustrating a washing machine operation with checkmarks and X/√ symbols indicating selection or confirmation steps.48
text_image
CLICK min. 500 ml 17 fl.oz.The image is too blurry to recognize any text content.
text_image
5 s calc50
text_image
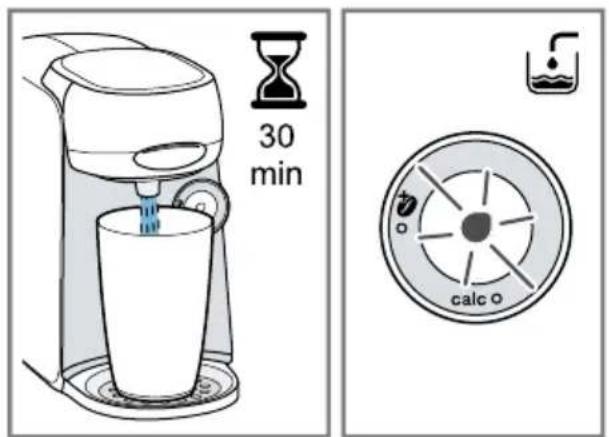
30 min calc oThe image is too blurry to recognize any text content.
text_image
Diagram showing a blue cup being poured into a machine with a warning sign indicating heat.52
text_image
maxThe image is too blurry to recognize any text content.
natural_image
Two-step illustration showing a hand pouring liquid into a container and a water dispenser with a glass (no text or symbols)54
flowchart
graph TD
    A["Step 1: Heating"] --> B["Step 2: Reaction"]
    B --> C["Reaction: 3x"]
    C --> D["Final Product: Blue Liquid with Heat Exchanger"]
The image is too blurry to recognize any text content.
text_image
calc o ↑ ↑ →56
text_image
CLICKThe image is too blurry to recognize any text content.
text_image
max58
natural_image
Line drawing of a modern hand mixer with a checkmark indicating inspection (no text or symbols present)59
Inhaltsverzeichnis
1 Sicherheit 12
1.1 General information 19
1.2 Intended use.... 19
1.3 Restriction on user group 19
1.4 Safety information.... 19
2 Overall view 21
2.1 Control panel 21
3 Performing initial start-up ...... 21
4 Operation.... 21
4.1 Preparing a drink.... 21
5 IntensityBoost.... 22
6 Cleaning and servicing 22
6.1 Dishwasher-safe components ..... 22
6.2 Cleaning the appliance .... 22
6.3 Descale the appliance.... 22
7 Troubleshooting...... 22
8 Technical specifications ...... 23
9 Disposing of old appliance...... 23
10 Customer Service.... 24

Safety
- Read this instruction manual carefully.
- Keep the instruction manual and the product information safe for future reference or for the next owner.
■ Do not connect the appliance if it has been damaged in transit. Only use this appliance:
■ for preparing hot drinks.
■ in private households and in enclosed spaces in a domestic environment.
■ up to an altitude of max. 2000 m above sea level.
This appliance may be used by children aged 8 or over and by people who have reduced physical, sensory or mental abilities or inadequate experience and/or knowledge, provided that they are supervised or have been instructed on how to use the appliance safely and have understood the resulting dangers.
Do not let children play with the appliance.
Children must not perform cleaning or user maintenance unless they are at least 8 years old and are being supervised.
Keep children under the age of 8 years away from the appliance and power cable.
- Keep packaging material away from children.
▶ Do not let children play with packaging material. - Keep small parts away from children.
▶ Do not let children play with small parts. - Connect and operate the appliance only in accordance with the specifications on the rating plate.
- Connect the appliance to a power supply with alternating current only via a properly installed socket with earthing.
- The protective conductor system of the domestic electrical installation must be properly installed.
▶ Never operate a damaged appliance.
▶ Never operate an appliance with a cracked or fractured surface.
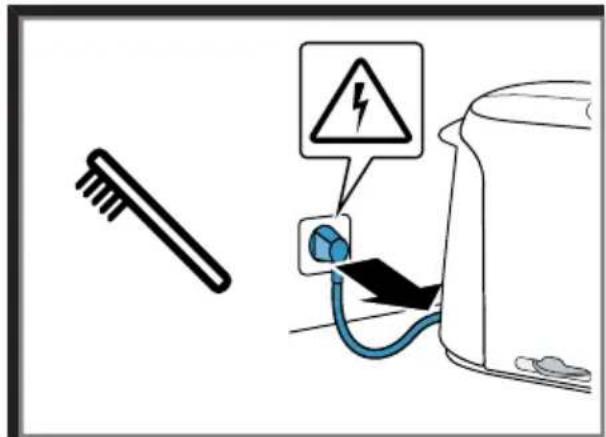
▶ Never pull on the power cord to unplug the appliance. Always unplug the appliance at the mains.
▶ If the appliance or the power cord is damaged, immediately unplug the power cord or switch off the fuse in the fuse box.
▶ Call customer services. → Page 24
en Safety
- Repairs to the appliance should only be carried out by trained specialist staff.
▶ Only use genuine spare parts when repairing the appliance.
If the power cord of this appliance is damaged, it must be replaced by the manufacturer, the manufacturer's Customer Service or a similarly qualified person in order to prevent any risk.
▶ Never immerse the appliance or the power cord in water. - Liquids must not be spilled on the appliance plug connection.
▶ Only use the appliance in enclosed spaces.
▶ Never expose the appliance to intense heat or humidity. - Do not use steam- or high-pressure cleaners to clean the appliance.
▶ Ventilate the appliance adequately.
▶ Never operate the appliance in a cabinet.
▶ Never leave the appliance unattended while it is switched on.
▶ Do not use extension cables or multiple socket strips.
▶ Only use adapters and power cords approved by the manufacturer. - If the power cord is too short and a longer one is not available, please contact an electrician to have the domestic installation adapted.
▶ Never open the brewing system during operation.
▶ Only use the original Tassimo T DISCs.
▶ Never use a damaged T DISC.
▶ Never use a drinks T DISC more than once.
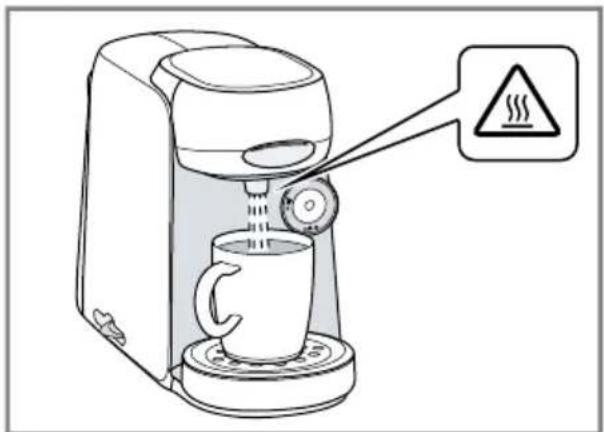
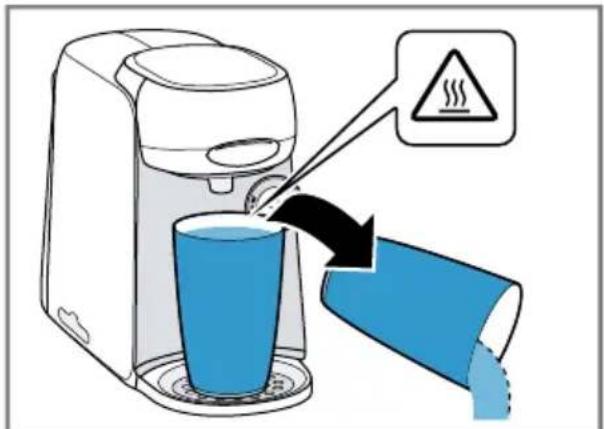
▶ Never touch hot appliance parts.
▶ After use, allow hot appliance parts to cool down before touching.
Leave drinks to cool down if necessary. -
Do not let escaping liquids or steam come into contact with your skin.
▶ To avoid injuries, only use the appliance for its intended purpose.
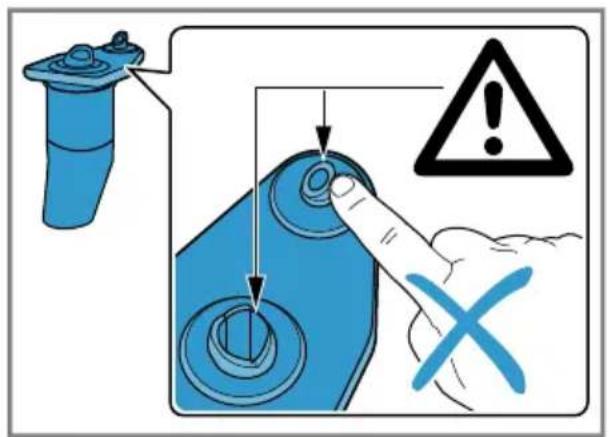
▶ Be careful of your fingers when inserting or cleaning the T DISC.
▶ People with electronic implants must stand at least 10 cm away from the appliance.
This minimum distance of 10 cm must also be observed for the water tank when removed. -
To ensure hygiene, follow the cleaning instructions for the appliance.
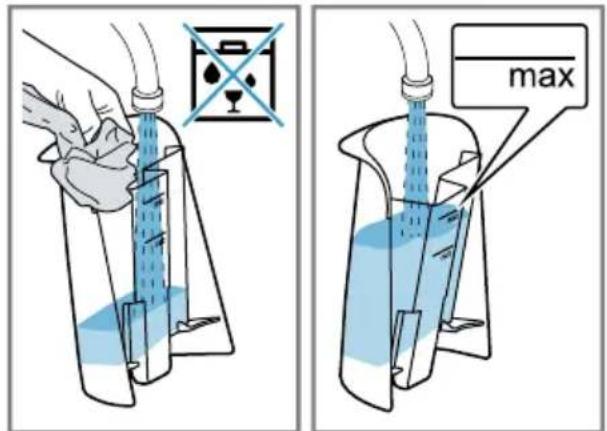
▶ Only ever use the appliance with fresh, cold, non-carbonated drinking water.
Overall view
You can find an overview of the parts of your appliance here.
Note: Individual details and colours may differ, depending on the appliance model.
→ Fig. 1
| 1 | Float |
| 2 | Calc mark |
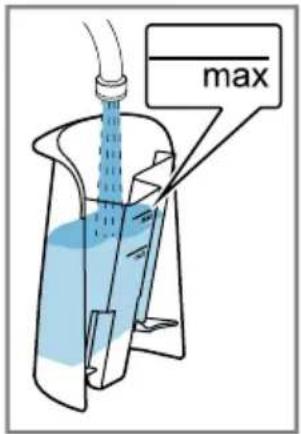
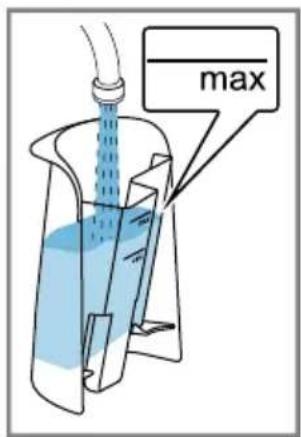
| 3 | Max mark |
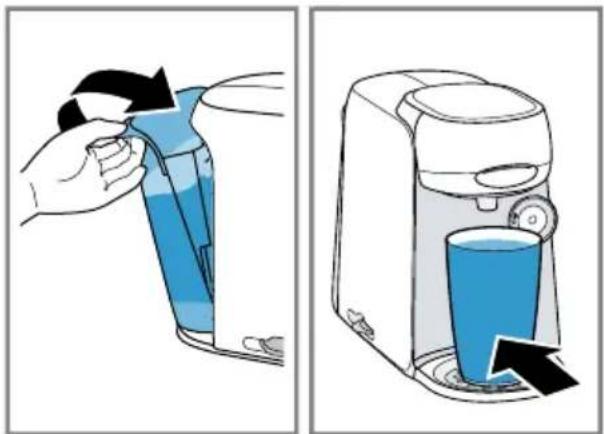
| 4 | Water tank |
| 5 | T DISC reading window |
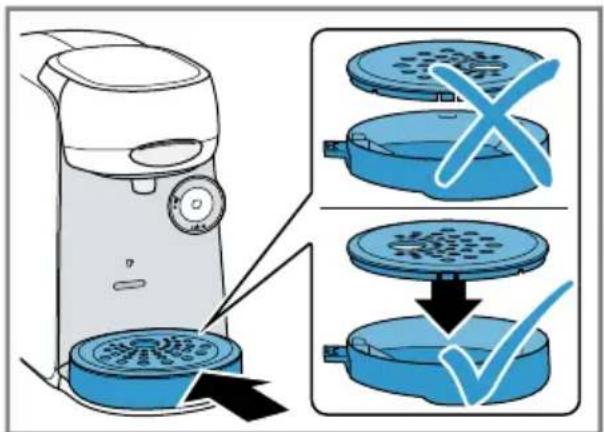
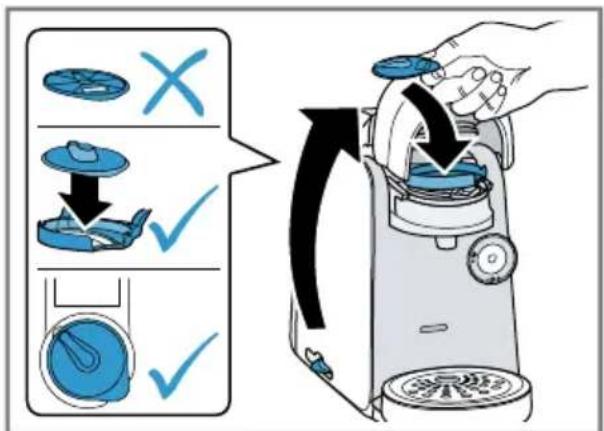
| 6 | T DISC piercing unit |
| 7 | T DISC holder |
| 8 | Lock |
| 9 | Brewing system |
| 10 | Control panel |
| 11 | Storage compartment |
| 12 | Bowl |
| 13 | Cup stand |
| 14 | Drip grate |
| 15 | Brief cleaning / descaling instructions |
| 16 | Service T DISC |
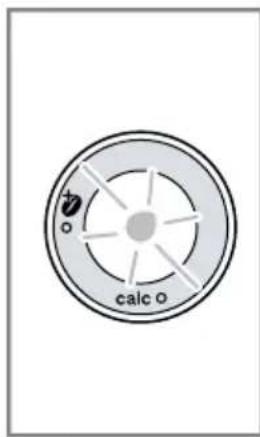
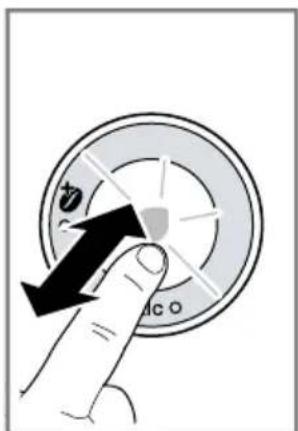
Control panel
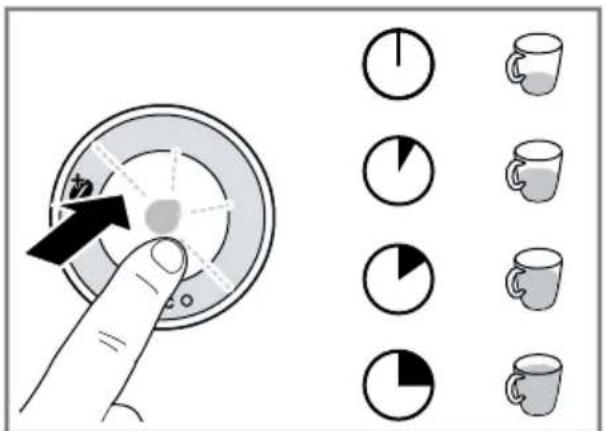
You can use the control panel to configure all functions of your appliance and to obtain information about the operating status.

■ Activate the appliance.
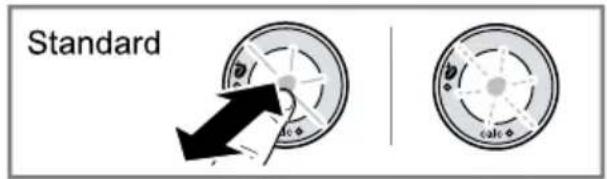
■ Start standard drinks dispensing.
■ Start IntensityBoost drinks dispensing.
■ Stop drinks dispensing.
| ■ Prolong drinks dispensing. | |
| LED lights up yellow, appliance is ready for use. | |
| LED flashes yellow, drinks dispensing is running. | |
| LED lights up red, fill water tank. | |
| LED lights up yellow, Intensity-Boost is activated. | |
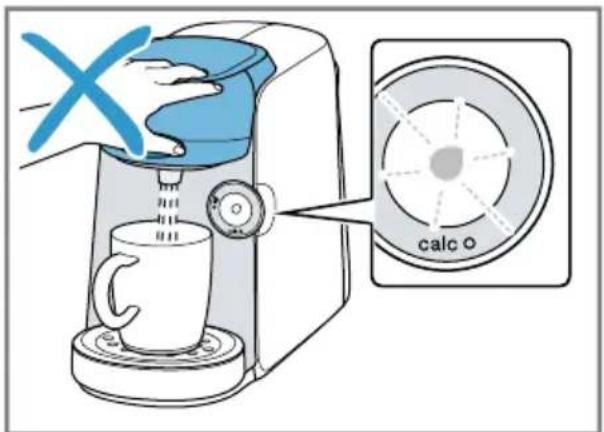
| calc ○ | LED lights up or flashes red, appliance needs to be descaled or descaling programme is running. |
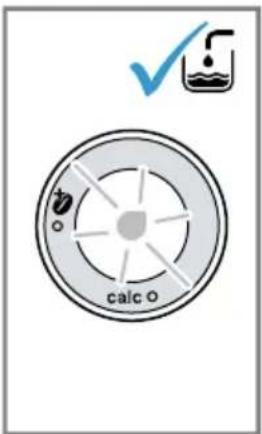
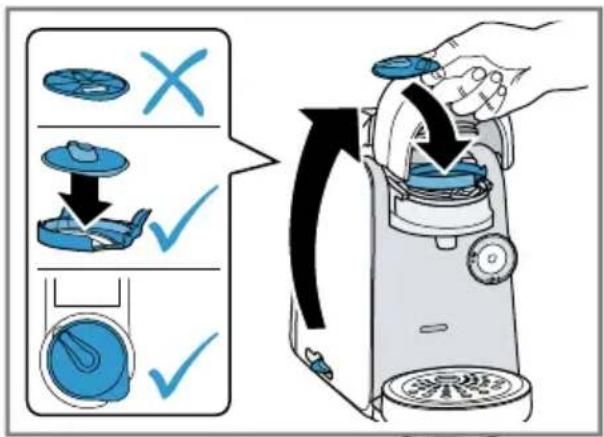
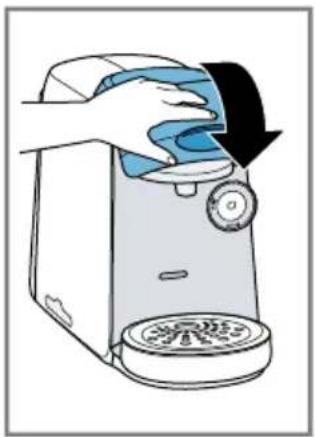
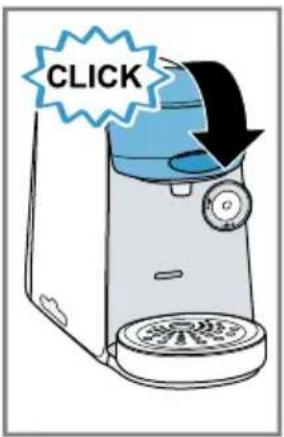
Performing initial start-up
Follow the pictorial instructions at the start of these instructions.
→ Fig. 2 - 14
Note: You can prepare a wide range of hot beverages with the multiple hot drinks machine. When you insert a T DISC, the scanner reads the barcode and controls the flow of hot water automatically.
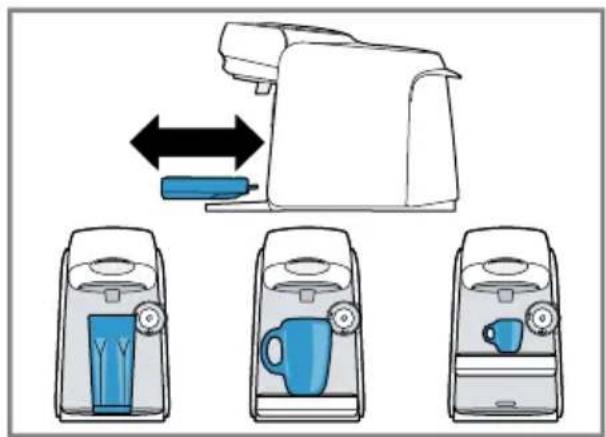
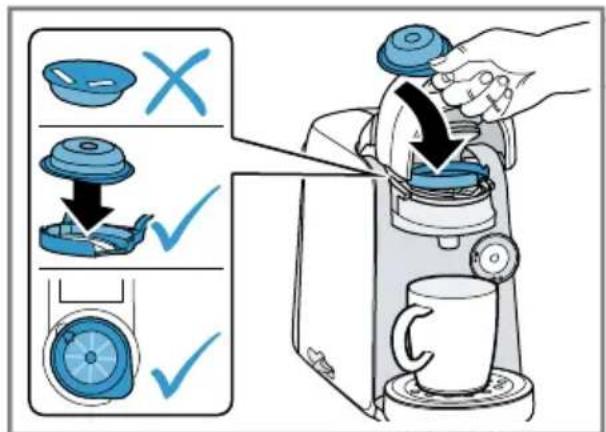
Operation
Preparing a drink
Find out how to prepare a drink of your choice. Follow the pictorial instructions at the start of these instructions.
→ Fig. 15 - 27
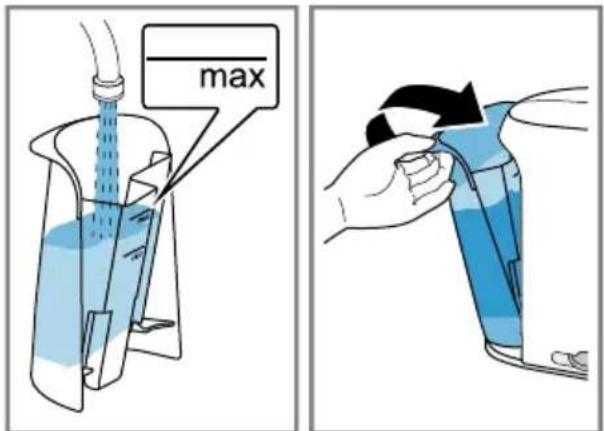
Note: Fill the water tank each day with fresh, cold, non-carbonated water.
Tips
■ Do not use chemically decalcified water.
■ You can also pre-heat cups before dispensing using hot water.
■ To interrupt the dispensing process, briefly press
■ To prolong dispensing, press and hold ⓞ until the required quantity is reached.
IntensityBoost
To obtain coffee with a stronger flavour, press ⓞ button for 3 seconds. The LED lights up and your appliance automatically adjusts the brewing process.
Cleaning and servicing
To keep your appliance working efficiently for a long time, it is important to clean and maintain it carefully.
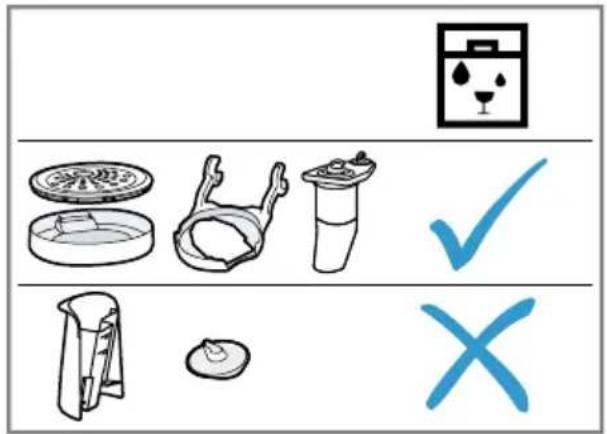
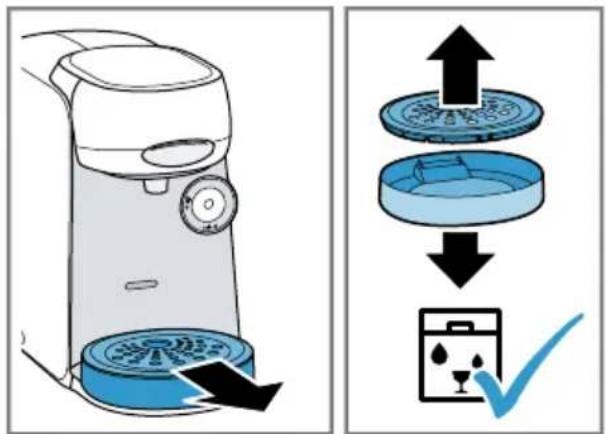
Dishwasher-safe components
Here you can find an overview of the components you can clean in the dishwasher.
→ Fig. 28
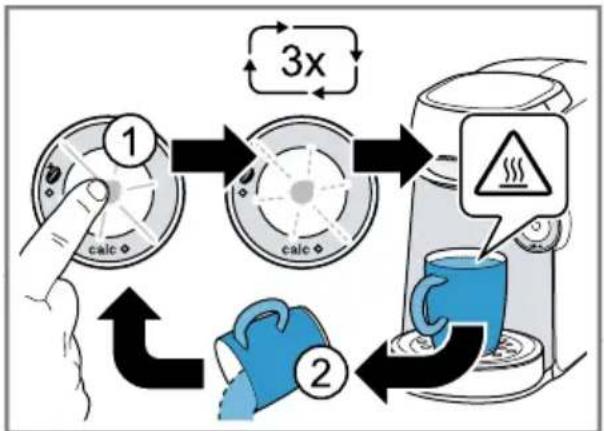
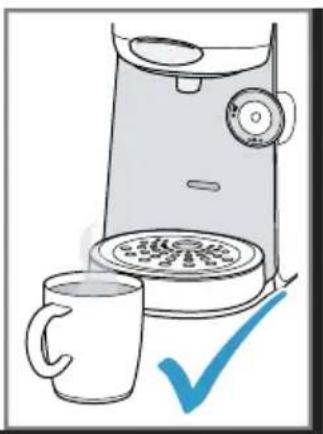
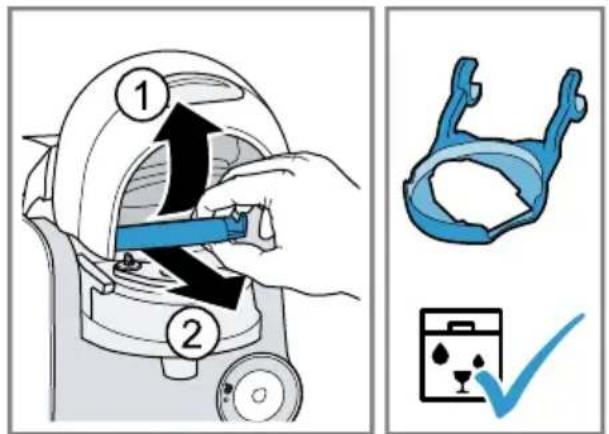
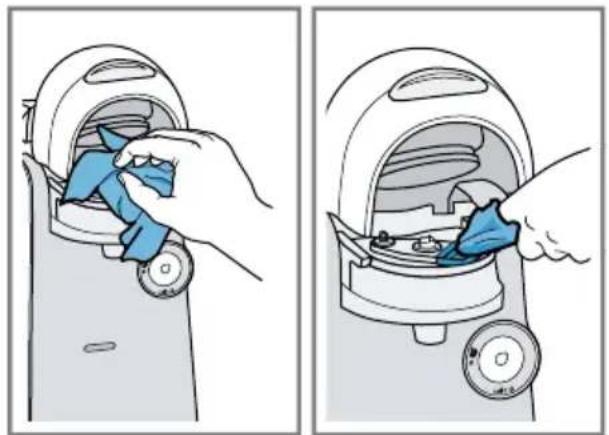
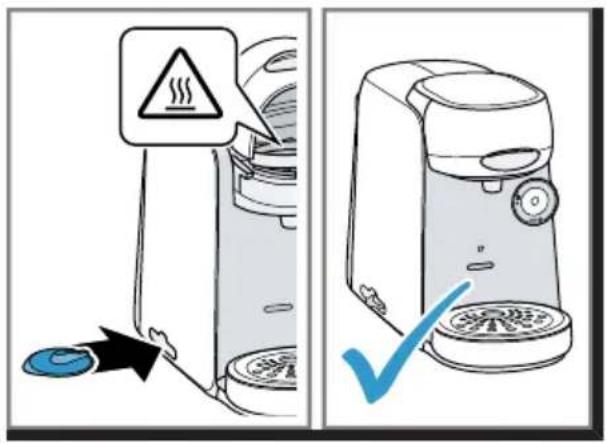
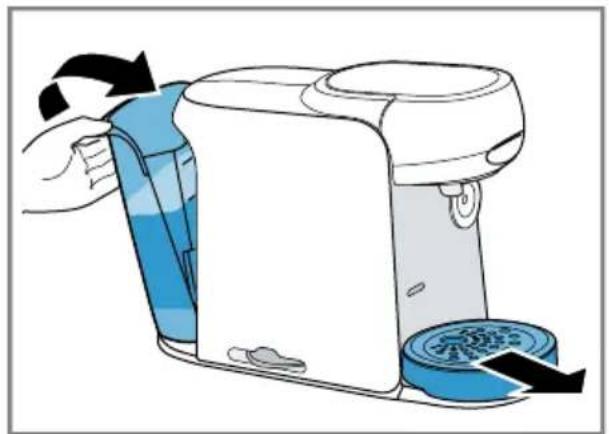
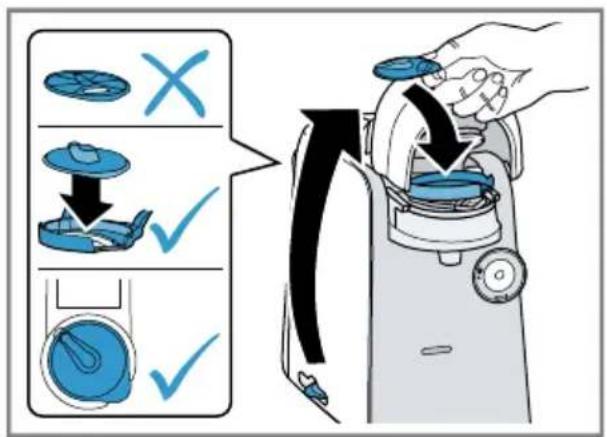
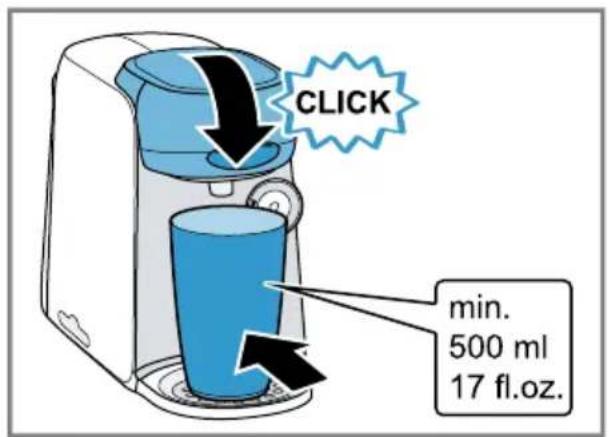
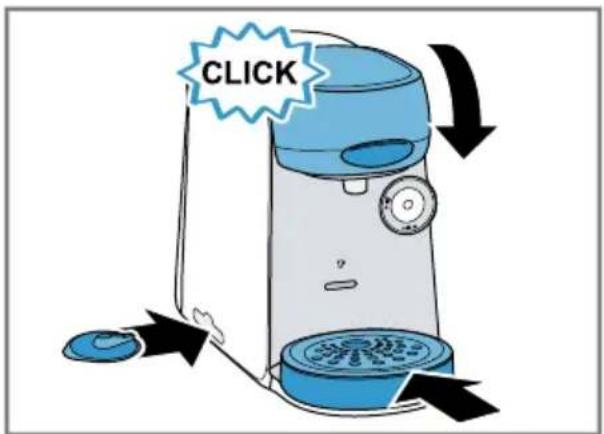
Cleaning the appliance
Follow the pictorial instructions at the start of these instructions.
→ Fig. 29 - 44
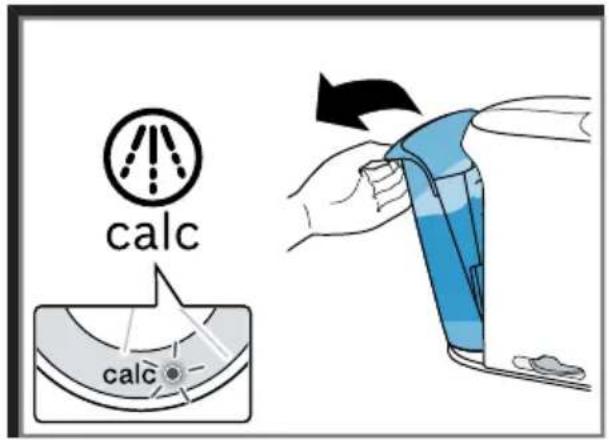
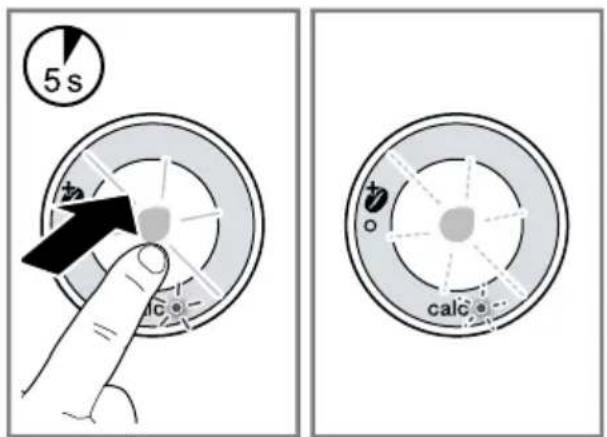
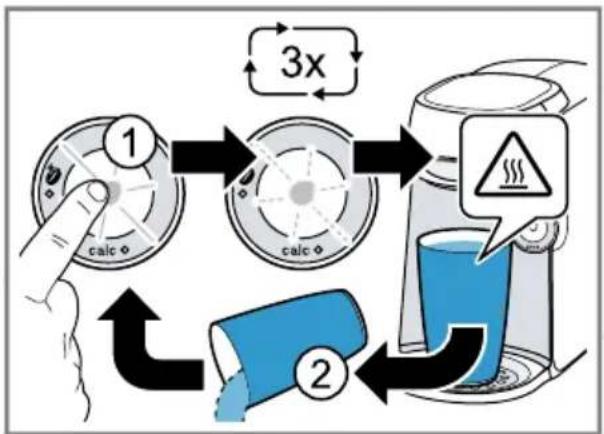
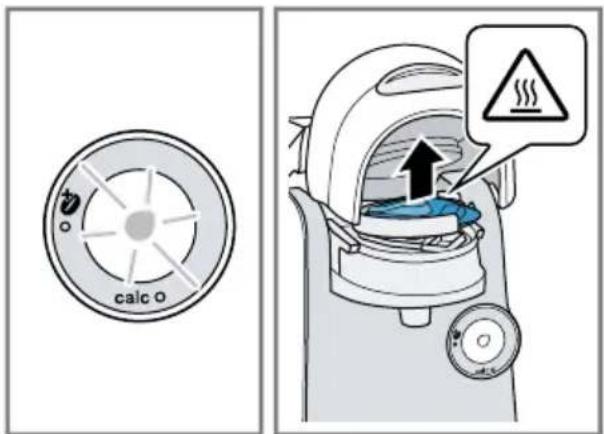
Descale the appliance
If the calCD lights up, run the descaling programme. Follow the illustrated instructions at the beginning of this manual.
▶ Immediately perform the descaling process in accordance with the instructions.
- Do not use descaling agent with phosphoric acid.
→ Fig. 45 - 59
Troubleshooting
▶ Repairs to the appliance should only be carried out by trained specialist staff.
▶ Only use genuine spare parts when repairing the appliance.
If the power cord of this appliance is damaged, it must be replaced by the manufacturer, the manufacturer's Customer Service or a similarly qualified person in order to prevent any risk.
The appliance is not working.
LEDs do not light up.
The appliance has no power supply.
- Check to see whether the appliance is connected to the mains.
Brewing process starts, drink is not dispensed.
Water tank was removed during brewing and inserted again or appliance has not been used for a long time.
▶ Start cleaning with the Service T DISC.
Float is stuck in the water tank.
-
Descale the appliance. → "Descale the appliance", Page 22
-
Reach into the water tank and move the float up and down.
Brewing process does not start, status display lights up red.
Water tank has not been sufficiently filled.
-
Fill the water tank with fresh, cold water up to the mark .max
-
Insert the water tank.
Brewing process does not start, status display flashes red.
T DISC has not been correctly inserted.
▶ Check whether the T DISC is inserted.
The T DISC bar code is not recognised.
- Clean the T DISC reading window with a soft, damp cloth.
▶ Smooth out the film of the T DISC.
▶ Remove the used T DISC. - Contact the TASSIMO careline if the problem persists.
The appliance not connected to the power supply when the T DISC was inserted.
- Connect the appliance to the power supply before inserting the T DISC.
Brewing unit cannot be closed.
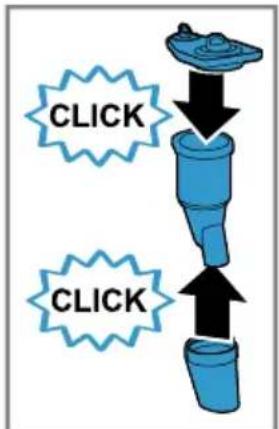
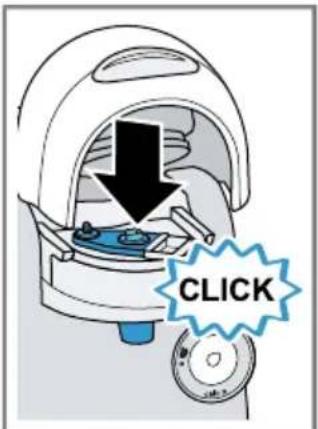
T DISC piercing unit or T DISC holder is not correctly inserted.
- Press the T DISC piercing unit into the holder until it clicks audibly into place.
-
Check the position of the T DISC holder.
T DISC has not been correctly inserted. -
Insert the T DISC with the printed side facing downwards.
-
Check whether the tab of the T DISC is in the recess.
Brewing unit cannot be opened.
Brewing unit is locked.
▶ Only open the brewing unit when the status display remains lit continuously.
▶ If the brewing unit remains locked, contact the TASSIMO careline.
Water is dripping from the brewing unit.
T DISC is damaged or not correctly inserted.
▶ Use a new T DISC.
T DISC piercing unit is not correctly inserted.
- Press the T DISC piercing unit into the holder until it clicks audibly into place.
There is water under the cup stand.
Condensation has formed due to technical reasons or valves are clogged with limescale.
▶ Descale the appliance. → "Descale the appliance", Page 22
No LED is lit.
Appliance is in idle mode.
- Press ☉ or open or close the brewing system.
All LEDs flashing.
There are problems with the power supply.
-
Pull out the mains plug, wait 5 minutes and plug it back in.
-
If the problem persists, contact the TASSIMO careline.
LED lights up red even though there is enough water in the water tank.
Float is stuck in the water tank.
-
Descale the appliance. → "Descale the appliance", Page 22
-
Reach into the water tank and move the float up and down.
calc LED lights up although softened water has been used.
Decalcified water still contains small amounts of lime.
▶ Descale the appliance.
→ "Descale the appliance", Page 22
LED and LED flash, brewing is not possible.
Appliance has a fault.
- Unplug the mains plug.
- Contact the TASSIMO careline.
Quality of beverages has deteriorated, e.g. crema or volume.
Beverage outlet is soiled.
▶ Clean the beverage outlet.
▶ Clean the brewing unit with the T DISC.
Build-up of limescale in the appliance.
▶ Descale the appliance.
→ "Descale the appliance", Page 22
Drink volume has reduced.
Drink dispensing halts.
Water tank has not been sufficiently filled.
-
Fill the water tank with fresh, cold water up to the mark .max
-
Keep Ⓞpressed until the desired fill volume is reached.
Technical specifications
Voltage 220–240 V \~
Frequency 50 Hz
Power rating 1400 W
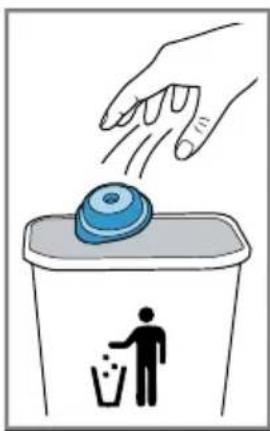
Disposing of old appliance
- Unplug the appliance from the mains.
- Cut through the power cord.
- Dispose of the appliance in an environmentally friendly manner. Information about current disposal methods are available from your specialist dealer or local authority.
This appliance is labelled in accordance with European Directive 2012/19/EU concerning used electrical and electronic appliances (waste electrical and electronic equipment - WEEE). The guideline determines the framework for the return and recycling of used appliances as applicable throughout the EU.
Customer Service
Detailed information on the warranty period and terms of warranty in your country is available from our after-sales service, your retailer or on our website.
The contact details for Customer Service can be found in the enclosed Customer Service directory or on our website.
Table des matières
1 Sécurité 26
Puissance raccor-dée 1400 W
Looking for help? You'll find it here.
Expert advice for your Bosch home appliances, need help with problems or a repair from Bosch experts.
Find out everything about the many ways Bosch can support you:
www.bosch-home.com/service
Contact data of all countries are listed in the attached service directory.
Visit tassimo.com for registration, accessories and more.