
TT-02U - Documentary camera Elmo - Free user manual and instructions
Find the device manual for free TT-02U Elmo in PDF.


| Product Type | Document Camera (Visual Presenter) |
| Brand and Model | Elmo TT-02U |
| Dimensions (Set Up) | L343 x D368 x H411 mm |
| Dimensions (Folded) | L195 x D368 x H444 mm |
| Weight (Main Unit) | Approx. 2.9 kg |
| Power Supply | 12 V DC via AC adapter 100-240 V, 50/60 Hz |
| Power Consumption | 9 W (adapter included) |
| Image Sensor | DCC 1/3", approx. 850,000 pixels (total), 1024x768 effective |
| Lens | f = 4.0 - 21.2 mm (optical zoom 5.3x), F2.0 - 4.5 |
| Digital Zoom | 8x |
| Focus | Automatic (one-shot) and manual via OSD |
| Focus Range | 50 mm to infinity (from top of lens) |
| Shooting Field | Max. 426x317 mm, min. 93x70 mm |
| Video Outputs | RGB OUT (mini DSUB 15P), Composite video (RCA, NTSC/PAL) |
| Video Input | RGB IN (mini DSUB 15P) |
| USB Connector | USB 2.0 type B (for image transfer and PC control) |
| Resolution (RGB output) | Horizontal 600 TV lines or more, vertical 600 TV lines or more |
| Resolution (Video output) | Horizontal 400 TV lines or more |
| White Balance | Auto, One-Push, Manual (R-Gain/B-Gain adjustments) |
| Brightness Adjustment | Auto (adjustable level) or Manual |
| Image Modes | Text1/2/3, Graphic (with edge enhancement and gamma) |
| Image Rotation | 0° / 180° |
| Standby / Pause | Pause function available, temporary image freeze |
| Included Accessories | AC adapter, RGB cable, stage plate, magnetic sheet, anti-glare sheet, cover, USB cable, software CD-ROM, manuals |
| Cleaning | Soft dry cloth; do not use solvents; unplug before cleaning |
| Environmental Conditions | Temperature 0-40°C, humidity 30-85% (without condensation) |
| Recycling | Contains a fluorescent lamp with mercury; do not dispose of with household waste |
Frequently Asked Questions - TT-02U Elmo
User questions about TT-02U Elmo
0 question about this device. Answer the ones you know or ask your own.
Ask a new question about this device
Download the instructions for your Documentary camera in PDF format for free! Find your manual TT-02U - Elmo and take your electronic device back in hand. On this page are published all the documents necessary for the use of your device. TT-02U by Elmo.
USER MANUAL TT-02U Elmo
Please read this instruction manual carefully before using this product and keep it for future reference.
IMPORTANT SAFEGUARDS
■ Read Instructions All the safety and operating instructions should be read before the appliance is operated.
■ Retain Instructions The safety and operating instructions should be retained for future reference.
■ Heed Warnings All warnings on the product and in the operating instructions should be adhered to.
■ Follow Instructions All operating and use instructions should be followed.
■ Cleaning Unplug this product from the wall outlet before cleaning. Do not use liquid cleaners or aerosol cleaners. Use a damp cloth for cleaning.
■ Attachments Do not use attachments not recommended by the product manufacturer as they may cause hazards.
■ Water and Moisture Do not use this product near water - for example, near a bath tub, wash bowl, kitchen sink, or laundry tub, in a wet basement, or near a swimming pool, and the like.
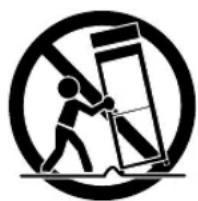
■ Placement Do not place this product on an unstable cart, stand, tripod, bracket, or table. The product may fall, causing serious injury to a child or adult, and serious damage to the product. Use only with a cart, stand, tripod, bracket, or table recommended by the manufacturer, or sold with the product. Any mounting of the product should follow the manufacturer's instructions,
and should use a mounting accessory recommended by the manufacturer.
■ Ventilation Slots and openings in the cabinet are provided for ventilation and to ensure reliable operation of the product and to protect it from overheating, and these openings must not be blocked or covered. The openings should never be blocked by placing the product on a bed, sofa, rug, or other similar surface. This product should not be placed in a built-in installation such as a bookcase or rack unless proper ventilation is provided or the manufacturer's instructions have been adhered to.
■ Power Sources This product should be operated only from the type of power source indicated on the marking label. If you are not sure of the type of power supply to your home consult your appliance dealer or local power company. For products intended to operate from battery power, or other sources, refer to the operating instructions.
■ Grounding or Polarization This product may be equipped with either a polarized 2-wire AC line plug (a plug having one blade wider than the other) or a 3-wire grounding type plug, a plug having a third (grounding) pin. The 2-wire polarized plug will fit into the power outlet only one way. This is a safety feature. If you are unable to insert the plug fully into the outlet, try reversing the plug. If the plug still fails to fit, contact your electrician to replace your obsolete outlet. Do not defeat the safety purpose of the polarized plug. The 3-wire grounding type plug will fit into a grounding type power outlet. This is a safety feature. If you are unable to insert the plug into the outlet, contact your electrician to replace your obsolete outlet. Do not defeat the safety purpose of the grounding type plug.
■ Power-Cord Protection Power-supply cords should be routed so that they are not likely to be walked on or pinched by items placed upon or against them, paying particular attention to cords at plugs, convenience receptacles, and the point where they exit from the product.
■ Lightning For added protection for this product during a lightning storm, or when it is left unattended and unused for long periods of time, unplug it from the wall outlet and disconnect the antenna or cable system. This will prevent damage to the product due to lightning and
power-line surges.
■ Overloading Do not overload wall outlets, extension cords, or integral convenience receptacles as this can result in a risk of fire or electric shock.
■ A product and cart combination should be moved with care. Quick stops, excessive force, and uneven surfaces may cause the pr combination to ov
■ Object and Liquid Entry Never push objects of any kind into this product through openings as they may touch dangerous voltage points or short-out parts that could result in a fire or electric shock. Never spill liquid of any kind on the product.
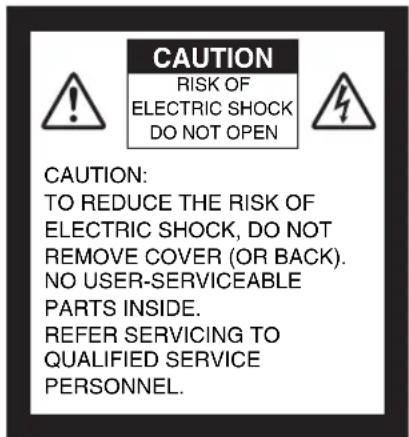
■ Servicing Do not attempt to service this product yourself as opening or removing covers may expose you to dangerous voltage or other hazards. Refer all servicing to qualified service personnel.
natural_image
Symbolic icon of a person pushing a large object, enclosed in a circle (no text or symbols)■ Damage Requiring Service Unplug this product from the wall outlet and refer servicing to qualified service personnel under the following conditions:
- When the power-supply cord or plug is damaged.
- If liquid has been spilled, or objects have fallen into the product.
- If the product has been exposed to rain or water.
- If the product does not operate normally by following the operating instructions. Adjust only those controls that are covered by the operating instructions as an improper adjustment of other controls may result in damage and will often require extensive work by a qualified technician to restore the product to its normal operation.
- If the product has been dropped or damaged in any way.
- When the product exhibits a distinct change in performance - this indicates a need for service.
■ Replacement Parts When replacement parts are required, be sure the service technician has used replacement parts specified by the manufacturer or have the same characteristics as the original part. Unauthorized substitutions may result in fire, electric shock or other hazards.
■ Safety Check Upon completion of any service or repairs to this product, ask the service technician to perform safety checks to determine that the product is in proper operating condition.
■ Heat The product should be situated away from heat sources such as radiators, heat registers, stoves, or other products (including amplifiers) that produce heat.
SA 1965
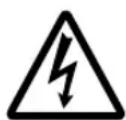
The lightning flash with arrowhead symbol, within an equilateral triangle, is intended to alert the user to the presence of uninsulated "dangerous voltage" within the product's enclosure that may be of sufficient magnitude to constitute a risk of electric shock to persons. This marking is located at the bottom of product.

SA 1966
The exclamation point within an equilateral triangle is intended to alert the user to the presence of important operating and maintenance (servicing) instructions in the literature accompanying the product.
WARNING: TO REDUCE THE RISK OF FIRE OR ELECTRIC SHOCK, DO NOT EXPOSE THIS PRODUCT TO RAIN OR MOISTURE.
The connection of a non-shielded equipment interface cable to this equipment will invalidate the FCC Certification or Declaration of this device and may cause interference levels which exceed the limits established by the FCC for this equipment. It is the responsibility of the user to obtain and use a shielded equipment interface cable with this device. If this equipment has more than one interface connector, do not leave cables connected to unused interfaces. Changes or modifications not expressly approved by the manufacturer could void the user's authority to operate the equipment.
WARNING : Handling the cord on this product or cords associated with accessories sold with this product, will expose you to lead, a chemical known to the State of California to cause birth defects or other reproductive harm.
Wash hands after handling.
FOR UNITED STATES USERS: INFORMATION
This equipment has been tested and found to comply with the limits for a Class B digital device, pursuant to Part 15 of the FCC Rules. These limits are designed to provide reasonable protection against harmful interference in a residential installation. This equipment generates, uses, and can radiate radio frequency energy and, if not installed and used in accordance with the instructions, may cause harmful interference to radio or television reception. However, there is no guarantee that interference will not occur in a particular installation. If this equipment does cause interference to radio and television reception, which can be determined by turning the equipment off and on, the user is encouraged to try to correct the interference by one or more of the following measures.
- Reorient or relocate the receiving antenna.
- Increase the separation between the equipment and receiver.
- Connect the equipment into an outlet on a circuit different from that to which the receiver is connected.
- Consult the dealer or an experienced radio/TV technician for help.
USER-INSTALLER CAUTION:
Your authority to operate this FCC verified equipment could be voided if you make changes or modifications not expressly approved by the party responsible for compliance to Part 15 of the FCC rules.
BEFORE YOU USE
■ AC adapter applicable to the local power specification is attached. Use the AC adapter attached to the products in North America market(AC120V 50/60Hz).
■ Do not leave this product under direct sunlight or by heaters, or it may be discolored, deformed or damaged.
■ Do not keep this product in any humid, dusty, salt bearing wind or vibrating location. Use it under the following environmental conditions:
Temperature: 0°C - 40°C (32°F - 104°F)
Humidity: 30% - 85% (No condensation)
■ Use a soft, dry cloth for cleaning. Do not use any volatile solvent such as thinner or benzene.
■ Do not directly point the camera lens into the sun, or the camera may be damaged.
■ Luminescent and Black Spots
There may be some pixels that do not properly operate due to the use of CCD Area Image Sensors made-up of many pixels. Though luminescent or black spots may be found on the screen, it is a phenomenon peculiar to the Sensors and is not a malfunction.
■ Follow the guidelines below to prevent the unit from dropping or overturning.
- Use the product on a stable base, desk or table. Do not place the product on unstable base or slant place.
- Place or wire the unit to prevent the AC adapter cord or video cable from pulling.
- Carry the product holding the lower part of the main unit held in your both hands. Never hold the product by the column or the camera head.
■ Use (including set-up and storage) or transfer with your closest attention to prevent the camera head from shocking. When a magnetic sheet is brought close to a cathode ray tube (Braun tube), a speaker, a CD-player, a DVD, or cellular phone, etc, the normal operation may be interrupted or failure may occur.
CONTENTS
IMPORTANT SAFEGUARDS .... 1
BEFORE YOU USE 6
CONTENTS....8
- PART NAMES AND FUNCTIONS ...... 9
Name of Each Part 9
Appearance 9
Functions 10
Operating buttons
Rear Panel....11
OSD (On Screen Display) 12
2.SETTING UP 14
Setting Up 14
Connecting of AC adapter and Video cable 15
3.STORING 17
Storing 17
Presentation using printed materials, etc. 18
Presentation using printed materials, etc. (Using the stage) 19
Presentation using the supplied software with the USB-connected PC .....20
Presentation using a Microscope 21
Shooting a 3-D object....22
Shooting wall surface or distant view 23
5.VARIOUS FUNCTIONS AND OPERATIONS 24
Zoom....24
Focus 25
Auto focus 25
Manual focus....26
Adjusting the brightness....27
Automatic brightness adjustment 27
Manual brightness adjustment....27
Image Selection....28
White Balance....29
How to use [Auto] 29
How to use [One-Push]....29
How to use [Manual]....29
Save/call setting 30
How to save setting....30
How to call setting....30
6.TROUBLE SHOOTING....31
Symptoms and Confirmation 31
7.SPECIFICATIONS....32
General 32
Main Camera 32
Supplied Accessories....33
PART NAMES AND FUNCTIONS
English
P1\~P33
Name of Each Part
■ Appearance
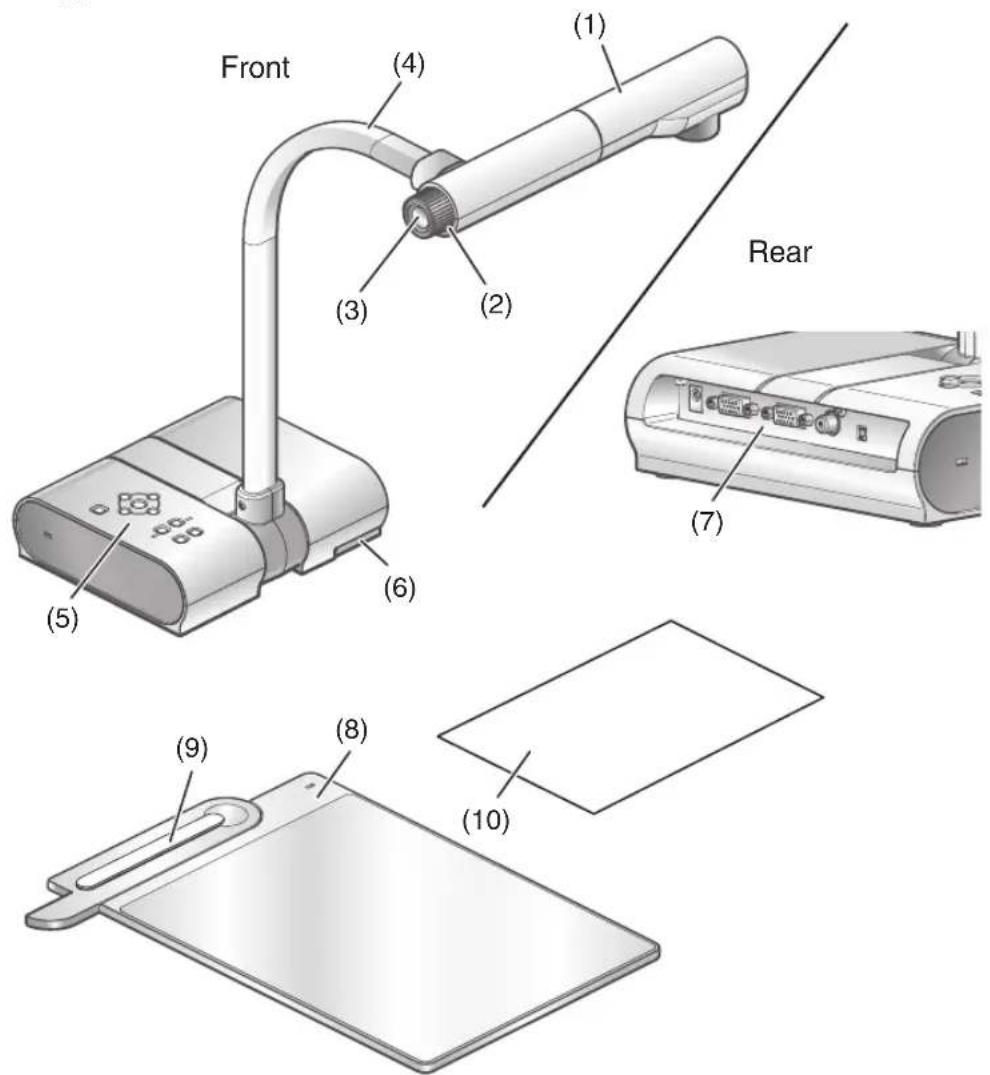
PART NAMES AND FUNCTIONS
| No Name No Name | |
| (1) | Camera head |
| (2) | Zoom dial P24 |
| (3) | AF Button P25 |
| (4) | Camera column |
| (5) | Operating button P10 |
| (6) | Stage positioning P.19 |
| (7) | Rear panel P.11 |
| (8) | Stage P.19 |
| (9) | Magnetic sheet P.19 |
| (10) | Anti-glare sheet P.19 |
Functions
■ Operating buttons
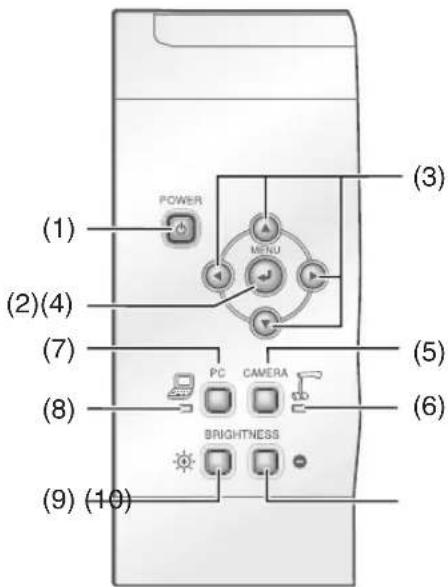
| Name Function | Name Function | ||
| (1) | POWER(Power switch ON/OFF standby) | To turn ON/OFF the power.Power ON: Green light turns onPower OFF standby: Red light turns on | |
| (2) | OSD operation | MENU To display/delete MENU OSD. | |
| (3) | ▲▼◀▶ (Direction) | To select the OSD item. | |
| (4) | ◀ (Decision) | To decide the OSD item. | |
| (5) | Image select | CAMERA (Camera image) | To output the camera image from the output terminal. P.28 |
| (6) | Image select | (Camera image selection display lamp) | To turn on when the camera image is selected as the output image. |
| (7) | PC ([RGB IN] terminal image) | To output the image input to [RGB IN] terminal from RGB output terminal.P28 | |
| (8) | ([RGB IN] terminal image selection lamp) | To turn on when [RGB IN] terminal image is selected as the output image. | |
| (9) | BRIGHT NESS | To brighten the camera image.P27 | |
| (10) | To darken the camera image.P27 | ||
■ Rear Panel
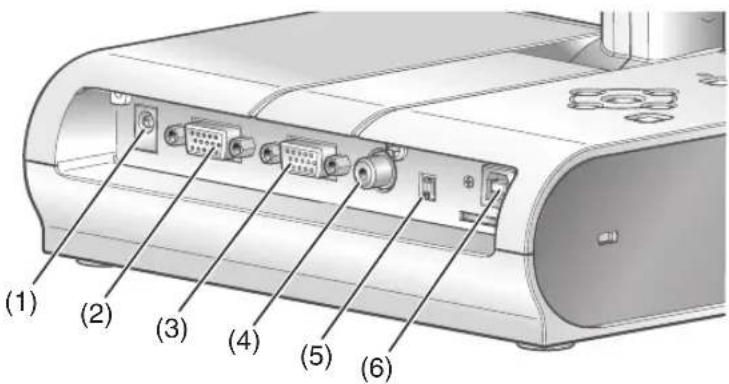
NAMES AND FUNCTIONS
NAMES AND
DART
| Name Function | |||
| (1) | DC IN 12V(Power Socket) | DC IN 12V | Plug-in for the AC adapter |
| (2) | RGB OUT(Analog RGB Output Terminal) |  RGB OUT RGB OUT | To output analog video signal to the projector, the PC monitor or other RGB input device. |
| (3) | RGB IN(Analog RGB Input Terminal) |  RGB IN RGB IN | To output the image input to this terminal, when [PC] is selected by Image select button. |
| (4) | VIDEO OUT(Composite Video Output Terminal) |  VIDEO OUT VIDEO OUT | To output image from the RCA pin-jack terminal to the NTSC/PAL-system monitor (e.g., TV monitor) |
| (5) | OUTPUT(DIP Switch)RGBNTSCVIDEO PAL OUTPUT | To switch the following:Left key : Output terminalRight key : VIDEO output systemWhen switching the DIP switch key settings, be sure to turn OFF the power switch of the main unit. Switching the DIP switch key with the power switch of the main unit ON does not switch the output image.Either one of [RGB OUT] or [VIDEO OUT] images can be output. (Unable to simultaneously output both of [RGB OUT] and [VIDEO OUT] images)When the left key is set to [VIDEO], the image input to [RGB IN] can not be output.(The [PC] button on the main unit is unable to operate) In addition, the image cannot be output from the USB.Factory default setting provides left key : RGB and right key : NTSC. | |
| (6) | USB(2.0 Compliant) | [0276][0232] | To transfer image or control the main unit using the software contained in the supplied Utility Software CD-ROM by connecting with the PC. |
OSD (On Screen Display)
The menu items displayed/selected on the monitor or the projection screen are referred to as "OSD (On-Screen Display)."
When the [MENU] button is pressed, the OSD menu appears on the monitor screen. (By pressing the [MENU] button again, the OSD menu disappears.)
Move the cursor to the item to be set with the direction buttons [▲▼▶] and press operating button [◀] to decide setting. Pressing the direction button [◀] moves the cursor back to the OSD menu by one hierarchy. Pressing it on the top hierarchy allows the OSD menu to disappear.
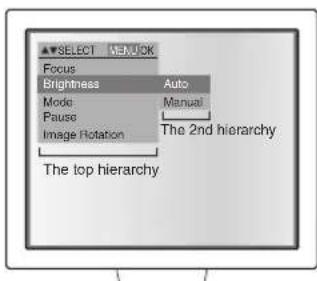
| The top hierarchy | The 2nd hierarchy Function | |
| Focus (Displayed in arrows (▲F, ▼)) | upper/lower | To focus manually. P25 |
| Brightness Auto Mode to change brightness which | automatically follows the object. P27 | |
| Manual Mode to fix the brightness of the image to a specific level. P27 | ||
| Mode Text3 To sharpen B&W characters and lines | of image. The larger the figure is, the higher the effect is. When setting this mode to "Graphics", color image such as a color drawing and a photo can be shown vividly. Edge enhancement and gamma settings can be set only when this mode is set to "Graphics." | |
| Pause On To pause the camera image. | ||
| Image Rotation | On To rotate the camera image | by 180° when this function is On. |
| Off √ | ||
| Microscope | Set | Mode to shoot the microscope. |
| Off √ | P21 | |
* [✓] shows factory default setting.
| The top hierarchy | The 2nd hierarchy Function | |
| White Balance | Auto √ | To set the white balance to Auto.P29 |
| One-Push To set the white balance to One-Push. | ||
| Manual To manually adjust the red/blue elements. | ||
| R-Gain (Displayed) | n level bar) To adjust the red element when the white balance is set to Manual. | |
| B-Gain (Displayed) | n level bar) To adjust the blue element when the white balance is set to Manual. | |
| Posi/Nega Posi | √ | To switch the Posi/Nega of the camera image.· Factory setting for Nega Gamma: Normal |
| Nega | ||
| Color/B&W Color | √ | To switch the color/B&W of the camera image. Use this function to make B&W document easy-to-read. |
| B&W | ||
| Edge Effect 3 To set the level of edge enhancement | when the "Graphics" mode is selected.The larger the figures is, the higher the effect is. | |
| Gamma High | To set gamma curve when the "Graphics" mode is selected. Tone wedge can be changed depending on user's preference. | |
| Normal √ | ||
| Low | ||
| Preset | 1 To save the setting in the selected memory. P30 | |
| 2 | ||
| 3 | ||
| Power On | ||
| Call | 1 To call the setting saved in the selected memory. P30 | |
| 2 | ||
| 3 | ||
| Power On | ||
| Default | ||
| Guide | On √ | To set whether the operation state of the main unit should be displayed on the screen or not. |
| Off | ||
| Language | English √ | To set the language for the OSD menu. |
| Japanese | ||
[√] shows factory default setting.
2 SETTING UP
Setting Up
SETTING UP
Note
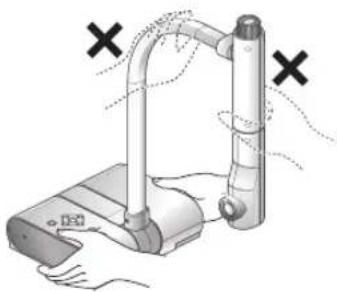
- Be sure to hold the lower part of the main unit in both hands when carrying the unit. Never hold the column or the camera head
- Pay attention to prevent the camera head from knocking against the desk or the like.
natural_image
Diagram of a handheld device with a vertical tube and connecting rod, showing no text or symbols1 Turn the camera head.
Note
- Proper set up position of the camera head is as shown in the right figure.
Never apply excessive force to the camera head.
2 Connect the analog RGB cable to the [RGB OUT] terminal and connect the DC plug of AC adapter to [DC IN 12V] terminal. P.15
P.15
![Elmo TT-02U - Connect the analog RGB cable to the [RGB OUT] terminal and connect the DC plug of AC adapter to [DC IN 12V] terminal. P.15 - 1](/content/2026/04/699912/images/87938dd7bc23921f2da30dc1024f60cd065cdab01979ecf1234858dd521b8056.jpg)
natural_image
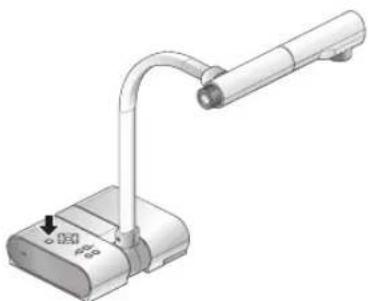
Illustration of a desktop computer with a curved stand and two connected cables (no text or symbols visible)3 Turn the power switch of the main unit ON.
natural_image
Illustration of a handheld electronic device with a curved arm and base (no text or symbols visible)Connecting of AC adapter and Video cable
(5) DC IN 12V terminal
- To power plug
(1) RGB OUT terminal
- To projector
- To PC monitor
(2) RGB IN terminal
- To PC
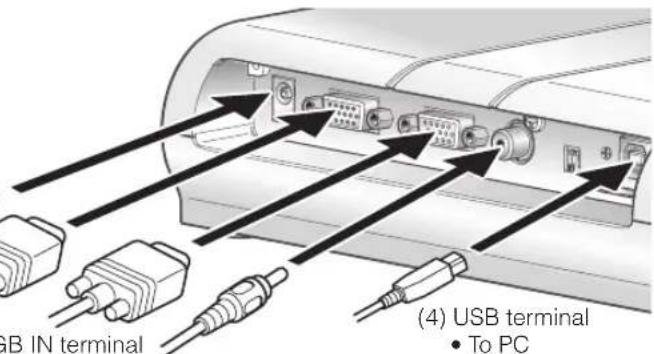
(3) VIDEO OUT terminal
- To TV monitor
(1) Connecting to the unit with analog RGB input terminal equipped
Connect the supplied analog RGB cable to the [RGB OUT] terminal on the rear panel.
- The display position may be displaced from the center of the screen. In such case, adjust the horizontal and vertical positions manually from the connected device.
- Vertical strips may appear on the projector or PC monitor screen. This can be mitigated by manually adjusting the dot clock from the connected device.
(2) Connecting to the unit with analog RGB output terminal equipped
Connect the supplied analog RGB cable to the [RGB IN] terminal on the rear panel.
Note
- When using a notebook PC with an external output mode switching, set the notebook PC side to the external output mode after pushing the manual operation button [PC] of this equipment.
■ Specifications of the analog RGB input terminal of this product
Signal allocation
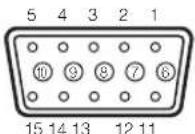
Video signal : Analog 0.7V(p-p) 75W terminated
Horizontal synchronized signal: TTL level (Positive/negative polarity)
Vertical synchronized signal : TTL level (Positive/negative polarity)
DSUB 15P shrink terminal (Female)
Pin assignment
| Pin No. | Name Pin No. | Name Pin No. | Name |
| 1 | Video signal (Red) | 6 GND | (Red) 11 GND |
| 2 | Video signal (Green) | 7 GND | (Green) 12 N.C |
| 3 | Video signal (Blue) | 8 GND | (Blue) 13 |
| 4 N.C | 9 N.C | 14 | |
| 5 GND | 10 GND | 15 N.C |
| Horizontal synchronized signal | |
| Vertical synchronized signal | |
(3) Connecting to the unit with composite video input terminal equipped
Connect the video cable with RCA pin plug to the [VIDEO OUT] terminal on the rear panel.
(4) Connecting to the PC with a USB cable
Connect a USB cable to the [USB] terminal on the rear panel.

- The USB cable compliant with USB2.0 is recommended.
- If you plug into a USB connector with power on, PC may not recognize this product.
(5) Connecting the AC adapter
Connect the DC plug of the supplied AC adapter to the [DC IN 12V] terminal on the rear panel before inserting the AC adapter in an outlet.
- As for switching-over of the image output, refer to "OUTPUT (DIP switch)" on page 11.
- To protect the unit and peripheral devices, unplug the AC adapter, turn OFF power switches of all other devices before connecting video cable.
- Hold the plug of cable to plug/unplug the AC adapter or video cable.
3
STORING
English
P1\~P33
Storing
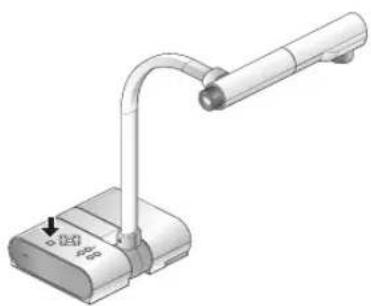
1 Turn the power switch of the main unit OFF
(Continuously press the power switch for approx. 2 sec. The green light turns to red and the power switch of the main unit is OFF.)
- Before storing, be sure to check if the lens returned to the proper position after the power switch of the main unit is OFF.
natural_image
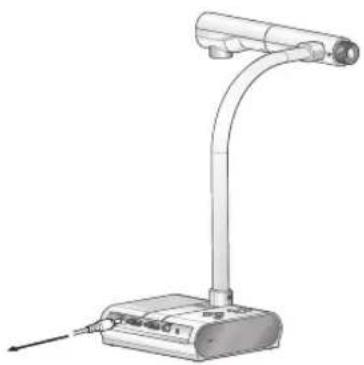
3D rendering of a mechanical device with a curved arm and base, no visible text or symbols2 Unplug the AC adapter and the video cable.
natural_image
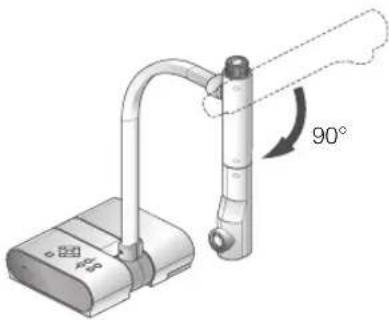
Illustration of a desktop computer with a curved arm and a base unit (no text or symbols visible)3 Turn the camera head to the direction shown in the figure.
natural_image
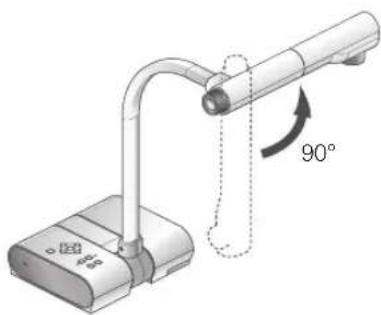
Diagram of a medical or laboratory device with a 90-degree angle indicator and a curved pipe fitting (no text or symbols present)Note
- Proper storing position of the camera head is as shown in the figure on the right. Never apply excessive force to the camera head.
- Pay attention to prevent the camera head from knocking against desk or the like.
- Unplug the AC adapter when the unit is not used.
Presentation using printed materials, etc.
natural_image
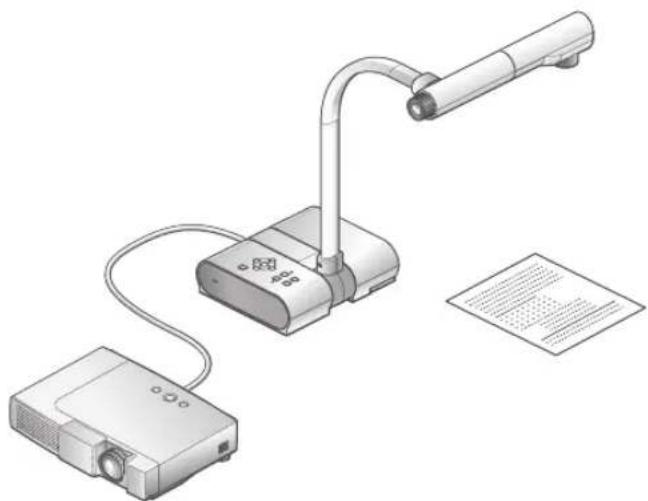
Illustration of a projector connected to a display unit with a paper sheet nearby (no text or symbols)■ Setting the main unit
Set the main unit as shown in the above figure, connect the main unit to the projector or the PC monitor, and then turn the power switch of the main unit ON.
■ Adjusting the size
Place an object, adjust the position of the object with the zoom dial so that the objective part fits the screen size.
P.24
■ Adjusting the focus
Press the [AF] button to focus the camera on the object.
P.25
■ Adjusting the brightness
Press the [BRIGHTNESS • 🎨] and [BRIGHTNESS • —buttons on the main unit to adjust image brightness.
- When connecting to other devices, be sure to turn OFF the power of all the devices.
Presentation using printed materials, etc. (Using the stage)
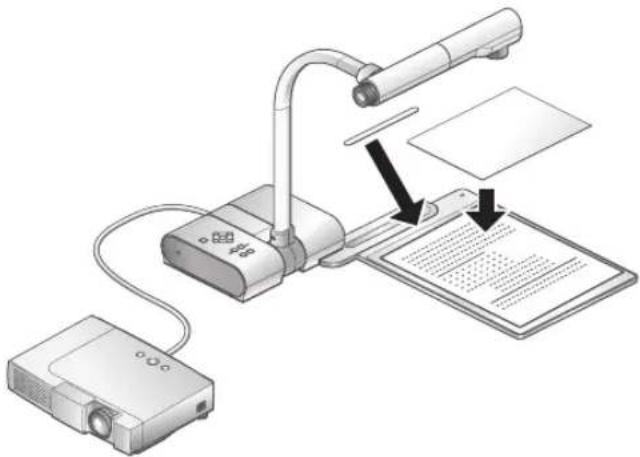
Using the supplied stage, magnetic sheet or anti-glare sheet, effective presentation is possible.
■ Setting the main unit
Attach the stage to the specified position as shown in the above figure and connect to the projector or the PC monitor. Then turn the power switch of the main unit ON.
- To prevent the printed materials, etc. from moving, use the supplied magnet sheet to properly fix the printed materials, etc. on the stage.
■ Adjusting the size
Place an object on the stage, adjusting the position of the object with the zoom dial so that the objective part fits the screen size.
■ Adjusting the focus
Press the [AF] button to focus the camera on the object.
P.24
■ Adjusting the brightness
Press the [BRIGHTNESS • 🎨] and [BRIGHTNESS • 🎨] buttons on the main unit to adjust image brightness.

Note
- Shooting glossy printed materials, etc. may cause unclear image due to reflection by room illumination. In such cases, place the supplied anti-glare sheet on the reflected part. Reflection will be reduced.
Presentation using the supplied software with the USB-connected PC

natural_image
Illustration of a desktop computer connected to a laptop and a projector (no text or symbols)"Utility Software" is in the supplied CD-ROM.
"Utility Software" contains the PC link software "Image Mate for Presentation" and the TWAIN driver "ELMO TWAIN DS (VHM)" for the following operations:
- Transfer of moving/still images to the PC
• Operation of this product from the PC
The PC equipped with Microsoft Windows 2000(SP4 or newer)/XP(SP2 or newer) is recommended.
For details, refer to the "Utility Software" Installation Manual and the "HELP Folder" in the CD-ROM.
Note
- When the operating button is in operation, do not connect/disconnect the USB cable, or malfunction will be caused to this product.
- The USB cable compliant with USB2.0 is recommended.
- When the DIP switch is set to the VIDEO, the image cannot be output from the USB. Refer to "OUTPUT (DIP switch)" on page 11 to switch the image output to the RGB.
Presentation using a Microscope
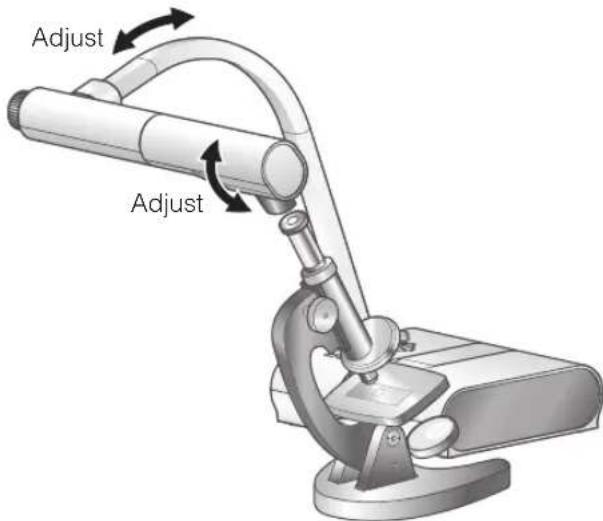
■ Setting a microscope
Place an object such as a prepared slide on a microscope. Adjust focus by checking with eyes at the microscope side.
■ Setting the main unit
Connect the main unit to a projector or a PC monitor. Then turn the power switch of the main unit ON.
■ Changing to the Microscope mode
Change the Microscope mode to [Set] from the OSD menu. Then connect the main unit to a microscope as shown in the above figure.

Note
- Pay attention to prevent the lens from knocking on a microscope.
- When being changed to the microscope mode, [Graphics] is automatically selected as [Mode].
■ Adjusting the focus
Adjust focus by pressing the [AF] button. In a case when the object can not be brought into focus with the [AF] button, adjust focus with the manual focus by selecting [Focus] in the OSD menu.
■ Adjusting the brightness
Press the [BRIGHTNESS • 🎨] and [BRIGHTNESS • ⏻ buttons on the main unit to adjust the image brightness.

Note
- When using the document camera successively after the use of microscope, set [Set] [Off] in the OSD.
- When setting [Set] [Off] in the OSD, [Mode] gets back to the selected [Mode] just before being changed to the microscope mode.
Shooting a 3-D object
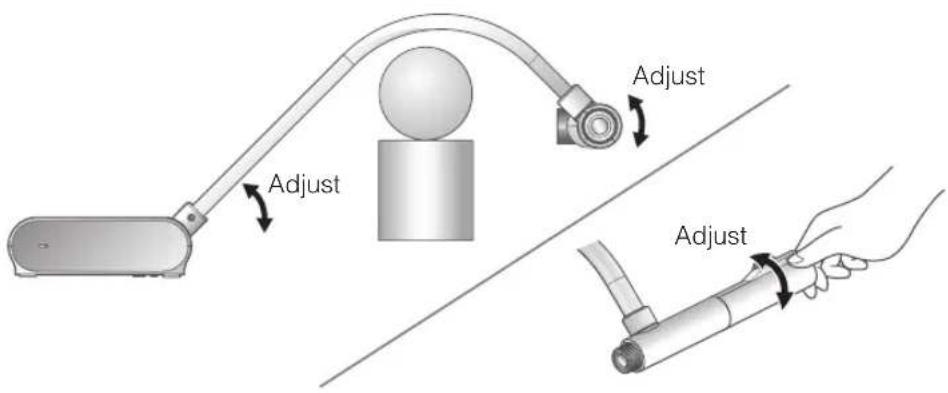
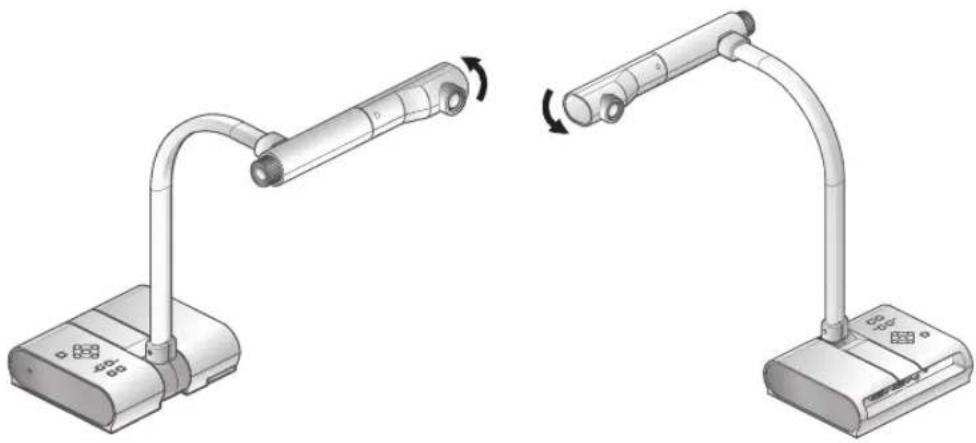
By adjusting angle of the camera column and the camera head, a 3-D object can be shot from the side.
■ Setting the main unit
Connect the main unit to a projector or a PC monitor.
Then turn the power switch of the main unit ON. Adjust angle of the camera column and the camera head as shown in the above figure to shoot a 3-D object.
■ Adjusting the size
Adjust the position of the object with the zoom dial so that the objective part fits the screen size.
■ Adjusting the focus
Press the [AF] button to focus the camera. In a case when the object can not be brought into focus with the [AF] button, adjust focus with the manual focus by selecting [Focus] in the OSD menu.
Note
- The focus can be achieved from 50mm to .
■ Adjusting the brightness
Press the [BRIGHTNESS • ⚙] and [BRIGHTNESS • ⏻] buttons on the main unit to adjust image brightness.
Shooting wall surface or distant view
natural_image
Illustration of a robotic arm with rotating arms and base-mounted devices (no text or symbols)Forward shooting Backward shooting
When the camera head is set horizontally, wall, distant view, etc, can be shot.
Note
- To shoot forward of the main unit, set to [Image Rotation] [On] in the OSD to rotate the image by 180^ .
- Camera head rotation angle
Forward shooting : 110° from the normal downward shooting position Backward shooting : 110° from the normal downward shooting position - The focus can be achieved from 50mm to .
5 VARIOUS FUNCTIONS AND OPERATIONS
Zoom
VARIOUS FUNCTIONS AND OPERATIONS
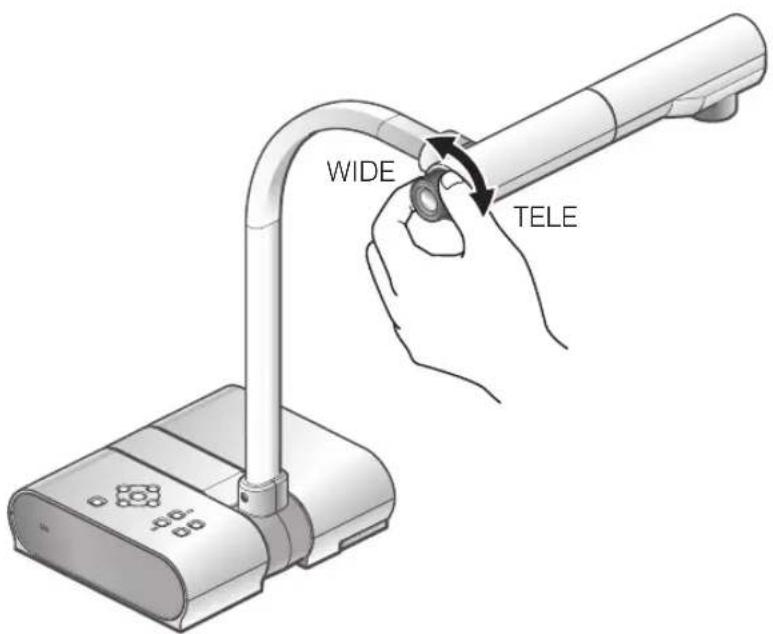
The display range of the document can be adjusted by rotating the zoom dial.
(Zoom-OUT ☐): Object can be shown in small size.
(Zoom-IN ☐): Object can be shown in large size.
Note
- Zoom ratio : Optical 5.3x, Digital 8x
- Within the digital zoom range, the image quality is degraded.
Focus
■ Auto focus
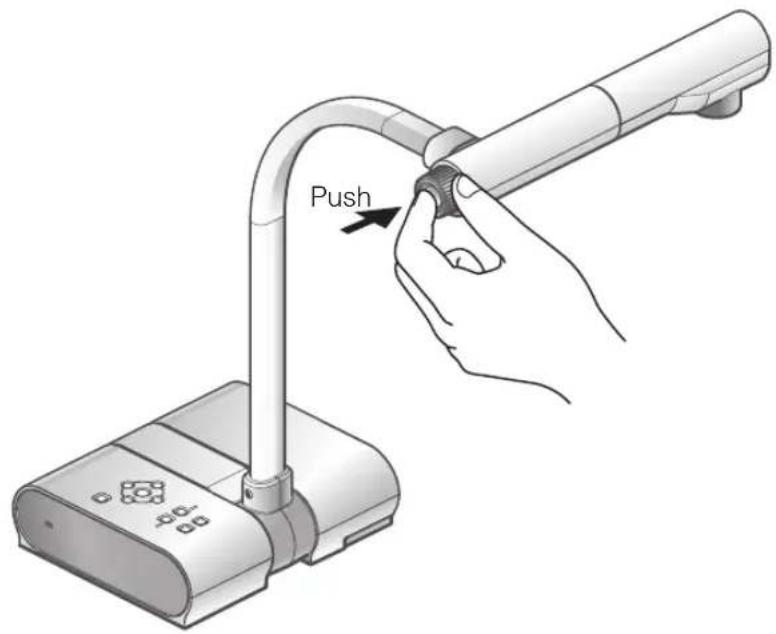
Press the [AF] button to automatically focus. The unit provides one-shot auto-focus system. Once the camera is focused, the auto focus operation is released, and then focus position is maintained.

Note
●The objects listed below may not be brought into focus in the auto focus. In such cases, use the manual focus.
- Objects having low contrast
- Objects with fine repeated patterns, such as lateral stripes and cross stripes
- Objects glittering or reflecting strong light
- Objects with bright background or excessive contrast
- Objects that are entirely dark
- Objects located near and far away at the same time
- Objects in motion
●The focus can be achieved from 50mm to ∞.
■ Manual focus
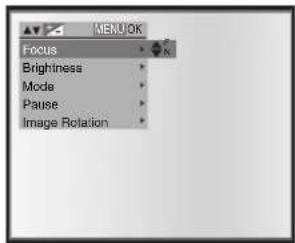
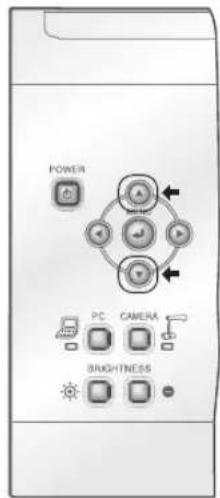
The position to focus can be changed with [▲] [▼] buttons on the main unit after selecting [Focus] in the OSD menu. Use the manual focus to focus on any position of a 3-D object.
VARIOUS FUNCTIONS AND OPERATIONS
Adjusting the brightness
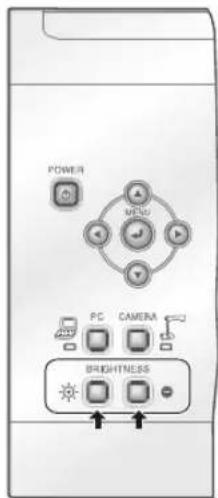
Press the [BRIGHTNESS • 🍒] and [BRIGHTNESS • 🍒] buttons on the main unit to adjust image brightness. Following two adjustment mode can be selected from the OSD menu.
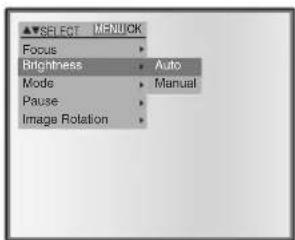
■ Automatic brightness adjustment
([Brightness] → [Auto] in the OSD)
Brightness of the image changes automatically according to the brightness of the object.
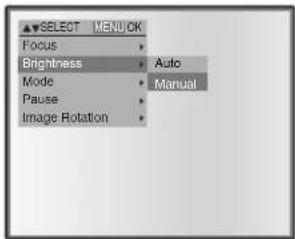
■ Manual brightness adjustment
([Brightness] → [Manual] in the OSD)
Brightness of the image is fixed to the specified level.

Note
• Factory setting is set to [Auto]
- Manual adjustment fixes the brightness and does not follow the change in brightness of the object.
- When the brightness becomes dark, the frame rate slows, and the image may become hard to see.
- By setting [Guide] to [On] in the OSD menu, the setting details is displayed on the screen.
• To go back to factory settings, press the [BRIGHTNESS • and [BRIGHTNESS •
buttons on the main unit at the same time.

Image selection
VARIOUS FUNCTIONS AND OPERATIONS
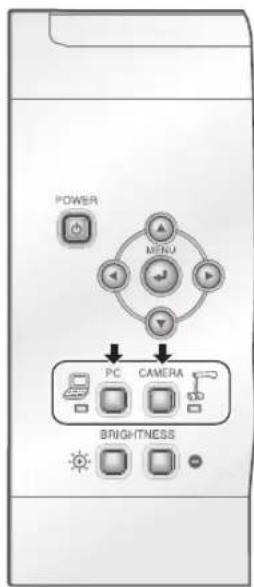
The camera image and the image input in the RGB input terminal [RGB IN] can be switched by pressing the [CAMERA] button and the [PC] button respectively.
By using these functions, output images can be switched without disconnecting cables.
Note
- The [PC] button can not be used when the dip switch is set to VIDEO.
- When using a laptop PC with external output selection equipped, set the output mode of the PC to "external" after pressing the [PC] button on the main unit.
White Balance
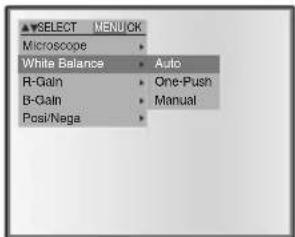
■ How to use [Auto]
Adjust the white balance automatically according to the color status of the document.
Factory setting : Auto
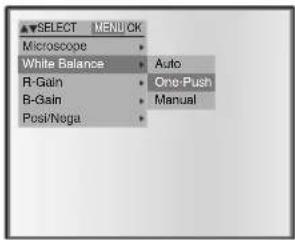
■ How to use [One-Push]
To be used when the color balance of the image is lost.
Firstly shoot a sheet of white paper and set the OSD menu [White Balance] → [One-Push]. And then, the white balance for the then color temperature is fixed.
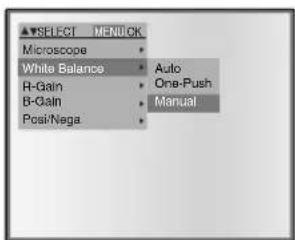
■ How to use [Manual]
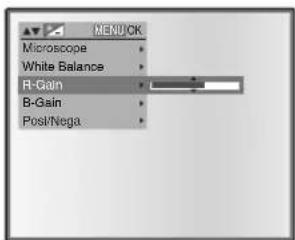
Setting to [White Balance] → [Manual] for the OSD fixes the white balance to allow [R-Gain] and [B-Gain] for the OSD to be adjustable.
VARIOUS FUNCTIONS AND OPERATIONS
![Elmo TT-02U - ■ How to use [Manual] - 3](/content/2026/04/699912/images/fff802d9d67b994603f17386fcf061e84eb035f23a642e432e3b7d6b518ac91b.jpg)
Note
- The automatically followed color temperature ranges from approx. 3000K - 8000K.
- By setting [Guide] to [On] in the OSD menu, the setting details are displayed on the screen.
Save/call setting
The operation status of the unit can be saved/called in the memory. The unit saves 4 conditions (1-3, ON setting) and the storable condition are as follows.
- Current zoom angle of view (The range of the optical zoom)
- Brightness
- Mode setting
• Edge enhancement (in Graphics mode)
• Gamma value setting (in Graphics mode)
• Status of image rotation
• Status of white balance
- Intensity of red color (when selecting [White Balance] [Manual])
- Intensity of blue color (when selecting [White Balance] [Manual])
- Posi/Nega setting
• Color/B&W switch setting
Note
●The saved conditions are retained even if the power is turned OFF.
■ How to save setting
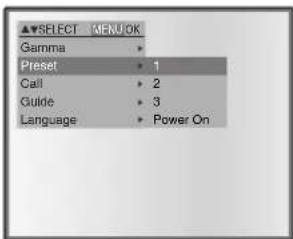
Selecting [Preset] → [1] \~ [3] in the OSD menu saves the current unit condition in the selected number.
Selecting [Preset] → [Power On] in the OSD menu saves the setting to be called when the power switch of the main unit is ON.
Note
● The status of a presentation done with microscope can not be saved.
● The status of image rotation can be saved only to [1] \~ [3]. (Not to [Power ON])
- Zoom angle of view in digital zoom mode can not be saved. When the status saving is done in digital zoom mode, saved zoom angle of view is the maximum TELE position [Zoom-IN ☐] of optical zoom.
■ How to call setting
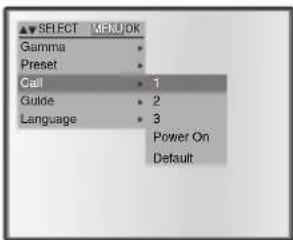
Selecting [Call] → the memory number for the OSD provides the setting for the selected number.
Selecting [Call] → [Power On] for the OSD provides the setting for the power supply ON.
Selecting [Call] → [Default] for the OSD provides the factory default setting.
6
TROUBLE SHOOTING
English
P1\~P33
Symptoms and Confirmation
Check the following items. If any abnormality is found, consult the seller from whom you have purchased this product or our branch/office near your location.
| Symptom Possible cause/counter measure | |
| No image is displayed. | The cable is not correctly connected.The AC adapter is disconnected from the wall outlet.The AC adapter is disconnected from the power supply socket of the presenter.The power supply is not ON. (Green light does not turn on)Zoom is set at the TELE side, displaying only the white/black part of the document.Turning ON the power supply immediately after turning OFF may not start the unit. Wait for several seconds after turning OFF the power supply, and then turn it ON.The dip switch is not set to proper image output (RGB/VIDEO). In such case, set the dip switch properly by referring to P.11 [OUTPUT]. |
| No image is displayed from the USB. | The DIP switch is not set to [RGB]. When the DIP switch is set to [VIDEO], the image cannot be output from the USB. Refer to “OUTPUT (DIP switch)” on page 11 to switch the output to [RGB]. |
| The image is out of focus. | The document (object) is too close to the lens.Zoom is set at the TELE side after focusing at a wide angle (WIDE side). Focus to its maximum limit at the TELE side.Some auto focus may be diffi cult to adjust. Focus on an image manually referring to “Manual focus” on page 26. |
| The video output image is disarrayed. | Video output is set to [PAL]. If this product with the PAL system set is connected to the monitor specially designed for the NTSC system, the video image may not be normally output but be disarrayed or in black and white. Refer to “OUTPUT” (p.11) to switch the video output system. |
| The image is too dark. | The intensity of the lighting is insufficient. Press the [BRIGHTNESS • ➕] button on the main unit adjust brightness. |
| The image is striped. | This may be interference fringes between dots of printed matter and TV scanning lines or CCD pixels. Changing the projection range may mitigate the trouble.Vertical stripes may appear on an LCD projector image. Manually adjusting dot clock at projector side may mitigate the trouble. |
| The image does not move. | Camera image is set to [Pause]. Set [Pause] → [Off] in the OSD. |

SPECIFICATIONS
■ General
| Item Specifications | |
| Power source 12VDC (AC adapter AC100 - 240V) | |
| Power consumption 9W (AC adapter included) | |
| Outside dimensions | W343xD368xH411mm (W13.5xD14.5xH16.2 in) (When setup) |
| W195xD368xH444mm (W7.7xD14.5xH17.5 in) (When folded) | |
| Weight Approx. 2.9kg (6.4 lbs) (Main body only) | |
| Input selection Main/External | |
| Output terminal RGB output Mini Dsub 15P connector, female x 1 | |
| Input terminal Input terminal RGB input Mini Dsub 15P connector female x 1 | |
| Ext. control terminal USB (2.0 compliant) Type B receptacle x 1 | |
*Use pin plug for RCA pin in accordance with EIAJ RC-6703.
■ Main Camera
| Item Specifications | ||
| Lens f = 4.0mm - 21.2mm (5.3-time zoom) F2.0 - 4.5 | ||
| Frame rate Max. 20 frames/sec. | ||
| Shooting area Max. 426x317mm (16.8x12.5 in) Min. 93x70mm (3.7x2.7 in) | ||
| Limit of focus adjustment | 50mm - ∞ (2.0 in x ∞ ) from lens top | |
| Optical zoom 5.3X | ||
| Digital zoom 8X | ||
| Focus Auto/Manual | ||
| Image pick-up element | 1/3" CCD | |
| Total pixels Horizontal | 1077, Vertical 788 ... Approx. 850,000 pixels | |
| Effective pixels | Horizontal 1024, Vertical 768 | |
| Synchronized signal | Internal | |
| Resolution | Analog RGBHorizontal 600TV lines or more Vertical 600TV lines or moreVideo output Horizontal 400TV lines or more | |
| Analog RGB output | Analog RGB output 0.7 V(p-p) 75 ΩunbalancedSynchronized signal: Negative polarity | XGA Horizontal frequency 48.363 kHzVertical frequency 60.004 HzCompliant with VESA |
| Composite video output | Compliant with NTSC/PAL | |
| White balance | Full auto/One-push/Manual | |
| Video output selection switch | Provided (NTSC/PAL) | |
| Brightness control | Auto (level control provided)/Manual | |
| Posi/Nega conversion | Provided | |
| Color/B&W selection | Provided | |
| Image rotation | Provided (0°/180°) | |
| Mode | Text1/Text2/Text3/Graphics | |
| Gamma setting | Provided (Only for graphic mode)) | |
| Edge enhancement | Provided (Only for graphic mode) | |
| Pause | Provided | |
*The above specifications are subject to change without notice.
■ Supplied Accessories
| Name Quantity | |
| AC adapter 1 | |
| Analog RGB cable (Dsub 15P connector) (2m) 1 | |
| Stage 1 | |
| Magnetic sheet 1 | |
| Anti-glare sheet 1 | |
| Dust cover 1 | |
| Instruction Manual 1 | |
| Warranty Card 1 | |
| Utility Software Installation Manual 1 | |
| Utility Software CD-ROM 1 | |
| USB cable (1.8m) 1 |
Trademark
ELMO is the trademark of ELMO Co., Ltd.
VESA and SVGA are the registered trademarks of Video Electronics Standards Association.
VGA and XGA are the trademark/registered trademark of International Business Machines Corporation.
All other company/products names described in the manual are trademarks or registered trademarks of respective companies.
ELMO
DOCUMENT CAMERA
TT-02u
Outil à enseigner
MODE D'EMPLOI
natural_image
Symbolic icon of a person pushing a large object through a circular frame (no text or symbols)The connection of a non-shielded equipment interface cable to this equipment will invalidate the FCC Certification or Declaration of this device and may cause interference levels which exceed the limits established by the FCC for this equipment. It is the responsibility of the user to obtain and use a shielded equipment interface cable with this device. If this equipment has more than one interface connector, do not leave cables connected to unused interfaces. Changes or modifications not expressly approved by the manufacturer could void the user's authority to operate the equipment.
FOR UNITED STATES USERS: INFORMATION
This equipment has been tested and found to comply with the limits for a Class B digital device, pursuant to Part 15 of the FCC Rules. These limits are designed to provide reasonable protection against harmful interference in a residential installation. This equipment generates, uses, and can radiate radio frequency energy and, if not installed and used in accordance with the instructions, may cause harmful interference to radio or television reception. However, there is no guarantee that interference will not occur in a particular installation. If this equipment does cause interference to radio and television reception, which can be determined by turning the equipment off and on, the user is encouraged to try to correct the interference by one or more of the following measures.
- Reorient or relocate the receiving antenna.
- Increase the separation between the equipment and receiver.
- Connect the equipment into an outlet on a circuit different from that to which the receiver is connected.
- Consult the dealer or an experienced radio/TV technician for help.
USER-INSTALLER CAUTION:
Your authority to operate this FCC verified equipment could be voided if you make changes or modifications not expressly approved by the party responsible for compliance to Part 15 of the FCC rules.
AVANT L'EMPLOI
natural_image
Diagram of a mechanical device with a curved pipe and two cross marks indicating failure or failure (no text or symbols present)natural_image
Illustration of a desktop computer with a curved stand and plug, no text or symbols presentnatural_image
Illustration of a handheld electronic device with a curved arm and a base (no text or symbols visible)natural_image
3D diagram of a handheld device with a curved arm and a base, no visible text or symbolsnatural_image
Illustration of a desktop computer with a curved arm and base (no text or symbols visible)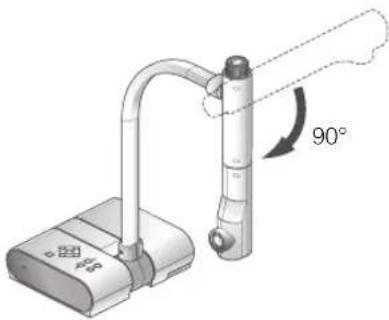
natural_image
Diagram of a medical or laboratory device with a 90-degree angle indicator and a curved pipe fitting (no text or symbols present)Note
natural_image
Illustration of a projector connected to a display unit with a paper sheet nearby (no text or symbols)natural_image
Illustration of a desktop computer connected to a laptop and a projector (no text or symbols)FONCTIONNEMENT
PROCÉDURES DE
natural_image
Illustration of a robotic arm with two articulated arms and a display case (no text or symbols)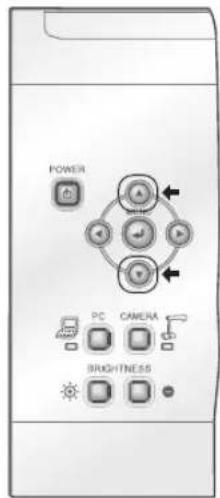
FONCTIONS
DES
DESCRIPTION

- IMPORTANT SAFEGUARDS
- FOR UNITED STATES USERS: INFORMATION
- USER-INSTALLER CAUTION:
- BEFORE YOU USE
- CONTENTS
- PART NAMES AND FUNCTIONS
- Name of Each Part
- Functions
- ■ Rear Panel
- OSD (On Screen Display)
- SETTING UP
- Setting Up
- Note
- Turn the camera head.
- Connect the analog RGB cable to the [RGB OUT] terminal and connect the DC plug of AC adapter to [DC IN 12V] terminal. P.15
- Turn the power switch of the main unit ON.
- Connecting of AC adapter and Video cable
- 3
- STORING
- Turn the power switch of the main unit OFF
- Unplug the AC adapter and the video cable.
- Turn the camera head to the direction shown in the figure.
- Presentation using printed materials, etc.
- ■ Setting the main unit
- ■ Adjusting the size
- ■ Adjusting the focus
- ■ Adjusting the brightness
- Presentation using printed materials, etc. (Using the stage)
- Presentation using the supplied software with the USB-connected PC
- Presentation using a Microscope
- ■ Setting a microscope
- ■ Changing to the Microscope mode
- Shooting a 3-D object
- Shooting wall surface or distant view
- VARIOUS FUNCTIONS AND OPERATIONS
- Zoom
- Focus
- ■ Auto focus
- ■ Manual focus
- Adjusting the brightness
- ■ Automatic brightness adjustment
- ■ Manual brightness adjustment
- Image selection
- White Balance
- ■ How to use [Auto]
- ■ How to use [One-Push]
- ■ How to use [Manual]
- Save/call setting
- ■ How to save setting
- ■ How to call setting
- 6
- TROUBLE SHOOTING
- Symptoms and Confirmation
- SPECIFICATIONS
- Trademark
- ELMO
- DOCUMENT CAMERA
- TT-02u
- Outil à enseigner
- MODE D'EMPLOI
- AVANT L'EMPLOI
Brand : Elmo
Model : TT-02U
Category : Documentary camera