PAU13 - Humidifier Perfect Aire - Free user manual and instructions
Find the device manual for free PAU13 Perfect Aire in PDF.


User questions about PAU13 Perfect Aire
0 question about this device. Answer the ones you know or ask your own.
Ask a new question about this device
Download the instructions for your Humidifier in PDF format for free! Find your manual PAU13 - Perfect Aire and take your electronic device back in hand. On this page are published all the documents necessary for the use of your device. PAU13 by Perfect Aire.
USER MANUAL PAU13 Perfect Aire
USER MANUAL/ MANUEL DE L'UTILISATEUR
FOR MODEL/ POUR MODÈLE:
PAU13
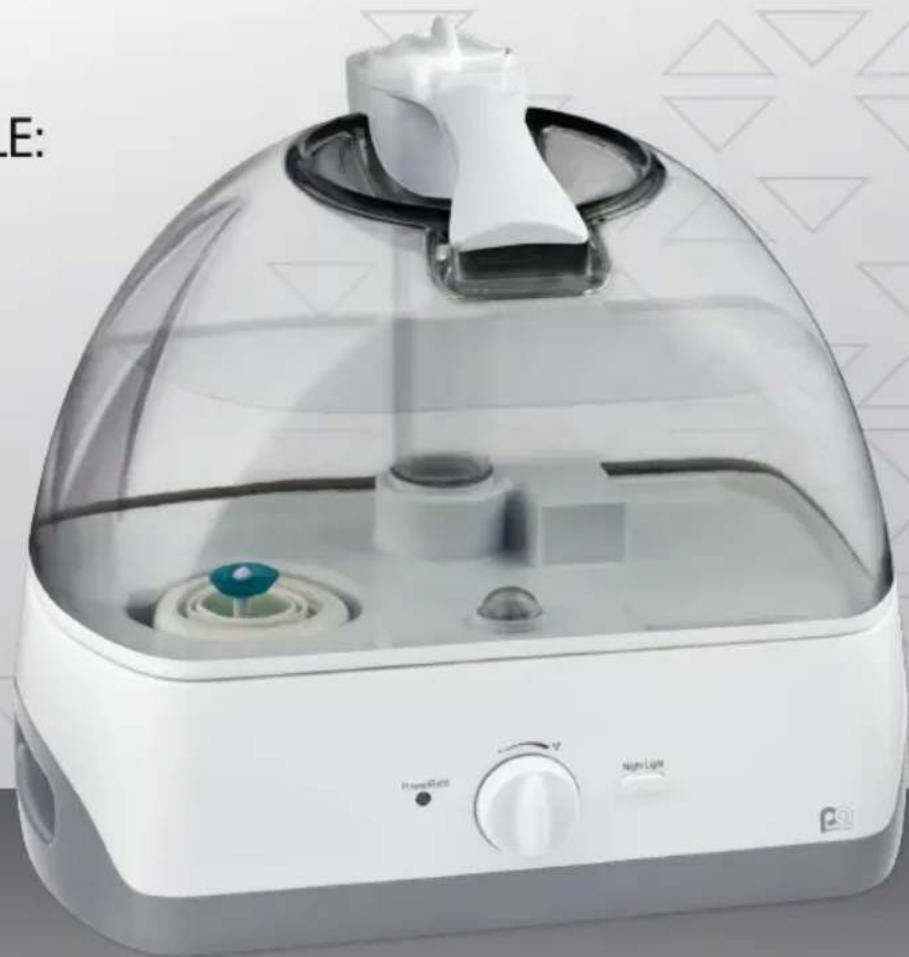
natural_image
White portable air purifier with clear dome cover and control knobs (no visible text or symbols)CONTENTS
Safety Guidelines....3
Technical Data....3
Features....3
Parts Diagram 4
Humidifier Placement....4
Refilling the Water Tank .... 4
OperatingInstructions....5
Weekly Maintenance 5
Storage Instructions....5
Troubleshooting 6
Warranty....7
SAFETY GUIDELINES
When using electrical appliances, basic safety precautions should always be followed. Failure to follow these safety precautions may result in personal injury, property damage, fire or shock.
-
Always have water in water tank (water bottle) when operating unit.
-
We recommend using only filtered or distilled water. Using tap water with a high mineral content (hard water) will result in a white dust and the need for more frequent cleanings. Hard water can damage the nebulizer and may eventually cause it to fail.
-
Be sure the cap is firmly fastened onto the tank.
-
Position the unit so the mist control output nozzle is aimed away from children, walls and furniture in the room (min. 36 in/91 cm clearance) to avoid condensation and property damage.
-
When removing the tank, grasp it firmly with both hands, before using one hand to support the bottom.
-
DO NOT use this unit if the tank is cracked.
-
DO NOT place the humidifier near heat sources such as a stove, oven, or direct sunlight. Keep the cord away from hot surfaces and areas where it can be stepped on or tripped over.
-
Use only a dedicated, grounded 115-120V AC outlet, making sure the unit is plugged in firmly and completely. Plug and unplug the unit with dry hands only.
-
Turn off and unplug the unit when moving or cleaning it, or when it's not in use.
-
☑ avoid the risk of fire, shock, or personal injury, do not use an extension cord or power strip. Warning: Never operate the unit with a damaged cord or plug.
-
DO NOT place on the floor or carpet. Always place the unit on a flat, level, waterproof surface at least 24 in. (61cm) off the floor AWAY from direct sunlight, computers or other sensitive electronics.
-
DO NOT place the humidifier on wood furniture or other surfaces that can be damaged by water.
-
DO NOT place the unit on towels or soft surfaces. This will block the air vent and cause overheating.
-
DO NOT add medicine, essential oils, or cleaning products of any type into the mist control nozzle, base or water tank (See the "Weekly Maintenance Cleaning & Care" section for proper cleaning instructions). NEVER cover or block any openings on the unit. NEVER drop or insert any objects into any openings.
-
The unit should not be left unattended in closed rooms as air could become too humid and leave condensation on the walls or furniture. Always leave a door partially open.
-
DANGER: NEVER immerse the humidifier base (motor unit) in water or other liquids as electrical shock may occur.
-
DO NOT use the unit outdoors.
-
Turn the humidifier OFF if the relative humidity exceeds 60% or if you notice condensation on the windows. For a proper humidity reading, use a hygrometer which is available in many retail stores.
-
The nebulizer (ultrasonic transducer) is highly sensitive. Keep this important part clean and treat it gently. Clean only according to the instructions on page 7. WARNING:
Do not touch the nebulizer while the unit is operating, as possible burns could result. Do not touch the nebulizer with fingers. Any residue on the metal will reduce mist output.
- The unit contains no user serviceable parts. To reduce the risk of electrical shock, do not attempt to open the base of the humidifier.
DANGER! To reduce the risk of electrical shock, this product has a polarized plug (one blade is wider than the other). As a safety feature this plug will fit into the outlet only one way. If the plug does not fit fully into the outlet, reverse the plug. If it still does not fit, contact a qualified electrician. DO NOT attempt to bypass this safety feature. Improper use of electric cords and plugs can cause a fire or electric shock hazard. NEVER pull on the cord to remove the plug from the outlet. Grip the plug and pull directly from the outlet. Check the power cord and plug for damage. If the cord or plug are damaged, contact Customer Service before using the humidifier.
FEATURES
Model: PAU13
Voltage: 115-120V\~/60Hz Watts: 35W Max.
Run Time: 36 hours Water Tank Capacity: 1.3 gal (4.9 L)
All data was tested by the factory and are for reference only. This unit is designed for home use only.
ULTRASONIC TECHNOLOGY
An ultrasonic transducer atomizes water droplets into ultra-fine particles which are dispersed into the air as a refreshing cool mist.
AUTO SHUT OFF PROTECTION / WATERLESS INDICATOR
When the water tank is empty, the motor will shut off automatically and the Power Indicator Light will turn red.
OVERLOAD PROTECTION
The unit will automatically shut off if a circuit is overloaded.
NIGHT LIGHT
Creates a soft illumination. To turn on the night light, push the night light button. Repeat the process to turn it off.
PARTS DIAGRAM
A. Mist Nozzle
B. Water Tank Handle
C. Water Tank
D. Tank Cap (located underneath the tank)
E. Power/Humidity Control Knob
F. Power Light/Water Refill Indicator
G. Ultrasonic Transducer
(Nebulizer - circle inside the black ring at the bottom)
H. Base
I. Fan Outlet
J. Power Cord
K. Water Level Sensor
L. Brush Holder for Nebulizer (brush included)
M. Night Light
N. Night Light On/Off Switch
O. Base Handle
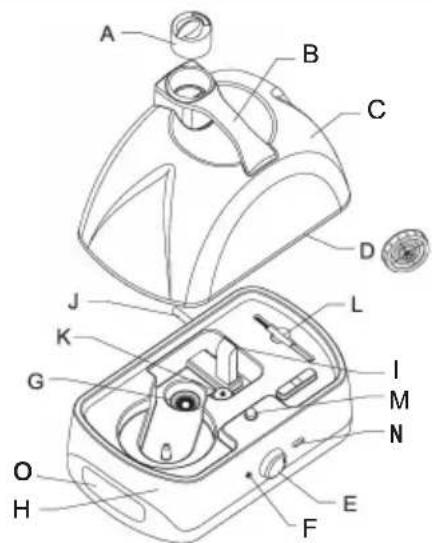
text_image
Technical diagram of a device with labeled parts, showing internal components like gears and buttonsHUMIDIFIER PLACEMENT
- Place thenit at least 6 ft (1.83 m) away from wood furniture, TVs, stereos and other electronicappliances.
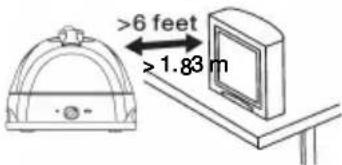
text_image
>6 feet >1.83 m- Do not place unit near curtains, paintings/portraits, bedding or wood furniture.
natural_image
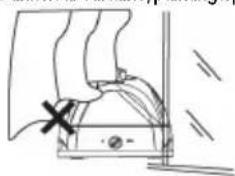
Simple line drawing of a mechanical component with no visible text or symbols- Always place the humidifier on a firm, flat, level, waterproof surface, at least 24in(61 cm) off the floor.
natural_image
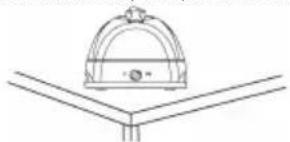
Simple line drawing of a dome-shaped object above two parallel lines (no text or symbols)- Do not place the unit near the stove or other heat sources. Do not place the unit in direct sunlight.
natural_image
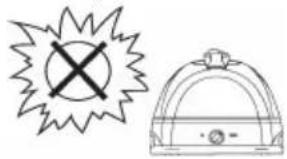
Simple line drawing of a warning symbol with a cross inside a jagged starburst shape and a helmet-like icon below (no text or labels)REFILLING THE WATER TANK
• Unplug the unit before refilling the tank.
- Do not set the unit on a soft surface such as a towel or carpet. NOTE: Do not fill the base of the unit. Only add water to the tank.
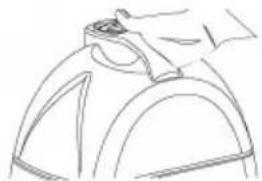
1. Hold the tank handle and lift the water tank from the base. If the unit was in use you may want a towel readily available for any water dripping.
natural_image
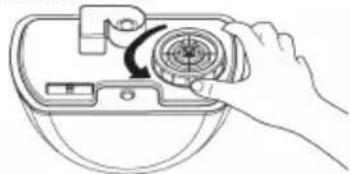
Line drawing of a dome-shaped object with a handle and a small protrusion, no text or symbols present- Carefully turn the water tank upside down; unscrew down; unscrew the tank cap by turning it counterclockwise and set aside.
natural_image
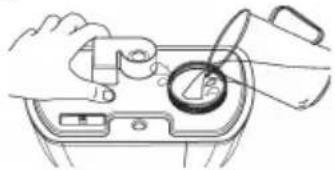
Line drawing of a hand inserting a circular component into a device (no text or symbols)- Take the tank to a sink to fill it, holding the tank steady to keep it from falling over. Fill the tank with clean, cool distilled or FILTERED tap water.
natural_image
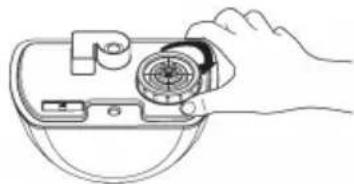
Line drawing of hands using a tool to adjust or install a device component (no text or symbols visible)- Replace the tank cap by firmly turning it clockwise.
natural_image
Line drawing of a hand holding a device with a circular component inserted (no text or symbols)- Set the base in an appropriate location, carefully placing the tank onto it. Once set, the base will partially fill with water.
OPERATING INSTRUCTIONS
IMPORTANT NOTES REGARDING HUMIDIFIER USE
We recommend the humidifier base be cleaned prior to the first use, according to the cleaning instructions on the next page. Position the unit at least 24 in. (61 cm) off the floor, on a firm, level, non-porous surface. Do not place the unit on wood or a soft, unstable surface, such as a towel or bed, as they will block the air vent and cause overheating. The humidifier should be placed at least 24 in. (61 cm) away from all walls or heat sources, and at least 6 ft. (1.83 m) from any electronics such as a TVs, speakers, laptops, etc.
WHEN FILLING THE TANK, NOTE:
• Always unplug the unit before filling and replacing the tank.
- Distilled or filtered water is highly recommended. The minerals in (hard) tap water may cause a "white dust" to appear on your furniture and can eventually cause unit failure.
- DO NOT ADD ANY ESSENTIAL OILS, MEDICINES, OR ADDITIVES TO THE WATER, AS THEY WILL CAUSE DAMAGE AND POTENTIAL FAILURE TO THE UNIT.
- Extreme temperatures can damage the unit. Water temperatures should NEVER be too hot or too cold.
- Return the tank securely to the base before turning on the humidifier. Improper placement will cause leaking and possible damage.
DANGER!
Improper use of electric cords and plugs can cause a fire or electric shock hazard.
NEVER pull on the cord to remove the plug from the outlet. Grip the plug firmly and pull directly away from the outlet. Check the power cord and plug for damage. A damaged cord or plug must be repaired before using the humidifier. In the event of damage, contact Customer Service.
WEEKLY MAINTENANCE
IMPORTANT:
• ALWAYS unplug the unit from the outlet before cleaning.
- NEVER use any cleansers (especially abrasive, corrosive, or flammable ones like alcohol) in the unit as these can damage the unit and, if used, will void the warranty.
CLEANING INSTRUCTIONS
For optimum performance, clean your humidifier once a week by following the instructions below. Using tap water in the tank may require cleanings every couple of days, as hard water leaves mineral deposits in the unit and creates "white mist."
TANK CLEANING
- Fill the water tank 1/3 of the way with a solution of clean water and 1 tbsp (15 ml) of white vinegar or bleach.
- Let the cleaning solution stand for 20 minutes, shaking the tank over a sink every few minutes. DO NOT place the tank on the base or run the unit while cleaning.
- Empty the tank and rinse it twice with clean water. Use a soft wash cloth to wipe down and dry off the tank.
BASE CLEANING
- For best results, pour 1 cup (240 ml) of clean water and 2 tbsp (30 ml) of white vinegar or bleach into the base of the unit. Set aside for 10 minutes. NEVER submerge or place the base under running water.
- Use a soft bristled brush or cloth to carefully clean around the nebulizer and loosen any mineral deposit build-up. DO NOT touch nebulizer with your hands as fingerprints or any other residue can affect the mist output.
- Empty the cleaning solution by holding the base from the side where the air outlet is located and having the water run to the opposite end.
- Rinse the base twice by pouring 2 cups (480 ml) of clean water in the base both times. NEVER submerge or place base of unit under running water.
- Wipe the base and outer surfaces with a soft, damp wash cloth.
STORAGE INSTRUCTIONS
- Clean the unit thoroughly according to the instructions on the previous page and allow the unit to dry completely before storing. DO NOT leave water in the tank or base for more than 24 hours.
- Store the unit in an upright position away from direct sunlight. Do not store in temperatures below 41°F (5°C).
Please check the following troubleshooting tips before calling for assistance.
| ISSUE | POSSIBLE CAUSE | SOLUTION |
| Power light is off | The unit is not plugged in. | Plug in the unit and turn the power/ output adjustment knob clockwise. |
| The wall outlet has no power. | Check the circuit and fuse; try another outlet. | |
| The power cord is damaged. | If the plug or cord are damaged, call Customer Service at 1-844-4PA-AIRE (1-844-472-2473) | |
| Unit / Mist has a peculiar smell | The unit is new. | Air the unit out in a cool place for 12 hours with the tank separate from the base. |
| The water is dirty or stale. | Thoroughly clean the unit and place fresh water in the tank. | |
| Excessive noise | There are vibrations between the humidifier and its resting surface. | Place the unit on a stable, waterproof |
| Low water level in the tank. | Fill the water tank. | |
| White dust | The water contains a high mineral content. | Switch to distilled or filtered water; clean the nebulizer according to the instructions. |
| Damp table or floor | The unit is too far from the end of the table or too close to the floor. | Move the unit closer to the table's edge giving the mist more time to disperse. Do not place the unit on the floor. |
| The water in the base overflowed. | The tank cap is not securely attached or it needs to be replaced. | |
| No mist/Little mist/No fan | The base overfilled with water. | Empty the base and restart. |
| The water tank is empty. | Add water to the tank. | |
| The power/output adjustment knob is not turned on. | Rotate the power/output adjustment knob clockwise to turn the unit on. | |
| The humidifier is not on a level surface. | Put the humidifier on a flat, waterproof surface. | |
| There is mineral scale on the nebulizer/transducer. | Clean the nebulizer/transducer according to the instructions | |
| The wrong type of cleanser was used to clean the tank. | Clean the water tank according to instructions, then let the tank dry completely. | |
| The water level is too low. Add water to the tank. | ||
| The water is dirty or stale. | Thoroughly clean the unit and place fresh water in the tank. | |
| The nebulizer/transducer or fan does not work. | Call Customer Service at 1-844-4PA-AIRE (1-844-472-2473). | |
| Condensation on the windows or unit | The room is too small or too humid. | Turn down the mist volume or turn the unit off completely, and check the room's square footage to ensure proper sizing. |
| Scaling on the nebulizer/ transducer | The water is too hard (mineral content is high). | Use distilled or filtered water. |
After reviewing the troubleshooting tips above, should you have any questions or concerns, please call Customer Service at 1-844-4PA-AIRE (1-844-472-2473).
PERFECT AIRE ^® warrants that during the first year from the original date of purchase, this product will be free from defects in material and workmanship. Perfect Aire, at its discretion, will repair or replace this product, or any component of this product, found to be defective during the warranty period. This is a one-time replacement warranty. If the product is no longer available, Perfect Aire will replace the unit with a similar model, equal or greater in value.
THIS WARRANTY IS NOT TRANSFERABLE.
PROOF OF PURCHASE IS REQUIRED IN ORDER TO OBTAIN WARRANTY ASSISTANCE.
THIS WARRANTY DOES NOT COVER:
- Damages caused by improper installation.
- Negligent use, or misuse of the unit.
- Damages as the result of not using the humidifier according to the instructions provided.
- Damage to the unit, walls, paintings/portraits, furniture, floors, etc. as the result of high mineral content in the water.
- Damage to the unit, walls, paintings/portraits, any furniture (wood), floors, etc. as a result of improper cleaning.
- Use of improper voltage or current.
• Additional or extended warranties offered by retail point of sale.
- Disassembly or repair not completed by a certified technician as authorized by Perfect Aire.
- Products used in a commercial setting.
• Floor display 'as-is' models.
- Damage caused by acts of nature such as hurricane, tornado, fire, etc.
- Incidental or consequential damages caused by breach of any expressed, implied or statutory warranty or condition with exception to the extent prohibited by law.*
- Any performance issues that fall outside of the 1-year warranty period.
*Note: Some states do not allow the exclusion or limitation of incidental or consequential damages. Such limitations or exclusions may not apply to you.
DO NOT RETURN THIS UNIT TO THE STORE.
If you have any questions about this unit or its warranty, please call customer service toll-free at 1-844-4PA-AIRE (1-844-472-2473).
CONSUMER PRODUCT INFORMATION
For your own records, please attach a copy of your sales receipt to this manual. Also write the store name/location and date purchased below:
Store Name: ____
Location: ____
Date Purchased: ____
SOMMAIRE
Voltage: 115-120V\~/60Hz Watts: 35W
text_image
Technical diagram of a device's internal components with labeled parts A through MPLACEMENT DE L'HUMIDIFICATEUR
natural_image
Simple line drawing of a mechanical component with a cross mark and curved lines, no text or symbols present.natural_image
Simple line drawing of a hard hat placed on a surface with two legs (no text or symbols)natural_image
Two technical illustrations: a starburst symbol with an 'X' and a dome-shaped helmet (no text or symbols present)REMLISSAGE DU RÉSERVOIR D'EAU
natural_image
Line drawing of a dome-shaped object with a handle, possibly a container or mechanical part (no text or symbols)natural_image
Line drawing of hands using a tool to adjust or clean a circular object inside a container (no text or symbols)natural_image
Line drawing of a hand holding a device with a circular component, no text or symbols presentnatural_image
Line drawing of a hand inserting a device into a device housing (no text or symbols)GARANTIE LIMITÉE D'UN AN
This apparatus meets all requirements of the Canadian Interface-Causing Equipment Regulations.
This Class B digital apparatus complies with Canadian ICES-001.
DÉCLARATION NMB
PA/User PAU13/05112020
Specification and performance data is subject to change without notice.
Thank you for purchasing our product and thank you for placing your confidence in us. We are proud to have you as a customer!
Choose to register your new product investment online at perfectaire.us or through mail by following these three steps:
1 Complete your Consumer Product Ownership Registration today. online at perfectaire.us or by mail. Have the peace of mind of knowing we can contact you in the unlikely event of a safety modification.
2 After mailing the registration form below or completing the form online, store this document, along with the User Manual and the original purchase receipt, in a safe place. These items contain information you will need should you require assistance.
3 Read your User Manual carefully. It will help you operate your new product properly.
Our Consumer Services number is 844.472.2473.
If you prefer to send in your Product Registration, complete the form below, detach, and mail.
Cut Here
CONSUMER PRODUCT OWNERSHIP REGISTRATION
MODEL NUMBER SERIAL NUMBER
The serial number is located on the bar code sticker on the product. It is below the bar code and begins with "SN."
First
Name
Last
Name
Street
Address
Apt. #
City
State
Zip
Code
Phone
Number
Date Purchased Store Where Purchased
Month Name/Location Day Year
FAILURE TO COMPLETE AND RETURN THIS CARD DOES NOT DIMINISH YOUR WARRANTY RIGHTS.
CONSUMER PRODUCT OWNERSHIP REGISTRATION
Protecting Your Investment
Takes 5 minutes!
We sincerely appreciate that you have chosen to purchase a Perfect Aire product, therefore we want to help you protect your investment. Please complete the Product Registration today for:
CONFIRMATION OF OWNERSHIP
In the event of product theft or loss, the completed Product Registration verifies your ownership.
○ PRODUCT REGISTRATION
Registering your product guarantees that you will be contacted in the unlikely case of a product safety issue.
FAILURE TO COMPLETE AND RETURN THIS CARD DOES NOT DIMINISH YOUR WARRANTY RIGHTS.
Cut Here
Place
Stamp
Here

text_image
p perfect aire®Perfect Aire, LLC
5401 Dansher Rd
Countryside, IL 60525