
3PAD50 - Humidifier Perfect Aire - Free user manual and instructions
Find the device manual for free 3PAD50 Perfect Aire in PDF.


| Product Type | Humidifier |
| Brand | Perfect Aire |
| Model | 3PAD50 |
| Humidification Type | Ultrasonic Cool Mist |
| Tank Capacity | 1.8 gallons (7 liters) |
| Coverage Area | Up to 400 sq ft |
| Runtime per Fill | Up to 24 hours |
| Power Supply | 120V AC, 60Hz, 30W |
| Dimensions (L x W x H) | 12.5 x 10.5 x 15 inches |
| Weight | 8.5 lbs |
| Mist Output Settings | Adjustable (Low, Medium, High) |
| Auto Shut-Off | Yes, when tank is empty |
| Indicator Light | Yes, power and low water |
| Noise Level | Less than 30 dB (whisper quiet) |
| Filter Type | Optional demineralization cartridge |
| Cleaning | Weekly descaling with vinegar; replace filter every 3 months |
| Safety Features | Auto shut-off, tip-over protection |
| Warranty | 1 year limited |
| Repairability | Replaceable filter and optional parts; contact support |
| Energy Star Certified | Not specified |
Frequently Asked Questions - 3PAD50 Perfect Aire
User questions about 3PAD50 Perfect Aire
0 question about this device. Answer the ones you know or ask your own.
Ask a new question about this device
Download the instructions for your Humidifier in PDF format for free! Find your manual 3PAD50 - Perfect Aire and take your electronic device back in hand. On this page are published all the documents necessary for the use of your device. 3PAD50 by Perfect Aire.
USER MANUAL 3PAD50 Perfect Aire
Your Source for Home Comfort
30, 50 & 70 PINT DEHUMIDIFIER
USER MANUAL
FOR MODELS:
3PAD30
3PAD50
3PAD70
Before using your dehumidifier, please read this manual carefully and keep it for future reference, along with your receipt.

natural_image
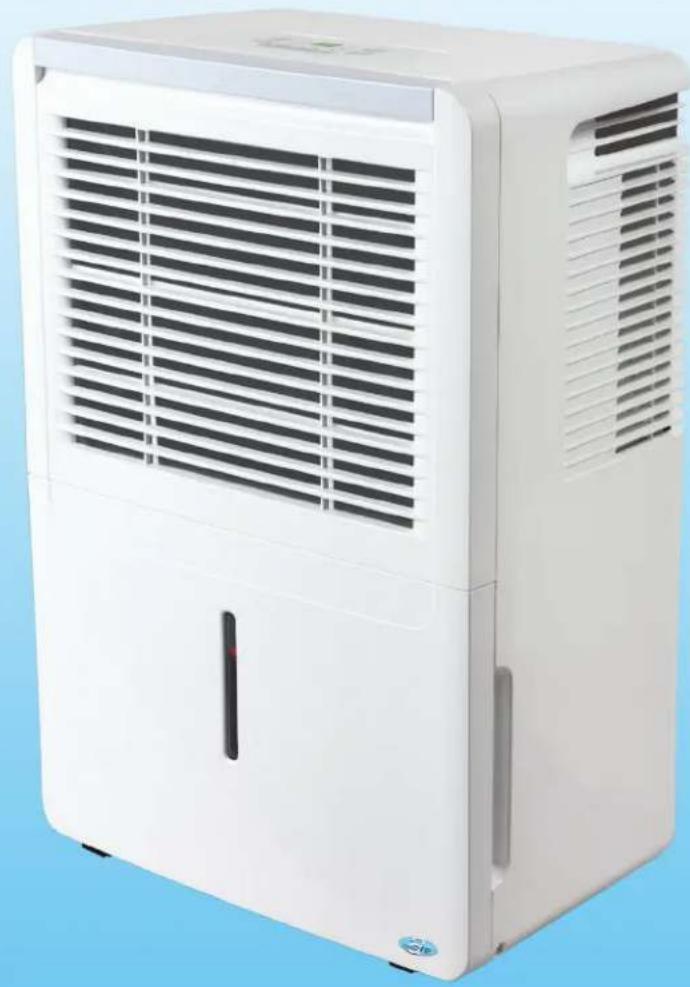
White portable water heater with ventilation grille and control panel (no visible text or symbols)Be sure to read the Quick Start Tips on Page 1
Quick Start Tips
It is highly suggested that the manual be read in full before operating the unit. However, the notes below are especially important in helping you to properly set up and begin to use your dehumidifier.
-
The dehumidifier should be kept upright. If for any reason it has not been stored upright while in your possession, put the unit in an upright position for a minimum of 24 hours before running it.
-
When first using the dehumidifier, operate the unit on continuous mode for 24 hours.
First 24 hours on Continuous Mode. Cont.
- After the first 24 hours, should you wish to set a desired humidity, you will need to take the unit off of "Continuous." You will not be able to select a desired humidity while the unit is set on "Continuous" mode.
(NOTE: You do not need to be in "Continuous" mode to do continuous draining.)
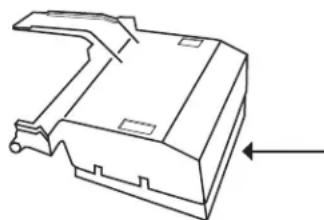
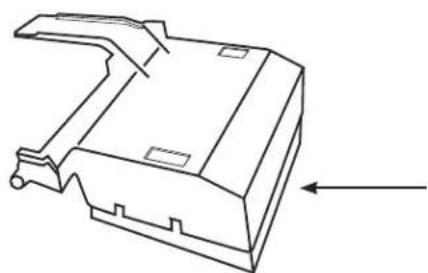
- When unpacking the dehumidifier, note that the foam inside the float piece of the bucket should NOT be removed. Without this foam piece, the dehumidifier will not operate properly.
natural_image
Technical line drawing of a mechanical component with no visible text or symbolsFoam piece inside float mechanism. DO NOT REMOVE this foam piece.
- The accessories are located in the packaging as follows.
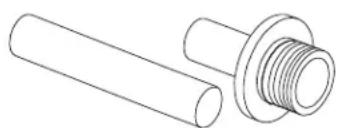
Find the garden hose adapter and short tube inside the bucket.
natural_image
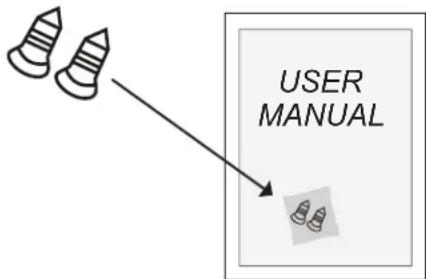
Technical line drawing of two mechanical components: a cylindrical shaft and a threaded flange (no text or symbols)Find the screws in a pouch inside the packaging for this manual.
flowchart
graph TD
    A["Two screw spools"] --> B["Device with mouse icon"]
    style B fill:#f9f,stroke:#333
This manual provides the information needed for proper use and maintenance of this air conditioner. Basic preventative care can help extend the life of this unit. The “Troubleshooting Tips” section in this manual contains a chart with solutions to the most common problems. Referring to this section may save time and prevent the need for a service call in the event of a problem.
Safety Precautions
Warning ....3
Caution 4
Electrical Information....4
Control Pads On The Dehumidifier
Control Pads....5
Error Protection Codes....6
Other Features ....6
Identification of Parts
Identification of parts 7
Removing the collected water 8
Operating The Unit
Positioning and using the unit....8
Removing the collected water 9
Care and Maintenance
Care and cleaning of the dehumidifier....10
Troubleshooting Tips
Troubleshooting tips 11–12
NOTE: All the illustrations in this manual are for explanation purposes only. Unit purchased may be slightly different.
The design and specifications of the dehumidifier are subject to change without prior notice for product improvement. Contact customer service for details.

CAUTION
- Contact an authorized service technician for repair or maintenance of this unit.
- Contact an installer for installation of this unit if necessary.
- The dehumidifier is not intended for use by young children without supervision. Young children should be supervised to ensure that they do not play with the air conditioner.
- Disabled persons may require assistance with set up and usage.
- If the power cord is to be replaced, replacement work should be performed by authorized personnel only.
- Installation and repair work must be performed in accordance with the national wiring standards by authorized personnel only.
To prevent injury to the user or other people and property damage, the following instructions must be followed. Incorrect operation due to ignoring instructions may cause harm or damage.
Failure to adhere to each of the following precautions can lead to results classified as follows:
| WARNING | This symbol indicates the possibility of death or serious injury. |
| CAUTION | This symbol indicates the possibility of injury or damage to property. |
■ Meanings of symbols used in this manual are as shown below.
| ∅ | Never do this. |
| ! | Always do this. |
WARNING
Do not exceed the rating of the power outlet or connection device.
●Otherwise, it may cause electric shock or fire due to excess heat generation.
Do not modify power cord length or share the outlet with other appliances.
● It may cause electric shock or fire due to heat generation.
① Disconnect the power if strange sounds, smells, or smoke comes from it.
● Failing to do so may cause fire and electric shock.
Do not use the unit near flammable gas/combustibles such as gasoline, benzene, thinner, etc.
- It may cause an explosion or fire.
Do not operate or stop the unit by inserting or pulling out the power plug directly from the wall.
●It may cause electric shock or fire due to heat generation.
Do not insert or pull out plug with wet hands.
●It may cause electric shock.
You should never try to take apart or repair the unit by yourself.
●It may cause failure of machine or electric shock.
Do not drink or use the water drained from the unit.
●It contains contaminants and could make you sick.
Do not damage or use an unspecified power cord.
- It may cause electric shock or fire. (If power cord is damaged, it must be replaced by a qualified professional.)
Do not place the unit near a heat source.
● Plastic parts may melt and cause a fire.
Before cleaning, turn off the power and unplug the unit.
● Failing to do so may cause electrical shock or injury.
Do not take the water bucket out during operation.
- It may cause malfunction of unit's "bucket full" feature and cause electrical shock.

CAUTION
Do not use the unit in small spaces.
● Lack of ventilation can cause overheating and fire.
Do not cover the intake or exhaust openings with cloths or towels.
● A lack of air flow can lead to overheating and fire.
Never insert fingers or other foreign objects into grille openings. Be sure to warn children of dangers.
- It may cause electric shock or failure of appliance.
① Always insert the filters securely. Clean filter at least once every two weeks.
● Operation without filters may cause failure.
Do not put in places where water may splash onto the unit.
●Water entering unit can degrade the insulation and cause electric shock or fire.
①Care should be taken when using the unit in a room with the following persons:
● Infants, children, elderly people, and people insensitive to humidity.
Do not place heavy objects on the power cord and make sure that the cord is not compressed.
●There is danger of fire or electric shock.
①If water enters the unit, turn unit off, disconnect power and contact a qualified service technician.
●It may cause failure of appliance and there is danger of electric shock.
① Place the unit on a level, sturdy section of the floor.
- If unit falls over, it may spill water and damage belongings, or cause electrical shock or fire.
Do not use in areas where chemicals are handled.
● This will cause unit deterioration due to chemicals and solvents dissolved in the air.
Do not climb up on or sit on the unit.
- You may be injured if you fall or if the unit falls over.
Do not place flower vases or other water containers on top of the unit.
● Water may spill into the inside of the unit, causing insulation failure and electrical shock or fire.
Electrical Information
- The manufacturer's nameplate is located on the rear panel of the unit and contains electrical and other technical data specific to this unit.
- Be sure the unit is properly grounded. To minimize shock and fire hazards, proper grounding is important. The power cord is equipped with a three-prong grounding plug for protection against shock hazards.
- Your unit must be used in a properly grounded wall receptacle. If the wall receptacle you intend to use is not adequately grounded or protected by a time delay fuse or circuit breaker, have a qualified electrician install the proper receptacle.
- Ensure the receptacle is accessible after the unit installation.
- Do not use extension cords or an adapter plug with this unit. If it is necessary to use an extension cord, use an approved “Dehumidifier” extension cord only (available at most local hardware stores).
- To avoid the possibility of personal injury, always disconnect the power supply to the unit, before installing and/or servicing.
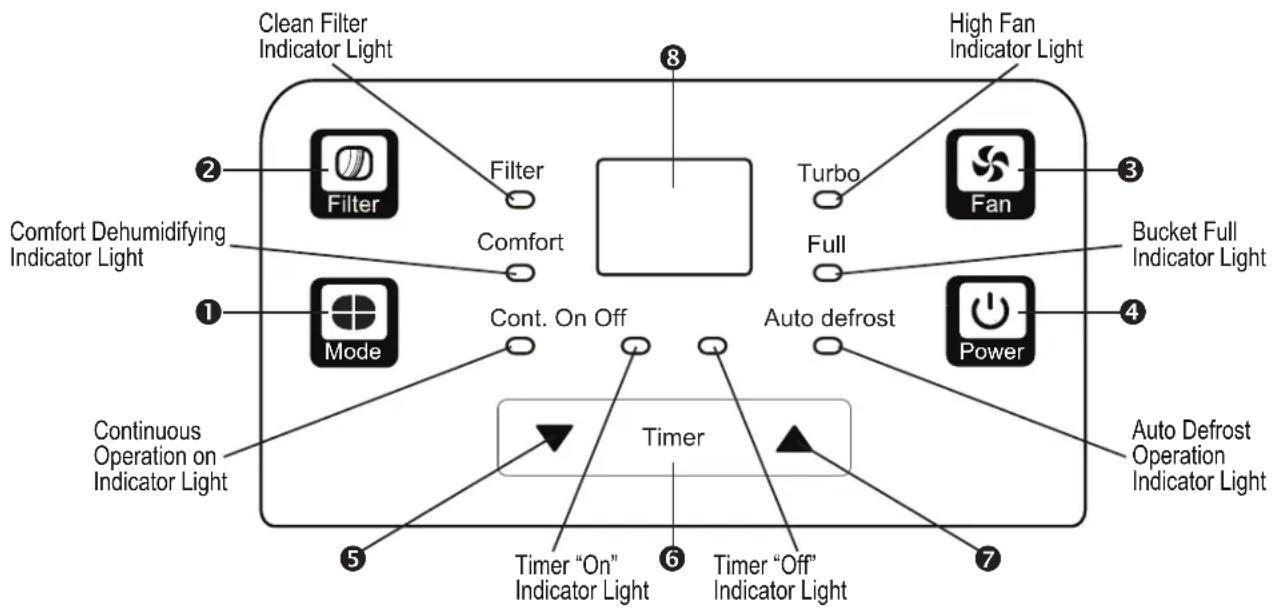
NOTE: The control panel of the unit you purchased may be slightly different according to the models.
flowchart
graph TD
    A["1: Comfort Dehumidifying Indicator Light"] --> B["2: Clean Filter Indicator Light"]
    B --> C["3: Turbo Fan"]
    C --> D["4: Bucket Full Indicator Light"]
    A --> E["5: Continuous Operation on Indicator Light"]
    E --> F["6: Timer “On” Indicator Light"]
    F --> G["7: Timer “Off” Indicator Light"]
    G --> H["8: High Fan Indicator Light"]
    H --> I["9: Cont. On Off"]
    I --> J["Timer"]
    J --> K["10: Auto defrost Power"]
    style A fill:#f9f,stroke:#333
    style B fill:#ccf,stroke:#333
    style C fill:#cfc,stroke:#333
    style D fill:#fcc,stroke:#333
    style E fill:#cff,stroke:#333
    style F fill:#ffc,stroke:#333
    style G fill:#fcf,stroke:#333
    style H fill:#cff,stroke:#333
    style I fill:#ffc,stroke:#333
    style J fill:#cfc,stroke:#333
    style K fill:#fcc,stroke:#333
Control Pads: When you push the button to change operation modes, the unit will make a single "beep" sound to indicate that it is changing modes.
① Mode
Toggle between the following features:
- Normal
Utilize this mode if you would like the unit to cycle on and off based on the relative humidity setting you have manually selected. (See numbers 5/7 and 8 in the column to the right for further instruction.) In Normal mode, both the "Comfort" and "Cont." indicator lights will not be illuminated.
- Comfort
Utilize this dehumidification feature to automatically control humidity in the 45%-55% range based on room temperature. When operating in this mode the Up/Down ▲/▼ pads will be deactivated and you will NOT be able to set a desired humidity.
- Continuous (Cont.)
Press to activate the continuous dehumidifying operation. When operating in this mode the Up/Down ▲ /▼ pads will be deactivated and you will NOT be able to set a desired humidity. The unit will run non-stop.
② Filter
The check filter feature is a reminder to clean the Air Filter for more efficient operation. The "Filter" light (Clean Filter Indicator Light) will illuminate after 250 hours of operation. To reset after cleaning the filter, press the Filter pad and the light will go off.
③ Fan
Control the fan speed. Press to select either High or Normal fan speed. Set the fan control to High ("Turbo") for maximum moisture removal. When the humidity has been reduced and quiet operation is preferred, set the fan control to Normal by pressing the "Fan" button to turn off "Turbo" mode/light.
4 Power
Press to turn the dehumidifier on and off.
⑤ ⑦ ▲ / ▼ : Up/Down Pads
Humidity Set Control Pads
- The humidity level can be set within a range of 35%RH (Relative Humidity) to 85%RH (Relative Humidity) in 5% increments.
- For drier air, press the ▼ pad and set to a lower percent value (%).
- For damper air, press the ▲ pad and set a higher percent value (%).
- The recommended standard setting is 45 - 50% . You must be on Normal mode to set the humidity.
⑥ Timer
Press to initiate the Auto start and Auto stop feature, in conjunction with the ▲ and ▼ key pads. The timer range is 0.0 to 24 hrs. Timer does not cycle.
⑧ Display
Shows the set % humidity level from 35% to 85% or auto start/stop time (0-24) while setting, then shows the actual (+/- 5% accuracy) room % humidity level in a range of 30%RH (Relative Humidity) to 90%RH (Relative Humidity).
Control Pad On The Dehumidifier (continued)
Error & Protection Codes
AS- Humidity sensor error
Unplug the unit for at least 5 minutes and plug it back in. If error repeats, call Perfect Aire Consumer Services.
ES- Temperature sensor error
Unplug the unit for at least 5 minutes and plug it back in. Perfect Aire Consumer Services.
P2- Bucket is full or not in the correct position.
Empty the bucket and replace it in the proper position. Ensure float switch and foam are secured properly in bucket.
E1- Unit malfunction
Unplug the unit for at least 5 minutes and plug it back in. If error repeats, call Perfect Aire Consumer Services.
EC- Unit malfunction
Make sure the temperature of the working environment is between 41^ F/5°C and 95^ F/35°C. If not, please operate the unit under the correct stated temperature. If on a concrete floor, unplug and elevate unit a few inches off the floor; plug back into outlet and power on. If you have made these adjustments and still see the EC error code, please call Perfect Aire Consumer Services.
Other Features
Bucket Full Indicator Light
Illuminates when the bucket is ready to be emptied, is removed, or is not replaced in the proper position.
Auto Shut Off
The dehumidifier shuts off after 30 seconds when the bucket is full or when the bucket is removed or not replaced in the proper position. When the humidity setting is reached, the unit will cycle off automatically. (The compressor cycles off first. Three minutes later, the fan will turn off as well.)
Auto Defrost
When frost builds up on the evaporator coils, the compressor will cycle off and the fan will continue to run (on "Turbo") until the frost disappears. The Auto Defrost Indicator light will illuminate. The unit will restart on its own once the auto defrost process has completed.
Safety Feature
After the unit has stopped, it cannot resume operation in the first 3 minutes afterwards. This is to protect the unit. Operation will automatically start after 3 minutes.
Check Filter Feature
The system starts to log the time once the fan motor operates. The check filter light will be lit up only when the accumulated operation time achieves 250 hours or more. The Reset light (Clean Filter indicator light) flashes one time per second. After cleaning the air filter, press the Filter pad and the Reset light (Clean Filter indicator light) goes off.
Auto-Restart
If the unit breaks off unexpectedly due to a loss of power, it will restart with the previous function setting automatically when the power resumes.
Setting the Timer
- When the unit is on, press the Timer button; the Timer Off indicator light illuminates, indicating that the Auto Stop program is initiated. Press it again and the Time On indicator light illuminates indicating that the Auto Start is initiated.
- If you prefer, you can set the timer while the unit is powered off and follow the instructions above to set the unit to go on and then off.
- Press or hold the UP or DOWN pad to change the Auto time by 0.5 hour increments, up to 10 hours, then at 1 hour increments up to 24 hours. The display on the control pad will count down the time remaining until start/stop.
- The selected time will register for 5 seconds and the system will automatically revert back to display the previous humidity setting.
- When the Auto start and Auto stop times are set within the same program sequence, TIMER ON and OFF indicator lights illuminate identifying both ON and OFF times are now programmed. You can set the Timer for just ON or just OFF in which case the single corresponding ON or OFF light will be illuminated.
- Turning the unit ON or OFF at any time or adjusting the timer setting to 0.0 will cancel the Auto Start/Stop.
- When LED display window displays the code of P2, the Auto Start/Stop function will also be canceled.
A NOTE ABOUT THE TIMER:
When you set the timer, the unit will only go on once and off once. If you want the dehumidifier to cycle on and off repeatedly, you do not need to set the timer. Instead, set your desired humidity and the unit will cycle on and off based on that humidity setting.
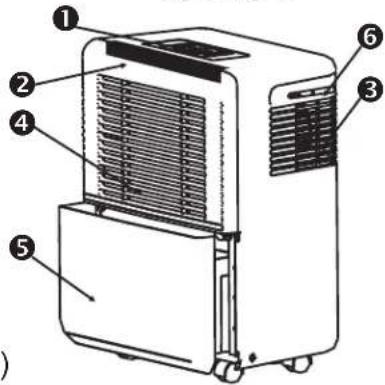
Front Rear
① Control Panel
② Air Filter (pull up to remove)
③ Air Intake Grill
④ Air Outlet Grill
⑤ Water Bucket
⑥ Handle (both sides)
Fig. 1a Fig. 1b
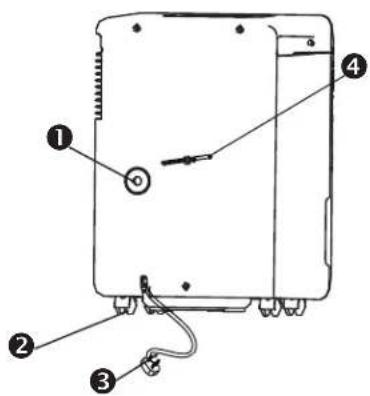
① Drain Hose Outlet
② Casters
③ Power Cord & Plug
④ Band (used only when storing unit)
NOTE: All the pictures in the manual are for explanation purposes only. The actual shape of the unit you purchased may be slightly different, but the operations and functions are the same.
WHAT IS THE "FLOAT"? DOES IT NEED THE FOAM PIECE INSIDE OF IT?
Inside the bucket, on the left side, is an "arm" mechanism that wobbles. This piece is called the "float." DO NOT remove the foam piece that is found in the plastic holder part of the float. (See Fig. 2.) If the piece is removed, the bucket will overflow.
natural_image
Technical line drawing of a mechanical component with an arrow indicating direction (no text or symbols)Fig. 2 - Foam piece inside float mechanism. DO NOT REMOVE the foam.
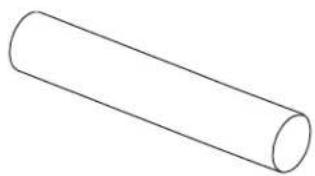
Accessories (Fig. 3):
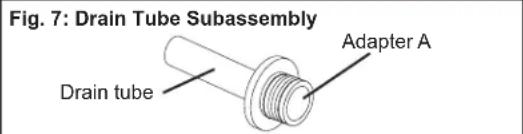
Drain Tube (1pc)
Adapter A (1pc)
Screws (2pc)
natural_image
Simple line drawing of a cylinder (no text or symbols)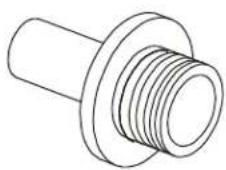
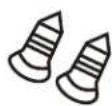
NOTE: Drain tube and adapter are located inside of the water bucket. Screws are located in a pouch inside the packaging for this user manual.
Positioning the unit
A dehumidifier operating in one room will have little or no effect in drying an adjacent enclosed area, such as a closet, or other room unless there is adequate circulation of air in and out of the area.
- Do not use outdoors.
- This dehumidifier is intended for indoor residential applications only. This dehumidifier should not be used for commercial or industrial applications.
- Place the dehumidifier on a smooth, level floor, strong enough to support the unit with a full bucket of water.
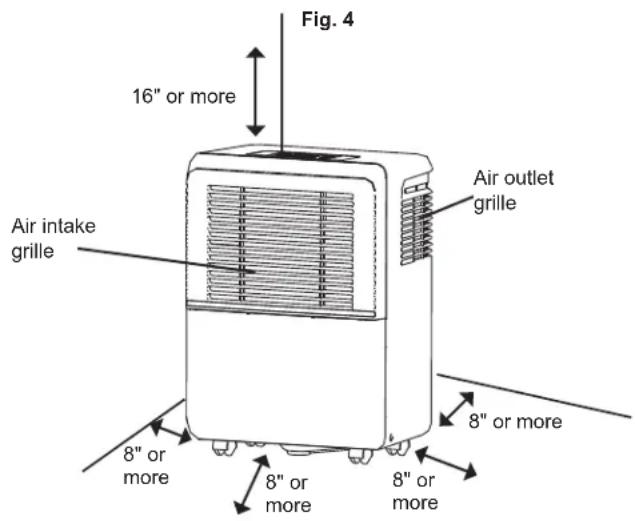
- Allow at least 8 in. (20 cm) of air space on all sides of the unit for good air circulation.
- Place the unit in an area where the temperature will not fall below 41°F (5°C). The coils can become covered with frost at temperatures below 41°F (5°C), which may reduce performance.
- Place the unit away from the clothes dryer, heater or radiator.
- Use the dehumidifier to prevent moisture damage anywhere books or valuables are stored.
- Use the dehumidifier in a basement to help prevent moisture damage.
- The dehumidifier must be operated in an enclosed area to be most effective.
- Close all doors, windows and other outside openings to the space that you wish to dehumidify.
Casters (At four points on the bottom of unit)
- Casters can move freely.
- Never force casters to move over carpet or move the unit with water in the bucket. (The unit may tip over and spill water.)
When using the unit
- When first using the dehumidifier, operate the unit in "Continuous" mode for 24 hours.
NOTE: After the first 24 hours, should you wish to set a desired humidity, you will need to take the unit off of "Continuous." You will not be able to select a desired humidity while the unit is set on "Continuous" mode. - This unit is designed to operate with a working environment between 41^ / 5^ and 95^ / 35^ .
- If the unit has been switched off and needs to be switched on again quickly, allow approximately 3 minutes for the correct operation to resume.
- Do not connect the dehumidifier to a multiple socket outlet, that is being used for other electrical appliances.
- Select a suitable location, making sure you have easy access to an electrical outlet.
- Plug the unit into an electrical outlet with a grounding connection.
- Make sure the water bucket is correctly fitted or the unit will not operate properly.
- NOTE: Do not attempt to move the dehumidifier when there is water in the bucket. The unit may tip over and spill water or damage unit.
Removing the collected water: 2 options
OPTION #1: Use the bucket
- If the bucket is full when the unit is OFF, the unit will beep 8 times, the full indicator light will flash and the digital display will show P2.
- If the bucket is full when the unit is ON, the compressor will turn off followed by the fan 30 seconds later. The unit will then beep 8 times, the full indicator light will flash and the digital display will show P2.
- Slowly pull out the bucket. Grip the left and right handles securely, and carefully pull out straight so water does not spill. Do not put the tank on the floor because the bottom of the bucket is uneven. The bucket will fall and cause the water to spill.
- Throw away the water and replace the bucket. The bucket must be in place securely for the dehumidifier to operate. (Do not drink the water.)
- The machine will re-start when the bucket is restored in its correct position. The unit will take 3 minutes to restart.
OPTION #1: Using & Emptying the Bucket
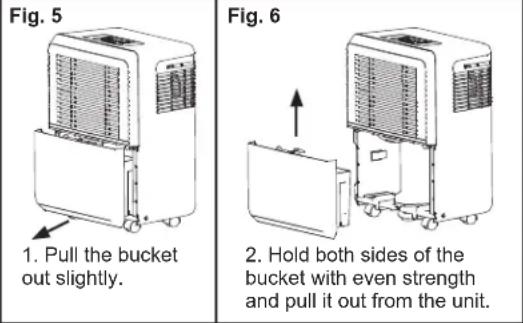
- Dispose of water; replace bucket into proper place.
NOTES: • When you remove the bucket, do not touch any parts inside of the unit. Doing so may damage the product. • Be sure to push the bucket gently all the way into the unit. Improper installation or failing to push it in securely may cause the unit not to operate. - When you remove the bucket, be sure to wipe away any excess moisture found inside the unit.
OPTION #2: Continuous draining
Water can be automatically emptied into a floor drain by attaching a water hose, garden hose, or dehumidifier drain hose to the dehumidifier. (Hose must have a female threaded end. Hose not included.)
- If not already assembled, put together the "Drain Tube Subassembly" by securely connecting the drain tube (included) to adapter A (included). (See Fig. 7. Drain tube and adapter can be found inside the bucket).
- Remove the rubber plug from the drain outlet on the back of the unit and set aside. Remove bucket to access connector. Insert the drain hose through the unit's drain outlet (from the back of the unit going forward) and securely press it into the connector on the front of the unit. (Fig. 9)
- Tighten adapter A to the unit by using the two screws provided, which can be found inside a pouch in the packaging for this user manual.
- Install the female threaded end of the water hose, garden hose, or dehumidifier drain hose into adapter A (Fig. 10); Then lead the water hose to the floor drain or a suitable drainage facility.
- A hose length of no more than 6 ft. is recommended as the hose must allow the water to continuously travel downward into the drain.
- Make sure the hose is secure to avoid leakage.
- Direct the hose down toward the drain, making sure that there are no kinks that will stop the water flow.
- Place the end of the hose into the drain and make sure the end of the hose is level or down to let the water flow smoothly. Never let drain hose go upward against gravity.
- Place the bucket back in the unit in the proper position. The unit will not run if the bucket is not in the proper place.
- Select the desired humidity setting and fan speed on the unit for continuous draining to start.
NOTES:
- Continuous mode and continuous draining are different. You do not need to be on Continuous mode to do continuous draining. See pg. 5 for additional information about Continuous mode.
- To eliminate the use of the drain tube adapter assembly and still drain to the floor you may use tubing (5/8" O.D. 1/2" I.D.) in the length required (up to 6 ft.) to go directly from the unit to floor drain.
OPTION #2: CONTINUOUS DRAINING
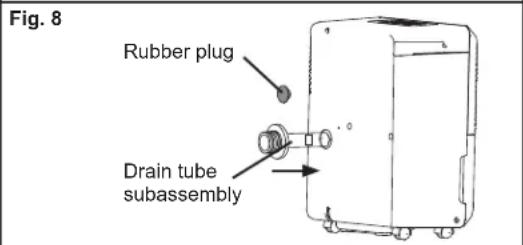
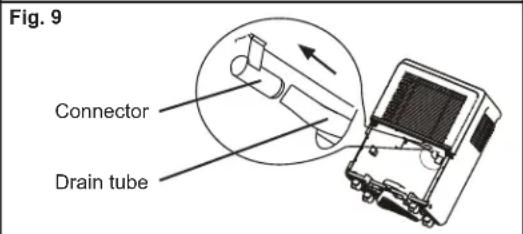
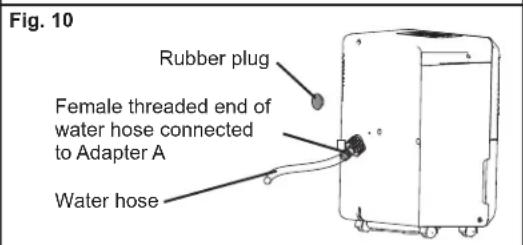
NOTE: When the continuous drain feature is not being used, remove the drain hose from the outlet and insert drain plug. Failure to re-insert the drain plug will result in unit malfunction and possible error codes.
Care and cleaning of the dehumidifier
Turn the dehumidifier off and remove the plug from the wall outlet before cleaning.
1. Clean the Grille and Case
- Use a cloth dampened with water and a mild detergent. Do not use bleach or abrasives.
- Do not splash water directly onto the main unit. Doing so may cause an electrical shock, cause the insulation to deteriorate, or cause the unit to rust.
- The air intake and outlet grilles get soiled easily, so use a vacuum attachment or brush to clean.
2. Clean the bucket
Every few weeks, clean the bucket to prevent growth of mold, mildew and bacteria.
- Remove the bucket and clean it in an area away from the dehumidifier to avoid splashing water onto/in the unit.
- Partially fill the bucket with clean water and add a small amount of mild detergent. Swish it around in the bucket, empty and rinse.
NOTE: Do not use a dishwasher to clean the bucket. After cleaning the bucket, it must be securely in place for the dehumidifier to operate.
3. Clean the air filter
- Remove and clean the filter when the filter light illuminates. For more frequent use, clean the filter more often (i.e. every 2 weeks).
- Remove the filter from the top of the unit (See Fig. 11.)
- Wash the filter with clean water, then dry thoroughly before re-inserting the filter.
CAUTION: DO NOT operate the dehumidifier without a filter because dirt and lint will clog the unit and reduce performance.
4. Prolonged Periods of Non-Use
• After turning off the unit, wait one day before emptying the bucket.
- Clean the main unit, water bucket and air filter and let dry completely.
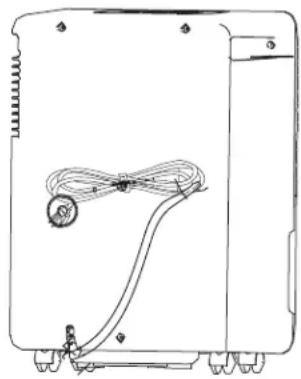
- Wrap the cord and bundle it with the band on the unit. (See Fig. 12).
- Cover the unit with a plastic bag.
- Store the unit upright in a dry, well-ventilated place.
Fig. 11: Removing the Filter
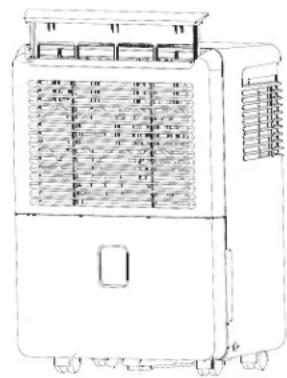
Fig. 12: Cord Storage
natural_image
Line drawing of a device rear panel with cable and sensor (no text or symbols)Before calling for service, please review the chart below.
| Issue Possible Solutions | |
| AUTO DEFROST DISPLAYS REPEATEDLY | Turn off unit and unplug 4-6 hours. |
| Plug unit back in. Run in normal mode (no Turbo fan, not on Continuous operation) and set humidity level to no more than 5% lower humidity than what the display reads for the room humidity. | |
| Allow time for the unit to run until it successfully reaches initial humidity setting. | |
| Lower humidity another 5% and repeat until desired humidity is reached. (Average setting should be 45-50%). | |
| Be sure unit humidity is not set too low, unit is not sitting on too cold of a floor and unit is not being used in too cold of a room. (Room should be 41°F or above.) | |
| Be sure there is sufficient air circulation between the unit and the floor. | |
| FROST APPEARS ON THE COILS | This is normal. The dehumidifier has an auto defrost feature. See page 5 for more information. |
| DEHUMIDIFIER P2 OR 'BUCKET FULL' DISPLAYS | Verify rubber drain plug is not removed from back of unit if using bucket to collect water. |
| Check float switch (inch length silver tab in top of unit behind bucket) to ensure it is not cracked, bent, broken, dirty, or obstructed. If bent, re-adjust by re-bending back in place. The switch is located on the left side behind the bucket when you are facing the unit. | |
| Check that unit is level and the filter, vents and bucket are thoroughly clean. | |
| Ensure float is snapped into place inside the bucket and that foam piece is inserted in float. See page 7, Fig. 2. | |
| Unplug unit for at least 5 minutes. Plug back in unit. Remove and return bucket securely, then turn on unit. | |
| DEHUMIDIFIER NOT DRAWING WATER | Be sure unit is not too large or too small for the area of the room. |
| When first installed, run unit on Continuous Mode for 24 hours. | |
| Allow enough time for unit to remove moisture. | |
| Set humidity low enough to ensure moisture removal. Setting the unit below 45% is not recommended. | |
| Setting may be the same as actual humidity in room, thus no moisture to remove. | |
| Be sure all doors, windows and other openings are securely closed. | |
| Be sure unit is level and that there is sufficient air circulation around the unit, as well as between unit and floor. | |
| Make sure unit is level and that there are no curtains, blinds, or furniture blocking the unit. | |
| Check that room temperature is 41°F or above. | |
| If unit is near a heat source, such as a clothes dryer, etc., relocate unit. | |
| DEHUMIDIFIER CONSTANTLY CYCLES ON/OFF | Be sure unit is not too large or too small for the area of the room. |
| Using unit in much less than its stated coverage will likely cause it to go on and off more frequently. Using too small of a unit will cause it to run constantly. | |
| If the humidity setting and actual humidity in room are cycling right around the same, the unit would go off and on accordingly. | |
| The fan will run for a few minutes after the compressor shuts off. If you have turned the Continuous mode on, the fan and compressor will not turn off; they will run continuously in this mode. | |
| Check that unit is level and the filter, vents and bucket are thoroughly clean and nothing is obstructing them. | |
| Be sure all doors, windows and other openings are securely closed. | |
| Ensure there is sufficient air circulation around the unit, as well as between unit and floor. | |
| Unplug unit for at least 5 minutes. Plug back in unit, remove and return bucket to dehumidifier and turn on. | |
| ES, AS, P2, EC, or E1 APPEARS ON THE DISPLAY | These are error and protection codes. See page 6 of this manual for more information. |
Continued on next page.
Before calling for service, please review the chart below.
| Question Possible Solutions | |
| DEHUMIDIFIER ALWAYS RUNNING | Be sure unit is not too large or too small for the area of the room. |
| Allow enough time for unit to remove moisture. | |
| If set on Continuous Mode, de-select button and set unit to an appropriate humidity setting. | |
| If humidity in room is above the set humidity, then unit will be running. | |
| Be sure all doors, windows and other openings are securely closed. | |
| Be sure unit is level and that there is sufficient air circulation around the unit, as well as between unit and floor. | |
| Make sure there are no curtains, blinds, or furniture blocking the unit. | |
| Lower room temperature. | |
| If unit is near a source of moisture, such as a sink, shower, washing machine, etc., then relocate unit. | |
| Check that filter, vents and bucket are thoroughly clean. | |
| CONTINUOUS DRAIN NOT WORKING PROPERLY | Be sure hose is CLEAN, pliable and no longer than 6 feet in length (recommended). Clear tubing with sizing of 5/8 inch for the outer diameter and 1/2 inch for inner diameter is recommended. |
| Hose should be secure on both ends, being especially mindful that it is pushed all the way onto connector piece inside unit. | |
| Hose should exit through the back of unit and always be positioned at a DOWNWARD slope to the desired drain location. | |
| If using garden hose attached to adaptor piece, be sure connection is secure throughout. | |
| Be sure nothing is obstructing hose connection and there are no kinks or tears in any of the hosing. | |
| Ensure unit is level and not tilted forward and that bucket is pushed in all the way. Though the unit may appear level, if the surface it sits on is even slightly uneven and the front of the unit is tilted downward, continuous draining may not work. If necessary, slightly prop up the front two wheels of the unit, taking care that the unit does not fall backward. | |
| Check that filter, vents and bucket are thoroughly clean. | |
| If water is going into bucket instead of hose, the unit is working properly. Please double check all of the above and/or un-hook hosing set-up and start again. | |
| UNIT DOES NOT START | Make sure the dehumidifer's plug is pushed completely into the outlet. |
| Check the fuse/circuit breaker box in your home. | |
| The bucket is full and needs to be emptied. | |
| The water bucket is not in the proper position. | |
| UNIT MAKES A LOUD NOISE WHEN OPERATING | Make sure the air filter is clean and not clogged. |
| Make sure the unit is upright (not tilted) and on a flat, level surface. | |
| If you are using the pump operation, the unit may be noisy for the first 3-5 minutes after the pump begins operating. This is normal. | |
| WATER ON FLOOR | Check the hose connection points to make sure they are not loose. |
| If collecting water in the bucket, make sure continuous drain outlet plug has not been removed from back of unit. | |
| Make sure the foam piece has not been removed from the float. Without this piece, the float mechanism will not work properly and the bucket will overflow. See page 7, Fig. 2. | |
| UP AND DOWN PADS ON CONTROL PANEL DO NOT ALLOW USER TO ADJUST HUMIDITY SETTING | Unit must be powered on. |
| Unit cannot be in Continuous mode. | |
| Unit cannot be in Comfort mode. | |
NOTE: A highly recommended troubleshoot for any issue in general consists of turning off unit and unplugging for 5 minutes. It is also recommended to try another wall outlet.

Your Source for Home Comfort
Distributed by:
Perfect Aire, LLC
5151 Belt Line Rd.
Suite 878
Dallas, TX 75254
877-365-6274
www.perfectaire.us
Specification and performance data is subject to change without notice.
Printed in China
- 30, 50 & 70 PINT DEHUMIDIFIER
- USER MANUAL
- Quick Start Tips
- Safety Precautions
- Control Pads On The Dehumidifier
- Identification of Parts
- Operating The Unit
- Care and Maintenance
- Troubleshooting Tips
- CAUTION
- WARNING
- Electrical Information
- ① Mode
- - Normal
- - Comfort
- - Continuous (Cont.)
- ② Filter
- ③ Fan
- Power
- ⑤ ⑦ ▲ / ▼ : Up/Down Pads
- Humidity Set Control Pads
- ⑥ Timer
- ⑧ Display
- Control Pad On The Dehumidifier (continued)
- Error & Protection Codes
- AS- Humidity sensor error
- ES- Temperature sensor error
- P2- Bucket is full or not in the correct position.
- E1- Unit malfunction
- EC- Unit malfunction
- Other Features
- Bucket Full Indicator Light
- Auto Shut Off
- Auto Defrost
- Safety Feature
- Check Filter Feature
- Auto-Restart
- Setting the Timer
- A NOTE ABOUT THE TIMER:
- Front Rear
- WHAT IS THE "FLOAT"? DOES IT NEED THE FOAM PIECE INSIDE OF IT?
- Accessories (Fig. 3):
- Positioning the unit
- Casters (At four points on the bottom of unit)
- When using the unit
- Removing the collected water: 2 options
- OPTION #1: Use the bucket
- OPTION #2: Continuous draining
- NOTES:
- Care and cleaning of the dehumidifier
- Clean the Grille and Case
- Clean the bucket
- Clean the air filter
- Prolonged Periods of Non-Use
- Distributed by:
- 877-365-6274
- www.perfectaire.us
Brand : Perfect Aire
Model : 3PAD50
Category : Humidifier