WH7IPC15BM60 - Dishwasher WHIRLPOOL - Free user manual and instructions
Find the device manual for free WH7IPC15BM60 WHIRLPOOL in PDF.

| Brand | Whirlpool |
| Model | WH7IPC15BM60 |
| Product type | Dishwasher |
| Capacity | 15 place settings |
| Programs | Eco, Intensive Auto 65°, Mixed Auto 55°, Rapid Auto 50°, Rapid 45°, Crystal 45°, Silent 55°, Antibacterial 65°, Pre-wash, Self-cleaning 65° |
| Options | Power Clean®, Half Load, Extra Dry, Delayed Start, Favorite Program, NaturalDry |
| Control panel | Buttons and indicators: On/Off, previous/next programs, favorite, options, display, start/pause |
| Water softener | Yes, with regenerating salt reservoir, adjustable from 1 to 5 |
| Rinse aid dispenser | Yes, adjustable from 0 to 5 |
| Detergent dispenser | Yes, with prewash compartment |
| Spray arms | 2 (lower and intermediate) + Power Clean® integrated |
| Baskets | 3 baskets: cutlery basket, height-adjustable upper basket, lower basket with fold-down supports |
| Power Clean® | High-pressure jets in the lower basket for intensive pot washing |
| NaturalDry | Convection drying with automatic door opening |
| Descaling function | Alarm and Self-cleaning program to remove limescale |
| Indicators | Salt, rinse aid, descaling, water tap closed, cycle |
| Water consumption (Eco cycle) | 9.5 L |
| Energy consumption (Eco cycle) | 0.76 kWh |
| Eco cycle duration | 3 h 30 min |
| Maintenance | Clean filters, spray arms, regular descaling |
| Spare parts | Available for 7 to 10 years according to regulations |
Frequently Asked Questions - WH7IPC15BM60 WHIRLPOOL
User questions about WH7IPC15BM60 WHIRLPOOL
0 question about this device. Answer the ones you know or ask your own.
Ask a new question about this device
Download the instructions for your Dishwasher in PDF format for free! Find your manual WH7IPC15BM60 - WHIRLPOOL and take your electronic device back in hand. On this page are published all the documents necessary for the use of your device. WH7IPC15BM60 by WHIRLPOOL.
USER MANUAL WH7IPC15BM60 WHIRLPOOL
THANK YOU FOR BUYING A WHIRLPOOL PRODUCT.
In order to receive a more complete assistance, please register your appliance on: www.whirlpool.eu/register

Before using the appliance carefully read Safety and Installation Instructions.
After installation, please remember to remove all transport protection parts from the dishwasher.
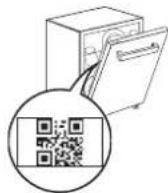
PLEASE SCAN THE QR CODE ON YOUR APPLIANCE IN ORDER TO HAVE MORE DETAILED INFORMATION

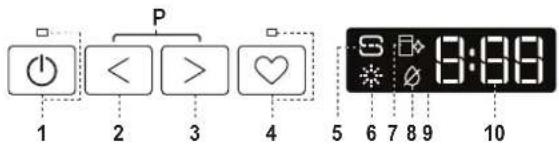
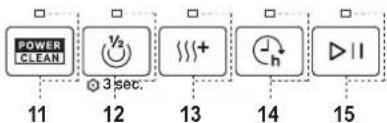
CONTROL PANEL
- ON-OFF/Reset button with indicator light
- PREVIOUS program button
- NEXT program button
- FAVOURITE program button with indicator light
- Salt reservoir empty indicator light
- Rinse Aid reservoir empty indicator light
- DESCALE indicator light
- Closed Water Tap indicator light
- Display
- Program number and remaining time indicator


- Power Clean® option button with indicator light
- Half Load option button with indicator light/ Settings - 3 sec. press
- Extra Dry option button with indicator light
- Delay option button with indicator light
- START/Pause button with indicator light
FIRST TIME USE
More information in the Daily Reference Guide on website.
SETTING MENU
- Switch on the appliance by pressing the ON-OFF button.
- Hold the Settings ✪ (Half Load ⏻) button for 3 seconds, until you hear a beep and the display shows „SEt”.
- After one second the first available setting (letter „h“) will be displayed.
- Press PREVIOUS to scroll through the list of available settings (see table below), then press START/Pause ▷II to view and change the value of the currently selected setting.
- Press PREVIOUS to change the value, then press START/Pause ▶to save the new value and return to the main menu.
- To change another setting, repeat points 4 and 5.
- Press ON-OFF (or wait 30 seconds to exit the menu.
| LETTER | SETTING | VALUES(Default - in bold)* |
| Cycle Counter - number of washing cycles carried out by the dishwasher. | Eg. 25 cycles: 25; Eg. 13.947 cycles: 13_947 (scrolling for 3 times) | |
| Water Hardness Level(see "SETTING THE WATER HARDNESS" and "WATER HARDNESS TABLE") | 1 | 2 | 3 | 4 | 5 | |
| Rinse Aid Level(see "ADJUSTING THE DOSAGE OF RINSE AID") | 0 | 1 | 2 | 3 | 4 | 5 | |
| NaturalDry(see "OPTIONS AND FUNCTIONS")“1" = On, "0" = Off | 1 | 0 | |
| Sound“1" = On, "0" = Off | 1 | 0 | |
| Factory Settings - press START/Pause to re-store to the factory default all the values of the settings included in the settings menu. | - |
FILLING THE SALT RESERVOIR
The use of salt prevents the formation of LIMESCALE on the dishes and on the machine's functional components.
The salt reservoir is located in the lower part of the dishwasher (under the lower rack on the left side).
- It is mandatory that the salt reservoir never be empty.
• It is important to set the water hardness. - Salt must be filled when the SALT REFILL indicator light on the control panel is lit.
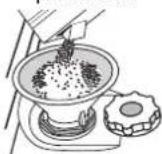
- Remove the lower rack and unscrew the reservoir cap (anticlockwise).
- Position the funnel (see figure) and fill the salt reservoir right up to its edge (approximately 0,5 kg); it is not unusual for a little water to leak out.
-
Only the first time you do this: fill the salt reservoir with water.
-
Remove the funnel and wipe any salt residue away from the opening.
Make sure the cap is screwed on tightly so that no detergent can get into the container during the wash program (this could damage the water softener beyond repair).
Run a program every time as soon as you completed refilling the salt reservoir to avoid corrosion.
WATER SOFTENING SYSTEM
Water softener automatically reduces water hardness, consequently preventing scale buildup on the heater, contributing also to better cleaning efficiency. This system regenerates itself with salt, therefore it is required to refill the salt container when empty.
The frequency of regeneration depends on the water hardness level setting - regeneration takes place once per 4-6 Eco cycles with the water hardness level set to 3. The regeneration process occurs at the beginning of the cycle with additional fresh water.
- Single regeneration consumes 3 L of water;
• Takes up to 5 additional minutes for the cycle;
• Consumes below 0.005kWh of energy.
FILLING THE RINSE AID DISPENSER
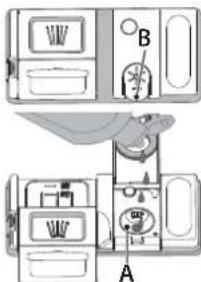
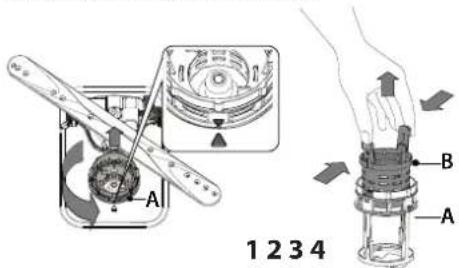
Rinse aid makes dish DRYING easier. The rinse aid dispenser A should be filled when the RINSE AID REFILL indicator light in the control panel is lit.
- Open the dispenser B by pressing and pulling up the tab on the lid.
- Pour in the rinse aid (max. 110 ml), making sure it does not overflow from the dispenser. If this happens, clean the spill immediately with a dry cloth.
- Press the lid down until you hear a click to close it. NEVER pour the rinse aid directly into the appliance tub.
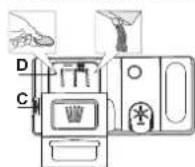
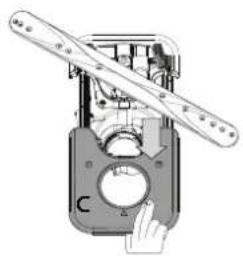
FILLING THE DETERGENT DISPENSER
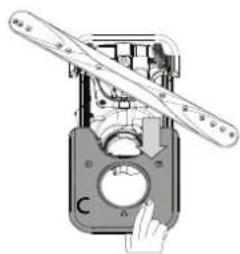
To open the detergent dispenser use the opening device C. Introduce the detergent into the dry dispenser D only. Place the amount of detergent for pre-washing directly inside the tub.
-
When measuring out the detergent refer to the mentioned earlier information to add the proper quantity. Inside the dispenser D, there are indications to help the detergent dosing.
-
Remove detergent residues from the edges of the dispenser and close the cover until it clicks.
- Close the lid of the detergent dispenser by pulling it up until the closing device is secured in place.
The detergent dispenser automatically opens up at the right time according to the program.
Usage of detergent not designed for dishwashers may cause malfunction or damage to the appliance.
PROGRAMS TABLE
| Program | Programs description | Drying phase | NaturalDry | Available options*) | Duration of wash program (h:min) (*) | Water consumption (litres/cycle) | Energy consumption (kWh/cycle) | ||
| P1 Eco | Eco 50°- Program is suitable to clean normally soiled tableware, that for this use, it is the most efficient program in terms of its combined energy and water consumption, and that it is used to assess compliance with the EU Ecodesign legislation. | ✓ | ✓ | 3:30 9.5 | 0.76 | ||||
P2  | Auto Intensive 65° - Automatic program for heavily soiled dishes and pans. | Senses the level of soil-ing on the dishes and adjusts the program accordingly. When the sensor is detecting the soil level an animation appears in the display and the cycle duration is updated. | ✓ | ✓ | 2:25-3:10 | 17.0-25.0 1.30-1.70 | |||
| P3 [STH6] | Auto Mixed 55° - Automatic program for nor-mally soiled dishes with dried food residues. | ✓ | ✓ | 1:20-3:20 | 7.5-20.5 0.75-1 | 20 | |||
P4  ——A ——A | Auto Fast 50° - Automatic program for nor-mally and lightly soiled dishes. The everyday cycle that ensures optimal cleaning and drying performance in a shorter time. | ✓ | ✓ | 1:00-1:50 | 8.0-16.0 0.70-1 | 10 | |||
| P5 [X3ST] | Rapid 45° - Program is recommended for limited amount of lightly-soiled dishes with no dried food residues. Does not include the drying phase. | - | ✓ | 0:30-0:40 | 10.5-15.0 0.55-0.65 | ||||
P6  | Crystals 45° - Program for delicate items, which are more sensitive to high temperatures, for example, glasses and cups. | ✓ | ✓ | 1:40-1:50 | 12.5-17.0 0.95-1.20 | ||||
P7  | Silent 55° - Suitable for night-time operation of the appliance. Ensures optimal cleaning and drying performance with the lowest noise emission. | ✓ | ✓ | 3:50-4:10 | 10.5-14.5 0.80-1.15 | ||||
| P8 --- [27B4] | Sanitizing 65° - Normally or heavily soiled crockery, with additional anti-bacterial wash. Can be used to perform maintenance of the dishwasher. | ✓ | - | 1:55-2:10 | 12.0-19.0 1.40-1.80 | ||||
| P9 [XAVA] | Prewash - Used to refresh crockery planned to be washed later. No detergent is to be used with this program. | - | ✓ | 0:12 4.5 | 0.10 | ||||
| P10 [DO7W] — | Self Clean 65° - Program to be used to perform maintenance of the dishwasher, to be carried out only when the dishwasher is EMPTY using specific detergents designed for dishwasher maintenance. | - | - | 1:15 | 12.7 | 1.10 | |||
ECO program data is measured under laboratory conditions according to European Standard EN 60436:2020.
Note for Test Laboratories:
For information on comparative EN testing conditions, please send an email to the following address: dw_test_support@europeanappliances.com
Pre-treatment of the dishes is not needed before any of the programs.
*) Not all options can be used simultaneously.
**) Values given for programs other than the program Eco are indicative only. The actual time may vary depending on many factors such as temperature and pressure of the incoming water, room temperature, amount of detergent, quantity and type of load, load balancing, additional selected options and sensor calibration. The sensor calibration can increase program duration by up to 20 min.
OPTIONS AND FUNCTIONS
Please scan the QR code on your product in order to have more detailed information.
OPTIONS can be selected/ deselected, after choosing the program, directly by pressing the corresponding button (if available - the indicator lights up) (see CONTROL PANEL). If an option is not compatible with the selected program (see PROGRAMS TABLE), the corresponding LED flashes rapidly 3 times and beeps will sound. The option will not be enabled. An option can change time or water or energy consumption for the program.
POWER CLEAN® - Thanks to the additional power jets this option provides a more intensive and powerful wash in the lower rack, in the specific area. This option is recommended for washing pots and casseroles (Please refer to the Power Clean® loading section).
^1/2 HALF LOAD - If there are not many dishes to be washed, HALF LOAD is used to save water, electricity or time, depending on the selected program. Remember to halve the amount of detergent.
+ EXTRA DRY - The higher temperature during the final rinse and the extended drying phase allow improved drying. The EXTRA DRY option results in the lengthening of the wash cycle.
DELAY - The start of the program may be delayed for a period of time between 0:30 and 24 hours.
The DELAY function cannot be set once a program has been started.
SENSING - When the sensor is detecting the soil level an animation appears in the display (around 20 min.) and the cycle duration is updated. SENSING is for the level of soiling on the dishes and is present for all cycles (excepting Eco) adjusting the program accordingly.
WATER TAP CLOSED – Alarm - Flashes when there is no inlet water or water tap is closed.
FAVOURITE PROGRAM - The FAVOURITE program may be saved and will be easily accessible. Find the program using PREVIOUS/NEXT, and then press the FAVOURITE program button for 3 seconds..
NaturalDry - It is a convection drying system which automatically opens the door during/after drying phase to ensure exceptional drying performance every day. Door opens at the temperature that is safe to your kitchen furniture. As additional steam protection, special designed protection foil is added together with the dishwasher.
☐ DESCALE – Alarm - Limescale accumulation was detected on the internal components of the appliance. Check if the Water Hardness Setting is at the correct value and salt is present in the salt container (see FIRST TIME USE), then use a descaling product (WPro brand is recommended) with Self-Clean program. After a successful descaling, the icon will stop being displayed.
If the actions above are not performed, product performance will deteriorate. DESCALE warning will start blinking and «dES» alarm will appear on the display. If still no action is taken, the appliance will only allow a certain number of cycles to be started (indicated during «dES» alarm display) and then will be BLOCKED to prevent component damage, with only the Self-Clean program available. Performing a full descaling will unblock the product. In the case of extremely high amounts of limescale, descaling may have to be performed twice to be efficient..
CYCLE COUNTER - This feature shows the number of cycles the dishwasher has performed.
For the number of cycles from 0-999, a fixed number will be displayed.
Example for 25 cycles.
When the cycle number is higher than 1000, the number will scroll in the display. The “_” represents the :”, as for instance: 1.000 = 1_000, 13.947 = 13_947 (the number will scroll for 3 times).
Example for 13.947 cycles:
After the cycle visualization, the display will return to visualize "π". NOTE: The dishwasher may have already performed about 30 cycles. This is due to the extended quality process carried out during production. It guarantees higher product quality.
LOADING THE RACKS
CAPACITY: 15 standard place-settings
CUTLERY RACK
The third rack was designed to house the cutlery. Arrange the cutlery as shown in the figure.
A separate arrangement of the cutlery makes collection
natural_image
Architectural floor plan showing room layouts and structural elements (no text or labels)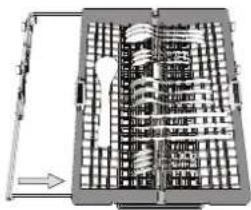
natural_image
Architectural floor plan showing building layouts and a central tower (no text or labels)easier after washing and improves washing and drying performance.
Knives and other utensils with sharp edges must be positioned with the blades facing downwards.
The cutlery rack is equipped with two sliding side trays to make the most of the height of the space below and enable the loading of high items into the upper rack.
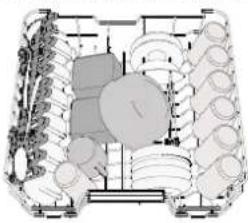
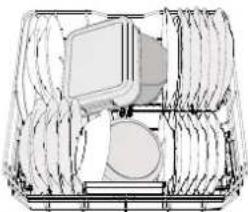
UPPER RACK
Load delicate and light dishes: glasses, cups, saucers, low salad bowls.
The upper rack has tip-up supports which can be used in a vertical position when arranging tea/ dessert saucers or in a lower position to load bowls and food containers.
natural_image
Technical diagram of a mechanical assembly with multiple components and no visible text or symbols(loading example for the upper rack)
ADJUSTING THE HEIGHT OF THE UPPER RACK
The height of the upper rack can be adjusted: a high position to place bulky crockery in the lower basket and a low position to make the most of the tip-up supports by creating more space upwards and avoiding collision with the items loaded into the lower rack.
We strongly recommend that you do not adjust the height of the rack when it is loaded. NEVER raise or lower the basket on one side only.
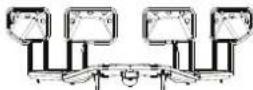
FOLDABLE FLAPS WITH ADJUSTABLE POSITION
The side foldable flaps can be folded or unfolded to optimize the arrangement of crockery inside the rack. Wine glasses can be placed safely in the foldable flaps by inserting the stem of each glass into the corresponding slots.

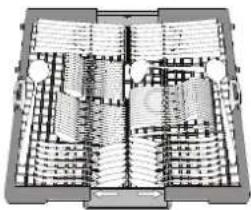
LOWER RACK
For pots, lids, plates, salad bowls, cutlery etc. Large plates and lids should ideally be placed at the sides to avoid interferences with the spray arm. The lower rack has tip-up supports which can be used in a vertical position when arranging plates or in a horizontal position (lower) to load pans and salad bowls easily.
(loading example for the lower rack)
natural_image
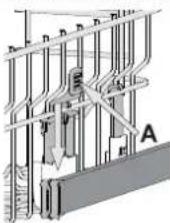
Pure technical line drawing of a mechanical assembly without any text, numbers, or symbolsPOWER CLEAN®
Power Clean® uses the special water jets in the rear of cavity to wash more intensively the high dirty items. The lower rack has a Space Zone,
a special pull-out support in the rear of the rack that can be used to support frying pans or baking pans in upright position, thus taking up less space. Placing the pots/casseroles faced to the Power Clean® component please activate the POWER CLEAN on the panel.
CARE AND MAINTENANCE
More information in the Daily Reference Guide on website.
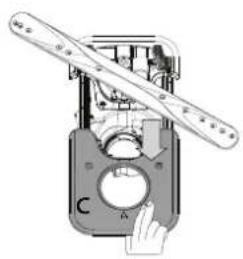
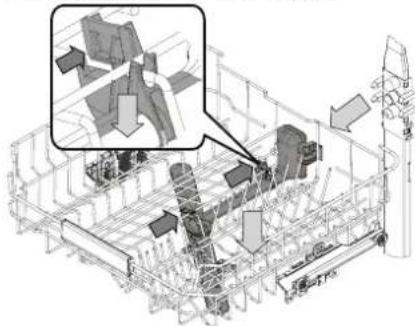
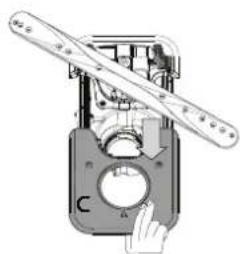
CLEANING THE FILTER ASSEMBLY
natural_image
Mechanical assembly diagram showing a lever mechanism with a handle and circular component (no text or symbols)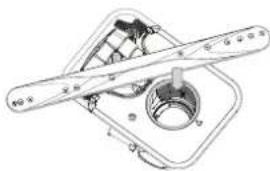
natural_image
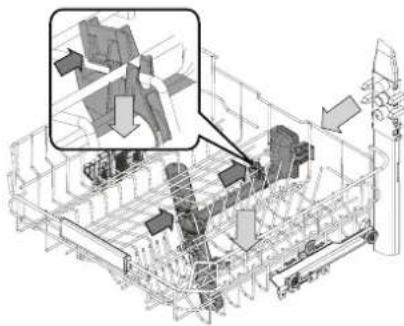
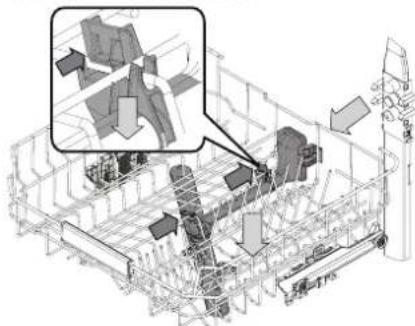
Technical line drawing of a mechanical assembly with no visible text or symbolsThe dishwasher must not be used without filters or if the filter is loose.
It is important when reinstalling the filter that the two triangles shown on the zoom meet (Fig 1). In case you find foreign objects (such as broken glass, porcelain, bones, fruit seeds etc.) please remove them carefully.
Inspect the trap and remove any food residues. NEVER REMOVE the wash-cycle pump protection (shown by an arrow) (Fig 4).
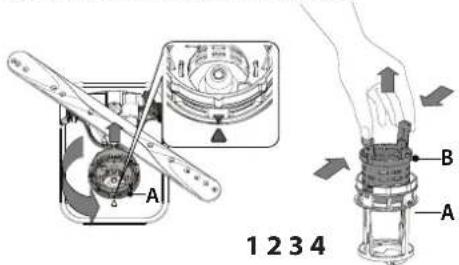
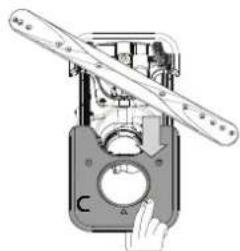
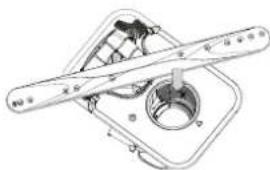
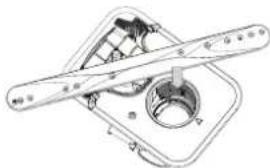
CLEANING THE SPRAY ARMS
natural_image
Technical line drawing of a mechanical assembly with internal components and a magnified inset (no text or symbols)On occasions, food residue may become encrusted onto the spray arms and block the holes used to spray the water. It is therefore recommended that you check the arms from time to time and clean them with a small non-metallic brush.
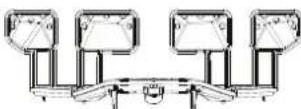
To remove the upper spray you must remove it together with the manifold.
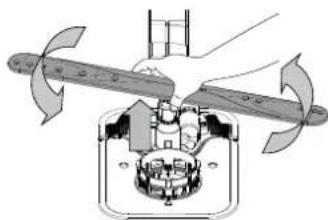
natural_image
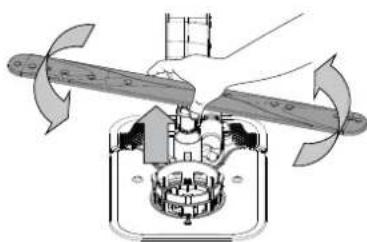
Technical diagram of a mechanical assembly with three blades and a central rotating component (no text or symbols)The lower spray arm may be removed by pulling it upwards and rotating it anti-clockwise. Mounting back the spray arm is by pulling it down and rotating it clockwise.
TROUBLESHOOTING
Please scan the QR code on your product in order to have more detailed information.
In case your dishwasher doesn't work properly, check if the problem can be solved by going through the following list. For other errors or issues please contact authorized After-sales Service whose contact details can be found in the warranty booklet. Spare parts will be available for a period of either up to 7 or up to 10 years, according to the specific Regulation requirements.
| PROBLEMS POSSIBLE CAUSES SOLUTIONS | ||
| ☐Descale indicator is lit or blinking;"dES" alarm is displayed. | Limescale is accumulating on internal components of the appliance. | Descale the appliance immediately using the Self Clean program and a commercially available descaling product (see OPTIONS AND FUNCTIONS). Refill the reservoir with salt. Check the water hardness setting. If the appliance is not descaled, it will stop functioning. |
| The dishwasher won't drain. Display shows: F7 E3 or F9 E1 | The filter is clogged with food residues or limescale | Clean the filter and descale the appliance (see CLEANING THE FILTER ASSEMBLY and DESCALE INSTRUCTION). |
| The drain hose is kinked. Check the drain hose | (see INSTALLATION INSTRUCTION). | |
| The sink drain pipe is blocked. Clean the sink drain pipe. | ||
| The dishwasher does not fill the water. The display shows: H2O and is lit; acoustic alarm sounds. | No water in the water supply or the tap is closed. | Make sure there is water in the water supply and the water tap is open. |
| The water inlet hose is kinked. | Check the inlet hose (see INSTALLATION). Open dishwasher door, press START/Pause button and close the door within 4 seconds. | |
| The screen in the water inlet hose is clogged; it is necessary to clean it. | Check and clean the screen in the water inlet hose. Open dishwasher door, press START/Pause button and close the door within 4 seconds. | |
| The dishwasher finishes the cycle prematurely. The display shows: F8 E3 | The filter is clogged with food residues or limescale. | Clean the filter and descale the appliance (see CLEANING THE FILTER ASSEMBLY and DESCALE INSTRUCTION). |
| Drain hose positioned too low or siphoning into the home sewage system. | Check if the end of the drain hose is placed at the correct height (see INSTALLATION). Check for siphoning into the home sewage system, and install a siphon breaker/air admittance valve if necessary. | |
| An excessive amount of foam is present. | The detergent has not been measured out correctly or it is not suitable for use in dishwashers (see FILLING THE DETERGENT DISPENSER). | |
| Air in the water supply. Check water supply for leaks or other issues letting air inside. | ||
| The dishes are not dried well. | Rinse aid is not present or the dosage is too low. | Make sure the rinse aid dispenser is filled (see FILLING THE RINSE AID DISPENSER). Multifunctional tablets only will not provide as good drying effects as the actual use of liquid rinse aid. |
| The dishes have been unloaded after the door was opened automatically but before the actual cycle end. | Make sure the cycle has ended before starting to unload the dishes (see DAILY USE). For even better drying results, it is recommended to let the dishes sit inside the dishwasher with the door open for additional 15 minutes after the cycle ends. | |
| The dishes are sitting too flat. | If you notice puddles of water inside cavities of cups, mugs or bowls, try loading the dishes (especially in the upper rack) providing more inclination to let larger amounts of water drip down before drying starts. | |
| The selected cycle does not have the drying phase. | Please check in the PROGRAMS TABLE if the selected program is equipped in the drying phase. A cycle without the drying phase may not deliver desired drying efficiency, so it is recommended to change cycle selection for the one that has the drying phase. | |
| The dishes are made of non-stick or plastic. | Some water drops remaining on this type of material are normal. | |
| Dishes and glasses are covered with limescale or a whitish film. | The salt reservoir is empty. | Refill the reservoir with salt as soon as possible. Using the appliance without salt may cause damage to its internal components. |
| The water hardness setting is too low. | Increase the setting (see WATER HARDNESS TABLE). | |
| The cap of the salt reservoir is not properly closed. | Check and close the salt reservoir cap. | |
| The rinse aid reservoir is empty or the rinse aid dosage is insufficient. | Refill the dispenser with rinse aid and check the dosage setting (for more information - see FILLING THE RINSE AID DISPENSER). | |
| The dishwasher shows F8 E5 | Valve is blocked or faulty. Close the water tap, if possible. Do not switch off the power supply. Call the service. | |
| Detergent leaks. | Depends on the liquid detergent used and can be emphasized in case of delay option is activated. | Small leaks will not cause machine malfunction and can be avoided by changing liquid detergent type or using tablets. |
Policies, standard documentation, ordering of spare parts and additional product information can be found by:
• Using QR code on your product.
- Visiting our website docs.whirlpool.eu/docs and parts-selfservice.europeanappliances.com
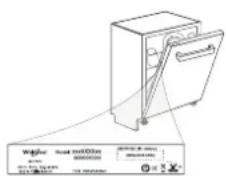
- Alternatively, contact our After-sales Service (See phone number in the warranty booklet). When contacting our After-sales Service, please state the codes provided on your product's identification plate.
The model information can be retrieved using the QR-Code reported in the energy label.
The label also includes the model identifier that can be used to consult the portal of the registry at https://eprel.ec.europa.eu.
®/TM/ © 2024 Whirlpool. Produced under license

DOPLNĚNÍ DÁVKOVAČE LEŠTIDLA
natural_image
Architectural floor plan showing room layouts and structural elements (no text or labels)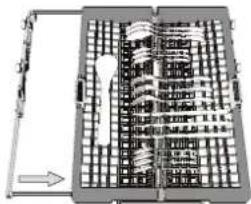
natural_image
Architectural floor plan showing room layouts and structural elements (no text or labels)natural_image
Diagram of a mechanical or electrical component with multiple circular components and connections (no visible text or symbols)SKLOPNÉ OPĚRKY S NASTAVITELNOU POLOHOU
natural_image
Top-down architectural sketch of a modern building facade with curved roof and central circular structure (no text or symbols)POWER CLEAN®
natural_image
Mechanical assembly diagram showing a rotating component with a handle and shaft (no text or symbols)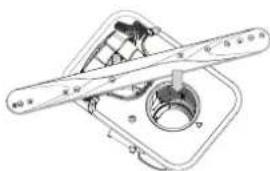
natural_image
Technical diagram of a mechanical assembly with no visible text or symbolsnatural_image
Technical line drawing of a mechanical assembly with internal components and a magnified inset (no text or symbols)natural_image
Mechanical diagram showing a rotating fan assembly with blades and a central housing (no text or symbols)
TAK FORDI DU HAR K∅BT ET WHIRLPOOL-PRODUKT.
For at modtage en mere komplet assistance, bedes du
registrere dit apparat på www.whirlpool.eu/register

PÄFYLDNING AF OPVASKEMIDDEL
natural_image
Architectural floor plan showing room layouts and structural elements (no text or labels)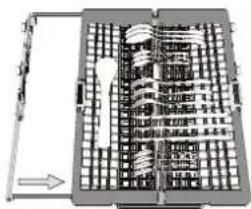
natural_image
Architectural floor plan showing building layouts and a directional arrow (no text or labels)Knive og andre skarpe genstande skal placeres med spidserne nedad.
natural_image
Architectural floor plan showing room layouts and structural elements (no text or labels)natural_image
Architectural line drawing of a building facade with internal structural elements (no text or symbols)POWER CLEAN®
natural_image
Mechanical device with a lever and dial (no visible text or symbols)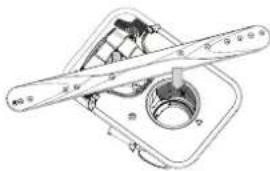
natural_image
Technical line drawing of a mechanical component with no visible text or symbolsnatural_image
Technical line drawing of a mechanical assembly with internal components and a magnified inset (no text or symbols)natural_image
Mechanical assembly diagram showing a rotating fan and housing components (no text or labels)natural_image
Architectural floor plan showing room layouts and structural elements (no text or labels)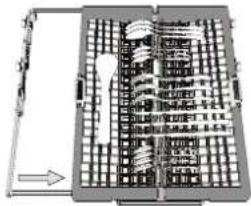
natural_image
Architectural site plan showing building layouts and a directional arrow (no text or labels)natural_image
Architectural floor plan showing room layouts and structural elements (no text or labels)natural_image
Technical line drawing of a mechanical assembly or housing with layered components (no text or symbols)POWER CLEAN®
natural_image
Mechanical device with lever and dial (no visible text or symbols)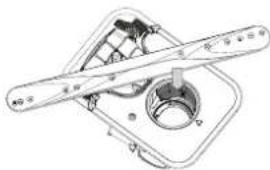
natural_image
Technical line drawing of a mechanical component with no visible text or symbolsnatural_image
3D architectural or engineering diagram showing structural framework with no visible text, numbers, or symbols.natural_image
Mechanical assembly diagram showing a rotating fan and housing components (no text or labels)LISÄVALINNAT JA TOIMINNOT
natural_image
Architectural floor plan showing room layouts and structural elements (no text or labels)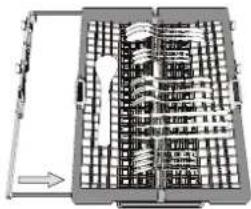
natural_image
Architectural floor plan showing room layouts and structural elements (no text or labels)natural_image
Top-down schematic of a mechanical or electrical component assembly (no text or symbols visible)YLÄKORIN KORKEUDEN SÄÄTÄMINEN
natural_image
Technical line drawing of a mechanical assembly or assembly (no visible text or symbols)POWER CLEAN®
natural_image
Mechanical assembly diagram showing a hand operating a component with no visible text or symbols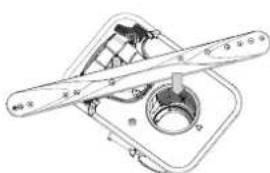
natural_image
Technical line drawing of a mechanical component with two cylindrical parts and a central circular feature (no text or symbols)natural_image
Technical line drawing of a mechanical assembly with internal components and a magnified inset (no text or symbols)natural_image
Mechanical assembly diagram showing a rotating shaft and housing with directional arrows indicating motion (no text or symbols)MERCI D'AVOIR CHOISI UN PRODUIT WHIRLPOOL.
OPTIONS ET FONCTIONS
natural_image
Architectural floor plan showing room layouts and structural elements (no text or labels)
natural_image
Architectural floor plan showing room layouts and structural elements (no text or labels)natural_image
Cross-sectional diagram of a mechanical or architectural structure with layered components (no visible text or symbols)AJUSTER LA HAUTEUR DU PANIER SUPÉRIEUR
VOLETS PLIABLES AVEC POSITIONS AJUSTABLES
natural_image
Technical line drawing of a mechanical assembly with layered components (no text or symbols)natural_image
Technical line drawing of a mechanical assembly with internal components and a magnified inset (no text or symbols)natural_image
Diagram of a mechanical device with rotating blades and a central hub (no text or symbols)
ZAHVALUJEMO VAM NA KUPOVINI PROIZVODA WHIRLPOOL. Kako bismo vam mogli pružiti potpuniju pomoć, registrirajte svoj uređaj na adresi: www.whirlpool.eu/register

Prije upotrebe uređaja pažljivo pročitajte ove Sigurnosne upute i Upute za postavljanje. Nakon postavljanja nemojte zaboraviti izvaditi sve zaštitne dijelove za transport iz perilice posuđa.
SKENIRAJTE QR KOD NA SVOM UREĐAJU DA BISTE DOBILI VIŠE INFORMACIJA.
UPRAVLJAČKA PLOČA
-
Gumb za UKLJ/ISKLJ/Ponovno postavljanje sa svjetlom indikatora
-
Gumb programa PRETHODNO
-
Gumb programa SLJEDEĆE
-
Gumb za odabir programa OMILJENO sa svjetlom indikatora
-
Svjetlo indikatora praznog spremnika za Sol
-
Svjetlo indikatora praznog spremnika Sredstva za Ispiranje
-
Svjetlo indikatora UKLANJANJE KAMENCA
-
Svjetlo indikatora Zatvorene Slavine za Vodu
-
Zaslon
-
Indikator broja programa i preostalog vremena
-
Gumb opcije Power Clean® sa svjetlom indikatora
natural_image
Architectural floor plan showing room layouts and structural elements (no text or labels)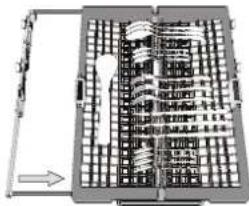
natural_image
Architectural floor plan showing building layouts and a central tower (no text or labels visible)Noževe i ostali pribor s oštricom mora se postaviti s oštricama okrenutima prema dolje.
natural_image
Cross-sectional diagram of a mechanical or architectural component with layered structures and no visible text or symbolsPODEŠAVANJE GORNJE KOŠARE PO VISINI
Visina gornje košare može se podesiti: visoki položaj za postavljanje glomaznog suđa u donju košaru i niski položaj za potpuno iskorištavanje potpornja za postavljanje stvaranjem više mjesta u gornjem dijelu i izbjegavanje udaraca s predmetima u donjoj košari
POMIČNI PREKLOPI S PODESIVIM POLOŽAJEM
natural_image
Technical line drawing of a mechanical assembly with layered components (no text or symbols)POWER CLEAN®
natural_image
Mechanical device diagram showing a lever mechanism with a handle and circular component (no text or symbols)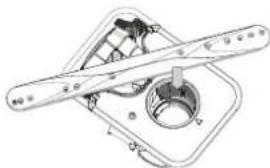
natural_image
Technical line drawing of a mechanical assembly with no visible text or symbolsPerilica suđa ne smije se upotrebljavati bez filta-ra ili s otpuštenim filtrom.
Prilikom ponovnog postavljanja filtra moraju se spojiti dva trokuta prikazana na zumiranju (sl. 1).
natural_image
Technical line drawing of a mechanical assembly with internal components and a magnified inset showing detail (no text or symbols)Povremeno, ostaci hrane mogu se skoriti na nosačima mlaznica i blokirati otvore za raspršivanje vode. Zbog toga se preporučuje da povremeno provjerite nosače i očistite ih malom četkicom koja nije metalna.
Gornju mlaznicu možete skinuti tako da je obavezno skinete zajedno s odvodom.
natural_image
Mechanical assembly diagram showing a rotating component with three blades and a central hub (no text or symbols)Donji krak mlaznice može se skinuti tako da se povuče prema gore i okrene
AZ ÖBLÍTŐSZER-ADAGOLÓ FELTÖLTÉSE
natural_image
Architectural floor plan showing room layouts and structural elements (no text or labels)
natural_image
Architectural floor plan showing room layouts and structural elements (no text or labels)natural_image
Technical diagram of a mechanical assembly with multiple components and no visible text or symbolsÁLLÍTHATÓ MAGASSÁGÚ LEHAJTHATÓ POLCOK
natural_image
Cross-sectional diagram of a mechanical or architectural component with layered structure (no visible text or symbols)natural_image
Mechanical assembly diagram showing a hand operating a component with a circular base and two blades (no text or symbols)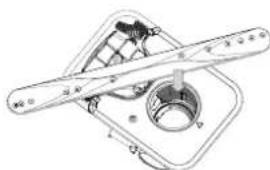
natural_image
Technical diagram of a mechanical assembly with no visible text or symbolsnatural_image
Technical line drawing of a mechanical assembly with internal components and a magnified inset showing detail (no text or symbols)natural_image
Mechanical assembly diagram showing a rotating fan and housing components (no text or labels)natural_image
Architectural floor plan showing room layouts and structural elements (no text or labels)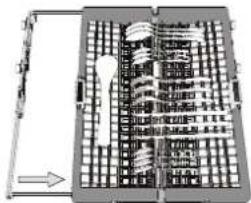
natural_image
Architectural floor plan showing a curved building facade with grid layout and directional arrow (no text or labels)natural_image
Architectural floor plan showing room layouts and structural elements (no text or labels)REGOLAZIONE IN ALTEZZA DEL CESTELLO SUPERIORE
natural_image
Technical line drawing of a mechanical component or assembly (no visible text or symbols)1234
natural_image
Mechanical assembly diagram showing a hand operating a component with a circular dial and intersecting blades (no text or symbols visible)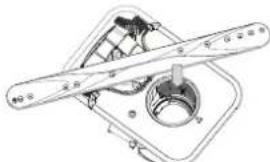
natural_image
Technical line drawing of a mechanical assembly with no visible text or symbolsnatural_image
Technical line drawing of a mechanical assembly with internal components and a magnified inset showing structural details (no text or symbols)natural_image
Diagram of a mechanical device with rotating blades and a central hub (no text or symbols)natural_image
Architectural floor plan showing room layouts and structural elements (no text or labels)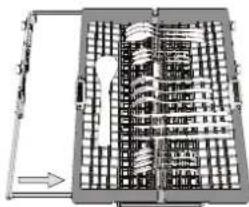
natural_image
Architectural floor plan showing room layouts and structural elements (no text or labels)natural_image
Cross-sectional diagram of a mechanical or architectural structure with layered components (no visible text or labels)ПРИЛАГОДУВАЊЕ НА ВИСИНАТА НА ГОРНАТА РЕШЕТКА
natural_image
Technical line drawing of a mechanical assembly with no visible text or symbols1234

natural_image
Mechanical assembly diagram showing a hand operating a circular component with a handle (no text or symbols visible)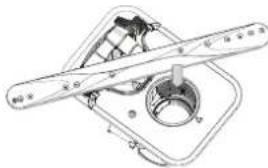
natural_image
Technical line drawing of a mechanical component with no visible text or symbolsnatural_image
Technical line drawing of a mechanical assembly with internal components and a magnified inset (no text or symbols)natural_image
Mechanical assembly diagram showing a rotating component with blades and central hub (no text or symbols)natural_image
Architectural floor plan showing room layouts and structural elements (no text or labels)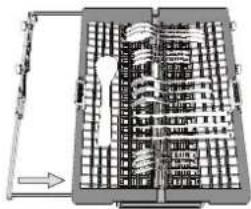
natural_image
Architectural floor plan showing building layouts and structural elements (no text or labels)natural_image
Architectural floor plan showing room layouts and structural elements (no text or labels)DE HOOGTE VAN HET BOVENSTE REK AFSTELLEN
natural_image
Technical line drawing of a mechanical assembly with no visible text or symbolsPOWER CLEAN®
1234
natural_image
Mechanical assembly diagram showing a rotating component with a handle and shaft (no text or symbols)
natural_image
Technical line drawing of a mechanical component with no visible text or symbolsnatural_image
Isometric architectural or engineering diagram showing structural elements and components (no visible text or labels)natural_image
Mechanical assembly diagram showing a rotating fan and housing mechanism (no text or symbols)
natural_image
Architectural floor plan showing room layouts and structural elements (no text or labels)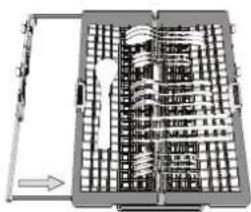
natural_image
Architectural floor plan showing room layouts and structural elements (no text or labels)natural_image
Technical diagram of a mechanical assembly with multiple components and no visible text or symbolsnatural_image
Technical line drawing of a mechanical assembly or housing with internal components (no text or symbols)PLEIE OG VEDLIKEHOLD
natural_image
Mechanical device with a lever and control panel (no visible text or symbols)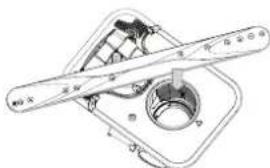
natural_image
Technical line drawing of a mechanical component with no visible text or symbolsnatural_image
Technical line drawing of a mechanical assembly with internal components and a magnified inset showing detail (no text or symbols)natural_image
Mechanical assembly diagram showing a rotating component with blades and housing (no text or symbols)natural_image
Architectural floor plan showing room layouts and structural elements (no text or labels)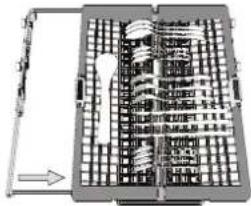
natural_image
Architectural site plan showing building layouts and a central tower (no text or labels)natural_image
Diagram of a mechanical or architectural component with multiple circular elements and layered structures (no text or symbols)natural_image
Technical line drawing of a mechanical assembly with no visible text or symbols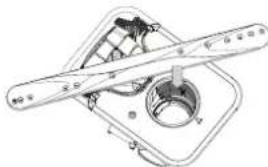
natural_image
Technical line drawing of a mechanical assembly with no visible text or symbolsnatural_image
Technical line drawing of a mechanical assembly with no visible text or symbolsnatural_image
Mechanical assembly diagram showing a propeller with rotating blades and a central housing (no text or symbols)natural_image
Architectural floor plan showing room layouts and structural elements (no text or labels)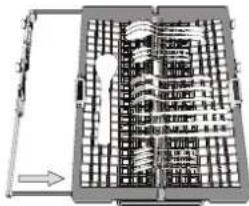
natural_image
Architectural floor plan showing building layouts and a directional arrow (no text or labels)natural_image
Architectural floor plan showing room layouts and structural elements (no text or labels)natural_image
Technical line drawing of a mechanical assembly with no visible text or symbolsPOWER CLEAN®
natural_image
Technical line drawing of a mechanical assembly with no visible text or symbolsnatural_image
3D wireframe diagram of a mechanical assembly with internal components and a magnified inset showing structural details (no text or symbols)natural_image
Mechanical assembly diagram showing a rotating component with two blades (no text or symbols)POLNJENJE POSODE ZA TEKOČINO ZA LESK
natural_image
Architectural floor plan showing room layouts and structural elements (no text or labels)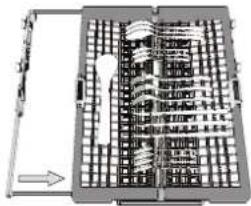
natural_image
Architectural floor plan showing room layouts and structural elements (no text or labels)natural_image
Cross-sectional diagram of a mechanical or electrical component with layered structures and no visible text or symbols(primer nalaganja posode v zgornjo košaro)
NASTAVITEV VIŠINE ZGORNJE KOŠARE
natural_image
Technical line drawing of a mechanical assembly with no visible text or symbols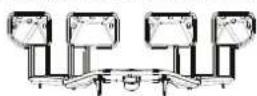
SERVIS IN VZDRŽEVANJE
natural_image
Mechanical device with a hand operating a circular component labeled 'C' (no text or symbols on the device itself)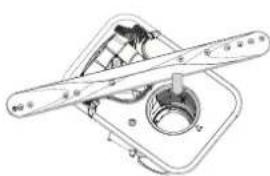
natural_image
Technical line drawing of a mechanical assembly with no visible text or symbolsPomivalnega stroja ni dovoljeno uporabljati brez filtrov ali z nepritrjenimi filtri.
natural_image
Technical line drawing of a mechanical assembly with internal components and a magnified inset showing detail (no text or symbols)natural_image
Mechanical assembly diagram showing a rotating component with blades and housing (no text or symbols)
FALEMINDERIT PËR BLERJEN E PRODUKTIT TË MARKËS WHIRLPOOL.
natural_image
Architectural floor plan showing room layouts and structural elements (no text or labels)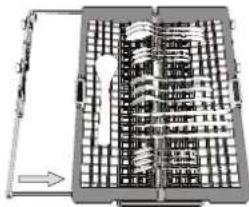
natural_image
Architectural floor plan showing building layouts and a central staircase (no text or labels)natural_image
Architectural floor plan showing room layouts and structural elements (no text or labels)natural_image
Technical line drawing of a mechanical assembly or housing with layered components (no text or symbols)1234
natural_image
Mechanical assembly diagram showing a hand operating a circular component with a ruler and pointer (no text or symbols visible)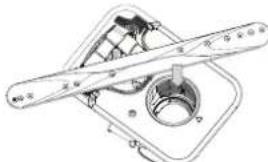
natural_image
Technical line drawing of a mechanical component with no visible text or symbolsnatural_image
Technical line drawing of a mechanical assembly with internal components and a magnified inset (no text or symbols)natural_image
Mechanical assembly diagram showing a rotating component with two blades and a central hub (no text or symbols)®/TM/ © 2024 Whirlpool. Prodhuar sipas licencës

HVALA ŠTO STE KUPILI PROIZVOD KOMPANIJEWHIRLPOOL.
natural_image
Architectural floor plan showing room layouts and structural elements (no text or labels)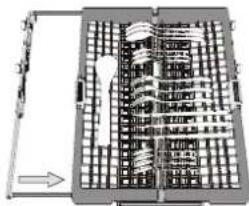
natural_image
Architectural floor plan showing building layouts and a central tower (no text or labels)natural_image
Architectural floor plan showing room layouts and structural elements (no text or labels)PODEŠAVANJE VISINE GORNJE KORPE
SKLOPIVA KRILCA SA PODESIVIM POLOŽAJEM
natural_image
Technical line drawing of a mechanical assembly with internal components (no text or symbols)POWER CLEAN®
Power Clean ^® koristi posebne vodene mla- znice u unutrašnjem zadnjem delu za in- tenzivnije pranje veoma prljavih predmeta. Donja korpa ima Prostornu Zonu, poseban držač koji se može izvući i nalazi se u za- dnjem delu korpe, a može se koristiti za ti- položaju, koji tako zauzimaju manje prostor
Prilikom postavljanja šerpi/posuda za pečenje okrenutim prema komponenti Power Clean® aktivirajte POWER CLEAN® na tabli.
NEGA I ODRŽAVANJE
Više informacija u Uputstvo Za Svakodnevnu Upotrebu na veb-sajtu.
ČIŠĆENJE SKLOPA FILTERA
natural_image
Technical line drawing of a mechanical component with no visible text or symbolsMašina za pranje sudova se ne sme koristiti bez filtera ili ako je filter labav.
Važno je da se prilikom ponovne ugradnje filtera dva trougla prikazana na uvećanju dodiruju (slika 1).
Ukoliko pronađete strane predmete (kao što je slomljeno staklo, porcelan, kosti, semenke voća itd.) pažljivo ih uklonite.
Proverite sklopku i uklonite sve ostatke hrane. NI-KADA NE UKLANJAJTE zaštitu pumpe za ciklus pranja (prikazano strelicom) (slika 4).
ČIŠĆENJE PRSKALICA
natural_image
3D architectural or mechanical diagram showing internal components and structural framework (no visible text or symbols)natural_image
Diagram of a mechanical device with rotating blades and a central hub (no text or symbols)®/TM/ © 2024 Whirlpool. Proizvedeno pod licencom

natural_image
Architectural floor plan showing room layouts and structural elements (no text or labels)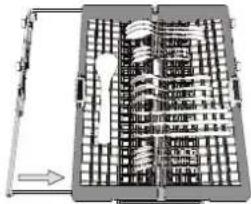
natural_image
Architectural floor plan showing building layouts and a central tower (no text or labels)natural_image
Diagram of a mechanical or architectural structure with circular components and layered elements (no text or symbols)JUSTERA HÖJDEN PÅ ÖVERKORGEN
natural_image
Technical line drawing of a mechanical assembly with no visible text or symbolsPOWER CLEAN®
natural_image
Mechanical device with a hand operating a circular component, no visible text or symbols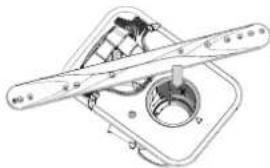
natural_image
Technical line drawing of a mechanical component with no visible text or symbolsRENGÖRING AV SPOLARMARNA