
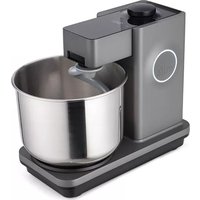
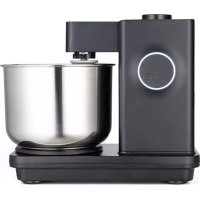
ProBaker Timer KM2BS-T70 - Food Processor WILFA - Free user manual and instructions
Find the device manual for free ProBaker Timer KM2BS-T70 WILFA in PDF.

| Product type | Stand mixer |
| Brand | Wilfa |
| Model | ProBaker Timer KM2BS-T70 |
| Power supply | 220-240 V~, 50/60 Hz, 700 W |
| Bowl capacity | 7 L, stainless steel |
| Included tools | Dough hook, flexible beater with silicone scraper, double whisk (2 balloon whisks), splash guard, bowl cover, dough scraper |
| Speed setting | Variable from 5% to 100% in 5% increments, pulse mode |
| Integrated timer | Stopwatch and adjustable timer |
| Protection | Automatic overload and motor thermal protection |
| Maximum kneading capacities | Standard dough: 3 kg flour, 2 L liquid (67%), speed 50-100%, 5-8 min; semi-dry dough: 1.5 kg, 0.9 L (60%), 30-70%, 5-8 min; dry dough: 0.8 kg, 0.44 L (55%), 20-50%, 5-8 min; noodle dough: 0.5 kg, 0.3 kg eggs, 10-30%, 1-4 min |
| Maximum whisking capacities | Cream: 0.1-1.5 L, 30-50%, 2-4 min; egg whites: 2-16 whites, 50-70%, 4-8 min; pancake batter: 0.5-3 L, 30-50%, 1-3 min; sponge batter: 2-12 eggs, 50-70%, 4-8 min |
| Maximum flexible beater capacity | 3 L, speed 100%, max duration 15 min |
| Cleaning | Bowl, dough hook, flexible beater (after removing silicone scraper), balloon whisks, splash guard, bowl cover and dough scraper are dishwasher safe. The machine itself and the whisk speed variator should be cleaned with a damp cloth. |
| Warranty | 5 years on the product, 10 years on the motor (domestic use only) |
| Usage | Indoor domestic use only |
| Dimensions | Not specified |
| Weight | Not specified |
Frequently Asked Questions - ProBaker Timer KM2BS-T70 WILFA
User questions about ProBaker Timer KM2BS-T70 WILFA
0 question about this device. Answer the ones you know or ask your own.
Ask a new question about this device
Download the instructions for your Food Processor in PDF format for free! Find your manual ProBaker Timer KM2BS-T70 - WILFA and take your electronic device back in hand. On this page are published all the documents necessary for the use of your device. ProBaker Timer KM2BS-T70 by WILFA.
USER MANUAL ProBaker Timer KM2BS-T70 WILFA
KITCHEN MACHINE KM2GY-T70
EN·Instruction manual DE·Anleitung
IMPORTANT SAFETY INSTRUCTIONS
- This appliance shall not be used by children. Keep the appliance and its cord out of reach of children.
Children shall not play with the appliance. - Appliances can be used by persons with reduced physical, sensory or mental capabilities or lack of experience and knowledge if they have been given supervision or instruction concerning use of the appliance in a safe way and if they understand the hazards involved.
- Always disconnect the appliance from the power supply if it is left unattended and before assembling, disassembling or cleaning.
- Switch off the appliance and disconnect from the power supply before changing accessories or approaching parts that move in use.
- If the power supply cord is damaged, it must be replaced by a special cord or assembly available from the manufacturer or its service agent in order to avoid a hazard.
- Never leave the appliance unattended when it is connected to the mains.
-
Never immerse the appliance in water.
-
Care shall be taken when handling the sharp cutting blades, emptying the bowl and during cleaning.
- This product is intended for indoor, non-industrial, non-commercial, household use only.
- This appliance must be placed on a flat, even surface before use.
- Check if the voltage indicated on the appliance corresponds to the local mains voltage before you connect the appliance.
- This appliance incorporates an earth connection for functional purposes only.
- Instructions manual is also available at our website www.wilfa.com.
SPECIAL SAFETY INSTRUCTIONS FOR THIS UNIT
- Never put hands between the rotating bowl and main unit to avoid injury.
- Avoid contact with moving parts. Keep hands, hair, clothing, as well as spatulas and other utensils away from the rotating bowl, beater, whisk, or dough hook during operation to prevent injury and /or damage to the mixer.
- Do not exceed the maximum capacities specified for each tool.
EN
INSTRUCTION MANUAL - PROBAKER TIMER
CONGRATULATIONS ON YOUR NEW WILFA PROBAKER KITCHEN MACHINE
This kitchen machine is designed and developed in Norway by our experienced and enthusiastic team in cooperation with The Norwegian Bakery and Pastry Team – to give you the best possible kitchen machine.

BKL
The Norwegian
Bakery and Pastry Team
EN
INSTRUCTION MANUAL - PROBAKER TIMER
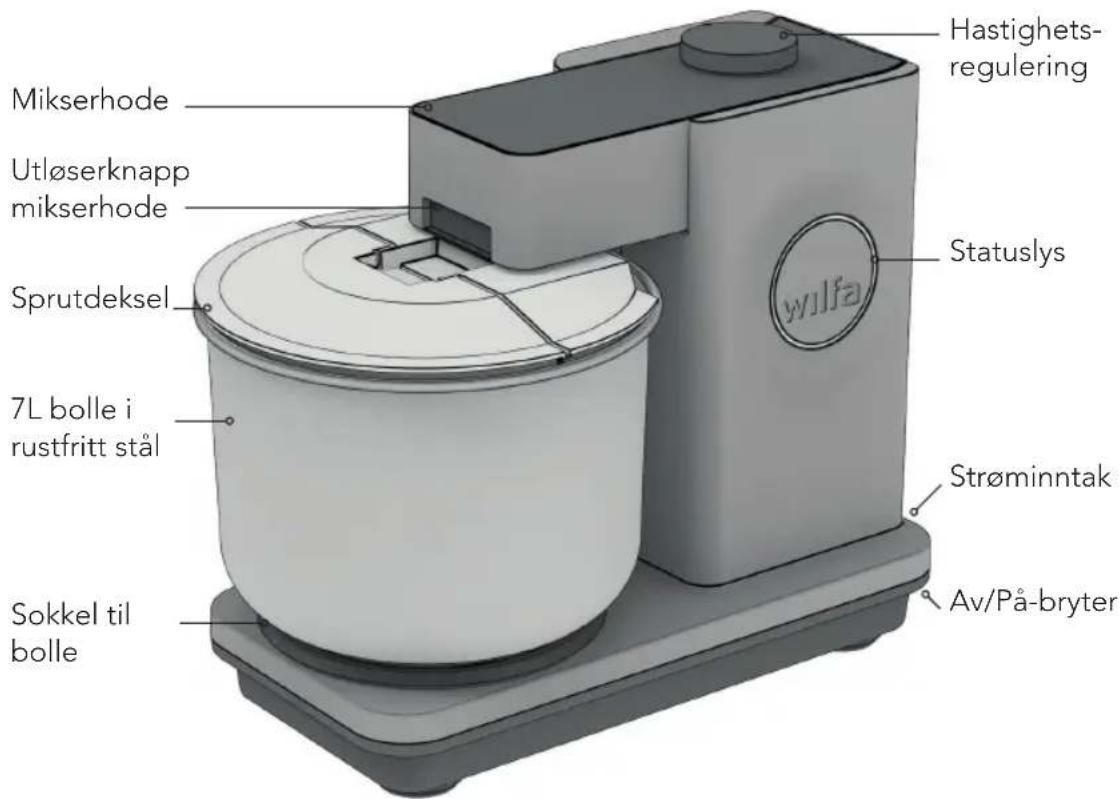
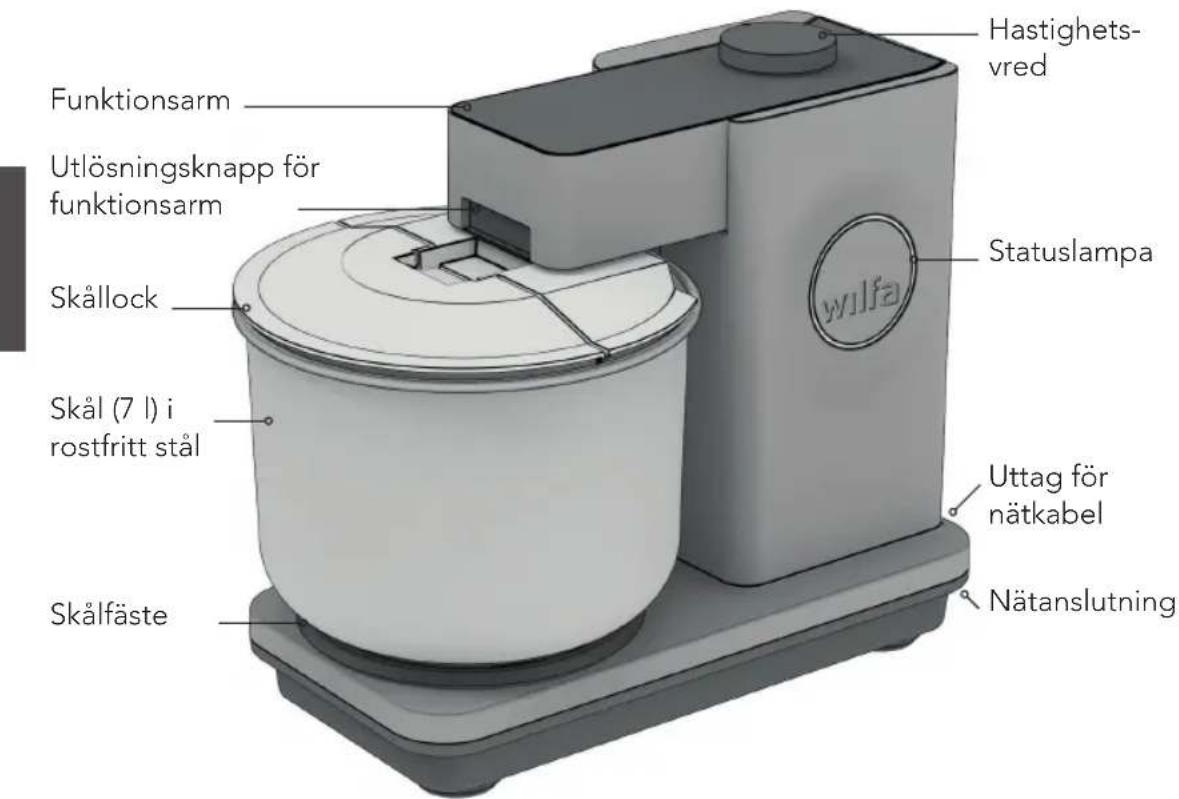
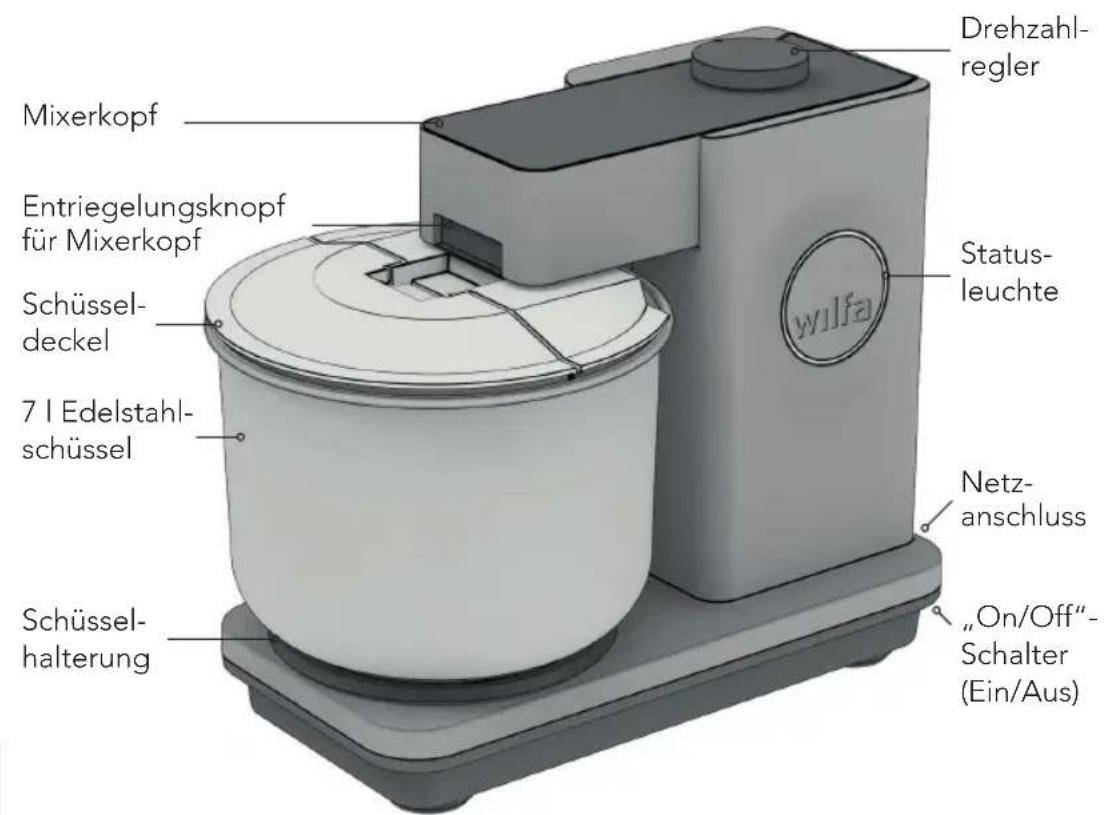
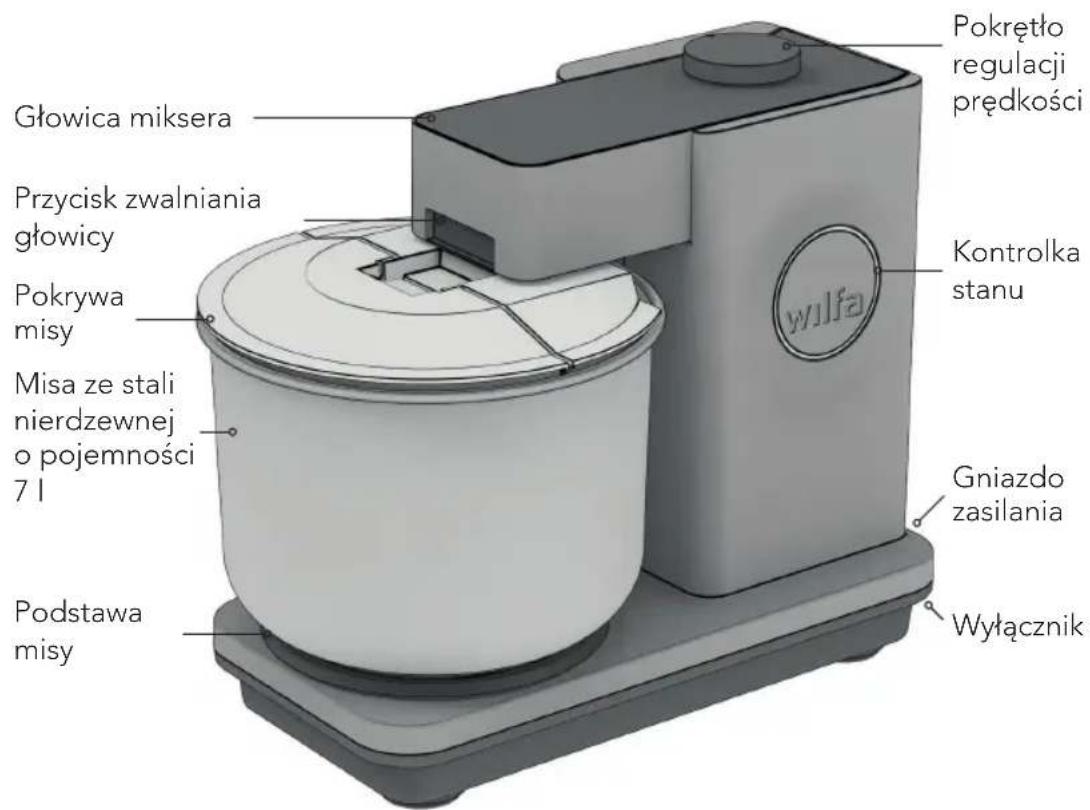
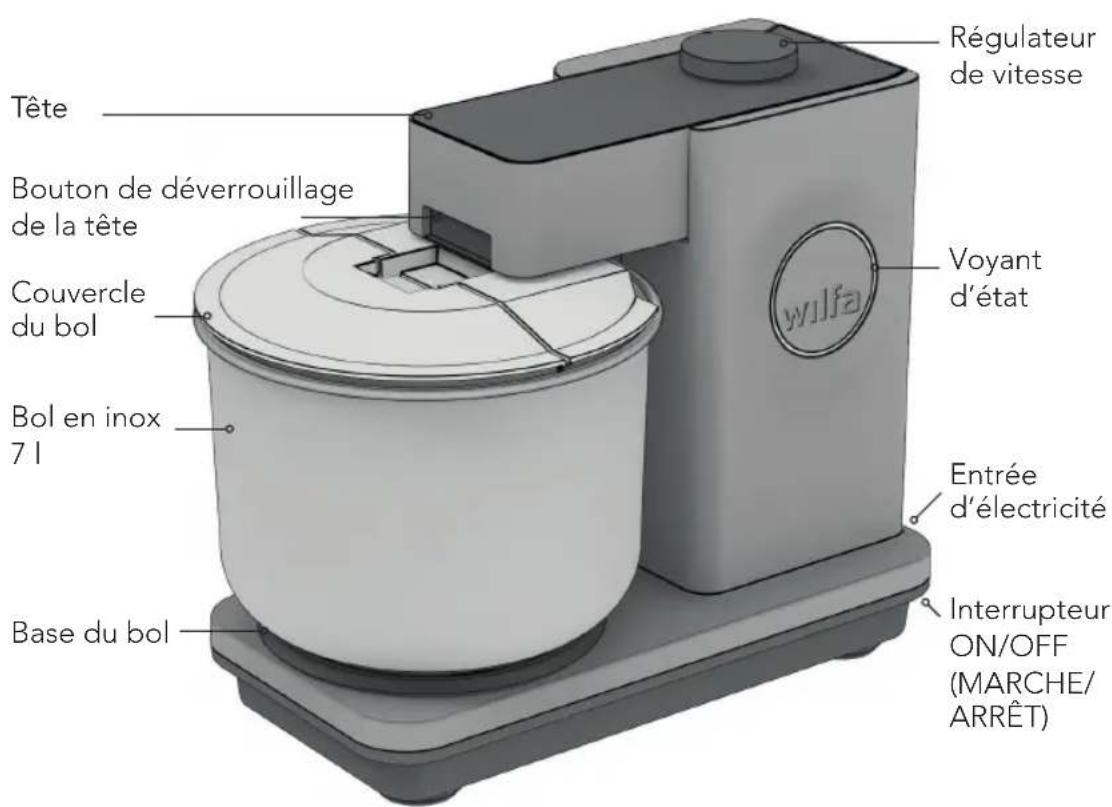
PRODUCT OVERVIEW

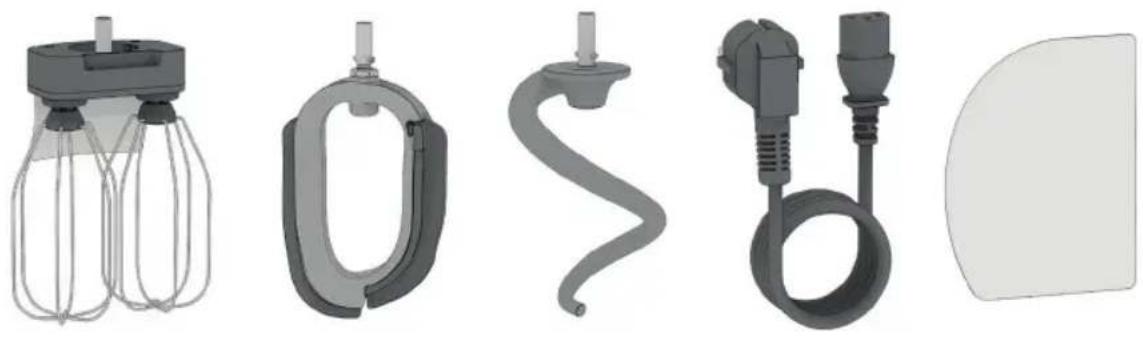
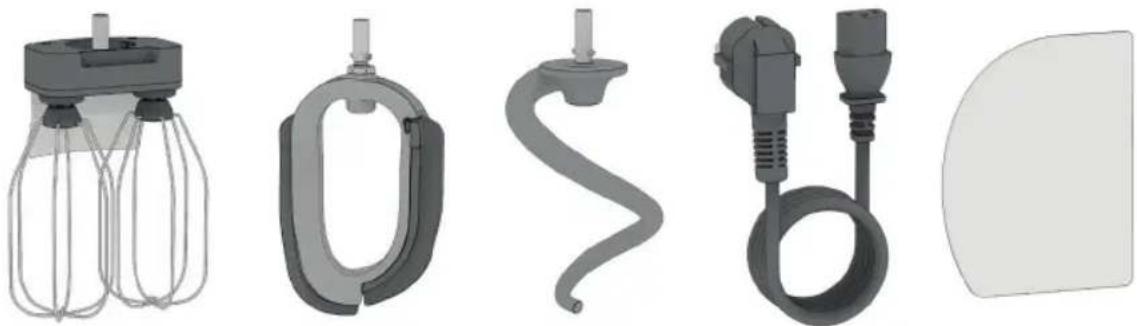
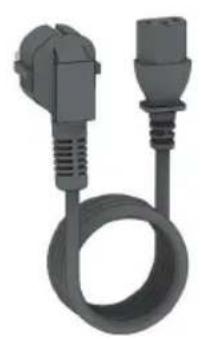
Dual Whisk Flexi-Beater Spiral Hook Power Cable Dough Scaper
BEFORE FIRST USE
- Clean all food-contact parts before first use. Please refer to "Cleaning Instructions" for details.
BASIC OPERATIONS
Note: Always ensure that speed is set to 0 before opening the head or attaching / releasing tools
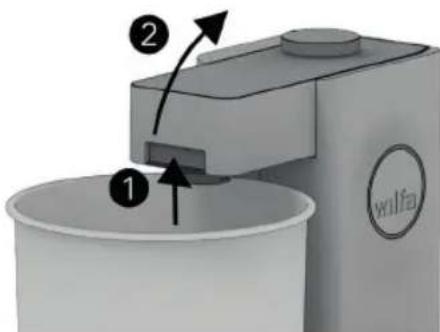
OPEN MIXER HEAD
- Push and hold the head release button.
- Tilt the mixer head back until it locks in extended position.
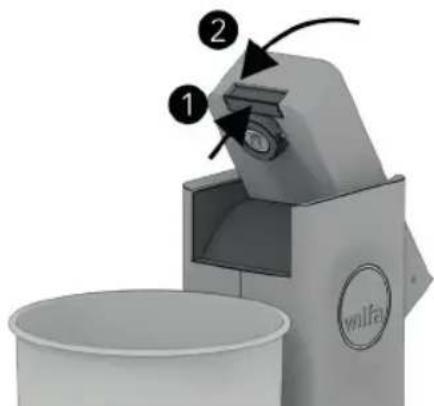
CLOSE MIXER HEAD
- Push and hold the head release button.
- Push the mixer head downwards until the head locks in closed position.
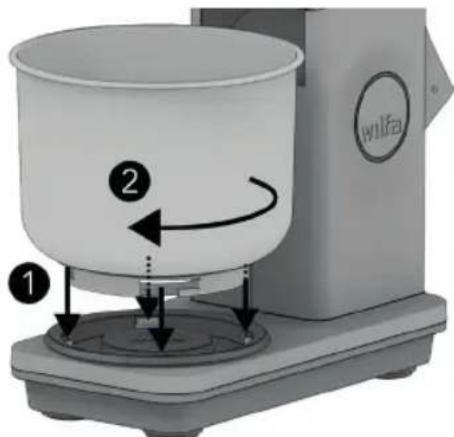
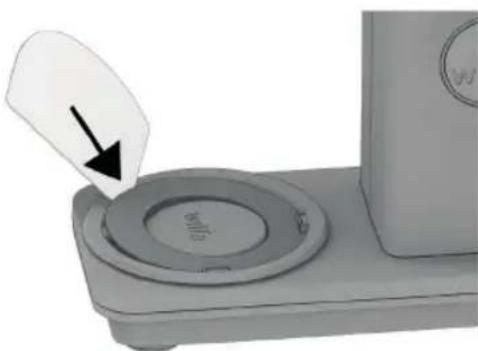
ATTACH BOWL
- Carefully place the bowl onto the bowl base while ensuring the bowl mounting cut-outs align to the bowl base locking mechanism.
- Rotate the bowl clockwise. It is securely locked when it cannot be rotated further.
EN
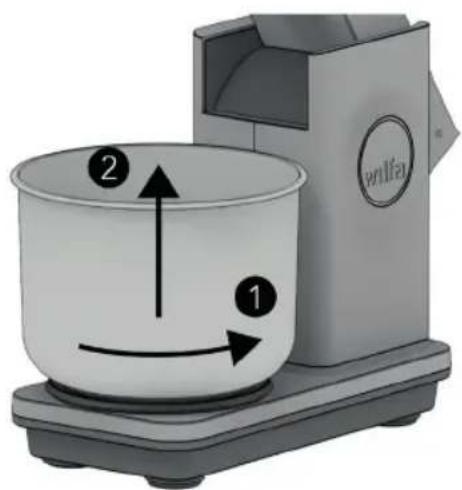
DETACH BOWL
- Rotate the bowl anticlockwise until it cannot be rotated further.
- Remove the bowl from the bowl base.
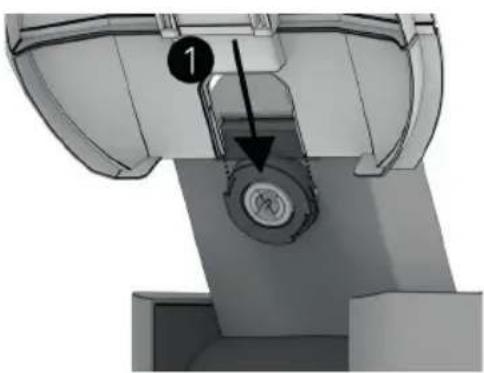
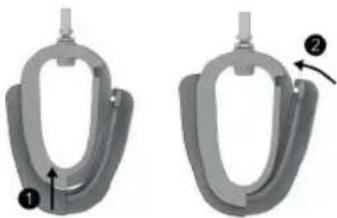
ATTACH BOWL LID
- Push the lid into the slot closest to the mixer head.
- The lid is correctly placed when it locks in place.
Note: The mixer head must be in open position before attaching the lid. Failing to do so might cause damage to the lid.
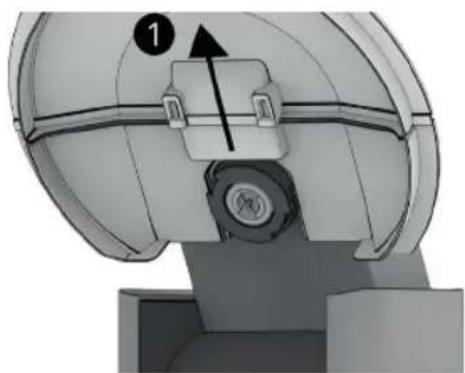
DETACH BOWL LID
- Remove the bowl lid by pulling the bowl lid outwards.
Note: The mixer head must be in open position before detaching the lid. Failing to do so might cause damage to the lid.
SPEED ADJUSTMENT
Note: Refer to the specific tool sections for speed recommendations.
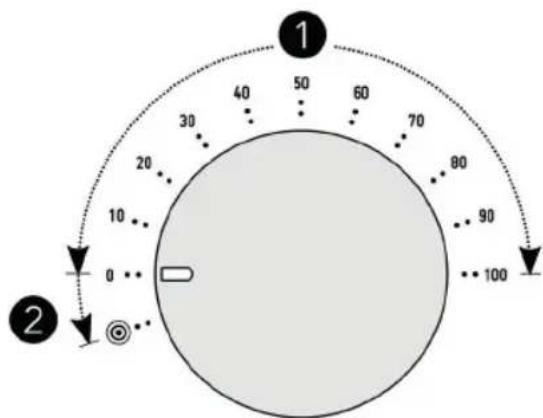
1 SPEED MODE
The speed can be set from 5% to 100% with increments of 5% . The speed indication line indicates the current speed setting.
HOW TO USE:
- Always start with the speed indicator set to 0.
- Ensure that the device is plugged in and that the switch next to the power inlet on the machine is turned to the ON position.
- Start slow and rotate the speed knob clockwise gradually until desired speed.
PULSE MODE
The pulse mode allows for quickly setting short bursts of maximum speed.
HOW TO USE:
- Always start with the speed indicator set to 0.
- Ensure that the device is plugged in and that the switch next to the power inlet on the machine is set to ON position.
- Twist the speed button anticlockwise and hold it in position to activate pulse mode.
- Release the button to stop the machine.
WARNING: Always consider whether the content in the bowl risks splashing or the mixture is too heavy for the machine at full speed. If in doubt, use the speed mode.
EN
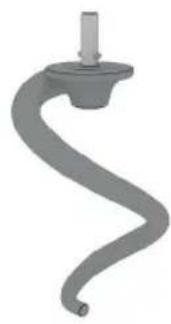
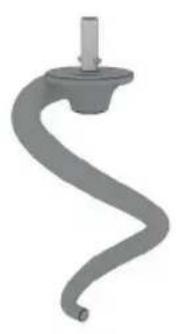
SPIRAL HOOK
RECOMMENDED FOR:
- Yeasted doughs
- Shortcrust pastry
- Pasta dough
MAXIMUM CAPACITIES
| Maximum Flour | Liquid Content (liquid %*) | Recommended Time | Recommended Speed | |
| Regular dough | 3 kg 2.0 L (67%) | 5 - 8 min 50 - 100% | ||
| Semi-dry dough | 1.5 kg 0.9 L (60%) | 5 - 8 min 30 - 70% | ||
| Dry dough | 0.8 kg 0.44 L (55%) | 5 - 8 min 20 - 50% | ||
| Pasta dough | 0.5 kg 0.3 kg eggs | 1 - 4 min 10 - 30% |
*Liquid%: Liquid to flour ratio. Calculated by using "Bakers Percentage".
The maximum capacities and recommended times are based on kneading dough with regular all-purpose flour and cold water until gluten is fully developed.
AUTOMATIC OVERLOAD PROTECTION SYSTEM
The unit is equipped with an automatic overload protection system that monitors the motor loading continuously. In case of overload due to too heavy kneading the machine will automatically stop and the speed indicator will start blinking to indicate overload. Reset the machine by setting speed to 0% . Repeated triggering of the overload protection might cause rapid wear on the unit and the following measures should be considered if the motor overload protection is triggered:
- Add more liquid. This will make the dough easier to knead.
- Split dough into two pieces and knead half the dough at a time.
- Run machine at a lower speed setting.
Note: Probaker is also equipped with a thermal motor protection. Repeated triggering of the automatic overload protection system or use in elevated room temperatures might trigger the thermal protection. Let the machine cool down for 30 minutes if the machine will not start.
CLEANING
Clean the spiral hook with warm soapy water or by dishwasher.
USE
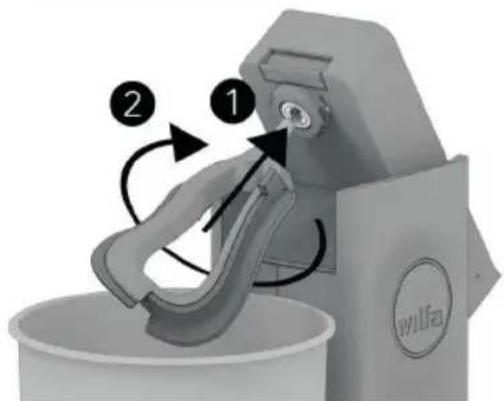
ATTACH SPIRAL HOOK
- Insert the tool shaft into the tool mount.
- Twist clockwise to lock the tool. The tool is properly mounted when its "snaps" into position.
DETACH SPIRAL HOOK
- Twist anticlockwise until the tool moves outwards.
- Remove the tool from the tool mount.
Always start slowly when mixing in ingredients or while adding new ingredients. Gradually increase speed as content gets mixed.
BAKERS TIP
- Start with cold ingredients. The kneading process generates heat during kneading. The temperature of the dough will typically increase by 1 - 2^ per minute. In general, it is recommended to stop kneading when dough temperature reaches 26^ . Higher temperatures might affect the dough and causes the gluten network to degrade.
- Knead enough to develop a strong gluten network. Kneading with recommended speed and time as described in "Maximum capacities" usually yields good results.
- Challenge yourself: High water content in the dough combined with proper kneading usually makes for long-lasting and airy results.

EN
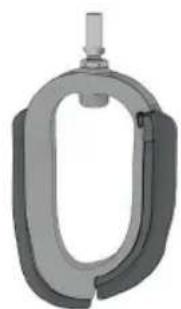
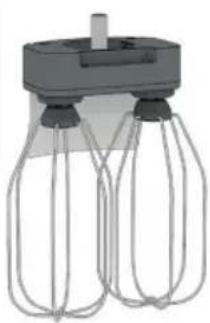
FLEXI-BEATER
RECOMMENDED FOR:
Butter cream
- Cake mixtures
Jam
- Mashed potatoes
MAXIMUM CAPACITIES
Maximum content 3L
Maximum speed 100%
Maximum time 15 min
WARNING:
- Always use butter at room temperature and properly boiled potatoes while using the flexi-beater.
- Do not use the flexi-beater for dough and shortcrust pastry. The spiral hook is the recommended tool for such doughs.
CLEANING
The flexi-beater should always be disassembled before cleaning.
- To disassemble: Remove the silicone scraper by detaching the silicone scrapers flap.
- The flexi-beaters main body and the silicone scraper part are both dishwasher safe.
USE
MOUNT THE SILICONE SCRAPER
- Mount the silicone scraper into the slot in in the base of the flexibeaters main body.
- Hook in the flaps at each end of the silicone scraper.
- Ensure that the silicone scraper is mounted securely to the flexi-beater main body.
ATTACH FLEXI-BEATER
- Insert the tool shaft into the tool mount.
- Twist clockwise to lock the tool. The tool is properly mounted when it "snaps" into position.
DETACH FLEXI-BEATER
- Twist anticlockwise until the tool moves outwards.
- Remove the tool from the tool mount.
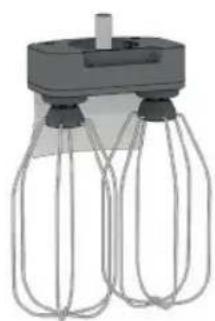
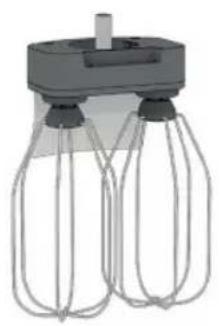
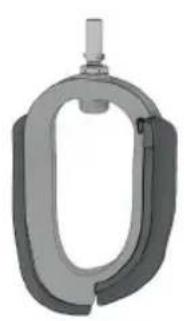
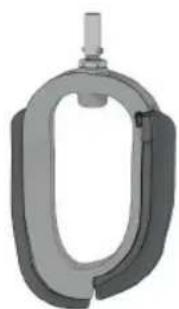
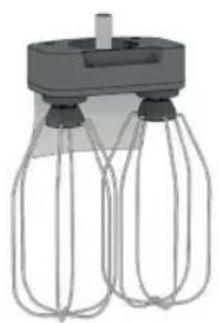
DUAL WHISK
RECOMMENDED FOR:
- Cream
- Egg whites
- Sponge cake mixture
MAXIMUM CAPACITIES
| Minimum Maximum Recommended Time | Recommended Speed | |||
| Cream 0.1L 1.5L | 2 - 4 min | 30 - 50% | ||
| Egg whites | 2 egg whites | 16 egg whites | 4 - 8 min | 50 - 70% |
| Pancake mixture | 0.5L | 3L 1 - 3 min | 30 - 50% | |
| Sponge cake mixture | 2 eggs | 12 eggs | 4 - 8 min | 50 - 70% |
WARNING:
- Be careful not to mix heavy cake mixes with the dual whisk. The flexi-beater is the recommended tool for mixing heavier cake mixtures.
- Always start slowly while using the dual whisk and gradually speed up as content gets mixed. Never exceed 70% speed.
CLEANING
Always detach the whisk balloons and splash guard from the whisk gearbox before cleaning. The whisk balloons and splash guard are dishwasher safe. The whisk gearbox should be cleaned with a moist cloth.
USE
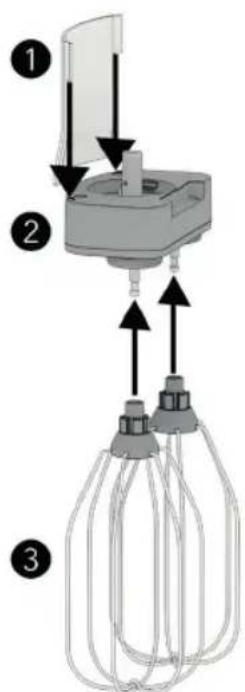
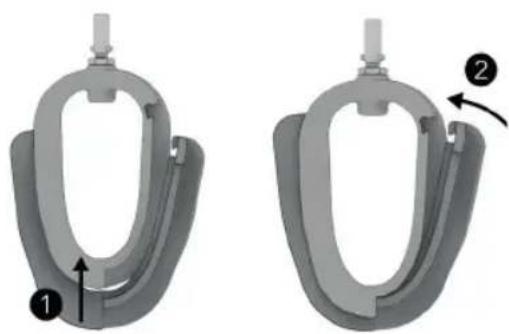
MOUNT THE WHISK
- Mount the whisk balloons (3) to the whisk gearbox (2) by pushing them into the whisk balloon attachment shafts. The whisks are properly inserted when they snap into place.
- It is recommended to use the whisk splash guard (1) and bowl lid (ref. "basic operation") to avoid splashing. The splash guard is mounted by sliding it into the slots in the whisk gearbox.
Note: The whisk balloons are designed to automatically adjust their height based on content. This means that with a very small amount of content the whisk might touch the bottom of the bowl.
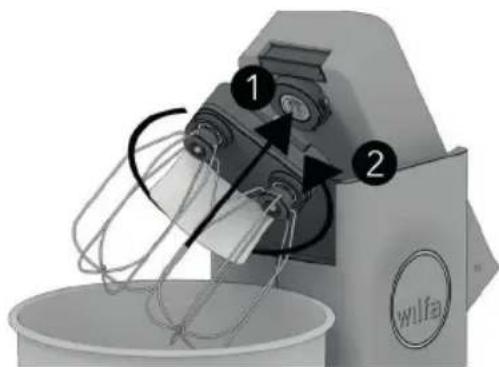
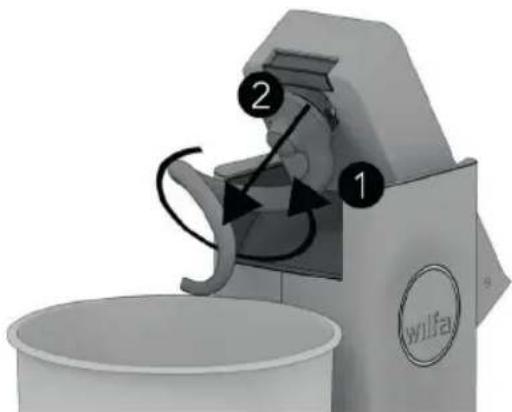
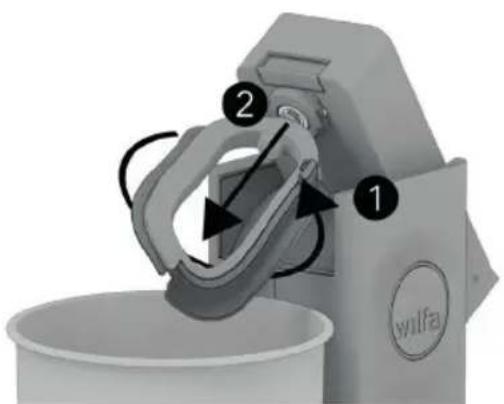
ATTACH DUAL WHISK
- Start with the whisk gearbox angled approximately 45 degrees clockwise as in the illustration and insert the tool shaft into the tool holder.
- Lock the tool in place by twisting it anticlockwise until it locks in place.
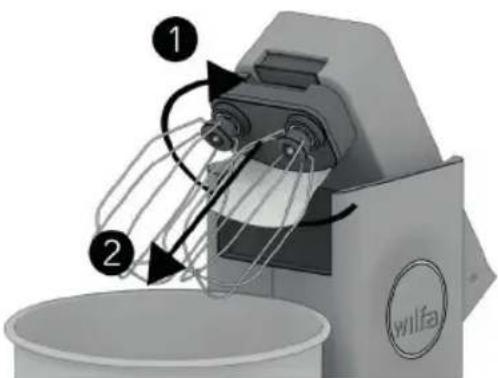
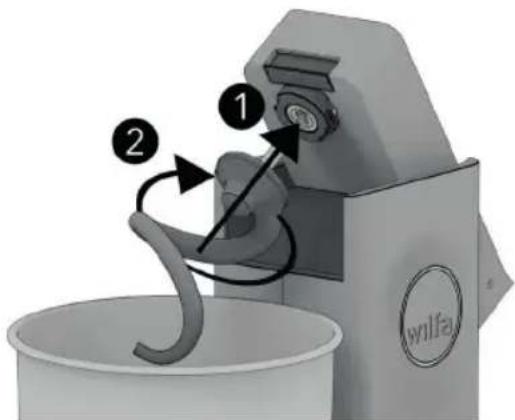
DETACH DUAL WHISK
- Rotate the whisk gearbox clockwise approximately 45 degrees until it cannot be rotated further.
- Pull the tool away from the mixer head to remove it.
TIMER FUNCTIONS
STOP WATCH:
Probaker timer has a built-in stopwatch that can be used to control how long the machine has been running. The timer starts automatically to count from 0 when you start the machine, and pauses when you stop the motor (speed 0).
To set the timer to 0, stop the machine (speed set to 0), and press zero.
TIMER:
Use the +/- buttons to set the preferred time before starting the machine. The countdown starts automatically when you start your machine by increasing the speed (speed set over 0). You could also start the countdown after setting the timer, by pressing the clock button.
If the stopwatch have been used, you have to reset the timer by pressing zero before starting the timer.
TIP:
Correct kneading time is important for a good result. Read the recipe leaflet for a guidance of kneading time for the different recipes.

CLEANING INSTRUCTIONS
THE FOLLOWING TOOLS AND ACCESSORIES ARE DISHWASHER SAFE:
- Spiral hook
- Flexi-beater*
Whisk balloons
Whisk splashguard - 7L stainless steel bowl
- Bowl lid
- Dough scraper
USE A MOIST CLOTH TO CLEAN:
- Probaker main unit
Whisk gearbox - The bowl base rubber ring**
- Always separate the silicone scraper from the flexi-beater before cleaning (ref. "Flexi-Beater")
**The bowl base rubber ring for the bowl holder should be carefully lifted with a flat item for thorough cleaning

TROUBLESHOOTING GUIDE
| Problem Possible Cause Action | ||
| Missing rubber ring in the bowl mounting base | Reattach the rubber ring | |
| Bowl is loose when mounted | Bowl is not properly locked | Turn bowl clockwise until it cannot be moved further |
| Grease or water between bowl and mounting base | Clean rubber ring as described in “Cleaning Instructions” | |
| Bowl is hard to lock | Debris between the base and bowl | Clean rubber ring as described in “Cleaning Instructions” and clean the ring and the base of the machine with a moist cloth |
| Machine stops during kneading | Too heavy loading (Probaker instantaneously measures how heavy the machine is loaded and cuts the power when the loading is too high) | 1. Set speed to 0 2. Reduce the doughs resistance by either: a. Adding liquid b. Removing part of the dough c. Kneading at lower speed |
| Motor overheating (The motor is equipped with a thermal protection system that cuts power if the motor temperature gets too high) | Unplug the device and let the machine cool down for 30 minutes before restarting | |
| Timer display does not show | After a longer break (30 minutes) the machine goes in standby, and only the clock button will show. | To activate the timer, press the clock-button. The timer will automatically start when increasing the speed. |
Problem Possible Cause Action
| Whisk hits bottom of bowl | Not enough content in bowl (The whisk balloons are designed to automatically adjust their height based on content. This means that with a very small amount of content the whisks might touch the bottom of the bowl) | Add more content |
| Machine will not start | Power switch next to the power inlet is in OFF position (O) | Set power switch to the ON position (I) |
| Power cable not properly in place | Ensure the plug is fully connected | |
| Head is not properly closed | Close the head until it properly locks in place | |
| Motor is overheated Probaker cuts power when the motor temperature becomes too high. Unplug the device and let it cool for at least 30 minutes | ||
| Speed indicator ring is blinking on power up | Speed not set to 0 when machine starts | Set speed knob to 0 |
| The flexi-beater silicone scraper loosens | Debris or grease in the mounting point | Clean silicone ring and the flexi-beater thoroughly with soapy water or in dishwasher |
| The flexi-beater is not the correct tool for heavier doughs like yeasted dough and shortcrust pastry | Refer to “tool section”. If in doubt use the spiral hook | |
EN


GUARANTEE
Wilfa issues a 5 year guarantee on this product from the day of purchase. We also issue a 10 year guarantee on the motor. The guarantee covers production failure or defects that arise during the guarantee period. Your purchase receipt works as proof towards retailer if claiming your guarantee.
The guarantee is valid only for products that are bought and used in private households. The guarantee is not valid if the product is used commercially. The guarantee is not valid if the product is misused, used by negligence, if not following instructions given by Wilfa, if modified or if unauthorized reparation is done. The guarantee is also not valid for normal wear of the product, misuse, lack of maintenance, use of wrong electrical voltage or:
- Tools or main unit damaged due to exceeding maximum capacities
- Wear marks on main unit, stainless steel bowl and tools
TECHNICAL SPECIFICATIONS
220-240V~50/60Hz, 700W
SUPPORT AND SPARE PARTS
For support please visit us at wilfa.com, and see our customer service/support page. Here you will find frequently asked questions, spare parts, tips and tricks and all our contact information.
RECYCLABILITY
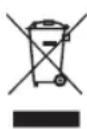
This marking indicates that this product should not be disposed with other household wastes throughout the EU. To prevent possible harm to the environment or human health from uncontrolled waste disposal, recycle it responsibly to promote the sustainable reuse of material resources. To return your used device, please use the return
and collection systems or contact the retailer where the product was purchased.
They can take this product for environmentally safe recycling free of charge.
NO
NO
INNHOLD
28 VIKTIGE SIKKERHETSANVISNINGER
30 SPESIELLE SIKKERHETSANVISNINGER FOR DETTE PRODUKTET
32 PRODUKTOVERSIKT
33 FØR FØRSTE GANGS BRUK
33 GRUNNLEGGENDE FUNKSJONER
35 HASTIGHETSJUSTERING
36 SPIRALKROK
38 FLEXI-VISP
40 DOBBEL VISP
42 RENGJØRINGSANVISNINGER
43 FEILSKINGSVEILEDNING
46 GARANTI
47 TEKNISKE SPESIFIKASJONER
47 SUPPORT OG RESERVEDELER
47 GJENVINNING
VIKTIGE SIKKERHETSANVISNINGER
- Produktet skal ikke brukes av barn. Oppbevar Produktet og ledningen utilgjengelig for barn.
Barn skal-ilke leke medprodukter. - Produktet kan brukes av personer med nedsatte fysisiske, sansemessige eller mentale evner, uller mangel på erfaring og kunnskap, hvis de er under tilsyn eller har fätt anvisninger om sikkerBruk av produitet og er klar over farene forbundet medBruken.
- Trekk alltid ut stopselet til produitet hvis du går fra det uten tilsyn samt før montering, demontering eller rengjøring.
- Slå av produitet og trekk ut støpselet før du skifter tilbehør eller handterer bevegelige deler under bruk.
- Hvis strømledningen blir skadet, på den skiftes ut med en tilsvarende ledning som kan bestilles fra produsenten eller en servicerepresentant for produsenten. Ellers kan det medføre fare.
- Gå aldri fra produitet uten tilsyn när det er koblett til strømforsyningen.
- Produktet må aldri senkes ned i vann.
NO
Vær forsiktig när du handterer de skarpe knivene, tømmer bollen og under rengjøring.
- Produktet er beregnet for innendørs bruk i private husholdninger. Det er ikke beregnet for bruk i industrii eller annenningen.
- Produktet på plasseres på et plant og stabilt underlag på bruk.
- Kontroller at spenningen som er angitt på produit, tilsvarer spenningen i det lokale strømnettefør du kobler til produit.
- Produktet er koblet til jord kun for funksjonsformål.
- Bruksanvisningen finner du ögså på vårt nettsted www.wilfa.no.
SPESIELLE SIKKERHETSANVISNINGER FOR DETTE PRODUKTET
NO
Bakery and Pastry Team
PRODUKTOVERSIKT
NO
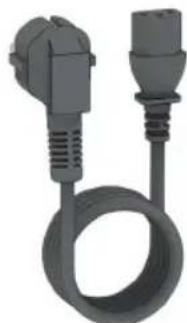

Dobbel visp Flexi-visp Spiralkrok Strømledning Deigskrape
FØR FØRSTE GANGS BRUK
Bakery and Pastry Team
PRODUKTÖVERSIKT
SE
Dubbelseisp Flexi-visp Degkrok Nätkabel Degskrapa
Bakery and Pastry Team
Bakery and Pastry Team
PRODUKTÜBERSICHT
DE
SCHUSSELDECKEL ABNEHMSN
FLEXI-RUHRBSEN ABNEHMSN
Bakery and Pastry Team
NL

PRODUCTOVERZICH
NL
Dubbelegarde
Flexiblele klopper
Bakery and Pastry Team
PL
OPIS OGÓLNY PRODUKTU
Bakery and Pastry Team
APERCU DU PRODUIT
Double fouet

Batteur flexible
Crocket petrisseur
FIXATION DUCOUVERCLEDUBOL
- Crème
Blancsd'oeuf
Patea gateau eponge
CAPACITÉS MAXIMALES


- IMPORTANT SAFETY INSTRUCTIONS
- SPECIAL SAFETY INSTRUCTIONS FOR THIS UNIT
- CONGRATULATIONS ON YOUR NEW WILFA PROBAKER KITCHEN MACHINE
- PRODUCT OVERVIEW
- BEFORE FIRST USE
- BASIC OPERATIONS
- OPEN MIXER HEAD
- CLOSE MIXER HEAD
- ATTACH BOWL
- DETACH BOWL
- ATTACH BOWL LID
- DETACH BOWL LID
- SPEED ADJUSTMENT
- SPEED MODE
- HOW TO USE:
- PULSE MODE
- EN
- SPIRAL HOOK
- RECOMMENDED FOR:
- MAXIMUM CAPACITIES
- AUTOMATIC OVERLOAD PROTECTION SYSTEM
- CLEANING
- USE
- ATTACH SPIRAL HOOK
- DETACH SPIRAL HOOK
- BAKERS TIP
- FLEXI-BEATER
- WARNING:
- MOUNT THE SILICONE SCRAPER
- ATTACH FLEXI-BEATER
- DETACH FLEXI-BEATER
- DUAL WHISK
- MOUNT THE WHISK
- ATTACH DUAL WHISK
- DETACH DUAL WHISK
- TIMER FUNCTIONS
- STOP WATCH:
- TIMER:
- TIP:
- CLEANING INSTRUCTIONS
- THE FOLLOWING TOOLS AND ACCESSORIES ARE DISHWASHER SAFE:
- USE A MOIST CLOTH TO CLEAN:
- TROUBLESHOOTING GUIDE
- GUARANTEE
- TECHNICAL SPECIFICATIONS
- SUPPORT AND SPARE PARTS
- RECYCLABILITY
- INNHOLD
- VIKTIGE SIKKERHETSANVISNINGER
- SPESIELLE SIKKERHETSANVISNINGER FOR DETTE PRODUKTET
- NO
- PRODUKTOVERSIKT
- FØR FØRSTE GANGS BRUK
- PRODUKTÖVERSIKT
- PRODUKTÜBERSICHT
- SCHUSSELDECKEL ABNEHMSN
- FLEXI-RUHRBSEN ABNEHMSN
- APERCU DU PRODUIT
- FIXATION DUCOUVERCLEDUBOL
- CAPACITÉS MAXIMALES
Brand : WILFA
Model : ProBaker Timer KM2BS-T70
Category : Food Processor