CE4.3 - Elliptical bike Horizon Fitness - Free user manual and instructions
Find the device manual for free CE4.3 Horizon Fitness in PDF.


| Product Type | Elliptical trainer (elliptical exercise machine) |
| Brand | Horizon Fitness |
| Model | CE4.3 |
| Usage | Home use only |
| Dimensions (L x W x H, estimated) | 152 cm x 64 cm x 178 cm |
| Weight (estimated) | 68 kg |
| Max user weight (capacity, not specified, estimate) | 136 kg |
| Power supply | AC adapter, standard 110-240V AC power outlet |
| Display | LCD screen: time, level, heart rate, distance, calories, speed, profiles |
| Resistance | Adjustable levels (quick-touch keys) |
| Workout programs | Manual, Hills, Weight loss, Reverse, Custom (15 segments) |
| Goals | Time, Calories, Distance |
| Heart rate monitor | Contact grip handles |
| Additional functions | 3-speed fan, speakers, audio input (adapter cable included), bottle holder, reading rack |
| Maintenance | Clean with a damp cloth and mild soap, do not use solvents |
| Warranty | Frame: lifetime; Electronic components and parts: 1 year; Labor: 1 year (residential use) |
| Assembly | Requires assembly - parts and tools included (Allen wrenches, screwdriver) |
| Safety | Emergency stop via STOP key (hold 3 s to reset); automatic shut-off after inactivity |
| Serial number | On white sticker on front stabilizer tube |
Frequently Asked Questions - CE4.3 Horizon Fitness
User questions about CE4.3 Horizon Fitness
0 question about this device. Answer the ones you know or ask your own.
Ask a new question about this device
Download the instructions for your Elliptical bike in PDF format for free! Find your manual CE4.3 - Horizon Fitness and take your electronic device back in hand. On this page are published all the documents necessary for the use of your device. CE4.3 by Horizon Fitness.
USER MANUAL CE4.3 Horizon Fitness
CE4.3
ELLIPTICAL OWNER'S MANUAL
MANUEL DU PROPRIÉTAIRE DE L'EXERCISEUR ELLIPTIQUE
MANUAL DEL PROPIETARIO DE LA MÁQUINA ELÍPTICA

Read the ELLIPTICAL GUIDE before using this OWNER'S MANUAL.
SAVE THESE INSTRUCTIONS
Read the ELLIPTICAL GUIDE before using this OWNER'S MANUAL. When using an electrical product, basic precautions should always be followed, including the following: Read all instructions before using this elliptical. It is the responsibility of the owner to ensure that all users of this elliptical are adequately informed of all warnings and precautions. If you have any questions, contact Customer Tech Support at the number listed on the back panel of this OWNER'S MANUAL.
This elliptical is intended for in-home use only. Do not use this elliptical in any commercial, rental, school or institutional setting. Failure to comply will void the warranty.



DANGER
TO REDUCE THE RISK OF ELECTRICAL SHOCK:
Always unplug the elliptical from the electrical outlet immediately after using, before cleaning, performing maintenance and putting on or taking off parts.

WARNING
TO REDUCE THE RISK OF BURNS, FIRE, ELECTRICAL SHOCK OR INJURY TO PERSONS:
- If you experience any kind of pain, including but not limited to chest pains, nausea, dizziness, or shortness of breath, stop exercising immediately and consult your physician before continuing.
- When exercising, always maintain a comfortable pace. Do not sprint above 80 RPMs on this machine.
• To maintain balance, it is recommended to keep a grip on the handlebars while exercising, mounting or dismounting the machine. - Do not turn pedal arms by hand.
- Make sure handlebars are secure before each use.
- Keep the topside of the foot support clean and dry.
- Care should be taken when mounting or dismounting the equipment. Before mounting or dismounting, move the pedal on the mounting or dismounting side to its lowest position and bring the machine to a complete stop.
- Do not wear clothes that might catch on any part of the elliptical.
• Always wear athletic shoes while using this equipment. - Do not jump on the elliptical.
- At no time should more than one person be on the elliptical while in operation.
- This elliptical should not be used by persons weighing more than the specified user capacity in the OWNER'S MANUAL WARRANTY SECTION. Failure to comply will void the warranty.
- This elliptical is intended for in-home use only. Do not use this elliptical in any commercial, rental, school or institutional setting. Failure to comply will void the warranty.
- Do not use elliptical in any location that is not temperature controlled, such as but not limited to garages, porches, pool rooms, bathrooms, car ports or outdoors. Failure to comply will void the warranty.
- To prevent electrical shock, never drop or insert any object into any opening.
- Connect this exercise product to a properly grounded outlet only.

WARNING
TO REDUCE THE RISK OF BURNS, FIRE, ELECTRICAL SHOCK OR INJURY TO PERSONS:
- Keep power cord away from heated surfaces. Do not carry this unit by its supply cord or use the cord as a handle.
- Do not use other attachments that are not recommended by the manufacturer. Attachments may cause injury.
- Do not operate where aerosol (spray) products are being used or when oxygen is being administered.
- Use the elliptical only as described in the elliptical guide and owner's manual.
- Disconnect all power before servicing or moving the equipment. To clean, wipe surfaces down with soap and slightly damp cloth only; never use solvents. (See MAINTENANCE)
- The elliptical should never be left unattended when plugged in. Unplug from outlet when not in use, and before putting on or taking off parts.
- Do not operate under blanket or pillow. Excessive heating can occur and cause fire, electric shock, or injury to persons.
- At NO time should children under the age of 13 or pets be within 10 feet of the machine.
- At NO time should children under the age of 13 use the elliptical.
- Children over the age of 13 or disabled persons should not use the elliptical without adult supervision.
- Never operate the elliptical if it has a damaged cord or plug, if it is not working properly, if it has been dropped or damaged, or immersed in water. Contact tech support at the number on the back panel to schedule service.
- Keep power cord away from heated surfaces. Do not carry this unit by its supply cord or use the cord as a handle.
- To disconnect, turn all controls to the off position, then remove plug from outlet.
- Do not remove the console covers unless instructed by Customer Tech Support. Service should only be done by an authorized service technician
It is essential that your elliptical is used only indoors, in a climate controlled room. If your elliptical has been exposed to colder temperatures or high moisture climates, it is strongly recommended that the elliptical is warmed up to room temperature before first time use. Failure to do so may cause premature electronic failure.

WARNING
This product contains chemicals known to the State of California to cause cancer and birth defects or other reproductive harm.
ASSEMBLY

WARNING
There are several areas during the assembly process that special attention must be paid. It is very important to follow the assembly instructions correctly and to make sure all parts are firmly tightened. If the assembly instructions are not followed correctly, the elliptical could have frame parts that are not tightened and will seem loose and may cause irritating noises. To prevent damage to the elliptical, the assembly instructions must be reviewed and corrective actions should be taken.
Before proceeding, find your elliptical's serial number located on a white barcode sticker on the front stabilizer tube and enter it in the space provided below.
ENTER YOUR SERIAL NUMBER AND MODEL NAME IN THE BOXES BELOW:
SERIAL NUMBER:
EP
MODEL NAME: HORIZON
ELLIPTICAL
SERIAL NUMBER LOCATION
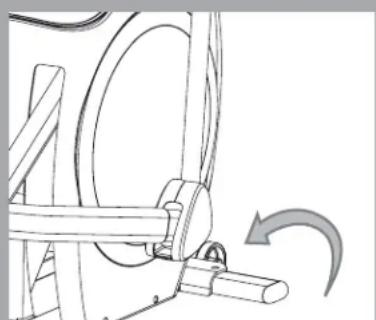
» Refer to the SERIAL NUMBER and MODEL NAME when calling for service.
TOOLS INCLUDED:
□ 5 mm Allen Wrench
□ 6 mm Allen Wrench
□ 13/15 mm Flat Wrench
□ Screwdriver
PARTS INCLUDED:
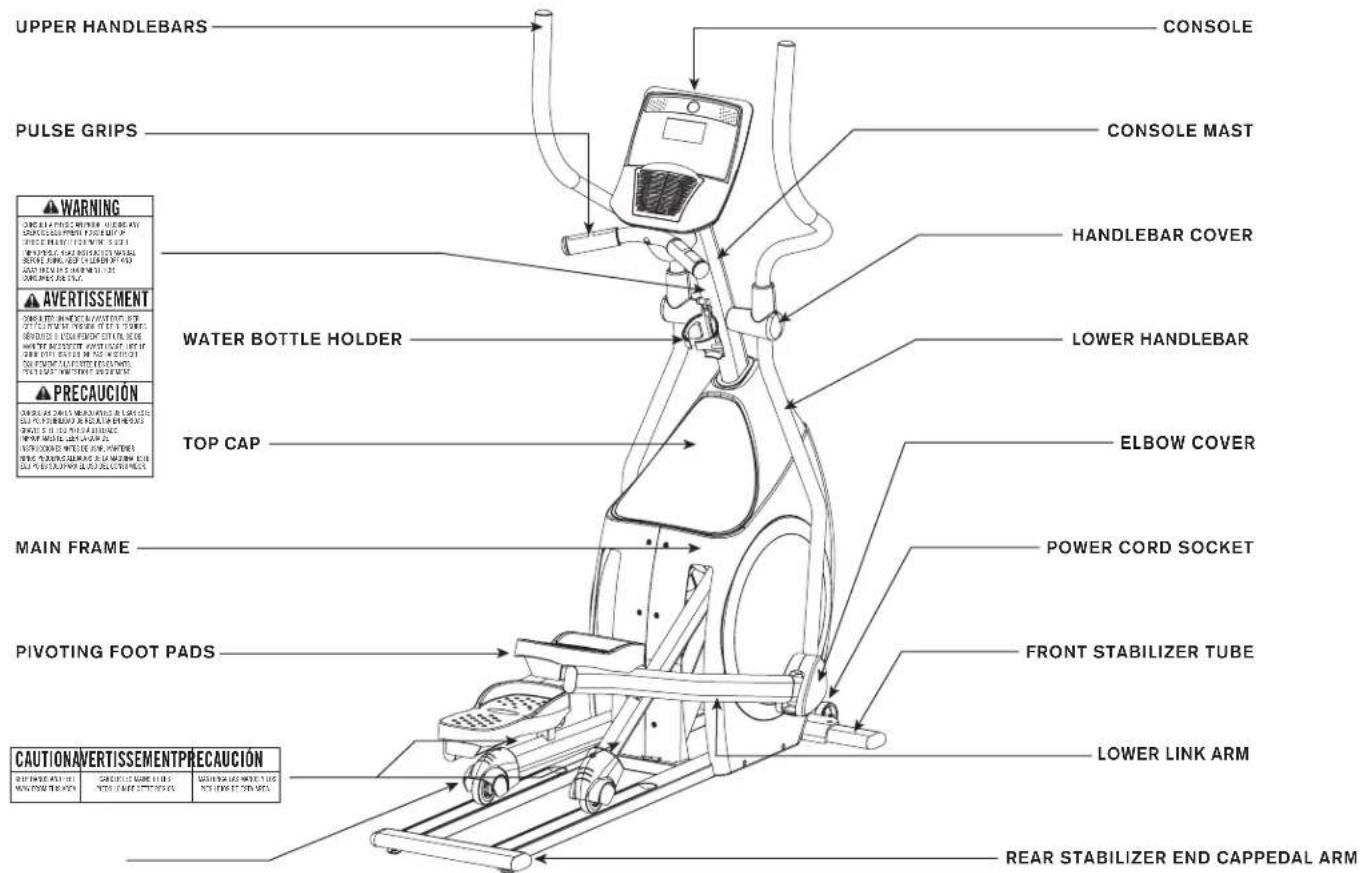
□ 1 Console
□ 1 Console Mast
□ 1 Front Stabilizer Tube
□ 2 Upper Handlebars
□ 2 Lower Handlebars
□ 2 Lower Link Arms
□ 1 Top Front Cover
□ 1 Top Rear Cover
☐ 2 Rear Stabilizer End Caps
□ 2 Elbow Cover Sets
□ 2 Handle Bar Cover Sets
□ 1 Water Bottle Holder
□ 1 Console Mast Boot
□ 1 Hardware Kit
□ 1 Audio Adapter Cable
□ 1 Power Adapter
PRE ASSEMBLY
UNPACKING
Unpack the product where you will be using it. Place the elliptical carton on a level flat surface. It is recommended that you place a protective covering on your floor. Never open box when it is on its side.
NOTE: During each assembly step, ensure that ALL nuts and bolts are in place and partially threaded in before completely tightening any ONE bolt.
NOTE: A light application of grease may aid in the installation of hardware. Any grease, such as lithium bike grease is recommended.

NEED HELP?
If you have questions or if there are any missing parts, contact Customer Tech Support. Contact information is located on the back panel of this manual.
ASSEMBLY STEP 1
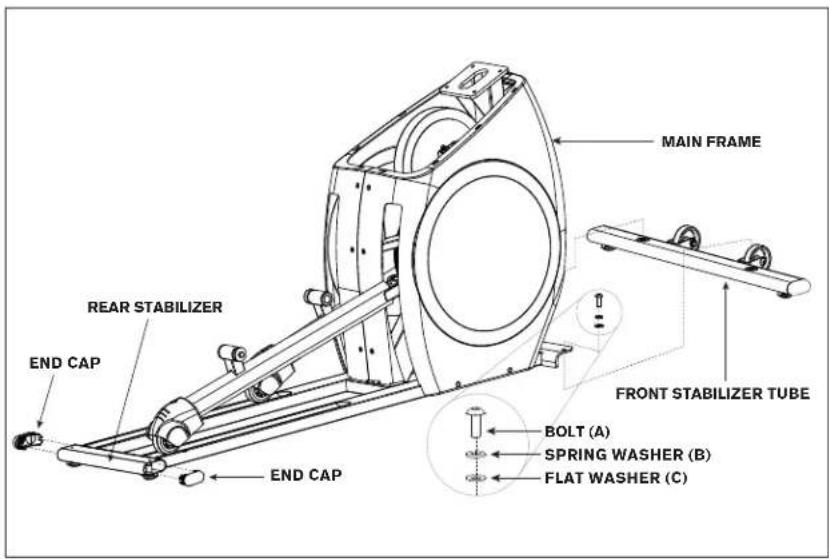
HARDWARE FOR STEP 1:

BOLT (A) 20 mm Qty: 2

SPRING WASHER (B) 18 mm Qty: 2

FLAT WASHER (C) 20 mm Qty: 2
A Open HARDWARE BAG FOR STEP 1.
B Attach the FRONT STABILIZER TUBE to the MAIN FRAME using 2 BOLTS (A), 2 SPRING WASHERS (B) and 2 FLAT WASHERS (C).
C Fit both END CAPS into REAR STABILIZER TUBE.
ASSEMBLY STEP 2
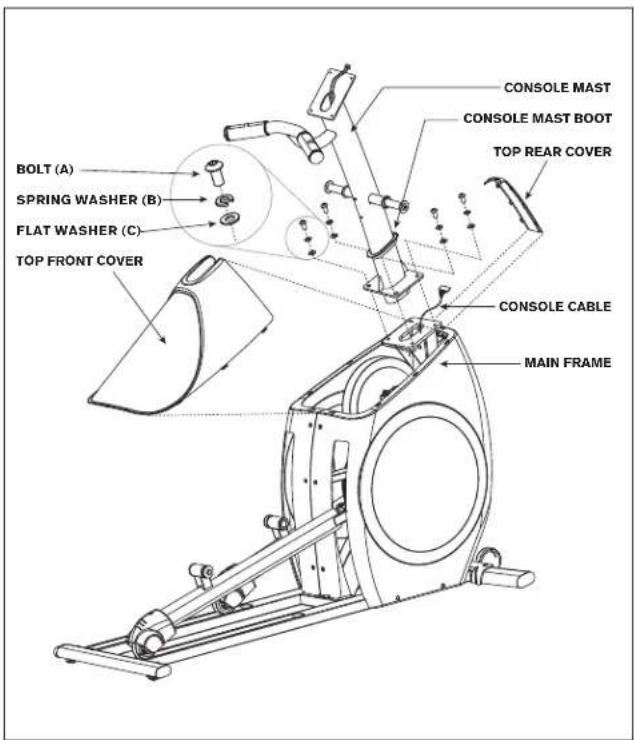
HARDWARE FOR STEP 2:

A Open HARDWARE BAG FOR STEP 2.
B Carefully pull the CONSOLE CABLE through the CONSOLE MAST using the twist tie located inside the CONSOLE MAST.
C Attach the CONSOLE MAST to the MAIN FRAME using 4 BOLTS (A), 4 SPRING WASHERS (B) and 4 FLAT WASHERS (C).
D Attach the TOP FRONT COVER, followed by the TOP REAR COVER and snap them together.
E Slide CONSOLE MAST BOOT down to seal the console mast hole.
NOTE: Be careful not to pinch any wires while attaching the console mast.
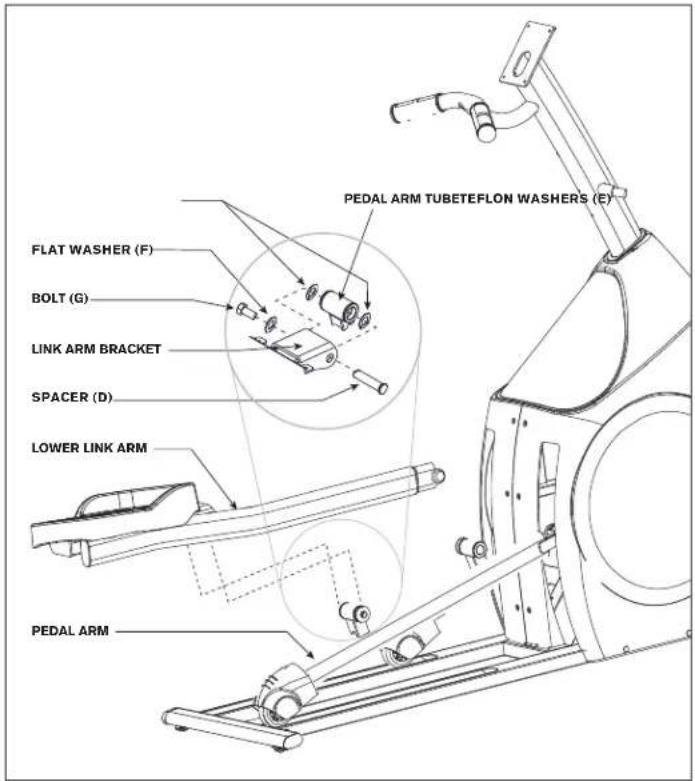
ASSEMBLY STEP 3
HARDWARE FOR STEP 3:
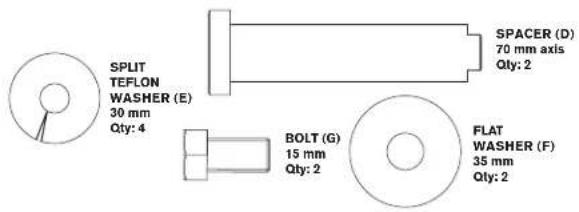
A Open HARDWARE FOR STEP 3.
B Align the bracket on the LEFT LOWER LINK ARM with the tube on the LEFT PEDAL ARM.
C Slide the SPACER (D) through the LINK ARM BRACKET and the PEDAL ARM so it can't rotate.
D Insert 2 TEFLON WASHERS (E) between the PEDAL ARM and the LINK ARM BRACKET.
E Secure the joint with a FLAT WASHER (F) and BOLT (G).
F Repeat on the other side.
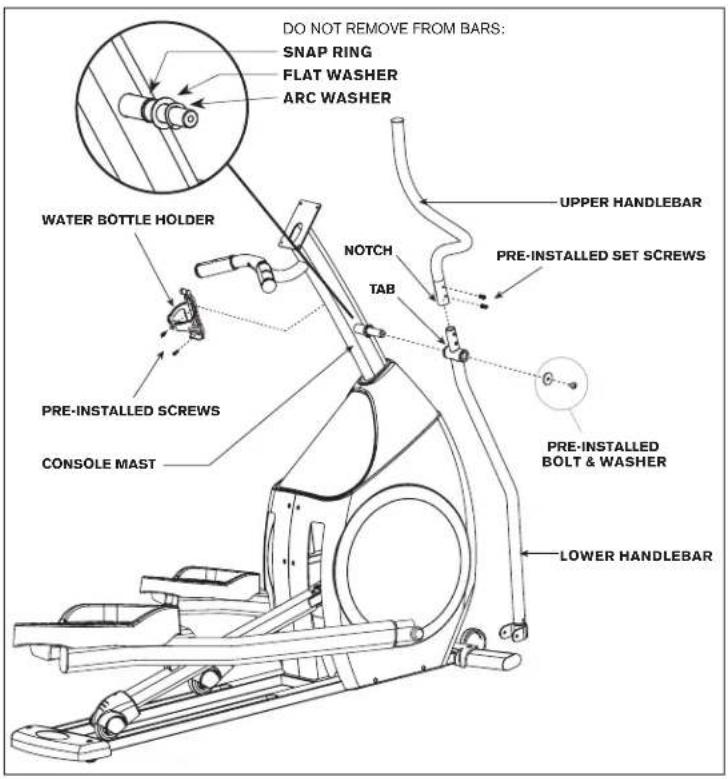
NOTE: The hardware for this step is pre-installed.
A Remove PRE-INSTALLED BOLT & WASHERS from CONSOLE MAST.
B Slide LOWER HANDLEBARS onto
CONSOLE MAST and attach by re-inserting
PRE-INSTALLED BOLT & WASHERS.
C Slide UPPER HANDLEBARS onto LOWER HANDLEBARS and align NOTCH with TAB making sure handlebars are joined together completely. Secure UPPER HANDLEBARS to LOWER HANDLEBARS using PRE-INSTALLED SET SCREWS.
D Repeat on other side.
E Attach WATER BOTTLE HOLDER to CONSOLE MAST using PRE-INSTALLED SCREWS.
NOTE: After handlebars are assembled they will rotate freely – be cautious. Until the machine is fully assembled, do not grab the handlebars for support.
ASSEMBLY STEP 5
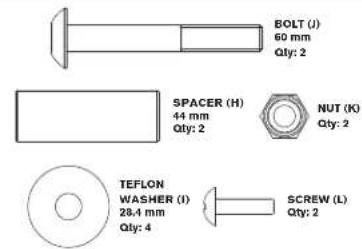
HARDWARE FOR STEP 5:
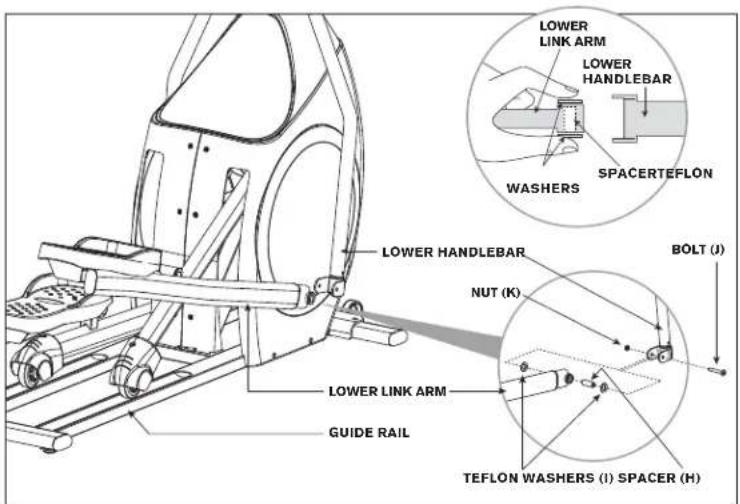
A Open HARDWARE BAG FOR STEP 5.
B Slide SPACER (H) into LOWER LINK ARM.
C Place TEFLON WASHERS (I) on either side of SPACER (H). While holding TEFLON WASHERS (I) slide LOWER LINK ARM into bottom end of LOWER HANDLEBAR.
D Insert BOLT (J) into LOWER HANDLEBAR and secure using NUT (K).
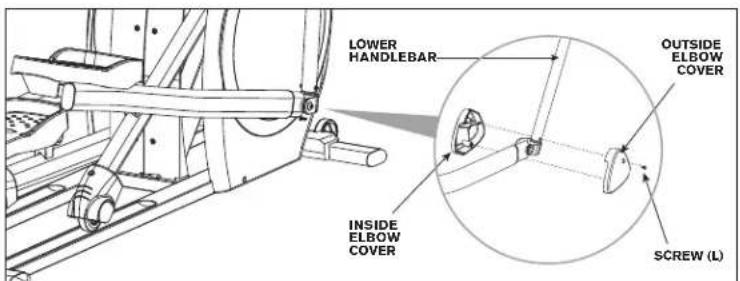
E Attach the outside ELBOW COVER to elbow joint using 1 SCREW (L).
F Snap the INSIDE ELBOW COVER onto the outside elbow cover. Note the position of the snap tabs before snapping into position.
G Repeat on other side.
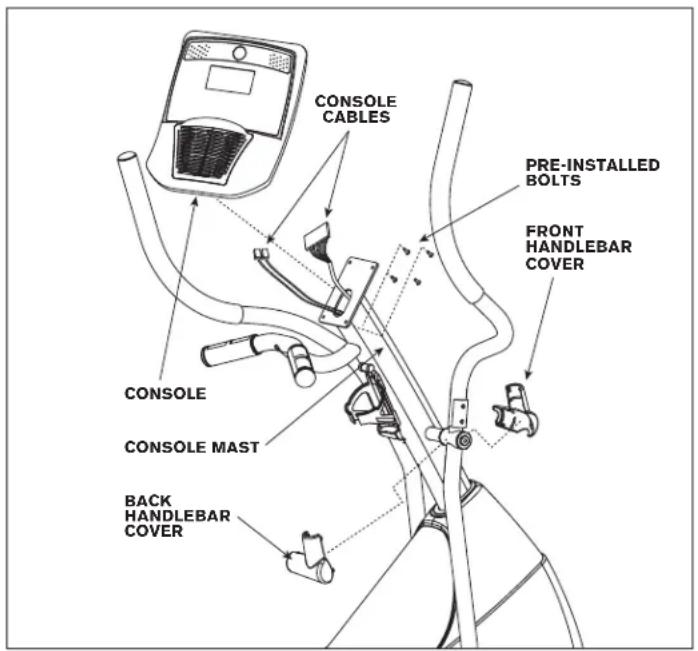
NOTE: The hardware for this step is pre-installed.
A Snap the FRONT AND BACK HANDLEBAR COVERS together onto the upper handlebars. Note the position of the snap tabs on the covers before snapping into position.
B Remove the 4 PRE-INSTALLED BOLTS from the back of the CONSOLE.
C Attach the CONSOLE CABLES to the CONSOLE.
D Carefully tuck the CONSOLE CABLES into the CONSOLE MAST before attaching the CONSOLE to the CONSOLE MAST using 4 PRE-INSTALLED BOLTS.
NOTE: Be careful not to pinch cables while attaching the console.
ASSEMBLY COMPLETE!
This section explains how to use your elliptical's console and programming.
The BASIC OPERATION section in the ELLIPTICAL GUIDE has instructions for the following:
• LOCATION OF THE ELLIPTICAL
• POWER/GROUNDING INSTRUCTIONS
• FOOT POSITIONING
• MOVING THE ELLIPTICAL
• LEVELING THE ELLIPTICAL
• USING THE HEART RATE FUNCTION


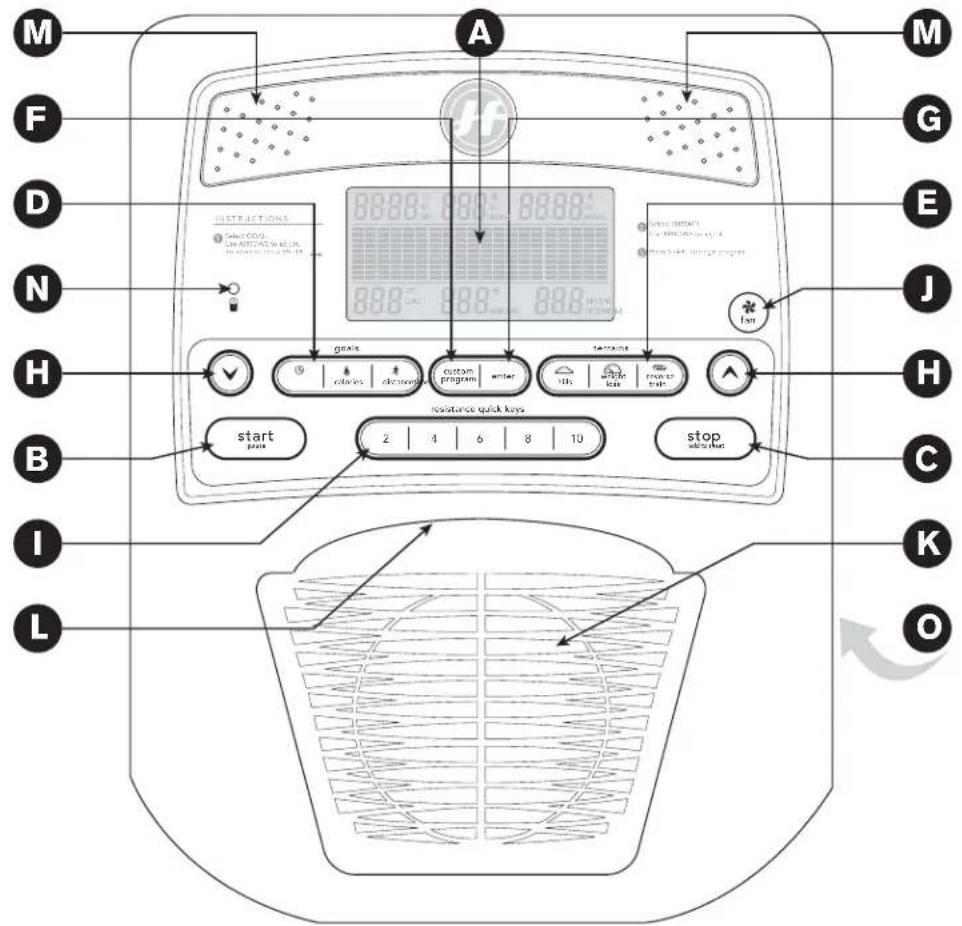
CONSOLE OPERATION
Note: There is a thin protective sheet of clear plastic on the overlay of the console that should be removed before use.
A) LCD DISPLAY: time, level, heart rate, distance, calories, speed, program profiles.
B) START: press to begin exercising, start your workout, pause or resume exercising.
C) STOP: press to pause/end your workout. Hold for 3 seconds to reset the console.
D) GOALS: press to select your desired goal.
E) TERRAINS: press to select your desired terrain.
F) CUSTOM PROGRAM: press to select custom program.
G) ENTER: used to choose your program and confirm program settings.
H) ▼▲ KEYS: used to select / adjust your program and program settings.
I) QUICK KEYS: used to reach desired resistance level more quickly.
J) FAN KEY: used to adjust fan to 3 speed levels.
K) FAN: personal workout fan.
L) READING RACK: holds reading material or media player.
M) SPEAKERS: music plays through speakers when your media player is connected to console.
N) AUDIO IN: plug your media player into the console using the included audio adaptor cable.
O) ON/OFF SWITCH: located on back of console.
Decals are included if you would prefer French text on your console.
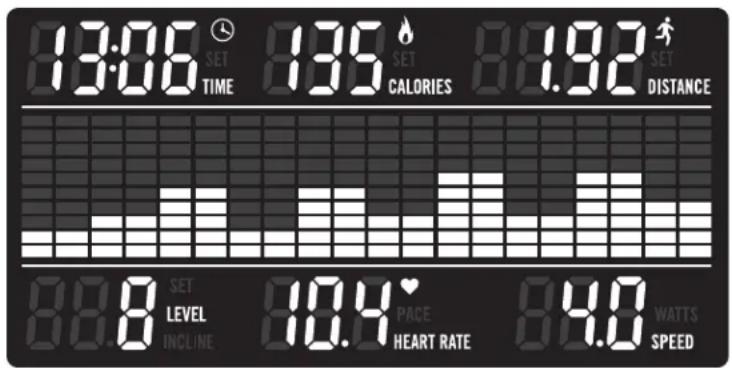
DISPLAY INFORMATION
• TIME: Shown as minutes : seconds. View the time remaining or the time elapsed in your workout.
• CALORIES: Total calories burned or calories remaining left to burn during your workout.
- DISTANCE: Shown as miles. Indicates distance traveled or distance remaining during your workout.
• LEVEL: Shows the current level of resistance.
- HEART RATE: Shown as BPM (beats per minute). Used to monitor your heart rate (displayed when contact is made with both pulse grips).
• WATTS: Displays current user power output.
- SPEED: Shown as MPH. Indicates how fast the foot pedals are moving.
GETTING STARTED
1) Check to make sure no objects are nearby that will hinder the movement of the elliptical.
2) Plug in the power cord located at the bottom-front of the elliptical.
A) QUICK START UP
Simply press the START key to begin working out.
The time will count up from 0:00, the resistance level will default to level 1. OR...
B) SELECT A GOAL AND TERRAIN
1) Press one of the GOAL KEYS to select a GOAL and press ENTER.
2) Adjust the GOAL settings using ▼ and press ENTER to advance.
3) Press one of the TERRAIN KEYS to select a TERRAIN.
4) Press START to begin workout.
NOTE: You can adjust the resistance level during your workout.
NOTE: If no GOAL nor TERRAIN is selected, the program will function as a MANUAL program. All changes in resistance level or incline will need to be from the user in this setting.
When your workout is complete, the monitor display will flash "FINISHED" and beep. Your workout information will stay displayed on the console for 30 seconds and then reset.
USING A MEDIA PLAYER
1) Connect the included AUDIO ADAPTOR CABLE to the AUDIO IN JACK next to the console display and to the headphone jack on your media player.
2) Use your media player to adjust volume and song settings.
3) Remove the AUDIO ADAPTOR CABLE when not in use.
TO RESET THE CONSOLE
Hold STOP key for 3 seconds.

GOAL PROGRAM INFORMATION
The programs on your elliptical allow you to exercise towards the goal of your choice, either TIME, number of CALORIES or a certain DISTANCE, while allowing you to choose the "terrain."

GOAL: TIME
Allows you to work towards a time-based goal.
1) Press TIME key once.
2) Use √ to select the desired duration of workout and press ENTER.
3) Choose desired terrain by pressing HILLS, WEIGHT LOSS or REVERSE TRAIN keys and press ENTER.
4) Press START to begin your workout.
NOTE: If you'd like to set a goal without choosing a terrain, press the start key after step 2. Your goal will count down and you can set the resistance manually.

GOAL: CALORIES
Allows you to work towards a calorie-based goal.
1) Press CALORIE key once.
2) Use √ to select the desired caloric expenditure for the workout and press ENTER.
3) Choose desired terrain by pressing HILLS, WEIGHT LOSS or REVERSE TRAIN keys and press ENTER.
4) Press START to begin your workout.

GOAL: DISTANCE
Allows you to work towards a distance-based goal.
1) Press DISTANCE key once.
2) Use √ to select the desired mileage of workout and press ENTER.
3) Choose desired terrain by pressing HILLS, WEIGHT LOSS or REVERSE TRAIN keys and press ENTER.
4) Press START to begin your workout.
PROGRAM INFORMATION

HILLS
Motivates with different
combinations of RESISTANCE.

WEIGHT LOSS
Promotes weight loss by raising
and lowering the resistance level, while keeping you in your fat burning zone.

REVERSE TRAIN
Program cues you to pedal forward
(F) and backwards (R) for an exciting and challenging workout.
| HILLS | |||||||||||||||||
| Warm-Up Program | Segments - Repeat | ||||||||||||||||
| Seconds | 60 | 60 | 60 | 60 | 60 | 60 | 60 | 60 | 60 | 60 | 60 | 60 | |||||
| Segments | 12345 | 6789 | 1011 | 12131 | 41516 | ||||||||||||
| Level 11 | 12123 | 4123 | 41234 | ||||||||||||||
| WEIGHT LOSS | ||||||||||||||||
| Warm-Up Program Segments - Repeat | ||||||||||||||||
| Seconds 60 60 60 60 | 60 60 | 60 60 | 60 60 | 60 60 | 60 60 | 60 60 | 60 60 | 60 60 | 60 | |||||||
| Segments 12345 | 6789 | 1011 | 2131 | 41516 | ||||||||||||
| Level 11 | 2222 | 2233 | 32222 | |||||||||||||
| REVERSE TRAIN | |||||||||||||
| Program Segments - Repeat | |||||||||||||
| Seconds 60 60 60 60 30 45 60 30 90 60 30 45 60 30 90 60 | |||||||||||||
| Segment | Warm-Up | F | R | F | R | F | R | F | R | F | R | F | R |
| Level 11 | 2434234234234 | ||||||||||||

CUSTOM
Design and store your own custom exercise program. Allows you to customize your workout by letting you create the terrain.
1) Press CUSTOM key once.
2) Choose a GOAL by pressing TIME, CALORIES or DISTANCE key.
3) Use √ ▲ to select the desired duration, caloric expenditure or mileage of workout and press ENTER.
4) Set the RESISTANCE PROFILES using the ▼▲ and press ENTER after each RESISTANCE SEGMENT is set to the desired level. (Repeat until all 15 segments are set.)
NOTE: If STOP key is pressed, it will take you back to the previous segment.
5) Press START to begin your program.
NOTE: to reset the memory, press and hold the enter button for 5 seconds.
LIMITED HOME-USE WARRANTY


WEIGHT CAPACITY = 275 lbs (125 kilograms).
FRAME • LIFETIME
Horizon Fitness warrants the frame against defects in workmanship and materials for the lifetime of the original owner, so long as the device remains in the possession of the original owner. (The frame is defined as the welded metal base of the unit and does not include any parts that can be removed.)
ELECTRONICS & PARTS • 1 YEAR
Horizon Fitness warrants the electronic components, finish and all original parts for a period of one year from the date of the original purchase, so long as the device remains in the possession of the original owner.
LABOR • 1 YEAR
Horizon Fitness shall cover the labor cost for the repair of the device for a period of one year from the date of the original purchase, so long as the device remains in the possession of the original owner.
EXCLUSIONS AND LIMITATIONS
Who IS covered:
- The original owner and is not transferable.
What IS covered:
- Repair or replacement of a defective motor, electronic component, or defective part and is the sole remedy of the warranty.
What IS NOT covered:
- Normal wear and tear, improper assembly or maintenance, or installation of parts or accessories not originally intended or compatible with the equipment as sold.
- Damage or failure due to accident, abuse, corrosion, discoloration of paint or plastic, neglect, theft, vandalism, fire, flood, wind, lightning, freezing, or other natural disasters of any kind, power reduction, fluctuation or failure from whatever cause, unusual atmospheric conditions, collision, introduction of foreign objects into the covered unit, or modifications that are unauthorized or not recommended by Horizon Fitness.
- Incidental or consequential damages. Horizon Fitness is not responsible or liable for indirect, special or consequential damages, economic loss, loss of property, or profits, loss of enjoyment or use, or other consequential damages of whatsoever nature in connection with the purchase, use, repair or maintenance of the equipment. Horizon Fitness does not provide monetary or other compensation for any such repairs or replacement parts
costs, including but not limited to gym membership fees, work time lost, diagnostic visits, maintenance visits or transportation.
- Equipment used for commercial purposes or any use other than a single family or Household, unless endorsed by Horizon Fitness for coverage.
• Equipment owned or operated outside the US and Canada. - Delivery, assembly, installation, setup for original or replacement units or labor or other costs associated with removal or replacement of the covered unit.
- Any attempt to repair this equipment creates a risk of injury. Horizon Fitness is not responsible or liable for any damage, loss or liability arising from any personal injury incurred during the course of, or as a result of any repair or attempted repair of your fitness equipment by other than an authorized service technician. All repairs attempted by you on your fitness equipment are undertaken AT YOUR OWN RISK and Horizon Fitness shall have no liability for any injury to the person or property arising from such repairs.
- If you are out of the manufacturer's warranty but have an extended warranty, refer to your extended warranty contract for contact information regarding requests for extended warranty service or repair.
SERVICE/RETURNS
- In-home service is available within 150 miles of the nearest authorized Service Provider (Mileage beyond 150 miles from an authorized service center is the responsibility of the consumer).
- All returns must be pre-authorized by Horizon Fitness.
- Horizon Fitness' obligation under this warranty is limited to replacing or repairing, at Horizon Fitness' option, the same or comparable model.
- Horizon Fitness may request defective components be returned to Horizon Fitness upon completion of warranty service using a prepaid return shipping label. If you have been advised to return parts and did not receive a label, please contact Customer Tech Support.
- Replacement units, parts and electronic components reconditioned to as-new condition by Horizon Fitness or its vendors may sometimes be supplied as warranty replacement and constitute fulfillment of warranty terms.
- This warranty gives you specific legal rights, and your rights may vary from state to state.

FRANÇAIS
PRÉCAUTIONS IMPORTANTES
CONSERVEZ CES DIRECTIVES
FONCTIONNEMENT DE LA CONSOLE
CAPACITÉ DU POIDS = 125 kilogrammes (275 lbs)
CADRE • À VIE
if you have any problems during assembly or if parts are missing.
For fast and friendly service, please contact one of our trained customer technicians via phone, email or our website.
We want to know if you have a problem and we want to have an opportunity to correct it for you. NOTE: Please read the TROUBLESHOOTING section in the ELLIPTICAL GUIDE before contacting Customer Tech Support. Additional product information is available on our website.

www.horizonfitness.com
Horizon Fitness
1600 Landmark Drive,
Cottage Grove WI, 53527
- ELLIPTICAL OWNER'S MANUAL
- MANUEL DU PROPRIÉTAIRE DE L'EXERCISEUR ELLIPTIQUE
- MANUAL DEL PROPIETARIO DE LA MÁQUINA ELÍPTICA
- SAVE THESE INSTRUCTIONS
- DANGER
- TO REDUCE THE RISK OF ELECTRICAL SHOCK
- WARNING
- TO REDUCE THE RISK OF BURNS, FIRE, ELECTRICAL SHOCK OR INJURY TO PERSONS
- ASSEMBLY
- TOOLS INCLUDED
- PARTS INCLUDED
- PRE ASSEMBLY
- UNPACKING
- NEED HELP
- ASSEMBLY STEP 1
- HARDWARE FOR STEP 1
- ASSEMBLY STEP 2
- HARDWARE FOR STEP 2
- ASSEMBLY STEP 3
- ASSEMBLY STEP 5
- CONSOLE OPERATION
- DISPLAY INFORMATION
- GETTING STARTED
- QUICK START UP
- SELECT A GOAL AND TERRAIN
- USING A MEDIA PLAYER
- TO RESET THE CONSOLE
- GOAL PROGRAM INFORMATION
- GOAL: TIME
- GOAL: CALORIES
- GOAL: DISTANCE
- PROGRAM INFORMATION
- HILLS
- WEIGHT LOSS
- REVERSE TRAIN
- CUSTOM
- LIMITED HOME-USE WARRANTY
- FRAME • LIFETIME
- ELECTRONICS & PARTS • 1 YEAR
- LABOR • 1 YEAR
- EXCLUSIONS AND LIMITATIONS
- SERVICE/RETURNS
- PRÉCAUTIONS IMPORTANTES
- CONSERVEZ CES DIRECTIVES
- FONCTIONNEMENT DE LA CONSOLE
- CADRE • À VIE
Brand : Horizon Fitness
Model : CE4.3
Category : Elliptical bike