
Classic SHG 3 6 kW - Heating EINHELL - Free user manual and instructions
Find the device manual for free Classic SHG 3 6 kW EINHELL in PDF.

| Brand | Einhell |
| Model | Classic SHG 3.6 kW |
| Product type | Electric sauna heater |
| Nominal power | 3.6 kW |
| Supply voltage | 230 V AC, 1N |
| Recommended cabin volume | 4 to 6 m³ |
| Minimum cable cross-section (heater → control) | 3 x 1.5 mm² (silicone) |
| Recommended fuse protection | 16 A |
| Stone type | Natural, pre-washed |
| Weight of stones supplied | Sufficient quantity (not specified) |
| Maximum admissible ambient temperature | 140 °C (for cables) |
| Operating temperature (Finnish sauna) | 70 to 110 °C |
| Maximum relative humidity | 15% (dry sauna) |
| Functions | Heating, infusion possible |
| Cleaning | Dry, without abrasive products |
| Stone maintenance | Replace every 2 years if crumbling |
| Safety | Residual current device, protection against water shortage (optional evaporator) |
| Warranty | 2 years |
| Installation | Must be carried out by a qualified electrician |
| Minimum cabin height | 1.75 m |
Frequently Asked Questions - Classic SHG 3 6 kW EINHELL
User questions about Classic SHG 3 6 kW EINHELL
0 question about this device. Answer the ones you know or ask your own.
Ask a new question about this device
Download the instructions for your Heating in PDF format for free! Find your manual Classic SHG 3 6 kW - EINHELL and take your electronic device back in hand. On this page are published all the documents necessary for the use of your device. Classic SHG 3 6 kW by EINHELL.
USER MANUAL Classic SHG 3 6 kW EINHELL
GB Table of contents
Table of contents 2
General 15
Important safety instructions 15
Recommendations for starting the
sauna oven for the first time 16
Installation instructions 16
Installing the sauna oven 17
Electrical connection to the control unit 18
SHG standard connection diagram 19
SHG evaporator connection diagram 20
SHG evaporator connection diagram 21
Cleaning and care 22
Placing the sauna stones on the stone grate 22
Liquid 22
What to do in the event of problems 22
Notes on the sauna oven with integral evaporator 23
Installing the oven 23
General notes 24
Bath types 24-25
Cleaning and care of the evaporator 25
Spare parts lists and spare parts drawing 92-93
EC declaration of conformity 94
Service request form 96
Warranty certificate 103
Electric Scrap Regulation 105
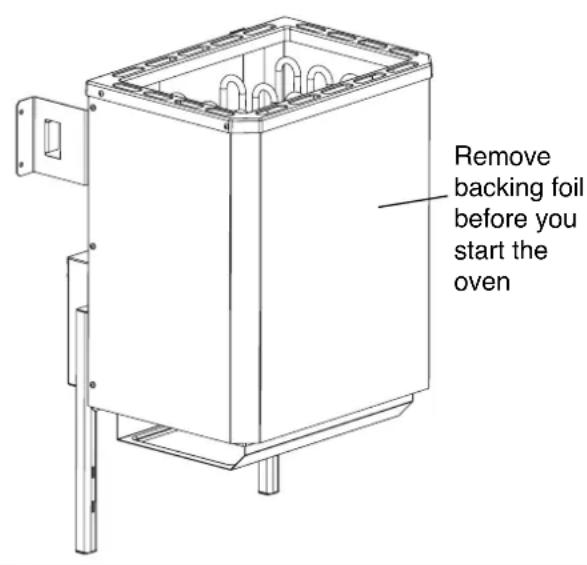
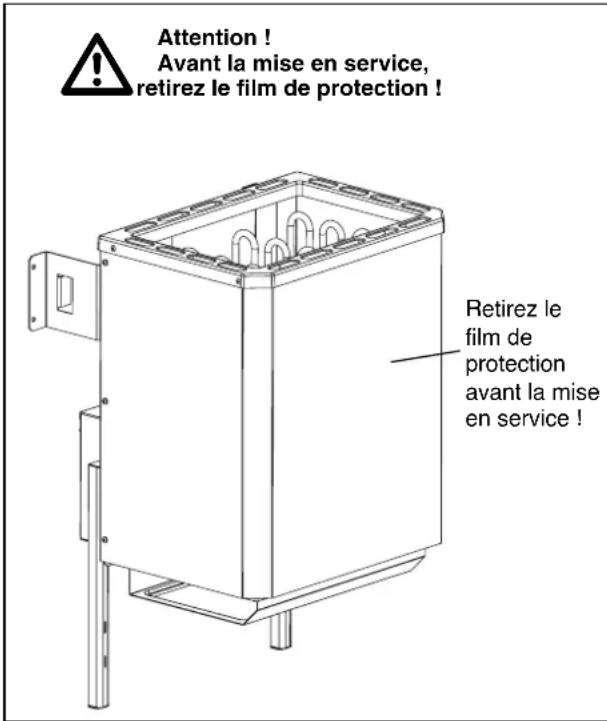
Important. Remove backing foil before you start the oven
General
Dear Customer,
Read this instruction manual carefully before you start using the oven. This will enable you to become familiar with how to use the unit quickly.
Take care when operating the sauna oven
When operating the sauna oven remember that it reaches very high temperatures.
The sauna oven becomes particularly hot around the top section of its frame.
Children should therefore be kept well away from it since they will not necessarily recognize the dangers that may be involved with using this unit. Our ovens comply with the latest safety regulations. However, these regulations do not necessarily cover every possible accident risk. To ensure that your oven can be used safely, you should pay close attention to the safety instructions in the appropriate section of this manual.
Important safety instructions
Whilst your sauna oven is operating, very high temperatures will be created in the booth and above all on the oven itself. If it is not installed correctly there is a risk of fire. Read these installation instructions carefully. Pay special attention to the dimensions and the instructions listed below.
●The SHG 3.6 kW sauna oven is designed for a connection voltage of 230 V AC.
●The SHG 7.5 kW SHG 9.0 kW, SHG 7.5 kW with evaporator and SHG 9.0 kW with evaporator sauna ovens are designed for a connection voltage of 400 V AC 3 N.
●The installation and the electrical connection of the sauna equipment and other electrical equipment must be carried out by a trained electrician. Special attention must be paid to the safety measures set out in VDE 0100 § 49 DA/6 and VDE 0100 Part 703/11.82 §4 during this work.
●Sauna equipment may only be installed in sauna booths made of suitable, low-resin and untreated material (for example nordic spruce).
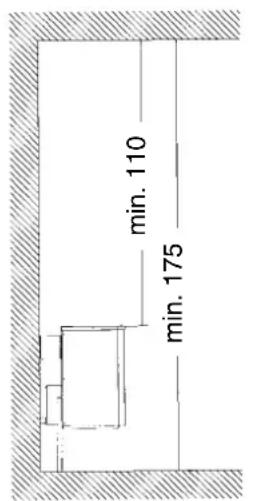
●The minimum height of the sauna booth must be 1.75 m (interior height).
- Important: The moisture protection package in the oven's connection box must be removed (fire risk).
●Only a sauna oven with the appropriate heating capacity may be installed in the sauna booth.
| Connection rating Booth size [kW] [m] | 3 |
| 3.6 approx. 4 - 67.5 approx. 8 - 129.0 approx. 10 - 14 | |
●Ventilation slits must be provided in all sauna booths.
●The venting point must always be positioned at a diagonal to the rear sauna wall at the bottom. The ventilation slits must not be sealed.
●The control unit required for controlling and regulating the sauna oven must be installed on the exterior wall of the booth, whilst the sensor casing must be installed inside the sauna booth as detailed in the enclosed installation instructions.
- The booth light and its installation must be in a „splash-proof“ design and suitable for an ambient temperature of 140°C. Therefore only a VDE-approved sauna light with a maximum rating of 40 W may be installed with the sauna oven.
GB
Recommendations for starting the sauna oven for the first time
It is known that the heating elements absorb residual moisture due to climate differences, and that this results in the RCCB tripping without the heating elements actually suffering a fault. Therefore if the sauna oven is exposed to large temperature differences (in the winter) it should be left in a temperature-controlled room for at least 12 hours.
What to do if the RCCB trips anyway
Have the electrician check the ohm values between the core and core with an insulation measuring instrument
15 - 18 Ω on the SHG 3.6 kW
33 - 39 Ω on the SHG 3.6 kW for evaporator only
19 - 23 Ω on the SHG 7.5 kW
33 - 39 Ω on the SHG 7.5 kW for evaporator only
16 - 19.5 Ω on the SHG 9.0 kW
33 - 39 Ω on the SHG 9.0 kW for evaporator only
and between the core and earth (over 1 MΩon all ovens). If the differences are excessive, return the oven to the manufacturer.
Heating for approx. 10 minutes without the RCCB The electrician can heat the sauna oven for approx. 10 minutes using the safety conductor connector. After 10 minutes the oven will be reconnected properly to the RCCB. If the RCCB trips anyway, please return the oven to the manufacturer.
In any event the oven must be connected properly to the domestic installation system using an RCCB as set out in VDE 0100.
Installation instructions
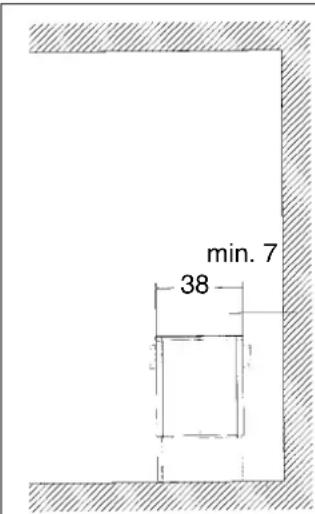
- For the installation of the sauna oven ensure that the vertical distance between the top of the sauna oven and the ceiling of the sauna booth is at least 110 cm and the horizontal (lateral) distance between the oven and the wall of the booth is at least 7 cm. The distance between the bottom of the oven and the floor depends on the design of the oven (adjustable feet). However, it should be ensured that the oven is not placed on a floor made of highly inflammable material (wood, plastic flooring, etc.). Ideally ceramic tiles or the like should be used in the sauna. The distance between the rear wall of the oven and the wall of the booth also depends on the design (wall bracket).
●The distance between the oven safety grille or the bench and other inflammable materials from the oven must be at least 7 cm. The height of the safety grille must be equal to the height of the oven at the front.
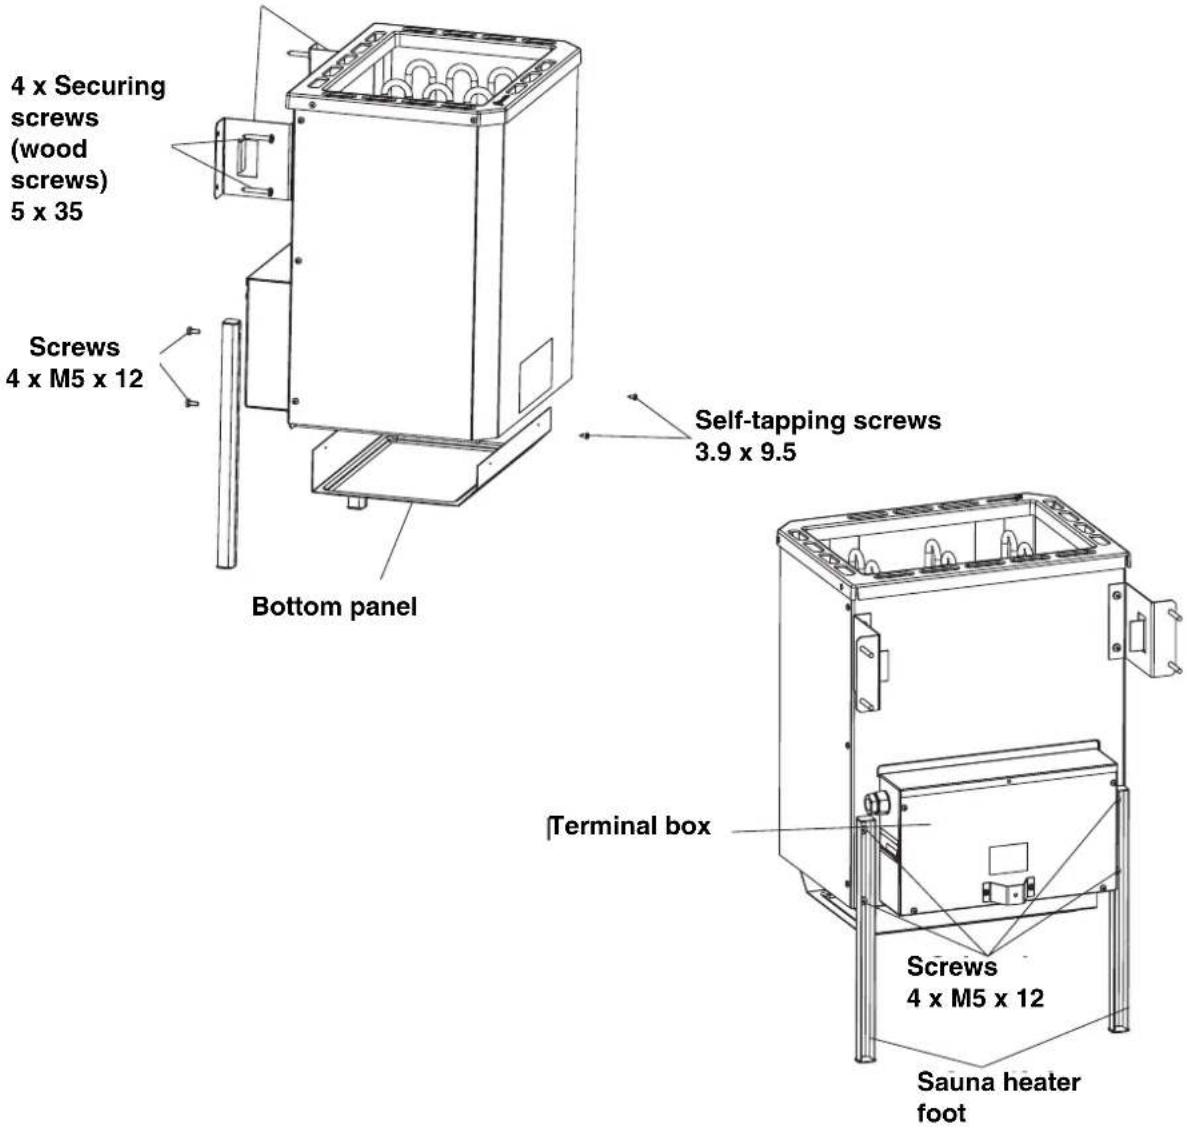
●Affix the feet on the rear wall of the oven using the screws supplied (4 screws M5 x 12).
●Fasten the bottom panel to the inner sheath with 4 self-tapping screws 3.9 x 9.5.
●Thread the mains cable into the terminal box through the hole provided for it.
●After making the electrical connection of the mains cable, close the cover on the terminal box again (with the spacer on the outside).
- Position the sauna oven in front of the air intake opening. Secure the wall bracket to the wall of the booth using the wood screws supplied.
- Insert the stone grate (see description entitled "Placing the sauna stones on the stone grate", section entitled "Cleaning and care", page 20).
2 x Wall bracket
GB
Electrical connection to the controller
The sauna equipment (sauna oven, control unit and light, etc.) may only be connected to the mains supply by a locally authorized electrician using a permanent connection. All the connection cables installed inside the booth must be suitable for an ambient temperature of at least 140°C. Silicon cables are ideal for this purpose. If single-core cables are used to make the connection, these must be protected by a pliable metal tube. The minimum cross-section of the connection cable and the minimum size of the sauna booth are listed in the following table.
If your booth does not have any empty tubes, drill a hole approximately 10 - 12 mm in diameter in the wall of the booth immediately next to the oven at the point where the cable comes out of the oven and thread the cable through this hole to the outside and then route it to the control unit. The cable and all other connection cables (supply cables to the mains and to the booth light) should also be protected from damage on the outside of the booth. This protection may take the form of installation tubes or strips of wood.
| Oven type Connection Suitable for Minimum cross-sections mm ^2 (copper cable) rating booth size SHG 7.5 -9.0 kW: Connect to 400 V AC 3N in kW in m ^3 SHG 3.6 kW: Connect to 230 V 1N | |||||
| Mains cable from mains to cable from control A control unit unit to oven (silicon) | |||||
| SHG 3,6 kW 3,6 approx. 4 - SHG 7,5 kW 7,5 approx.. 8 - SHG 9,0 kW 9,0 approx. 10 | 6 3 x 1,5 3 x 1,5 16 - 12 5 x 2,5 5 x 1,5 16 - 14 5 x 2,5 5 x 1,5 16 | ||||
| SHG 3,6 kW + 1,5 kW with evaporator | 3,6/1.5 | ca. 4-6 | 2 x 3x1,5 | 2 x 3x1,5 | 2 x 16 |
| SHG 7,5 kW + 1,5 kW with evaporator | 7,5 | approx. 8 - 12 | 5 x 2,5 | 7 x 1,5 | 20 |
| SHG 9,0 kW + 1,5 kW with evaporator | 9,0 | approx. 10 - 14 | 5 x 2,5 | 7 x 1,5 | 20 |
The electrical connection is to be made as shown in the connection diagram. There is a connection diagram on the inside of the connection cover.
Please note that live cables should not be installed on the inside of the booth for safety reasons. For this reason most sauna booths have empty tubes for cable installation in the wall element with the air intake opening.
Reference to sauna heater 3.6kW with evaporator
Important
The sauna heater 3.6kW with evaporator is powered by two separate electric circuits.
Disconnect both electric circuits before opening the terminal box!
Connection diagram for SHG standard sauna oven
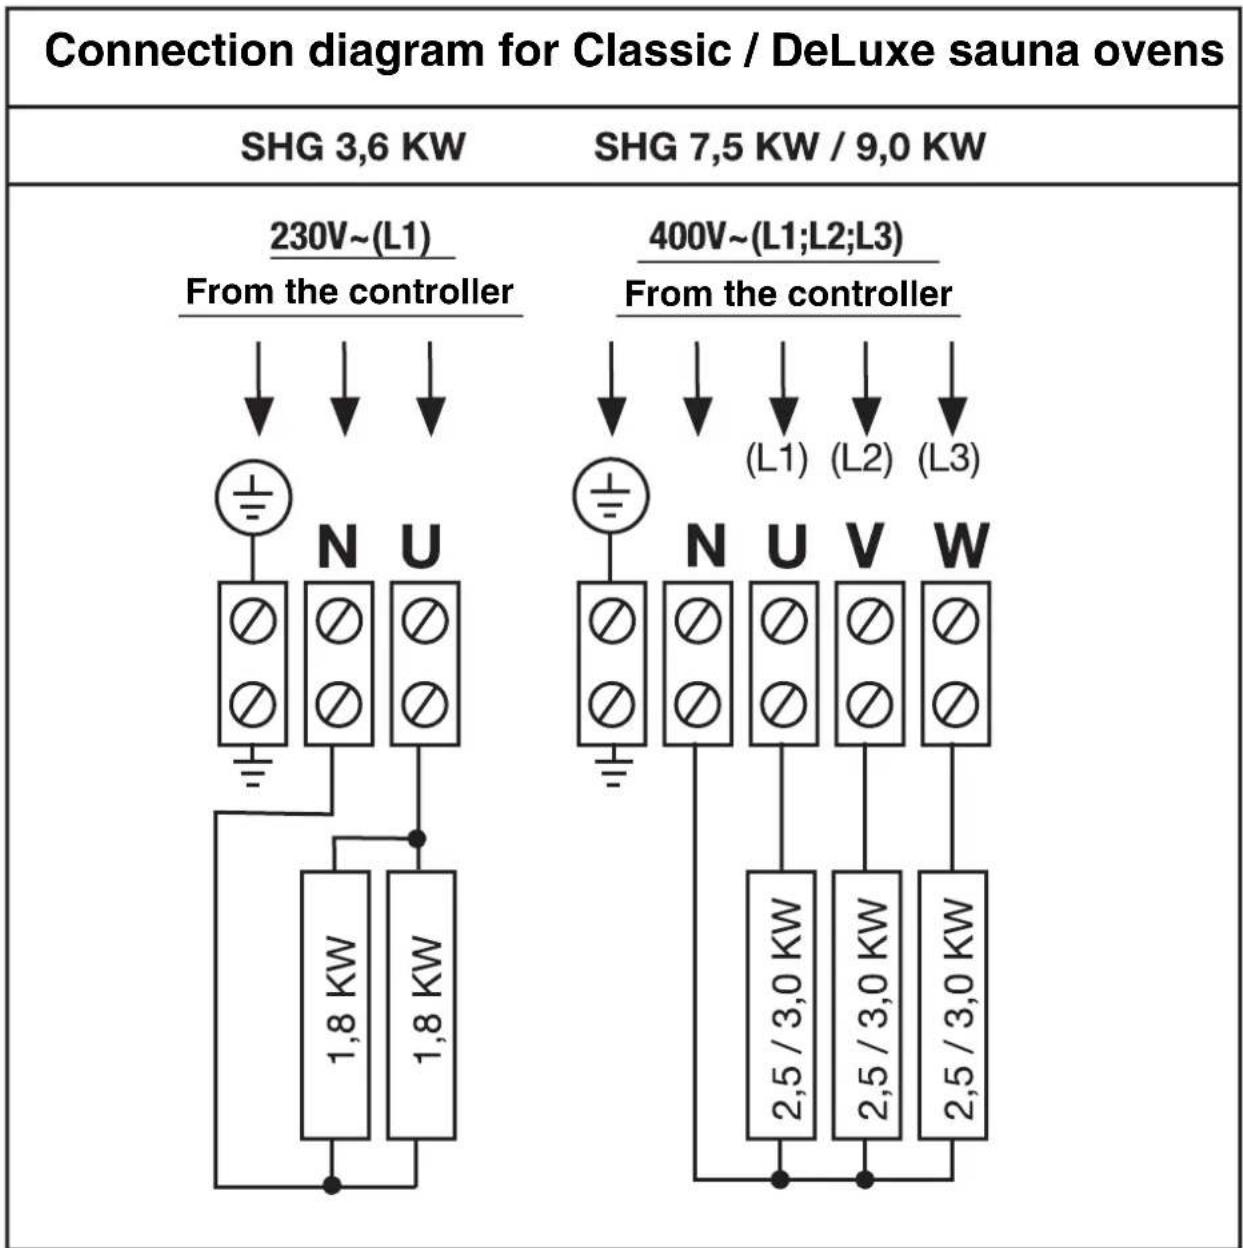
line
| Power Level | Component | Value | |-------------|-----------|-------| | 230V~(L1) | N | 1,8 KW | | 230V~(L1) | U | 1,8 KW | | 400V~(L1;L2;L3) | N | 2,5/3,0 KW | | 400V~(L1;L2;L3) | V | 2,5/3,0 KW | | 400V~(L1;L2;L3) | W | 2,5/3,0 KW |GB
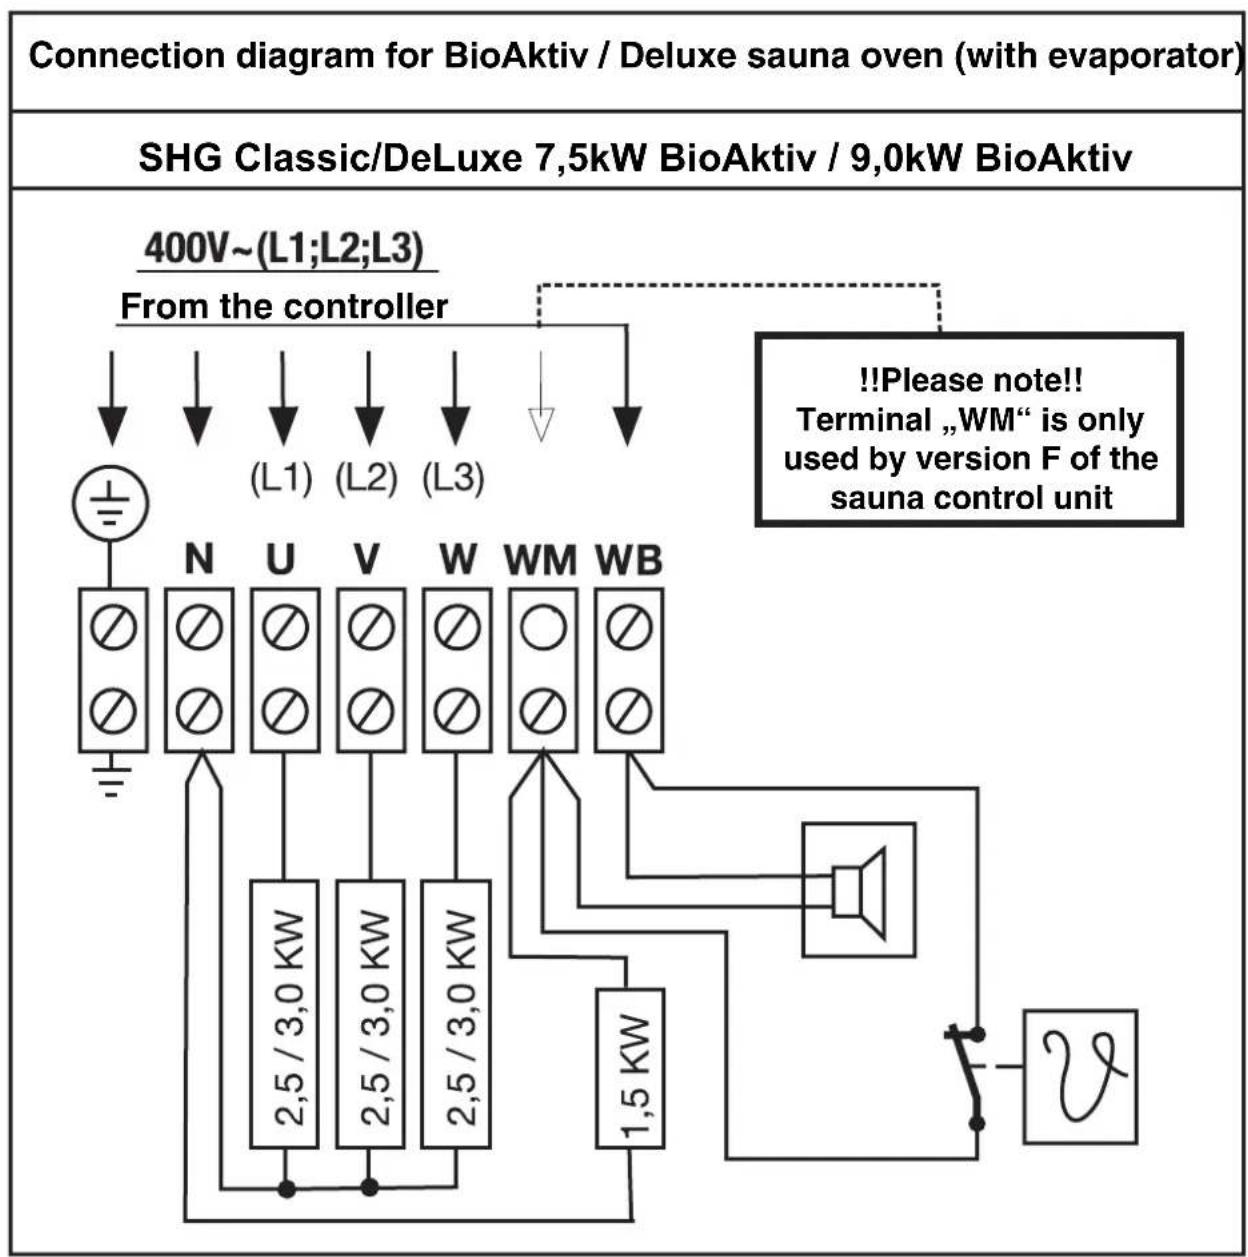
Connection diagrams for SHG evaporator
flowchart
graph TD
    A["Connection diagram for BioAktiv / Deluxe sauna oven (with evaporator)"] --> B["SHG Classic/DeLuxe 7,5kW BioAktiv / 9,0kW BioAktiv"]
    B --> C["400V~(L1;L2;L3)"]
    C --> D["From the controller"]
    D --> E["N"]
    D --> F["U"]
    D --> G["V"]
    D --> H["W"]
    D --> I["WM"]
    D --> J["WB"]
    E --> K["2,5/3,0 KW"]
    F --> L["2,5/3,0 KW"]
    G --> M["2,5/3,0 KW"]
    H --> N["1,5 KW"]
    I --> O["1,5 KW"]
    J --> P["1,5 KW"]
    Q["Terminal „WM“ is only used by version F of the sauna control unit"] --> R[!!Please note!!
GB
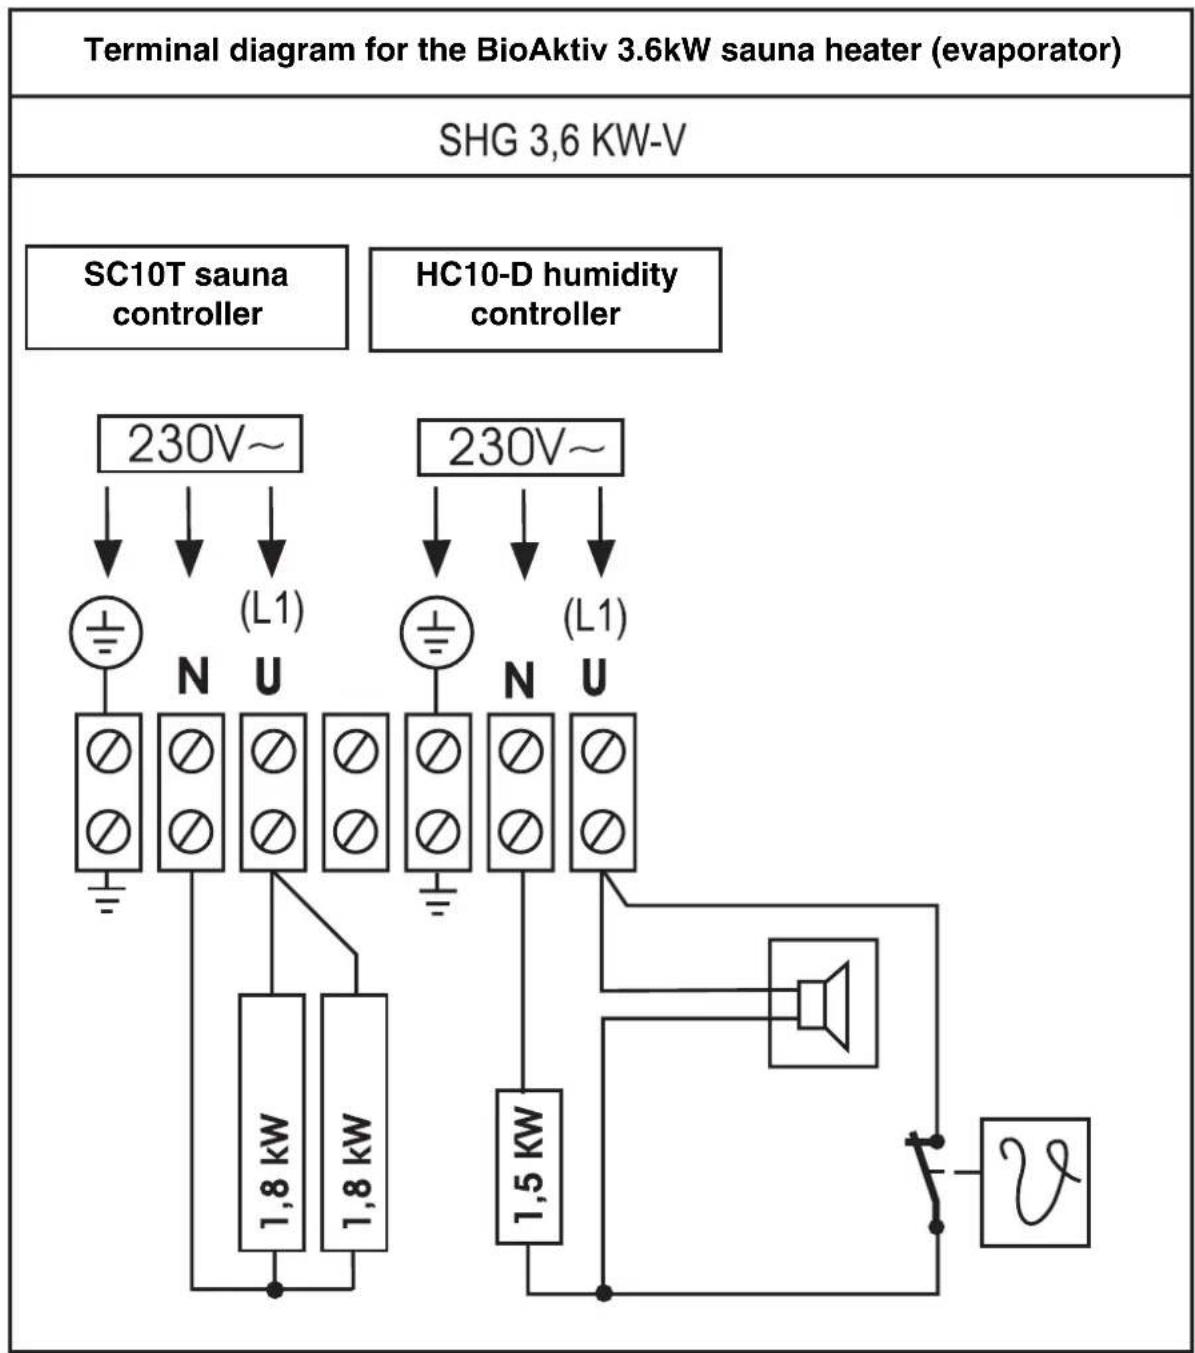
Terminal diagrams for the sauna heater evaporator
Note:
There must be two separate supply cables, each with a 16A fuse, for the sauna controller and the humidity controller when using the Biomat 3.6kW with evaporator.
The supply cables connecting the controllers with the heater must also consist of two separate lines.
flowchart
graph TD
    A["Terminal diagram for the BioAktiv 3.6kW sauna heater (evaporator)"] --> B["SHG 3,6 KW-V"]
    B --> C["SC10T sauna controller"]
    B --> D["HC10-D humidity controller"]
    C --> E["230V~"]
    D --> F["230V~"]
    E --> G["N U"]
    F --> H["N U"]
    G --> I["1,8 kW"]
    H --> J["1,5 kW"]
    I --> K["1,8 kW"]
    J --> L["1,5 kW"]
    K --> M["Ground"]
    L --> N["Ground"]
GB
Cleaning and care
Before cleaning the oven, switch it off (at the control unit) and allow it to cool down.
Do not use any abrasive cleaning products to clean and treat the oven.
Placing the sauna stones on the stone grate
Sauna stones are a natural product. The stones are supplied clean but we recommend that you clean them again using clean water. An adequate quantity of sauna stones is supplied with the oven.
A support surface has been prepared for the placement of the stone grate on the inner casing of the sauna oven.
Put the large stones at the bottom and the small stones on the top. Put in the stones loosely so that the air circulation in the oven is not restricted. Piling the stones too close together will impair the sauna temperature. The heating elements should be completely covered with stones. Replace the stones when they become brittle. It is recommended to replace the stones every 2 years.
Liquid
The sauna oven is designed for use with sauna liquids.
Please note the following:
●The volume of liquid should not exceed 15 g/m ^3 of the booth volume.
●The liquid must be spread evenly over the stones.
●Pour the liquid directly over the hot stones. To avoid the risk of burns caused by the hot vapors rising as you pour on the liquid, the liquid should always be poured from the side using a ladle.
- If you use liquid concentrates (for example essential oils), follow the instructions for use supplied by the manufacturer. If you use excessive concentrations of these products they may explode.
- Do not use liquids containing alcoholic drinks or other additives that are not suitable for use in saunas as a result of the fire risk that they pose.
What to do in the event of problems
The oven will not heat up...
Have you pressed all the required switches?
(See operating manual)
Has the fuse on the domestic switchboard tripped?
Have you set the temperature controllers correctly?
(See operating manual)
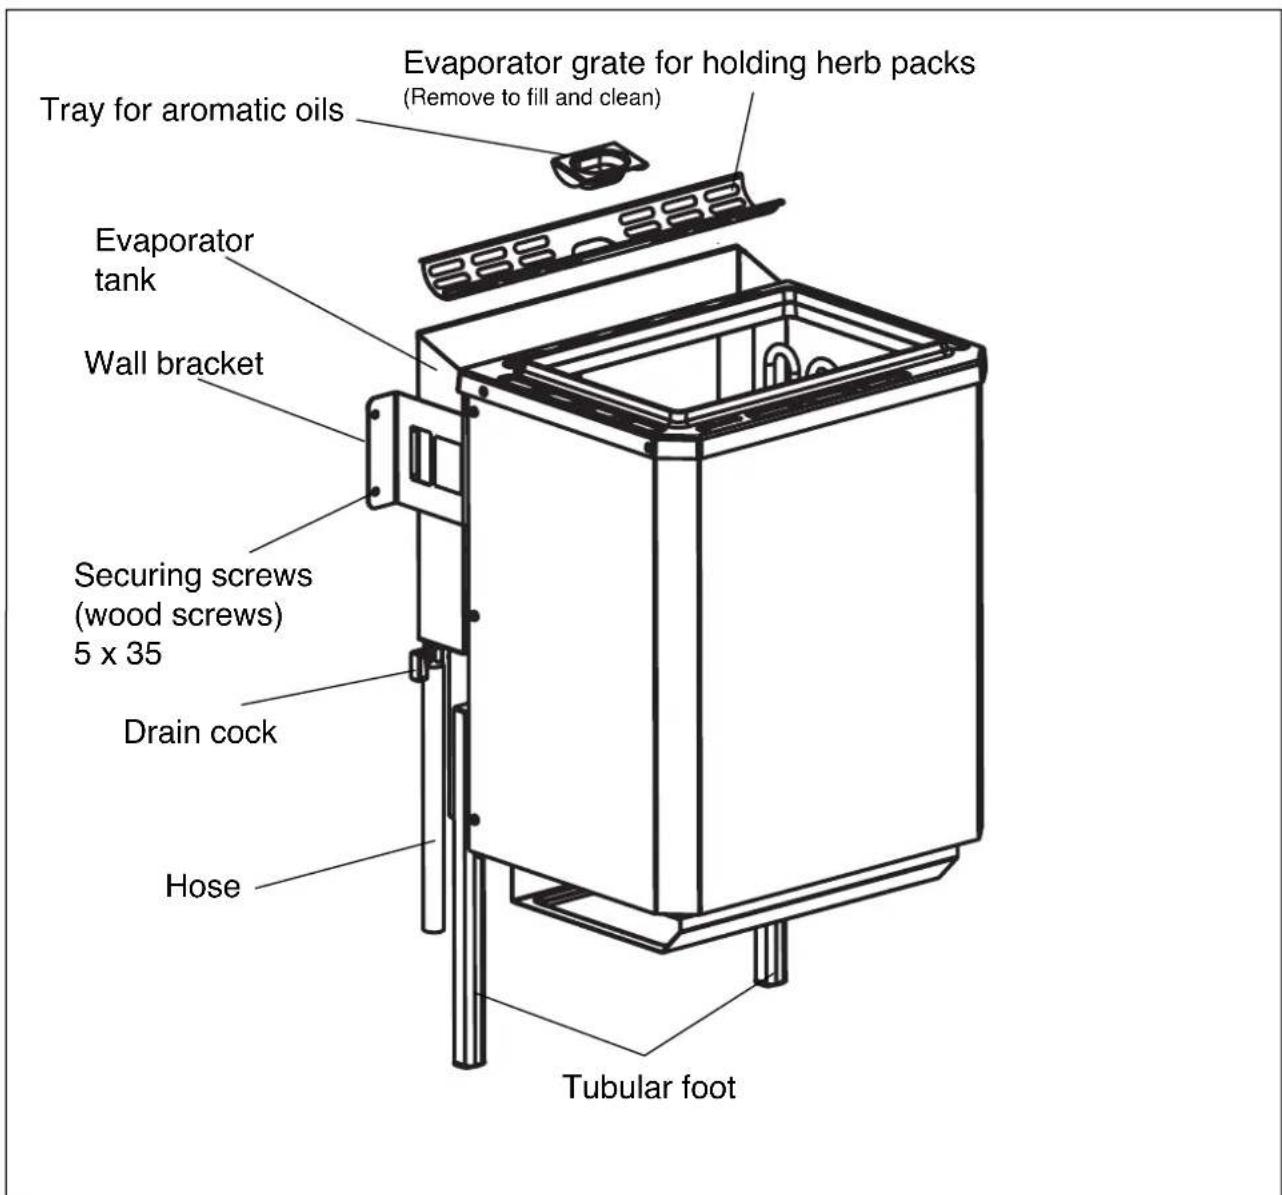
Instructions for the sauna oven with integral evaporator
Installing the oven
The same instructions apply to the installation of the sauna oven with integral evaporator as for the installation of the standard sauna oven (see page 15).
The user can choose whether to install the ball cock for draining the water tank on the left or right, depending on which side provides better access. A section of hose is supplied to push on to the ball cock so that the contents of the tank can be drained into a container (for example a bucket).
The opening on the other side of the evaporator tank must be sealed using the R 1/8" blind stopper and aluminium seal supplied for this purpose.
GB
General notes
IMPORTANT. DANGER OF SCALDING.
Steam is emitted from the top of the evaporator tank whilst the oven is operating. To prevent injury do not place herb packs or aromatic oils on the top whilst the oven is operating. Place these items on top of the evaporator before you start the oven.
●The volume required in the evaporator for it to operate perfectly is approx. 3.3 liters. Pour in the water from the top.
- Do not fill the tank to the top in any circumstances since otherwise the water will „boil over“ whilst the oven is operating.
●In addition the evaporator must also not be started without water in it.
- Do not exceed the maximum fill level (see warning signs on both sides).
●The evaporator takes a few minutes to heat up. You can reduce this time if you enter a higher humidity value on the control unit during it.
●The evaporator is fitted with a low water guard. That means that as soon as the water level falls below the minimum level, the evaporator will be shut down automatically and an acoustic signal will sound. In this case we advise that you allow the evaporator to cool for a few minutes before you fill the evaporator tank again. The low water guard is only designed to be used in
emergencies. We do not advise that you use the evaporator without filling it until this cut-out device trips.
This should not be required since the water volume of 3.3 liters will suffice for the evaporator to be operated for a period of approx. 60 minutes.
- Allow the unit to cool after using the evaporator and drain any residual water.
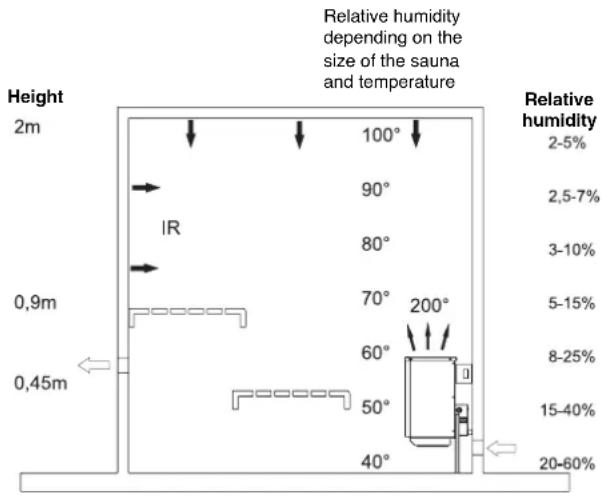
Types of bath
The integral evaporator and the corresponding control unit enable you to set different types of bath. In addition to the classic Finnish sauna at temperatures of between 70°C and 110°C with very little humidity (max. 15%), you can also enjoy a steam or herb bath at temperatures between 30°C and 60°C.
Please note that for a steam bath the temperature is limited or must be limited to 60^ C for safety reasons.
The duration of a steam bath should be between 15 and 30 minutes depending on how well you feel in it. (You may take a second steam bath after a period of rest). If you suffer from heart problems, circulation problems, high blood pressure or other disorders you should consult your doctor between using a sauna.
Types of bath (humidity/temperature)
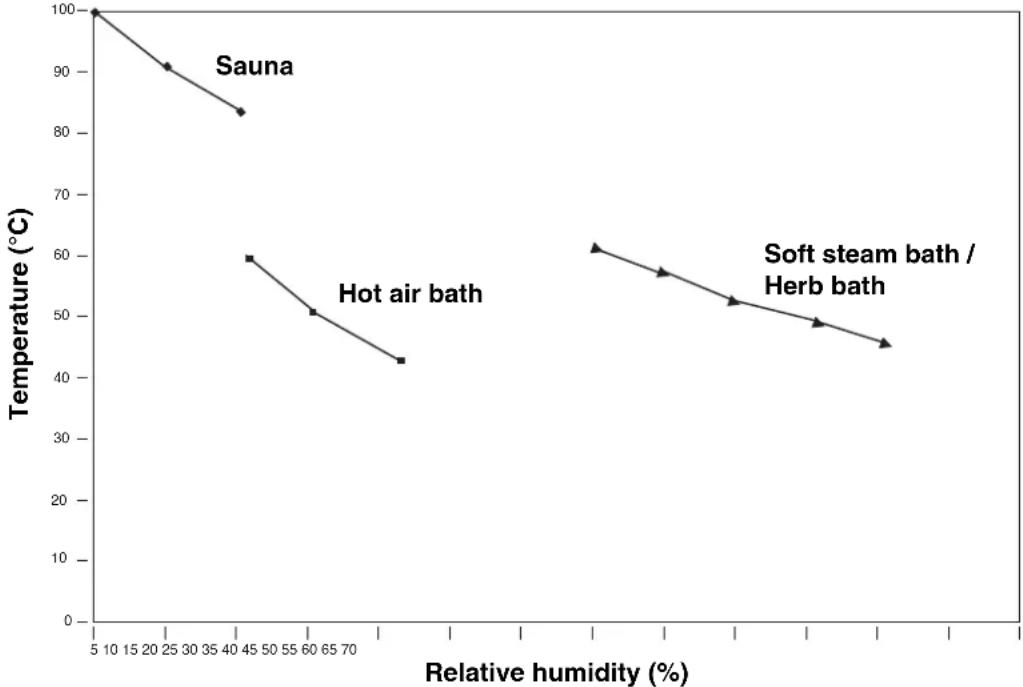
line
| Treatment | Relative humidity (%) | Temperature (°C) | | :--- | :--- | :--- | | Sauna | 40 | 83 | | Hot air bath | 45 | 59 | | Soft steam bath / Herb bath | 60 | 51 | | Soft steam bath / Herb bath | 70 | 43 | | Soft steam bath / Herb bath | 80 | 46 | The chart displays a single data point for 'Sauna' at approximately 100°C. The other two points are labeled as 'Hot air bath'. The x-axis represents 'Relative humidity (%)', and the y-axis represents 'Temperature (°C)'.GB
Only use herb essences that will dissolve fully in water or packed herb bags, consisting of vegetable or synthetic oils. These articles are available as accessories in our sauna product range.
After diluting it with a little water, place the product in the herb tray. Never use pure sauna liquids. These do not dissolve fully in water and are therefore not suitable.
Place packed herb bags on the grate provided for them (see figure on page 21). The rising steam will dissolve the aromatic substances in the herbs and spread them through the booth in the steam.
You can also use the usual sauna liquid at the end of your sauna on this sauna oven. However, you should only use the liquid that has been diluted by the manufacturer for this purpose.
Never use alcohol.
Danger of fire and explosion.
Cleaning and care of the evaporator
Drain the water each time after you have used the evaporator. Any impurities caused by herb essences can be removed by rinsing them with clean water. To do this you can connect a hose to the drain cock and drain the water through it. Caution: The water may still be hot. The evaporator is suitable for use with water of hardness class 1 (1 - 7 German hardness classes). If necessary, contact your water supply company to ask the hardness of your water. If the water is harder than this you should use demineralized water. The evaporator tank should be descaled as often as required depending on the water hardness, similar to a coffee machine. If the water contains a high level of lime, we advise that you descale the tank every two to three weeks if you use the sauna every day. Please note, however, that this period depends on the hardness of the water and how much water you evaporate. Do not allow the system to run dry frequently since this may damage the heating elements. This is why you should never refill the evaporator tank with water during or shortly after use. The heating elements would be quenched too quickly and could thus suffer damage.
F
other
| Component | Power Rating | |-----------|--------------| | N | 2.5/3.0 KW | | U | 2.5/3.0 KW | | V | 2.5/3.0 KW | | W | 2.5/3.0 KW | | WM | 1.5 KW | | WB | 1.5 KW |F
other
| Bus Segment | Voltage Level | Power Level | |-------------|---------------|-------------| | L1 | 2.5/3.0 KW | - | | L2 | 2.5/3.0 KW | - | | L3 | 2.5/3.0 KW | - | | WB | 1.5 KW | - | | N | - | - | | U | - | - | | V | - | - | | W | - | - | | WM | - | - | | WB | - | - |H
Ersatzteillisten
2006/95/EC R&TTED 1999/5/EC
□ 97/23/EC 2000/14/EC_2005/88/EC
2004/108/EC L
WM=
dB;
I_WA=
d B
□ 90/396/EEC
P=
KW;
L/∅ =
cm
89/686/EEC 95/54/EC
□
97/68/EC:
EN 60335-1; EN 60335-2-53; EN 55014-1:2000/A1:2001; EN 50366; EN 55014-2; EN 1000-3-2:2000; EN 61000-3-3:1995/A1:2001
37.462.21; 37.462.13;
37.424.16
Subject to change without notice
Archive-File/Record: SHG-Classsic-TE009-4155045
Service request form:
If your sauna oven suffers a defect.
□Warranty inquiry
□Repair inquiry (for payment)
If the sauna oven suffers a defect, complete this form carefully and send it with the defective sauna oven and a copy of your proof of purchase and confirmation from your electrician to our Service Department, since otherwise we cannot deal with your complaint.
weka Holzbau GmbH
Service-Abteilung
Johannesstraße 16
Part 1: (to be completed by the customer) Phone:
Customer's name: ____
Street:
Postcode/Town: ____
Details of the defective sauna oven
weka article No. Electrician invoice No.
Model/Type: Electrician Company:
Serial No. Street:
Date of purchase: Postcode/Town:
weka order No. Phone:
Fault description: ____
The sauna oven was sent to weka Holzbau GmbH with your proof of purchase on ____
Part 2: (to be completed by weka)
The sauna oven and proof of purchase was received by weka on ____
Sauna oven test by weak and test result:
Date, signature of weka test department
A replacement sauna oven will be dispatched immediately if the oven is still under warranty.
If the defect is not a manufacturing fault or is not covered by the warranty, the customer will be sent a quotation for the repair work.
The guarantee period begins on the sales date and is valid for 2 years.
Responsibility is assumed for faulty construction or material or functional defects.
Any necessary replacement parts an necessary repair work are free of charge.
We do not assume responsibility for consequential damage.
Your customer service partner
① CERTIFICATO DI GARANZIA
natural_image
Symbol of a trash bin crossed with two diagonal lines, representing no waste or discharge (no text or labels)© Nur für EU-Länder
Never place any electric tools in your household refuse.
To comply with European Directive 2002/96/EC concerning old electric and electronic equipment and its implementation in national laws, old electric tools have to be separated from other waste and disposed of in an environment-friendly fashion, e.g. by taking to a recycling depot.
Recycling alternative to the demand to return electrical devices:
As an alternative to returning the electrical device, the owner is obliged to cooperate in ensuring that the device is properly recycled if ownership is relinquished. This can also be done by handing over the used device to a returns center, which will dispose of it in accordance with national commercial and industrial waste management legislation. This does not apply to the accessories and auxiliary equipment without any electrical components which are included with the used device.

- GB Table of contents
- General
- Take care when operating the sauna oven
- Important safety instructions
- GB
- Recommendations for starting the sauna oven for the first time
- What to do if the RCCB trips anyway
- Installation instructions
- Electrical connection to the controller
- Important
- Connection diagram for SHG standard sauna oven
- Connection diagrams for SHG evaporator
- Terminal diagrams for the sauna heater evaporator
- Note:
- Cleaning and care
- Placing the sauna stones on the stone grate
- Liquid
- What to do in the event of problems
- The oven will not heat up...
- Instructions for the sauna oven with integral evaporator
- Installing the oven
- General notes
- IMPORTANT. DANGER OF SCALDING.
- Types of bath
- Cleaning and care of the evaporator
- F
- Service request form:
- weka Holzbau GmbH
- Service-Abteilung
- Johannesstraße 16
- Details of the defective sauna oven
- ① CERTIFICATO DI GARANZIA
Brand : EINHELL
Model : Classic SHG 3 6 kW
Category : Heating