
S7 MaxV Ultra - Robot vacuum ROBOROCK - Free user manual and instructions
Find the device manual for free S7 MaxV Ultra ROBOROCK in PDF.

| Product Type | Robot vacuum and mop with auto-empty, wash, and refill station |
| Brand | Roborock |
| Model | S7 MaxV Ultra |
| Station Model | EWFD01LRR / EWFD02LRR |
| Robot Dimensions (approx.) | 350 × 350 × 96.5 mm |
| Robot Weight (approx.) | 4.5 kg |
| Station Dimensions (approx.) | 420 × 380 × 450 mm |
| Station Weight (approx.) | 8 kg |
| Power Supply | 120 V ~ 50-60 Hz |
| Battery | Lithium-ion 14.4 V / 5,200 mAh |
| Runtime (approx.) | Up to 180 minutes |
| Robot Dustbin Capacity | 400 ml (est.) |
| Robot Water Tank Capacity | 200 ml (est.) |
| Station Dust Bag Capacity | 2.5 L (est.) |
| Station Clean Water Tank Capacity | 2.5 L (est.) |
| Station Dirty Water Tank Capacity | 2.5 L (est.) |
| Main Functions | Vacuuming, mopping, auto-empty, auto mop washing, auto water refill |
| Navigation | LiDAR and camera (ReactiveAI) |
| Connectivity | Wi-Fi, Roborock app |
| Noise Level (approx.) | 67 dB |
| Routine Maintenance | Clean main brush, water filter, charging contacts, water tanks |
| Periodic Replacement | Disposable dust bag: 1-2 months; Main brush: 6-12 months |
| Safety | Grounding, surge protection, auto shut-off |
| Spare Parts | Disposable dust bag, main brush, water filter, dustbin, tanks |
| Regulatory Information | FCC Part 15, IC, declaration of conformity |
Frequently Asked Questions - S7 MaxV Ultra ROBOROCK
User questions about S7 MaxV Ultra ROBOROCK
0 question about this device. Answer the ones you know or ask your own.
Ask a new question about this device
Download the instructions for your Robot vacuum in PDF format for free! Find your manual S7 MaxV Ultra - ROBOROCK and take your electronic device back in hand. On this page are published all the documents necessary for the use of your device. S7 MaxV Ultra by ROBOROCK.
USER MANUAL S7 MaxV Ultra ROBOROCK
Roborock Empty Wash Fill Dock User Manual
Read this user manual carefully before using this product and store it properly for future reference.
English 04
Français 21
Español 39
Contents
05 IMPORTANT SAFETY INSTRUCTIONS
05 WARNING
07 FCC/IC Statement
09 Parts List
09 Product Overview
11 Installation
13 Instructions for Use
14 Routine Maintenance Frequency
14 Routine Maintenance
18 Basic Parameters
19 Troubleshooting
20 Disposal
IMPORTANT SAFETY INSTRUCTIONS
When using an electrical appliance, basic precautions should always be followed, including the following: READ ALL INSTRUCTIONS BEFORE USING (THIS APPLIANCE). Failure to follow the warnings and instructions may result in electric shock, fire and/or serious injury.
WARNING
To reduce the risk of fire, electric shock, or injury:
- Do not use outdoors or on wet surfaces.
- Do not allow to be used as a toy. Close attention is necessary when used by or near children, pets or plants.
- Use only as described in this manual. Use only manufacturer's recommended attachments.
- Do not use with damaged cord or plug. If appliance is not working as it should, has been dropped, damaged, left outdoors, or dropped into water, return it to a service center.
- Do not pull or carry by cord, use cord as a handle, close a door on cord, or pull cord around sharp edges or corners.
- Do not run appliance over cord. Keep cord away from heated surfaces.
- Do not unplug by pulling on cord. To unplug, grasp the plug, not the cord.
- Do not handle charger, including charger plug, and charger terminals with wet hands.
- Do not put any object into openings. Do not use with any opening blocked; keep free of dust, lint, hair, and anything that may reduce air flow.
- Keep hair, loose clothing, fingers, and all parts of body away from openings and moving parts.
- Do not use to pick up flammable or combustible liquids, such as gasoline, or use in areas where they may be present.
-
Do not pick up anything that is burning or smoking, such as cigarettes, matches, or hot ashes.
-
Do not use without dust bag.
- Unplug the appliance before making any adjustments, changing accessories, or storing appliance. Such preventive safety measures reduce the risk of starting the appliance accidentally.
- Do not carry the product using dock base or dustbin.
- Do not use the product when the ambient temperature is higher than 40^ (104°F), lower than 4^ (39°F).
- Place the dock on a flat floor away from fire, heat, and water. Avoid narrow spaces or locations where the robot may be suspended in the air.
- The product must be switched off and the plug must be removed from socket outlet before cleaning or maintaining the product.
- This product can be used by children aged from 8 years and above and persons with reduced physical, sensory or mental capabilities or lack of experience and knowledge if they have been given supervision or instruction concerning use of the product in a safe way and understand the hazards involved. Children shall not play with the product. Cleaning and user maintenance shall not be made by children without supervision.
WARNING
- Do not use wet cloth or liquids for cleaning the charging contacts.
- Do not dismantle, repair or modify the battery or charging dock.
- If the dock is placed in an area susceptible to thunderstorms or with unstable voltage, take protection measures.
- Keep the charging dock away from heat (such as radiators).
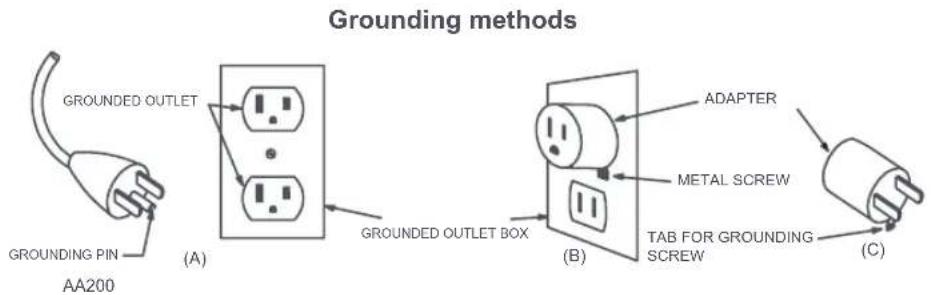
- Connect to a properly grounded outlet only. See Grounding Instructions.

PROTECTIVE EARTH
SAVE THESE INSTRUCTIONS
Household use only.
GROUNDING INSTRUCTIONS
This appliance must be grounded. If it should malfunction or breakdown, grounding provides a path of least resistance for electric current to reduce the risk of electric shock. This appliance is equipped with a cord having an equipment-grounding conductor and grounding plug.
The plug must be inserted into an appropriate outlet that is properly installed and grounded in accordance with all local codes and ordinances. WARNING - Improper connection of the equipment-grounding conductor can result in a risk of electric shock. Check with a qualified electrician or service person if you are in doubt as to whether the outlet is properly grounded. Do not modify the plug provided with the appliance - if it will not fit the outlet, have a proper outlet installed by a qualified electrician.
This appliance is for use on a nominal 120-V circuit and has a grounding attachment plug that looks like the plug illustrated in sketch A in Grounding methods. Make sure that the appliance is connected to an outlet having the same configuration as the plug.
No adaptor should be used with this appliance.
FCC/IC Statement
| Compliance Information | |
| Product Name Empty Wash Fill | Dock |
| EWFD01LRR, EWFD02LRRProduct Model | |
| Compliance Statement | This device complies with Part 15 of the FCC Rules.Operation is subject to the following two conditions:(1) this device may not cause harmful interference, and(2) this device must accept any interference received, including interference that may cause undesired operation.This device contains licence-exempt transmitter(s)/receiver(s) that comply with Innovation, Science and Economic Development Canada's licence-exempt RSS(s).Operation is subject to the following two conditions:(1) This device may not cause interference.(2) This device must accept any interference, including interference that may cause undesired operation of the device. |
| Correspondence of the responsible party in USA | |
| Roborock Technology Co.Company | |
| 108 West 13th Street, Wilmington, Delaware 19801.Address | |
| support@roborock.comEmail | |
FCC/IC Statement
Warning
Any changes or modifications to this unit not expressly approved by the party responsible for compliance could void the user's authority to operate the equipment.
This equipment has been tested and found to comply with the limits for a Class B digital device, pursuant to part 15 of the FCC Rules. These limits are designed to provide reasonable protection against harmful interference in a residential installation. This equipment generates, uses and can radiate radio frequency energy and, if not installed and used in accordance with the instructions, may cause harmful interference to radio communications. However, there is no guarantee that interference will not occur in a particular installation. If this equipment does cause harmful interference to radio or television reception, which can be determined by turning the equipment off and on, the user is encouraged to try to correct the interference by one or more of the following measures:
—Reorient or relocate the receiving antenna.
—Increase the separation between the equipment and receiver.
—Connect the equipment into an outlet on a circuit different from that to which the receiver is connected.
—Consult the dealer or an experienced radio/TV technician for help.
Parts List
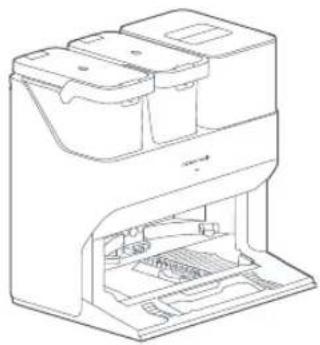
natural_image
Line drawing of a multi-tiered electronic device with internal components (no text or symbols)Dock (Disposable Dust Bag Pre-Installed)
Dock Base
Disposable Dust Bag Power Cable
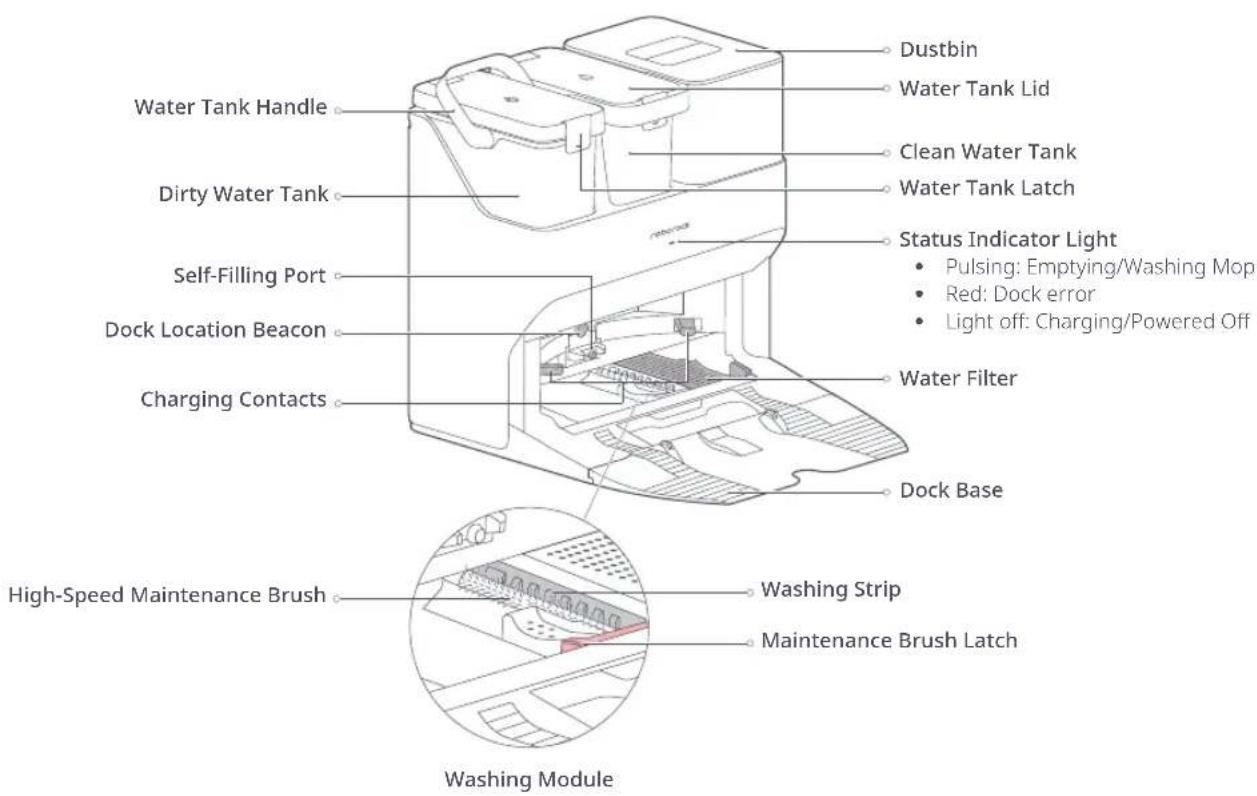
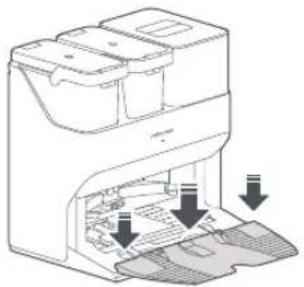
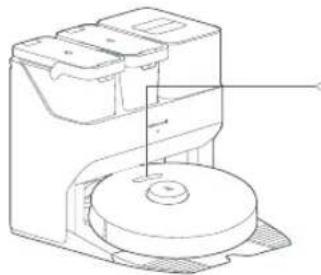
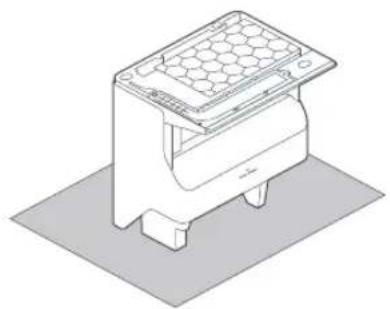
Product Overview
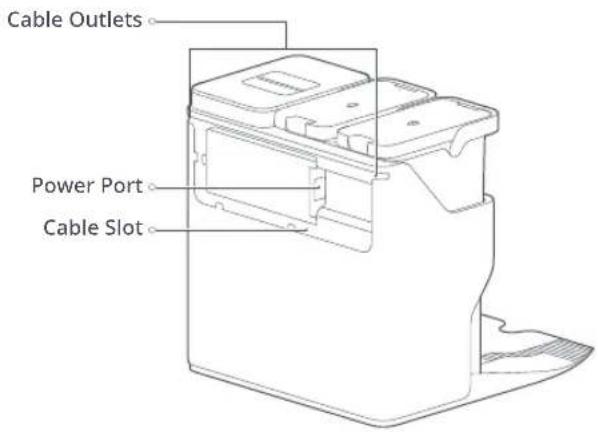
Product Overview
Installation
Assembly
- Place the dock on a hard and flat floor, and remove the foam used to secure the high-speed maintenance brush components in shipment at the bottom.
natural_image
Line drawing of a hand inserting a device into a printer (no text or symbols present)- Attach the base by pressing down both sides of the base firmly, and then pressing the connecting part in the middle until you hear a click.
natural_image
Diagram of a printer with internal components and arrows indicating flow or movement (no text or symbols)Note: Remove the water tanks and the dustbin before moving the dock.
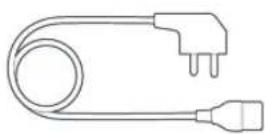
- Connect the power cable to the back of the dock, and keep excess cable inside the storage slot.

natural_image
Diagram of a washing machine with a handle and arrow indicating direction (no text or symbols)Note: Power cable can exit at either side.
Placement of the Dock
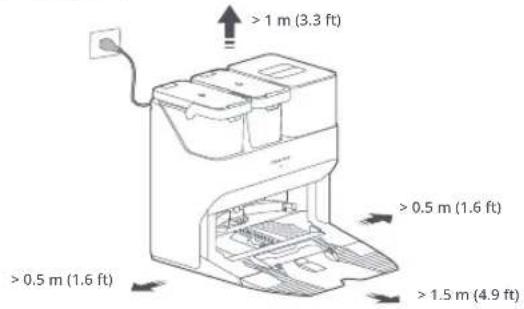
Place the dock on a hard and flat floor (wood/tile/concrete etc.), flat against a wall. Keep at least 0.5 m (1.6 ft) of clearance on either side, 1.5 m (4.9 ft) in front, and 1 m (3.3 ft) above. Make sure the location has good WiFi for a better experience with the mobile app, and then plug it in.
Installation
Notes:
- If the power cable hangs vertically to the ground, it may be caught by the robot, causing the dock to be moved or disconnected.
- The dock indicator is on when the dock is powered on, and off when the robot is charging.
- The dock indicator turns red if an error occurs.
- Place the dock on a flat floor away from fire, heat, and water. Avoid narrow spaces or locations where the robot may be suspended in the air.
- Placing the dock on a soft surface (carpet/mat) may cause the dock to tilt over and cause problems docking and departing.
- Keep the dock away from direct sunlight or anything that may block the dock location beacon; otherwise, the robot may fail to return to the dock.
- Do not use the dock without clean water tank, dirty water tank, high-speed maintenance brush, dustbin, dust bag or water filter.
- Maintain the dock according to the maintenance instructions. Do not clean the dock with a wet cloth or tissue.
- All docks are subject to water-based tests before leaving the factory. It is normal that a small amount of water remains in the waterway of the dock.
Preparing for Auto-Emptying
- When auto-emptying for the first time or if the dock has not emptied for an extended period, empty the robot dustbin manually and clear the air inlet of any debris to ensure optimum performance.
natural_image
Line drawing showing a hand pouring liquid into a container and an open storage case with a directional arrow (no text or symbols)- Remove the plate covering the air inlet in the robot.
natural_image
Diagram of a mechanical device with a central component and internal components, no visible text or symbolsPowering On & Charging
Press and hold the button to power on the robot. Wait until the power light is steady, and then place the robot on the dock to charge. The robot is equipped with a high-performance lithium-ion rechargeable battery pack. To maintain battery performance, keep the robot charged during normal use.
natural_image
Technical line drawing of a mechanical device with a circular base and three compartments (no text or symbols)The color of the power indicator indicates the battery level.
- White: ≥ 20%
- Red: < 20%
Note: The robot may not be turned on when the battery is low. In this case, connect the robot to the dock.
* Images are for illustration purposes only and may not exactly represent the product.
Instructions for Use
Filling the Water Tank
Open the clean water tank. Fill with water until the Max line. Close the lid, lock the latch, and fit the tank back in place.
natural_image
Line drawing of a mechanical device with an upward arrow indicating motion or force (no text or symbols present)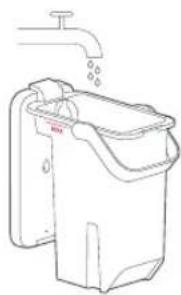
natural_image
Line drawing of a hand washing machine with a faucet above (no text or symbols)Notes:
• To prevent corrosion or damage, only use the Roborock branded floor cleaner in the water tank.
• To avoid water tank deformation, do not place hot water in the tank.
- If water marks remain on the water tank, wipe them clean before reinstallation.
Auto Mop Washing
During cleaning, the robot automatically determines when it should return to dock for mop washing and water tank refilling to maximize its mopping performance.
Note: To allow the robot to wash the mop automatically, start the robot from the dock once it is fully charged. Do not move the dock during cleaning.
Manually Activated Mop Washing
During cleaning, press any button to pause, then press and hold the ↑ button to send the robot back for mop washing.
Auto-Emptying
Auto-emptying will begin when the robot returns to the dock after cleaning.
Notes:
- If the dock has not emptied for an extended period, empty the robot dustbin manually and clear the air inlet of any debris to ensure optimum performance.
• If necessary, auto-emptying can be disabled in the app.
natural_image
Line drawing of an open rectangular device with a handle and internal compartments, no text or symbols present.Manually Activated Emptying
Emptying can be triggered manually by pressing the button while the robot is charging.
Note: Avoid frequent manual emptying.
Stopping Emptying
Press any button to stop emptying.
Charging
After cleaning, the robot will automatically return to the dock to charge. The power indicator will pulse as the robot charges.
Note: If the robot fails to find the dock, it will automatically return to its starting location. Place the robot on the dock manually to recharge.
Routine Maintenance Frequency
To ensure optimal performance of the dock, refer to the following table for routine maintenance:
| Parts Clean Frequency | Replacement Frequency | |
| Water Filter Clean as needed / | ||
| Clean Water Tank and Dirty Water Tank | Clean as needed / | |
| High-Speed Maintenance Brush | Clean as needed Every 6-12 months | |
| Disposable Dust Bag / Every 1-2 months | ||
| Dock Charging Contacts, Location Beacon, and Robot Body | Clean every month / |
Note: The frequency of replacement may vary depending on the situation. If abnormal wear occurs, replace the parts immediately.
Routine Maintenance
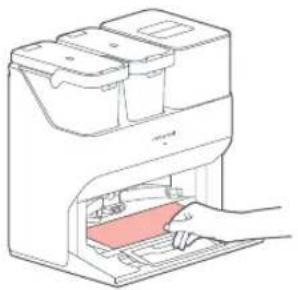
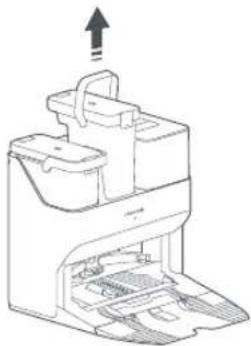
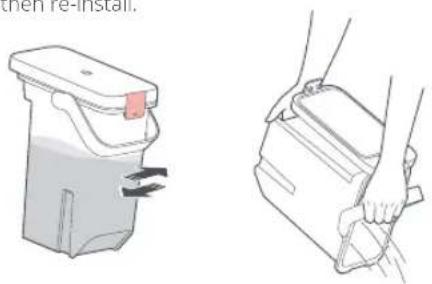
Moving the Dock
Remove the water tanks and the dustbin before moving the dock. Grip the handle on the back with one hand and the inner side of the front, as shown. Do not grip the base because as it is not designed for lifting.

Water Tank
Clean the dirty water tank as needed. Open the dirty water tank lid and pour out the dirty water. Fill the tank with clean water, close the lid, lock it, and shake. Pour out the dirty water. Close the lid and then re-install.
Routine Maintenance
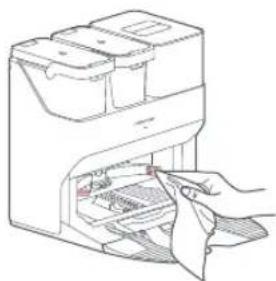
Charging Contact Areas
Use a soft, dry cloth to wipe the charging contacts on the dock.
natural_image
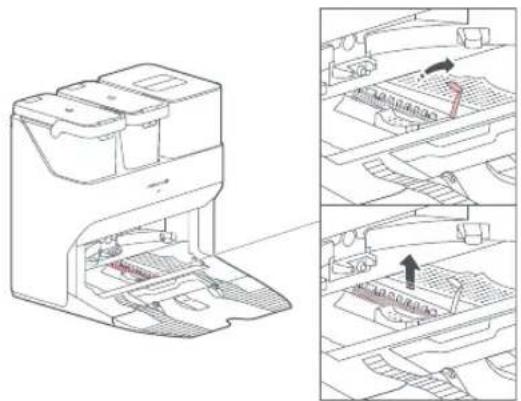
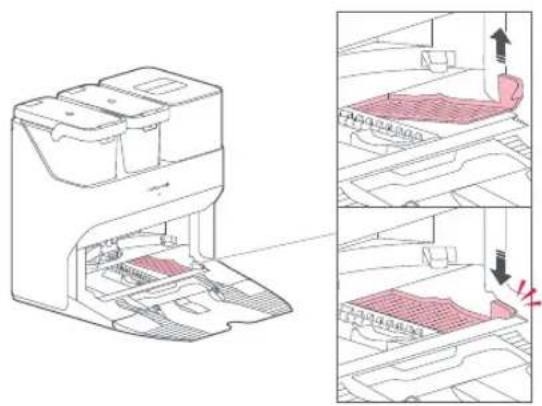
Line drawing of a hand inserting a device into a device with a tool (no text or symbols)High-Speed Maintenance Brush
- Lift the high-speed maintenance brush latch and remove the brush, as shown below.
natural_image
Technical line drawing of a printer device showing internal components and assembly steps (no text or symbols)- Remove any entangled objects in the high-speed maintenance brush and rinse it clean. Reinstall the brush and latch it in place.
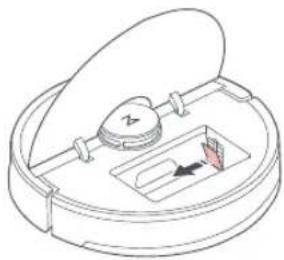
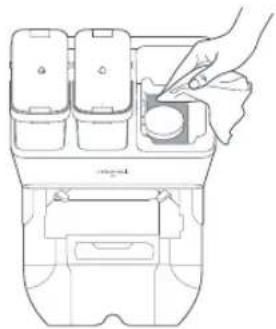
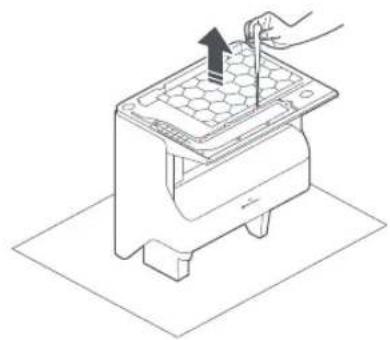
Water Filter
Unlock the water filter and remove it for washing. Use a soft, dry cloth to wipe the cleaning tank, and then reinstall the filter. Press down the filter until you hear it lock with a click.
Routine Maintenance
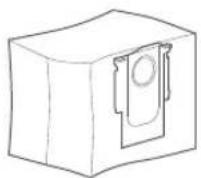
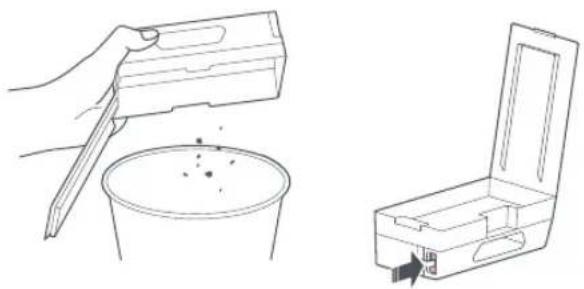
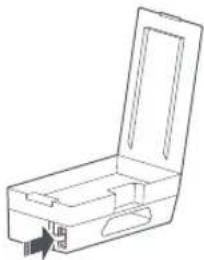
Replacing the Disposable Dust Bag
Note: Replace the disposable dust bag when it is full.
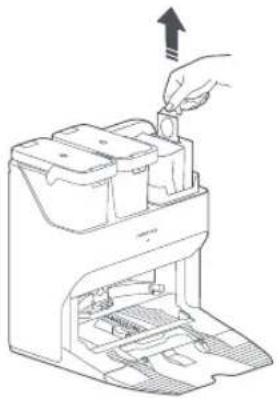
- Lift the dustbin.
- Remove the bag vertically as shown.
natural_image
Line drawing of a hand inserting a component into a device (no text or symbols)Note: Pulling the dust bag handle to remove the bag will seal the bag to prevent leakage.
-
Discard the dust bag.
-
Clean around the filter with a dry cloth.
natural_image
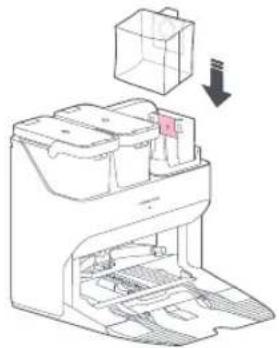
Line drawing of a hand placing a small object into a container with compartments (no text or symbols)- Slot in a new disposable dust bag as shown. Slide until it reaches the bottom of the slot.
natural_image
Line drawing of a printer internal structure with a box and arrow indicating assembly (no text or symbols)- Reinstall the dustbin securely.
Note: Always install a dust bag before putting back the dustbin top lid to avoid auto-emptying without the bag. You can also disable auto-emptying in the app.
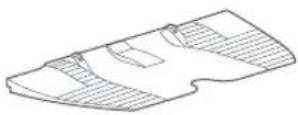
Routine Maintenance
Cleaning the Air Duct
Follow the following steps to clean the air duct and avoid blockages.
- Remove the clean water tank, dirty water tank, and dustbin.

natural_image
Technical line drawing of a mechanical device casing with internal compartments and mounting holes (no text or symbols)- Remove the water filter and wipe off any water marks with a cloth.
natural_image
Technical illustration of a refrigerator interior with an inset showing the exterior view of the drawer (no text or symbols present)- Carefully place the the dock upside down on a hard floor covered with a soft towel.
natural_image
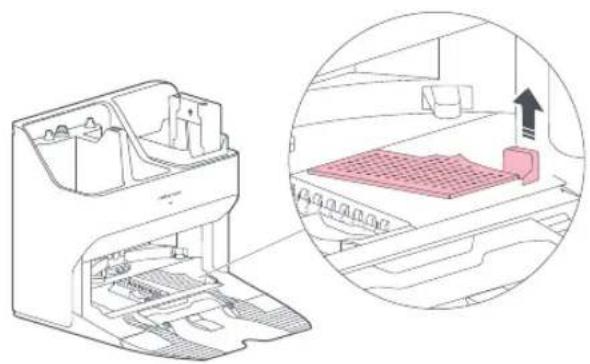
Isometric line drawing of a mechanical component with hexagonal top and base (no text or symbols)- Unscrew the eight screws and remove the cover.
natural_image
Line drawing of a hand using a tool to press or install a component on a grid-patterned base (no text or symbols)Routine Maintenance
- Wipe the air duct and duct cover with a dry cloth.

natural_image
Line drawing of a hand placing a hexagonal grid on top of a mechanical device (no text or symbols)- Re-install the cover and screw it back in place.

natural_image
Isometric line drawing of a mechanical device with a hand holding a tool, showing internal components and a downward arrow (no text or symbols)Basic Parameters
| Empty Wash Fill Dock | |
| Name Empty Wash Fill Dock | |
| Model EWFD01LRR, EWFD02LRR | |
| 120VACRated Input Voltage | |
| Rated Frequency 50-60Hz | |
| 9.5ARated Input (Dust Collection) | |
| 0.75ARated Input (Charge) | |
| Rated Output 20VDC 1.8A | |
| Charging Battery | 14.4V/5200mAh lithium-ion battery |
Troubleshooting
Dock Error
The dock indicator will be steady red. Follow the robot voice instructions and the prompts in the app for troubleshooting.
| Conditions Possible Causes & Solutions | |
| The LED status indicator light is steady red. | 1. The dustbin or dust bag is not in place. Check and correct installation.2. Voltage error. Check that local voltage meets the requirements listed on the dock.3. Check clean water tank placement or refill as required.4. Check dirty water tank placement or empty as required.5. Check that the water filter has been correctly installed. |
| Reduced emptying performance or unusual noise when emptying. | 1. The robot dustbin has not been replaced with the auto-empty dustbin. Use the auto-empty dustbin.2. The plate covering the air inlet has not been removed. Remove the plate.3. The main brush or main brush cover is not properly installed. Check and correct installation.4. The filter, air duct, suction inlet, air inlet, or dustbin is blocked. Clean to remove blockages. |
| Robot voice alert: Error 42. Maintenance brush jammed. Clean it and remove blockages. | 1. If the brush stops at the left side, it may be jammed. Remove any items jamming it.2. If the brush stops at the right side, the filter may be blocked or is not installed in place. Clean and correct installation. |
| Reduced mop washing performance. | 1. The mop is not attached properly. Reinstall.2. The floor is dirty. Change the mop washing mode to "Deep" in the app for better cleaning. |
| Auto-emptying is not working. | 1. Auto-emptying is disabled. Check in-app settings.2. Dock dustbin is not installed. Check and install.3. Auto-emptying will not be triggered if the robot returns to the dock without cleaning.4. The robot will not auto-empty after returning to the dock in Do Not Disturb (DND) mode. Adjust cleaning or DND duration, or start emptying manually. |
| The mop is not washed. | 1. The mop will not be washed if not used.2. The robot will not return to the dock for mop washing if it does not start from the dock or no dock is found on the app map.3. Check tank placement and refill or empty as required.4. Check that the water filter has been correctly installed. |
If the problem persists after using the recommendations in the table above, contact our support team at:
support@roborock.com (United States/Canada/Non-Europe)
1-855-960-4321 (United States only)
1-833-421-1915 (Canada only)
Disposal
Correct disposal of this product, should not be disposed with other household wastes. To return your used device, please use the return and collection systems or contact the retailer where the product was purchased. They can take this product for environmentally safe recycling.
Roborock Empty Wash Fill Dock Manuel d'utilisation
natural_image
Line drawing of a multi-tiered electronic device with internal components (no text or symbols)natural_image
Line drawing of a printer with a hand inserting a card into the base (no text or symbols)natural_image
Diagram of a printer with internal components and arrows indicating flow or movement (no text or symbols)natural_image
Line drawing of a washing machine interior with a handle and outlet (no text or symbols)natural_image
Line drawing showing a hand pouring liquid into a container and an open storage box with a handle (no text or symbols)natural_image
Diagram of a circular device with a lid and internal components, no text or symbols presentnatural_image
Technical line drawing of a mechanical device with a circular base and three compartments (no text or symbols)natural_image
Technical line drawings of two household appliances with water flow indicators (no text or symbols)Remarques :
natural_image
Line drawing of an open rectangular device with a handle and label arrow (no text or symbols)Activation manuelle du vidage
Réservoir d'eau
natural_image
Line drawing of a hand inserting a device into a device (no text or symbols)natural_image
Technical line drawing of a mechanical device with internal components and assembly steps (no text or symbols)natural_image
Technical line drawing of a printer with internal components and a close-up view of the interior (no text or symbols)natural_image
Line drawing of a hand inserting a component into a device (no text or symbols)natural_image
Line drawing of a hand placing a small object into a device casing (no text or symbols)natural_image
Diagram of a printer internal structure with a box and arrow indicating assembly (no text or symbols)natural_image
Technical line drawing of a mechanical device with internal compartments and housing (no text or symbols)natural_image
Technical illustration of a refrigerator interior with an inset showing the exterior view of the drawer (no text or symbols present)natural_image
Isometric line drawing of a mechanical component with hexagonal top and base (no text or symbols)natural_image
Line drawing of a hand using a tool to press or install a component on a grid-patterned surface (no text or symbols)natural_image
Line drawing of a hand placing a hexagonal grid on top of a mechanical device (no text or symbols)natural_image
Isometric line drawing of a mechanical device with a hand holding a tool, showing internal components and a downward arrow (no text or symbols)Paramètres de base
natural_image
Technical line drawing of a mechanical device with internal components (no text or symbols)natural_image
Line drawing of a hand inserting a device into a machine (no text or symbols)natural_image
Diagram of a printer's internal structure showing paper feeding into a container with arrows indicating parts (no text or symbols present)natural_image
Diagram of a washing machine interior with a handle and outlet, showing no text or symbolsnatural_image
Line drawing showing a hand pouring liquid into a container and an open storage case with a directional arrow (no text or symbols)natural_image
Diagram of a mechanical device with a central component and internal structure (no text or symbols)Encendido y carga
natural_image
Technical line drawing of a mechanical device with a circular base and internal components (no text or symbols)natural_image
Technical line drawing of a water dispenser with two views: one showing internal components and the other showing a drain outlet (no text or symbols)Notas:
Tanque de agua
natural_image
Illustration of a hand washing a small container with arrows indicating flow (no text or symbols)natural_image
Line drawing of a hand inserting a device into a device casing (no text or symbols)natural_image
Technical line drawing of a mechanical device with internal components and directional arrows indicating movement (no text or symbols)natural_image
Line drawing of a hand inserting a component into a device (no text or symbols)natural_image
Line drawing of a hand inserting a small object into a device casing (no text or symbols)natural_image
Diagram of a printer with internal components and a box, showing no text or symbolsnatural_image
Technical line drawing of a mechanical device with internal components (no text or symbols)natural_image
Diagram of a refrigerator interior showing internal compartments and a close-up view of the tray (no text or symbols)natural_image
Isometric line drawing of a hexagonal grid device mounted on a base plate (no text or symbols)natural_image
Isometric line drawing of a kitchen appliance with a hand inserting a tool into the top panel (no text or symbols)natural_image
Line drawing of a hand using a handheld device to press or install a grid-patterned component (no text or symbols)natural_image
Isometric line drawing of a mechanical device with a hand inserting a plug into it (no text or symbols)Parámetros básicos
Empty Wash Fill Dock
Product Model: EWFD01LRR, EWFD02LRR
Manufacturer: Beijing Roborock Technology Co., Ltd.
Address of Manufacturer: Floor 6, Suite 6016, 6017, 6018, Building C, Kangjian Baosheng Plaza,
No.8 Heiquan Road, Haidian District, Beijing, P.R. China
For more product information, visit our website: www.roborock.com
For after-sales support, contact our support team at:
support@roborock.com (United States/Canada/Non-Europe)
1-855-960-4321 (United States only)
1-833-421-1915 (Canada only)

- Roborock Empty Wash Fill Dock User Manual
- Contents
- IMPORTANT SAFETY INSTRUCTIONS
- WARNING
- SAVE THESE INSTRUCTIONS
- FCC/IC Statement
- Parts List
- Product Overview
- Installation
- Assembly
- Placement of the Dock
- Notes:
- Preparing for Auto-Emptying
- Powering On & Charging
- Instructions for Use
- Filling the Water Tank
- Auto Mop Washing
- Manually Activated Mop Washing
- Auto-Emptying
- Manually Activated Emptying
- Stopping Emptying
- Charging
- Routine Maintenance Frequency
- Routine Maintenance
- Moving the Dock
- Water Tank
- Charging Contact Areas
- High-Speed Maintenance Brush
- Water Filter
- Replacing the Disposable Dust Bag
- Cleaning the Air Duct
- Basic Parameters
- Troubleshooting
- Dock Error
- Disposal
- Roborock Empty Wash Fill Dock Manuel d'utilisation
- Remarques :
- Activation manuelle du vidage
- Réservoir d'eau
- Paramètres de base
- Encendido y carga
- Notas:
- Tanque de agua
- Parámetros básicos
- Empty Wash Fill Dock
Brand : ROBOROCK
Model : S7 MaxV Ultra
Category : Robot vacuum