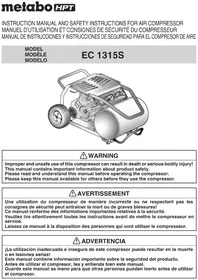
EC1315S - Compressor HiKOKI - Free user manual and instructions
Find the device manual for free EC1315S HiKOKI in PDF.


| Product Type | Portable Air Compressor |
| Brand | HiKOKI |
| Model | EC1315S |
| Power Supply | Single Phase 120 V, 60 Hz, 13.5 A |
| Motor | Universal Single Phase, 1.5 HP (1.12 kW) |
| Tank Capacity | 8 gal (30.2 L) |
| Maximum Pressure | 225 PSI (15.5 bar) |
| Air Flow at 40 PSI | 6.3 CFM (178.2 L/min) |
| Air Flow at 90 PSI | 5.0 CFM (141.6 L/min) |
| Lubrication | Oil-Free |
| Duty Cycle | S3 50% (5 min on, 5 min off) |
| Dimensions (approx.) | 60 x 40 x 50 cm (L x W x H) |
| Weight (approx.) | 32 kg |
| Pump Type | Piston, Oil-Free |
| Safety Valve | Integrated, Pre-Set |
| Thermal Protection | Thermal Overload Limiter |
| Applications | Inflation, Pneumatic Tools, Cleaning |
| Outlet Connection | 1/4 in NPT Quick Coupler |
| Noise Level (approx.) | 80 dB(A) |
| Operating Temperature | 0 °C to 40 °C |
| Routine Maintenance | Daily tank draining, valve check |
| Spare Parts | Available from metabo HPT |
| Warranty | See manual |
Frequently Asked Questions - EC1315S HiKOKI
User questions about EC1315S HiKOKI
0 question about this device. Answer the ones you know or ask your own.
Ask a new question about this device
Download the instructions for your Compressor in PDF format for free! Find your manual EC1315S - HiKOKI and take your electronic device back in hand. On this page are published all the documents necessary for the use of your device. EC1315S by HiKOKI.
USER MANUAL EC1315S HiKOKI
natural_image
Technical illustration of a pressure expander with visible internal components and wheels (no text or symbols)
WARNING
Improper and unsafe use of this compressor can result in death or serious bodily injury!
This manual contains important information about product safety.
Please read and understand this manual before operating the compressor.
Please keep this manual available for others before they use the compressor.

AVERTISSEMENT
Read and understand all of the operating instructions, safety precautions and warnings in the Instruction Manual before operating or maintaining this compressor.
Most accidents that result from compressor operation and maintenance are caused by the failure to observe basic safety rules or precautions. An accident can often be avoided by recognizing a potentially hazardous situation before it occurs, and by observing appropriate safety procedures.
Basic safety precautions are outlined in the “SAFETY” section of this Instruction Manual and in the sections which contain the operation and maintenance instructions.
Hazards that must be avoided to prevent bodily injury or machine damage are identified by WARNINGS on the compressor and in this Instruction Manual.
Never use this compressor in a manner that has not been specifically recommended by metabo HPT, unless you first confirm that the planned use will be safe for you and others.
MEANINGS OF SIGNAL WORDS
| WARNING | indicates a potentially hazardous situations which, if ignored, could result in death or serious personal injury. |
| CAUTION | indicates a potentially hazardous situations which, if not avoided, may result in minor or moderate injury, or may cause machine damage. |
| NOTE | emphasizes essential information. |
MEANINGS OF SYMBOLS
| SymbolsThe following show symbols used for the machine. Be sure that you understand their meaning before use. Proper interpretation of these symbols will allow you to operate the compressor better and safer. | |||
 | WARNINGTo reduce the risk of injury, user must read instruction manual. |  | Risk of Fire of ExplosionDo not spray flammable liquid in a confined area. Spray area must be well ventilated.Do not smoke while spraying or spray where spark or flame is present. Keep compressors as far from the spraying area as possible, at least 15 feet from the spraying area and all explosive vapors. |
| V | Volts | ||
| A | Amperes | ||
| Hz | Hertz | ||
| ~ | Alternating Current | 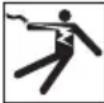 | Risk of Electrical ShockHazardous Voltage: disconnect from power source before servicing. Compressor must be grounded. |
 | Wet Conditions AlertDo not expose to rain or use in damp locations. | ||
 | Eye ProtectionWe are eye protection marked to coANSI Z87.1. |  | Hot SurfaceTh reduce the risk of injury or damage, contact with any hot surface. |
 | Safety AlertPrecautions that involve your safety. | 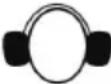 | Risk to HearingAlways wear ear protection when using this compressor. Failure to do so may result in hearing loss. |
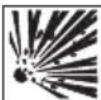 | Risk of BurstingDo not adjust the regulator to result in output pressure greater than the marked maximum pressure of the attachment. Do not use at a pressure greater than the rated maximum pressure of this compressor. | 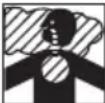 | Risk to BreathingAir obtained directly from the air compressor should never be used to supply air for human consumption. |
SAFETY
IMPORTANT SAFETY INSTRUCTIONS FOR USE OF THE COMPRESSOR

WARNING: Death or serious bodily injury could result from improper or unsafe use of compressor. To avoid these risks, follow these basic safety instructions:
READ ALL INSTRUCTIONS
Never place your hands, fi ngers or other body parts near the compressor's moving parts.
Never insert your fingers or other objects into the shroud ventilator. Such an action invites the danger of injuries or electric shocks.
2. NEVER OPERATE WITHOUT ALL GUARDS IN PLACE.
Never operate this compressor without all guards or safety features in place and in proper working order. If maintenance or servicing requires the removal of a guard or safety features, be sure to replace the guard or safety features before resuming operation of the compressor.
3. ALWAYS WEAR PROTECTION.
Risk of injury. Always wear ANSI Z87.1 safety glasses with side shields or equivalent eye protection. Compressed air must never be aimed at anyone or any part of the body. Use ear protection as air flow noise is loud when draining.
4. PROTECT YOURSELF AGAINST ELECTRIC SHOCK.
Prevent body contact with grounded surfaces such as pipes, radiators, ranges and refrigeration enclosures.
This compressor must be properly grounded. Don't expose compressor to rain. Never operate the compressor in damp or wet locations.
To reduce risk of electric shock, do not remove shroud.
5. DISCONNECT THE COMPRESSOR.
Always disconnect the compressor from the power source and remove the compressed air from the air tank before servicing, inspecting, maintaining, cleaning, replacing or checking any parts.
6. AVOID UNINTENTIONAL STARTING.
Do not carry the compressor while it is connected to its power source or when the air tank is filled with compressed air. Be sure the power switch in the "OFF" position before connecting the compressor to its power source.
7. STORE COMPRESSOR PROPERLY.
When not in use, the compressor should be stored indoors in a non-freezing, dry place. Keep out of reach of children. Lock-out the storage area.
8. KEEP WORK AREA CLEAN.
Cluttered areas invite injuries. Clear all work areas of unnecessary tools, debris, furniture, etc.
9. CONSIDER WORK AREA ENVIRONMENT.
Keep work area well lit and well ventilated.
Operate the compressor in an open area at least 18 inches (457 mm) away from any wall or object that could restrict the flow of fresh air to the ventilation openings. Do not place rags or other objects on or near these openings.
Risk of fire or explosion. Do not carry and operate the compressor or any other electrical device near the spray area. Do not use compressor in the presence of flammable liquids or gases.
Never place objects against or on top of compressor.
Compressor produces sparks during operation. Never use compressor in sites containing lacquer, paint, benzine, thinner, gasoline, gases, adhesive agents, and other materials which are combustible or explosive.
Always operate the compressor in a stable and secure position to prevent accidental movement of the unit. Never operate the compressor on a roof or other elevated positon. Never use on a ladder or unstable support. Use an additional air hose to reach high locations.
This compressor contains some components parts that tend to produce arcs or sparks, and therefore, when located in a garage, it should be in a room or enclosure provided for this purpose, and should be 18 inches (457 mm) or more above the floor.
10. KEEP COMPRESSORS AS FAR FROM THE SPRAYING AREA AS POSSIBLE.
Risk of fire or explosion. Do not spray flammable liquid in a confined area. The spray area must be well ventilated. Do not smoke while spraying or spray where parks or a flame is present. Use spray gun hose
at least 25 feet (7.6 m) long and keep the compressor/motor at least 20 feet (6.1 m) away from vapours. Do not use this air compressor to spray chemicals. Your lungs can be damaged by toxic fumes.
A respirator may be necessary in dusty environments or when spraying paint. Do not carry while painting.
11. KEEP CHILDREN AWAY.
Do not let visitors contact compressor extension cord.
All visitors should be kept safely away from work area.
12. DRESS PROPERLY.
Do not wear loose clothing or jewelry. They can be caught in moving parts.
Wear protective hair covering to contain long hair.
13. DON'T ABUSE CORD.
Never yank it to disconnect from receptacle.
Keep cord from heat, oil and sharp edges.
14. MAINTAIN COMPRESSOR WITH CARE.
Please conduct maintenance in accordance with page 17.
Inspect cords periodically and if damaged, have repaired by authorized service center. Inspect extension cords periodically and replace if damaged.
15. OUTDOOR USE EXTENSION CORDS.
When compressor is used outdoors, use only extension cords intended for use outdoors and so marked.
16. STAY ALERT.
Watch what you are doing. Use common sense. Never stand on the compressor. Do not allow the compressor to operate unattended. Do not operate compressor when you are tired. Compressor should never be used by you if you are under the influence of alcohol, drugs or medication that makes you drowsy.
17. CHECK DAMAGED PARTS AND AIR LEAK.
Before further use of the compressor, a guard or other part is damaged should be carefully checked to determine that it will operate properly and perform its intended function. Check for alignment of moving parts, binding of moving parts, bre mounting, air leak, and any other conditions that may affect its operation.
A guard or other part that is damaged should be properly repaired or replaced by a metabo HPT authorized service center.
Have defective pressure switches replaced by a metabo HPT authorized service center.
Do not use compressor if switch does not turn it on and off.
18. NEVER USE COMPRESSOR FOR APPLICATIONS ex OTHER THAN THOSE SPECIFIED.
Never use compressor for applications other than inhathosg specifi ed in the Instruction Manual.
Following all safety precautions in this manual and the manufacturer's instructions in the application manual.
Never use compressed air for breathing or respiration.
19. HANDLE COMPRESSOR CORRECTLY.
Operate the compressor according to the instructions provided herein. Never allow the compressor to be operated by children, individuals unfamiliar with its operation or unauthorized personnel.
20. KEEP ALL SCREWS, BOLTS AND GUARDS TIGHTLY IN PLACE.
Keep all screws, bolts, and guards tightly mounted.
Check their conditions periodically.
21. KEEP MOTOR AIR VENT CLEAN.
The motor air vent must be kept clean so that air can freely flow at all times. Check for dust build-up frequently.
22. OPERATE COMPRESSOR AT THE RATED VOLTAGE.
Operate the compressor at voltages specified on their nameplates.
If using the compressor at a higher voltage than the rated voltage, it will result in abnormally f revolution and may damage the unit and burn out the motor.
If compressor is connected to a circuit protected by fuse, use time delay fuses. Time delay fuses should be marked "D" in Canada and "T" in the U.S.
23. NEVER USE A COMPRESSOR WHICH IS DEFECTIVE OR OPERATING ABNORMALLY.
If the compressor appears to be operating unusually, making strange noises or vibration, or otherwise appears defective, stop using it immediately and arrange for repairs by a metabo HPT authorized service center.
24. CHECK AIR PRESSURE OF TIRES.
Tires can burst if the air pressure is too high. Check wires with pressure gauge prior to use and during the fllling of tires. The appropriate air pressure is listed on the side of each tire.
25. USE ONLY GENUINE metabo HPT REPLACEMENT PARTS.
Replacement parts not manufactured by metabo HPT may void your warranty and can lead to malfunction and resulting injuries. Genuine metabo HPT parts are available from your dealer.
26. DO NOT MODIFY THE COMPRESSOR.
Do not modify the compressor. Do not drill into, weld, patch or modify the air tanks. Do not make adjustments to the components that control tank pressure. Do not make alterations to the factory operating pressure settings. Do not operate at pressures or speeds in excess of the manufacturer's recommendations. Always contact the metabo HPT authorized service center for any repairs. Unauthorized modification may not only impair the compressor performance but may also result in accidents or injury to repair who do not have the required knowledge and technical expertise to perform the repair operations correctly.
27. TURN OFF THE POWER SWITCH WHEN THE COMPRESSOR IS NOT USED.
When the compressor is not used, turn off the power switch, disconnect the plug from the power source and open the drain cock to discharge the compressed air from the air tank.
To reduce the risk of burns, do not touch the delivery pipe, check valve or pump.
These areas can remain hot for at least 45 minutes after this compressor is shutdown.
Allow compressor to cool prior to servicing.
29. DO NOT DIRECT AIR STREAM AT BODY.
Risk of injury. Do not direct air stream at persons or animals.
30. DRAIN TANK.
Risk of bursting. Water will condense in the air tank. If not drained, water will corrode and weaken the air tank causing a risk of air tank rupture.
Drain tank daily or after 4 hours of use. To drain the air tank, open valves slowly and tilt compressor to empty accumulated water.
Keep face and the other body parts away from outlet of drain.
Use ANSI Z87.1 safety glasses with side shields when draining as debris can be kicked up into face.
31. DO NOT STOP COMPRESSOR BY PULLING OUT THE PLUG.
This could result in damage to the unit.
Use the power switch.
32. MAKE SURE THE COMPRESSOR OUTLET PRESSURE IS SET LOWER THAN THE MAXIMUM OPERATING PRESSURE OF THE TOOL.
Too much air pressure causes a hazardous risk of bursting.
Check the manufacturer's maximum pressure rating for air tools and accessories. The regulator outlet pressure must never exceed the maximum pressure rating.
p39. S THE SAFETY VALVE MUST WORK PROPERLY.
Risk of bursting. Before starting the compressor, pull the ring on the safety valve to make sure that the safety valve operates smoothly. If the safety valve does not work properly, over-pressurization may occur, causing air tank rupture or an explosion. Do not use compressor if the safety valve is stuck or does not operate smoothly. Have defective safety valve replaced by a metabo HPT authorized service center.
34. USE OF THIS PRODUCT WILL EXPOSE YOU TO CHEMICALS KNOWN TO THE STATE OF CALIFORNIA.
Some dust created by this product contains chemicals known to State of California to cause cancer, birth defects or other reproductive harm. Some examples of these chemicals are:
– compounds in fertilizers
- compounds in insecticides, herbicides and pesticides
- arsenic and chromium from chemically treated lumber
To reduce your exposure to these chemicals, approved safety equipment such as dust masks that are specially designed to filter out microscopic particles. Use of this product will expose you to chemicals known to the State of California to cause cancer, birth defects and other reproductive harm. Avoid inhaling vapors and dust, and wash hands after using. This product contains chemicals, including lead, known to the State of California to cause cancer, and birth defects or other reproductive harm. Wash hands after handling.
35. PROTECT MATERIAL LINES AND AIR LINES FROM DAMAGE OR PUNCTURE.
Keep the hose and power cord away from sharp objects, chemical spills, oil, solvents, and wet floors.
36. CHECK HOSES FOR WEAK OR WORN CONDITION BEFORE EACH USE, MAKING CERTAIN ALL CONNECTIONS ARE SECURE.
Do not use if a defect is found. Purchase a new hose or notify an authorized service center for examination or repair.
- RELEASE THE PRESSURE WITHIN THE SYSTEM SLOWLY.
Dust and debris may be harmful. - KEEP THE EXTERIOR OF THE AIR COMPRESSOR DRY, CLEAN, AND FREE FROM OIL AND GREASE.
Always use a clean cloth when cleaning. Never use brake fluids, gasoline, petroleum-based products, or any strong solvents to clean the unit. Following this rule will reduce the risk of deterioration of the enclosure plastic. - IF CONNECTED TO A CIRCUIT PROTECTED BY FUSES, use time-delay fuses with this product.
- MAKE SURE TH OBSTRUCTIONS OR SNAGS.
Entangled or snarled hoses can cause loss of balance or footing and may become damaged. - NEVER LEAVE A COMPRESSOR UNATTENDED WITH THE AIR HOSE ATTACHED.
- DO NOT OPERATE THIS COMPRESSOR IF IT DOES NOT CONTAIN A LEGIBLE WARNING LABEL.
- DO NOT CONTINUE TO USE A COMPRESSOR OR HOSE THAT LEAKS AIR OR DOES NOT FUNCTION PROPERLY.
-
ALWAYS DISCONNECT THE AIR SUPPLY AND POWER SUPPLY BEFORE MAKING ADJUSTMENTS, SERVICING A COMPRESSOR, OR WHEN A COMPRESSOR IS NOT IN USE.
-
DO NOT ATTEMPT TO PULL OR CARRY THE AIR COMPRESSOR BY THE HOSE.
- YOUR TOOL MAY REQUIRE MORE AIR CONSUMPTION THAN THIS AIR COMPRESSOR IS CAPABLE OF PROVIDING.
- INSPECT COMPRESSOR CORDS AND HOSES PERIODICALLY AND, IF DAMAGED, HAVE REPAIRED AT YOUR NEAREST AUTHORIZED SERVICE CENTER. CONSTANTLY STAY AWARE OF CORD LOCATION.
Following this rule will reduce the risk of electric shock or fire.
E 48. NEVER USE AN ELECTRIC AIR AEPOR WITH THIS GROUNDED PLUG.
49. CHECK DAMAGED PARTS. BEFORE FURTHER USE OF THE AIR COMPRESSOR OR AIR TOOL, A GUARD OR OTHER PART THAT IS DAMAGED SHOULD BE CAREFULLY CHECKED TO DETERMINE THAT IT WILL OPERATE PROPERLY AND PERFORM ITS INTENDED FUNCTION.
CHECK FOR ALIGNMENT OF MOVING PARTS, BINDING OF MOVING PARTS, BREAKAGE OF PARTS, MOUNTING, AND ANY OTHER CONDITIONS THAT MAY AFFECT ITS OPERATION. A GUARD OR OTHER PART THAT IS DAMAGED SHOULD BE PROPERLY REPAIRED OR REPLACED BY AN AUTHORIZED SERVICE CENTER.
Following this rule will reduce the risk of shock, fire or serious injury.


WARNING:
The operation of any compressor can result in foreign objects being thrown into your eyes, which can result in severe eye damage. Before beginning compressor operation, always wear safety goggles, safety glasses with side shields, or a full face shield when needed. We recommend Wide Vision Safety Mask for use over eyeglasses or standard safety glasses with side shields. Always use eye protection which is marked to comply with ANSI Z87.1.
REPLACEMENT PARTS
When servicing use only identical replacement parts.
Repairs should be conducted only by a metabo HPT authorized service center.
ELECTRICAL SAFETY
EXTENSION CORDS
- Use only 3-wire extension cords that have 3-prong grounding plugs and 3-pole receptacles that accept the air compressor's plug.
- When using the air compressor at a considerable distance from the power source, use an extension cord heavy enough to carry the current that the compressor will draw.
An undersized extension cord will cause a drop in line voltage, resulting in a loss of power and causing the motor to overheat. Use the chart provided below to determine the minimum wire size required in an extension cord.
- Only round jacketed cords listed by Underwriter's Laboratories (UL) should be used.
** Ampere rating (on air compressor data plate)
0-2.02.1-3.43.5-5.05.1-7.07.1-12.012.1-16.0
| Cord Length Wire Size (A.W.G.) | ||||||||
| 2 | 5 | ’ | 1 | 4 | 1 | 4 | 1 | 4 |
| 5 | 0 | ’ | 1 | 4 | 1 | 4 | 1 | 4 |
| 100' | 14 | 14 | 14 | 12 | 10 | - | ||
** Used on 12 gauge - 20 amp circuit.
NOTE: AWG = American Wire Gauge
- When working with the air compressor outdoors, use an extension cord that is designed for outside use. This is indicated by the letters "W-A" on the cord's jacket.
- Before using an extension cord, inspect it for loose or exposed wires and cut or worn insulation.
WARNING:
Keep the extension cord clear of the working area. Position the cord so that it will not get caught on lumber, tools, or other obstructions while you are working with a compressor. Failure to do so can result in serious personal injury.
WARNING:
Check the extension cords before each use. If damaged, replace immediately. Never use the air compressor with a damaged cord since touching the damaged area could cause electrical shock resulting in serious personal injury.
NOTE: Use longer air hoses instead of long extension cords.
Your air compressor will run better and last longer. Always use a minimum 3/8" (9.5 mm) or greater air hose rated at 300 psi.
ELECTRICAL CONNECTION
- This air compressor is powered by a precision built electric motor. It should be connected to a power supply that is 120 volts, 60 Hz, AC only (normal household current).
- Do not operate this compressor on direct current (DC). A substantial voltage drop will cause a loss of power and the motor will overheat. If the air compressor does not operate when plugged into an outlet, double check the power supply.
SPEED AND WIRING
- The no-load speed of the electric motor varies by model and specification. The motor speed is not constant and decreases under a load or with lower voltage. For voltage, the wiring in a shop is as important as the motor's horsepower rating.
- A line intended only for lights cannot properly carry a compressor motor. Wire that is heavy enough for a short distance will be too light for a greater distance. A line that can support one compressor may not be able to support two or three compressors.
GROUNDING INSTRUCTIONS
-
This product must be grounded. In the event of an electrical short circuit, grounding reduces the risk of electric shock by providing an escape wire for the electric current. This air compressor is equipped with an electric cord having an equipment-grounding conductor and a grounding plug. The plug must be plugged into a matching outlet that is properly installed and grounded in accordance with all local codes and ordinances.
-
Do not modify the plug provided. If it will not fit the outlet, have the proper outlet installed by a qualified electrician.

WARNING:
Improper connection of the equipment-grounding conductor can result in a risk of electric shock.
- We recommend that you never disassemble the compressor or try to do any rewiring in the electrical system. Any repairs should be performed only by metabo HPT Service Centers. Should you be determined to make a repair yourself, remember that the green colored wire is the "grounding" wire. Never connect this green wire to a "live" terminal. If you replace the plug on the power cord, be sure to connect the green wire only to the grounding (longest) prong on a 3-prong plug.
Check with a qualified electrician or service personnel if the grounding instructions are not completely understood, or if in doubt as to the compressor is properly grounded.
- Replace a damaged or worn cord immediately.
- This product is for use on a nominal 120-V circuit and has a grounding plug similar to the plug illustrated in Fig. 1. Only connect the product to an outlet having the same con-fi guration as the plug. Do not use an adapter with this product.
- Never use an electrical adapter with this grounded plug.
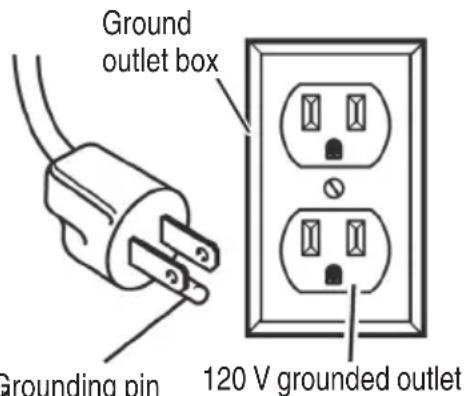
Fig. 1

WARNING:
Avoid electrical shock hazard. Never use this compressor with a damaged or frayed electrical cord or extension cord. Inspect all electrical cords regularly. Never use in or near water or in any environment where electric shock is possible.
SAVE THESE INSTRUCTIONS AND MAKE THEM AVAILABLE TO OTHER USERS OF THIS TOOL!
The information contained in this Instruction Manual is designed to assist you in the safe operation and maintenance of the compressor.
Some illustrations in this Instruction Manual may show details or attachments that differ from those on your own compressor.
NAME OF PARTS
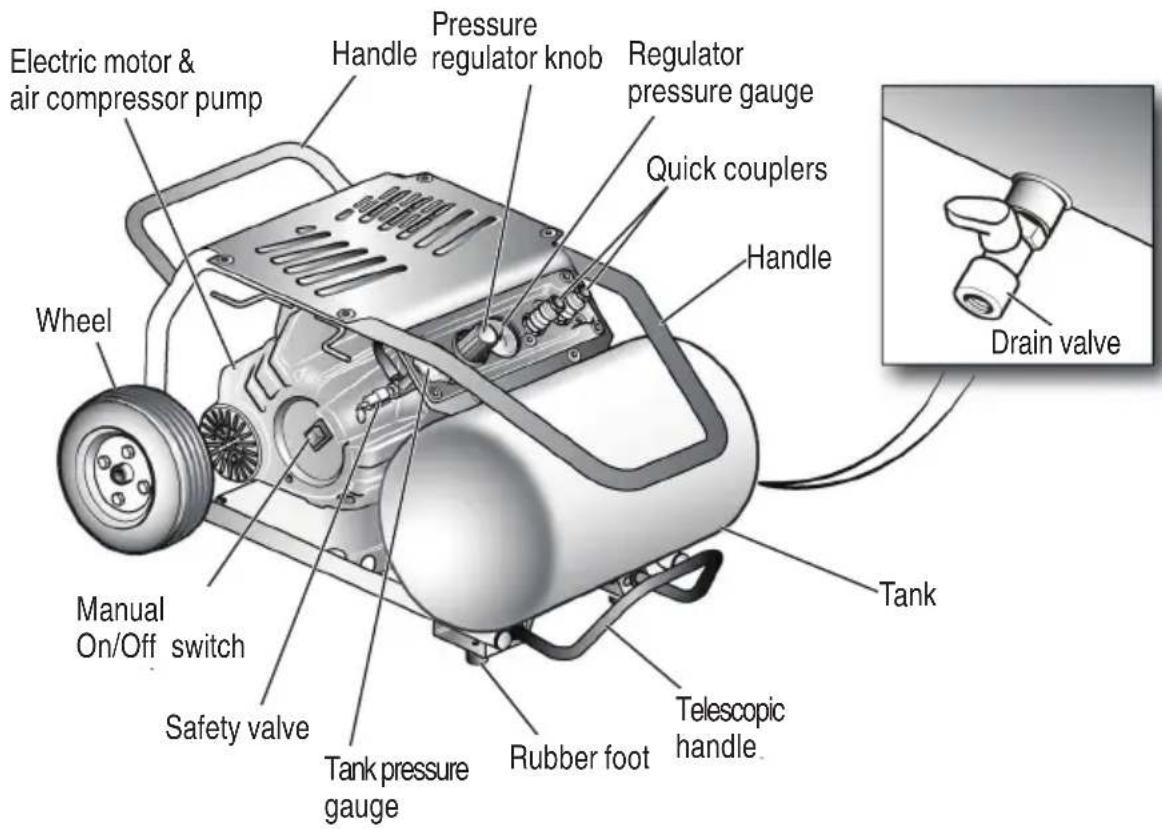
Fig. 2
SPECIFICATIONS
| Model EC 1315S | ||
| Motor Single-Phase, universal motor | ||
| Power Source Single-Phase, 120 V AC 60 Hz | ||
| Running Horse Power 1.5 HP (1.12 kW) | ||
| Current 13.5 A | ||
| Tank Capacity 8 gal. (30.2 ltr) | ||
| Maximum Pressure 225 PSI (15.5 bar) | ||
| Free Air Delivery | at 40 PSI (2.8 bar) 6.3 CFM (178.2 ltr/min) | |
| at 90 PSI (6.2 bar) 5.0 CFM (141.6 ltr/min) | ||
| Lubrication Oil-less | ||
| Duty Cycle S3 50% - 5 minutes ON and 5 minutes OFF | ||
KNOW YOUR AIR COMPRESSOR
Before attempting to use this product, familiarize yourself with all operating features and safety rules. (Fig. 2)
OIL-FREE UNIVERSAL MOTOR
Your air compressor features permanently lubricated bearings.
ON/OFF POWER SWITCH
This switch is used to start or stop the air compressor. Moving the switch to the (ON) position will provide automatic power to the pressure switch which will allow the motor to start when the air tank pressure is below the factory set cut-in pressure. When in the (ON) position, the pressure switch stops the motor when the air tank pressure reaches the factory set cut-out pressure. Moving the switch to the (OFF) position will remove power from the motor and stop the air compressor.
ELECTRIC MOTOR & AIR COMPRESSOR PUMP
The motor is used to power the pump. The electric motor has a thermal overload protector. If the motor overheats for any reason, the thermal overload will cut off power, thus preventing the motor from being damaged. Wait until the motor is cool.
Air compressor pump: to compress air, the piston moves up and down in the cylinder. On the down stroke, air is drawn in through the air intake valve while the exhaust valve remains closed. On the upstroke, air is compressed, the intake valve closes and compressed air is forced out through the exhaust valve, into the discharge line, through the check valve and into the air tank.
SAFETY VALVE
This valve is designed to prevent system failures by relieving pressure from the system when the compressed air reaches a predetermined level. The valve is preset by the manufacturer and must not be modified in any way.
DRAIN VALVE
The drain valve is used to remove moisture from the air tank.
TANK PRESSURE GAUGE
The tank pressure gauge indicates the pressure of the air in the tank.
REGULATOR PRESSURE GAUGE
The current line pressure is displayed on the regulator pressure gauge. This pressure can be adjusted by rotating the pressure regulator knob.
PRESSURE REGULATOR KNOB
Use the pressure regulator knob to adjust the amount of air being delivered through the hose.
The air pressure coming from the air tank is controlled by the regulator knob. Pull the knob out and turn clockwise to increase pressure and counterclockwise to decrease pressure. When the desired pressure is reached push knob in to lock in place. Follow tool operating instructions for recommended pressure range.
AIR TANK
The tank is used to store the compressed air.
QUICK COUPLER
The outlet is used to connect the 1/4 in. NPT air hose.
OVERLOAD PROTECTOR
This air compressor is equipped with a thermal overload device which will turn the air compressor off automatically, if the air compressor becomes overheated. If the motor turns OFF repeatedly, check for the following possible causes first: Low Voltage from the outlet. Lack of proper ventilation or outside air or room temperature too high. Extension cord too long or wrong gauge wire used.
To reset the air compressor:
(1) Turn the air compressor off.
(2) Unplug the air compressor and allow it to cool for 30 minutes.
(3) Plug the air compressor into an approved outlet.
(4) Turn the air compressor on.
DUTY CYCLE:
To avoid overheating of the electric motor, this compressor is designed for intermittent operation as indicated on the dataplate: S3 50 means 5 minutes ON and 5 minutes OFF. If the compressor run time exceeds the S3 50 duty cycle, then the application requires more air than the compressor is capable to deliver.
To ensure tool performance, the SCFM compressor should exceed the CFM requirement of the tool by 20%.
ASSEMBLY
UNPACKING
This product has been shipped completely assembled.
○ Carefully remove the compressor and any accessories from the box. Make sure that all items listed in the packing list are included.
○ Inspect the compressor carefully to make sure no breakage or damage occurred during shipping.
Do not discard the packing material until you have carefully inspected and satisfactorily operated the compressor.
PACKING LIST
- Air Compressor
- Instructions Manual
WARNING:
If any parts are missing do not operate the compressor until the missing parts are replaced. Failure to do so could result in possible serious personal injury.
WARNING:
Do not attempt to modify this compressor or create accessories not recommended for use with this compressor. Any such alteration or modification is misuse and could result in a hazardous condition leading to possible serious personal injury.
CAUTION: Do not lift compressor from telescopic handle.
ATTACHING HOSE
○ Insert the hose into the quick coupler already installed on the compressor. (Fig. 3)

WARNING:
Do not attach any tools to the open end of the hose until start-up has been completed.
○ Firmly grasp the open end of the hose; hold facing away from yourself and others.
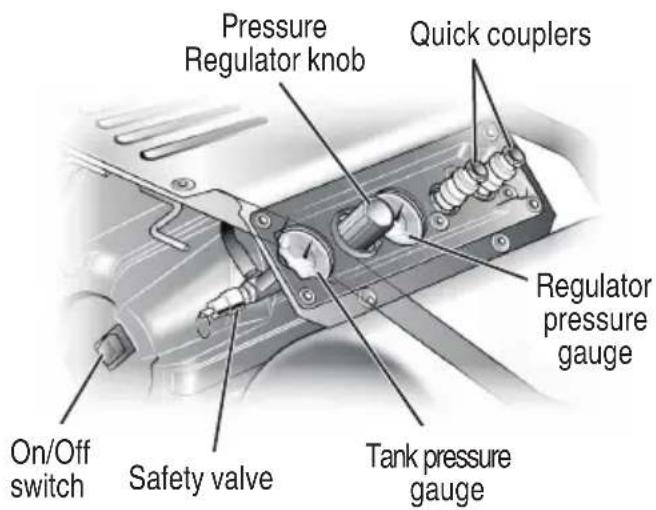
Fig. 3
○ Check and tighten all bolts, fi ttings, etc.
○ Pull the pressure regulator knob out and turn fully clockwise to open the air flow. (Fig. 3)
○ Place the switch in the OFF (O) position and plug in the power cord.
○ Open the drain valve completely (Fig. 4).
Turn the air compress ON (1) and run the air compressor for 10 minutes to break in pump parts.
○ Place the switch in the OFF (O) position.
○ Close the drain valve (Fig. 4).
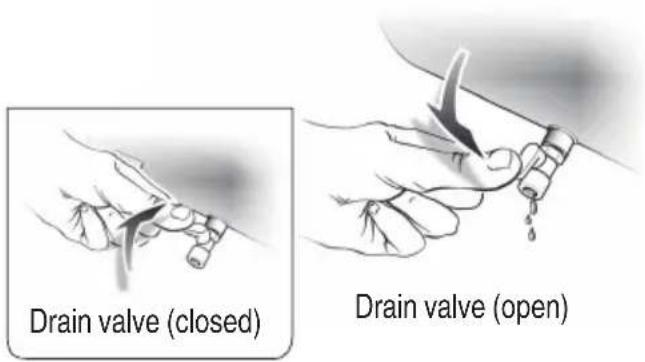
Fig. 4
TRANSPORT
TRANSPORT
○ Pull telescopic handle out until it locks into place. (Fig. 5)
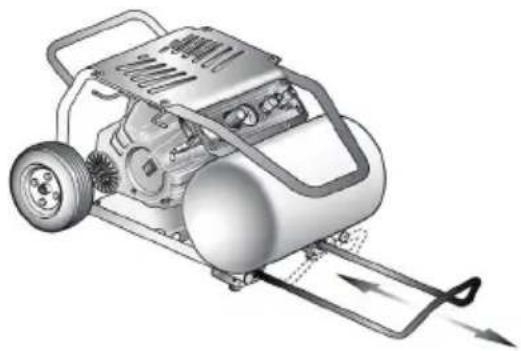
natural_image
Technical illustration of a portable air compressor with wheels and control panel (no text or symbols)Fig. 5
CAUTION: The telescopic handle is only for pulling the unit. (Fig. 6) DO NOT lift the unit by this handle.
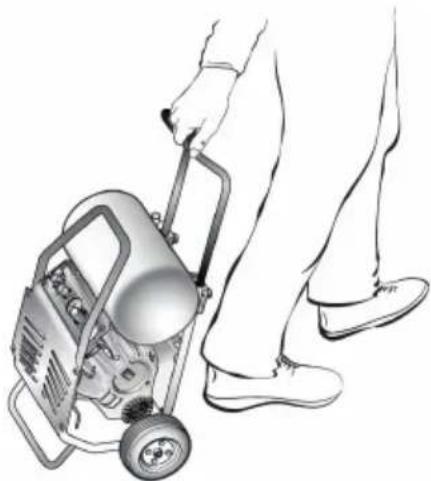
natural_image
Line drawing of a person pushing a portable pump cart with wheels (no text or symbols)Fig. 6
To collapse the handle, apply pressure for the first few inches to unlock, then slide the handle strait in until it stops. (Fig. 5)
WARNING:
Two person lift.
Do not attempt to lift the compressor by yourself. Lifting the compressor is a two-man operation requiring the assistance of another person. The compressor is lifted by gripping hand ho A and B. (Fig. 7)
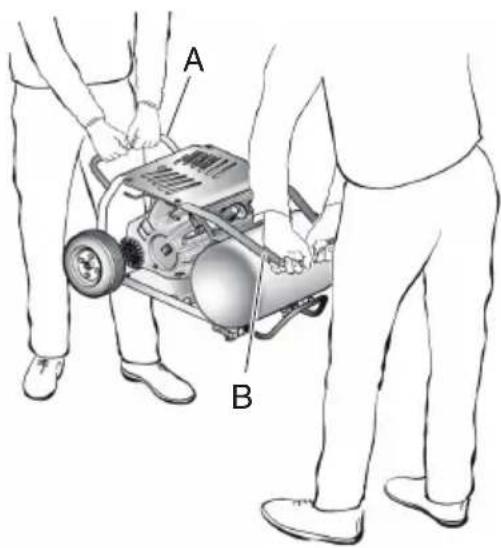
Fig. 7
When transporting the compressor, do not drop the unit or allow the unit to fall from a vertical position.
OPERATION (CONTINUED)
APPLICATIONS
Air compressors are utilized in a variety of air system applications.
Match hoses, connectors, air tools, and accessories to the capabilities of the air compressor.
You may use this compressor for purposes listed below:
○ Always use a minimum 3/8" (9.5 mm) or greater air hose rated at 300 psi.
○ Operating air powered tools requiring less than 5 SCFM @ 90 PSI.
○ Powering pneumatic nail guns, inflating tires, cleaning / blowing with pressurized air.
WARNING:
Risk of Bursting. Too much air pressure causes a hazardous risk of bursting. Check the manufacturer's maximum pressure rating for air tools and accessories. The regulator outlet pressure must never exceed the maximum pressure rating.
WARNING:
Do not allow familiarity with compressor and tools to make you careless. Remember that a careless fraction of a second is sufficient to inflict serious injury.
WARNING:
Always wear safety goggles or safety glasses with side shields when operating compressor. Failure to do so could result in objects being thrown into your eyes resulting in possible serious injury.
CAUTION:
Do not use in an environment that is dusty or otherwise contaminated. Using the air compressor in this type of environment may cause damage to the unit.
CHECKING THE SAFETY VALVE
Before starting compressor, pull the ring on the safety valve to make sure that the safety valve operates smoothly. (Fig. 8) Do not use compressor if the safety valve is stuck or does not operate smoothly. Have defective safety valve replaced by a metabo HPT authorized service center.
WARNING:
Drain tank to release air pressure before pull the ring on the safety valve.
WARNING:
Risk of bursting. If the safety valve does not work properly, over-pressurization may occur, causing air tank rupture or an explosion.
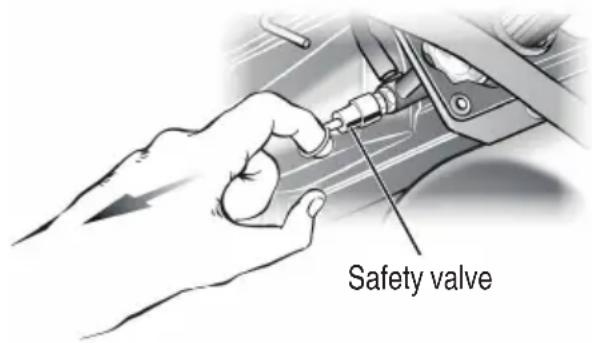
Fig. 8
USING THE AIR COMPRESSOR
○ Temperature
Operating temperatures are between 32^ F and 104^ F ( 0^ C and 40^ C).
CAUTION:
Never operate in temperatures below 32^ F ( 0^ C) or above 104^ F ( 40^ C).

WARNING:
Always ensure the ON/OFF switch is in the OFF (O) position and the regulator pressure gauge reads zero before changing air tools or disconnecting the hose from the air outlet. Failure to do so could result in possible serious personal injury.
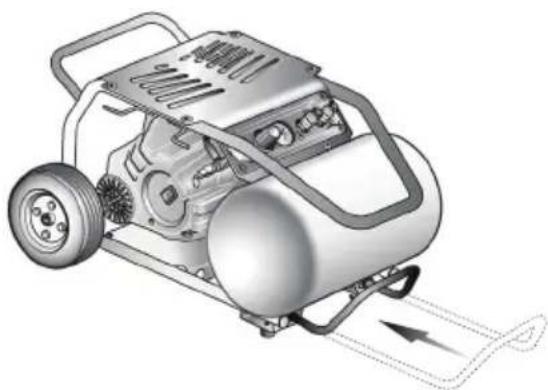
○ Ensure the compressor is positioned as shown and that the telescopic handle is not extended. (Fig. 9)
natural_image
Technical illustration of a pressure vessel with attached fan and motor (no text or symbols)Fig. 9

CAUTION:
Do not operate with the compressor set in the vertical position.
Vertical position is used only when storing the compressor.
○ Ensure the tank drain valve is closed (Fig. 10).
○ Ensure the ON/OFF switch is in the OFF (O) position and the air compressor is unplugged (Fig. 10).
○ Ensure the pressure regulator knob is turned fully counterclockwise (Fig. 10).
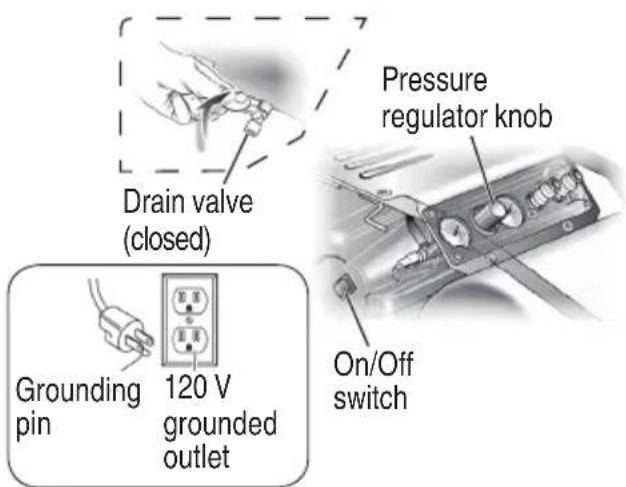
Fig. 10
○ If not already installed, attach the hose to the compressor.
○ Always use a minimum 3/8" (9.5 mm) or greater air hose rated at 300 psi.
○ Connect the air powered tools to the air hose by inserting the male quick-connect plug to the quick-coupler at the end of the hose (Fig. 11).
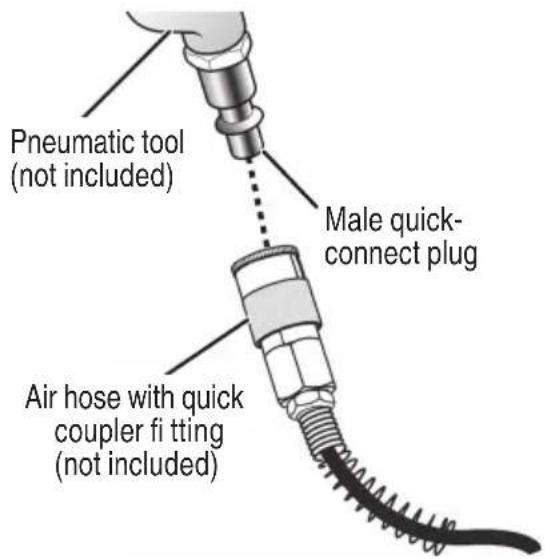
Fig. 11
○ Connect the power cord to the power supply.
NOTE: If compressor is connected to a circuit protected by fuse, use time delay fuses. Time delay fuses should be marked "D" in Canada and "T" in the U.S.
○ Turn the ON/OFF switch to the ON (I) position.
○ Rotate the pressure regulator knob to the desired line pressure. Pull the knob out and turn clockwise to increase pressure and counterclockwise to decrease pressure. When the desired pressure is reached push knob in to lock in place.
NOTE: Before connecting or disconnecting air tools, turn the regulator knob counterclockwise to stop the flow of air.
○ Following all safety precautions in this manual and the manufacturer's instructions in the air tool manual, you may now use your air-powered tool.
○ If using an inflation accessory with a quick-connect fitting, control the amount of air flow with the pressure regulator knob. Turning the knob fully counterclockwise will completely stop the flow of air.
NOTE: Always use the minimum amount of pressure necessary for your application. Using a higher pressure than needed will drain air from the tank more rapidly and cause the unit to cycle on more frequently.
When finished, always drain the tank and unplug the unit. Never leave the unit plugged in and/or running unattended.
WARNING:
Check the air tool manual to ensure the correct air pressure regulator setting for optimum operation of your air tools. If you are using an air tool not originally included in the package contents list (not necessarily supplied with the air compressor model you have purchased), your tool may require more air consumption than this air compressor is supply.
Always read your air tool owner's manual to match the correct air supply to your air tool to avoid damage to the tool or risk of personal injury.
DRAINING THE TANK
To help prevent tank corrosion and keep moisture out of the air used, the tank of the compressor should be drained daily.
To drain the tank: (Fig. 12)
○ Verify that the compressor is turned off.
○ Holding the handle, tilt the compressor toward the drain valve so that it's set in a lower position.
○ Open the drain valve by rotating it 1/4 turn counterclockwise.
- Keep the compressor tilted until all moisture has been removed.
○ Drain moisture from tank into a suitable container.
NOTE: Condensate is a polluting material and should be disposed of in compliance with local regulations.
☐ If drain valve is clogged, release all air pressure by pulling the safety valve. Remove and clean valve, then reinstall.
WARNING:
Unplug the air compressor and release all air from the tank before servicing. Failure to depressurize tank before attempting to re may cause serious personal injury.
○ Close the drain valve by rotating it 14 turn clockwise.
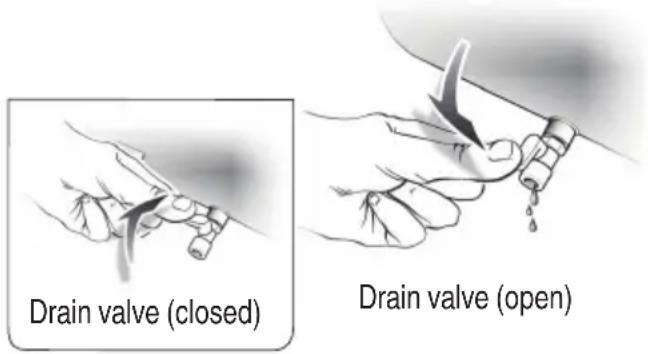
Fig. 12
○ Turn ON/OFF power switch to the OFF position.
○ Unplug power cord from wall outlet and wrap it around the hook on the side of the compressor to prevent damage when not in use.
- Open the drain valve located at the lower part of the tank (Fig. 12). Tank pressure should be below 10 psi when draining the tank.
WARNING:
Risk of bursting. When the tank gets corroded, there is a risk of breakdown. Water will condense in the air tank. If not drained, water will corrode and weaken the air tank causing a risk of air tank rupture. Drain tank daily or after 4 hours of use. The drain contains moisture in the air, abrasion particles, rust, etc.. To drain tank open valve slowly and tilt compressor to empty accumulated water. Keep face and eyes away from drain cock.
○ Air hose should be disconnected from compressor and hung open ends down to allow any moisture to drain.
○ Compressor and hose should be stored in a non-freezing, cool, dry place.
○ Compressor can be stored in horizontal and vertical position.
move valve
WARNING:
Always drain the tank before to store compressor in vertical position.
MAINTENANCE

WARNING:
When servicing, use only identical replacement parts. Use of any other parts may create a hazard or cause product damage.
LUBRICATION
All the bearings in this compressor are lubricated with a sufficient amount of high grade lubricant for the life of the unit under normal operating conditions. Therefore, no further lubrication of the bearings is required.

WARNING:
Always wear safety or safety glasses with side shields during compressor operation or when blowing dust. If operation is dusty, also wear a dust mask.
SERVICE AND REPAIRS
All quality compressors will eventually require servicing or replacement of parts because of wear and tear from normal use. To assure that only genuine replacement parts will be used, all service and repairs must be performed by a metabo HPT AUTHORIZED SERVICE CENTER, only.

WARNING:
Always release all pressure, disconnect from power supply, and allow unit to cool to the touch before cleaning or making repairs on the air compressor.
NOTE: Specifications are subject to change without any obligation on the part of the metabo HPT.
GENERAL MAINTENANCE
Humidity in the air causes condensation to form in the air tank. This condensation should be drained daily and/or every hour, using the instructions found in Draining the Tank.
The safety valve automatically releases air if the air receiver pressure exceeds the preset maximum. Check the safety valve before each use following the instructions found in Checking the Safety Valve.
Inspect the tank yearly for rust, pin holes, or other imperfections that could cause it to become unsafe.
Avoid using solvents when cleaning plastic parts. Most plastics are susceptible to damage from various types of commercial solvents and may be damaged by their use. Use clean cloths to remove dirt, dust, oil, grease, etc.

WARNING:
Do not at any time let brake fl uids, gasoline, petroleum-based products, penetrating oils, etc., come in contact with plastic parts.
Chemicals can damage, weaken or destroy plastic which may result in serious personal injury
TROUBLESHOOTING
| Problem Possible Cause Solution | ||
| The compressor does not run. | Loss of power or overheating.There is no electrical power being supplied to compressor or the power switch is in the OFF position.A fuse has blown at the power supply.A breaker has tripped at the power supply.Thermal overload open.The pressure switch is bad.Tank is full of air. | Check for proper use of extension cord.Check to be sure the compressor is plugged in and the power switch is in the ON position.Replace the fuse at the power supply.Reset the breaker at the power supply and determine why the problem happened.First unplug the compressor and wait until it becomes cool. Motor will restart when cool.Replace the pressure switch.Compressor will turn on when tank pressure drops to cut-in pressure. |
| The motor hums, but does not run or runs slowly. | The voltage from the power supply is low.The gauge wire or the length of extension cord is wrong.The motor winding is shorted or broken.The unloader or check valve is defective. | Check the voltage with a voltmeter.Use the correct wire gauge and length extension cord.Take the compressor to a service center.Take the compressor to a service center. |
| The fuses blow or the circuit breaker trips repeatedly. | The fuse size is incorrect or the circuit is overloaded.The gauge wire or the length of extension cord is wrong.The unloader or check valve is defective. | Check the fuse or breaker at the power supply is the correct size and type. Be sure to use only time-delay fuses to avoid overloading a curuit, disconnect other electrical appliances from circuit or operate compressor on its own branch circuit.Use the correct wire gauge and length extension cord.Take the compressor to a service center. |
| The thermal overload protector cuts out repeatedly. | The voltage from the power supply is low.A poorly ventilated room is causing the motor to overheat.The gauge wire or the length of extension cord is wrong. | Check the voltage with a voltmeter.Move the compressor to well-ventilated area.Check for proper gauge wire and cord length. |
| The air receiver pressure drops when the compressor shuts off . | The connections are loose or leaking (fi ttings, tubing, etc.).The drain valve is loose.The check valve is leaking. | Check all the connections with soapy water and look for bubbles. Tighten any loose conections until the leak stops.Tighten the drain valve.Take the compressor to a service center.⚠ WARNING: Do not disassemble check valve while air is in tank - empty the all the air out of the tank before dissassembly. |
| There is excessive moisture in the air discharge. | There is excessive water in the air tank.The humidity is high. | Drain the tank to remove water.Move the compressor to an area of less humidity or use an air line fi lter to reduce moisture discharge in the tank. |
| Air is leaking from the compressor. | The hose connection is loose or improperly sealed.The air hose is broken or damaged. | Ensure connections are sealed with thread sealing tape and tightened.Replace the air hose. |
| The compressor runs continuously. | The tank drain valve is open.The pressure switch is defective.The usage is excessive. | Ensure the tank drain valve is closed.Take the compressor to a service center.Decrease the amount of tool run-time; the compressor is not large enough to supply the air requirement of the tool. |
| The compressor vibrates. | The compressor mounting bolts are loose. Tighten mounting bolts. | |
| The air output is lower than normal. | The inlet valves are broken.The connections are leaking. | Take the compressor to a service center.Apply thread sealing tape to fi tting and tighten. |
| Regulator knob has continuous air leak.Regulator will not shut off air outlet. | Regulator is damaged. Take the compressor to a service center. | |
INFORMATIONS IMPORTANTES
natural_image
Technical illustration of an air compressor with wheels and attached hoses (no text or symbols)Fig. 5
PRÉCAUTION :
natural_image
Line drawing of a person using a portable pump cart (no text or symbols)Fig. 6
natural_image
Technical illustration of a portable air compressor with cooling fan and wheels (no text or symbols)Fig. 5
PRECAUCIÓN:
natural_image
Line drawing of a person using a portable push cart with legs and feet (no text or symbols)Fig. 6
natural_image
Technical illustration of a pressure vessel with attached fan and motor (no text or symbols)Fig. 9
d! PRECAUCIÓN:
Shinagawa Intercity Tower A, 15-1, Konan 2-chome, Minato-ku, Tokyo 108-6020, Japan
Distributed by
Koki Holdings America Ltd.
1111 Broadway Ave, Braselton, Georgia, 30517
Koki Holdings America Ltd. Canadian Branch
3405 American Drive, Units 9-10, Mississauga, ON, L4V 1T6
- WARNING
- AVERTISSEMENT
- MEANINGS OF SYMBOLS
- SAFETY
- IMPORTANT SAFETY INSTRUCTIONS FOR USE OF THE COMPRESSOR
- READ ALL INSTRUCTIONS
- NEVER OPERATE WITHOUT ALL GUARDS IN PLACE.
- ALWAYS WEAR PROTECTION.
- PROTECT YOURSELF AGAINST ELECTRIC SHOCK.
- DISCONNECT THE COMPRESSOR.
- AVOID UNINTENTIONAL STARTING.
- STORE COMPRESSOR PROPERLY.
- KEEP WORK AREA CLEAN.
- CONSIDER WORK AREA ENVIRONMENT.
- KEEP COMPRESSORS AS FAR FROM THE SPRAYING AREA AS POSSIBLE.
- KEEP CHILDREN AWAY.
- DRESS PROPERLY.
- DON'T ABUSE CORD.
- MAINTAIN COMPRESSOR WITH CARE.
- OUTDOOR USE EXTENSION CORDS.
- STAY ALERT.
- CHECK DAMAGED PARTS AND AIR LEAK.
- NEVER USE COMPRESSOR FOR APPLICATIONS ex OTHER THAN THOSE SPECIFIED.
- HANDLE COMPRESSOR CORRECTLY.
- KEEP ALL SCREWS, BOLTS AND GUARDS TIGHTLY IN PLACE.
- KEEP MOTOR AIR VENT CLEAN.
- OPERATE COMPRESSOR AT THE RATED VOLTAGE.
- NEVER USE A COMPRESSOR WHICH IS DEFECTIVE OR OPERATING ABNORMALLY.
- CHECK AIR PRESSURE OF TIRES.
- USE ONLY GENUINE metabo HPT REPLACEMENT PARTS.
- DO NOT MODIFY THE COMPRESSOR.
- TURN OFF THE POWER SWITCH WHEN THE COMPRESSOR IS NOT USED.
- DO NOT DIRECT AIR STREAM AT BODY.
- DRAIN TANK.
- DO NOT STOP COMPRESSOR BY PULLING OUT THE PLUG.
- MAKE SURE THE COMPRESSOR OUTLET PRESSURE IS SET LOWER THAN THE MAXIMUM OPERATING PRESSURE OF THE TOOL.
- p39. S THE SAFETY VALVE MUST WORK PROPERLY.
- USE OF THIS PRODUCT WILL EXPOSE YOU TO CHEMICALS KNOWN TO THE STATE OF CALIFORNIA.
- PROTECT MATERIAL LINES AND AIR LINES FROM DAMAGE OR PUNCTURE.
- CHECK HOSES FOR WEAK OR WORN CONDITION BEFORE EACH USE, MAKING CERTAIN ALL CONNECTIONS ARE SECURE.
- WARNING:
- REPLACEMENT PARTS
- ELECTRICAL SAFETY
- EXTENSION CORDS
- ELECTRICAL CONNECTION
- SPEED AND WIRING
- GROUNDING INSTRUCTIONS
- SAVE THESE INSTRUCTIONS AND MAKE THEM AVAILABLE TO OTHER USERS OF THIS TOOL!
- NAME OF PARTS
- KNOW YOUR AIR COMPRESSOR
- OIL-FREE UNIVERSAL MOTOR
- ON/OFF POWER SWITCH
- ELECTRIC MOTOR & AIR COMPRESSOR PUMP
- SAFETY VALVE
- DRAIN VALVE
- TANK PRESSURE GAUGE
- REGULATOR PRESSURE GAUGE
- PRESSURE REGULATOR KNOB
- AIR TANK
- QUICK COUPLER
- OVERLOAD PROTECTOR
- To reset the air compressor:
- DUTY CYCLE:
- ASSEMBLY
- UNPACKING
- PACKING LIST
- ATTACHING HOSE
- TRANSPORT
- OPERATION (CONTINUED)
- APPLICATIONS
- CAUTION:
- CHECKING THE SAFETY VALVE
- USING THE AIR COMPRESSOR
- DRAINING THE TANK
- To drain the tank: (Fig. 12)
- MAINTENANCE
- LUBRICATION
- SERVICE AND REPAIRS
- GENERAL MAINTENANCE
- TROUBLESHOOTING
- INFORMATIONS IMPORTANTES
- PRÉCAUTION :
- PRECAUCIÓN:
- d! PRECAUCIÓN:
- Koki Holdings America Ltd.
- Koki Holdings America Ltd. Canadian Branch
Brand : HiKOKI
Model : EC1315S
Category : Compressor