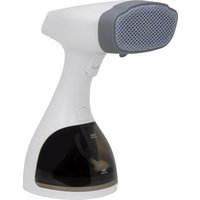
GST 47574 - Steam cleaner KALORIK - Free user manual and instructions
Find the device manual for free GST 47574 KALORIK in PDF.


| Product type | Handheld garment steamer / Steam cleaner |
| Brand | Kalorik |
| Model | GST 47574 |
| Power supply | Mains 120 V ~ 60 Hz (polarized plug) |
| Power | Approximately 1500 W |
| Water tank capacity | Approx. 200 ml (MIN and MAX marks) |
| Body material | Heat-resistant plastic |
| Heat-up time | Approximately 30 to 45 seconds |
| Steam settings | 2 levels: low steam and high steam |
| Continuous steam function | Yes (trigger with lock) |
| Included accessories | Fabric brush, steam bonnet |
| Usage | Vertical only (do not use horizontally) |
| Maintenance | Descale with white vinegar; clean with a damp cloth |
| Safety | Manual stop via button; do not direct at people or animals |
| Cord length | Approximately 2.5 m |
| Weight | Approximately 0.9 kg |
| Dimensions (L x W x H) | Approximately 30 x 10 x 20 cm |
| Warranty | 1 year (USA and Canada) |
| Spare parts / Repairability | Removable water tank; repair by authorized center |
Frequently Asked Questions - GST 47574 KALORIK
User questions about GST 47574 KALORIK
0 question about this device. Answer the ones you know or ask your own.
Ask a new question about this device
Download the instructions for your Steam cleaner in PDF format for free! Find your manual GST 47574 - KALORIK and take your electronic device back in hand. On this page are published all the documents necessary for the use of your device. GST 47574 by KALORIK.
USER MANUAL GST 47574 KALORIK
natural_image
White and black hair dryer with mesh grille and 'MAX' label (no visible text or symbols on device body)EN......3
FR......13
PARTS DESCRIPTION / DESCRIPTION DES ÉLÉMENTS
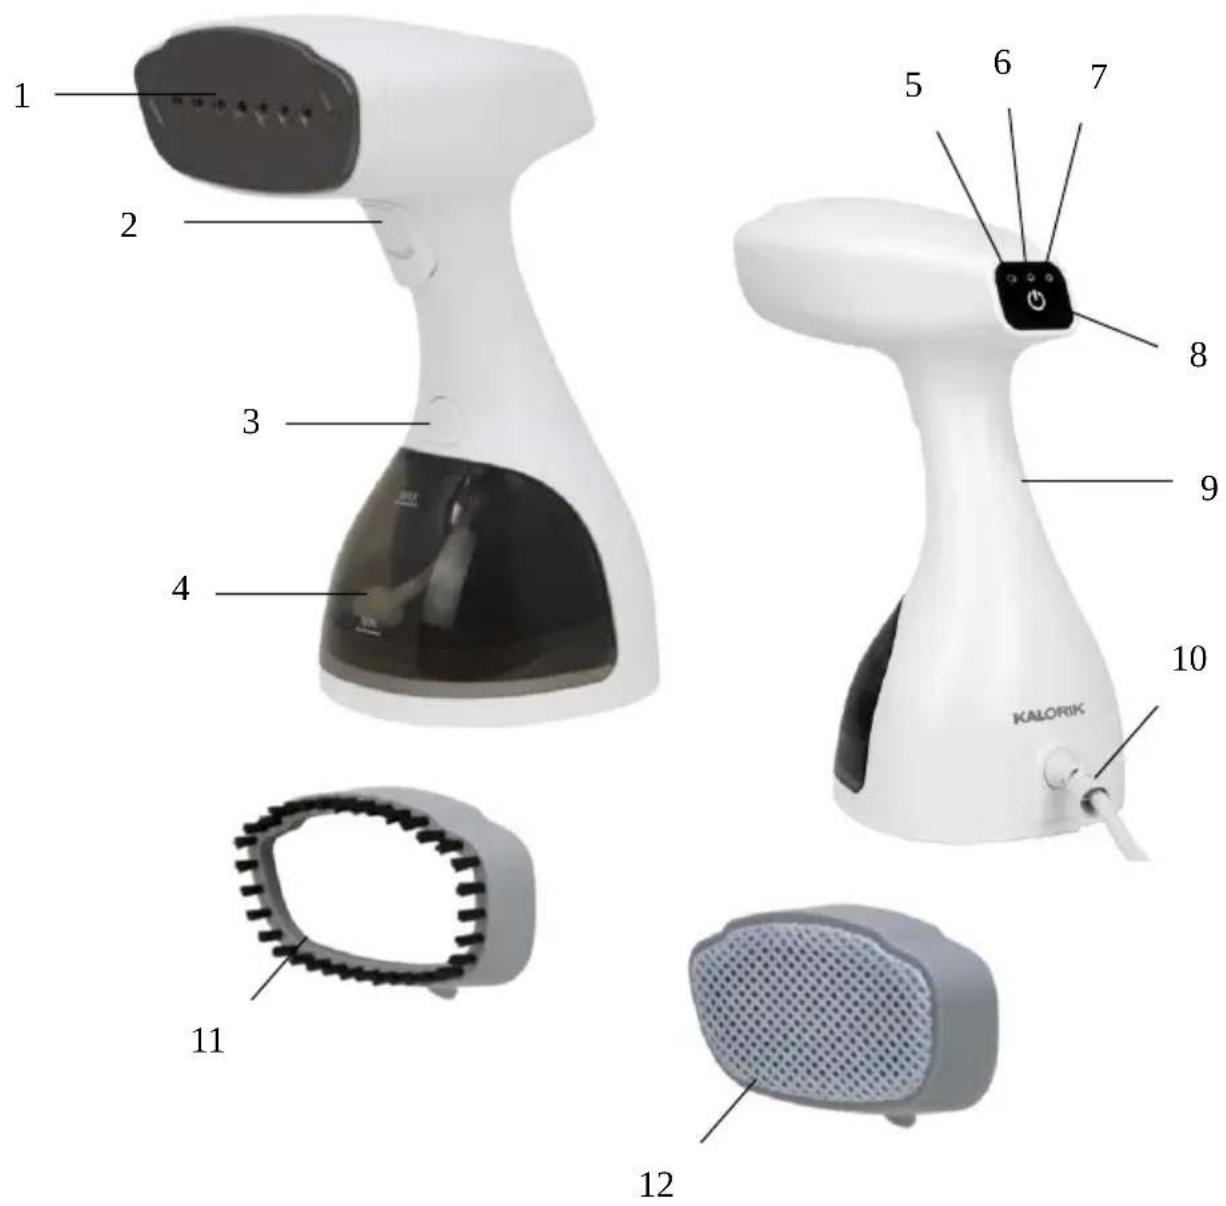
ENGLISH :
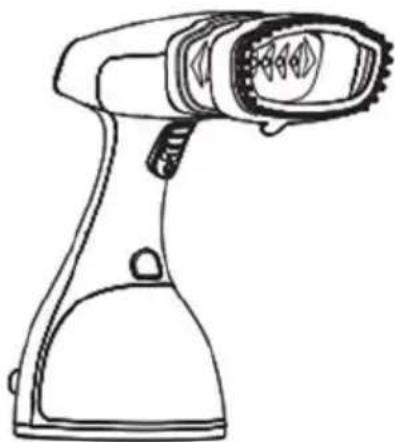
- Ironing head
- Steam switch with lock function
-
Water tank release button
-
Removable water tank
- Power indicator light
-
Low steam level indicator light
-
High steam level indicator
- On/off button
-
Handle
-
Cord protector
- Fabric brush
- Steam bonnet
FRANÇAIS :
WARNING: To reduce the risk of fire, electric shock or injury, when using your appliance, basic safety precautions should always be followed, including the following:
- Read all instructions before use.
- Use appliance only for its intended use.
- To reduce the risk of electrical shock, do not immerse the appliance in water or other liquids. Do not rinse this appliance under tap water.
- Never yank cord to disconnect from outlet; instead, grasp plug and pull to disconnect.
- Do not allow cord to touch hot surfaces. Let appliance cool completely before putting away. Loop cord loosely around appliance when storing.
-
To reduce the risk of contact with hot water emitting from steam vents, check appliance before each use by holding it away from body and operating steam button.
-
Always disconnect appliance from electrical outlet when filling with water or emptying, and when not in use. If object falls into water or comes into outside contact with water, always unplug before trying to remove it from water.
- Do not operate appliance with a damaged cord, or if the appliance itself has been dropped or damaged. To reduce the risk of electric shock, do not disassemble or attempt to repair the appliance, take it to a qualified service person for examination and repair. Incorrect reassembly or repair could cause a risk of fire, electric shock, or injury to persons when the appliance is used.
- Close supervision is necessary for any appliance being used by or near children. Do not leave appliance unattended while connected.
- Burns could occur from touching hot metal or plastic parts, hot water, or steam. Use care when you turn a steam appliance upside down – there may be hot water in the reservoir.
- To reduce the likelihood of circuit overload, do not operate another high wattage appliance on the same circuit at the same time.
- If an extension cord is absolutely necessary, a 10 ampere rated cord should be used. Cords rated for less amperage may overheat and eventually lead to a fire. Care should be taken to arrange the cord so that the cord cannot be pulled or tripped over.
- To reduce the risk of electric shock, this appliance has a polarized plug (one blade is wider than the other). This plug will fit in a polarized outlet only one way. If the plug does not fit fully in the outlet, reverse the plug. If it still does not fit, contact a qualified electrician to install the proper outlet. Do not modify the plug in any way.
- Do not alter the plug or its cord in any way. Avoid tight coiling, twisting, or bundling of the cord. Do not expose power cord to high temperatures or place under heavy objects. Do not use the power cord to hang heavy objects, as this may cause fire or electric shock.
- Do not touch hot objects such as steam head during use to avoid scalding. Do not point the appliance towards people or pets while turned on, as this may cause injury.
-
Do not use it outdoors or use it for purposes that are beyond its functional range.
-
Pay close attention to the appliance while in use. Water tank must be filled and secured in its place before use. Pay attention to the water level when using and avoid going below "MIN" level.
-
Only remove detachable water tank when appliance is turned off and unplugged. Only turn garment steamer on if water tank is filled to at least its minimum water level.
-
Do not add any cleaning agent to the water tank to avoid machine malfunction. Do not add essential oils or anything other than water into the tank. Do not fill tank above its MAX level. Use distilled water for best results.
-
Keep appliance away from direct sunlight or highly moist environments.
SAVE THESE INSTRUCTIONS HOUSEHOLD USE ONLY
BEFORE THE FIRST USE
Pour water into water tank
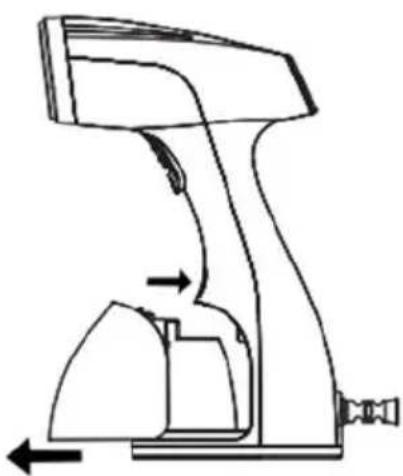
Press down on the water tank button to remove the tank from the main body. Pull the stopper and pour water into tank. Be careful not to fill past the top water line (MAX). See pictures below for reference.
natural_image
Line drawing of a mechanical device with directional arrows indicating movement or force (no text or symbols)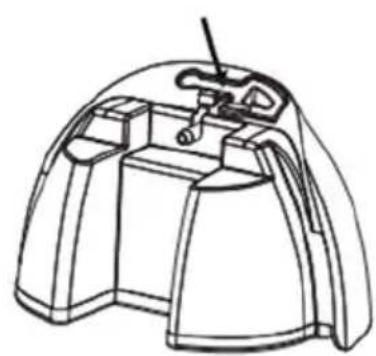
natural_image
Line drawing of a mechanical component with a handle and base (no text or symbols)Installing attachments
If you wish to install the fabric brush or steam bonnet attachments, hold the handle and use the other hand to clip on the fabric brush or steam bonnet onto the ironing head. See picture below for reference.
NOTE: The fabric brush is used to brush out wrinkles and dust while the steam bonnet filters water from impurities and for added drip protection.
natural_image
Line drawing of a handheld electric shaver with handle and base (no text or symbols)USE
• After adding water, plug the appliance in.
- Press the power button. The red standby light will start to blink. Wait for about 30 seconds for the standby light to stop blinking. This indicates the preheating is finished and the machine is ready to use.
- Hang the clothes that you wish to steam in an area that will not be impacted by the heat and steam, such as on a shower rod. Try to straighten the clothes as much as possible. Press on power button to select desired steam flow, once for low or twice for high. Press the steam switch to start steaming, and click down if you wish to have a continuous steam flow.
- Aim the head toward the clothes. Holding the steamer approximately 1 inch from the fabric, move in a slow, continuous
motion down, going over the same general area until wrinkles are eliminated.
NOTE:
- When the steam switch is pressed once and clicked down, the product will emit a continuous steam flow. When the steam switch is pressed again, the appliance will stop emitting steam.
- If the steamer runs out of water while operating, turn the appliance off immediately. Do not operate without water. If you are not done steaming, simply refill water tank and resume with steaming.
CAUTION:
- Never steam clothes while wearing them. Always remove and hang clothes before steaming.
- Never use the steamer horizontally or steam on horizontal surfaces. This product is intended for vertical steaming.
- Never aim the steamer head at a person or animal to avoid high temperature scalding. Be careful with hands while steaming as you may accidentally burn yourself with the steamer.
- When using the garment steamer, the ironing steam head will become HOT. Do not touch directly to avoid scalding or burns.
When finished steaming, press the power button for 2 seconds. The power indicator light should turn off. Unplug the appliance and allow to cool off. Store in a dry place, out of reach from children.
CLEANING AND MAINTENANCE
- Machine body cleaning: Unplug the steamer. Wipe the body with a soft damp cloth after the main unit has cooled down.
- Pour distilled or clean water into the tank. Shake the water tank to clean the inner wall, then pour the water out. Repeat if needed.
- When the steam output hole is blocked, a toothpick can be used to remove buildup. You can also use distilled white vinegar, which will
kill bacteria in the water tank. Simply fill the tank to “MAX” level with vinegar, turn on the machine and allow it to heat up. “Steam” out the vinegar into a kitchen sink until the level reaches “MIN”.
Remove the vinegar and rinse out with water 2-3 times, until there is not trace of the vinegar left. Repeat the same process with distilled water.
- When storing, place the garment steamer in a dry, dust-free environment. Ensure that the tank is completely dry when storing to avoid mildew.
NOTE:
- Do not soak in water to clean this product, otherwise it may cause electric shock and unit to short circuit.
- Do not use strong alkali or strong acid to avoid damaging the unit or causing discoloration of the unit.
- Please unplug the steamer and cool the main unit before carrying out maintenance work. Failure to do so may cause danger of electric shock or scalding.
If additional assistance is needed, please contact our Customer Assistance at 1-888-525-6745.
TROUBLESHOOTING
| Issue | Reason | Solution |
| Steamer does not produce steam | Water tank does not have water | Add water to water tank |
| The water level is too low | Add water to water tank (above MIN level) | |
| The water tank is not properly installed | Ensure water tank is clicked into place before steaming. | |
| The product is not fully heated | Let the unit heat for about 45 seconds; when the product indicator light is steady, the steamer is ready for use | |
| The steam switch was not fully pressed | Ensure the steam switch is clicked into place. | |
| Water is dripping from the steamer head | The steamer is not fully heated | Let the unit heat for about 45 seconds; when the indicator light is steady, the steamer is ready for use. |
| The steamer emits vibration and pumping sounds | Water is pumped to the steam head to create steam | This is totally normal! As long as there is water in the tank, you shouldn't worry. Refill the tank if it the water level has fallen below minimum level. |
| The steamer is not heating up. | The power cord is not plugged in | Check that the power cord plug is properly plugged into the power outlet and that the power outlet is working properly. |
| The power button is not turned on. | Turn on steamer by pressing the power button. |
Steaming Tips and Tricks
- Why steam? Because it helps clear your clothes of bacteria between washes while also keeping them wrinkle-free! This means that clothes that cannot be washed as often or are “dry-clean only” can still be maintained without risking them getting damaged in the wash. Using distilled water is your best bet for keeping clothes clean* and garments wrinkle free.
- What should you steam? Best items to steam range from wrinkled shirts to wool and wool-like fabrics, silk and silk-like fabrics, and other delicate fabrics. Avoid steaming suede, leather, plastic or
completely synthetic fabrics as they may melt from the heat of the steamer.
- How do you steam? Always hang fabrics and garments about to be steamed. When steaming, pull slightly on fabric until it is slightly taught and steam from the top down, with about an inch of distance from the fabric. Really wrinkly clothes can be steamed from the inside out to facilitate the process. Use short, slow movements to allow the steam to do its magic.
- What should you use to steam? We recommend distilled water, as it prevents the opportunity for mineral buildup that may occur when using tap water. For tips on how to avoid this, or cleaning your steamer should this happen, go to the “Care and maintenance” section
- We suggest using a hanger that won't risk rusting- something made of heat-resistant plastic or another rust-free metal hanger.
- Use gloves for added protection while steaming.
- Adjust steam flow based on need—use a lighter steam flow for more delicate items, and a heavier steam flow for thicker fabrics.
NOTE: Using a garment steamer does not replace cleaning or dry-cleaning your garments. It does help maintain more delicate clothes between washes.
We suggest that you complete and return the enclosed Product Registration Card promptly to facilitate verification of the date of original purchase. However, return of the Product Registration Card is not a condition of these warranties. You can also fill out this warranty card online, at the following address: www.KALORIK.com
This KALORIK product is warranted in the U.S.A. and in Canada for 1 year from the date of purchase against defects in material and workmanship. This warranty is not transferable. Keep the original sales receipt. Proof of purchase is required to obtain warranty performance.
During this period, if the KALORIK product, upon inspection by KALORIK, is proven defective, it will be repaired or replaced, at Kalorik's option, without charge to the customer. If a replacement product is sent, it will carry the remaining warranty of the original product.
This warranty does not apply to any defect arising from a buyer's or user's misuse of the product, negligence, failure to follow KALORIK instructions noted in the user's manual, use on current or voltage other than that stamped on the product, wear and tear, alteration or repair not authorized by KALORIK, or use for commercial purposes. There is no warranty for glass parts, glass containers, filter basket, blades and agitators, and accessories in general. There is also no warranty for parts lost by the user.
ANY WARRANTY OF MERCHANTABILITY OR FITNESS WITH RESPECT TO THIS PRODUCT IS ALSO LIMITED TO THE ONE YEAR LIMITED WARRANTY PERIOD.
Some states do not allow limitation on how long an implied warranty lasts or do not allow the exclusion of incidental or consequential damages, so the above limitations may not apply to you. This warranty gives you specific legal rights, and you may also have other rights which vary from state to state.
If the appliance should become defective within the warranty period and more than 30 days after date of purchase, do not return the appliance to the store: often, our Customer Service Representatives can help solve the problem without having the product serviced. If
servicing is needed, a Representative can confirm whether the product is under warranty and direct you to the nearest service location.
If this is the case, bring the product, or send it, postage prepaid by the user (all Kalorik customers are responsible for the initial shipment back to the warranty center), along with proof of purchase and a return authorization number indicated on the outer package, given by our Customer Service Representatives. Send to the authorized KALORIK Service Center (please visit our website at www.KALORIK.com or call our Customer Service Department for the address of our authorized KALORIK Service Center).
When sending the product, please include a letter explaining the nature of the claimed defect.
If you have additional questions, please call our Customer Service Department (please see below for complete contact information), Monday through Thursday from 9:00am - 5:00pm (EST) and Friday from 9:00am - 4:00pm (EST). Please note hours are subject to change.
If you would like to write, please send your letter to:
KALORIK Customer Service Department
Team International Group of America Inc.
16175 NW 49th Avenue
Miami Gardens, FL 33014 USA
Or call:
Toll Free: +1 888-521-TEAM / +1 888-KALORIK
Only letters can be accepted at this address above. Shipments and packages that do not have a return authorization number will be refused.
natural_image
Line drawing of a handheld device with directional arrows indicating movement or force (no text or symbols)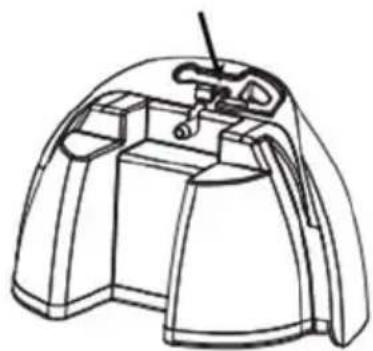
natural_image
Technical line drawing of a mechanical component with no visible text or symbolsnatural_image
Line drawing of a portable electric shaver with handle and spout (no text or symbols)UTILISATION
Team International Group of America Inc.
16175 NW 49th Avenue
Miami Gardens, FL 33014 USA
For questions please contact:
Team International Group of America Inc.
16175 NW 49th Avenue
Miami Gardens, FL 33014 USA
User manual content and recipes courtesy of Team International Group – Do not reproduce without consent of the authors - All rights reserved.
Brand : KALORIK
Model : GST 47574
Category : Steam cleaner