STP 30138 - Steam cleaner KALORIK - Free user manual and instructions
Find the device manual for free STP 30138 KALORIK in PDF.



| Product type | Steam iron press |
| Brand | Kalorik |
| Model | STP 30138 |
| Power supply | 120 V ~ 60 Hz (estimate for US market) |
| Power | Not specified in the manual |
| Water tank capacity | Approximately 300 ml (estimate) |
| Maximum temperature | 200 °C / 390 °F (for linen) |
| Heating time | A few minutes (not specified) |
| Main functions | Steam ironing, steam jet, temperature adjustment by fabric type (nylon, silk, wool, cotton, linen), auto shut-off, integrated sprayer, ironing cushion for delicate areas |
| Control type | Electronic with temperature display and fabric selector |
| Handle | With two steam jet buttons (for right-handed and left-handed) |
| Indicator lights | On (red), temperature, steam ready |
| Safety | Auto shut-off if press lowered >10 s or open >15 min, transport lock, grounding |
| Maintenance and cleaning | Cleaning the soleplate by steam jet on cushion covered with a towel; board cover washable with water and mild detergent |
| Spare parts | Not specified; contact after-sales service |
| Warranty | 1 year (USA), against material and manufacturing defects |
| Usage | Household use only |
| Included accessories | Ironing cushion, sprayer, ironing board with removable cover |
Frequently Asked Questions - STP 30138 KALORIK
User questions about STP 30138 KALORIK
0 question about this device. Answer the ones you know or ask your own.
Ask a new question about this device
Download the instructions for your Steam cleaner in PDF format for free! Find your manual STP 30138 - KALORIK and take your electronic device back in hand. On this page are published all the documents necessary for the use of your device. STP 30138 by KALORIK.
USER MANUAL STP 30138 KALORIK
When using electrical appliances, basic safety precautions should always be followed, including the following:
1. READ ALL INSTRUCTIONS
-
Use the appliance only for the purpose for which it is intended.
-
Check that your mains voltage corresponds to that stated on the appliance.
-
To protect against electrical shock do not immerse cord, plugs, or appliance in water or other liquid.
-
The power switch must always be put in the "OFF" position before plugging or unplugging from the outlet. Never yank the cord to disconnect form the outlet; instead, grasp the plug and pull to disconnect.
-
Do not allow the cord to touch the hot surfaces. Let the appliance cool down completely (for about 30 minutes) before moving it or putting it away.
-
Always disconnect the appliance from the electrical outlet when filling with water or emptying; and when not in use. Be careful to avoid spilling water on the appliance when filling.
-
Do not operate the appliance with a damaged cord or plug or after the appliance has been dropped or damaged in any manner. To avoid the risk of electric shock, do not disassemble the appliance; take it to a qualified service center for examination and repair. Incorrect reassembly can cause a risk of electric shock when the appliance is used.
-
If the appliance is not operating normally, disconnect from the power supply and have the appliance serviced by an authorized service center.
-
Close supervision is necessary when the appliance is used by or near children. Young children should be supervised to ensure that they DO NOT play with the appliance.
-
Please keep out of reach of children and pets. This product is not intended for use by children, by persons with reduced physical, sensory or mental capabilities, or lacking experience or knowledge, unless they have been given supervision or instruction concerning the use of the product, by a person responsible for

their safety. Extra caution is always necessary when using this product.
- Burns can occur from touching hot metal parts, hot water or steam. The pressing plate and metal parts can become very hot when the steam press is in operation. For this reason, to avoid burns, keep your hands away from these hot surfaces, and be careful when using the steam shot function.
- Do not touch hot surfaces. Use handle and knobs.
- Do not let the cord hang over the edge of counters.
- Always put the appliance in a secure, stable place, on a table or counter when using.
- Do not move the appliance without unplugging it first.
- Use distilled water in the appliance. Do not use perfumes or products containing alcohol in the appliance as they would damage the steam press.
- This appliance must be grounded. Do not alter the plug or attempt to defeat this feature.
SPECIAL INSTRUCTIONS: to avoid a circuit overload, do not operate another high wattage appliance on the same circuit.
SAVE THESE INSTRUCTIONS HOUSEHOLD USE ONLY
3-PRONG PLUG INSTRUCTIONS
For your personal safety, this appliance must be grounded. This appliance is equipped with a power supply cord having a 3-prong grounding plug. To minimize possible shock hazard, the cord must be plugged into a mating 3-prong, grounding type, wall socket, grounded in accordance with the National Electrical Code ANSI/NFPA 70 latest edition and all local codes and ordinances. If a mating wall receptacle is not available, it is the personal responsibility and obligation of the customer to have a properly grounded, 3-prong, wall receptacle installed by a qualified electrician.
SHORT CORD INSTRUCTIONS
A short power supply cord is provided to reduce the hazards resulting from becoming entangled in, or tripping over a longer cord. Extension cords may be used if care is exercised in their use.
- The extension cord should be a grounding type 3-wire cord.
- The electrical rating of the extension cord should be at least that of the appliance. If the electrical rating of the extension cord is too low, it could overheat and burn.
- The resulting extended cord should be arranged so that it will not drape over the counter top or tabletop where it can be pulled on by children or tripped over.
PART DESCRIPTION
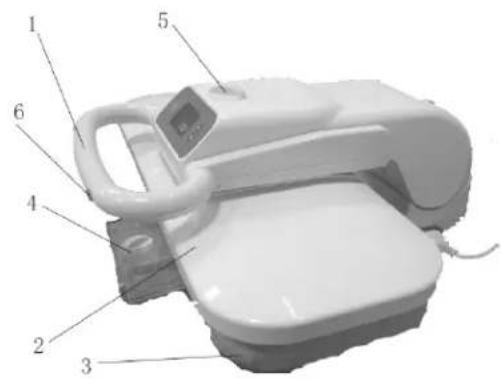
- Handle
- Pressing plate
- Ironing board with cover
- Water tank
- Locking knob
- Burst of steam buttons (for left and right handed people)
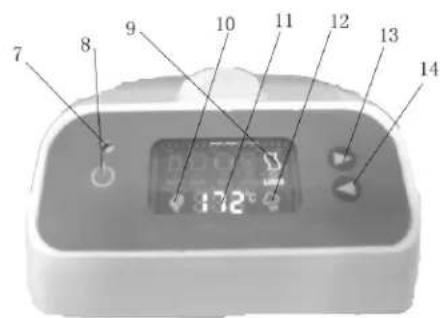
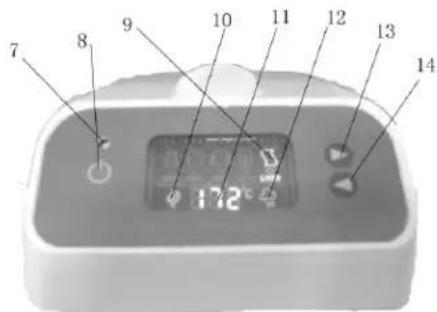
- Power light (red)
-
ON/OFF switch
-
Temperature / fabric setting indicator
- Heat indicator light (green)
- Temperature display (°F only)
- Steam ready light (blue)
- Temperature / fabric selection (+)
- Temperature / fabric selection (-)
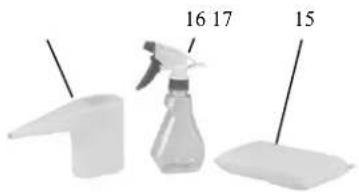
- Pressing cushion
- Spray bottle
- Water beaker
BEFORE USE
Set the appliance on a sturdy work surface. Unlock the locking knob.
FILLING THE WATER TANK
Use preferably demineralized water. If you want to use the steam function fill the water tank as follows:
1) Unplug the steam press from the outlet and make sure it is cool. If not, let it cool down.
2) The pressing plate (2) must be lifted to the raised (up) position.
3) Slide the water tank towards the front of the unit. It will not come completely out so do not force it to do so. Remove the lid of the water tank (4) by a counter-clockwise turning motion. Using the water beaker (17), slowly pour the distilled water into the water tank. Never overfill the water tank. The water level can be seen through the front of the tank.
4) Be careful to avoid spilling water onto the steam press when filling.
5) Put the lid back in place using a clockwise turning motion.
6) Slide the water tank back in.
Note: When pressing, unplug the appliance before refilling.
OPERATING INSTRUCTIONS
- Make sure the locking knob (5) is in the open position (UNLOCK) allowing free movement of the pressing plate before plugging in the appliance.
- Lift the pressing plate (2) to the fully raised (up) position.
- Plug the appliance into an electric outlet. The red power light (7) should be blinking.
- Press the "ON/OFF" button (8) and the red power light (7) will stay on.
TEMPERATURE SETTINGS
- You can choose the temperature setting according to the cloth you are pressing (see table below).
- Press the arrow buttons (13) (14) to choose the kind of fabric you wish to press. Press “>” (13) to move selection to a higher temperature setting and press “<” (14) to move selection to a lower temperature setting. If in doubt, please check the garment label.
• The Heat Indicator light (10) will start flashing. - When the Heat Indicator light goes off, the pressing plate has reached the temperature for the desired setting.
- When changing the setting from a higher selection to a lower setting, allow several minutes after making the change, for the pressing plate to cool down sufficiently, before continuing use.
| Kind of textile Temperature* Steam | ||
| Nylon | 50-80°C / 120-175°F | NO |
| Silk | 80-110°C / 175-230°F | NO |
| Wool | 110-140°C / 230-285°F | NO |
| Cotton | 140-170°C / 285-340°F | YES |
| Linen | 170-200°C / 340-390°F | YES |
* For reference only
NOTE: You may find it more efficient to arrange your fabrics from those requiring the lowest setting to those requiring the highest setting and proceed accordingly. This will avoid any unnecessary delay or wait for the pressing plate to cool.
NOTE: the temperature display will only display temperatures in Fahrenheit degrees (°F).
STEAM CONTROL
- Steam is produced only when the blue steam ready light (12) is on (the press needs to reach a temperature of 150° C / 300°F), meaning at the higher temperature settings (Cotton and Linen).
- If this is the first time you are using the steam press or you have been storing it for some time, lift the pressing plate (2) into the raised position and press the burst of steam button several times until the steam begins to flow.
- The burst of steam function shall only be used when the steam ready light is on and with the steam press in a slightly opened

position. Do NOT use the burn of steam function when the steam press is closed, or you may damage the unit.
- Do not press the burst of steam button (6) for more than 5 seconds or water may drip on your garment.
- The handle (1) is equipped with 2 steam burst buttons (6), in order for the press to be used easily by right-handed or left-handed people.
PRESSING
- Make sure the locking knob (5) is in the open position (UNLOCK).
- Lift the handle (1). The pressing plate (2) moves to the up position.
- Carefully arrange the garment to be pressed onto the ironing board (3).
Note: Avoid contact with the hot plate at any time!
- Grasp the handle of the pressing plate (2) and lower it onto the ironing board (3), capturing the garment between the two halves of the steam press.
- For lightly creased garments, simply lowering the handle and allowing the pressing plate to rest on the ironing board for a few seconds will be sufficient. Return then to the open position.
- For very creased garments, continue to grasp the handle and push it downwards completely, until the pressing plate is pushed to its lowest position. Then open the press.
- If the temperature is set high enough you may give the fabric a burst of steam by pressing the burst of steam button (6) to remove stubborn wrinkles.
Caution: For bursts of steam, lower the pressing plate until it is about two inches from the garment, not completely down! Press the burst of steam button for about 3-5 seconds. After releasing the burst of steam button you may fully lower the pressing plate.
Note: Do not press the burst of steam button when the pressing plate is in its lowest (closed) position.
- After a few seconds, lift the handle and bring the pressing plate back to the raised position.
USING THE SPRAY BOTTLE
Lightly spray the garment with the spray bottle (16) before placing it on the ironing board. This helps to distribute an even, fine mist over the fabric, preparing it to be pressed, and removing all wrinkles.
USING THE PRESSING CUSHION
Some garments have been constructed with details, such as darts, curved seams and shoulder pads, which are not intended to be pressed flat. A pressing cushion is supplied with your steam press for use with these areas.
- Use the cushion (15) whenever pressing areas where no creases are desired or to shape tailored garments.
- Place the area to be pressed onto the ironing board.
- Place the pressing cushion under the dart, seam etc.
- Make sure the area to be pressed is raised and lower the pressing plate. The raised area is the only area the plate should contact.
NOTE: Do not attempt to lower the pressing plate to its lowest position or lock the pressing plate against the ironing board with the pressing cushion in place. You MAY DAMAGE the steam press by doing so.
- Raise the pressing plate after a few seconds.
FINISHING PRESSING / STORAGE
- Water may be left in the water tank, because it will not drip out if the machine is stored in an upright position. However, it is very recommended that if the machine will be stored for some time, that all the water in the unit should be drained by pressing the burst of steam button until all of the water is pumped out.
- Press the "ON/OFF" button, the red power light will start blinking. Disconnect the plug from the wall outlet. Leave the appliance in open position.
- Wait for the steam press to cool completely (approximately 30 minutes).
- When cool, lower the pressing plate onto the ironing board pushing the handle to its lowest position.
- Turn the locking knob to the "Lock" position. This should prevent the steam press from opening while being moved or stored.
- Loosely wrap the electric cord and place it in the opening at the front of the base of the ironing board. You can also disconnect the power cord from the unit.
• Emptying the water tank after each use is preferable if possible.
CLEANING
- To clean the pressing plate, place the pressing cushion in the center of the ironing board. Place a clean towel over the pressing cushion and the ironing board. Set the temperature control to its maximum setting. When the ready light comes on and the steam ready light goes off, gently lower the pressing plate onto the pressing cushion. With water in the water tank, press the burst of steam button 6 to 7 times. Be careful to avoid touching the hot metal surfaces or leaving your hand in the way of steam.
- Once the pressing plate has cooled down you can clean the surface with a damp cloth. DO NOT use any abrasive material or cleaner on the pressing plate! This pressing plate has a non-stick coating that will help for cleaning.
- The ironing board cover is removable for normal washing. You can clean the ironing board cover with water and mild detergent; rinse with warm water.
SAFETY FEATURES (AUTO SHUT-OFF)
The multiple safety features of this appliance turn off electric power to the heater when the pressing plate has been left against the ironing board for about 10 seconds. You will hear a warning beep and the red power indicator (7) will start flashing. If the pressing plate (2) is left in the open (up) position without use after approximately 15 minutes, the unit will also be automatically shut-off.
In either case, to restart the unit, you have to press the "ON/OFF" button (8) again.
TROUBLESHOOTING
| PROBLEM CAUSE SOLUTION | ||
| Steam press cannot be opened with the handle | Locking knob is in locked position | Turn the locking knob to the unlocked position |
| Steam press becomes warm but DOES NOT remove wrinkles. | Temperature setting is not high enough for the fabric; the piece of garment is too dry. | Gradually increase the temperature until obtaining the desired results; spray water over the piece of garment. |
| Press DOES NOT get warm. | Temperature has not been selected | Make a proper fabric selection. |
| Press is not plugged into an outlet. | Plug the appliance in. | |
| Automatic Shut-Off is engaged. The pressing plate has been left open for more than 15 minutes (or closed for more than 10 seconds) | Press “ON/OFF” again. | |
| No Steam | Water Level is too low. | Fill the water tank. |
| Temperature is set too low. | If suitable for the fabric, make a selection to a higher temperature. Wait for the steam ready light to come on. If not, use spray bottle as directed. | |
| Water drips from the pressing plate. | Burst of steam button has been pressed too long. | Do not press the burst of steam button for more than 5 seconds continuously. |
| The handle will not move into the automatic maximum pressure position (handle completely down). | Item on the ironing board is too thick | Keep one hand on handle and exert light pressure on thicker items. Burst more steam for wrinkles. |
WARRANTY
We suggest that you complete and return the enclosed Product Registration Card promptly to facilitate verification of the date of original purchase. However, return of the Product Registration Card is not a condition of these warranties. You can also fill out this warranty card online, at the following address: www.KALORIK.com
This KALORIK product is warranted in the U.S.A. for 1 year from the date of purchase against defects in material and workmanship. This warranty is not transferable. Keep the original sales receipt. Proof of purchase is required to obtain warranty performance.
During this period, if the KALORIK product, upon inspection by KALORIK, is proven defective, it will be repaired or replaced, at Kalorik's option, without charge to the customer. If a replacement product is sent, it will carry the remaining warranty of the original product.
This warranty does not apply to any defect arising from a buyer's or user's misuse of the product, negligence, failure to follow KALORIK instructions noted in the user's manual, use on current or voltage other than that stamped on the product, wear and tear, alteration or repair not authorized by KALORIK, or use for commercial purposes. There is no warranty for glass parts, glass containers, filter basket, blades and agitators, and accessories in general. There is also no warranty for parts lost by the user.
ANY WARRANTY OF MERCHANTABILITY OR FITNESS WITH RESPECT TO THIS PRODUCT IS ALSO LIMITED TO THE ONE YEAR LIMITED WARRANTY PERIOD.
Some states do not allow limitation on how long an implied warranty lasts or do not allow the exclusion of incidental or consequential damages, so the above limitations may not apply to you. This warranty gives you specific legal rights, and you may also have other rights which vary from state to state.
If the appliance should become defective within the warranty period and more than 30 days after date of purchase, do not return the appliance to the store: often, our Customer Service Representatives can help solve the problem without having the product serviced. If servicing is needed, a Representative can confirm whether the product is under warranty and direct you to the nearest service location.
If this is the case, bring the product, or send it, postage prepaid by the user (all Kalorik customers are responsible for the initial shipment back to the warranty center), along with proof of purchase and a return authorization number indicated on the outer package, given by our Customer Service Representatives. Send to the authorized KALORIK Service Center (please visit our website at www.KALORIK.com or call our Customer Service Department for the address of our authorized KALORIK Service Center). When sending the product, please include a letter explaining the nature of the claimed defect.
If you have additional questions, please call our Customer Service Department (please see below for complete contact information), Monday through Thursday from 9:00am - 5:00pm (EST) and Friday from 9:00am - 4:00pm (EST). Please note hours are subject to change.
If you would like to write, please send your letter to:
KALORIK Customer Service Department
Team International Group of America Inc.
1400 N.W 159th Street, Suite 102
Miami Gardens, FL 33169 USA
Or call:
Toll Free: +1 888-521-TEAM / +1 888-KALORIK
Only letters can be accepted at this address above. Shipments and packages that do not have a return authorization number will be refused.
12 STP 30138 - 120501

Team International Group of America Inc. 1400 N.W 159th Street, Suite 102 Miami Gardens, FL 33169 USA
O llame gratuitamente (U.S.A.) al +1 888-521-TEAM / +1 888-KALORIK
INSTRUCTIONS POUR LES FICHES AVEC MISE A LA TERRE
Team International Group of America Inc. 1400 N.W 159th Street, Suite 102 Miami Gardens, FL 33169 USA
- READ ALL INSTRUCTIONS
- SAVE THESE INSTRUCTIONS HOUSEHOLD USE ONLY
- 3-PRONG PLUG INSTRUCTIONS
- SHORT CORD INSTRUCTIONS
- BEFORE USE
- FILLING THE WATER TANK
- OPERATING INSTRUCTIONS
- TEMPERATURE SETTINGS
- FOR REFERENCE ONLY
- STEAM CONTROL
- PRESSING
- USING THE SPRAY BOTTLE
- USING THE PRESSING CUSHION
- FINISHING PRESSING / STORAGE
- CLEANING
- SAFETY FEATURES (AUTO SHUT-OFF)
- WARRANTY
- KALORIK CUSTOMER SERVICE DEPARTMENT
- INSTRUCTIONS POUR LES FICHES AVEC MISE A LA TERRE
Brand : KALORIK
Model : STP 30138
Category : Steam cleaner