RVC 47730 - Robot vacuum KALORIK - Free user manual and instructions
Find the device manual for free RVC 47730 KALORIK in PDF.

User questions about RVC 47730 KALORIK
0 question about this device. Answer the ones you know or ask your own.
Ask a new question about this device
Download the instructions for your Robot vacuum in PDF format for free! Find your manual RVC 47730 - KALORIK and take your electronic device back in hand. On this page are published all the documents necessary for the use of your device. RVC 47730 by KALORIK.
USER MANUAL RVC 47730 KALORIK
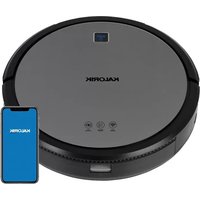
natural_image
Top-down view of a Kalorik robotic vacuum cleaner with blue control panel and 'AUTO' button (no readable text or symbols beyond branding)EN.....2
FR.....18
When using electrical appliances, basic safety precautions should always be followed, including the following:
-
Read all instructions before use.
-
This device can be used by children aged from 8 years and above and persons with reduced physical, sensory or mental capabilities or lack of experience and knowledge if they have been given supervision or instruction concerning use of this device in a safe way and understand the hazards involved.
-
Children should be supervised to ensure they do not play with this device.
-
Cleaning and maintenance shall not be performed by children without adult supervision.
-
This device is only to be used with the charging base and adaptor provided.
-
The battery must be removed from this device before this device is disposed of. Do not attempt to disassemble or replace the battery yourself as incorrect operation might cause overheating, fire or injury.
-
The Li-ion battery should be serviced or recycled by an authorized service provider, and must be recycled or disposed of separately from household waste. Dispose of the battery according to your local environmental laws and regulations.
-
The external cord of the charging base unit cannot be replaced; if the cord is damaged, the charging base shall be disposed of.
-
This device is for indoor use only.
-
This device is not a toy. Do not sit or stand on this device. Small children and pets should be supervised when this device is operating.
-
Store and operate this device in room temperature environments only.
-
Clean with a cloth dampened with water only.
-
Do not use this device to pick up anything that is burning or smoking.
-
Do not use this device to pick up spills of bleach, paint, chemicals, or anything wet.
-
Before using this device, pick up objects like clothing and loose paper. Lift up cords for blinds or curtains, and move power cords and fragile objects out of the way. If this device passes over a power cord and drags it, an object could be pulled off a table or shelf.
-
If the room to be cleaned has a balcony, a physical barrier should be used to prevent access to the balcony and to ensure safe operation.
-
Do not place anything on top of this device.
- Be aware that this device moves around on its own. Take care when walking in the area where this device is operating to avoid stepping on it.
- Do not operate this device in areas with exposed electrical outlets on the floor.
- Do not expose the electronics of this device, its battery, or the charging base. There are no user-serviceable parts inside.
- Do not use this device on an unfinished, unsealed, waxed or rough floor. It may result in damage to the floor and this device. Use only on hard floor surfaces or low-pile carpet.
- This device has been designed to be used on floors without scratching them. We still recommend that you test this device on a small area of the room to be cleaned to ensure no scratches are made before cleaning the whole room.
SAVE THESE INSTRUCTIONS HOUSEHOLD USE ONLY
KNOW YOUR IONIC PURE AIR SMART ROBOT VACUUM PRO
Tackle life's everyday messes without ever lifting a finger! This helpful little robot — and tidiest new member of your household — makes messes disappear before you even know they're there. The Kalorik Home Smart Robot Vacuum Pro cleans your house from the ground up, leaving not only your floors spotless, but the air in your home too! Ionic Pure Air technology harnesses the power of negative ions which magnetically attract airborne pollutants to remove them from the air you breathe. Advanced HEPA filtration provides added support for capturing dust and allergens. High-velocity suction and dual multi-surface rotation brushes loosen and lift dust, dirt, hair, and debris for pristine floors and carpets. Endurance cleaning with auto-return vacuums up to 90 minutes before automatically returning to the base to dock and recharge. The Kalorik Home Smart Robot Vacuum Pro keeps a low profile, both in its slim design and reduced noise emission. It swiftly cleans under low-hanging furniture, beds, sofas, and other hard-to-reach areas where dust hides. WiFi connectivity lets you easily start your
cleanings from your phone, or with voice control via Amazon Alexa or Google Assistant. Anti-collision sensors and gyroscopic mapping intelligently navigate your home, avoiding stairs, ledges and obstacles for a thorough, accurate clean. Cleaning modes include: Smart, Spiral, Wall Follow, Manual, and Return to Charging Base.
MAIN UNIT COMPONENTS
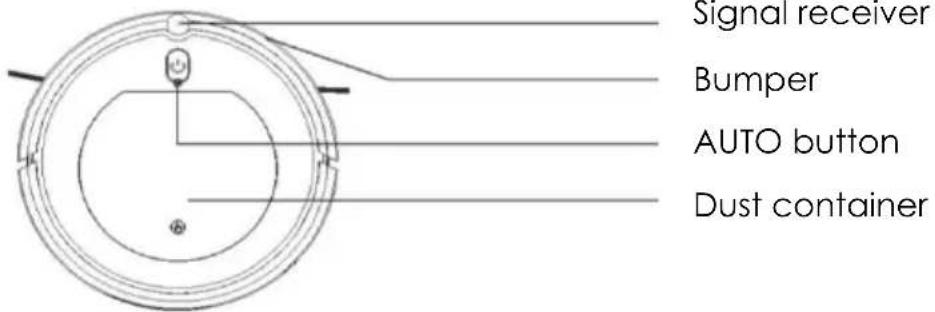
text_image
Signal receiver Bumper AUTO button Dust containerNOTE: The AUTO button is used to pause/restart the vacuuming process. It is also used to connect the robot vacuum to the KALORIK Home app.
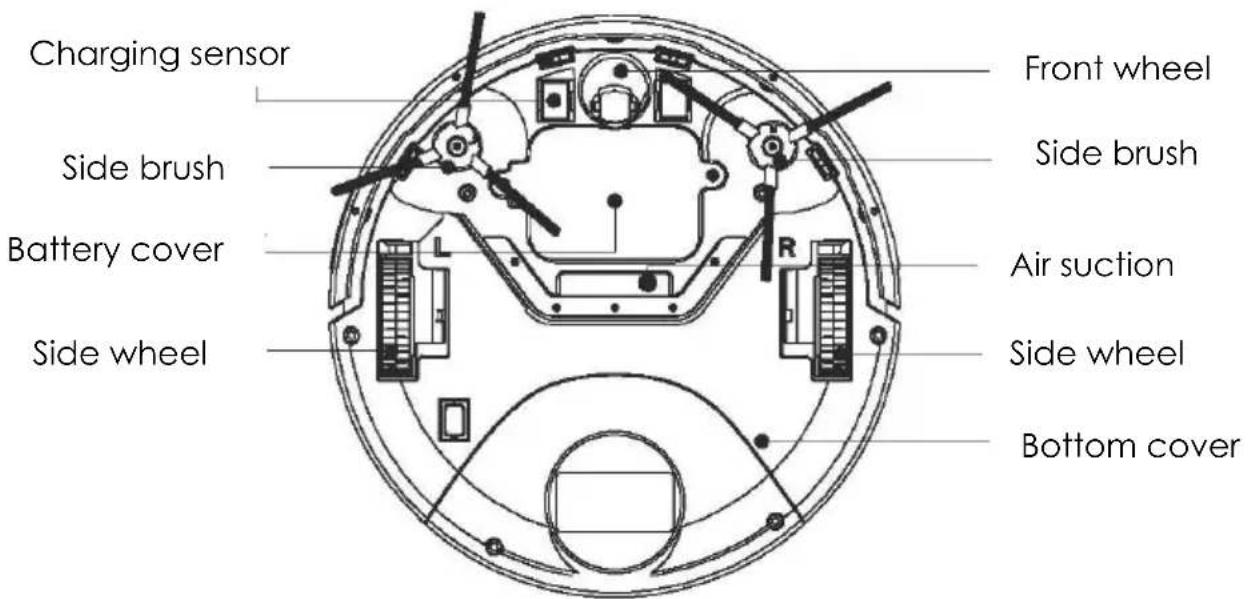
text_image
Charging sensor Side brush Battery cover Side wheel Front wheel Side brush Air suction Side wheel Bottom cover
Dust container cover
Dust container
Power adaptor socket
Dust container
Preliminary filter
HEPA filter
Filter support
Charging base
Adaptor
BEFORE THE FIRST USE
- Remove any power cords and small objects from the floor that may obstruct the vacuum. Fold any tasseled edges of area rugs underneath to prevent tangling when vacuuming.
- Avoid cleaning very dark-colored, high-pile rugs or rugs thicker than 1 in. / 26 mm, as they may cause the appliance to malfunction.
- Keep the vacuum away from spaces lower than 3 in. / 73 mm to prevent it from getting stuck. If necessary, place a physical barrier to block off the problem areas.
- Keep the vacuum away from wet areas.
- The vacuum may climb on top of objects less than 1 in. / 16 mm tall. Remove these objects if possible.
- Anti-drop sensors prevent the vacuum from tumbling down stairs and steep drops. They may work less effectively if dirty or used on reflective/very dark-colored floors. It is recommended to place physical barriers to block off areas where the vacuum may fall.
- Remove the foam blocks beside the bumper before use.
Note: Place physical barriers in front of fireplaces and areas that could damage the vacuum.
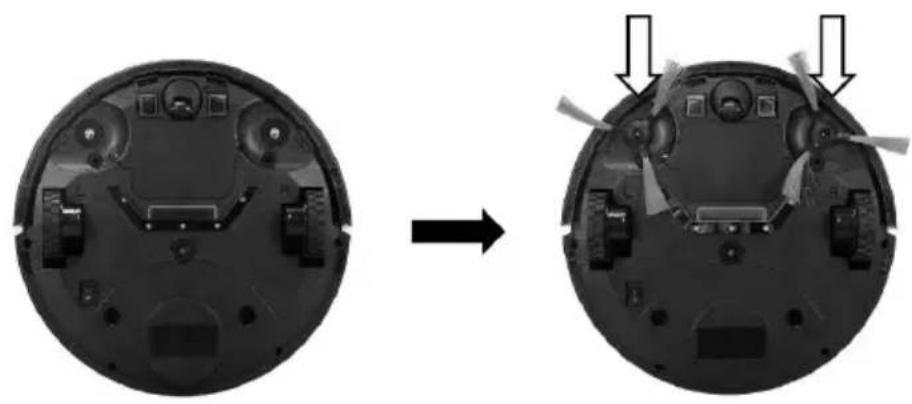
- Insert the side brushes into the vacuum. Please make sure the "L" and "R" signs on the side brushes correspond to the position "L" and "R" at the bottom of the machine respectively.
natural_image
Two views of a device showing internal components before and after assembly, with arrows indicating transformation (no text or symbols present)- Place the charging base on a hard, level surface and against a wall.
- Remove objects within 3 ft. / 1 m of the left and right side and within 6 ft. / 2 m of the front of the charging base.
- Connect the round connector of the adapter into the power socket on the charging base and the other end into a wall outlet.
- Press the AUTO button on top of the vacuum to turn the unit on. Alternatively, you can use the KALORIK Home app, Alexa or Google Home to turn on the vacuum.
NOTE:
- Install the charging base in a location that the vacuum can easily access. It is recommended to place the charging base against a wall, and on a hard-level surface rather than on rugs or carpets.
- Always keep the charging base plugged in, otherwise the vacuum will not automatically return to it.
Charging the Vacuum
The vacuum has a pre-installed rechargeable battery that must be fully charged (approximately 4-6 hours) before use. The vacuum returns to the charging base at the end of a cleaning cycle or when its battery is running low.
There are two ways to initially charge the vacuum when it has no power:
- Option 1: Attach the vacuum to the charging base by aligning its charging pins with the charging pins on the base.
- Option 2: Directly connect the power adaptor to the jack on the side of the vacuum.
If the vacuum has sufficient power, it can also be directed to the charging base by using the KALORIK Home app. Otherwise, the unit will return to the charging base when low on power.
USING WITH WIFI
KALORIK Home App
The vacuum is WiFi compatible through the KALORIK Home app. The WiFi functionality allows you to control the vacuum through your smartphone while also mapping the areas the vacuum has cleaned. It can be downloaded by searching for the app on your smartphone or using the QR Codes below.

text_image
QR code image containing encoded data, no visible human-readable text
Available on the App Store

text_image
QR code image containing encoded data, no visible human-readable text
GET IT ON
Google Play
- Once the download is complete, follow the onscreen instructions to create your account.
-
Restart the vacuum. Press and hold the AUTO button on top of the robot vacuum. The indicator light will flash blue for 10 seconds, indicating the robot vacuum is in WiFi mode.
-
In the KALORIK Home app, press the “+” symbol in the top right corner or “Add Device” in the center.
- Select "Small Home Appliances", then choose the "Robot Vacuum" category. Follow the instructions to input your WiFi information and connect the app to your WiFi network.
There are 2 ways to connect your robot vacuum to the KALORIK Home app:
- EZ Mode (recommended): Uses your home WiFi network to communicate between your phone and the robot vacuum
- AP Mode: Uses the robot vacuum's built in WiFi to communicate between your phone and the robot vacuum.
- Once the KALORIK Home app is connected to your WiFi, click on the upper right corner to select between "EZ Mode" or "AP Mode". Click the small circle in front of "Confirm indicator rapidly blinking", then click "Next" to proceed to the next step.
To connect in EZ Mode:
- After selecting "EZ Mode" in the KALORIK Home APP, press and hold the AUTO button on top of the robot vacuum. The indicator light will rapidly flash purple, indicating the robot vacuum is in EZ Mode.
- Once the indicator light begins to flash, press the "Next" button. The app interface will display "Adding device..." as the device connects.
- Once successful, the indicator light on the robot vacuum will be steady blue light and the app will read “Added successfully”.
To connect in AP Mode:
- After selecting "AP Mode" in the KALORIK Home APP, press and hold the AUTO button on top of the robot vacuum. The indicator light will rapidly flash purple. Release the AUTO button and press again. The indicator light will flash slowly, indicating the robot vacuum is in AP Mode.
- Once the indicator light begins to flash, press the "Next" button.
- Select "Go to Connect" on the app interface and connect your phone to the robot vacuum's WiFi hotspot. The app interface will display "Adding device..." as the device connects.
- Once successful, the indicator light on the robot vacuum will be steady blue light and the app will read “Added successfully”.
For more information and instructions on how to connect your robot vacuum, please visit http://www.kalorik.com/robotvacuumguide
Using with Amazon Echo and Amazon Alexa
The robot vacuum is compatible with Amazon Echo's Alexa. Follow the steps below to connect:
- Make sure your Amazon Echo is set up and that the Amazon Alexa app is downloaded and connected to your Amazon Echo.
- Make sure you have downloaded the KALORIK Home app and successfully connected the robot vacuum as outlined in the “KALORIK Home App” section. Make sure it is connected to the same WiFi as the Alexa app.
- In the Amazon Alexa app. Tap the "More" menu towards the bottom right of the Alexa app.
- Tap the “Skills & Games” category and search for “KALORIK Home”.
- Tap "ENABLE" to enable the KALORIK Home app.
- You will be redirected to a page to link the account. Type in your KALORIK Home login information and select the corresponding country/region.
- Tap "Link Now" to link your KALORIK Home account. Note: all the account information must match your KALORIK Home account information to successfully link.
- Say out loud “Alexa, discover devices” towards the Amazon Echo. This will cause your Amazon Echo to connect to any devices linked to the KALORIK Home app.
After completing the steps above, you will be able to control your robot vacuum through Amazon Echo. The name of your robot vacuum will be the same as the name set in the KALORIK Home app.
Note: whenever you change the device's name on the KALORIK Home app, your Echo must re-discover the robot vacuum.
Using with Google Home and Google Assistant
The robot vacuum is compatible with Google Home. Follow the steps below to connect:
- Make sure your Google Home is set up and that the Google Home app is downloaded and connected to your Google Home.
- Make sure you have downloaded the KALORIK Home app and successfully connected the robot vacuum as outlined in the “KALORIK Home app” section. Make sure it is connected to the same WiFi as the Google Home app.
- In the Google Home app, tap the menu icon in the upper left corner.
- Select "Home control".
- Tap the "+" button in the lower right corner and search for "KALORIK Home"
- Select you KALORIK Home's account region and input your KALORIK Home account and password.
- Tap "Link Now", then "Authorize". After you assign rooms for devices, your devices will be listed in the Home Control page. Note: all the account information must match your KALORIK Home account information to successfully link.
- The robot vacuum should appear under devices. If you wish to set a nickname using Google Home, select the robot vacuum and tap "Set a nickname" to enter the desired name.
After completing the steps above, you will be able to control your robot vacuum through Google Home.
Note: if you change the device's name on the KALORIK Home app, your Google Home must re-discover the robot vacuum.
USING THE APPLIANCE
The Kalorik Home Ionic Pure Air Smart Robot Vacuum Pro has several cleaning functions outlined in this section.
Smart Cleaning
Pressing the AUTO button on the vacuum or the "A" icon labeled "Smart" in the KALORIK Home App causes the robot vacuum to start automatically cleaning.
Manual Control
Press the "Manual" icon in the KALORIK Home app to control the robot vacuum using directional buttons.
Spiral Mode
The vacuum moves in an outward spiral, cleaning the floor in expanding circles. Place the unit by the area you wish to power clean and use the KALORIK Home app to activate. When complete, the machine will return to the auto sweeping mode.
Wall Follow Mode
In Wall Follow mode, the vacuum follows the wall while avoiding obstacles to ensure the edge is cleaned thoroughly. Use the KALORIK Home app to activate. The mode remains on until the user changes to another mode.
NOTE: Pressing the "Switch" button in the KALORIK Home app will turn the robot vacuum off and on in any of the modes.
Adhesion settings
Toggling the adhesion settings changes between the two speed settings: "Strong" and "Normal" modes. The Strong mode operates at a higher speed setting with stronger suction power while the Normal mode operates at a lower speed, using less energy. The adhesion setting can be changed during any of the other operating functions using the settings in the KALORIK Home app.
Using the Ion Function
The vacuum comes with an Ionic Air Purifier function that generates negative ions which magnetically attract pollutants to remove them from the air you breath. This function can be turned on or off through the settings in the KALORIK Home app and be used simultaneously with any other mode. The indicator light on the robot vacuum will turn purple when this function is activated.
Directing to the Charging Base
If the vacuum has sufficient power, it can be directed to the charging base by using the KALORIK Home app. Otherwise, the unit will return to the charging base when low on power. Battery level is indicated by percentage on the main screen, labeled “Residual Electricity”.
CLEANING AND MAINTENANCE
Follow the instructions below regularly to clean and maintain the vacuum.
NOTE:
- Before cleaning, always switch the vacuum off and disconnect the charging base.
- Never immerse any electrical part of the product in water or other liquids. Never place under running water.
- Never use solvents or abrasive materials. Never use metallic or sharp cleaning tools.
Cleaning the Filters
For optimal performance, cleaning the filters is recommended approximately after a week of regular use.
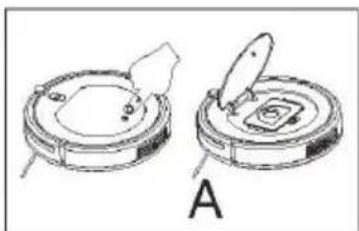
Follow the instructions below along with the corresponding images.
A. Press down towards the end of the cover as indicated. The cover will open automatically.
B. After removing the dust container, please make sure to check if the suction channel of the appliance is not obstructed in any way.
C. Remove the HEPA filter.
D. Remove the preliminary filter.
E. Pour all the dust out of the dust container onto a trashcan.
F. Proceed to clean the dust container, preliminary filter, and HEPA filter fully. Our suggestion is to clean the HEPA filter every 15-30 days of use. The maximum service life of the HEPA filter is 24 months. The HEPA filter is not to be cleaned using a brush, but instead it should be blown using a dryer, or slightly knocked to remove all the dust. NOTE: Please do not wash it with water.
G. Assemble all parts again carefully. Please make sure both filters are assembled properly to prevent any damage to the appliance.
NOTE:
- Please clean the dust container and suction channel every time after sweeping.
- When cleaning the dust container with water, make sure to let it dry naturally, but not under the sun. As soon as it is thoroughly dried, it should be put back into the robot vacuum to prevent affecting the functions and life of the appliance.
- If any of the filters are damaged, they need to be replaced as soon as possible to prevent affecting the effectiveness of dust removal.
natural_image
Technical line drawing of two circular mechanical components with a clip and labeled section A (no text or symbols on the components themselves)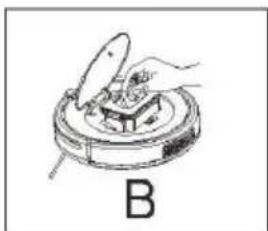
natural_image
Illustration of a hand using a tool to clean or inspect a circular object, labeled 'B' (no text or symbols on the diagram itself)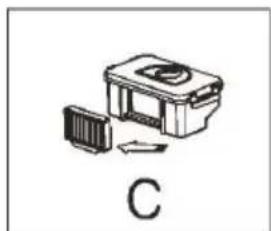
natural_image
Simple line drawing of a device with a panel and directional arrow, labeled 'C' (no text or symbols on the diagram itself)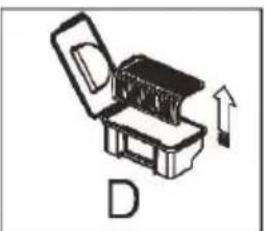
natural_image
Diagram of an open mechanical device with a circular component and an upward arrow, labeled 'D' (no text or symbols on the device itself)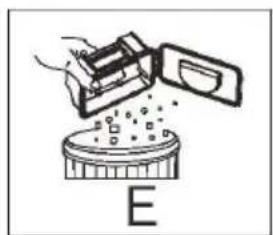
natural_image
Diagram showing a hand pouring liquid into a container labeled 'E' (no text or symbols on the diagram itself)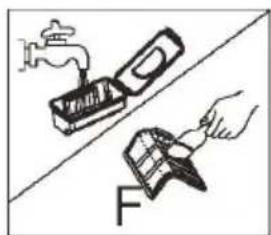
natural_image
Illustration of a hand using a tool to clean or store items, with a faucet and a magnifying glass nearby (no text or symbols)
text_image
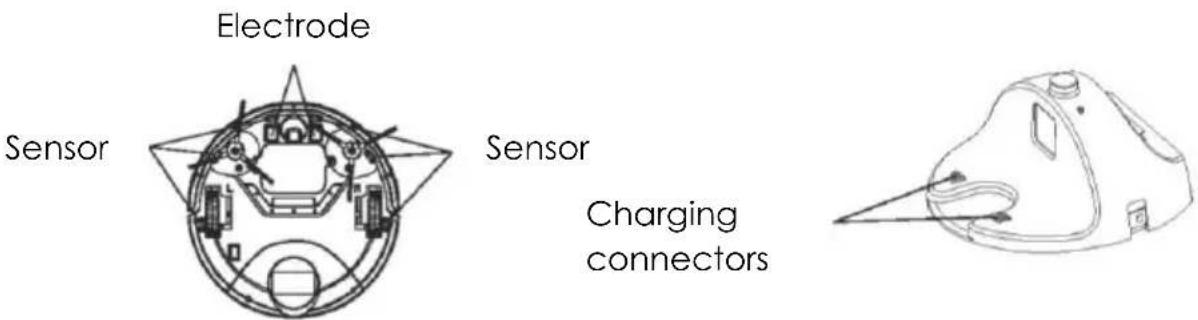
GCleaning the Sensors
Use a soft damp cloth to wipe the sensors gently on both the unit and the charging base. See the following image for reference on where the sensors are located.
text_image
Electrode Sensor Sensor Charging connectorsCleaning the Side Brushes
For optimal performance, cleaning the side brushes is recommended approximately after a month of regular use. Follow the instructions below to clean the side brushes.
- Remove the side brushes from the vacuum.
- Carefully remove any debris wrapped between the main unit and the side brushes.
- Use a cloth dampened with warm water to remove any dust from the brushes or to gently reshape them.
TROUBLESHOOTING
| Status | LED | Solution |
| The robot vacuum is on standby mode or working normally. | Permanently blue | N/A |
| The robot vacuum is on the base and the battery is charged | Permanently blue | N/A |
| Cleaning paused | Flashing blue | N/A |
| The robot vacuum is on the base and charging | Flashing blue | N/A |
| Ion function is on | Permanently purple | N/A |
| The robot vacuum is in standby mode | Light off | N/A |
| Floor sensor error | Red light is permanently on while the robot vacuum beeps once | One of the floor sensors has been disrupted.Check to see if the robot vacuum is on an abnormal surface and reposition. |
| Side brush error | Red light flashes while the robot vacuum beeps once | Check to see if the side brushes are obstructed. |
| Fan motor error | Red light permanently on while the robot vacuum beeps twice | Check to see if there is any obstruction to the air suction. |
| Abnormal collision | Permanently red while the robot vacuum beeps 3 times | Check the front bumper for any obstructions |
| Overloaded front wheel | Red light flashes while the robot vacuum beeps 3 times | Check the front wheel for any obstructions or issues |
| Error with all floor sensors | Blue light stays on while the robot vacuum beeps 3 times. | All floor sensors have been disrupted. May happen when the vacuum is picked up during cleaning. |
If additional assistance is needed, please contact our Customer Assistance at 1-888-525-6745.
We suggest that you complete and return the enclosed Product Registration Card promptly to facilitate verification of the date of original purchase. However, return of the Product Registration Card is not a condition of these warranties. You can also fill out this warranty card online, at the following address: www.KALORIK.com
This KALORIK product is warranted in the U.S.A. and in Canada for 1 year from the date of purchase against defects in material and workmanship. This warranty is not transferable. Keep the original sales receipt. Proof of purchase is required to obtain warranty performance.
During this period, if the KALORIK product, upon inspection by KALORIK, is proven defective, it will be repaired or replaced, at Kalorik's option, without charge to the customer. If a replacement product is sent, it will carry the remaining warranty of the original product.
This warranty does not apply to any defect arising from a buyer's or user's misuse of the product, negligence, failure to follow KALORIK instructions noted in the user's manual, use on current or voltage other than that stamped on the product, wear and tear, alteration or repair not authorized by KALORIK, or use for commercial purposes. There is no warranty for glass parts, glass containers, filter basket, blades and agitators. There is also no warranty for parts lost by the user.
ANY WARRANTY OF MERCHANTABILITY OR FITNESS WITH RESPECT TO THIS PRODUCT IS ALSO LIMITED TO THE ONE YEAR LIMITED WARRANTY PERIOD.
Some states do not allow limitation on how long an implied warranty lasts or do not allow the exclusion of incidental or consequential damages, so the above limitations may not apply to you. This warranty gives you specific legal rights, and you may also have other rights which vary from state to state.
If the appliance should become defective within the warranty period and more than 30 days after date of purchase, do not return the appliance to the store: often, our Customer Service Representatives can help solve the problem without having the product serviced. If
servicing is needed, a Representative can confirm whether the product is under warranty and direct you to the nearest service location.
If this is the case, send the product via your pre-paid postage back to Kalorik, along with proof of purchase and a return authorization number indicated on the outer package, given by our Customer Service Representatives. Send to the authorized KALORIK Service Center (please visit our website at www.KALORIK.com or call our Customer Service Department for the address of our authorized KALORIK Service Center).
When sending the product, please include a letter explaining the nature of the claimed defect.
If you have additional questions, please call our Customer Service Department (please see below for complete contact information), Monday through Thursday from 9:00am - 5:00pm (EST) and Friday from 9:00am - 4:00pm (EST). Please note hours are subject to change.
If you would like to write, please send your letter to:
KALORIK Customer Service Department
Team International Group of America Inc. 16175 NW 49th Avenue Miami Gardens, FL 33014 USA
Or call:
Toll Free: +1 888-521-TEAM / +1 888-KALORIK
Only letters can be accepted at this address above. Shipments and packages that do not have a return authorization number will be refused.
CONSIGNES DE SÉCURITÉ IMPORTANTES
text_image
Technical diagram of a circular mechanical or electrical component with labeled parts and directional arrows indicating flow or movement.Récepteur de signal
Pare-chocs
natural_image
Two views of a device showing internal components before and after assembly, with arrows indicating motion (no text or symbols present)text_image
QR code image containing encoded data, no visible human-readable textAvailable on the App Store

text_image
QR code image containing encoded data, no visible human-readable textGET IT ON Google Play
natural_image
Technical line drawing of two circular mechanical components with a central knob, labeled A (no text or symbols on the components themselves)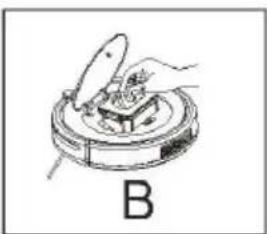
natural_image
Illustration of a hand using a tool to press or install a component on a circular base, labeled 'B' (no text or symbols on the diagram itself)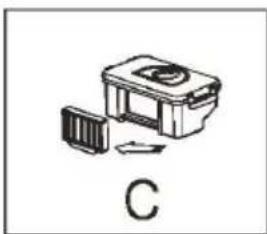
natural_image
Simple line drawing of a mechanical device with a labeled section 'C' (no text or symbols on the device itself)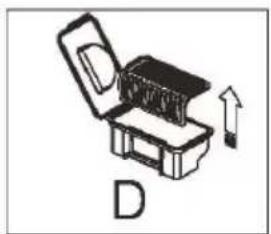
natural_image
Illustration of a box with an open lid and an upward arrow, labeled 'D' (no text or symbols on the diagram itself)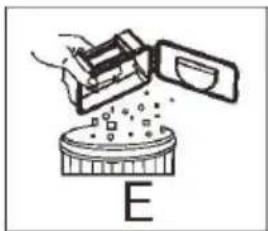
natural_image
Diagram of a device emitting particles into a circular container labeled 'E' (no text or symbols on the diagram itself)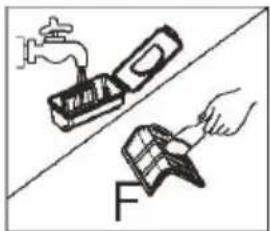
natural_image
Illustration of a hand using a tool to clean or repair a surface, with a faucet and a paintbrush nearby (no text or symbols)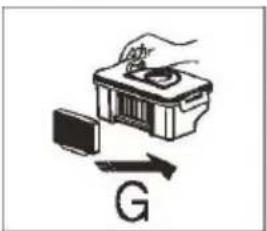
natural_image
Illustration of a hand using a power tool to interact with a device and magnetic field (no text or symbols)Team International Group of America Inc.
16175 NW 49 ^th Ave.
Miami Gardens, FL 33014 USA
For questions please contact:
Team International Group of America Inc.
16175 NW 49th Avenue
Miami Gardens, FL 33014 USA
User manual content and recipes courtesy of Team International Group – Do not reproduce without consent of the authors - All rights reserved.