
Designer FT 52790 - Deep fryer KALORIK - Free user manual and instructions
Find the device manual for free Designer FT 52790 KALORIK in PDF.

| Brand | Kalorik |
| Model | Designer FT 52790 |
| Type | Air Fryer |
| Capacity | 7.5 liters (8 quarts) |
| Voltage | 120 V, 60 Hz |
| Power | 1700 W |
| Adjustable Temperature | 180 °F to 400 °F (82 °C to 204 °C) |
| Timer | 1 to 120 minutes |
| Number of Presets | 12 (air fry, reheat, fries, wings, chicken, steak, fish, shrimp, vegetables, pork chop, bake, tofu) |
| Display | Digital LED display with temperature and time |
| Special Functions | Shake reminder, °C/°F conversion, mute, interior light (7.5 L model) |
| Safety | Safety micro-switch, automatic shut-off, cooling ventilation |
| Basket Material | Steel with non-stick coating |
| Basket Cleaning | Hand wash with warm soapy water (not dishwasher safe) |
| Cavity Cleaning | Damp cloth, no abrasive products |
| Spare Parts | Available at www.kalorik.com |
| Warranty | 1 year limited (USA and Canada) |
| Use | Household use only, flat and heat-resistant surface |
Frequently Asked Questions - Designer FT 52790 KALORIK
User questions about Designer FT 52790 KALORIK
0 question about this device. Answer the ones you know or ask your own.
Ask a new question about this device
Download the instructions for your Deep fryer in PDF format for free! Find your manual Designer FT 52790 - KALORIK and take your electronic device back in hand. On this page are published all the documents necessary for the use of your device. Designer FT 52790 by KALORIK.
USER MANUAL Designer FT 52790 KALORIK
natural_image
Exterior view of a modern KALORIK air fryer with digital display and control buttons (no readable text or symbols beyond branding)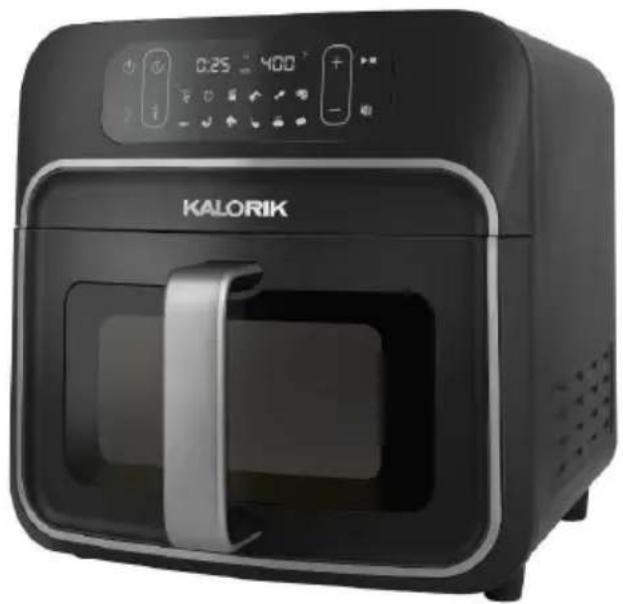
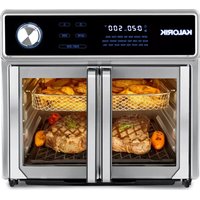
natural_image
Exterior view of a modern black KALORIK air fryer with digital display and control buttons (no text or symbols on main body)DIGITAL AIR FRYER, 5Qt or 8Qt FRITEUSE NUMÉRIQUE, 4.5L or 7.5L FREIDORA DE AIRE, 4.5L or 7.5L
EN.....2
FR.....14
ES.....27

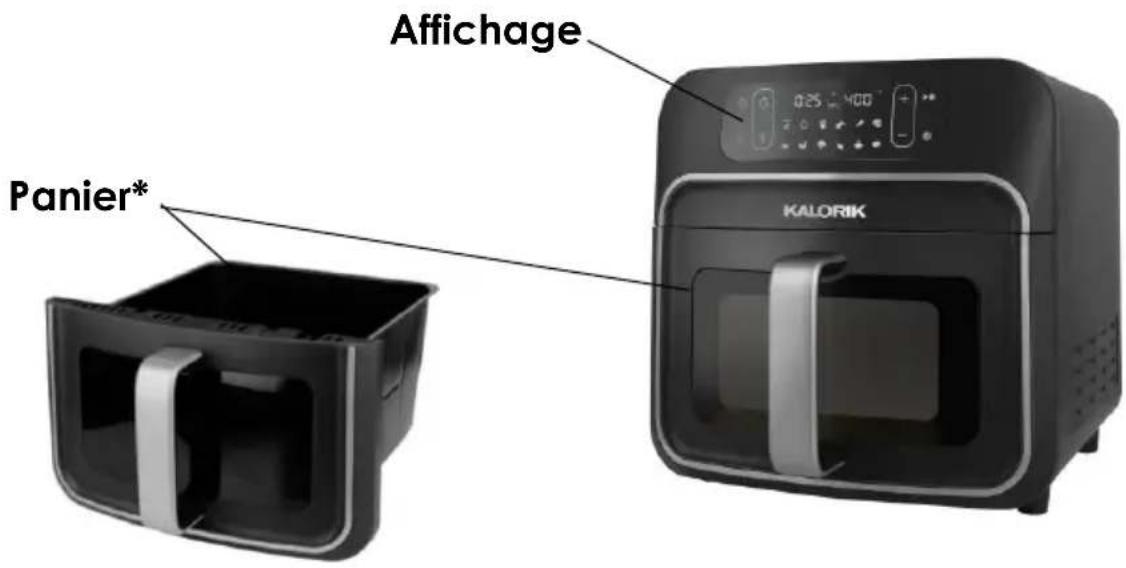
*Window only available on 8Q† model.
PRODUCT SPECIFICATIONS
| Models | Voltage | Wattage | Capacity |
| FT52836 | 120V, 60Hz | 1500W | 5Q† / 4.5L |
| FT52790 | 120V, 60Hz | 1700W | 8Q† / 7.5L |
When using electrical appliances, basic safety precautions should always be followed, including the following:
1. READ ALL INSTRUCTIONS BEFORE USE!
- Check that the voltage in your home corresponds to that stated on the appliance.
- Do not touch hot surfaces. Use handles or knobs.
- To protect against electrical shock, fire, or personal injury, do not immerse the cord, plugs, or the appliance in water or other liquid.
- Close supervision is necessary when any appliance is used by or near children. As a rule, this appliance is not intended to be used by children.
- Unplug from the outlet when not in use and before cleaning. Allow it to cool before putting on or taking off parts.
- Do not operate any appliance with a damaged cord or plug or after the appliance malfunctions or has been damaged in any manner. Return the appliance to the nearest authorized service facility for examination, repair, or adjustment.
- The use of accessory attachments not recommended by the appliance manufacturer may cause injuries.
-
Not for outdoor use.
-
Do not let the cord hang over the edge of a table or counter. Do not touch hot surfaces.
-
Do not place on or near a hot gas or electric burner, or in a heated oven.
-
Extreme caution must be used when moving an appliance containing hot oil or other hot liquids.
-
To disconnect, switch the unit OFF and then unplug the cable from the outlet.
-
Do not use the appliance for anything other than intended use.
-
Oversized foods or metal utensils must not be inserted in the air fryer as they may create a fire or risk of electric shock.
-
A fire may occur if the appliance is covered or touching flammable material, including curtains, draperies, walls, and the like, when in operation. Do not store any item on top of the appliance when in operation.
-
Do not clean with metal scouring pads. Pieces can break off the pad and touch electrical parts, creating a risk of electric shock.
-
Extreme caution should be exercised when using containers constructed of materials that are not metal or glass.
-
Do not store any materials, other than manufacturers recommended accessories, in this appliance when not in use.
-
Do not place any of the following materials in the appliance: paper, cardboard, plastic, and the like.
-
Do not cover the cooking basket or any part of the air fryer with metal foil. This causes overheating of the air fryer.
-
Do not leave unit unattended when in use.
-
Use extreme caution when removing the basket or trivet and disposing of hot grease.
-
The air fryer can be turned off while using any of the functions by pressing the POWER button.
-
During hot air frying, hot air is released through the air outlet openings. Keep your hands and face at a safe distance from the steam and from the air outlet openings. Also, be careful of hot steam and air when you remove the basket from the appliance.
-
Immediately unplug the appliance if you see dark smoke coming out of the appliance. Wait for the smoke emission to stop before you remove the pan from the appliance.
-
Do not place the appliance against a wall or against other appliances.
-
Leave at least 6 inches (15 cm) of free space on the back, sides, and above the appliance for proper ventilation.
Caution!!
- ALWAYS place the appliance on a horizontal, level, heat-resistant, and stable surface.
- This appliance is intended for normal household use only.
• Always unplug the appliance after use.
- Let the appliance cool down for at least 30 minutes before handling or cleaning it.
- The appliance is equipped with a safety micro switch inside that will pause the cooking process automatically if the basket is removed during cooking.
SAVE THESE INSTRUCTIONS HOUSEHOLD USE ONLY
POLARIZED PLUG INSTRUCTIONS
This appliance is equipped with a polarized plug (one blade is wider than the other). To reduce the risk of electric shock, this plug will fit into the polarized outlet only one way. If the plug does not properly fit into the outlet at first, reverse it. If it still does not fit, contact a competent qualified electrician. Do not attempt to modify the plug in any way.
A short power supply cord is provided to reduce the hazards resulting from becoming entangled in or tripping over a longer cord. Extension cords may be used if care is exercised in their use.
- The electrical rating of the extension cord should be at least that of the appliance. If the electrical rating of the extension cord is too low, it could overheat and burn.
- The resulting extended cord should be arranged so that it will not drape over the counter-top or tabletop where it can be pulled on by children or tripped over.
BEFORE THE FIRST USE
- Unpack the appliance and its accessories (food basket, trivet). Wash the accessories in hot, soapy water and then wipe them dry. Wipe the interior of the frying cavity with a damp cloth or sponge, and then dry with a paper towel. Make sure the cavity is dry before operating the unit.
- Position the air fryer on a flat, level and heat-resistant surface. Make sure that it is also positioned at least 6 inches (15 cm) away from any surrounding objects.
- It is recommended to let the air fryer heat for about 20 minutes without any food in it. This helps to eliminate grease that may have adhered during manufacturing, and to eliminate the "new" appliance smell.
- Ventilate the room during this period. When your air fryer is heated for the first time, it may emit slight smoke or odor. This is normal with many heating appliances. This does not affect the safety of your appliance.
Caution: When moving the air fryer, make sure that you hold it securely and support the base—do not rely on the food basket handle when moving the air fryer!
Preparing for use:
- Make sure that the trivet is securely placed inside the basket. Use the trivet handle located in the center of the trivet to easily insert or remove it from the basket.
- Plug the power cord into a wall socket. The POWER button will turn on to signal that it is ready for use.
Caution!
- Do not fill the food basket with oil or any other liquid, as this may cause a fire hazard.
• Never use the air fryer without the food basket and trivet in place. - Keep all ingredients in the basket to prevent any contact with the appliance's heating elements. Do not overfill the food basket.
- Do not cover the air inlet on the top or the air outlet on the back of the unit while the appliance is in use.
- Do not touch the inside of the appliance while it is operating.
- Never immerse the unit's housing in water or rinse it under the tap.
Control Panel
8 Quart Air Fryer:
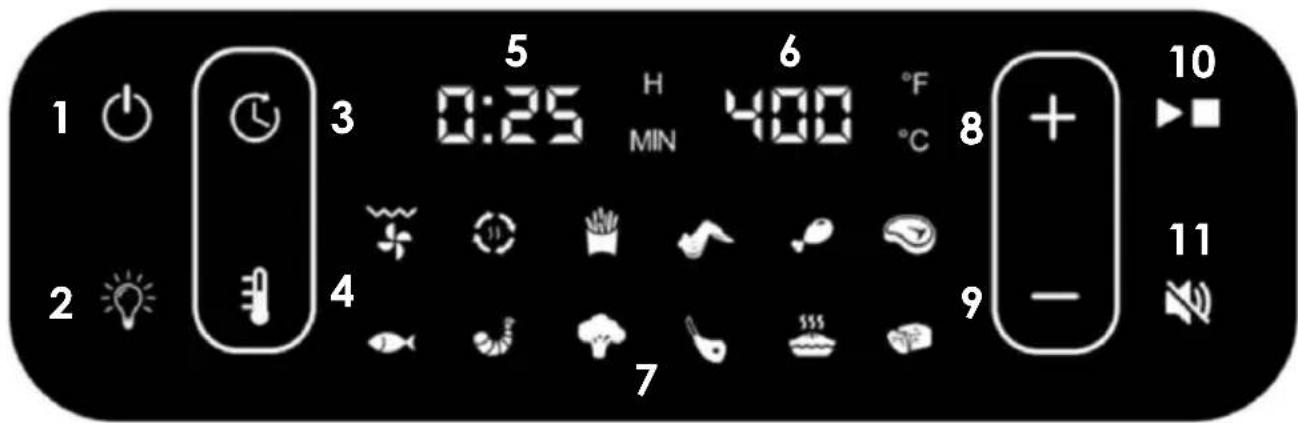
- On/Off
- Light
- Time
- Temperature
- Time Display
-
Temperature Display
-
Presets
- Plus (+)
- Minus (-)
- Start/Stop
- Mute
5 Quart Air Fryer:
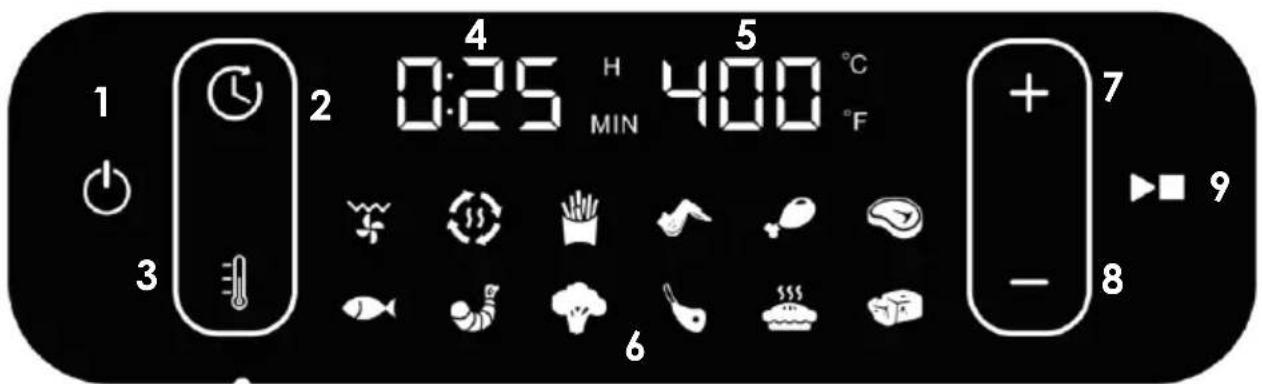
- On/Off
- Time
- Temperature
- Time Display
-
Temperature Display
-
Presets
- Plus (+)
- Minus (-)
- Start/Stop
Using the appliance:
- Once the appliance has been plugged in and is ready for use, proceed to press the On/Off button to turn on.
- The display will light up.
- Scroll using the plus (+) and minus (−) to navigate through presets.
- After selecting your desired preset press Play/Stop to begin the cooking process.
- Time and temperature can be adjusted at any point during the cooking process by selecting the time and temperature buttons and adjust by using the plus (+) and minus (-). After five seconds your adjustments will be accepted, and the unit will continue cooking. Time will increase by increments of 1 and Temperature will increase by increments of 5 degrees.
- The cooking process can be paused by removing the basket.
a. If you remove the basket in the middle of the cooking process to shake or check on your ingredients, cooking will be paused. Simply place the basket back in place to continue cooking.
b. Shake reminder will alert you halfway through the cooking process by beeping 3 times (1 short, 1 long, 1 short) and the time and temperature display will flash for 10 seconds. If no action is taken cooking will continue without pause.
NOTE: The unit will automatically shut off if the cooking process is paused for more than 10 minutes.
-
Once the cooking is completed the display will show "OFF" and signal that the cooking is done by beeping 3 times. The unit's fan will remain on for one minute while it cools down and then shuts off completely.
-
Proceed to remove the basket, take out your food, and enjoy!
^ F ^ C:
Your unit can also switch from Fahrenheit to Celsius and vice versa easily by pressing the + / - temperature symbols for 3 seconds.
Mute:
8Qt models include a Mute button. For 5Qt models, to silence the unit, press the +/- buttons for 3 seconds.
Light (8Qt Model Only):
To turn on the light inside your unit for a better view of food press the light button. After one minute the lamp will automatically turn off.
Presets:
Your air fryer has 12 Presets: Air fry, Reheat, Fries, Wings, Thighs, Steak, Fish, Shrimp, Vegetables, Pork Chops, Bake, and Tofu.
| MENU | Default temp (F) | Default time (mins) | Adjustable Time (mins) | Adjustable Temp (F) | FAN | Shake/Flip/ Rotate Reminder |
| AIR FRY | 400 | 20 | 1-120 | 180-400 | ON | YES |
| REHEAT | 350 | 7 | 1-120 | 180-400 | ON | YES |
| FRIES | 400 | 20 | 1-120 | 180-400 | ON | YES |
| WINGS | 400 | 16 | 1-120 | 180-400 | ON | YES |
| CHICKEN | 400 | 20 | 1-120 | 180-400 | ON | YES |
| STEAK | 400 | 13 | 1-120 | 180-400 | ON | YES |
| FISH | 400 | 10 | 1-120 | 180-400 | ON | YES |
| SHRIMP | 400 | 13 | 1-120 | 180-400 | ON | YES |
| VEGETABLES | 400 | 9 | 1-120 | 180-400 | ON | YES |
| PORK CHOPS | 400 | 12 | 1-120 | 180-400 | ON | YES |
| BAKE | 350 | 18 | 1-120 | 180-400 | ON | YES |
| TOFU | 400 | 17 | 1-120 | 180-400 | ON | YES |
CLEANING AND MAINTENANCE
- Make sure to clean the appliance after each use!
- Switch the appliance off. Before cleaning, unplug the appliance from the outlet and allow it to cool down completely.
Cleaning the basket and trivet:
- The basket should be hand-washed in hot water with mild detergent or dish soap. Do not immerse in water. Do not put it in the dishwasher. Clean with a damp sponge or cloth. Do not use metal kitchen utensils or abrasive cleaning materials to clean basket or trivet, as this may damage the non-stick coating. Rinse and dry thoroughly after cleaning.
- To remove baked-on food, fill the basket with hot, soapy water. Soak it for about 10 minutes before cleaning it in the sink.
Cleaning inside the cavity:
- Wipe the cavity with a damp cloth or sponge. Dry with a paper towel.
- Never use abrasive products in the cavity!
- Never immerse the appliance in water and make sure that no water or moisture penetrates the upper part of the air fryer.
- Clean the heating element inside the air fryer with a cleaning brush to remove any food residue.
Cleaning the exterior:
- Wipe clean with a damp sponge or cloth. Wipe dry.
- NEVER use steel wool, metal scouring pads or abrasive cleaners, as they may damage the finish.
- Do not let any liquids enter the air inlet on the top of the air fryer.
Any other servicing should be performed by an authorized service representative.
DO NOT IMMERSE THE FRYER IN WATER OR ANY OTHER LIQUID!
| Problem | Possible cause | Solution |
| The air fryer does not work | The appliance is not plugged in. | Put the main plug in an earthed wall socket. |
| You have not set the timer. | Adjust the setting to the required preparation time to switch on the appliance. | |
| The basket is not properly locked. | Push the basket back in the air fryer properly. | |
| The ingredients fried with the air fryer are not done. | There is too much food in the basket. | Put smaller batches of ingredients in the basket. Smaller batches are fried more evenly. |
| The set temperature is too low. | Adjust the setting to the required temperature setting. | |
| The cooking time is too short. | Adjust the setting to the required preparation time (see section ‘Cooking guide’) | |
| Fried snacks are not crispy when they come out of the air fryer. | You used a type of snack meant to be prepared in a traditional deep fryer. | Use snacks made to be prepared in the oven, or lightly brush some oil onto the snacks for a crispier result. |
| I cannot slide the basket into the appliance properly. | There is too much food in the basket. | Do not fill the basket to capacity; refer to the “Cooking guide” table for quantities. |
| White smoke comes out of the appliance. | You are preparing greasy ingredients. | When you fry greasy ingredients in the air fryer, a large amount of oil will leak into the bottom of the basket. The oil can produce white smoke and the basket may heat up more than usual. This does not affect the appliance or the end result. |
| The pan still contains grease residues from previous use. | White smoke is caused by grease heating up in the basket; make sure you clean the basket and trivet thoroughly after each use. | |
| Fresh fries are fried unevenly in the air fryer. | You did not use the right type of potato.You did not rinse the potato sticks properly before you fried them. | Use fresh potatoes and make sure they stay firm during frying.Rinse the potato sticks thoroughly to remove starch from the outside of the sticks. |
| Fresh fries are not crispy when they come out of the air fryer. | The crispiness of the fries depends on the amount of oil and water in the fries. | Make sure you dry the potato sticks properly before you add the oil. |
| Cut the potatoes into thinner sticks for a crispier result. | ||
| Add slightly more oil for a crispier result. |
Appliance 1 Year Limited Warranty
The Legacy Companies (“the Company”) warrants this appliance from failures in the material and workmanship for one (1) year from the date of original purchase with proof of purchase, provided that the appliance is operated and maintained in conformity with the Instruction Manual. During this period, your exclusive remedy is repair or replacement without charge of this appliance or any component found to be defective at the Company’s discretion. If the appliance or any component is no longer available, the Company will replace it with a similar one of equal or greater value. This warranty is void if the appliance is used for anything other than single-family indoor household use, or with voltage of other than 120 Volts.
THIS WARRANTY IS IN LIEU OF ALL IMPLIED WARRANTIES, INCLUDING WARRANTIES OF MERCHANTABILITY, FITNESS FOR A PARTICULAR PURPOSE, PERFORMANCE, OR OTHERWISE, WHICH ARE HEREBY EXCLUDED. IN NO EVENT SHALL THE COMPANY BE LIABLE FOR ANY DAMAGES, WHETHER DIRECT, INDIRECT, INCIDENTAL, FORSEEABLE, CONSEQUENTIAL, OR SPECIAL ARISING OUT OF OR IN CONNECTION WITH THIS APPLIANCE.
You may have other legal rights depending upon where you live. Some States or Provinces do not allow limitations on warranties so the foregoing may not apply to you.
If you think the appliance has failed or requires service within its warranty period, please contact the Customer Care Department through our website at www.kalorik.com “Support” → “Contact Us”. A receipt proving the original purchase date will be required for all warranty claims, handwritten receipts are not accepted. You may also be required to return the appliance for inspection and evaluation. Return shipping costs are not refundable. The Company is not responsible for returns lost in transit.
Valid only in USA and Canada.
© 2024 The Legacy Companies. All Rights Reserved. KALORIK® is a registered trademark of The Legacy Companies.
REPLACEMENT PARTS
Replacement parts, if available, may be ordered online at
www.kalorik.com. This manual contains important and helpful information regarding the safe use and care of your product. For future reference, attach dated sales receipt for warranty proof of purchase and record the following information:
Date purchased or received as gift: ____
Where purchased & price, if known: ____
Item Number & Date Code (shown bottom/back of product):
Dessous de plat
natural_image
Black diamond-shaped grid pattern with a central square hole, no text or symbols presentINSTRUCTIONS RELATIVES AU CORDON COURT
For questions please contact:
© 2024 The Legacy Companies
All Rights Reserved.
Kalorik® is a registered trademark of The Legacy Companies
Companies Kalorik® es una marca registrada de The Legacy Companies
User manual content and recipes courtesy of The Legacy Companies – Do not reproduce without consent of the authors - All rights reserved.

- READ ALL INSTRUCTIONS BEFORE USE!
- Caution!!
- SAVE THESE INSTRUCTIONS HOUSEHOLD USE ONLY
- POLARIZED PLUG INSTRUCTIONS
- BEFORE THE FIRST USE
- Preparing for use:
- Caution!
- Control Panel
- Quart Air Fryer:
- Quart Air Fryer:
- Using the appliance:
- ° F → ° C:
- Mute:
- Light (8Qt Model Only):
- Presets:
- CLEANING AND MAINTENANCE
- Cleaning the basket and trivet:
- Cleaning inside the cavity:
- Cleaning the exterior:
- DO NOT IMMERSE THE FRYER IN WATER OR ANY OTHER LIQUID!
- Appliance 1 Year Limited Warranty
- Valid only in USA and Canada.
- REPLACEMENT PARTS
- INSTRUCTIONS RELATIVES AU CORDON COURT
Brand : KALORIK
Model : Designer FT 52790
Category : Deep fryer