RMC 40-400 - Lawn mower ATIKA - Free user manual and instructions
Find the device manual for free RMC 40-400 ATIKA in PDF.

| Product type | cordless lawn mower |
| Brand | ATIKA |
| Model | RMC 40-400 |
| Cutting width | 40 cm |
| Cutting height | 2.5 – 7.5 cm (7 positions) |
| Collection bag volume | 50 L |
| Weight (without battery) | approx. 20 kg |
| Dimensions (L x W x H) | 131 cm x 46 cm x 106 cm |
| Power source | Li-ion battery 36 V (max. 40 V), compatible with AP 40-2000 (2000 mAh) or AP 40-4000 (4000 mAh) |
| Recommended charger | ALG 40-1800 (not included) |
| Main functions | Mowing, mulching, collection |
| Soft start | Yes (approx. 3 seconds to reach max speed) |
| Energy saving | Automatic speed adjustment |
| Guaranteed sound power level | 94 dB(A) |
| Sound pressure level | 75 dB(A) |
| Hand-arm vibration | a_hd = 2.2 m/s², K = 1.5 m/s² |
| Maintenance | Clean after use, do not use running water or high-pressure cleaner; replace blades in pairs |
| Safety | Safety button + switch lever, safety key, automatic blade stop, anti-throw protection |
| Spare parts and repairability | ATIKA after-sales service or authorized dealer; original parts available (blade, wheels, handle, bag, etc.) |
| Intended use | Private lawns and leisure gardens; not suitable for public, agricultural or forestry use |
| Warranty | Warranty declaration included |
Frequently Asked Questions - RMC 40-400 ATIKA
User questions about RMC 40-400 ATIKA
0 question about this device. Answer the ones you know or ask your own.
Ask a new question about this device
Download the instructions for your Lawn mower in PDF format for free! Find your manual RMC 40-400 - ATIKA and take your electronic device back in hand. On this page are published all the documents necessary for the use of your device. RMC 40-400 by ATIKA.
USER MANUAL RMC 40-400 ATIKA
Original instructions
Notice originale
① Keep the operating instructions in a safe place for future use.
① Pass the operating instructions on to all persons who work with the machine.
You may not start to operate the machine until you have read these operating instructions, observed all the instructions given and installed the machine as described!

This machine must not be operated / used by children, persons with restricted physical, sensory or mental abilities or a lack of experience and/or know-how or by persons who are not familiar with the instructions.

The unit and the charger must not be operated by children or young people under 16 years of age.
National and local regulations may determine a different age restriction for the user.

Keep children away from the battery since they cannot estimate the hazards of the battery.
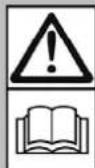
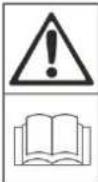
Symbols operating manual

Threatened hazard or hazardous situation. Not observing this instruction can lead to injuries or cause damage to property.

Important information on proper handling. Not observing this instruction can lead to faults in the machine.

User information. This information helps you to use all the functions optimally.

Assembly, operation and servicing. Here you are explained exactly what to do.

Please refer to the attached assembly and operating instruction sheet for references to figure numbers in the text.
Symbols machine
The symbols on the lawn mower are explained below. Memorise the meaning to be able to operate the lawn mower more safely and to protect yourself and others from possible injuries.
i Refer to the respective "Operating instructions" for the meaning of the "Symbols" of the batteries and the charger.
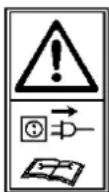
Warning! This lawn mower may cause serious injuries!
Carefully read operator's manual before handling the machine. Observe instructions and safety rules when operating.
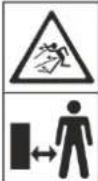
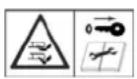
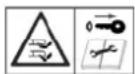
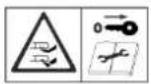
Danger – objects may be thrown out at high speed when motor is running. Keep bystanders as well as pets and domestic animals away from the danger zone.
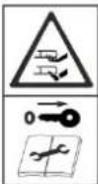
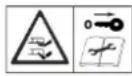
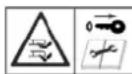
Caution: -Sharp cutting blades - Pull off safety key before any maintenance work.

Wear eye and ear protection.
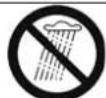
Do not expose to rain. Protect against humidity.
Protection class III (Protective extra-low voltage)
This product complies with European regulations specifically applicable to it.
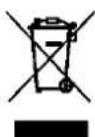
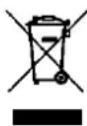
Electrical devices do not go into the domestic rubbish.
Give devices, accessories and packaging to an ecofriendly recycling.
According to the European Directive 2012/19/EU on electrical and electronic scrap, electrical devices that are no longer serviceable must be separately collected and brought to a facility for an environmentally compatible recycling.
Contents
Symbols operating manual 12
Symbols machine 12
Extent of delivery 13
Operating times 13
Proper use 13
Residual risks 14
Vibrations 14
Safe working 14
Description of the device / Spare parts 16
Assembly 16
Before starting 16
Start-up 17
Adjusting the cutting height 17
Working instructions 18
Working with the lawn mower 18
Maintenance and cleaning 18
Transport 19
Storage 19
Disposal 19
Guarantee 19
Possible faults 20
Technical data 21
Declaration of Conformity 21
Extent of delivery
After unpacking, check the contents of the box
▶ That it is complete
▶ Check for possible transport damage


- 1 preassembled unit of equipment (not illustrated)
• 1 Lower handle hoop (1)
• 1 Upper handle hoop (2) - 1 cup holder (9)
• 1 collecting bag (10) - 1 mulch insert (11)
• 1 Fastener bag (not illustrated)
• 1 operating manual (i)
• 1 assembly and operating instruction sheet (i)
• 1 warranty declaration (i)


The following parts are not included in the scope of delivery. These accessories are available from your dealer or manufacturer:
- Charger (13) ALG 40-1800 (Order No.: 365500)
- Battery (12A) AP 40-2000 (Order no.: 365501) or
Battery (12C) AP 40-4000 (Order No.: 365503)
Report any damage or missing items to your dealer, supplier or the manufacturer immediately. Complaints made at a later date will not be acknowledged.
Packaging material can be recycled and should be brought to an eco-friendly recycling facility.
Operating Times
Please consider the individual country specifications.
Information on how to avoid noise:
Some noise exposure from this machine is unavoidable. Schedule noisy work to times during which it is allowed. Respect all rest times and restrict the work duration to the minimum. You as the operator and bystanders should wear a suited hearing protection.
Proper use
- The lawn mower is only suitable for mowing lawn and grass areas in the private house and hobby garden.
- The device is not allowed to be used in public gardens, parks, sports centres or at roadsides as well as in agriculture and forestry.
- The lawn mower must not be used:
— for cutting and trimming climbing plants
— for mowing lawn on roof greening
— on plastered or gravelled areas
Risk of injuries existing!
- The intended usage also includes compliance with the operating, servicing and repair conditions prescribed by the manufacturer and following the safety instructions included in the instructions.
- The relevant accident prevention regulations for the operation as well as the other generally acknowledged occupational medicine and safety rules must be complied with.
- Any other use is deemed not to be use as prescribed. The manufacturer is not liable for any type of damage resulting from this: the user bears the sole risk.
■ Unauthorised modifications on the lawn mower exclude a liability of the manufacturer for damages of any kind resulting from it. - Only persons who are familiarised with the device and informed about possible risks are allowed to prepare, operate and service this device. Repair works may only be carried out by us or by a customer service agent nominated by us.
- The machine may not be used in a potentially explosive environment or be exposed to the rain.
Residual risks
Even if used properly, residual risks can exist even if the relevant safety regulations are complied with due to the design determined by the intended purpose.
Residual risks can be minimised if the “Safety information” and the “Intended usage” as well as the whole of the operating instructions are observed.
Observing these instructions, and taking proper care, will reduce the risk of personal injury or damage to the equipment.
- Failure to observe the safety precautions can lead to injury to the operator or damage to property.
- Risk of injury to the fingers and hands, when carrying out assembly work and cleaning on the cutting blades.
■ Stones and soil may be thrown off.
Electric shock. - Touching live parts of opened electrical components.
- Impairment of hearing when working on the machine for longer periods of time without ear protection.
■ Eye injury when failing to wear safety goggles or visor.
■ Health impairment resulting from exposure to hand arm vibration if the machine is used too long or is not properly guided and maintained. - Warning! This device generates an electromagnetic field during operation. Such a field may affect active or passive medical implants under certain circumstances. To reduce the risk of serious injuries we recommend persons who carry medical implants to consult their doctor and the manufacturer of the medical implant before operating this device.
In addition, in spite of all the precautionary measures taken, non-obvious residual risks can still exist.
Vibrations (hand arm vibrations)
Hand arm vibration a_h=2,2 m/s^2
Measuring uncertainty K = 1,5 m/s²
The indicated vibration emission level has been measured according to a standardised test method and can be used to compare power tools.
It can also be used for an initial estimate of the vibration exposure.
The actual vibration emission level during the use of the machine may differ from that indicated in the operating instructions or indicated by the manufacturer.
This may be caused by the following factors to be minded before and during the use:
– Proper use of the machine
– Proper condition of the machine for use
- Is the sharpness of the cutting blade in order or the cutting blade correctly installed?
- Handles and optional anti-vibration handles properly mounted on the machine body
When you feel uncomfortable or notice discoloration of skin on your hands during the use of the machine, stop working immediately. Observe sufficient break times to rest. Failure to have sufficient break times may result in a hand-arm vibration syndrome.
The extent of exposure depending on the type of work or machine use should be estimated and appropriate breaks taken. In this way, the extent of exposure can be considerably reduced over the entire work time. Minimise the risk caused by vibrations. Maintain this machine according to the instructions in the manual. If you intend to use this machine frequently, contact your local authorised dealer and purchase anti-vibration accessories if required. Avoid the use of this machine at temperatures under 10°C. Create a work schedule in order to minimise vibration exposure.

Safe working

When improperly handled lawn mowers may be dangerous. The use of electrical tools requires the observation of basic safety precautions to eliminate risk of fire, electrical shock and personal injuries.
Before commissioning this product, read and keep to the following advice. Also observe the preventive regulations of your professional association and the safety provisions applicable in the respective country, in order to protect yourself and others from possible injury.
Pass the safety instructions on to all persons who work with the machine.
i Keep these safety instructions in a safe place.
Personal safety
- Familiarise yourself with the unit, the adjustment elements and the proper use of the unit before using it by referring to the original operating instructions.
- Be observant. Attend to what you do. Start working with rationality. Do not use the device when you are tired or under the influence of drugs, alcohol or medicaments. One moment of carelessness when using the device can result in serious injuries.
- Do not use the machine for unsuitable purposes (see "Normal intended use").
- The operator is responsible for accidents or risks which occur to other persons or their properties.
- Always wear suitable protective equipment when operating the unit:
- safety goggles
- ear protection (Sound intensity level at workplace can exceed 85 dB (A))
■ Always wear suitable work clothing when operating the machine:
- no loosely fitting clothing or jewellery; it may be sucked into the suction opening
- no loose clothing or such with hanging bands or drawstrings
– Solid shoes or boots with a nonskid sole
— Trousers to protect the legs
- Do not work with the device barfooted or only with thongs on your feet.
- Keep bystanders and animals away from your working area.
- Switch off the machine if persons, in particular children or animals, are close to you or if you change your working area.
- Do not allow other persons, especially children, to touch the tool or the battery.
■ Never leave the device unattended. - Only operate the machine with complete and correctly attached safety equipment and do not alter anything on the machine that could impair the safety.
Work area safety
- Familiarize yourself with your environment and pay attention to possible dangers which you may not be able to hear because of the motor noise.
■ Take into consideration environmental influences:
— Do not use the device in moist or wet ambience.
— Do not expose the device to rain. - Do not work in bad weather conditions (e.g. rain, risk of lightning).
- Do not work directly near swimming pools or garden ponds
- Do not work under inadequate lighting conditions (e.g. during fog or dusk) but only in daylight or good artificial lighting.
- Do not operate the device when the grass is wet, if possible.
■ Before trimming, remove all foreign objects (e.g. stones, branches, wires, etc.). While working watch out for further foreign objects. - If you come across to foreign objects, please power off the device and remove those foreign objects. However before you restart the device, check it for possible damages and have it repaired if necessary.
Battery tool use and care
- Do not overload the device! You work better and safer in the given performance range.
- Do not alter the motor controller setting, since the rotary speed controls the safe maximum operating speed, and protects the motor and all rotating parts against damage due to excess speed. Contact the customer service in case of problems.
- Do not modify the device or parts of the device respectively.
- Caution! The tool runs after. Do not try to slow down the tool by hand.
- Switch off the machine and pull the safety key, making sure that all moving parts have come to a complete standstill before:
— carrying out repair works
- maintenance and cleaning
– Removing malfunctions and blockages
- transport and storage
- Blade replacement
— leaving unattended (even during short interruptions)
- Touching the unit with stones, nails or other foreign objects to check the device for damage. Do not continue working with the lawnmower until any necessary repairs have been carried out.
– Check if the unit starts to vibrate excessively
- Check the machine for possible damage:
- Before continuing to use the machine, the protective devices must be inspected to ensure that they work perfectly and with their intended function. This includes also the grass catching bag if available.
- Check if parts are damaged or defective. All parts must be properly mounted and meet all conditions to ensure flawless operation.
- Damaged guards and parts must be properly repaired or exchanged by a recognized, specialist workshop; insofar as nothing else is stated in the instructions for use.
- Worn or damaged cutting blades and fastening bolts may only be replaced in sets to avoid imbalance.
— Make sure that all nuts, bolts and screws are tightened.
- Damaged or illegible safety warning labels should be replaced immediately.
■ Maintain your lawn mower with care:
- Ensure that all nuts, bolts and screws are tight.
- Make sure that the ventilation apertures are free.
- Keep handles free of oils and grease.
– Follow the maintenance instructions.
- Maintain the machine with care and keep it clean.
Do not wash down device with water. (origin of danger electric current).
- Store unused equipment in a dry, locked place out of the reach of children.
Safety instructions for lawn mowers
- Turn the machine off and wait for the cutting blades to stop when you:
- tip the lawn mower
— crossing areas not planted with grass
— transporting the device to and from the work area - Start or operate the starting switch with caution, following the manufacturer's instructions. Before turning on the motor, make sure that your feet are at a safe distance from the cutting tools.
- If not absolutely necessary, do not tilt the device when starting the motor. If it is necessary only tilt the device to the required extent and only lift the side which is averted to the operator.
- Never keep hands or feet close to or under rotating parts. Keep away from the ejection slot.
- Pay attention to sure footing especially when working on slopes or on wet grass and keep your balance at all times. Guide the device only a walking speed.
■ Do not mow on very steep slopes. - Always mow sideways to the incline and never up and down when working on slopes.
- Be especially careful when changing the operating direction on a slope.
- Observe the safety distance given by the handle bar.
GB
- Be especially careful when turning the lawn mower or pulling it towards you.
■ While the motor is running, do not
— lift or carry the device about - lift the impact guard
■ Make sure that the impact guard is closed or the collecting bag is attached.

Use only original spare parts and accessories parts. Accidents can arise for the user through the use of other spare parts. The manufacturer is not liable for any damage or injury resulting from such action.

Do not carry out repair operations on the machine other than those described in section "Maintenance and cleaning" but contact the manufacturer or authorized customer service centres.

Refer to the respective operating instructions for notes on the safety of the battery and the charger.
Description of device / spare parts
1 + 2
| Pos. | Denomination Order-no. | |
| 1 | Lower handle hoop | × |
| 2 | Upper handle hoop | × |
| 3 | Switch handle | × |
| 4 | Machine knob nut M8 | 365632 |
| 5 | Cutting height adjustment | × |
| 6 | Battery compartment | × |
| 7 | Safety knob | × |
| 8 | Impact guard | 365607 |
| 9 | Cup holder | 365610 |
| 10 | Grass catching bag | 365608 |
| 11 | Mulch insert | 365609 |
| 12A | Battery AP 40-2000 (2000 mA) 365501 | |
| 12C | Battery AP 40-4000 (4000 mA) 365503 | |
| 13 | Charging unit ALG 40-1800 | 365500 |
| 14 | Cutting blade | 365618 |
| 15 | Safety label | 363606 |
| 16 | Safety key | 365622 |
| 17 | Plastic clamping plate | 365619 |
| 18 | Clamping plate | 365620 |
| 19 | Nut M10 x 1,25 | 365621 |
| 20 | Cable bracket (not illustrated) | 365617 |
| 21 | Screw St 4 x 15 | × |
| 22 | Running wheel 6" (∅ 152,4 mm) | 365613 |
| 23 | Wheel cover 6" | 365614 |
| 24 | Running wheel 8" (∅ 203,2 mm) | 365615 |
| 25 | Wheel cover 8" | 365616 |
| 26 | Battery compartment cover | × |
Assembly
To achieve perfect function of the machine, follow the notes given in these instructions
Cup holder

Fasten the cup holder (9) with 4 screws M 4 x 15 on the upper handlebar (2).
Handle hoop

Fasten the lower handlebar (1) with the screws M 8 x 15 and nuts M 8 on both brackets.

Now fasten the upper handlebar (2) with the screws M 8 x 45 and the star knob nuts (4) on the lower handlebar (1).

You may fold the handlebar to save space. Loosen the star knob nuts (4) for this purpose and fold the upper handlebar down.
Grass catching bag

Pull the impact guard (8) up and hold it.

Hook the collecting bag (10) with the hooks into the holders on the housing (A).
→ Make sure the discharge opening is clean and does not contain any deposits.

The mulch insert must not be attached when working with the collecting bag.
Mulch insert

Pull the impact guard (8) up and hold it.

Insert the mulch insert. Slide the mulch insert into the opening until the latch engages audibly.
To remove the mulch insert, first press out the notch, then you can remove the mulch insert.

The mulch insert must not be attached when working with the collecting bag.
Before starting
Charging the rechargeable battery
| i | The lithium ion batteries and charger are not part of the scope of delivery and must be purchased separately. (See “Scope of delivery”) |
| ! | Use genuine batteries only.Do not use any other charger to charge the batteries. The charger is optimally matched to the batteries. Using an unsuitable charger may present a risk of shock, overheating or escape of caustic battery fluid. |
Refer to the respective operating instructions for further information on the batteries and the charger.
Inserting/ removing batteries
Inserting batteries
The lawn mower may be operated with one or two batteries; you may also use batteries with different capacities.
8 Open the cover of the battery compartment (6)
→ 8 Insert one or both batteries in the unit.
8 Make sure the batteries (12) are pushed in until they engage audibly.
→ 8 Insert the safety key (16) between the batteries
Removing batteries
- All the unlocking lever (B) up and pull out the batteries.
Start-up
Switching on/off
The device is equipped with a safety circuitry preventing inadvertent switching on.
⚠️ Make sure before each startup that the safety button and the switch bar are working properly. Do not use the unit if it can only be switched on with the switch bar. The unit must be checked and repaired immediately by the customer service.
Start the unit only after placing it on a lawn area Switching on
Tip the lawn mower slightly towards you so that the front wheels are above the ground.
→ 9 Push the safety button (7) and keep it depressed.
→ 9 Next, pull the switch lever (3) toward the handle hoop.
The lawn mower starts and the blade can turn freely
- Your lawn mower has a soft-start function; after operating the ON-switch, the lawn mower takes approximately 3 seconds to reach maximum speed.
Now release the safety button (7).
| i | To protect the battery the unit switches off automatically at a low battery charge.Do not try to restart the lawn mower; this may damage the battery. |
| i | Charge the lithium-ion batteries (→“Battery” operating instructions). |
The cordless lawn mower has an energy-saving function that automatically adjusts the cutting speed to the requirements to achieve the best possible cut while maximising run time and battery life.
Switching off
When you release the switch lever it returns automatically to its original position.
⚠ The cutting blade continues running a little longer after switching off the unit.
Adjusting the cutting height
Before adjusting the cutting height:
- switch off device
- Wait until the cutting blade has come to a stop
- Pull off the safety key and remove the batteries
- 10 Just the cutting height by moving the height adjustment lever (5) to the desired position
→ to increase the cutting height, slide the lever toward the rear wheel
→ to reduce the cutting height, slide the lever toward the front wheel
The cutting height can be adjusted at 7 levels from 2.5 – 7.5 cm.
i Recommended cutting height:
Decorative lawn 2.5 – 4 cm (Position 1-3)
Regular lawn 3 - 5 cm (Position 2-4)
Shade lawn 5 – 6 cm (Position 4-6)
During hot and dry weather the cutting height should be approximately 1 - 2 cm higher.
If the lawn is higher (e.g. after vacation time), cut only one third of the total height at the most. Allow the lawn to rest for a few days and then mow in stages to the normal height again.
➢ Cut the lawn a bit shorter (2.5 – 3 cm) toward winter to prepare the lawn for the winter.
⚠️ Increase the cutting height if the motor is overloaded (motor speed drops and motor noise changes).
Working instructions

Before commencing work, ensure the following:
You may not start to operate the machine until you have read these operating instructions, observed all the instructions given and installed the machine as described!
-
Provide for a safe and cleaned workplace. Remove from the working area objects which might be thrown off.
■ Before starting your work make sure that: -
the tools and bolts are not worn or damaged. To avoid any unbalance worn or damaged tools and bolts must only be replaced as a whole set.
- the cutting blade is in proper condition (see „Blade replacement“)
– all screw connections are tight - no other persons or animals stay within the working area,
- you can always step back without any barriers,
— you have always a secure standing position.
- When working on slopes, always position yourself perpendicular to the incline and ensure safe footing.

Use the unit only on slopes with a gradient less than 15^ . This corresponds to a slope of roughly one metre over a length of 4 metres.

Always keep your hands and feet at a safe distance to the rotating tool.
Working with the lawn mower
Regular mowing is important for a healthy lawn. The recurring cut causes the grasses to branch out at the base and the surface remains beautifully dense. How often you want to mow depends on the growth rate of the lawn. In the main growth period (May - June) twice a week, otherwise once a week.
Do not mow when the lawn is wet or too hot.
- Make sure that the cutting blade is always sufficiently sharp, otherwise the blades of grass will fray when mowing and the lawn will turn yellow.
- Select the appropriate cutting height (see "Adjusting the cutting height")
• Take care not to overload the lawn mower.
① In case of excessive strain, the motor speed drops and the motor noise changes.
→ Stop and release the switch lever
→ Wait until the cutting blade stops
→ Set a higher cutting height
- 11 Run the mower over your lawn at an appropriate, even speed in straight lines.
The lawnmower should always project one wheel width into the cut mowing track. In this way, a seamless and strip-free surface is created. - If you are working with a collecting bag, empty it in time.

Mulching
During mulching, the discharge channel is closed by the mulching insert. This cuts the grass several times until it falls finely chopped to the ground, where it then decomposes. This provides the lawn with important nutrients that it needs to grow and thrive and also protects it from drying out.
Keep the lawn short, mow regularly so that too much mulch material is not produced at once.
i Do not cut more than 20 mm of grass.
▶ Push the lawn mower slowly when mulching.
➢ Ensure that the cutting tracks overlap.
⚠ In any case, adhere to all safety notes (see "Safe working").
Maintenance and cleaning
Before each maintenance and cleaning work:
- switch off device
- Wait until the cutting blade has come to a stop
- Pull off the safety key and remove the batteries

Wear protective gloves in the area of the cutting blades during maintenance and cleaning work to avoid possible injuries.
Maintenance and cleaning activities beyond those described in this chapter may only be performed by customer service.
For maintaining and cleaning, removed security devices must unconditionally be mounted properly and proved again.
Use only original parts. Other parts can result in unexpected damages and injuries.
To make sure that the device is in a safe condition regularly check the device for apparent defects such as
- loose fastening elements (nuts, bolts, screws),
— grass catcher for wear or damaged parts - worn or damaged components and replace them for safety reasons
Maintenance

Blade replacement


The cutting blades can be moved even when the power source is switched off. Wear protective gloves when working with the blades. Risk of injury!
Worn blades reduce the performance of the device and put excessive strain on the motor. Therefore check the condition of the blades before each use. If necessary, have the blades sharpened by an expert or replace them with new ones.
- Secure the cutting blade against twisting with a piece of wood.
• 12 Loosen the fastening nut (19).
• 13 Remove both clamping plates (17, 18).
- Remove the cutting blade
- ⓚ When installing the new cutting blade, pay attention to the mounting direction specified by the holders in the cutting blade.
- Mount the two clamping plates (17, 18) and screw all parts together with the fastening nut (19). Tighten the nut firmly.
When working on the lawn mower, be careful not to pinch fingers between moving cutting blades and stationary parts of the machine.
Cleaning
i Clean the device carefully after each use to ensure faultless function to be maintained.


Wear protective gloves when working on the cutting blade. Risk of injury!
- Clean the device immediately after finishing the work.
■ Empty and clean the grass catching bag if necessary. - Clean the underside of the unit and the cutting blade.
- Clean the housing, especially the vent slots, from grass and dirt stuck to it.
■ Remove the dirt with a cloth or brush. - Do not clean the machine with running water or high-pressure cleaners.
- Do not use solvents for the synthetic parts (petrol, alcohol, etc.) as these can damage the synthetic parts.
For information on maintenance and cleaning of the battery and the charger, please refer to the respective operating Instructions.
Transport
Before each transport, switch off the unit, remove the safety key and remove the battery (batteries) to prevent unintentional start-up.
Even when the motor is switched off, the cutting blade can be damaged during transport, e.g. over hard ground. Therefore, set the cutting height to the highest position for transport.
For information on transport of the battery and the charger, please refer to the respective operating Instructions.
Storage
Before each storage, remove the safety key and remove the batteries to prevent them from starting unintentionally.
- Allow the motor to cool down before storing the machine.
- Store unused equipment in a dry, locked place out of the reach of children.
■ Before a longer storage observe the following in order to prolongate the service life of the machine and to guarantee a smooth running operation: - thoroughly clean the machine
- Treat metal parts after each use against corrosion using an environmentally friendly biologically degradable spray oil.
i Never use any grease!

To facilitate space-saving storage of the device, you can fold down the handle hoop. Loosen the star grip screws (6) for this purpose until the handle hoop (2) can be folded.

For information on storage of the battery and the charger, please refer to the respective operating Instructions.
Disposal
Dispose of the lawn mower, battery, charger, accessories and packaging in an environmentally friendly manner.
For EU countries only.
Electrical devices do not go into the domestic rubbish.
According to the European Directive 2012/19/EU on electrical and electronic scrap, electrical devices that are no longer serviceable must be separately collected and brought to a facility for an environmentally compatible recycling.

For information on disposal of the battery and charger, please refer to the respective operating Instructions.
Guarantee
Please observe the enclosed terms of guarantee.
Possible faults
Before each fault clearance
- switch off device
— Wait until the cutting blade has come to a stop
— Pull off the safety key and remove the batteries
After each fault clearance, put into operation and recheck all security installations.
| Fault | Possible cause | Remedy |
| Machine does not start after switching on | Safety key not insertedWrong starting sequenceLithium ion battery run downLithium-ion battery not engaged correctlyLithium ion battery too hot / coldGrass clogs the mower housingLithium ion battery defectiveSafety button or switch handle defectiveInternal fault | Insert the safety key between the batteriesSee chapter on “Startup”Charge the lithium ion batteryInsert the lithium-ion battery correctlyAllow lithium ion battery to cool / warm upPull off the safety key and clean the housingPlease contact the after sales service. |
| Machine does not work with full performance | Lithium ion battery run downLithium ion battery defective | Charge the lithium ion batteryPlease contact the after sales service. |
| The device operates with interruptions | Internal fault.Safety button or switch handle defectiveDevice overloaded as grass too high | Please contact the after sales service.Adjust a larger cutting height |
| Unusual vibrations or noises | Cutting blade damaged or dullLoose screws, nuts or other fasteners | See “Blade replacement”Tighten all parts; contact customer service if the noises continue to occur. |
| Unsatisfactory mowing results | Cutting height set too lowDull bladesDischarge opening blockedCollecting bag is full | Adjust a larger cutting heightSee “Changing blades”Empty the grass catching bag and remove the blockageEmpty the collecting bag |
| Cutting time with fully charged battery too short | Rechargeable battery is lowBattery service life exhaustedGrass too high, dense or cutting height set too low | Charging the rechargeable batteryReplace the rechargeable batteryAdjust a larger cutting height, walk more slowly and / or mow more often |
| Unit shuts off by itself | Lithium ion battery too hot (45°C)Battery charge too low | Allow lithium ion battery to coolCharge the lithium ion battery |
| Motor is running, blades stopped | Internal fault. | Please contact the after sales service. |
① In case of further faults or inquiries please contact your local dealer.
Technical data
| Typ / Modell | RMC 40-400 | |
| Year of construction see last page | ||
| No-load speed n0 3000 - 3500 min | -1 |  |
| Cutting width 40 cm |  | |
| Grass catching bag capacity 50 l |  | |
| Cutting height 2.5 – 7.5 cm (7 levels) |  | |
| Weight (without battery) | ca. 20 kg | |
| Dimensions (length x bright x height) | 131 cm x 46 cm x 106 cm | |
| Hand-arm vibration | ahd= 2.2 m/s2 | |
| Measuring uncertainty Khd 1.5 m/s2 | ||
| Sound power level LwA (according 2000/14/EC) | Measured sound power level 91 dB (A)Guaranteed sound power 94 dB (A) |  |
| Measuring uncertainty KwA 3.0 dB (A) | ||
| Sound levels at the work-place LpA 75 dB (A) | ||
| Measuring uncertainty KpA 3.0 dB (A) | ||
| Compatible battery voltage | 36 V (max. 40 V) === |  |
Refer to the respective operating instructions for technical specifications of the batteries and the charger.
Declaration of Conformity
No. (S-No.) 18783
according to EC Directive: 2006/42/EG
We,
ATIKA GmbH
Josef-Drexler-Str. 8 – 89331 Burgau – Germany
herewith declare under our sole responsibility that the product
Rasenmäher (Lawn mower) model RMC 40-400
Serial number: 000001 - 020000
is conform with the above mentioned EC directives as well as with the provisions of the guidelines below:
2014/30/EU, 2000/14/EC and 2011/65/EU.
Following harmonized standards have been applied:
EN 60335-1:2012+A11 :2014; EN 60335-2-77 :2010; EN 62233:2008;
EN 55014-1:2006+A1 :2009/+A2 :2011; EN 55014-2:2015 ;
Conformity assessment procedure: 2000/14/EC – Appendix VI
Measured level of the acoustic output L_WA 91 dB (A).
Guaranteed level of the acoustic output L_WA 94 dB (A).
Duly authorised person for the compilation of technical documents:
ATIKA GmbH – Technical department Josef-Drexler-Str. 8 – 89331 Burgau – Germany
Burgau, 09.07.2018
i.A. G. Engineering design management
i Technical modifications reserved!
Indkobling / Frakobling
Introducerea accumulatorilor