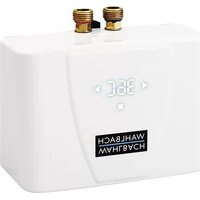
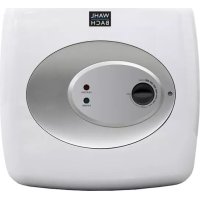
Mini E - Boiler Wahlbach - Free user manual and instructions
Find the device manual for free Mini E Wahlbach in PDF.


| Product type | Electric instantaneous water heater |
| Brand | Wahlbach |
| Model | Mini E (3.5 / 4.5 / 5.5 kW) |
| Dimensions (H x W x D) | 135 x 186 x 87 mm |
| Weight | 1.5 kg |
| Power supply | 230 V / 50 Hz |
| Rated power | 3.5 kW, 4.5 kW or 5.5 kW depending on model |
| Rated current | 16 A (3.5 kW), 20 A (4.5 kW), 24 A (5.5 kW) |
| Cable cross-section | 3x1.5 mm² (3.5 kW), 3x2.5 mm² (4.5/5.5 kW without plug) |
| Hot water flow rate (ΔT=25°C) | 2.0 L/min (3.5 kW), 2.6 L/min (4.5 kW), 3.1 L/min (5.5 kW) |
| Flow rate at ignition | 1.2 L/min (3.5 kW), 1.4 L/min (4.5 kW), 1.6 L/min (5.5 kW) |
| Working pressure | 0.8 MPa max |
| Minimum operating pressure | 0.05 MPa (0.5 bar) |
| Required water resistivity | ≥ 1300 Ω·cm at 15°C |
| Max. inlet water temperature | 30°C |
| Water connection | G 3/8\" (blue inlet, red outlet) |
| IP protection class | IP24 |
| Electrical protection class | I |
| Heating system | Closed |
| Sound power level | 16 dB(A) |
| Energy efficiency ηwh | 40.0% (3.5 & 4.5 kW), 40.1% (5.5 kW) |
| Daily electricity consumption (Qelec) | ~1.26 kWh |
| Draw-off profile | XXS |
| Maintenance | Clean exterior with a damp cloth and mild detergent; regularly clean the inlet water filter |
| Safety | Automatic shut-off in case of water shortage or overheating; frost protection (do not install in at-risk areas) |
| Warranty | 24 months (manufacturing and material defects) |
| Country of manufacture | Netherlands |
Frequently Asked Questions - Mini E Wahlbach
User questions about Mini E Wahlbach
0 question about this device. Answer the ones you know or ask your own.
Ask a new question about this device
Download the instructions for your Boiler in PDF format for free! Find your manual Mini E - Wahlbach and take your electronic device back in hand. On this page are published all the documents necessary for the use of your device. Mini E by Wahlbach.
USER MANUAL Mini E Wahlbach
GB: Instant water heater Mini E
User manual
Trouble shooting & Conditions of Guarantee
NL: Doorstroomverwarmer Mini E
Gebruiksaanwijzing
natural_image
White industrial water heater with two brass fittings and a 'WAHLBACH' label, against a blue background (no other text or symbols visible)WAHL
BACH
Durchlauferhitzer Instant water heater Doorstroomverwarmer Chauffe-eau instantané
3,5 / 4,5 / 5,5 kW
0,8 MPa
A. OBERTISCH/ OVERSINK

natural_image
Mechanical component diagram showing a valve with threaded ports and a handle (no text or symbols)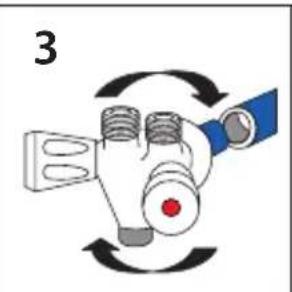
natural_image
Diagram of a mechanical device with rotating arrows and a red circular mark (no text or symbols)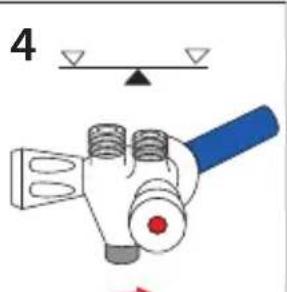
natural_image
Technical line drawing of a device with labeled parts, showing internal components and tool connections (no text or symbols)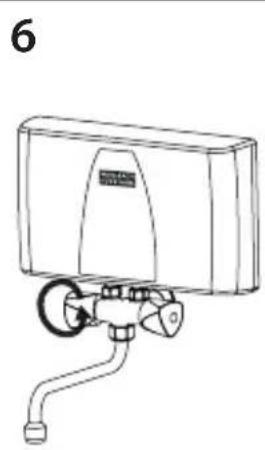
natural_image
Line drawing of a portable water heater with hose and valve (no text or symbols)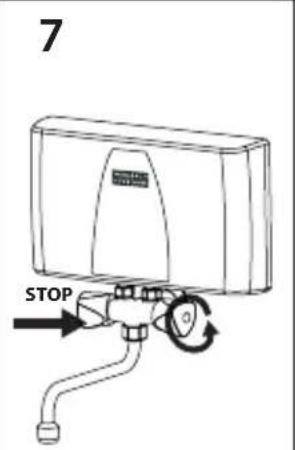
natural_image
Line drawing of a portable water heater with a plug and outlet, no text or symbols presentB. UNTERTISCH/ UNDERSINK

natural_image
Simple line drawing of a faucet with two blue and red vertical bars on a gray base (no text or symbols)
natural_image
Completely blank white image with no visible content, text, or symbols.
natural_image
Blank white image with no visible content, text, or symbols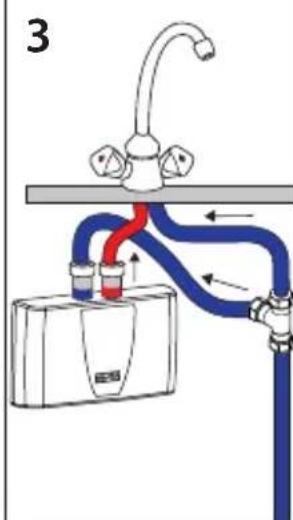
C.
1

natural_image
Technical diagram of two bolted components mounted on a base plate with an arrow indicating direction (no text or symbols)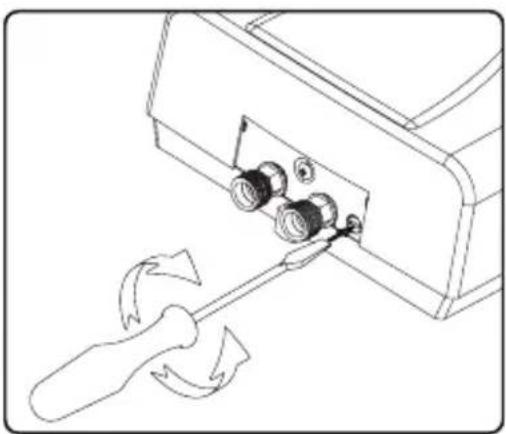
natural_image
Line drawing of a mechanical device with a wrench and screwdriver inserted, showing no text or symbols4
2
natural_image
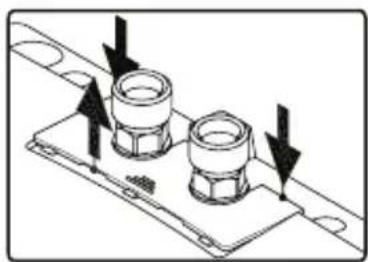
Technical diagram of two bolted components mounted on a base plate with directional arrows indicating movement (no text or symbols)| ↑∅ | - |
| ↓∅ | + |
3

natural_image
Technical diagram of two bolted components mounted on a base plate with directional arrows indicating movement (no text or symbols)D.
natural_image
Technical line drawing of a mechanical component with mounting holes and a curved part (no text or symbols)| 1. USE OF THE MANUAL | |
| Dear customer, we thank you for your purchase of our Wahlbach device. | |
| These instructions contain important information about commissioning, switching the device on and maintenance. To ensure your safety and that of others we suggest that you read these installation and operating instructions before using the device for the first time. Please keep the instructions and other documentation close to the device. | |
| This device has been manufactured in accordance with the prescribed standards and has been tested by the competent authorities. It has a Safety Certificate and a Certificate of Electromagnetic Compatibility. The technical data for the product is displayed on the sticker between the inlet and outlet pipes. | |
| The appliance should be installed by qualified persons. All repair and maintenance work on the device, for example the removal of limestone and water scale deposits, may only be carried out by duly authorised technical staff. The applicable regulations (German Technical and Scientific Association for Gas and Water (DVGW) Technical Guidelines for Water Systems) and regional requirements must always be duly observed! | |
| This device has been designed for use in modern small apartment blocks, hotels and toilets. Its modern design and the use of carefully selected materials and an improved manufacturing process ensure high quality. | |
| Symbols used in this manualThe following symbols are used in this manual and on the appliance: : | |
| Meets the basic safety standards of the relevant European Directives. | |
| Failure to observe this instruction may expose you or others to danger.Failure to observe this instruction may lead to damage to the device. | |
| Indicates live parts. Failure to observe this instruction may lead to damage to the device or danger to you or others. | |
| Please read the manual. | |
| Hazardous materials and waste electrical and electronic equipment should be taken to a designated recycling point. | |

This appliance can be used by children aged from 8 years and above and persons with reduced physical, sensory or mental capabilities or lack of experience and knowledge if they have been given supervision or instruction concerning use of the appliance in a safe way and understand the hazards involved.

Children shall not play with the appliance. Cleaning and user maintenance shall not be made by children without supervision.
Declaration of conformity
Wahlbach hereby declares that the Wahlbach device complies with the directives and standards:
• 2006/95/EC Low Voltage Directive
• 2004/108/EC Electromagnetic Compatibility Directive
• 2011/65/EC (RoHs II)
• 2009/125/EC Ecodesign
• (EC) No. 814/2013
And also comply with the provisions of the following European Standards:
• EN 62233:2008 + CI:2008
• EN 61000-3-2:2014
• EN 61000-3-3:2013
• EN 60335-1:2012 + All:2014 + AI3:2017
• EN 60335-2-35:2016
• EN 55014-1:2017
• EN 55014-2:2015
Wahlbach, De Overmaat 78, 6831 AJ Arnhem, The Netherlands, 2019-06-01
2. MOUNTING INSTRUCTIONS
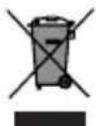
Disposal of the appliance
Old appliances must not be disposed of in your household waste!
Every consumer is legally obliged to dispose of old appliances separately from their household waste and to take them, for example, to a collection point in their local community or local district. Old electrical appliances will be accepted there free of charge. This ensures that the old appliances are properly recycled and any negative impacts on the environment are avoided.
This is why electrical appliances are marked with the symbol shown above.
| EnvironmentThis device is delivered in sturdy packaging in order to avoid damage during transport. This packaging consists mainly of recyclable materials. We request that you dispose of the packaging accordingly for recycling. | |
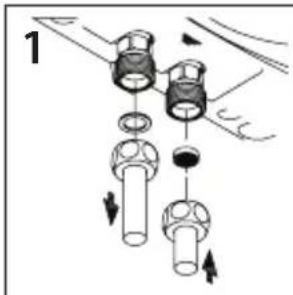
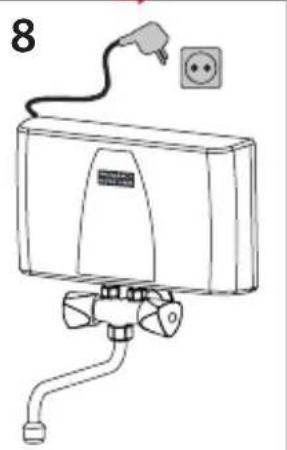
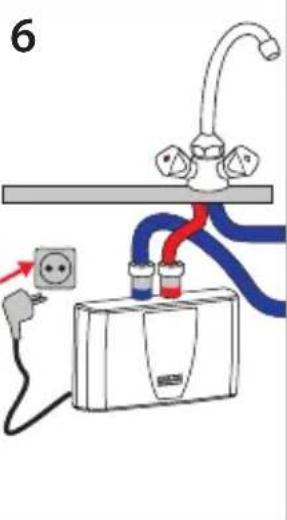
| InstallationThe device should be installed in accordance with the drawing on the first page of the user manual. Any other installation position may result in serious damage to the device. Installation should take place as close as possible to a cold water connection. The product should be protected from the effects of frost (for example in caravans, summer houses, etc.). The device may be installed above (OT) or under (UT) the worktop. | |
| Connection to the water supply | |
 | FrostThe device should be installed in a vertical position in a room protected from frost and in the proximity of the water connections. In case the room cannot be protected against frost, the device should not be installed in this room. Should the device be installed in such a room, the device should be emptied before the frost danger will occur. |
 | If the mains water supply pressure exceeds 5 bars, a pressure restrictor must be fitted in the feed pipe. At the spout of the tap only a strainer (supplied with tap) can be installed, whereas a normal aerator or restrictor is prohibited. |
 | Incorrect usage of this equipment (e.g. garden hose), or usage of a tap that is not meant for low pressure installations may cause pressure build-up in the device that might lead to damage and thereby void the warranty! |
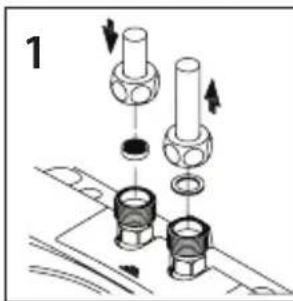
 | If the mains water supply pressure exceeds 5 bars, a pressure restrictor must be fitted in the feed pipe. At the spout of the tap only a strainer (normally supplied with a low-pressure tap) can be installed, whereas a normal aerator or restrictor is prohibited.Blue = cold water entry side (for filling)Red = hot water exit side (hot water demand)This system allows water to be drawn from a single discharge point. Never use a shut-off valve in the appliance's outlet.The connection pipes must be installed as shown in the drawing. |
| Connection to the electricity supply | |
  | The device must be filled with water (see above). Only then may the appliance be connected to the electricity supply (insert the plug in the wall socket).Connection of the device to the power supply network must take place in accordance with electric installation standards and as specified by local laws and regulations. |
 | Avoid danger from damaged power supply cables. In the event of damage, the device must be replaced by the manufacturer or its customer service department, or by an equivalently-qualified person. |
  | Internal modifications to the product may cause problems if this work is not carried out by authorized and qualified technical staff. The warranty only applies if the product has not been modified in any way, i.e. subject to it being in unchanged condition. |
| 3.5 kW: The device must be directly connected to the power supply network (230V) via original electrical cable and plug.4.5 / 5.5 kW: Observe the appliance name plate. The device must be directly connected to the power supply network (230V). Loosen the two screws and then remove the cover. Route the wiring through the cable entry and connect the cable to the terminal block. | |
Drawing A. Installation as oversink model
The device must be installed as shown in the installation drawing (A) for oversink model on the first page of this manual.
- Left outlet of the device is the water outlet (hot/ red), right outlet is the water inlet (cold/ blue).
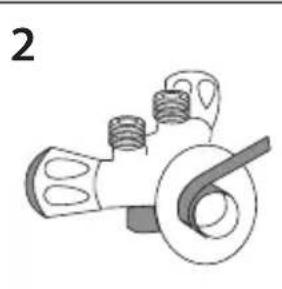
- Prepare the water connections to the tap. Make sure main water supply is switched off.
- Prepare the electrical connections for the device. For the 4.5 kW and 5.5 kW: Make sure main power is switched off.
- To prepare the connection to the water supply Teflon tape must be used for sealing the pipes.
- Mount the tap to the main water supply.
• Level the tap horizontally. - Mount the device to the tap.
- Open the main water supply and check for leakage and release air from the system by opening the hot water tap.
- 3.5 kW: When air has left the system, plug in the device to the electric system.
4.5 and 5.5 kW: When air has left the system, connect the device to the electric system.
• Heater should now function!
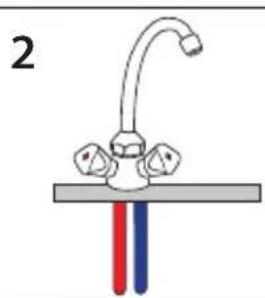
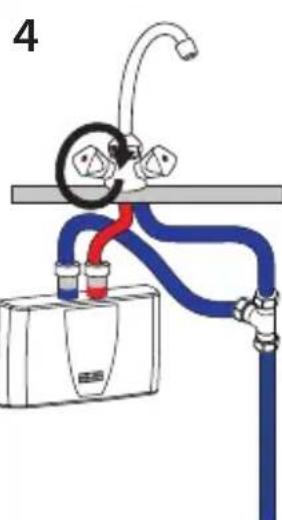
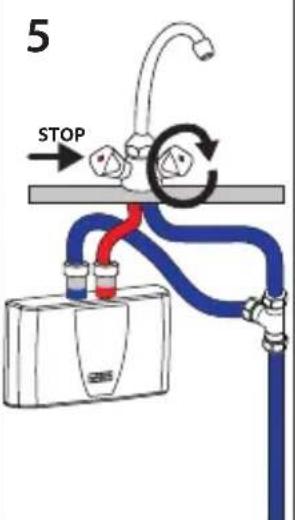
Drawing B. Installation as undersink model
The device must be installed as shown in the installation drawing (B) for undersink model on the first page of this manual.
- Left outlet of the device is the water inlet (cold/ blue), right outlet is the water outlet (hot/ red).
- Prepare the water connections to the tap. Make sure main water supply is switched off.
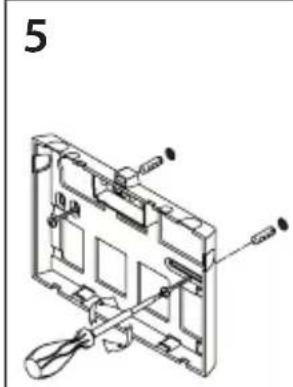
• Install the device by using the plastic installation bracket which is supplied with the device. For the 4.5 kW and 5.5 kW: Make sure main power is switched off. - Connect the water supply to the device and to the main water supply.
- Open the main water supply and check for leakage and release air from the system by opening the hot water tap.
- 3.5 kW: When air has left the system, plug in the device to the electric system.
4.5 and 5.5 kW: When air has left the system, connect the device to the electric system.
• Heater should now function!
Technical specifications
| Model Wahlbach Mini 3.5 E | Mini 4.5 E Mini 5.5 | E | |
| Nom. power rating 230V, | 50Hz. 230V, 50Hz. | 230V, 50Hz. | |
| Electric supply 3,5kW 4,5kW | 5,5kW | ||
| Nominal current 16A 20A | 24A | ||
| Cable size 3x 1,5mm2 | 3x 2,5mm2 (not included) | 3x 2,5mm2 (not included) | |
| Flow rate (Δt=25K) L/m 2, | 0L/min. 2,6L/min. 3, | 1L/min. | |
| Heating system | unvented unvented | unvented | |
| Min. water resistance at 15°C | ≥ 1300Ωcm | ≥ 1300Ωcm | ≥ 1300Ωcm |
| Switch on flow rate | 1,2L/min. | 1,4L/min. | 1,6L/min. |
| Max. inlet temperature | 30°C | 30°C | 30°C |
| Non-usage consumption | <0,1Wh/h | <0,1Wh/h | <0,1Wh/h |
| Protection class | I | I | I |
| Type of protection | IP24 | IP24 | IP24 |
| Dimensions heater (H x W x D) | 135 x 186 x 87mm | 135 x 186 x 87mm | 135 x 186 x 87mm |
| Unit weight | 1,5kg | 1,5kg | 1,5kg |
| Water connections | G3/8" | G3/8" | G3/8" |
| Distance water connections | 30mm | 30mm | 30mm |
| Max. pressure water mains | 0,8MPa | 0,8MPa | 0,8MPa |
| Switch on flow pressure | 0,05MPa | 0,05MPa | 0,05MPa |
| Daily electricity consumption (Qelec) | 1,263 kWh | 1,260 kWh | 1,268 kWh |
| Load profile | XXS | XXS | XXS |
| Sound power level (LWA) | 16 dB | 16 dB | 16 dB |
| Energy efficiency (ηwh3) | 40,0 % 40,0 % | 40,0 % |
| 3. USER MANUAL | |
 | Do not switch on the device if there is a chance the water inside the device is frozen. |
| Make sure the pressure of your water supply system supersedes the 0,5bar (0,05MPa). | |
| Setting the desired water temperatureStep 1: When the power is turned on for the first time, or if the power has been switched off, the appliance requires about 15 seconds to start up.Step 2: Open one of the hot water taps connected to the system and press ■ to illuminate the display. Press ■ again to switch on the appliance. The set temperature will be displayed for 2 seconds. Then the display switches to the actual temperature of the running water.Step 3: To increase the temperature: open one of the hot water taps connected to the system and press ▶. The temperature can be reduced by pressing ◀. The set temperature is displayed for 2 seconds. Then the display switches to the actual temperature of the running water. | |
| After this, the appliance will automatically switch on each time a water tap is opened. The temperature of the running water appears on the display. When the tap is closed, the display switches off after 3 seconds. | |
| The appliance can be installed with the inlet and outlet at the top or at the bottom. If the controls and temperature indication are displayed upside down, switch off the power briefly. The display will correct itself when you switch on the power again. The appliance will require about 15 seconds to start up again. | |
| If the set temperature is not reached, adjust the water flow rate. | |
| C. Adjusting the water flow rate.Step 1: Press down on the ribbed area of the cover and move it towards the wall.Step 2: Apply pressure to the rear of the cover until the front lifts.Step 3: Now remove the cover by pulling it forwards.Step 4: Adjust the screw to the desired setting. Turn it clockwise for maximum water flow. Turn it anticlockwise to reduce the water flow. | |
Temperature and flow rate
| Flow rate ( t ) | |||
| Rating power 2.0L/min 2.5L/min 3.0L/min | |||
| 3.5kW +25.0°C +20.0°C +16.7°C | |||
| 4.5kW +32.1°C +25.7°C +21.4°C | |||
| 5.5kW +39.3°C +31.4°C +26.2°C | |||
Note: Parameters in the above diagram are drawn under the following condition: Voltage Supply: 230V /50Hz
4. MAINTENANCE

Maintenance
Professional maintenance may only be carried out by duly authorised technical staff.

If faulty, never try to repair the hot water device yourself. Please contact the nearest service specialist or the party that supplied the appliance originally.

D. Disassemble
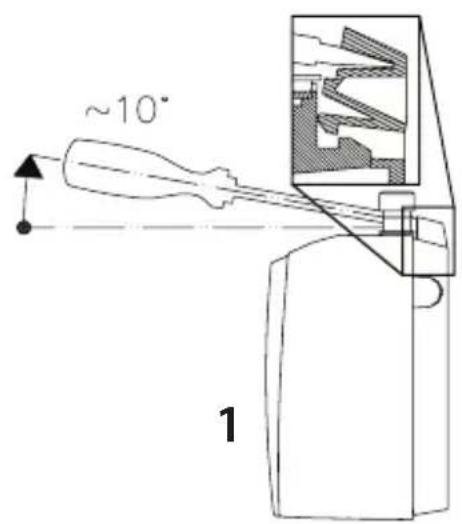
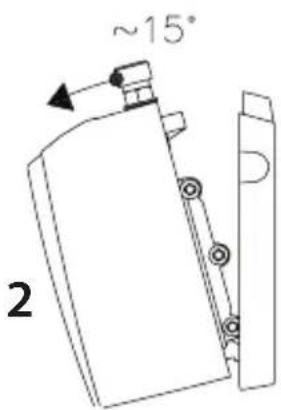
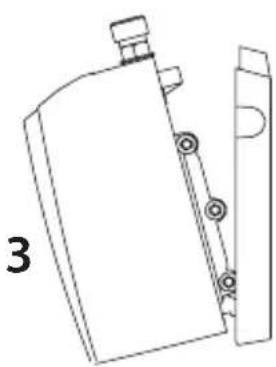
Removing the appliance from the wall bracket. (1) Insert a flat screwdriver under the lip between the water connections. Carefully lever the screwdriver upwards slightly. (2) Tip the appliance at an angle relative to the wall bracket and (3) disengage it by lifting it upwards.
Care
The enclosure can simply be cleaned with a damp cloth. Do not use aggressive cleaners or cleaners with a scouring effect!
Prolonged shutdown
Do not use heated water as drinking water.
After prolonged shutdown of the device for example due holiday, the device should be fully heated up to the maximum temperature (tap at minimum flow) before re-using. It is recommended to flush the pipes for one minute.
Cleaning the filter
Check the filter which is incorporated in the cold water inlet of the device (blue) regularly and keep it free from debris and dirt. This can be obtained by separating the device from the tap. Make sure you have switched off the main power supply and the main water supply.
5. TROUBLE SHOOTING
| Symptom: No heat, display off | |
| Cause Remedy | |
| Electric supply is off Turn on the main circuit breaker. | |
| No or low water flow Ensure that the minimum water pressure (0,05Mpa / 0,5bar) to switch on the device is met. Also check that the inlet filter screen is clear from any debris. This is located in the inlet. | |
| Water connections are reversed | Cold water inlet = blue;Hot water outlet = red. |
| Symptom: No heat or little hot water, display on | |
| Cause Remedy | |
| Water flow too high Reduce the water flow. | |
| Incorrect power supply Make sure that the device is connected to the voltage supply specified on the rating label on the front cover of the device and no other. | |
| E2 Replace the water temperature sensor. Contact after sales service at www.wahlbach.com | |
| Symptom: Water temperature is too low | |
| Cause Remedy | |
| Water flow too high Reduce the water flow, see chapter 3. | |
6. WARRANTY CONDITIONS
Warranty
The rights under this manufacturer's warranty shall apply in addition to the buyer's statutory rights. This warranty shall in no way restrict the buyer's statutory rights in particularly towards the seller.
Entitlement
The claiming of rights under this warranty shall be subject to the submission of the respective proof of purchase.
Content
Wahlbach, Gildestraat 13, 6883 DB Velp, the Netherlands shall guarantee as the manufacturer that this product is free of material and manufacturing errors. Material and manufacturing errors arising during the warranty period shall justify the rights under the warranty. This warranty shall not cover errors due to improper installation or incorrect taking into use, incorrect operating conditions or defective maintenance or repair work. Normal wear and tear as for lime scaling shall also be excluded under this warranty. The warranty will not be valid if the problem is caused by extreme values of drinking water (pH value not between 7 and 9.5 and/or Cl above 150 mg/l and/or Fe above 0.2mg/l).
Duration
The warranty shall be valid for 24 months. The warranty period shall commence on the day on which the product is purchased. Warranty services provided shall neither prolong the warranty period nor initiate a new warranty period.
Claims
The defective product should be sent together with the proof of purchase to the place of purchase.
Wahlbach shall not be liable for transport damage. The product shall be repaired or replaced at the discretion of Wahlbach. The functioning product shall then be sent to the buyer. Wahlbach shall acquire ownership of replaced parts or products. Wahlbach shall not be obliged to provide other services such as repair on location, dismantling of defective
Invalidity of warranty
Attempted repairs carried out by a customer or third party that are not authorized by Wahlbach shall invalidate the warranty. The same shall apply if parts are installed in the product or connected to the product that are not original parts from Wahlbach.
Restriction
This warranty shall be restricted to rectification and subsequent delivery. This warranty shall not include compensation, withdrawal from the agreement, reduction in price or any reimbursement for consequential loss due to defects.
This warranty does not apply to devices purchased outside Germany. The statutory provisions and delivery conditions of the national company or importers must be observed.
6. CONDITIONS DE GARANTIE
Garantie
natural_image
Close-up of a person's eye with water flowing over the mouth, against a clear blue background (no text or symbols)WAHL BACH
WWW.WAHLBACH.COM
WB V1 2019-08
- OBERTISCH/ OVERSINK
- UNTERTISCH/ UNDERSINK
- C.
- D.
- Declaration of conformity
- MOUNTING INSTRUCTIONS
- Disposal of the appliance
- Drawing A. Installation as oversink model
- Drawing B. Installation as undersink model
- MAINTENANCE
- Maintenance
- Disassemble
- Care
- Prolonged shutdown
- Cleaning the filter
- TROUBLE SHOOTING
- WARRANTY CONDITIONS
- Warranty
- Entitlement
- Content
- Duration
- Claims
- Invalidity of warranty
- Restriction
- CONDITIONS DE GARANTIE
- Garantie
Brand : Wahlbach
Model : Mini E
Category : Boiler