MPX C237EC - Surveillance Camera FLIR - Free user manual and instructions
Find the device manual for free MPX C237EC FLIR in PDF.


User questions about MPX C237EC FLIR
0 question about this device. Answer the ones you know or ask your own.
Ask a new question about this device
Download the instructions for your Surveillance Camera in PDF format for free! Find your manual MPX C237EC - FLIR and take your electronic device back in hand. On this page are published all the documents necessary for the use of your device. MPX C237EC by FLIR.
USER MANUAL MPX C237EC FLIR
On-Screen Display Guide C23 Series MPX Cameras
text_image
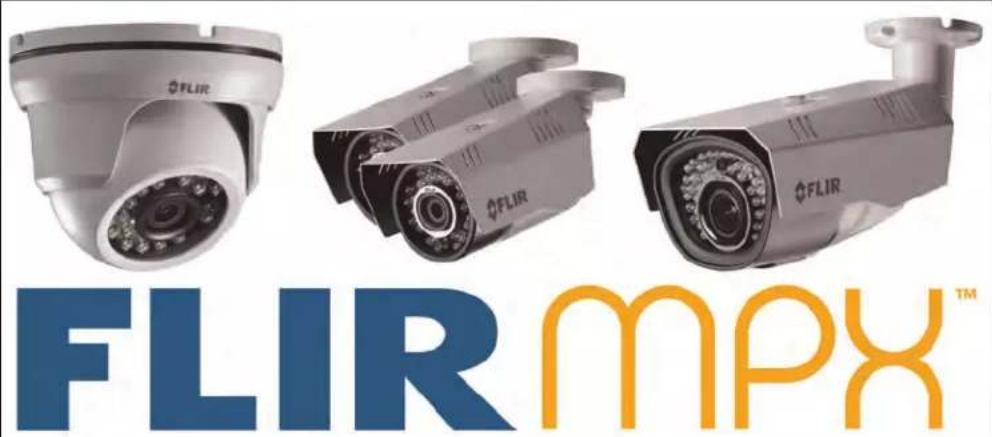
FLIR FLIR FLIR FLIR mpx™On-Screen Display
Guide
C23 Series MPX
Cameras
Thank you for purchasing this product. FLIR is committed to providing our customers with a high quality, reliable security solution.
This manual refers to the following models:
C23 Series
For the latest online manual, downloads and product updates, and to learn about our complete line of accessory products, please visit our website at:
www.flirsecurity.com/pro

WARNING
RISK OF ELECTRIC SHOCK DO NOT OPEN

WARNING: TO REDUCE THE RICK OF ELECTRIC SHOCK DO NOT REMOVE COVER. NO USER SERVICABLE PARTS INSIDE.
REFER SERVICING TO QUALIFIED SERVICE PERSONNEL.

The lightning flash with arrowhead symbol, within an equilateral triangle, is intended to alert the user to the presence of uninsulated "dangerous voltage" within the product's enclosure that may be of sufficient magnitude to constitute a risk of electric shock.

The exclamation point within an equilateral triangle is intended to alert the user to the presence of important operating and maintenance (servicing) instructions in the literature accompanying the appliance.
WARNING: TO PREVENT FIRE OR SHOCK HAZARD, DO NOT EXPOSE THIS UNIT TO RAIN OR MOISTURE.
CAUTION: TO PREVENT ELECTRIC SHOCK, MATCH WIDE BLADE OF THE PLUG TO THE WIDE SLOTAND FULLY INSERT.
Table of contents
1 Using the On-Screen Display (OSD) Menu ....1
1.1 Accessing the OSD Menu....1
2 Main Menu....2
2.1 Language....2
2.2 Video Format ....2
2.3 Wide Dynamic Range (WDR) 3
2.4 High Light Compensation (HLC)....3
2.5 Back Light Compensation (BLC) 4
2.6 Digital Noise Reduction (DNR)....5
2.7 Version ......6
3 Advanced Menu ....7
3.1 Lens Settings....8
3.2 Exposure 9
3.2.1 Brightness 9
3.2.2 Shutter.... 10
3.2.3 Sens-Up.... 10
3.2.4 Automatic Gain Control (AGC) 11
3.3 White Balance.... 11
3.4 Day & Night 12
FLIR MPX cameras have an integrated OSD menu that allows you to configure camera settings related to exposure, white balance, day / night settings and other camera image adjustments. You can also configure advanced picture correction features such as Wide Dynamic Range, Digital Noise Reduction and more.
The OSD menu appears as a text overlay on top of the camera image. In order to view the menu, you must connect the camera to a monitor.
1.1 Accessing the OSD Menu
FLIR MPX cameras feature an OSD control stick on the camera cable for easy access and configuration of menu items.
To access the OSD menu:
- Connect the camera to a power supply. See the quick start guide provided with your camera for details.
- Connect the camera to a monitor or compatible DVR.
text_image
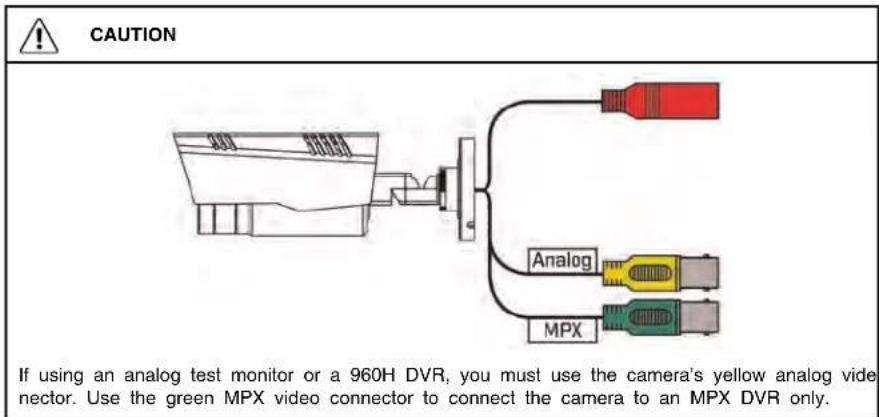
CAUTION If using an analog test monitor or a 960H DVR, you must use the camera's yellow analog vide nector. Use the green MPX video connector to connect the camera to an MPX DVR only.- Push the middle of the control stick to open the OSD menu.
- Move the control stick ↑ / ↓ to move the menu cursor, then ← / → to change the value of menu items.
- Push the middle of the control stick to confirm selection.
- Arrows beside menu items indicate a submenu(). Select the setting and push the middle of the control stick to enter the submenu.
- Select RETURN and push the middle of the control stick to return to the previous menu from a submenu, or EXIT from the main menu to close the OSD menu.
2
Main Menu
The main menu lets you configure the OSD menu language and basic camera attributes, such as video format. You can set backlight compensation and digital noise reduction from the main menu.
See below for the structure of the main menu:
| LANGUAGE | EnglishDeutschFrançaisEspañolPycckii PolskiItalianoPortuguês |
| VIDEO FORMAT | NTSCPAL |
| BACKLIGHT | WDRBLCHLC |
| DNR | LOWMIDDLEHIGH |
| ADVANCED Enter the advanced menu. See 3 Advanced Menu, page 7 for full details. | |
| VERSION Displays the current firmware version of the camera. | |
| EXIT Exits the menu. | |
2.1 Language
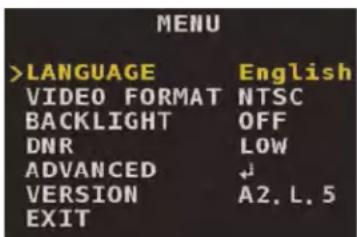
Select the language you want the OSD menu to appear in.
text_image
MENU >LANGUAGE English VIDEO FORMAT NTSC BACKLIGHT OFF DNR LOW ADVANCED ↓ VERSION A2. L. 5 EXITThe following languages are supported:
- English
- French
- Spanish
- German
- Russian
- Polish
- Italian
- Portuguese
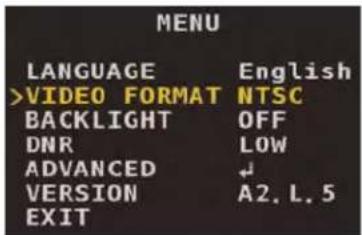
2.2 Video Format
Select the appropriate video format for your region. Select NTSC for North American installations, or PAL for European installations.
text_image
MENU LANGUAGE English >VIDEO FORMAT NTSC BACKLIGHT OFF DNR LOW ADVANCED ↓ VERSION A2. L. 5 EXIT2.3 Wide Dynamic Range (WDR)
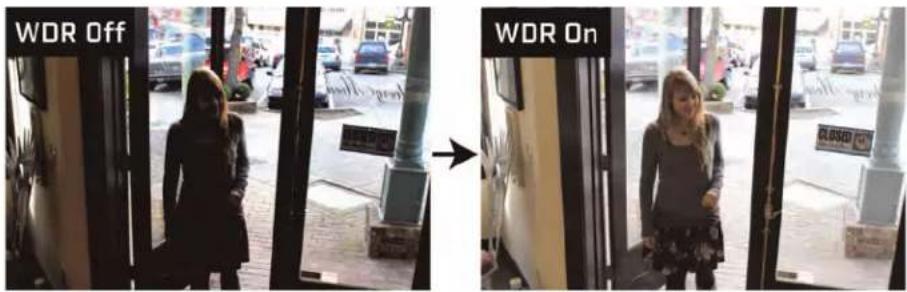
WDR fixes harsh contrast between bright and dark sections of the camera image. WDR is recommended for applications where light intensity varies throughout the day, or scenes with distinctly light and dark areas.
text_image
WDR Off WDR OnTo configure WDR:
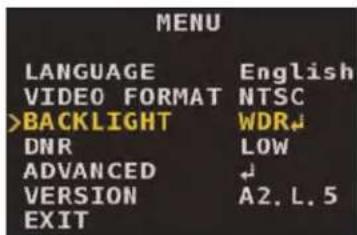
- From the main menu, use the control stick to select BACKLIGHT.
- Move the control stick / to select WDR. Push the middle of the control stick to configure WDR settings.
text_image
MENU LANGUAGE English VIDEO FORMAT NTSC >BACKLIGHT WDR↓ DNR LOW ADVANCED ↓ VERSION A2, L. 5 EXIT- Select WEIGHT. Move the control stick / to select LOW, MIDDLE or HIGH. Higher weight means a longer shutter for dark areas of the image and shorter shutter for bright areas.
2.4 High Light Compensation (HLC)
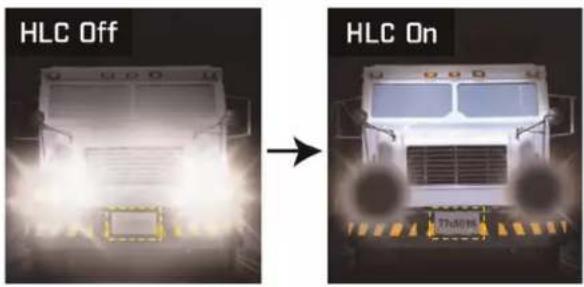
HLC darkens extremely bright areas of the camera image to ensure clear renderings of objects in the scene. This is recommended for scenes with extremely bright areas as well as nighttime images with intense brightness (for example, to identify a vehicle with bright headlights).
text_image
HLC Off HLC OnTo configure HLC:
- From the main menu, use the control stick to select BACKLIGHT.
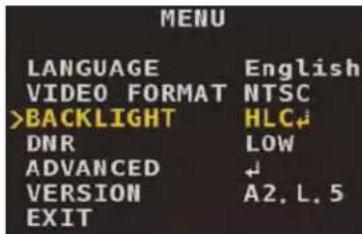
- Move the control stick / to select HLC. Push the middle of the control stick to configure HLC settings.
text_image
MENU LANGUAGE English VIDEO FORMAT NTSC >BACKLIGHT HLC↓ DNR LOW ADVANCED ↓ VERSION A2, L, 5 EXIT-
Select MODE, then move the control stick / to configure. Select ALL DAY to enable HLC in both day and night conditions, or select NIGHT ONLY to only enable HLC when the IR LEDs are active.
-
Select LEVEL, then move the control stick / to configure. Setting a lower level increases the black mask area, auto exposure gain, and noise level in the camera image. It is recommended to keep the HLC level at the default setting.
2.5 Back Light Compensation (BLC)
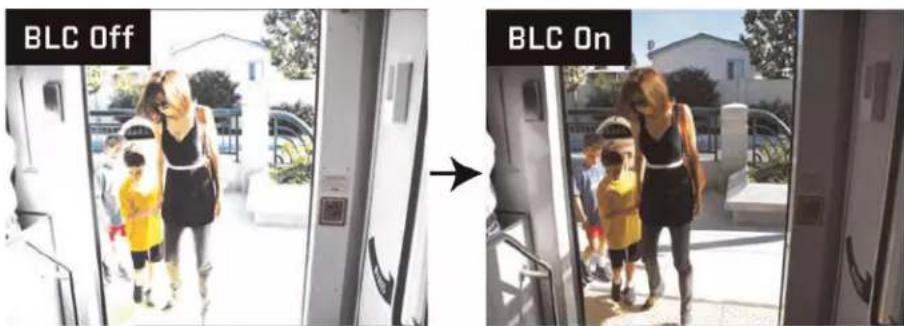
BLC tones down areas of the image with strong background lighting to create clearer, more detailed renderings of objects in the foreground. BLC is recommended for local light compensation applications, meaning that strong backlit conditions will occur in the same area of the camera image, such as a doorway.
text_image
BLC Off BLC OnTo configure BLC:
-
From the main menu, use the control stick to select BACKLIGHT.
-
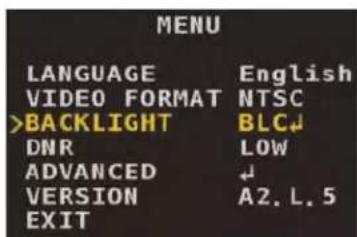
Move the control stick / to select BLC. Push the middle of the control stick to configure the active BLC area.
text_image
MENU LANGUAGE English VIDEO FORMAT NTSC >BACKLIGHT BLC↓ DNR LOW ADVANCED ↓ VERSION A2. L. 5 EXIT- Move the control stick / to configure the values for H-POS and V-POS to affect the horizontal and vertical position of the active area, then H-SIZE and V-SIZE to affect the horizontal and vertical size of the active area. The active area should cover a brightly-lit area where objects are expected to appear. For example, if the camera image shows 2 floodlights and a doorway, the active area should cover the doorway only.
2.6 Digital Noise Reduction (DNR)
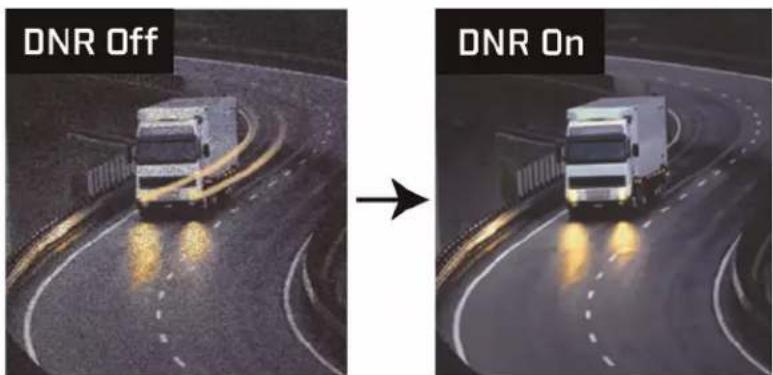
The camera features 2 types of noise reduction: 2D temporal noise reduction and 3D spatial noise reduction. DNR reduces the background noise in a low luminance environment. Removing noise from the camera image reduces your recording file size and reduces the appearance of graininess.
text_image
DNR Off DNR OnTo configure digital noise reduction:
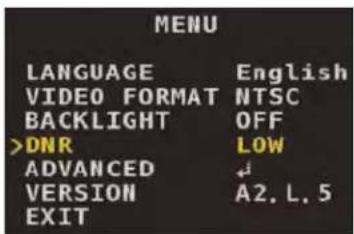
- From the main menu, use the control stick to select DNR.
text_image
MENU LANGUAGE English VIDEO FORMAT NTSC BACKLIGHT OFF >DNR LOW ADVANCED ↓ VERSION A2. L. 5 EXIT- Move the control stick / to configure the level of noise reduction. Select LOW, MIDDLE or HIGH noise reduction — use a higher setting to increase low-light sensitivity and reduce the appearance of graininess in the camera image.
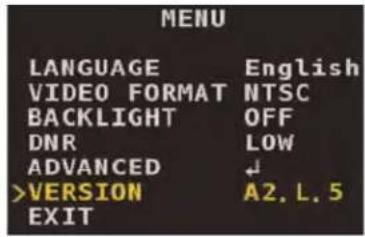
2.7 Version
This is a non-configurable field that displays the camera's firmware version. This is for service purposes only.
text_image
MENU LANGUAGE English VIDEO FORMAT NTSC BACKLIGHT OFF DNR LOW ADVANCED ↓ >VERSION A2, L. 5 EXITAdvanced Menu
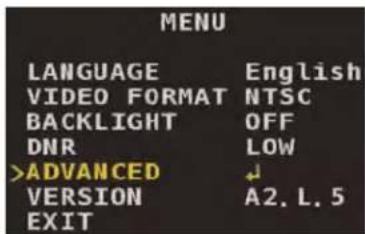
The advanced menu lets you configure the camera's more sophisticated features.
text_image
MENU LANGUAGE English VIDEO FORMAT NTSC BACKLIGHT OFF DNR LOW >ADVANCED ↓ VERSION A2. L. 5 EXITSee below for the structure of the advanced menu:
| LENS ELC | • NORMAL • DEBLUR | ||
| ALC | • INDOOR • OUTDOOR • DEBLUR | ||
| EXPOSURE BRIGHTNESS | 0-20 | ||
| SHUTTER AUTO | |||
| FLICKER | |||
| MANUAL SPEED: 1/60 - 1/60000 | |||
| SENS-UP | • OFF • X2 • X4 • X8 • X16 • X32 | ||
| AGC | 0-20 | ||
| WHITE BAL AUTO | |||
| ATW | |||
| PRESET | |||
| MANUAL KELVIN | • LOW • MIDDLE • HIGH | ||
| R-GAIN | 0-20 | ||
| B-GAIN | 0-20 | ||
| DAY&NIGHT MODE | • AUTO • EXT • B&W • COLOR | ||
| DELAY 0-20 | |||
| D→N LEVEL 0-20 | |||
| N→D LEVEL 0-20 | |||
| SMART IR | • ON • OFF | ||
| SMART IR LVL | 0-20 | ||
| IMAGE SHARPNESS | 0-20 | ||
| COLOR GAIN | 0-20 | ||
| FREEZE | • ON• OFF | ||
| FLIP | • OFF• HV-INV• V-INV• H-INV | ||
| D-ZOOM 1.0X-8.0X | |||
| DEFOG ON MODE | • AUTO• MANUAL | ||
| LEVEL• LOW• MIDDLE• HIGH | |||
| OFF | |||
| SPECIAL BLACK LEVEL | FULL | ||
| COMP | |||
| USER OFFSET | |||
| PRIVACY ON ZONE NUM | |||
| ZONE DISP | |||
| H-POS | |||
| V-POS | |||
| H-SIZE | |||
| V-SIZE | |||
| Y LEVEL | |||
| CR LEVEL | |||
| CB LEVEL | |||
| OFF | |||
| DP COMP THRESHOLD | 0-255 | ||
| DEFECT DET | |||
| RESET | |||
3.1 Lens Settings
Set the camera's light control method and preferences.
To configure the lens settings:
-
From the main menu, use the control stick to select ADVANCED. Push the middle of the control stick to confirm.
-
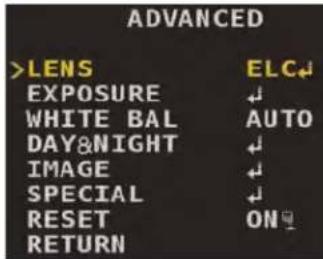
Move the control stick / to select LENS, then / to select ELC (Electronic Light Control) or ALC (Automatic Light Control). It is recommended to use ELC for fixed lens and manual varifocal camera models, or ALC for motorized lens camera models. Once you have selected, push the middle of the control stick.
text_image
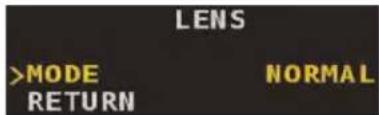
ADVANCED >LENS ELC↓ EXPOSURE ← WHITE BAL AUTO DAY&NIGHT ← IMAGE ← SPECIAL ← RESET ON↓ RETURN- Under MODE, move the control stick ← / → set the camera image conditions:
text_image
LENS >MODE RETURN NORMAL- If you selected ELC, select NORMAL for typical surveillance purposes, or select DEBLUR to correct a blurry camera image.
- If you selected ALC, select INDOOR for indoor conditions, OUTDOOR for outdoor conditions, or select DEBLUR to correct a blurry camera image.
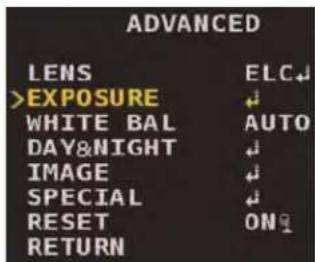
3.2 Exposure
Configure settings to determine how much light enters the camera.
text_image
ADVANCED LENS ELC↓ >EXPOSURE WHITE BAL AUTO DAY&NIGHT IMAGE SPECIAL RESET ON↓ RETURN3.2.1 Brightness
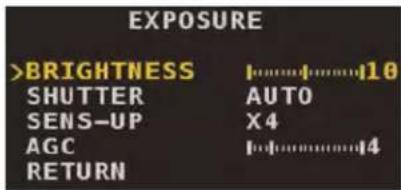
Set the brightness of the camera image.
To set brightness:
- From the main menu, use the control stick to select ADVANCED. Push the middle of the control stick to confirm.
-
Move the control stick / to select EXPOSURE. Push the middle of the control stick to confirm.
-
Move the control stick / to select BRIGHTNESS, then / to configure the brightness level. Setting a higher value makes the camera image brighter.
text_image
EXPOSURE >BRIGHTNESS SHUTTER SENS-UP AGC RETURN 10 AUTO X4 143.2.2 Shutter
Set the shutter speed of the camera.
To set shutter speed:
- From the main menu, use the control stick to select ADVANCED. Push the middle of the control stick to confirm.
- Move the control stick / to select EXPOSURE. Push the middle of the control stick to confirm.
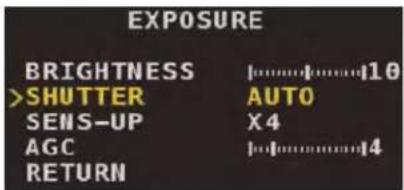
- Move the control stick / to select SHUTTER, then / to set the shutter mode:
text_image
EXPOSURE BRIGHTNESS |10 >SHUTTER AUTO SENS-UP X4 AGC |4 RETURN- Select AUTO for the camera to automatically determine the shutter speed based on lighting conditions.
- Select FLICKER to fix the camera shutter. This reduces color rolling caused by light flicker.
- Select MANUAL and push the middle of the control stick to set the shutter speed manually. Under SPEED, select a shutter speed from 1/60 - 1/60000.
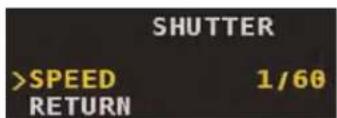
text_image
SHUTTER >SPEED 1/60 RETURN3.2.3 Sens-Up
Sens-Up is a slow shutter speed setting that allows more light into the camera to improve sensitivity in low light conditions. For proper setup, configure this setting while the camera is viewing low light or nighttime conditions.
To configure Sens-Up:
- From the main menu, use the control stick to select ADVANCED. Push the middle of the control stick to confirm.
-
Move the control stick / to select EXPOSURE. Push the middle of the control stick to confirm.
-
Move the control stick / to select SENS-UP, then / to set the slow shutter level. Select a value between X2 and X32 to activate Sens-Up, or select OFF to disable.
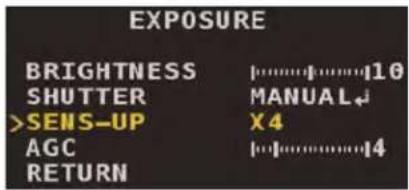
text_image
EXPOSURE BRIGHTNESS SHUTTER >SENS-UP AGC RETURN 10 MANUAL X4 143.2.4 Automatic Gain Control (AGC)
AGC is a fixed gain value that affects image brightness under very low light conditions. For proper setup, configure this setting while the camera is viewing low light or nighttime conditions.
To configure AGC:
- From the main menu, use the control stick to select ADVANCED. Push the middle of the control stick to confirm.
- Move the control stick / to select EXPOSURE. Push the middle of the control stick to confirm.
- Move the control stick / to select AGC, then / to set an AGC level between 0–20. Setting a higher value may create more noise in the camera image.
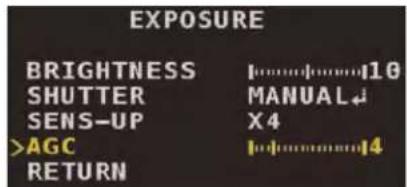
text_image
EXPOSURE BRIGHTNESS 10 SHUTTER MANUAL SENS-UP X4 >AGC 14 RETURN3.3 White Balance
Configure white balance in the camera image.
To configure white balance:
- From the main menu, use the control stick to select ADVANCED. Push the middle of the control stick to confirm.
- Move the control stick / to select WHITE BAL.
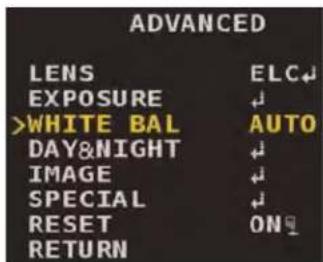
text_image
ADVANCED LENS ELC↓ EXPOSURE ↓ >WHITE BAL AUTO DAY&NIGHT ↓ IMAGE ↓ SPECIAL ↓ RESET ON↓ RETURN-
Move the control stick / to set the white balance mode:
-
Select AUTO for the camera to adjust white balance automatically.
- Select ATW for the camera to adjust white balance automatically for various color temperatures.
- Select PRESET to set the white balance based on a white reference object in the scene, such as a white piece of paper. Push and hold the middle of the control stick to automatically adjust the white balance. Release the control stick when the white reference object appears white.
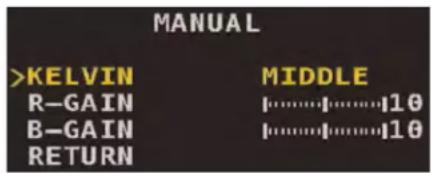
- Select MANUAL and push the middle of the control stick to set the white balance manually. Set KELVIN to HIGH to increase red-orange tones, LOW to increase blue tones, or MIDDLE to create a neutral image. Configure R-GAIN and B-GAIN to fine tune red gain and blue gain respectively.
text_image
MANUAL >KELVIN MIDDLE R-GAIN 10 B-GAIN 10 RETURN| NOTE |
| White balance may not work properly under the following conditions. In this case, use the PRESET white balance setting.When the color temperature of the environment surrounding the subject is outside of the supporte temperature range (for example, clear sky or sunset).When the ambient illumination of the subject is dim.If the camera is directed towards a fluorescent light or is installed in a place where illumination changes dramatically, the white balance function may become unstable. |
3.4 Day & Night
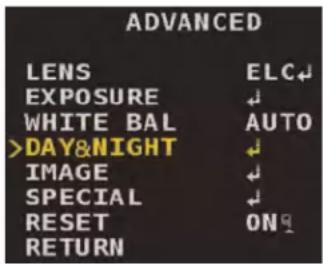
Set the day and night related settings for the camera.
text_image
ADVANCED LENS ELC↓ EXPOSURE ↓ WHITE BAL AUTO >DAY&NIGHT ↓ IMAGE ↓ SPECIAL ↓ RESET ON↓ RETURNTo set Day & Night mode:
- From the main menu, use the control stick to select ADVANCED. Push the middle of the control stick to confirm.
-
Move the control stick / to select DAY&NIGHT. Push the middle of the control stick to confirm.
-
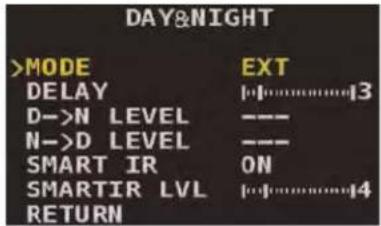
Move the control stick / to select MODE, then / to select one of the following modes:
text_image
DAY&NIGHT >MODE EXT DELAY [1]............3 D->N LEVEL --- N->D LEVEL --- SMART IR ON SMARTIR LVL [1]............4 RETURN- EXT: Day / night switch is determined by CdS light sensor. This setting is recommended for cameras that use IR LEDs.
- AUTO: Day / night switch is determined by the camera sensor based on lighting conditions. This setting is recommended for cameras without IR LEDs.
• COLOR: Camera image remains in color. No nighttime switch will occur in this mode. -
B&W: Camera image remains in black & white. No daytime switch will occur in this mode.
-
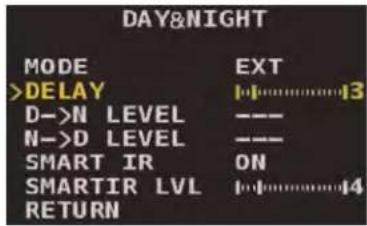
Select DELAY, then move the control stick / to set the time in seconds it takes for the camera to switch between day and night modes. For example, setting a DELAY value of zero means the switch will happen instantly when the proper light level is detected.
text_image
DAY&NIGHT MODE EXT >DELAY 13 D->N LEVEL --- N->D LEVEL --- SMART IR ON SMARTIR LVL 14 RETURN
NOTE
DELAY cannot be configured if the MODE is set to COLOR or B&W.
-
If the Day & Night MODE is set to AUTO, configure the D→N LEVEL and N→D LEVEL to configure day and night switchover levels.
-
D→N LEVEL determines the threshold for the switchover from day to night.
- N→D LEVEL determines the threshold for the switchover from night to day.
3.4.2 Smart IR
Enabling Smart IR improves close-up recognition in low light conditions.
To configure Smart IR:
- From the main menu, use the control stick to select ADVANCED. Push the middle of the control stick to confirm.
-
Move the control stick ↑ / ↓ to select DAY&NIGHT. Push the middle of the control stick to confirm.
-
Move the control stick ↑ / ↓ to select SMART IR, then ← / → to turn Smart IR ON or OFF.
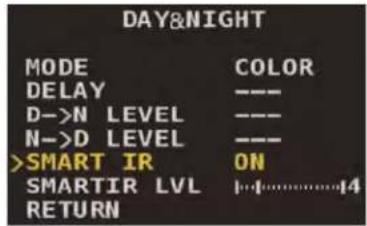
text_image
DAY&NIGHT MODE COLOR DELAY --- D->N_LEVEL --- N->D_LEVEL --- >SMART_IR_ON SMARTIR_LVL 14 RETURN- Select SMARTIR LVL, then move the control stick ← / → to set the Smart IR level.
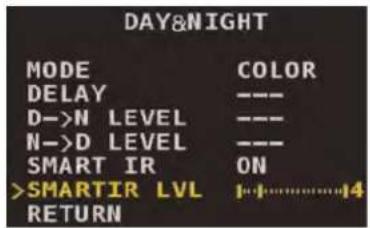
text_image
DAY&NIGHT MODE COLOR DELAY --- D->N_LEVEL --- N->D_LEVEL --- SMART_IR_ON >SMARTIR_LVL 14 RETURN3.5 Image
Set the picture and display control settings for the camera.
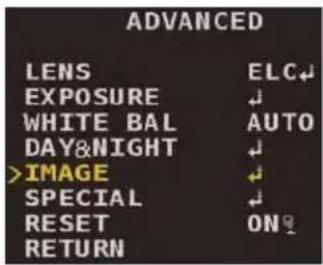
text_image
ADVANCED LENS ELC↓ EXPOSURE ↓ WHITE BAL AUTO DAY&NIGHT ↓ >IMAGE ↓ SPECIAL ↓ RESET ON↓ RETURN3.5.1 Picture Control Settings
To configure picture control settings:
- From the main menu, use the control stick to select ADVANCED. Push the middle of the control stick to confirm.
- Move the control stick / to select IMAGE. Push the middle of the control stick to confirm.
- Move the control stick / to select SHARPNESS, then / to set the sharpness level. It is recommended to use the default value for image sharpness.
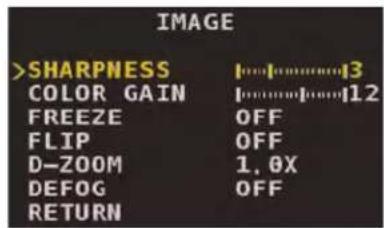
text_image
IMAGE >SHARPNESS COLOR GAIN FREEZE FLIP D-ZOOM DEFOG RETURN 13 12 OFF OFF 1, 0X OFF- Move the control stick / to select COLOR GAIN, then / to set the color gain level. Set a higher level for more vibrant color reproduction.
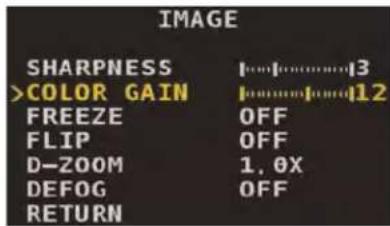
text_image
IMAGE SHARPNESS !...!......!3 >COLOR GAIN !......!12 FREEZE OFF FLIP OFF D-ZOOM 1.0X DEFOG OFF RETURN3.5.2 Freeze Image
Freeze the current camera image on screen.
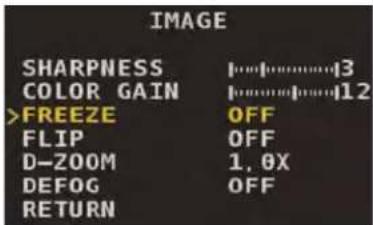
text_image
IMAGE SHARPNESS |3 COLOR GAIN |12 >FREEZE OFF FLIP OFF D-ZOOM 1.0X DEFOG OFF RETURNTo freeze the camera image:
- From the main menu, use the control stick to select ADVANCED. Push the middle of the control stick to confirm.
- Move the control stick / to select IMAGE. Push the middle of the control stick to confirm.
- Move the control stick ↑ / ↓ to select FREEZE, then ← / → to turn image freeze ON / OFF.
3.5.3 Flip Image
Flip the current camera image.
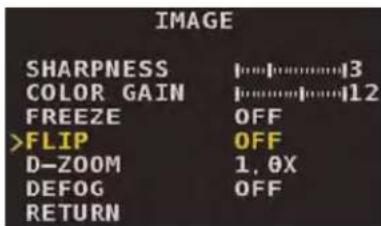
text_image
IMAGE SHARPNESS 13 COLOR GAIN 12 FREEZE OFF >FLIP OFF D-ZOOM 1, 0X DEFOG OFF RETURNTo flip the camera image:
- From the main menu, use the control stick to select ADVANCED. Push the middle of the control stick to confirm.
- Move the control stick / to select IMAGE. Push the middle of the control stick to confirm.
-
Move the control stick / to select FLIP, then / to select a flip mode:
-
OFF: No flip.
• H-INV: Horizontal flip.
• V-INV: Vertical flip.
• HV-INV: Horizontal + vertical flip.
3.5.4 Digital Zoom
Enable digital zoom to enlarge a portion of the camera image.
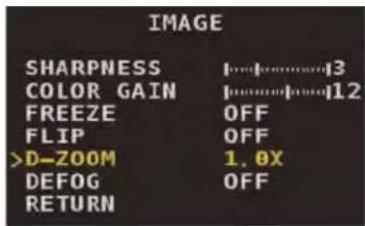
text_image
IMAGE SHARPNESS |13 COLOR GAIN |12 FREEZE OFF FLIP OFF >D-ZOOM 1.0X DEFOG OFF RETURNTo flip the camera image:
- From the main menu, use the control stick to select ADVANCED. Push the middle of the control stick to confirm.
- Move the control stick / to select IMAGE. Push the middle of the control stick to confirm.
- Move the control stick / to select D-ZOOM, then / to choose a digital zoom level between 1.0X and 8.0X.
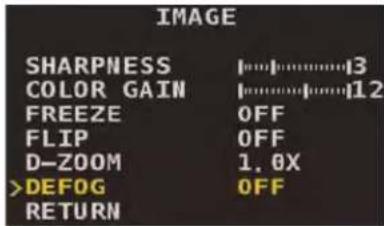
3.5.5 Defog
Enable defog to reduce the appearance of fog, mist or dust in the camera image.
To enable defog:
- From the main menu, use the control stick to select ADVANCED. Push the middle of the control stick to confirm.
- Move the control stick / to select IMAGE. Push the middle of the control stick to confirm.
- Move the control stick / to select DEFOG and push the middle of the control stick to confirm.
text_image
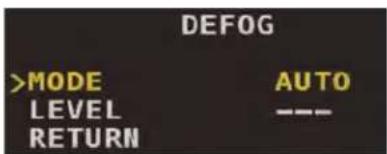
IMAGE SHARPNESS 13 COLOR GAIN 12 FREEZE OFF FLIP OFF D-ZOOM 1.0X >DEFOG OFF RETURN- Select MODE, then move the control stick / to set to MANUAL or AUTO. For MANUAL mode, select LEVEL and move the control stick / to select LOW, MIDDLE or HIGH.
text_image
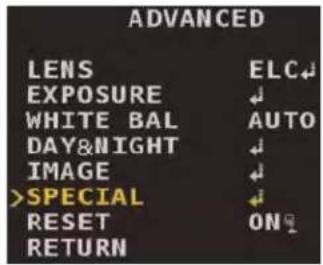
DEFOG >MODE AUTO LEVEL --- RETURN3.6 Special
Configure the camera's special settings.
text_image
ADVANCED LENS ELC↓ EXPOSURE ↓ WHITE BAL AUTO DAY&NIGHT ↓ IMAGE ↓ >SPECIAL ↓ RESET ON↓ RETURN3.6.1 Black Level
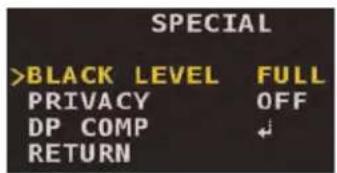
Set the black level of the camera image. To set properly, observe a black object in the camera image and adjust until it appears truly black.
To configure black level:
- From the main menu, use the control stick to select ADVANCED. Push the middle of the control stick to confirm.
- Move the control stick / to select SPECIAL. Push the middle of the control stick to confirm.
- Move the control stick ↑ / ↓ to select BLACK LEVEL, then move the control stick ← / → to select FULL, COMP, or USER.
text_image
SPECIAL >BLACK LEVEL FULL PRIVACY OFF DP COMP RETURN- If you selected USER, push the middle of the control stick to confirm. Under OFFSET, move the control stick / to set the black level.
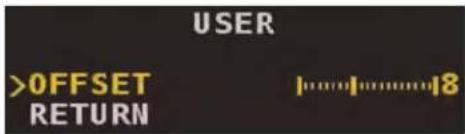
text_image
USER >OFFSET RETURN3.6.2 Privacy Masking
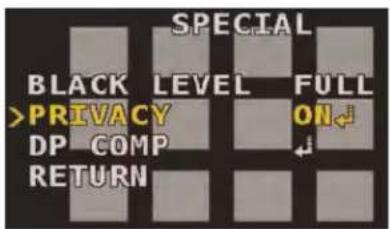
Set privacy masks to block specific areas of the camera image from recordings. You can configure up to 15 different privacy masks per camera.
text_image
SPECIAL BLACK LEVEL FULL >PRIVACY ON DP COMP RETURN| CAUTION |
| Privacy masks appear in video recordings and block areas of the camera image. |
To configure privacy masks:
- From the main menu, use the control stick to select ADVANCED. Push the middle of the control stick to confirm.
- Move the control stick / to select SPECIAL. Push the middle of the control stick to confirm.
- Move the control stick / to select PRIVACY, then move the control stick / to select ON. Push the middle of the control stick to confirm.
text_image
PRIVACY >ZONE NUM 0 ZONE DISP ON H-POS 12 V-POS 2 H-SIZE 3 V-SIZE 3 Y LEVEL |........|10 CR LEVEL |........|10 CB LEVEL |........|10 RETURN-
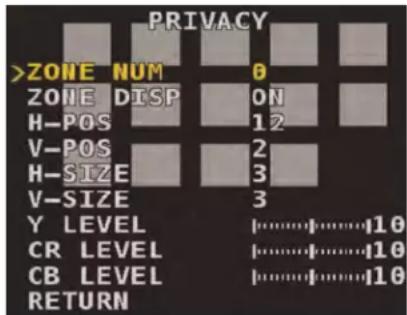
Select ZONE NUM, then move the control stick / to select a privacy mask ID number from 1-15. You can configure up to 15 separate privacy masks.
-
Select ZONE DISP, then move the control stick / to select ON or OFF. You must select ON to enable the currently selected privacy mask in recordings.
-
Move the control stick / to configure the H-POS and V-POS values to change the on-screen position of the currently selected privacy mask.
-
Move the control stick / to configure the H-SIZE and V-SIZE values to change the size of the currently selected privacy mask.
-
Move the control stick / to configure Y LEVEL, CR LEVEL and CB LEVEL to affect the color levels of black, red, and blue respectively. Setting different colors for different privacy masks is helpful for distinguishing multiple privacy areas — set based on personal preference.
-
Repeat steps 4–8 for each additional privacy mask you wish to configure.
3.6.3 Dead Pixel Compensation (DPC)
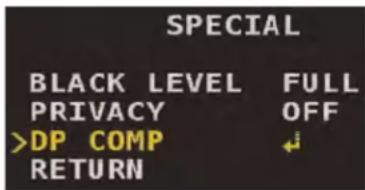
DPC is used to detect and compensate for the appearance of damaged pixels in the camera image.
| NOTE |
| In order to use DPC properly, you must cover the camera lens completely. It is recommended to p soft cloth or towel over the lens in order to get a totally black camera image. Also, ensure the car Day & Night mode is set to DAY — see 3.4.1 Day & Night Mode, page 12 for instructions. You may un- block the lens and change the Day & Night mode back after you have used the DPC feature. |
text_image
SPECIAL BLACK LEVEL FULL PRIVACY OFF >DP COMP RETURNTo configure DPC:
- From the main menu, use the control stick to select ADVANCED. Push the middle of the control stick to confirm.
- Move the control stick / to select SPECIAL. Push the middle of the control stick to confirm.
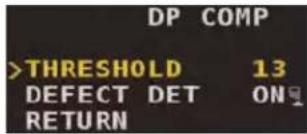
- Move the control stick / to select DP COMP. Push the middle of the control stick to confirm.
text_image
DP COMP >THRESHOLD 13 DEFECT DET ON RETURN- Select THRESHOLD, then move the control stick / to set the threshold for dead pixel detection.
- Select DEFECT DET, then push and hold the middle of the control stick.
3.7 Reset to Default Settings
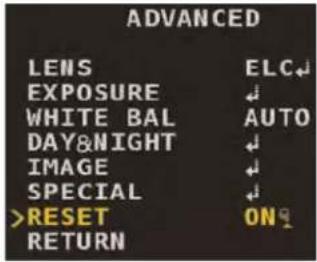
Resetting the camera to default settings will revert all OSD menu items to their out-of-the-box state.
text_image
ADVANCED LENS ELC↓ EXPOSURE ↓ WHITE BAL AUTO DAY&NIGHT ↓ IMAGE ↓ SPECIAL ↓ >RESET ON↓ RETURN
CAUTION
Resetting to default settings cannot be reversed.
To reset to default settings:
- From the main menu, use the control stick to select ADVANCED. Push the middle of the control stick to confirm.
- Move the control stick / to select RESET.
- Push and hold the middle of the control stick for 4 seconds to reset the camera to default settings.
OSD Menu Default Values
The following table shows the default values for the camera's OSD menu.
| SETTING DEFAULT VALUE | |
| LANGUAGE English | |
| VIDEO FORMAT NTSC | |
| BACKLIGHT OFF | |
| DNR | LOW |
| ADVANCED → LENS ELC | |
| ADVANCED → EXPOSURE → BRIGHTNESS | 10 |
| ADVANCED → EXPOSURE → SHUTTER AUTO | |
| ADVANCED → EXPOSURE → SENS-UP X4 | |
| ADVANCED → EXPOSURE → AGC | 4 |
| ADVANCED → WHITE BAL AUTO | |
| ADVANCED → DAY&NIGHT → MODE | EXT |
| ADVANCED → DAY&NIGHT → DELAY | 3 |
| ADVANCED → DAY&NIGHT → SMART IR | ON |
| ADVANCED → DAY&NIGHT → SMARTIR LVL | 4 |
| ADVANCED → IMAGE → SHARPNESS | 3 |
| ADVANCED → IMAGE → COLOR GAIN | 12 |
| ADVANCED → IMAGE → FREEZE | OFF |
| ADVANCED → IMAGE → FLIP | OFF |
| ADVANCED → IMAGE → D-ZOOM | 1.0X |
| ADVANCED → IMAGE → DEFOG | OFF |
| ADVANCED → SPECIAL → BLACK LEVEL | FULL |
| ADVANCED → SPECIAL → PRIVACY | OFF |
| ADVANCED → SPECIAL → DP COMP → THRESHOLD | 13 |
Website
www.flirsecurity.com/pro
Technical Support
1-866-816-5919
Customer Service
1-866-344-4674
Copyright
© 2015, FLIR Systems, Inc.
All rights reserved worldwide. Names and marks appearing herein are either registered trademarks or trademarks of FLIR Systems and/or its subsidiaries. All other trademarks, trade names or company names referenced herein are used for identification only and are the property of their respective owners.
Legal disclaimer
Specifications subject to change without further notice. Camera models and accessories subject to regional market considerations. License procedures may apply. Products described herein may be subject to US Export Regulations. Please refer to exportquestions@flir.com with any questions.
www.flirsecurity.com/pro

AVERTISSEMENT
RISQUE DE CHOC ÉLECTRIQUE NE PAS OUVRIR

AVERTISSEMENT : AFIN DE RÉDUIRE LE RISQUE DE CHOC ÉLECTRIQUE, NE PAS RETIRER LE COUVERCLE. LES PIÈCES INTERNES NE PEUVENT PAS ÊTRE RÉPARÉES PAR L'UTILISATEUR.
2 Menu principal ....2
text_image
HLC Off HLC On TH5016text_image
DNR Off DNR Ontext_image
MANUAL >KELVIN MIDDLE R-GAIN 10 B-GAIN 10 RETURN
REMARQUE
text_image
DAY&NIGHT >MODE EXT DELAY 3 D->N LEVEL --- N->D LEVEL --- SMART IR ON SMARTIR LVL 4 RETURNtext_image
DAY&NIGHT MODE EXT >DELAY 13 D->N LEVEL --- N->D LEVEL --- SMART IR ON SMARTIR LVL 14 RETURN
REMARQUE
text_image
DEFOG >MODE AUTO LEVEL --- RETURN3.6 Special
text_image
DP COMP >THRESHOLD 13 DEFECT DET ON RETURNwww.flirsecurity.com/pro
Assistance technique
1-866-816-5919
© 2015, FLIR Systems, Inc.
www.flirsecurity.com/pro

ADVERTENCIA
RIESGO DE CHOQUE
ELÉCTRICO
NO ABRIR

ADVERTENCIA: PARA REDUCIR EL RIESGO DE CHOQUE ELÉCTRICO, NO QUITAR LA TAPA. NO CONTIENE PARTES SUJETAS A MANTENIMIENTO. EL MANTENIMIENTO O SERVICIO DEBE ESTAR A CARGO DE PERSONAL CALIFICADO.

2 Menú principal ....2
2.1 Idioma....2
2.2 Formato de video....2
text_image
HLC Off HLC OnPara configurar HLC:
text_image
DNR Off DNR Ontext_image
MANUAL >KELVIN MIDDLE R-GAIN 10 B-GAIN 10 RETURNNOTA
text_image
DAY&NIGHT >MODE EXT DELAY 3 D->N LEVEL --- N->D LEVEL --- SMART IR ON SMARTIR LVL 4 RETURNtext_image
DAY&NIGHT MODE EXT >DELAY 13 D->N LEVEL --- N->D LEVEL --- SMART IR ON SMARTIR LVL 14 RETURN
text_image
DEFOG >MODE AUTO LEVEL --- RETURN ---3.6 Especial
text_image
DP COMP >THRESHOLD 13 DEFECT DET ON RETURNwww.flirsecurity.com/pro
Soporte Técnico
1-866-816-5919
Servicio al Cliente
1-866-344-4674
Derechos de Autor
© 2015, FLIR Systems, Inc.
