RP-BTGS10 - Earplug PANASONIC - Free user manual and instructions
Find the device manual for free RP-BTGS10 PANASONIC in PDF.

User questions about RP-BTGS10 PANASONIC
0 question about this device. Answer the ones you know or ask your own.
Ask a new question about this device
Download the instructions for your Earplug in PDF format for free! Find your manual RP-BTGS10 - PANASONIC and take your electronic device back in hand. On this page are published all the documents necessary for the use of your device. RP-BTGS10 by PANASONIC.
USER MANUAL RP-BTGS10 PANASONIC
Bone Conduction Headset
natural_image
Illustration of a curved mechanical component with two side protrusions (no text or symbols)
Bluetooth®

If you have any questions contact
In the U.S.A. and Puerto Rico:
http://www.panasonic.com/support
In Canada:
www.panasonic.ca/english/support
For U.S.A. and Puerto Rico only
The warranty can be found on pages 22 and 23.
Register online at
www.panasonic.com/register (U.S. customers only)
For Canada only
The warranty can be found on pages 24 and 25.
Thank you for purchasing this product.
Please read these instructions carefully before using this product, and save this manual for future use.
Key Features
- You can listen to music and make hands-free phone calls by wirelessly connecting a Bluetooth® device.
◆ Water resistant specifications (IPX4) allow the headset to be used without worrying about rain or sweating during sports.
◆ Equipped with bone conduction speakers, the headset lets you hear sounds from both the speakers and the surrounding environment.
- This headset is equipped with LED illumination that emits light in response to its state and operation.
The LED blinking pattern can be switched between two modes.
natural_image
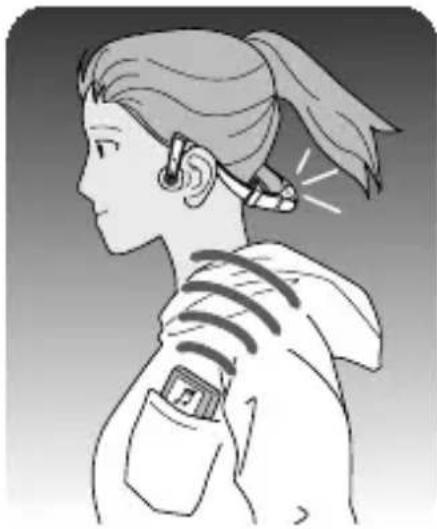
Side profile illustration of a person wearing earphones and a jacket, with no visible text or symbolsWhat are bone conduction headphones?
While ordinary headphones convey sounds through the eardrums, bone conduction headphones convey sounds by conducting vibrations directly to the auditory ossicles and cochlea through the skull.
Since they do not cover the ears, you can enjoy music coming from the headphones and still hear sounds from the surrounding environment. This feature reduces the strain on the eardrums as compared to ordinary headphones that cover the ears.

Table of contents
Before use
Accessories 3
(Important) About water resistance...4
Part names ....5
Preparation
Charging......6
Inserting a battery ....7
Turning the power on/off 7
Connecting a Bluetooth ^® device ....8
How to wear the headset .....9
Operation
Listening to music ....10
Making a phone call....12
Useful functions 13
Other
Restoring to the factory settings...13
Safety precautions ....14
About Bluetooth ^® ......16
Product service ....17
Maintenance....17
Troubleshooting guide .....18
Specifications ....20
Copyright, etc. 21
Limited Warranty (ONLY FOR U.S.A. AND PUERTO RICO)...22
Limited Warranty (ONLY FOR CANADA) ......24
Accessories
Please check and identify the supplied accessories.
Use numbers indicated in parentheses when asking for replacement parts.
(As of November 2013)
Only for U.S.A. and Puerto Rico: To order accessories, refer to "Accessory Purchases (United States and Puerto Rico)" on page 23.
Only for Canada:
To order accessories, call the dealer from whom you have made your purchase.
□ 1 Carrying Case [RFX0F91]
☐ 1 Accessory Pouch [RFX0F92]
☐ 1 USB Charger (battery charger) [DE-PAD010B]
☐ 1 Ni-MH Rechargeable Battery, AAA [HHR-80AAAB]*
□Adjustable Bands
RP-BTGS10PPK (Black)
- Black [RFX0F93]
- Red [RFX0F93-R]
RP-BTGS10PPA (Blue)
- Blue [RFX0F93-A]
- Green [RFX0F93-G]
RP-BTGS10PPH (Gray)
- Black [RFX0F93]
- Gray [RFX0F93-H]
* Make sure to buy [HHR-4MRA] (only for Canada) and use one of the pair when replacing the rechargeable battery. As for the U.S.A. and Puerto Rico, contact Panasonic for rechargeable battery replacement. (Refer to “Accessory Purchases (United States and Puerto Rico)” on page 23)
(Important) About water resistance
- This unit has water resistant specifications equivalent to IPX4 of IEC 60529.
(IPX4: Protected against splashing water) - Supplied USB charger and rechargeable battery are not water resistant.
About the IPX4 (liquid ingress protection level against splashing water)
Water resistance is not always guaranteed under all conditions.
This unit is compatible to operate after splashing approximately 1.8 L (0.5 gallon)/minute room temperature tap water for 10 minutes from the tap nozzle to the unit from all directions, approximately 20 cm (8 inches) away.
liquids associated with the water resistance
| Applicable Fresh water, tap water | |
| Not applicable | Soap water, shampoo, bath foam, detergent, hot spring water, swimming pool water, seawater, etc. |
Cautions for using near water (in a kitchen, etc.)
Conform to following. Improper use may result in a malfunction.
- Securely close the battery lid.
- Do not use the USB charger.
- Do not insert or replace batteries.
- Never submerge and never operate the unit in water (or in a bathtub).
- Do not use in very humid places such as bathrooms.
maintain the water resistant performance
Do not drop or hit the unit, or apply strong pressure to it.
The unit will lose its water resistance if it becomes deformed or damaged.
Handling the battery lid
Leaving the lid open can cause damage to the unit when water enters it while in use.
Make sure to close the lid before using the unit.
Do not open or close the battery lid with wet hands or when water droplets are on this unit.
After using the unit (when water droplets or sweats are on the unit)
Wipe the unit with a soft, dry cloth and store indoors.
- Do not dry with hot air from dryers, etc.
- In cold climates, leaving the unit with water droplets may cause the battery lid to be stuck closed due to freezing.
When water enters inside this unit, stop using it, and contact the nearest Dealer or Service Center.
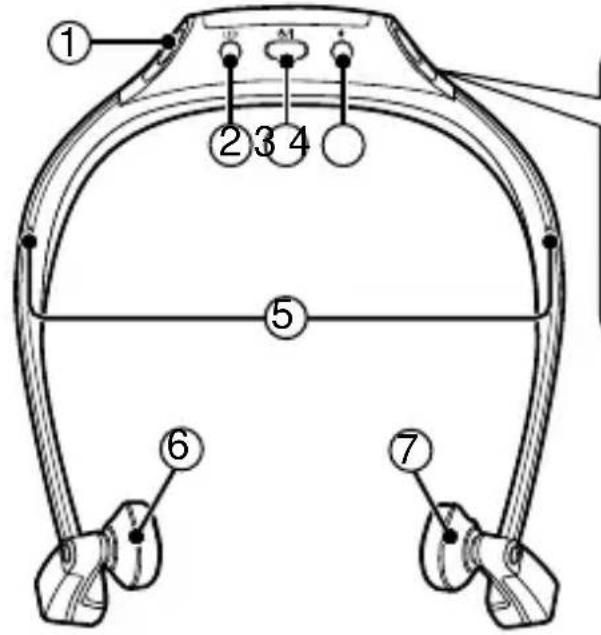
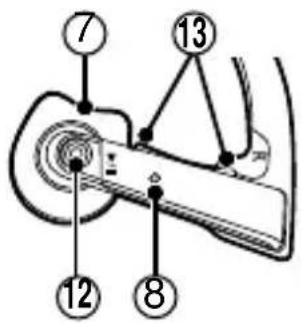
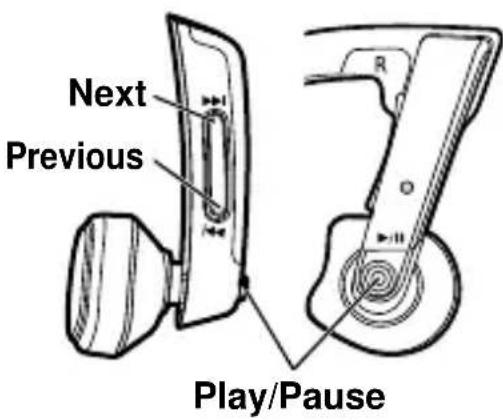
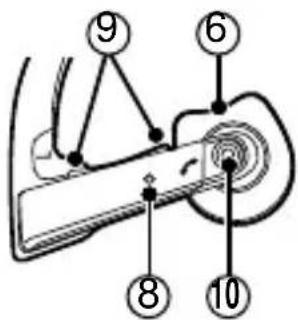
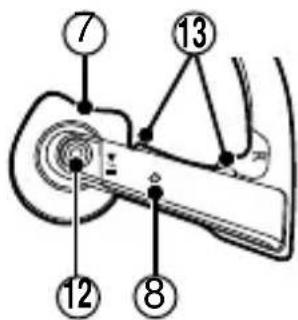
Part names
Bottom T
Left (L)

Outside
Inside
The product illustrations may differ from the actual product.


natural_image
Simple line drawing of a car's front view with a numbered point and arrow (no text or symbols)① Battery lid
② LED pattern switch button
• Switches between the sports and normal modes. (→ P. 13)
③Power button ⏻/
④ Pairing button
⑤ Protrusion (Adjustable band attachment position) (→ P. 9)
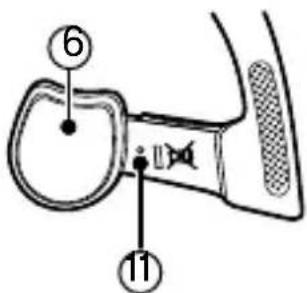
⑥ Left speaker
⑦ Right speaker
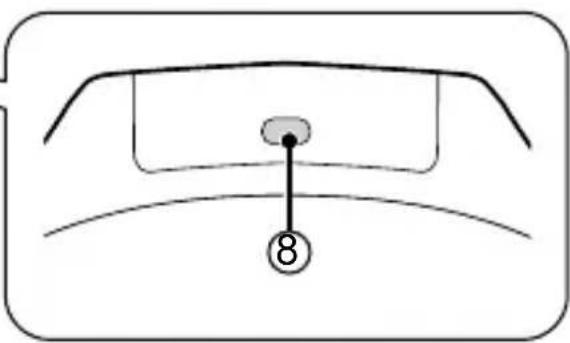
⑧ LED illumination*
- The number of blinks or color notifies the status of the unit. (* hereafter referred to as "LED")
⑨ Volume button VOL +/-
⑩ Call button
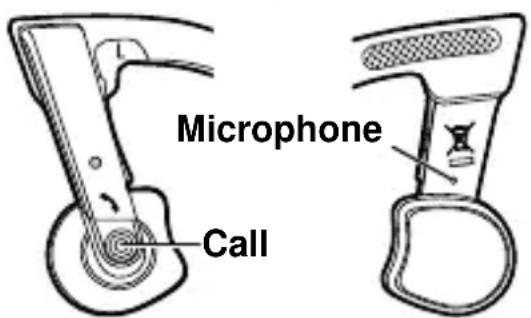
⑪ Microphone
⑫Play/Pause button ▶/11
⑬ Previous/Next button

- Excessive sound pressure from earphones and headphones can cause hearing loss.
- Listening at full volume for long periods may damage the user's ears.
Charging
The rechargeable battery is not charged initially. Charge the battery before using the headset.
1 Place the rechargeable battery in the USB charger
- The battery can be charged in either the right or left slot of the USB charger.
- Make sure to align the battery terminals (⊕, ⊕ correctly as marked in the USB charger.

* Use the USB charger as shown in the figure, without lifting up the terminal section.
2 Connect the USB charger to a computer with a USB connector
- The charging light will blink when charging is in progress. It will remain on when the battery is fully charged.
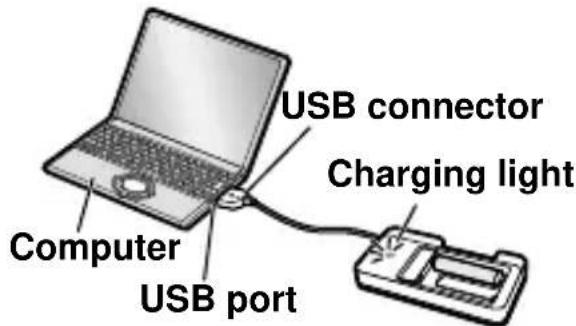
3 When charging is completed, unplug the USB connector from the computer, and remove the battery from the USB charger
Note on the USB charger
• Commercially available dry cell batteries cannot be charged.
Note on batteries
- Fully recharging a single drained rechargeable battery will take approximately 1 hour to recharge.
- Recharge the supplied or optional rechargeable battery using the supplied USB charger.
- Rechargeable batteries that are not fully recharged may be used.
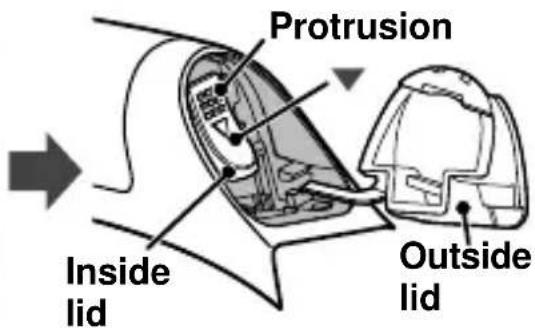
Inserting a battery
Insert the supplied or optional rechargeable battery (or any commercially available alkaline dry cell battery) into the headset.
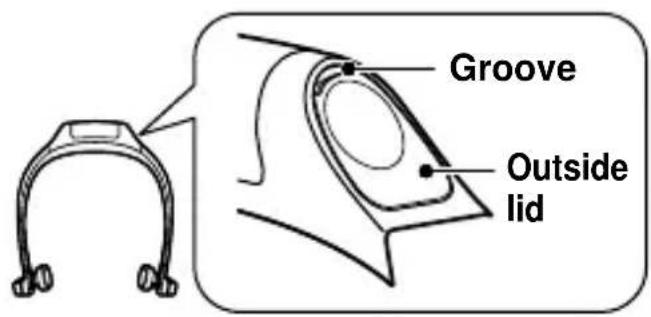
1 Open the battery lid of the headset
- Put your fingertip on the groove on the outside lid. Pull the lid towards you.
- Press▼ on the inside lid, and lower the lid.
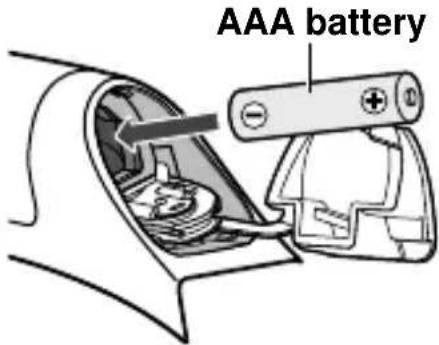
2. Place the battery inside
- Check the battery terminals (⊕, ⊕) Make sure the ⊖ terminal goes in first.
3 Close the lid
- Lift up the inside lid. Press the protrusion and close the lid securely.
- Close the outside lid. Press the lid surface and close it securely.
Note
- Panasonic batteries are recommended if using commercially available alkaline dry cell batteries.
- Using manganese dry cell batteries is not recommended as the battery life is short.
Turning the power on/off
Press and hold the power button ⏻/1 for approximately 2 seconds.
- The power is turned on, and the LED (blue) will light up once.
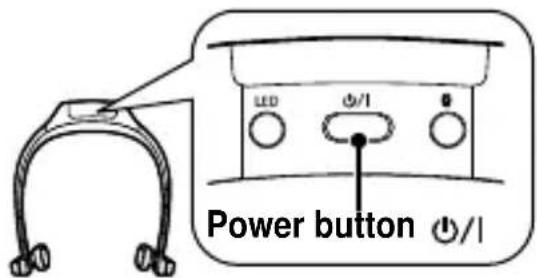
To turn the power off
- Press and hold the power button/| for approximately 2 seconds.
Note
- When the headset is not operated for a certain period of time, the power will automatically turn off. (See “Auto power off” (P. 13))
Connecting a Bluetooth® device
To establish a wireless connection, register the headset with Bluetooth® compatible devices.
Preparation on the Bluetooth® device
- Turn on the power, and enable the Bluetooth® feature.
- Place the device within 1 m (3.3 feet) from the headset.
- Check the device operation in its operation instructions, as required.
Power on for the first time
1 Turn on the headset
- The headset will start searching for the Bluetooth® device to connect to, and the LED on the top will blink in blue and magenta alternately. (Only one operation after purchase)
2 When the headset ("RP-BTGS10") is detected by the Bluetooth® device, register and connect to it
- If prompted for a passkey, input "0000 (four zeros)".
- If the Bluetooth® profile selection screen appears, select the “A2DP” profile. If “A2DP” is not supported or if you want to just use phone calls, select the “HFP” or “HSP” profile. (For details on profiles, see “Listening to music” (P. 10) and “Making a phone call” (P. 12))
3 Check the connection with the Bluetooth® device on the headset
- When the connection has been established, the LED on the top will emit blue light approximately every 3 seconds. One short beep will sound.
Connection after the second time
When the headset is turned on, it will search for the previously setup Bluetooth® device and automatically start connecting to it. The LED on the top of the headset will blink in blue until the connection is established.
Turn on the headset. Press and hold the pairing button 📋 for approximately 2 seconds. The headset will start searching for other Bluetooth® device, and the LED on the top will blink in blue and magenta alternately. A two-tone beep will sound.
Continue to steps 2 and 3 on the left.
Note
- If connection to a device is not established within 5 minutes, the headset will be turned off. Start from step 1 again.
- 2 or more Bluetooth® devices cannot be connected to the headset at the same time.
- You can pair up to 8 devices with this headset. If a 9th device is paired, the device with the oldest connection will be replaced. To use it, pair it again.
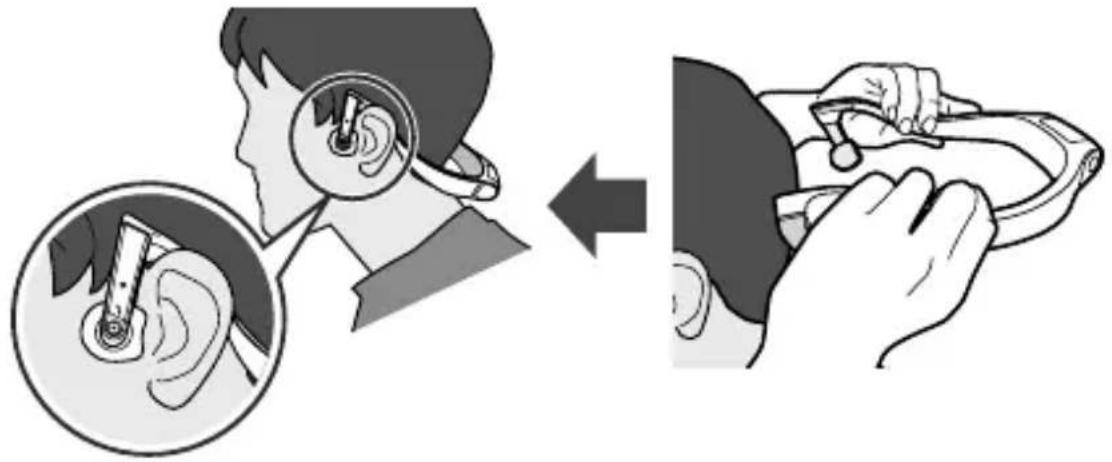
How to wear the headset
Wear the headset from behind your neck and hook over both ears, and place the speakers against the bone slightly in front of ear holes. If you wear the headset in the incorrect position, you may not hear sounds well from the speakers and the surrounding environment.
When you find the headset too loose and unstable on your head If you use the supplied adjustable band, the headset may fit you better.
How to attach the adjustable band
① Attach the adjustable band to the headset not going beyond the protrusion.

② Wear the headset and adjust the adjustable band position.
Note
The two adjustable bands of different colors are supplied. They have the same size and elasticity. Select the color you like.

Listening to music
If the Bluetooth® compatible device supports the “A2DP” and “AVRCP” Bluetooth® profiles, music can be played back with remote control operations on the headset.
• A2DP (Advanced Audio Distribution Profile):
Transmits audio to the headset.
- AVRCP (Audio/Video Remote Control Profile):
Allows remote control of the device using the headset.
1 Connect the Bluetooth® device and the headset (→ P. 8)
2 Select and play the music or video sound on the Bluetooth® device
- The selected music or sound is output to the speakers of the headset.
Operating time of batteries
| Battery type Operating time | |
| Rechargeable battery (supplied) Approx. 5 hours | |
| Alkaline dry cell battery Approx. 4.5 hours |
Operating time may be less depending on the operating conditions.
Note
- There may be instances when you need to set the audio on the Bluetooth device.
- Bluetooth® devices that support aptX® can transmit higher quality audio.
- When another Bluetooth® device is connected or if the battery is removed, the volume will return to the average hearing level.
- If the connection is unstable, cancel the setting for transmitting sound in high quality (including aptX®), and prioritize the Bluetooth® connection.
To switch the setting, turn off the headset first. Then press and hold the LED pattern switch button, and turn on the headset again. One short beep followed by a four-tone beep will sound, and the setting will be switched.
To return to the setting with high sound quality, perform the above operation again. Two short beeps followed by a four-tone beep will sound, and the setting will return to the default.
Attention
- The headset might leak sound depending on the volume level.
- When the volume is increased to near maximum level, music may sound distorted. Decrease the volume until music sounds without distortion.
Button operation
You can control the Bluetooth® device using buttons on the headset.
- Depending on Bluetooth® devices, some functions below do not work, or work differently via button operation of the headset.
(Operation example)
| ▶/II | Play/Pause button | ||
| Play/Pause/Resume | |||
| ◀◀ / ▶◀ | Previous button/Next button | ||
| Press | Press and hold | ||
| During playback | During pause | ||
| ◀◀ | Return to the start of current track | Rewind | |
| ▶◀ | Forward to the start of next track | Fast forward | |
Right (R)
Adjust the volume of the headset.
- The volume button of this unit is not used to adjust the volume of Bluetooth® devices.
| VOL | Volume button | |
| Press Press and hold | ||
| + Increases | Increasescontinuously | |
| - Decreases | Decreasescontinuously | |
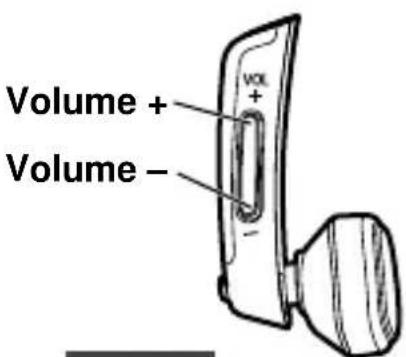
Left (L)
Note
• The volume can be adjusted in 15 levels.
When the maximum or minimum volume is reached, two beeps will sound.
Making a phone call
With Bluetooth® enabled phones (cell phones or smartphones) that support the "HFP" or "HSP" Bluetooth® profile, you can use the headset for phone calls.
• HFP (Hands-Free Profile):
In addition to the HSP function, an advanced communication feature is available.
• HSP (Headset Profile):
Hands-free phone calls are possible using the headset.
1 Connect the Bluetooth® enabled phone and headset (→ P. 8)
2
When answering an incoming call
Press the Call button on the headset and answer the call
- During an incoming call, one short continuous ringtone will sound from the speaker and the LED will blink.
- ( HFP only) To reject the incoming call, press and hold the Call button ↗ until the ringtone stops.
Left (outside) Left (inside)
When making an outgoing call
Make an outgoing call on the Bluetooth® enabled phone
- Also refer to the operating manual for the Bluetooth® enabled phone.
(Checking and operation steps on the headset are explained below)
- During an outgoing call, the ringtone (two-tone beep) will sound from the speaker and the LED will blink.
- To cancel the outgoing call, press the Call button. One short beep will sound.
- ( HFP only) When the phone is idle, press and hold the Call button ↗ for approximately 2 seconds. An outgoing call will be made to the last dialed number. One short continuous ringtone will sound from the speaker and the LED will blink.
3 Start talking
- The LED will repeatedly blink 3 times during a call.
- The volume can be adjusted during a phone call. For setting instructions, see page 11.
4 Press the Call button to end the phone call
• One short beep will sound.
Note
- There may be instances when hands free operation needs to be set on the Bluetooth® enabled phone.
- Depending on the Bluetooth® enabled phone, you may hear incoming and outgoing call ringtones of the phone from the headset.
- If you cannot check the outgoing call, press and hold the Call button on the headset for approximately 2 seconds and switch the device used for the call from the Bluetooth® enabled phone to the headset.
(HFP only) Each time you perform the above operation when dialing or taking a call, the calling device will switch between the Bluetooth® enabled phone and the headset.
Useful functions
Selecting LED pattern
After turning on the headset, you can switch the LED blinking pattern between the sports and normal modes. Press the LED pattern switch button. The normal mode is set as the factory default setting. The LED blinking pattern cannot be switched during Bluetooth® device pairing/connection operation.
When the Bluetooth® connection is completed, the LED on the top will blink in blue.
When the Bluetooth® connection is completed, the LED on the top will blink in blue and red. In addition, the LEDs near the right and left speakers will blink in blue when the LED on the top blinks in blue.
Auto power off
If the headset is silent for 5 minutes and operations for Bluetooth ^® devices are idle during that period, four-tone beep will sound and the power will be automatically turned off.
Low battery notification
When the battery level is low during use of the headset, the blue blinking LED on the top will change to red. Two beeps will sound once every minute. When the battery runs out, long beep will sound and then the power will be automatically turned off.
Restoring to the factory settings
When you want to delete all pairing device information, etc., you can restore the headset to the factory settings (original settings upon purchase).
① Turn on the headset.
- Check that the headset is not connected with other Bluetooth® devices.
② Press and hold the LED pattern switch button and pairing button for 5 seconds or more simultaneously.
- A two-tone beep followed by a four-tone beep will sound. The LEDs on the top and near the right and left speakers will blink in blue 3 times. The headset will restore to the factory settings.
Safety precautions
Unit
- Avoid using or placing this unit near sources of heat.
- Do not operate this unit while driving or cycling.
- Do not listen with this unit at high volume in places where you need to hear sounds from the surrounding environment for safety, such as at railroad crossings, platforms, roads and construction sites.
Batteries
- Do not peel off the covering on batteries and do not use the batteries if the covering has been peeled off.
- Align the poles and correctly when inserting the battery.
- Remove the battery if you do not intend to use the unit for a long time.
- Do not heat or expose to flame.
- Do not leave the battery(ies) in a car exposed to direct sunlight for a long period of time with doors and windows closed.
- Do not attempt to recharge dry cell batteries.
- Battery mishandling can cause electrolyte leakage which can damage items the fluid contacts and may cause a fire. If electrolyte leaks from the batteries, consult your dealer. Wash thoroughly with water if electrolyte comes in contact with any part of your body.
- Keep the AAA LR03 batteries and the rechargeable batteries out of reach of children to prevent swallowing. Accidental swallowing of batteries can result in stomach and intestinal damage.
- When carrying batteries in a pocket or bag, ensure no metal objects such as necklaces are placed together with them. Contact with metal may cause short-circuiting which can cause a fire. For safety, carry the batteries in a battery carrying case.

A nickel metal hydride battery that is recyclable powers the product you have purchased. Please call 1-800-8-BATTERY for information on how to recycle this battery.
Allergies
- Discontinue use if you experience discomfort with the speakers or any other parts that directly contact your skin.
- Continued use may cause rashes or other allergic reactions.
WARNING
To reduce the risk of fire, electric shock or product damage,
- Do not let water or other liquids drip or splash inside the unit.
- Do not expose accessories (battery pack, battery charger, AC adaptor, SD memory card and etc.) to rain, moisture, dripping or splashing.
- Do not place objects filled with liquids, such as vases, on accessories.
- Use only the recommended accessories.
- Do not remove covers.
- Do not repair this unit by yourself. Refer servicing to qualified service personnel.
CAUTION
- Danger of explosion if battery is incorrectly replaced. Replace only with the type recommended by the manufacturer.
- When disposing of the batteries, please contact your local authorities or dealer and ask for the correct method of disposal.
THE FOLLOWING APPLIES IN THE U.S.A. AND CANADA
This device complies with Industry Canada licence-exempt RSS standard(s). Operation is subject to the following two conditions:
(1) This device may not cause interference, and
(2) this device must accept any interference, including interference that may cause undesired operation of this device.
FCC ID : ACJ-RP-BTGS10
IC : 216A-RPBTGS10
This transmitter must not be co-located or operated in conjunction with any other antenna or transmitter.
This equipment complies with FCC/IC radiation exposure limits set forth for an uncontrolled environment and meets the FCC radio frequency (RF) Exposure Guidelines in Supplement C to OET65 and RSS-102 of the IC radio frequency (RF) Exposure rules. This equipment has very low levels of RF energy that are deemed to comply without testing of specific absorption ratio (SAR).
THE FOLLOWING APPLIES ONLY IN THE U.S.A.
FCC Note:
This equipment has been tested and found to comply with the limits for a Class B digital device, pursuant to Part 15 of the FCC Rules. These limits are designed to provide reasonable protection against harmful interference in a residential installation. This equipment generates, uses and can radiate radio frequency energy and, if not installed and used in accordance with the instructions, may cause harmful interference to radio communications. However, there is no guarantee that interference will not occur in a particular installation. If this equipment does cause harmful interference to radio or television reception, which can be determined by turning the equipment off and on, the user is encouraged to try to correct the interference by one or more of the following measures:
- Reorient or relocate the receiving antenna.
- Increase the separation between the equipment and receiver.
- Connect the equipment into an outlet on a circuit different from that to which the receiver is connected.
- Consult the dealer or an experienced radio/TV technician for help. Any unauthorized changes or modifications to this equipment would void the user's authority to operate this device.
This device complies with Part 15 of the FCC Rules. Operation is subject to the following two conditions: (1) This device may not cause harmful interference, and (2) this device must accept any interference received, including interference that may cause undesired operation.
Responsible Party: Panasonic Corporation of North America Two Riverfront Plaza, Newark, NJ 07102-5490
Support Contact: http://www.panasonic.com/contactinfo
THE FOLLOWING APPLIES ONLY IN CANADA.
CAN ICES-3(B)/NMB-3(B)
About Bluetooth®
Panasonic bears no responsibility for data and/or information that is compromised during a wireless transmission.
Frequency band used
This unit uses the 2.4 GHz frequency band.
Certification of this unit
- This unit conforms to frequency restrictions and has received certification based on frequency laws. Thus, a wireless permit is not necessary.
- The actions below are punishable by law in some countries:
– Taking apart/modifying the unit. - Removing specification indications.
Restrictions of use
- Wireless transmission and/or usage with all Bluetooth® equipped devices is not guaranteed.
- All devices must conform to standards set by Bluetooth SIG, Inc.
- Depending on the specifications and settings of a device, it can fail to connect or some operations can be different.
- This system supports Bluetooth® security features. But depending on the operating environment and/or settings, this security is possibly not sufficient. Transmit data wirelessly to this system with caution.
- This system cannot transmit data to a Bluetooth® device.
Range of use
Use this unit at a maximum range of 10 m (33 feet).
The range can decrease depending on the environment, obstacles or interference.
■terference from other devices
- This unit may not function properly and troubles such as noise and sound jumps may arise due to radio wave interference if this unit is located too close to other Bluetooth® devices or the devices that use the 2.4 GHz band.
- This unit may not function properly if radio waves from a nearby broadcasting station, etc. is too strong.
Intended usage
- This unit is for normal, general use only.
- Do not use this system near an equipment or in an environment that is sensitive to radio frequency interference (example: airports, hospitals, laboratories, etc).
Product service
- Damage requiring service – The unit should be serviced by qualified service personnel if:
(a) Objects or liquids have gotten into the unit; or
(b) The unit has been exposed to rain; or
(c) The unit does not operate normally or exhibits a marked change in performance; or
(d) The unit has been dropped or the cabinet damaged.
-
Servicing – Do not attempt to service the unit beyond that described in these operating instructions. Refer all other servicing to authorized servicing personnel.
-
Replacement parts – When parts need replacing ensure the servicer uses parts specified by the manufacturer or parts that have the same characteristics as the original parts. Unauthorized substitutes may result in fire, electric shock, or other hazards.
-
Safety check – After repairs or service, ask the servicer to perform safety checks to confirm that the unit is in proper working condition.
Product information
For product information or assistance with product operation: In the U.S.A. and Puerto Rico, refer to “Customer Services Directory (United States and Puerto Rico)” on page 23.
In Canada, contact the Panasonic Canada Inc., or visit the website (www.panasonic.ca/english/support), or an authorized Servicentre closest to you.
Maintenance
Clean this unit with a dry and soft cloth.
- Do not use solvents including benzine, thinner, alcohol, kitchen detergent, a chemical wiper, etc. This might cause the exterior case to be deformed or the coating to come off.
This unit and adjustable band
If the unit and adjustable band become too dirty, wring a cloth moistened in water, wipe the dirt with it and clean with a dry cloth.
USB charger
Clean the USB charger after disconnecting it from the computer.
Troubleshooting guide
Before requesting service, make the following checks. If you are in doubt about some of the check points, or if the remedies indicated in the chart do not solve the problem, refer to “Customer Services Directory (United States and Puerto Rico)” on page 23 if you reside in the U.S.A. or Puerto Rico, or refer to “Product information” on page 17 if you reside in Canada.
General
No operation
- Remove the battery, and insert it again. If you still cannot operate the unit, restore the unit to the factory settings. (→ P. 13)
Power supply and charging
Charging error
- Make sure the computer is turned on and is not on standby or sleep mode.
- Is the USB port you are currently using working properly? If your computer has other USB ports, unplug the connector from its current port and plug it into one of the other ports.
- If the measures mentioned above are not applicable, unplug the USB connector and plug it in again.
When the charging light is off:
- Check that the USB connector is securely connected to a computer.
When the charging light is blinking fast:
- The battery may have run down. (Number of recharging times of supplied battery: Approx. 300) Replace with a new specified AAA Ni-MH rechargeable battery and charge it.
- A dry-cell battery may be used. A dry-cell battery cannot be charged.
- Any other Ni-MH rechargeable battery than specified may have been used. Make sure to use the specified AAA Ni-MH rechargeable battery.
- The battery may have been incorrectly placed. Remove the battery from the charger and correctly place the battery again.
Charging error/Charging takes longer
- Is the USB connector directly connected to the computer? Make sure that the USB charger is connected to the computer without using a USB hub. (→ P. 6)
The power does not turn on
- The AAA Ni-MH rechargeable battery may have run down. Remove the battery and recharge it properly. ( P. 6)
- The battery may not be correctly inserted. Remove the battery completely and then correctly insert it back into the unit again. ( P. 7)
- Is the battery firmly in contact with the terminals? Clean the battery terminals.
Bluetooth® device connecting
The device cannot be connected
- The unit's pairing information may have been deleted from the Bluetooth® device. Pair them again if pairing information cannot be found. (→ P. 8)
- Delete the pairing information for this unit from the Bluetooth® device, then pair them again. (→ P. 8)
Sound and audio volume
No sound
- Make sure that the unit and the Bluetooth device are connected correctly. ( P.8)
- Check if music is playing on the Bluetooth® device.
- Make sure that the unit is turned on and the volume is not set too low.
- Pair and connect the Bluetooth device and the unit again. (→ P. 8)
- If you use the setting for transmitting sound in high quality, switch to the setting with higher priority on connection. ( P. 10)
Low volume
- Increase the volume of the unit. ( P. 11)
- Increase the volume on the Bluetooth device.
- Adjust the speakers to a position appropriate for listening.
Sound from the device is cut off / Sound quality is bad
- Sound may be disrupted if signals are blocked. Do not fully cover this unit with your palm, etc.
- The device may be out of the 10 m (33 feet) communication range. Move the device nearer to this unit.
- Remove any obstacle between this unit and the device.
- Switch off any wireless LAN device when not in use.
- Is the LED on top of the unit blinking in red? A communication problem may arise if the battery is depleted. Charge the AAA Ni-MH rechargeable battery or replace the battery with another one. (→ P. 6, 7, 13)
- If you use the setting for transmitting sound in high quality, switch to the setting with higher priority on connection. ( P. 10)
Calls
You cannot hear the other person
- Make sure that the unit and the Bluetooth® enabled phone are turned on.
- Check if the unit and the Bluetooth® enabled phone are connected. ( P. 8)
- Check the audio settings of the Bluetooth® enabled phone. Switch the calling device to the unit if it is set to the Bluetooth® phone. (→ P. 13)
- If the volume of the other person's voice is too low, increase the volume of both the unit and the Bluetooth® enabled phone.
Specifications
Bluetooth
| Bluetooth® system specification Ver.3.0 | |
| Wireless equipment classification Class 2 (2.5 mW) | |
| Frequency band 2.4 GHz band FH-SS | |
| Supported profiles A2DP, AVRCP, HSP, HFP | |
| Supported codec SBC, aptX | ® |
| Operating distance up to 10 m (33 ft.) | |
■ Microphone section
| Type Mono |
General
| Power supply | Rechargeable battery | DC 1.2 V (1 × Ni-MH rechargeable battery, AAA) |
| Dry-cell battery | DC 1.5 V (1 × LR03 battery, AAA) | |
| Dimensions (W × H × D) | 160 mm × 50 mm × 170 mm(6-5/16 in. × 2 in. × 6-11/16 in.) | |
| Mass (Weight) | Approx. 81 g (2.9 oz.) (with battery) | |
| Approx. 69 g (2.4 oz.) (without battery and adjustable band) | ||
| Operating time *1(1 kHz, 5 mW + 5 mW) | Approx. 5 hours (supplied rechargeable battery) | |
| Approx. 4.5 hours (Panasonic alkaline battery) | ||
| Operating temperature range 0 °C to 40 °C (32 °F to 104 °F) | ||
| Operating humidity range | 35%RH to 80%RH (no condensation) | |
| Recommended battery charging temperature range | 5 °C to 35 °C (41 °F to 95 °F) | |
■ Accessories
| USB charger | Power supply DC 5 V, 5 | 00 mA |
| DC output DC 1.2 V, 85 | 0 mA × 1 or 450 mA × 2 | |
| Recharging time *2 | Approx. 1 hour (1 × Ni-MH rechargeable battery, AAA) | |
| Approx. 2 hours (2 × Ni-MH rechargeable battery, AAA) |
*1 It may be shorter depending on the operating conditions.
*2 Time taken to recharge from empty to full
Specifications are subject to change without notice.
Copyright, etc.
The Bluetooth®word mark and logos are owned by the Bluetooth SIG, Inc. and any use of such marks by Panasonic Corporation is under license. Other trademarks and trade names are those of their respective owners.
- aptXoftware is copyright CSR plc or its group companies. All rights reserved.
The aptX ^® mark and the aptX logo are trademarks of CSR plc or one of its group companies and may be registered in one or more jurisdictions.
● Other system names and product names appearing in this document are in general the registered trademarks or trademarks of the respective developer companies.
Note that the ^TM mark and ^ mark do not appear in this document.
The serial number of this product can be found inside of the battery compartment. Please note them in the space provided below and keep for future reference.
MODEL NUMBER RP-BTGS10
SERIAL NUMBER
User memo:
DATE OF PURCHASE
DEALER NAME
DEALER ADDRESS
TELEPHONE NUMBER
-If you see this symbol-
Information on Disposal in other Countries outside the European Union
This symbol is only valid in the European Union.
If you wish to discard this product, please contact your local authorities or dealer and ask for the correct method of disposal.
Limited Warranty (ONLY FOR U.S.A. AND PUERTO RICO)
Panasonic Products Limited Warranty
Limited Warranty Coverage (For USA and Puerto Rico Only)
If your product does not work properly because of a defect in materials or workmanship, Panasonic Corporation of North America (referred to as “the warrantor”) will, for the length of the period indicated on the chart below, which starts with the date of original purchase (“warranty period”), at its option either (a) repair your product with new or refurbished parts, (b) replace it with a new or a refurbished equivalent value product, or (c) refund your purchase price. The decision to repair, replace or refund will be made by the warrantor.
| Product or Part Name Parts Labor | ||
| Accessories 90 Days Not Applicable | ||
| Batteries (Non-rechargeable batteries are not warranted.) | 10 Days Not Applicable | |
During the “Labor” warranty period there will be no charge for labor. During the “Parts” warranty period, there will be no charge for parts. This Limited Warranty excludes both parts and labor for non-rechargeable batteries, antennas, and cosmetic parts (cabinet). This warranty only applies to products purchased and serviced in the United States or Puerto Rico. This warranty is extended only to the original purchaser of a new product which was not sold “as is”.
Mail-In Service--Online Repair Request
Online Repair Request
To submit a new repair request and for quick repair status visit our Web Site at www.panasonic.com/repair.
When shipping the unit, carefully pack, include all supplied accessories listed in the Owner's Manual, and send it prepaid, adequately insured and packed well in a carton box. When shipping Lithium Ion batteries please visit our Web Site at www.panasonic.com/BatteryHandling as Panasonic is committed to providing the most up to date information. Include a letter detailing the complaint, a return address and provide a daytime phone number where you can be reached. A valid registered receipt is required under the Limited Warranty.
IF REPAIR IS NEEDED DURING THE WARRANTY PERIOD, THE PURCHASER WILL BE REQUIRED TO FURNISH A SALES RECEIPT/PROOF OF PURCHASE INDICATING DATE OF PURCHASE, AMOUNT PAID AND PLACE OF PURCHASE. CUSTOMER WILL BE CHARGED FOR THE REPAIR OF ANY UNIT RECEIVED WITHOUT SUCH PROOF OF PURCHASE.
Limited Warranty Limits And Exclusions
This warranty ONLY COVERS failures due to defects in materials or workmanship, and DOES NOT COVER normal wear and tear or cosmetic damage. The warranty ALSO DOES NOT COVER damages which occurred in shipment, or failures which are caused by products not supplied by the warrantor, or failures which result from accidents, misuse, abuse, neglect, mishandling, misapplication, alteration, faulty installation, set-up adjustments, misadjustment of consumer controls, improper maintenance, power line surge, lightning damage, modification, introduction of sand, humidity or liquids, commercial use such as hotel, office, restaurant, or other business or rental use of the product, or service by anyone other than a Factory Service Center or other Authorized Servicer, or damage that is attributable to acts of God.
THERE ARE NO EXPRESS WARRANTIES EXCEPT AS LISTED UNDER "LIMITED WARRANTY COVERAGE".
THE WARRANTOR IS NOT LIABLE FOR INCIDENTAL OR CONSEQUENTIAL DAMAGES RESULTING FROM THE USE OF THIS PRODUCT, OR ARISING OUT OF ANY BREACH OF THIS WARRANTY.
(As examples, this excludes damages for lost time, travel to and from the servicer, loss of or damage to media or images, data or other memory or recorded content. The items listed are not exclusive, but for illustration only.)
ALL EXPRESS AND IMPLIED WARRANTIES, INCLUDING THE WARRANTY OF MERCHANTABILITY, ARE LIMITED TO THE PERIOD OF THE LIMITED WARRANTY.
Some states do not allow the exclusion or limitation of incidental or consequential damages, or limitations on how long an implied warranty lasts, so the exclusions may not apply to you.
This warranty gives you specific legal rights and you may also have other rights which vary from state to state. If a problem with this product develops during or after the warranty period, you may contact your dealer or Service Center. If the problem is not handled to your satisfaction, then write to the warrantor's Consumer Affairs Department at the addresses listed for the warrantor.
PARTS AND SERVICE, WHICH ARE NOT COVERED BY THIS LIMITED WARRANTY, ARE YOUR RESPONSIBILITY.
Customer Services Directory (United States and Puerto Rico)
Obtain Product Information and Operating Assistance; locate your nearest Dealer or Service Center; purchase Parts and Accessories; or make Customer Service and Literature requests by visiting our Web Site at: http://www.panasonic.com/support or, contact us via the web at: http://www.panasonic.com/contactinfo
For hearing or speech impaired TTY users, TTY: 1-877-833-8855
Accessory Purchases (United States and Puerto Rico)
Purchase Parts, Accessories and Owner's Manual online for all Panasonic Products by visiting our Web Site at: http://www.pstc.panasonic.com
Or, send your request by E-mail to: npcparts@us.panasonic.com You may also contact us directly at: 1-800-237-9080 (Fax Only) (Monday-Friday 9am-9pm EST)
Panasonic National Parts Center 20421 84th Avenue South, Kent, WA 98032 (We accept Visa, MasterCard, Discover Card, American Express)
For hearing or speech impaired TTY users, TTY: 1-866-605-1277
As of November 2013
Limited Warranty (ONLY FOR CANADA)
Panasonic Canada Inc.
5770 Ambler Drive, Mississauga, Ontario L4W 2T3
PANASONIC PRODUCT – LIMITED WARRANTY EXCHANGE PROGRAM
Panasonic Canada Inc. warrants this product to be free from defects in material and workmanship under normal use and for a period as stated below from the date of original purchase agrees to, at its option either (a) repair your product with new or refurbished parts, (b) replace it with a new or a refurbished equivalent value product, or (c) refund your purchase price. The decision to repair, replace or refund will be made by Panasonic Canada Inc.
Accessories including rechargeable batteries
Ninety (90) days
This warranty is given only to the original purchaser, or the person for whom it was purchased as a gift, of a Panasonic brand product mentioned above sold by an authorized Panasonic dealer in Canada and purchased and used in Canada, which product was not sold “as is”, and which product was delivered to you in new condition in the original packaging.
IN ORDER TO BE ELIGIBLE TO RECEIVE WARRANTY SERVICE HEREUNDER, A PURCHASE RECEIPT OR OTHER PROOF OF DATE OF ORIGINAL PURCHASE, SHOWING AMOUNT PAID AND PLACE OF PURCHASE IS REQUIRED
LIMITATIONS AND EXCLUSIONS
This warranty ONLY COVERS failures due to defects in materials or workmanship, and DOES NOT COVER normal wear and tear or cosmetic damage. The warranty ALSO DOES NOT COVER damages which occurred in shipment, or failures which are caused by products not supplied by Panasonic Canada Inc., or failures which result from accidents, misuse, abuse, neglect, mishandling, misapplication, alteration, faulty installation, set-up adjustments, misadjustment of consumer controls, improper maintenance, power line surge, lightning damage, modification, introduction of sand, humidity or liquids, commercial use such as hotel, office, restaurant, or other business or rental use of the product, or service by anyone other than a Authorized Servicer, or damage that is attributable to acts of God.
Dry cell batteries are also excluded from coverage under this warranty.
THIS EXPRESS, LIMITED WARRANTY IS IN LIEU OF ALL OTHER WARRANTIES, EXPRESS OR IMPLIED, INCLUDING ANY IMPLIED WARRANTIES OF MERCHANTABILITY AND FITNESS FOR A PARTICULAR PURPOSE. IN NO EVENT WILL PANASONIC CANADA INC. BE LIABLE FOR ANY SPECIAL, INDIRECT OR CONSEQUENTIAL DAMAGES RESULTING FROM THE USE OF THIS PRODUCT OR ARISING OUT OF ANY BREACH OF ANY EXPRESS OR IMPLIED WARRANTY. (As examples, this warranty excludes damages for lost time, travel to and from the Authorized Servicer, loss of or damage to media or images, data or other memory or recorded content. This list of items is not exhaustive, but for illustration only.)
In certain instances, some jurisdictions do not allow the exclusion or limitation of incidental or consequential damages, or the exclusion of implied warranties, so the above limitations and exclusions may not be applicable. This warranty gives you specific legal rights and you may have other rights which vary depending on your province or territory.
CONTACT INFORMATION
For product operation and information assistance, please visit our Support page: www.panasonic.ca/english/support
For defective product exchange within the warranty period, please contact the original dealer.
Cher client
natural_image
Side profile illustration of a person wearing earphones and a medical device (no text or symbols)☐ 1 Pile rechargeable Ni-MH, AAA [HHR-80AAAB]*
☐ 2 Bandes ajustables RP-BTGS10PPK (noir)
- Noir [RFX0F93]
- Rouge [RFX0F93-R]
RP-BTGS10PPA (bleu)
- Bleu [RFX0F93-A]
- Vert [RFX0F93-G]
RP-BTGS10PPH (gris)
- Noir [RFX0F93]
- Gris [RFX0F93-H]
Droite (R)
Extérieur
Intérieur

natural_image
Simple line drawing of a car's front view with a numbered marker (8) pointing to the center area (no text or symbols beyond the number)Gauche (L)
Remarque
Panasonic Canada Inc.
5770, Ambler Drive, Mississauga (Ontario) L4W 2T3
PRODUIT PANASONIC – GARANTIE LIMITÉE
PROGRAMME DE REMPLACEMENT
natural_image
Side profile illustration of a person wearing earphones and holding a device (no text or symbols)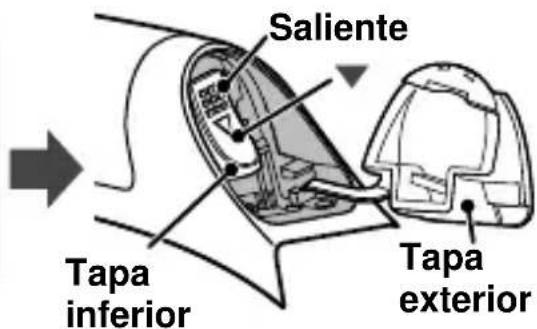
natural_image
Side profile illustration of a person wearing a medical or electronic device (no text or symbols visible)Banda ajustable
Escuchar música
Parte responsible: Panasonic Corporation of North America
Two Riverfront Plaza, Newark, NJ 07102-5490
The aptX® mark and the aptX logo are trademarks of CSR plc or one of its group companies and may be registered in one or more jurisdictions.
Panasonic National Parts Center
20421 84th Avenue South, Kent, WA 98032
(aceptamos Visa, MasterCard, Discover Card, American Express)
natural_image
Side profile illustration of a person wearing earphones and a sash, with no visible text or symbolsEsquerda (L)
Observação
- aptXoftware is copyright CSR plc or its group companies. All rights reserved.
The aptX® mark and the aptX logo are trademarks of CSR plc or one of its group companies and may be registered in one or more jurisdictions.
Panasonic Corporation of North America
Two Riverfront Plaza, Newark, NJ 07102-5490
http://www.panasonic.com
Panasonic Canada Inc.
5770 Ambler Drive, Mississauga, Ontario L4W 2T3
www.panasonic.ca
© Panasonic Corporation 2013
Printed in China/Imprimé en Chine/Impreso en China/
Impresso na China