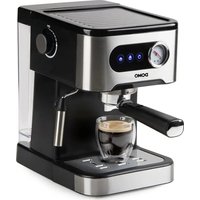
DO1138K - Coffee machine DOMO - Free user manual and instructions
Find the device manual for free DO1138K DOMO in PDF.


| Product type | Espresso machine |
| Brand | DOMO |
| Model | DO1138K |
| Power supply | 220-240 V ~ 50/60 Hz |
| Power | Approx. 1100 W |
| Pressure | Built-in pressure gauge, optimal pressure range |
| Water tank capacity | 1 L |
| Filters included | 2 filters (small for one cup, large for two cups) |
| Accessories included | Filter holder, tamper scoop, holding clip, milk pitcher not included |
| Functions | Espresso, steam for cappuccino, hot water, cup warmer |
| Control panel | On/off button, espresso button, steam button, pressure gauge |
| Chassis material | Metal and plastic |
| Cleaning removable parts | Dishwasher safe (filters, filter holder, drip tray, grid) |
| Recommended descaling | Every 2 to 4 weeks with descaling product |
| Safety | Manual shut-off, burn protection, hot cup warmer surface |
| Warranty | 2 years |
| Country of origin | Not specified |
| Weight | Approx. 5 kg |
| Dimensions (W x D x H) | Approx. 30 x 25 x 35 cm |
Frequently Asked Questions - DO1138K DOMO
User questions about DO1138K DOMO
0 question about this device. Answer the ones you know or ask your own.
Ask a new question about this device
Download the instructions for your Coffee machine in PDF format for free! Find your manual DO1138K - DOMO and take your electronic device back in hand. On this page are published all the documents necessary for the use of your device. DO1138K by DOMO.
USER MANUAL DO1138K DOMO
natural_image
Exterior view of a modern espresso machine with black and silver casing, featuring a glass cup and coffee cups (no visible text or symbols)NL Handleiding Espressomachine
EN Instruction booklet Espresso machine
Read all instructions carefully.
Save this instruction manual for future reference.
⚠PRODUCTSPECIFIEKE WAARSCHUWINGEN
flowchart
graph TD
    A["6: Setup"] --> B["7: START"]
    B --> C["8: Stop"]
    C --> D["9: Stop with coffee cup and hand icon"]
    D --> E["End: Take a trash bin with recycling symbol"]
Tips
natural_image
Symbol of a trash bin with crossed lines indicating no waste or discharge, and a solid black rectangle below (no text or labels)natural_image
Recycling symbol with three chasing arrows forming a triangle (no text or labels)⚠AVERTISSEMENTS SPÉCIFIQUES AU PRODUIT
AVANT LA PREMIÈRE UTILISATION
flowchart
graph TD
    A["6: Breakfast Screen"] --> B["7: START with 📄 icon"]
    B --> C["8: Stop with 📄 icon"]
    C --> D["9: Stop with 📄 brush and waste bin icon"]
Conseils
flowchart
graph LR
    A["1: Water Tap"] --> B["Power Switch"]
    B --> C["Drain to Coffee Cup"]
    C --> D["Hand Pressing Bubble"]
    D --> E["Receiving Cover"]
    E --> F["Product Washing Machine"]
natural_image
Line drawing of a coffee maker with a hand holding a cup (no text or symbols)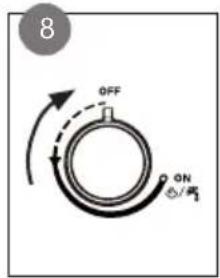
natural_image
Line drawing of a coffee machine with a straw and a smoking can (no text or symbols)FONCTION EAU CHAUDE
flowchart
graph LR
    A["6: Breakfast Screen"] --> B["7: START with Pie Chart"]
    B --> C["8: Stop with Pie Chart"]
    C --> D["9: Waste Discharge Bin"]
Tipps
natural_image
Symbol of a trash bin crossed with two crossed lines and a solid black rectangle below (no text or labels)Thank you for your confidence in DOMO. We do hope you enjoy your new purchase. Before reaching you, all our products undergo a strict quality inspection. Should you still encounter problems with your appliance, then we are truly sorry and will do everything possible to resolve the situation quickly. Do not hesitate to contact our customer service. Our staff will do all they can to help you!
+32 14 21 71 91 info@linea2000.be

Monday - Thursday: 8.30 - 12.00 and 13.00 - 17.00
Friday: 8.30 - 12.00 and 13.00 - 16.30
This device has a warranty period of 2 years from the date of purchase. During this warranty period, the distributor will assume responsibility for any defects that can be shown to be the result of material, construction or manufacturing errors. Such defects will be remedied by repair or replacement of the device. The 2-year warranty period will be suspended during the repair period and will continue after the repair has taken place for the remaining duration of the warranty period. The warranty will be honoured if proof of purchase clearly showing the date of purchase is provided. If your device becomes defective within the 2-year warranty period, please return it with your proof of purchase to the store you purchased it from or follow the procedure of the relevant webshop if you bought it online.
The warranty does not cover damage to the device, accessories or parts caused by:
• normal wear and tear from use;
• non-compliance with the instructions for use, maintenance and cleaning in the manual;
- incorrect connection, e.g. electrical voltage too high;
- incorrect, heavy-handed or abnormal use;
• repairs or alterations carried out by the consumer or unauthorised third parties;
- use of parts or accessories not recommended nor supplied by the distributor.
SAFETY INSTRUCTIONS
When using electrical appliances, basic safety precautions should always be taken, including the following. Any injury or damage caused by failure to comply with these rules are at your own risk. Neither the manufacturer, importer, or the supplier may be held liable.
- Read all instructions carefully.
• Make sure all packaging materials and promotional stickers have been removed before using the appliance for the first time. Make sure children cannot play with the packaging materials. -
This appliance is only suitable for use in domestic and similar environments, such as:
-
staff kitchen areas in shops, offices and other working environments;
- farm houses;
- by clients in hotels, motels and other residential type environments;
• bed and breakfast type environments.
• Children should be supervised to ensure that they do not play with the appliance.
- This appliance can be used by children aged from 16 years and above and persons with reduced physical, sensory or mental capabilities or lack of experience and knowledge if they have been given supervision or instruction concerning use of the appliance in a safe way and understand the hazards involved.
• Children shall not play with the appliance.
- Cleaning and user maintenance shall not be made by children unless they are older than 16 or supervised.
- Keep the appliance and its cord out of reach of children younger than 16 years.
- All repairs should be carried out by the manufacturer or its aftersales service.
▲ELECTRICAL WARNINGS
- In order to avoid a hazard this appliance must not be supplied through an external switching device, such as a timer or a separate remote control, or connected to a circuit that is regularly switched on and off by the utility.
- The appliance must be disconnected from its power source when not in use, during service and when replacing parts. If present, first turn all the buttons to the 'off' position, then pull the plug out of the socket by grasping the plug itself. Never pull the cord or appliance to remove the plug from the socket.
- Before use, check carefully that the electric tension and frequency of the power net at your home match the indications on the rating label of the appliance.
- The appliance must be plugged into an appropriate outlet that is installed and grounded in accordance with local installation regulations.
- Do not let the power supply cord hang over the edge of a counter, or touch hot surfaces.
- Keep the power cord away from hot parts and don't cover the appliance.
- Unwrap the cord completely to prevent overheating of the cord. Do not allow the power cord supply to run underneath or around the unit.
- For safety reasons, never use the appliance if the cord, plug, or appliance itself is damaged, or after a malfunction of the appliance. Return the appliance to the DOMO Service Department or its service agent for examination, repair, or electrical or mechanical adjustment. Do not try to repair the appliance yourself.
⚠️INSTALLATION
- Do not place near flammable materials, gases or explosives.
- Do not use or store this appliance outdoors.
• Always use the appliance on a steady, dry and level surface.
- Never place this appliance near a gas stove or electrical stove or in a place where it may come into contact with a warm appliance.
⚠ USE
- Do not use this appliance for other than intended use.
- Never leave the appliance unattended while it is functioning.
- Do not operate the appliance with wet hands.
- The use of accessories that are not recommended or sold by the manufacturer can cause fire, electrical shock or injuries. Only use the utensils delivered with the appliance.
⚠ CLEANING AND MAINTENANCE
- To protect against electrical shock or burns, do not immerse unit, cord, or plug in water or other liquid.
- Failure to maintain this appliance in a clean condition could adversely affect the life of the appliance and possibly result in a hazardous situation.
⚠️PRODUCTSPECIFIC WARNINGS
- Do not overfill the appliance. Never add water above the maximum level marked on the water tank.
- Do not spill any liquid on the connector.
- Do not move the appliance while in use or when still hot. Allow to cool before moving the appliance.
- Do not remove the portafilter or the water reservoir while making coffee or steaming milk.
- Caution should also be taken while removing the porta-filter since the metal parts will be hot.
- The steam from the steam nozzle is hot. Be careful not to get burned.
- Only touch the appliance by its buttons and handles. Other surfaces may become hot during use.
- Never use the appliance without water.
- Turn off the appliance before removing the water reservoir.
- The top of the appliance can be used as a cup warmer. This plate gets hot when in use. Do not touch it.
SAVE THESE INSTRUCTIONS FOR FUTURE REFERENCE
All images and descriptions in this manual are purely indicative and may differ slightly from the actual device.
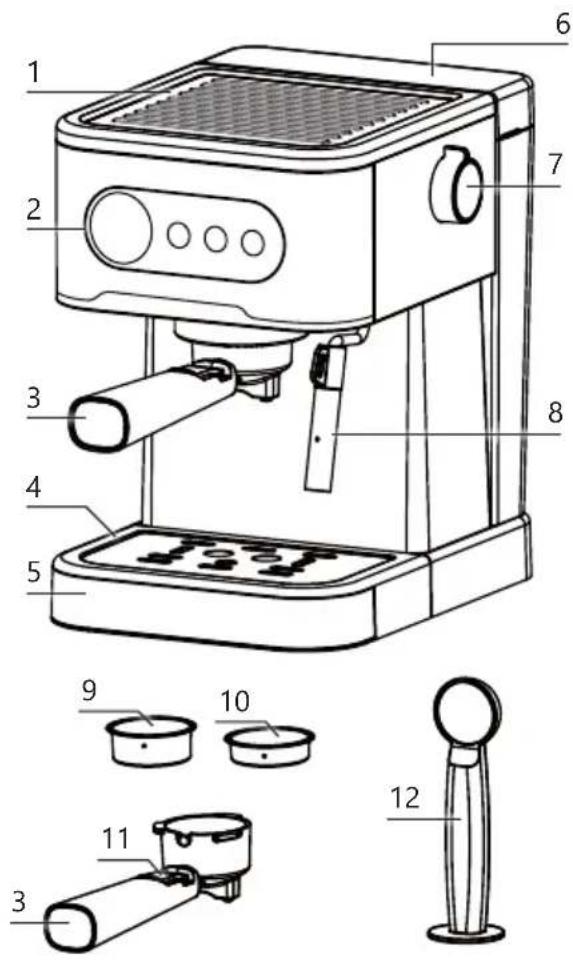
PARTS
- Cup warmer
- Control panel
- Portafilter
- Drip tray grille
- Drip tray
- Water reservoir
- Rotary knob (steam/water)
- Steam nozzle
- Large filter
- Small filter
- Retainer clip portafilter
- Measuring scoop with tamper
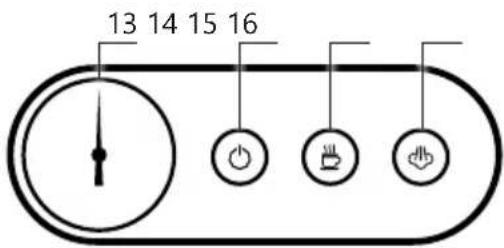
CONTROL PANEL
- Pressure gauge
- On/off button
- Espresso button
- Steam button
BEFORE THE FIRST USE
- Check that all accessories for the device are present and that the unit is not damaged.
- Flush out the pipes. First, allow the water to run through without adding ground coffee to the filter of the portafilter. See section: 'use/coffee'. Afterwards, throw away the water.
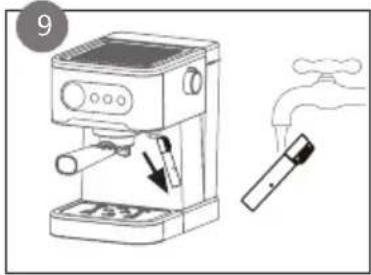
- Flush out the steam nozzle. See section: 'use/hot water feature'. Afterwards, throw away the water.
- Clean all parts with a moist cloth.
USE
COFFEE
-
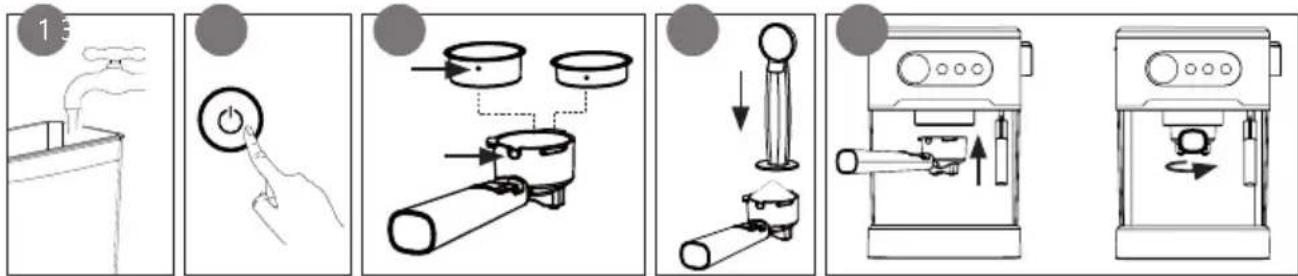
Fill the water reservoir with the desired amount of water. Make sure if the level is within the 'MIN' and 'MAX' indicators on the reservoir. The reservoir is removable. Open the lid; lift the reservoir out of the appliance to fill it and then carefully place it back in the appliance.
-
Plug the power cord into a socket. Make sure that the steam knob is in the off position. Press the on-off button; the appliance will start warming up. If all indicator lamps are lit, the appliance has warmed up and goes into standby mode.
-
Select the desired filter: the small filter for an espresso, the large filter for 2 cups or a double espresso. Place the filter in the portafilter. Make sure the dot on the filter is aligned with the groove in the portafilter.
-
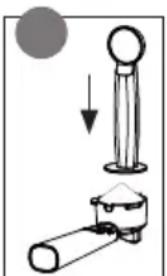
Fill the filter with fresh, finely ground espresso coffee using the measuring spoon (1 scoop for the small filter, 2 scoops for the large filter). Press the ground coffee firmly and evenly using the presser on the back side of the measuring spoon. Remove any excess coffee from the edge. We recommend you fill the filter to ±3 mm from the edge.
-
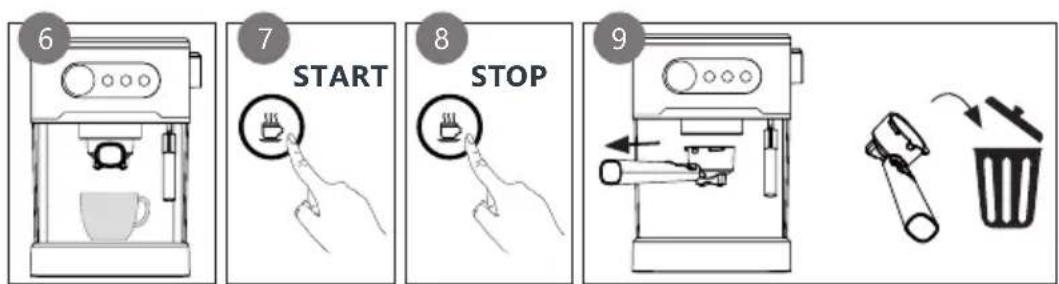
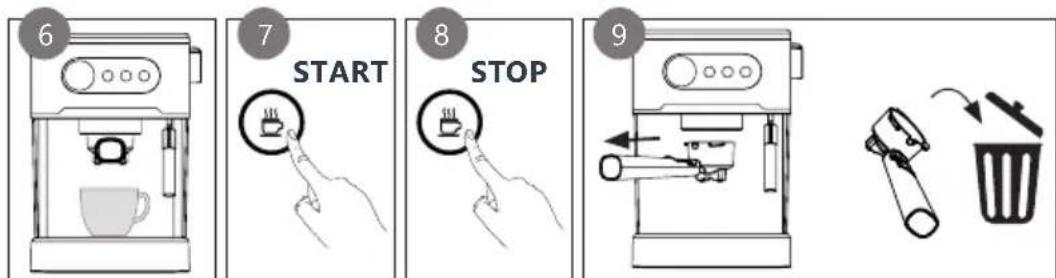
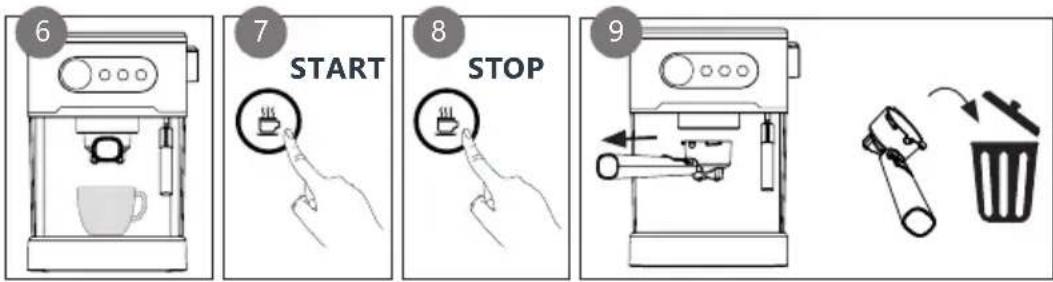
Place the portafilter under the brew group. Hold the handle so that it connects correctly to the open-lock symbol on the appliance and fits into the groove. Turn it slowly to the right, to the closed-lock symbol on the appliance.
-
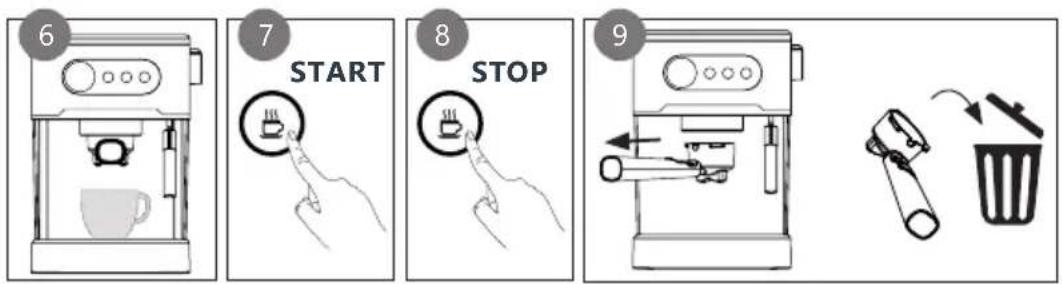
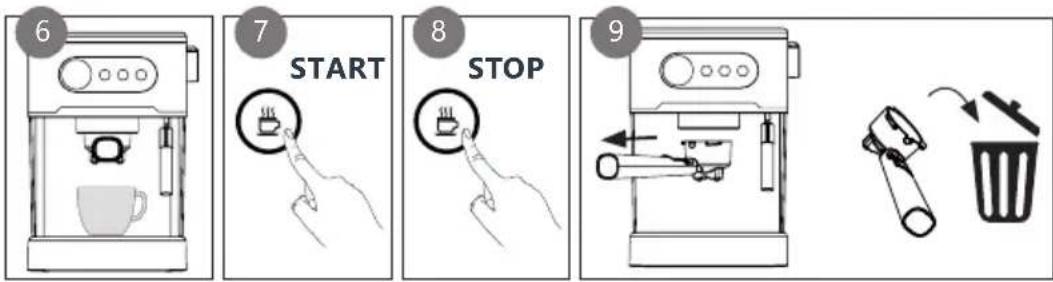
Place 1 or 2 cups on the drip tray.
-
Press the espresso button. The pressure gauge allows you to read the pressure during extraction.
-
When you have the desired amount of coffee in your cup, press the espresso button again to stop it.
⚠️ Never leave a running appliance unattended. The appliance does not stop automatically. You must stop it by pressing the espresso button.
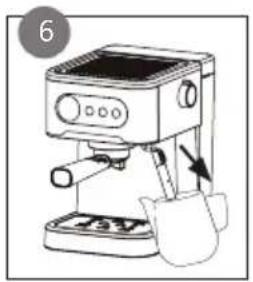
- Remove the portafilter from the appliance. Place the retainer clip against the filter and bang the coffee grounds out of the filter. Clean the portafilter and dry it off for the next use.
flowchart
graph TD
    A["6: Breakfast Screen"] --> B["7: START with Coffee Cup Icon"]
    B --> C["8: Stop with Coffee Box Icon"]
    C --> D["9: Stop with Hand Trigger"]
    D --> E["End: Bag with Waste Bin"]
Tips
- A clean coffee maker is essential to make great tasting coffee. Clean the appliance regularly according to the guidelines. Always use fresh, cold water in the coffee maker.
• Store coffee in a dry and cool place.
- The drip catcher can be removed to fit a large cup under the portafilter.
• Always make sure that the ground coffee is evenly spread out in the filter. This improves the permeation effect.
• To achieve the optimal coffee temperature, we recommend that you heat up the unit and the cup. Use the same method as for preparing coffee, but do not add ground coffee to the filter of the portafilter. Keep your cups above the unit, which acts as a cup warmer.
PRESSURE GAUGE
You can read the pressure/bars on the pressure gauge. It must be in the indicated region.
If the pressure is too low, check the following:
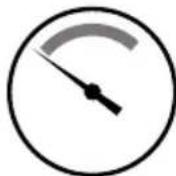
- Is the coffee fresh?
- Have you put enough pressure on the tamper? When pushing the ground coffee, you should use a force of ±15-20 kg.
- The coffee is ground too coarsely.
If the pressure is too high, check the following:
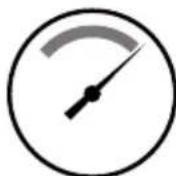
- Are the holes in the filter blocked?
- Have you put too much pressure on the tamper? When pushing the ground coffee, you should use a force of ±15-20 kg.
- The coffee is ground too finely.
STEAM NOZZLE
You use the steam nozzle to froth milk to achieve the perfect cappuccino or latte.
-
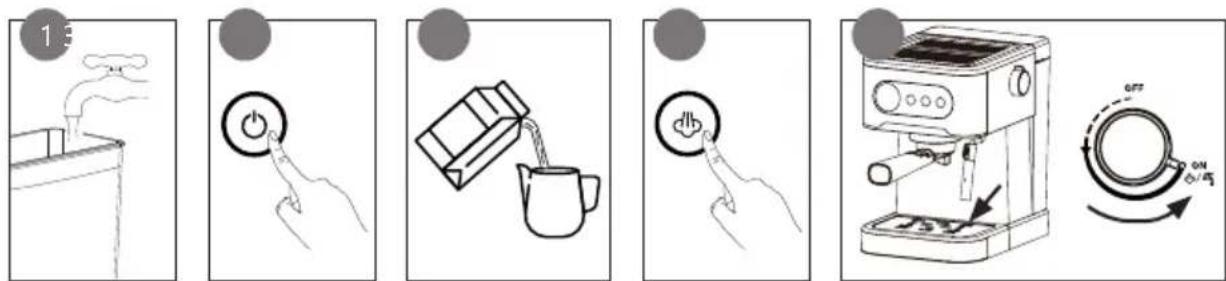
Fill the water reservoir.
-
Insert the plug in the power socket. Make sure that the steam dial is in the off position. Press the on/off button; the appliance will start warming up. If the indicator lamps are on, the appliance has warmed up and is in standby mode.
-
Fill a jug with cold, full-cream milk. (±100 ml milk for 1 cappuccino) Be careful not to overfill the milk jug. Frothing the milk will increase its volume.
-
Press the steam button.
-
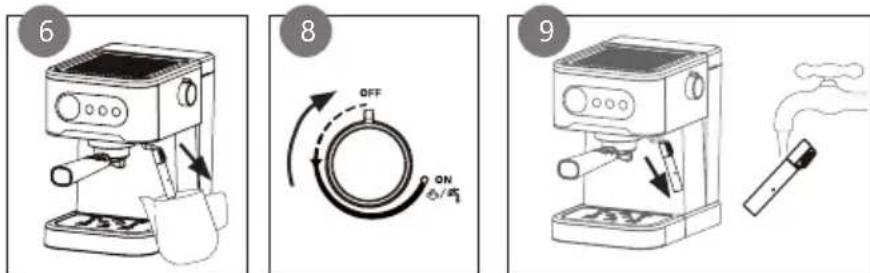
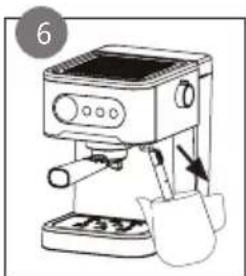
First, allow the steam nozzle to warm up. Point the steam nozzle over the drip tray. Slowly turn the dial to ON and wait 10 seconds.
-
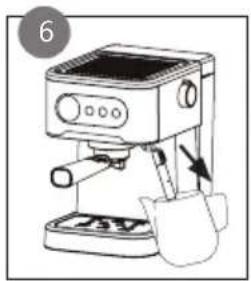
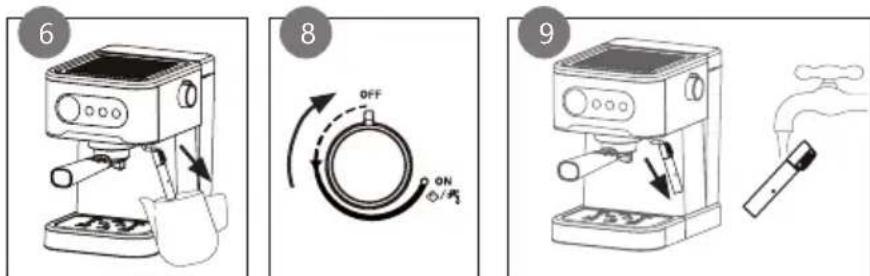
Turn the steam nozzle towards the milk jug. Bring the milk jug up to the steam wand and insert the steam nozzle a few millimetres into the milk.
⚠️ ATTENTION: the steam emitted by the steam nozzle is very, very hot.
- As the milk expands in volume, keep lowering the jug slightly until the steam nozzle tip is just below the surface of the milk. If you insert the steam nozzle too deeply into the milk, it heats the milk but does not froth air into the milk and no foam will form.
⚠️Do not use the steam feature for more than 5 minutes at a time.
-
When you obtain the desired amount of foam, turn the rotary knob to the off-position.
-
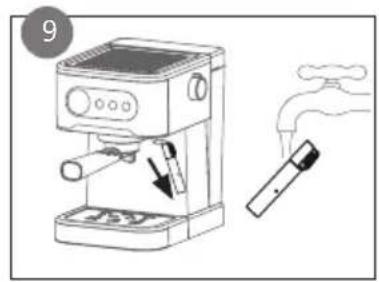
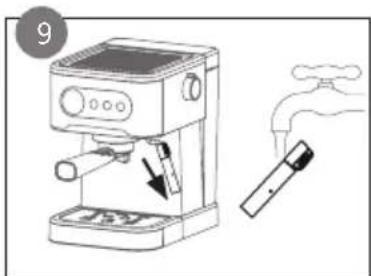
Clean the steam nozzle after every use.
⚠️ ATTENTION: the steam nozzle may still be really hot.
flowchart
graph LR
    A["1: Water Tap"] --> B["Step 1: Stopping with Air Tap"]
    B --> C["Step 2: Pressing a coffee cup with milk"]
    C --> D["Step 3: Pour tea into a mug"]
    D --> E["Step 4: Hand press on fan, click 'OK' button"]
    E --> F["Step 5: Washing Machine with lid, using hand valve"]
    F --> G["Step 6: Off/ON/OFF switch, rotary dial"]
natural_image
Line drawing of a coffee maker with a spoon and tray, no text or symbols present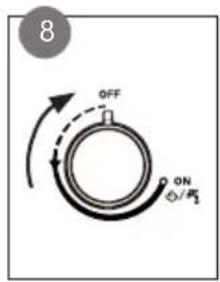
natural_image
Line drawing of a coffee machine with a hand tool and a smoking cup (no text or symbols)HOT WATER FEATURE
- Fill the water reservoir. Insert the plug in the power socket and press the on/off button.
- Place a cup under the steam nozzle.
- Turn the steam dial to ON. Hot water will flow from the steam nozzle.
- When you have enough water, turn the dial to the off position.
CLEANING AND MAINTENANCE
- Before cleaning the unit, pull the plug out of the power socket and let the unit cool down.
- Clean all removable parts (filters, portafilter, measuring scoop with tamper, drip tray, and grille) with clean warm water after use. Dry off the parts before putting them back. You can also clean these parts in the dishwasher.
- Wipe the unit housing clean with a soft, damp cloth to remove stains.
- Flush the unit regularly by brewing without putting ground coffee in the filter.
- Rinse the steam nozzle after each use with hot water. Remove the tube and rubber from the steam nozzle and clean in hot water with detergent. You can also clean the tube in the dishwasher. Dry off the parts before putting them back. You can clear the pipe opening using a 1 mm needle.
⚠️Do not immerse unit, cord, or plug in water or other liquid.
⚠️Never use aggressive or abrasive cleaning agents.
DESCALING
When?
Descale the unit regularly, on average every 2 to 4 weeks. Regularly descaling ensures the quality of your coffee will be consistent, lowers energy consumption, and extends the espresso machine's working life.
How?
- Fill the water reservoir with water and descaling product for espresso machines up to the descaling indicator ÷ diluted according to the instructions on the product packaging.
- Place the portafilter with filter but without ground coffee in the unit.
- Place a collection container of at least 500 ml under the brewing head and the steam nozzle.
- Insert the plug in the power socket, turn on the unit, and let it heat up.
-
Press the espresso button. The lamp will start blinking. The appliance will stop after about one and a half minutes. The espresso button lamp will stop blinking. Empty the collection container. Now put the collection container back in and repeat this procedure.
-
Press the steam button and wait for the lamp to turn on. Turn the steam dial to ON. Let the appliance steam for 1 minute then turn the knob back to 'OFF'.
- The unit must now be flushed with clean water to ensure no lime residue remains. Rinse the water reservoir and fill it with clean water. Empty the collection container.
- Repeat the descaling procedure, but now with clean water in the reservoir.
PROBLEMS AND SOLUTIONS
| PROBLEMS SOLUTIONS | |
| The coffee no longer flows. • There is no water in the reservoir. Fill the water reservoir.• The ground coffee is too fine or was compressed too tightly. Empty the filter, rinse it under water and refill it with coffee.• Descale the appliance. See section: ‘cleaning and maintaining/descaling’. | |
| No or little steam comes out of the steam nozzle. | • There is no water in the reservoir. Fill the water reservoir.• To use the steam feature on the appliance, you must first press the steam button before turning the dial to ON.• The steam nozzle is blocked. Remove the tube and rubber from the pipe. You can clear the pipe opening using a 1 mm needle.• Descale the appliance. See section: ‘cleaning and maintaining/descaling’. |
| Water leaks underneath the appliance. • This happens when you add too much water to the reservoir. Make sure you don’t overfill past the MAX indicator. | |
| Water leaks past the filter. | • There is ground coffee on the edge of the filter. Remove the excess coffee from the rim. |
| The filter is stuck in the portafilter. | • Make sure the dot on the filter is aligned with the groove in the portafilter. Turn the filter until the small recess is turned to the side of the handle. |
GUIDELINES
natural_image
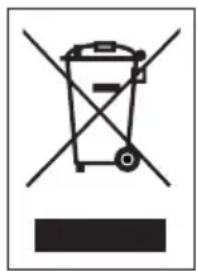
Symbol of a trash bin crossed with two crossed lines, no text or numbers presentThis symbol on the product or on its packaging indicates that this product may not be treated as household waste. Instead it must be brought to the applicable collection point for recycling of electrical and electronic equipment. By ensuring this product is disposed of correctly, you will help prevent potential negative consequences for the environment and human health, which could otherwise be caused by inappropriate waste handling of this product. For more detailed information about recycling of this product, please contact your local city office, your household waste disposal service or the shop where you purchased the product.

The packaging is recyclable. Please treat the packaging ecologically.

This appliance conforms to all European requirements in the areas of safety, health, and environmental protection.
The EU declaration concerning this appliance can be requested at any time from info@linea2000.be
GARANTIA
Estimado cliente,
flowchart
graph LR
    A["1: Air Fan"] --> B["Control knob"]
    B --> C["Hand press key"]
    C --> D["Switch button"]
    D --> E["Reactor with two cups"]
    E --> F["Check hand"]
    F --> G["Arrow pointing to control panel"]
    G --> H["Arrow pointing to output device"]
    H --> I["Final processing unit with mouse and fan"]
Consejos
flowchart
graph LR
    A["1: Tap Water"] --> B["1: Hand Pressing"]
    B --> C["2: Press Triggering to Power Supply"]
    C --> D["3: Pour to Cover Paper"]
    D --> E["4: Press Triggering to Press"]
    E --> F["5: Press Control with On/Off Roll"]
natural_image
Symbol of a trash bin with crossed lines indicating no waste or discharge, and a solid black rectangle below (no text or labels)PRIMA DELL'USO
flowchart
graph LR
    A["6: Breakfast Screen"] --> B["7: START with Coffee Box"]
    B --> C["8: Stop with Coffee Box"]
    C --> D["9: Stop with Paper Clip"]
    D --> E["10: Waste Discharge Bin"]
Suggerimenti
natural_image
Symbol of a trash bin with crossed lines indicating no waste or discharge, and a solid black rectangle below (no text or labels)PŘED PRVNÍM POUŽITÍM
flowchart
graph TD
    A["1: Stain on Top"] --> B["Control Button"]
    B --> C["Hand press to Press"]
    C --> D["Close-up of Paper Box"]
    D --> E["Close-up of Tank"]
    E --> F["Arrow pointing to Control Valve"]
    F --> G["Arrow pointing to Press"]
    G --> H["Final Process with Switch"]
    H --> I["End"]
flowchart
graph TD
    A["6: Breakfast Screen"] --> B["7: START Coffee Box"]
    B --> C["8: Stop Coffee Box"]
    C --> D["9: Waste Bin with Bottle"]
Tipy
flowchart
graph LR
    A["1: Steam Generation"] --> B["2: Power Switch"]
    B --> C["3: Pour Water to Dish"]
    C --> D["4: Hand Pressing to Sink"]
    D --> E["5: Washing Machine with On/OFF Control"]
natural_image
Symbol of a trash bin with crossed lines indicating no waste or discharge, and a solid black rectangle below (no text or labels)PRED PRVÝM POUŽITÍM
natural_image
Simple line drawing of a faucet above a container (no text or symbols)
natural_image
Hand pressing a button with a power symbol (no text or labels)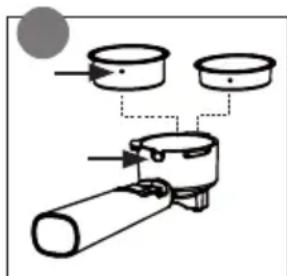
natural_image
Diagram showing a mechanical assembly with a cylindrical component and a lever, no text or symbols present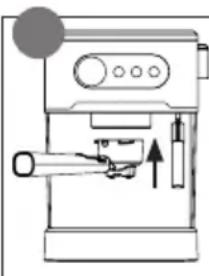
natural_image
Line drawing of a coffee machine with a handle and spout (no text or symbols)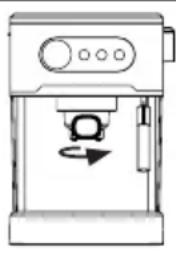
natural_image
Line drawing of a coffee maker with a rotating button and handle (no text or symbols)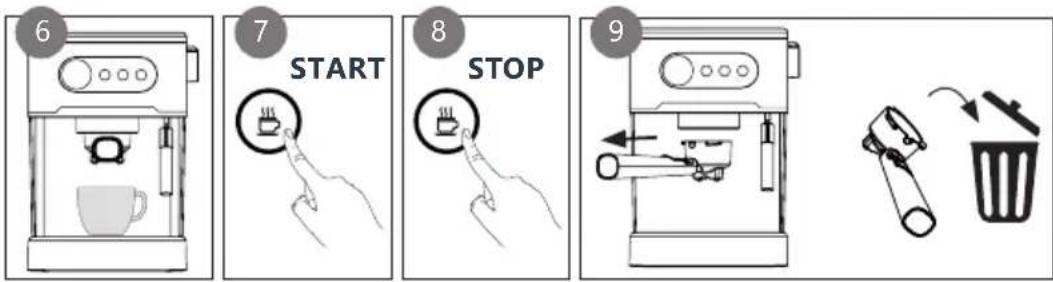
Tipy
flowchart
graph LR
    A["1: Stover"] --> B["2: Pressing Pump"]
    B --> C["3: Pressing Pie with On/Off Control"]
    C --> D["4: Pour to Cover Mout"]
    D --> E["5: Pressing Cup with On/Off Control"]
    E --> F["6: Pressing Cup with On/Off Control"]
    F --> G["7: Pressing Box with On/Off Control"]
natural_image
Line drawing of a coffee maker with a spoon and lid, no text or symbols present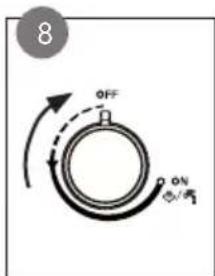
natural_image
Line drawing of a coffee machine with a hand tool and a water tap (no text or symbols)HORÚCA VODA Z TRYSKY
- Naplňte nádržku na vodu. Zasuňte zástrčku do zásuvky a stlačte tlačidlo on/off.
- Umiestnite šálku pod parnú trysku.
- Otočte ovládač pary do polohy ON. Z parnej trysky vyteká horúca voda.
- Ked' budete mat' dostatok vody, otočte voličom do polohy vypnuté.
ČISTENIE A ÚDRŽBA
natural_image
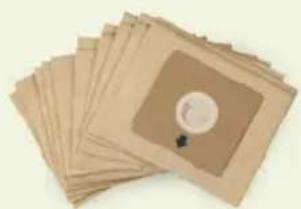
Symbol of a trash bin crossed with no text or numbers, representing waste sorting or disposal (no text present)Looking for extra accessories or you have a broken piece?
ORDER the original DOMO accessories and parts on our webshop.
Webshop

natural_image
Stack of sheets of paper with a circular inset showing a small object, no visible text or symbols
natural_image
Two white plastic electrical connectors with mounting holes (no text or symbols visible)
natural_image
White cylindrical container with black interior, no visible text or symbols
natural_image
Clear glass coffee maker with black handle and lid (no text or symbols visible)
- ⚠PRODUCTSPECIFIEKE WAARSCHUWINGEN
- Tips
- ⚠AVERTISSEMENTS SPÉCIFIQUES AU PRODUIT
- AVANT LA PREMIÈRE UTILISATION
- Conseils
- FONCTION EAU CHAUDE
- Tipps
- SAFETY INSTRUCTIONS
- ▲ELECTRICAL WARNINGS
- ⚠️INSTALLATION
- ⚠ USE
- ⚠ CLEANING AND MAINTENANCE
- ⚠️PRODUCTSPECIFIC WARNINGS
- SAVE THESE INSTRUCTIONS FOR FUTURE REFERENCE
- PARTS
- CONTROL PANEL
- BEFORE THE FIRST USE
- USE
- COFFEE
- PRESSURE GAUGE
- If the pressure is too low, check the following:
- If the pressure is too high, check the following:
- STEAM NOZZLE
- HOT WATER FEATURE
- CLEANING AND MAINTENANCE
- DESCALING
- When?
- How?
- GUIDELINES
- GARANTIA
- Consejos
- PRIMA DELL'USO
- Suggerimenti
- PŘED PRVNÍM POUŽITÍM
- Tipy
- PRED PRVÝM POUŽITÍM
- HORÚCA VODA Z TRYSKY
- ČISTENIE A ÚDRŽBA
Brand : DOMO
Model : DO1138K
Category : Coffee machine