
NorFrost HAIL 82 BI - Refrigerator NODOR - Free user manual and instructions
Find the device manual for free NorFrost HAIL 82 BI NODOR in PDF.

| Brand | NODOR |
| Model | NorFrost HAIL 82 BI |
| Product type | Refrigerator with 4-star freezer compartment, built-in |
| Dimensions (H x W x D) | 820 x 596 x 550 mm |
| Total volume | 111 L (refrigerator 95 L, freezer 16 L) |
| Energy efficiency class | E |
| Annual energy consumption | 147 kWh/year |
| Noise emissions | 40 dB(A) – class C |
| Climate class | Temperate, subtropical, tropical (16°C to 38°C) |
| Power supply | 220-240 V ~ 50 Hz |
| Refrigerant | R600a (isobutane) |
| Defrosting | Manual |
| Freezing capacity | 2.6 kg/24h |
| Interior lighting | LED (class G) |
| Manufacturer warranty | 36 months |
| Main functions | Refrigeration, freezing, reversible door, quick freezing (setting 5) |
| Temperature setting | 1 (warm) to 5 (cold); setting 4 recommended for normal operation |
| Accessories supplied | Egg tray, ice cube tray, ice scraper, drain plug |
| Maintenance and cleaning | Interior cleaning with bicarbonate/warm water solution; defrosting by shutting down and warm water; do not use metal tools or electric heaters |
| Safety instructions | Do not obstruct openings; do not use electrical appliances inside; do not damage the refrigeration circuit; handling by at least two persons |
Frequently Asked Questions - NorFrost HAIL 82 BI NODOR
User questions about NorFrost HAIL 82 BI NODOR
0 question about this device. Answer the ones you know or ask your own.
Ask a new question about this device
Download the instructions for your Refrigerator in PDF format for free! Find your manual NorFrost HAIL 82 BI - NODOR and take your electronic device back in hand. On this page are published all the documents necessary for the use of your device. NorFrost HAIL 82 BI by NODOR.
USER MANUAL NorFrost HAIL 82 BI NODOR
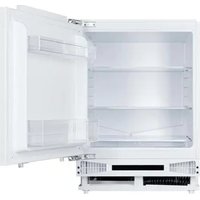
natural_image
Interior view of a fully open refrigerator with open doors and internal compartments (no visible text or symbols)
NODOR
always innovating
ES
MANUAL DE INSTRUÇÕES
DE
GEBRAUCHSANWEISUNG
natural_image
Front view of a computer chassis with two red-circled annotations pointing to internal components (no text or symbols present)natural_image
Simple line drawing of a rectangular device with two red circles highlighting the top corners (no text or symbols)natural_image
Technical line drawing of a mechanical device with mounting brackets and internal components (no text or symbols)Safety Instructions 3-4
Electrical Safety 4
Transportation & Handling 5
Installing & Switching on your Appliance 5
Before Switching On 6
Product Overview 7
Unit & Spare Parts 7
Usage 8-9
Temperature Selection 8-9
Door Reversal 10-13
Replacing the Light 13
Energy Saving Advice 14
Maintenance & Cleaning 15
Internal Cleaning 15
External Cleaning 15
When the appliance is not in Use 15
Defrosting 16
Trouble Shooting 17-18
Safety Instructions
Important note: Please read this booklet before installing and switching on this appliance. The manufacturer assumes no responsibility for incorrect installation and usage as described in this booklet.
- This model uses natural refrigerant gas as part of its cooling system. This gas is known as R600a (Isobutene) and is environmentally friendly but can be combustible. Care should therefore be taken when handling or transporting the product to ensure that none of the refrigeration circuit components are damaged,
- Do not obstruct ventilation openings in the appliance
- The appliance must not be placed or rested on its power cord.
- Do not use mechanical devices or other artificial means to accelerate the defrosting process, such as a heater or a hair dryer.
- Do not use electrical appliances in the refrigerator compartment of the appliance.
- If this appliance is to replace an old refrigerator with a lock, the lock must be removed as a safety measure before storing it or disposing of it. This is to protect children from locking themselves inside the appliance.
- Old refrigerators and freezers contain insulation gases and refrigerant, they must be disposed of properly. Contact your local authority or your dealer if you have any questions. Please ensure that you do not damage the scrap unit prior to being picked-up by the relevant waste disposal service.
- Do not use adaptors or extension leads when connecting the appliance to the electrical power supply
- Do not plug in damaged plugs
- Do not pull, twist or damage the power cable.
-
Do not plug-in or un-plug the appliance with wet hands to prevent electrical shock.
-
This appliance can be used by children aged from 8 years and above and persons with reduced physical, sensory or mental capabilities or lack of experience and knowledge if they have been given supervision or instruction concerning use of the appliance in a safe way and understand the hazards involved. Children should not play with the appliance.
- This appliance is designed to be used by adults, do not allow children to play with the appliance or let them hang over the door.
- Do not place explosive or flammable material in your appliance for your own safety.
- Bottles containing a high percentage of alcohol must be sealed well and placed vertically in the refrigerator.
- Do not cover the body or the top of the appliance
- Fix down the accessories in the appliance during transportation to prevent damage to them.
Electrical Safety
THIS APPLIANCE MUST BE PLUGGED INTO AN EARTHED SOCKET
- Before switching on, make sure that the voltage of your electricity supply is the same as that indicated on the rating plate. This product is designed to operate on 220 – 240V AC; 50Hz. Connection to any other power source may damage the unit.
- This product may be fitted with a non re-wireable plug. If it is necessary to change the fuse in the plug, the fuse cover must be refitted. If the fuse cover becomes lost or damaged, the plug must not be used until a suitable replacement is obtained.
- If the plug has to be changed because it is not suitable for your socket, or becomes damaged in any way, it should be cut off and an appropriate plug fitted following the wiring instructions. This should be carried out by a qualified electrician. The plug removed must be disposed of safely, as insertion into a 13 Amp socket is likely to cause an electrical hazard.
Transportation and Handling
For safe lifting, tilt the appliance backwards by no more than 45 degrees, hold the base and rear corners of cabinet. Lift the refrigerator carefully. Never use the door handles for lifting. To move the refrigerator on a flat level surface, tilt it slightly backwards and push backwards.
This unit is heavy and could cause injury – ensure there are adequate people present to move the appliance.
Installing and Switching on Your Appliance
- Operating voltage for your appliance is 220-240V at 50Hz.
- Before plugging in the power supply, ensure that the voltage on the rating label corresponds to the working voltage of your electrical system in your home.
- Insert the plug into an efficient Ground (Earth) connection. If the socket has no Ground (Earth) contact or the plug does not match, we suggest you call an authorised electrician for assistance.
- Place your appliance in an area that is not exposed to direct sunlight.
- Your appliance should be placed at least 10cm away from stoves, ovens and other heating cores.
• This appliance should never be used outdoors or left in the rain. - When your appliance is placed next to a chest freezer or freezer, there should be at least 10cms between them to prevent humidity on the outer surface.
- The appliance must be used in the vertical position and on a flat surface.
• To level the appliance, use the adjustable feet on the appliance. - Do not place your appliance on a carpeted surface as this will prevent adequate ventilation.
- Keep ventilation openings in the appliance enclosure or in the built in structure clear of obstruction
• This appliance should only be placed on a flat, firm surface. -
It is recommended the appliance is installed by a qualified kitchen fitter or joiner.
-
Choose a dry and well-ventilated space.
- The appliance should be positioned so that the plug is easily accessible.
Before Switching On
- Before using your appliance, add a teaspoon of bicarbonate of soda to warm water and with a damp cloth wipe down all parts of the new appliance, then repeat the process with a clean damp cloth and dry. (ensure the appliance is not connected to the power when performing this task).
- Remove all transport tapes and foam protection pieces. Clean the interior with a cloth dampened in lukewarm soap and water. Wipe with clean water and wipe dry.
- There may be an odour when you first switch on the appliance, it will disappear when the appliance starts to cool.
- When the appliance has been positioned, adjust the feet to ensure the unit is stable. This is essential to ensure quiet running and proper door opening /closing.
- Connect to the electrical socket but do not switch the power to the refrigerator on for at least 3 hours. The coolant within the product needs time to settle after it has been transported and put in to position, failure to do this will affect the cooling performance of your appliance.
- Once the appliance has settled locate the thermostat dial on the product and set to "5" and switch on the power. The compressor will begin to work. Close the door.
- We recommend that the door is not opened for a minimum of 4 hours to allow the appliance to reach the standard operating temperature.
- You may hear faint gurgling or bubbling sounds when the refrigerant is pumped to the cooling system and through the coils or tubing at the rear of the appliance. When the compressor is in operation you may hear a slight whirring sound or pulsating noise. The thermostat controls the operation of the compressor, and you may hear a slight click as it cycles in and out (this is normal).
- To save energy, you should minimize the frequency and duration of door opening.
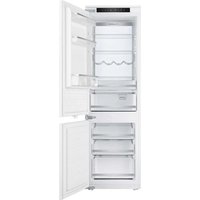
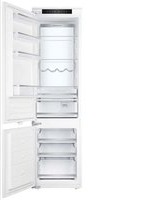
Product Overview
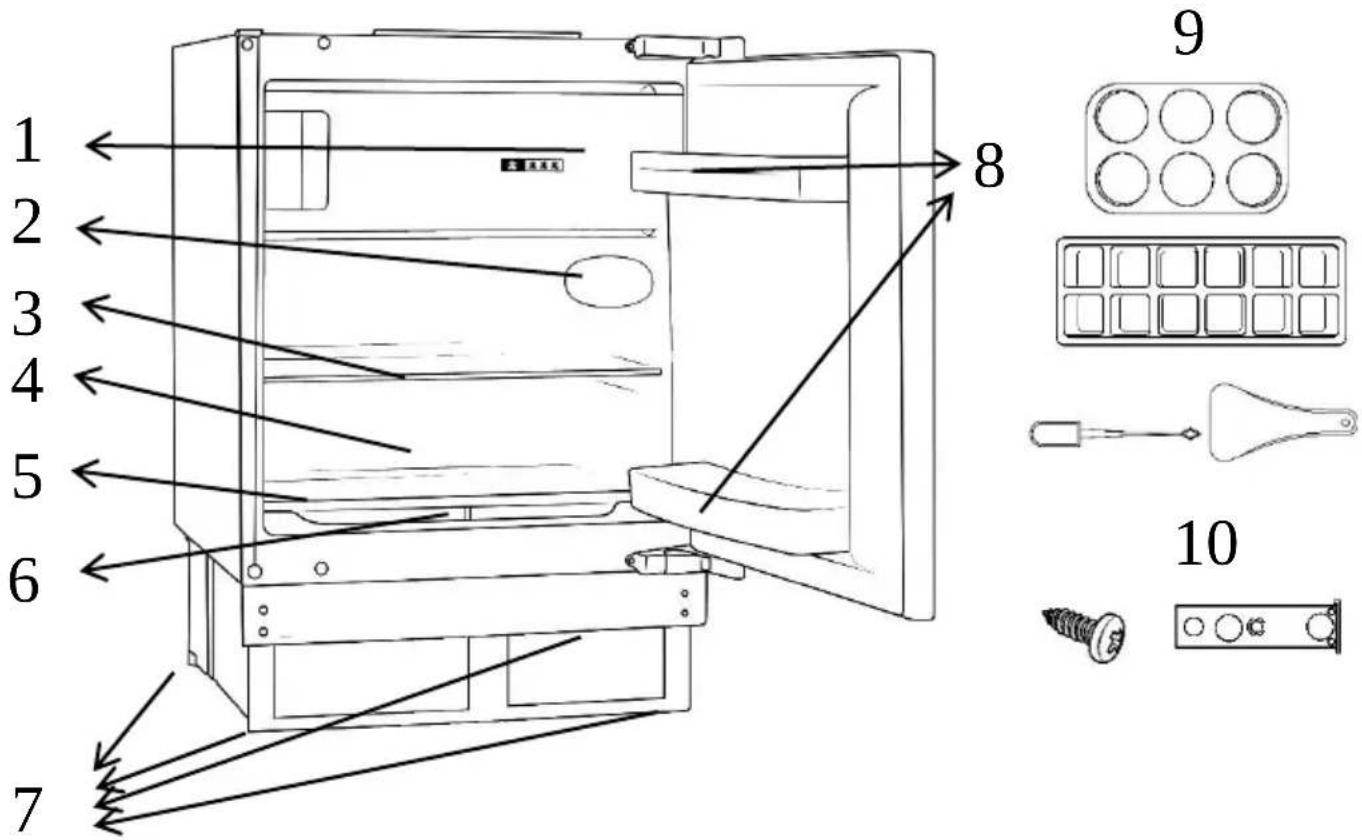
- Freezer compartment
- Light & thermostat
- Adjustable shelves
- Drainage hole
- Non-adjustable shelf
-
Crispers (under shelf)
-
Adjustable feet
- Door racks
- 1 x egg tray, 1 x ice cube tray, 1 x ice scraper & drainage hole plug
- Installation accessories
Unit Parts & Spare Parts
Before installation, check that all parts detailed in the product overview are present.
Usage
Allow to stand for a minimum of 3 hours before plugging in to the mains
The temperature in the appliance is controlled by the temperature control panel or thermostat located inside the fridge. Press the adjust button to change the temperature grade inside the freeze.
On the temperature control, 1 is the warmest setting and 5 is the coldest setting.
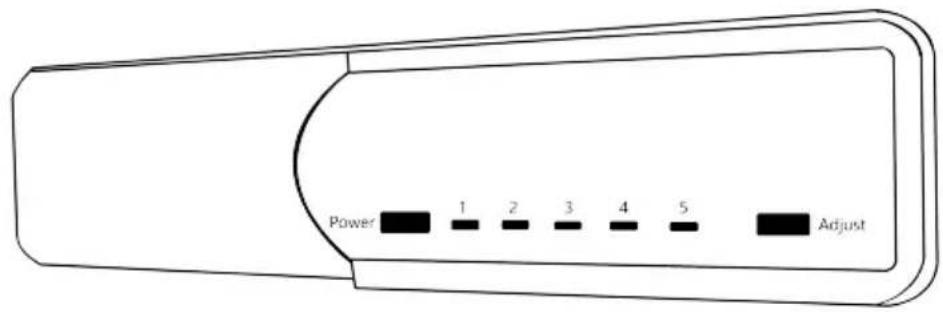
Depending on the ambient temperature of the room the appliance is situated in, you may need to adjust the temperature control panel; in a room with a high ambient temperature the temperature control panel may need to be adjusted to a colder setting (moved towards setting 5) or in a room with a low ambient temperature the temperature control panel may need to be adjusted to a warmer setting (moved towards setting 3).
Setting 5 should be used as a rapid cool/freeze setting and should only be set 2 hours before a large amount of food is placed in the fridge. The temperature control should be put back to setting 4 after the food has been placed in the fridge, if this is not done the temperature in the fridge compartment could fall below 0°C as the compressor will run continuously.
Once the temperature control has been set, close the door and plug in the appliance. We recommend that the door is not opened for a minimum of 4 hours to allow the appliance to reach the standard operating temperature.
Usage
Allow to stand for a minimum of 3 hours before plugging in to the mains
Note: The standard operating temperature for the fridge compartment should be between 0^ C and 4^ C and the standard operating temperature for the freezer compartment should be between -18^ C and -25^ C.
Note: The temperature of the freshly stored food and how often the door is opened affects the temperature in the refrigerator compartment. If required, change the temperature setting.
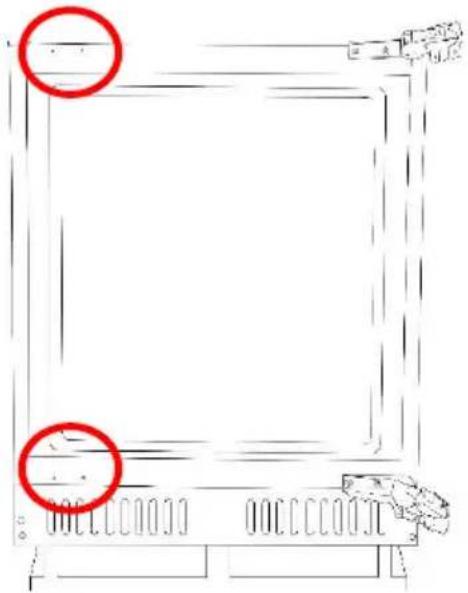
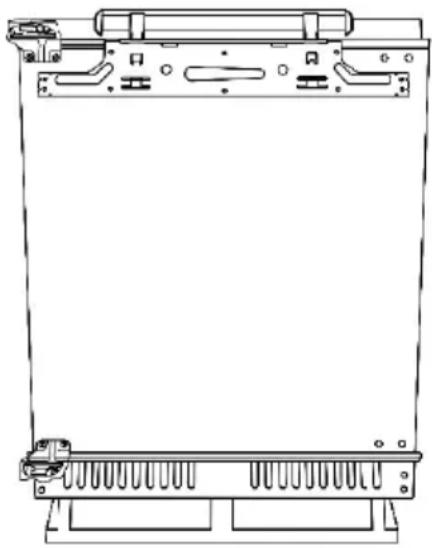
Door Reversal
To reverse the door you will need to tilt the appliance backward to access the lower hinge which holds screws. Do not tilt the appliance more than 45 degrees and do not lay the appliance flat on its side.
For your own safety, a minimum of 2 people should lift or tilt this product.
Tools Required: Torx headed screwdriver, flat headed screwdriver and hexagonal spanner or a socket driver.
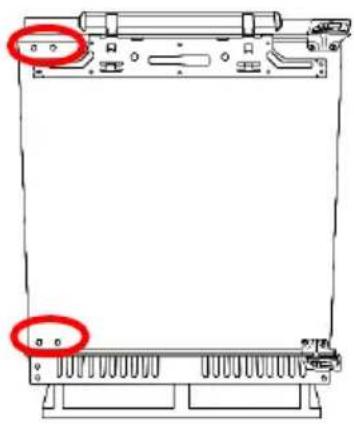
- Remove the 4 screw hole covers on the front of the appliance door at the top and the bottom.
natural_image
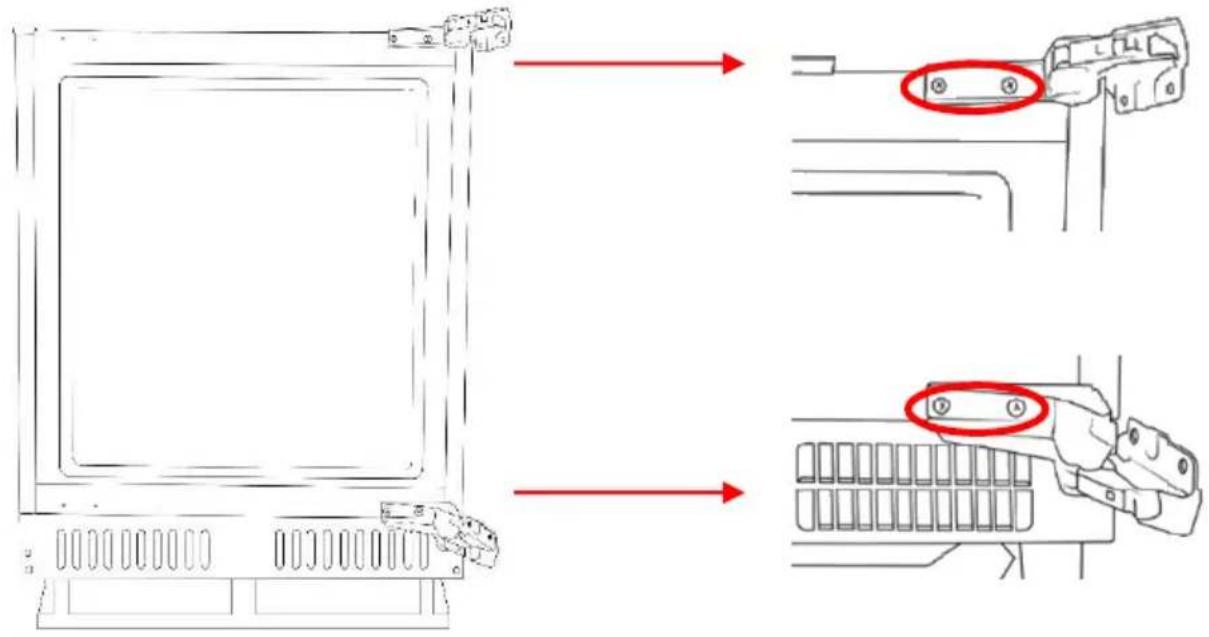
Front view of a computer chassis with two red circles highlighting specific components (no text or symbols present)- With the door closed remove the screws from the top and bottom hinges that hold the appliance door to the hinges. Remove the screws from the top hinge first.
Door Reversal
-
Support the door at the bottom and open the hinges away from the appliance door. Carefully lift the appliance door away, ensuring you don't damage the hinges or the door.
-
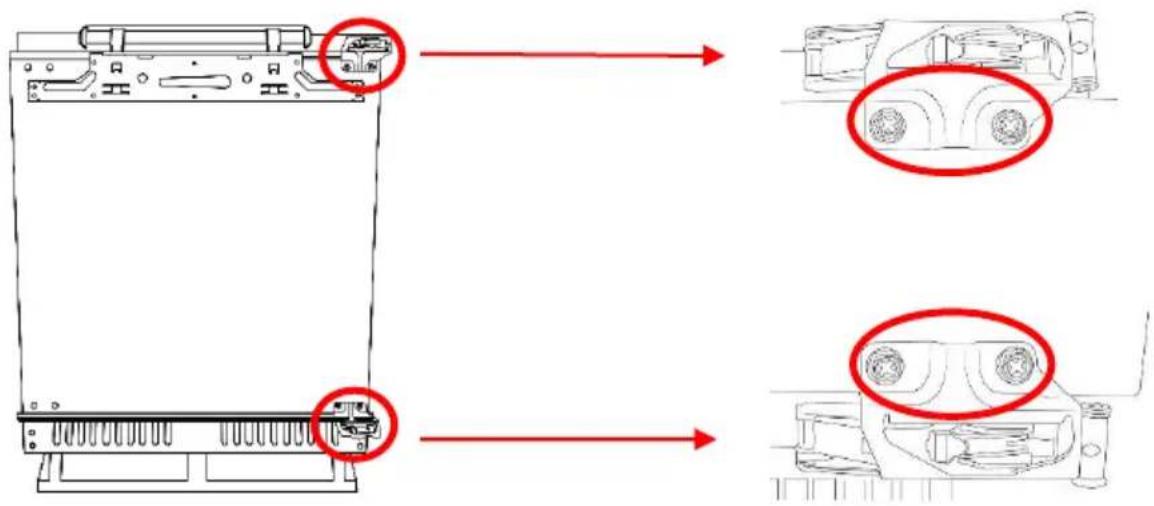
Remove the 4 screw hole covers on the cabinet of the appliance at the top and the bottom on the opposite side of where the hinges are currently fixed.
natural_image
Simple line drawing of a rectangular frame with two red circles highlighting the top corners (no text or symbols)- With the top hinge open, remove the screws from the top hinge that fix the hinge to the cabinet of the appliance.
Door Reversal
- Flip over the top hinge (by 180^ ) and fix it in place on the diagonally opposite corner of the appliance cabinet.
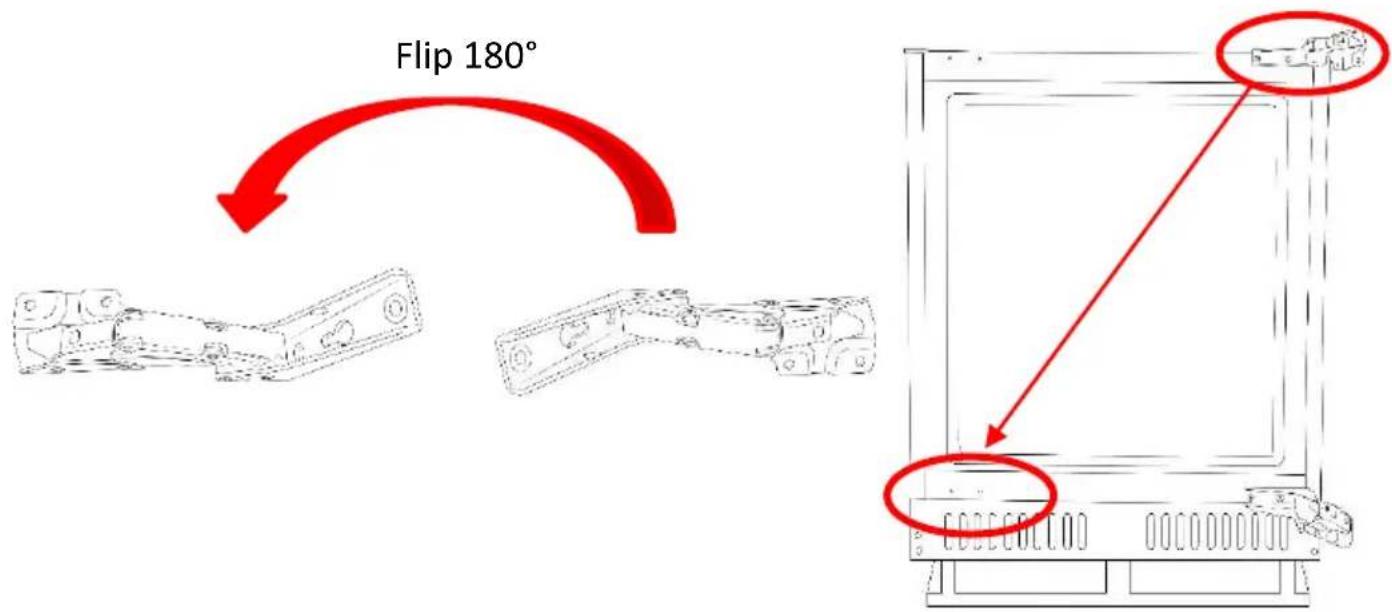
- Repeat the previous step with the bottom hinge and then replace the screw hole covers on the opposite side.
Door Reversal
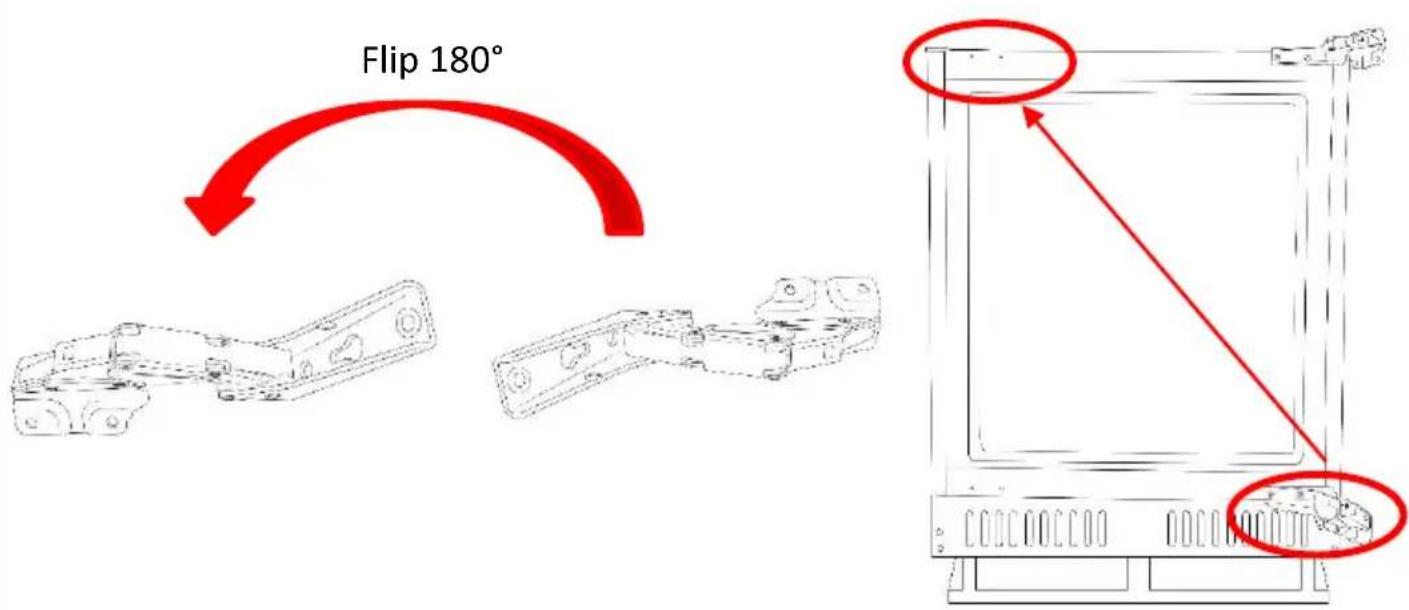
- Reattach the door by fixing the outside screws of the hinge to the door. You must ensure the fridge door is aligned horizontally and vertically, so that the seals are closed on all sides before finally tightening.
natural_image
Technical line drawing of a mechanical device with mounting brackets and internal components (no text or symbols)- Replace the 4 screw hole covers on the cabinet of the appliance at the top and the bottom on the opposite side of where the hinges are now fixed.
Replacing the Light
The light has to be replaced by a qualified engineer.
Energy Saving Advice
- Do not install the appliance close to sources of heat, such as a cooker, dishwasher or radiator.
- Locate the appliance in a cool well-ventilated room and make sure that the air vents are clear.
- Try to avoid keeping the doors open for a long time, as warm air will enter the cabinet and may cause a build-up of ice as well as affecting the energy consumption. Ensure there are no obstructions preventing the doors from closing properly.
- Ensure that the door seals are clean and there are no tears or splits.
- Keep the most perishable foods, (those with a short shelf-life, such as cooked meats), in the coldest part of the fridge. The Salad Crisper Box is the warmest part of your fridge and should be used for vegetables, salads and fruits etc.
- Do not overload the appliance: the cooling air that circulates and keeps the appliance cold gets blocked, and pockets of warm air form.
- Do not put hot food into the fridge or freezer – let it cool down first.
Maintenance & Cleaning
Disconnect the appliance from the power supply before cleaning.
Internal Cleaning
- Do not pour water over the appliance.
- The cavity should be cleaned periodically using a solution of bicarbonate of soda and lukewarm water (5ml to 0.5 litre of water)
- Clean the accessories separately with soap and water. Do not put them in the dishwasher.
- Do not use abrasive products, detergents or soaps.
• After washing, rinse with clean water and dry carefully. - When you have finished cleaning reconnect the plug with dry hands.
External Cleaning
- Wash the outer cabinet with warm soapy water. Do NOT use abrasive products.
- There are sharp edges on the underside of the product so care should be taken when cleaning.
- Once or twice a year dust the rear of the appliance and the compressor at the back of the appliance, with a brush or vacuum cleaner, as an accumulation of dust will affect the performance of the appliance and cause increased energy consumption.
When the appliance is not in use
When the appliance is not in use for long periods, disconnect from the electricity supply, empty all of the food and clean the inside. Leave the door open to prevent the build-up of odours.
Maintenance & Cleaning
Defrosting
Note: Care must be taken when performing the following procedure.
Defrost twice a year or when a frost layer of approximately 7 mm (1/4") has formed.
- 2 hours before the defrosting process, set the thermostat knob at the “6” position to make sure the food is at the lowest temperature before removing the frozen foods. All food should be wrapped in several layers of newspaper and stored in a cool place (e.g. fridge or larder).
- Place several layers of new paper or towels underneath and next to the freezer door/compartment
- Switch off the appliance at the socket outlet and pull out the mains plug.
- Remove all drawers, baskets, etc. and leave the door or lid open. Containers of warm water (not hot) may be placed carefully in the freezer to speed up the defrosting process.
- Never use hairdryers, electrical heaters or other such electrical appliances for defrosting.
- When the ice has melted, clean and dry the interior. Wipe up any spillages that may have occurred.
- Switch the appliance on and replace any frozen food

Never use sharp metal tools as it may damage the appliance. Never use an electrical heater, this may cause an electric shock.
Trouble shooting
| Problem | Solution |
| The fridge doesn't work | Check that the appliance is switched on. |
| Check that there has not been a power cut. | |
| Check that the plug is not faulty. | |
| Check that the fuse has not blown. | |
| Check that the voltage is correct for the appliance. | |
| Are there any faults with the socket? For this purpose, try the plug of your appliance by connecting it to a socket which you are sure is working. | |
| The temperature inside the appliance is not cold enough | Check that there is not too much food in the appliance. |
| Check that the thermostat is set to a suitable temperature/setting. | |
| Check that the appliance is not placed in direct sunlight, or too near to a heating source. | |
| Check that the ambient temperature is within the operation limits of the appliance. | |
| Are the doors of the appliance opened frequently? Once the door is opened, the humidity found in the air in the room enters the appliance, especially if the humidity levels in the room are very high. The more frequently the door is opened in humid conditions the more chance of the build up of moisture. | |
| The temperature within the appliance is too cold. | Increase the working temperature by adjusting the thermostat to a lower setting. |
| The highest setting should only be used as a rapid cool setting and should only be set 2 hours before a large amount of food is placed in the fridge. If this is not done the temperature in the fridge compartment could fall below 0°C as the compressor will run continuously. | |
| The inner surfaces of the appliance are wet | Caused by condensation - dry the inside of the appliance. |
| The outer surfaces of the appliance are wet | Caused by condensation - dry the outer of the appliance carefully. |
Trouble shooting
| Problem | Solution |
| Smell/odour | Check all the food and drink that is in the fridge is in date and correctly packaged. If it isn't then it should be removed immediately or repackaged.Check for spillages on each shelf, rack and drawer. You may need to remove the drawers to check that no spillages have settled underneath them. As spillages that have not been cleaned and have been left can cause smells and unwanted odours. |
| Check the drainage pipe is not clogged or the drip tray at the back of the appliance is full. The pipe can be cleared by pouring hot water through, but you must ensure the appliance is turned off, the plug is removed from the socket and a jug or bucket is in place to catch the flow of water. | |
| The doors do not close properly | Ensure there are no obstructions preventing door closure. |
| Check the door compartments and shelves are correctly in place. | |
| Check the door seal is not warped or torn. | |
| Check the appliance is level. | |
| Unusual noises | Check that the appliance is on a flat, level surface and is stable. |
| Check the spacing's around the appliance and ensure it is not touching other items. | |
| Bubbling and gurgling sound: • This noise is emitted as the coolant fluid flows through the pipes within the system. This is normal. | |
| Water flowing sound: • This is the normal sound of water flowing into the drain trough during the defrosting process. | |
| If the appliance is operating noisily (compressor noise): This is normal. This noise indicates that the compressor is operating normally. As the compressor is being energized, it might run a bit more noisily for a short period of time. |
Table des matières
Transport et manutention 5
Transport et manutention
natural_image
Front view of a computer chassis with two red-circled annotations pointing to internal components (no text or symbols present)natural_image
Line drawing of a server rack with two red circles highlighting the top and bottom (no text or symbols)natural_image
Technical line drawing of a mechanical device with mounting brackets and internal components (no text or symbols)natural_image
Front view of a computer chassis with two red-circled annotations pointing to internal components (no text or symbols present)natural_image
Simple line drawing of a rectangular frame with two red circles highlighting the top corners (no text or symbols)natural_image
Technical line drawing of a mechanical device with mounting brackets and internal components (no text or symbols)natural_image
Front view of a computer chassis with two red-circled annotations pointing to internal components (no text or symbols present)Umdrehen der Tür
natural_image
Simple line drawing of a rectangular frame with two red circles highlighting the top corners (no text or symbols)Umdrehen der Tür
natural_image
Technical line drawing of a mechanical device with mounting brackets and internal components (no text or symbols)| Product Information Sheet EN COMMISSION DELEGATED REGULATION (EU) 2019/2016 | ||||||
| Supplier's name or trademark: Nodor | ||||||
| Supplier's address: CNA Group, Carrer del Ter, 2 08570 Torelló (SPAIN) | ||||||
| Model identifier: NorFrost HAIL 82 BI | ||||||
| Type of refrigerating appliance: | ||||||
| Low-noise appliance: —Design type: Built-in v | ||||||
| Free standing | ||||||
| Wine storage appliance: —Other refrigerating appliance: v | ||||||
| General product parameters: | ||||||
| Parameter Value Parameter Value | ||||||
| Overall dimensions (millimetre) | Height | 820 | Total volume (dm3 or l) | 111 | ||
| Width 596 | ||||||
| Depth550 | ||||||
| EEI | 99.5 | Energy efficiency class | E | |||
| Airborne acoustical noise emissions (dB(A) re 1 pW) | 40 Airborne acoustical noise emission class C | |||||
| Annual energy consumption (kWh/a) | 147.10 | Climate class: | Extended Temperate | |||
| Temperate | ||||||
| Subtropical | v | |||||
| Tropical | ||||||
| Minimum ambient temperature (°C), for which the refrigerating appliance is suitable | 16 Maximum | ambient temperature (°C), for which the refrigerating appliance is suitable | 38 | |||
| Winter setting No | ||||||
| Compartment Parameters: | ||||||
| Compartment type | Compartment parameters and values | |||||
| Compartment volume (dm3 or l) | Recommended temperature setting for optimised food storage (°C) These settings shall not contradict the storage conditions set out in Annex IV, Table 3 | Freezing capacity (kg/24h) | Defrosting type (auto-defrost=A, manual defrost=M) | |||
| Pantry | No | — | — | — | — | |
| Wine storage | No | — | — | — | — | |
| Cellar | No | — | — | — | — | |
| Fresh food | Yes | 95 | 3-4 | N/A | M | |
| Chill | No | — | — | — | — | |
| 0-star or icemaking | No | — | — | — | — | |
| 1 -star | No | — | — | — | — | |
| 2 -star | No | — | — | — | — | |
| 3 -star | No | — | — | — | — | |
| 4 -star | Yes | 16 | 3-4 | 2.6 | M | |
| 2-star section | No | — | — | — | — | |
| Variable temperature compartment | No | — | — | — | — | |
| For 4-star compartments | ||||||
| Fast freeze facility | YES | |||||
| Light source parameters: | ||||||
| Type of light source | LED Module | |||||
| Energy efficiency class | G | |||||
| Minimum duration of the guarantee offered by the manufacturer (months): | 36 | |||||
| Additional information: | ||||||
| Weblink to the manufacturer's website, where the information in point4(a) Annex of Commission Regulation (EU) 2019/2019 is found: | ||||||
This product contains LED light source of energy efficiency class

- NODOR
- Safety Instructions
- Electrical Safety
- THIS APPLIANCE MUST BE PLUGGED INTO AN EARTHED SOCKET
- Transportation and Handling
- Installing and Switching on Your Appliance
- Before Switching On
- Product Overview
- Unit Parts & Spare Parts
- Usage
- Allow to stand for a minimum of 3 hours before plugging in to the mains
- Door Reversal
- Replacing the Light
- Energy Saving Advice
- Maintenance & Cleaning
- Internal Cleaning
- External Cleaning
- When the appliance is not in use
- Defrosting
- Table des matières
- Transport et manutention
- Umdrehen der Tür
Brand : NODOR
Model : NorFrost HAIL 82 BI
Category : Refrigerator