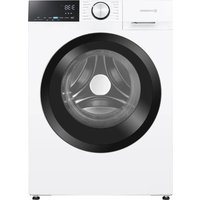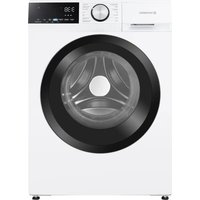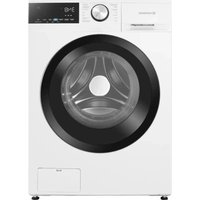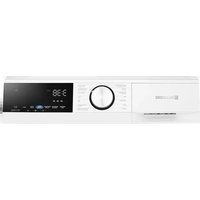
WBWM1400A9WNB - Washing machine Wisberg - Free user manual and instructions
Find the device manual for free WBWM1400A9WNB Wisberg in PDF.


User questions about WBWM1400A9WNB Wisberg
0 question about this device. Answer the ones you know or ask your own.
Ask a new question about this device
Download the instructions for your Washing machine in PDF format for free! Find your manual WBWM1400A9WNB - Wisberg and take your electronic device back in hand. On this page are published all the documents necessary for the use of your device. WBWM1400A9WNB by Wisberg.
USER MANUAL WBWM1400A9WNB Wisberg
Product ID:
Normal load:
Kaled voltage
Max. current: 100 mA
koted frequency
kated power:
Wate pess
Grade at waterproof
Wisepick Productions B.V.
Weeng 664
3012CN Rotterdam
The Netherlands
Made in China


WBWM1400A9WNB

WISBERG
WASHING MACHINE
MODEL:WBWM1400A9WNB
Product ID:
Normal load.
Rated voltage
Max. current:
Ralef frequent
Rated power:
Water pressu
Grade of waterproof
Wisepick Productions B.V.
Weega 66
3012CN.Rotterdam
The Netherlands
Made in Ching.
Serial Number:
Batchcode:
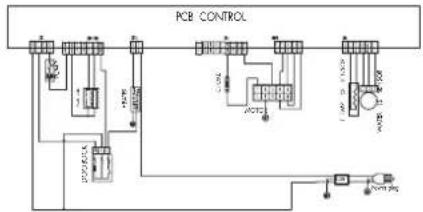
PCB CONTROL


INHOUDSOPGAVE
Voorwoord
5
1. Veiligheid 6
1.1. VEILIGHEIDSWAARSCHUWINGEN EN -VOORSCHRIFTEN

WAARSCHUWING!
2. INFORMATIE OVER HET APPARAAT
2.1. BESCHRIJVING VAN HET APPARAAT
www.wisberghome.com.
3.3. HOOFDONDERDELEN
8.1. VERPAKKINGSMATERIALAAL AFVOEREN
8.2. HET APPARAAT AFVOEREN

Wisepick Productions B.V.
Weenda 664
3012 CN Rotterdam
Nederland
Made in China
EN - USER MANUAL
WASHING MACHINE
WBWM1400A8WNB
WBWM1400A9WNB
TABLE OF CONTENTS
Foreword
37
1. Safety 38
1.1. Safety warnings and regulations 38
1.2. Explanation of graphic symbols on the product and packaging 41
2. Information about the device 41
2.1.Description of the device 41
2.2. General specifications 41
2.3.Type plate 42
2.4. Spare parts 42
2.5. Warranty 42
3. Installation 42
3.1. Requirements on the location of installation 42
3.2. Remove and check the packaging 43
3.3. Main parts 43
3.4. Required tools 43
3.5. Removing the transport protection 43
3.6. Connecting the supply hose 44
3.7. Connecting the discharge hose 44
3.8.Level the appliance 45
3.9. To calibrate the appliance 45
3.10. Remove factory residue 46
4.Use 46
4.1. Operating panel 46
4.2.Preparing for a wash 47
4.3. Turning the appliance on and off 47
4.4. Starting the laundry programme 47
4.5. Adjusting laundry programmes 50
4.6. Other functions 52
4.7. Opening an appliance during a laundry programme 52
4.8.Cancelling a laundry programme 52
4.9. Saving a modified laundry programme (my programme) 53
4.10.Adding detergents 53
4.11. Starting the wash 53
4.12. The end of a programme 53
4.13. Detergent recommendations 54
4.14. Laundry recommendations 55
4.15. Extensive laundry programme specifications Wisberg WBWM 1400A8WNB 55
4.16. Extensive laundry programme specifications Wisberg WBWM 1400A9WNB 55
5. Cleaning and maintenance 56
5.1. General cleaning and drum cleaning 56
5.2. Cleaning the water filter 56
5.3.Cleaning the detergent tray 57
5.4. Cleaning the drain pump 58
6. Troubleshooting
60
6.1. Problems with the appliance 60
6.2.Problems with clean laundry 62
6.3. Fault codes on the control panel 63
7. Taking out of service 64
7.1. Transport and storage 64
8. Safe disposal
64
8.1. Disposing of packaging material
8.2. Disposing of the appliance
FOREWORD
About this document
- This user manual contains all information for correct, efficient and safe use of the device.
- This user manual is intended for the end user and/or buyer of this device.
- Please make sure that you have completely read and understood the instructions in this manual before you install or use the device. Keep this document for future use as long as you are using and/or are in possession of this device.
- Wisepick Productions B.V. cannot be held responsible in any way for immaterial damage to you or others, or material damage to the device, your property or the property of others caused by not or not correctly following the instructions in this manual.
The warnings and safety regulations in this manual do not cover all possible circumstances and situations.
If you contact our customer service, make sure you have the model number ready. The information can be found on the type plate or on the front of this manual.
Original instructions
This user manual was originally written in Dutch. All other languages are translated documents. In case of translation errors, the Dutch version shall prevail.
Used symbols
| SYMBOL DESCRIPTION | |
| DANGER! | Indicates fire hazard and/or flammable materials. |
| WARNING! | Indicates a hazardous situation which, if not avoided, could result in serious immaterial damage to you or others. |
| CAUTION! | Indicates a hazardous situation which, if not avoided, could result in light immaterial damage to you or others. |
| TICE! | Indicates a situation related to material damage. |
| NOTE | Indicates useful, additional information. |

You can also find the latest version of this manual online, at www.wisberghome.com if you search by item number.
Copyright
The data displayed in this manual, including text, photographs, graphic drawings, graphic brands, (trade) names and logos are the property of Wisepick Productions B.V. and are protected by copyright, trademark law and/or any other intellectual property right, unless these data belong to a third party. You are never permitted to reproduce, transfer, distribute, store, or make available to third parties for payment, the contents of this user manual in its entirety or partially without prior written permission from Wisepick Productions B.V. and/or the third party the data belongs to.
Compliance
WBWM1400A8WNB
Wisepick Productions B.V. hereby declares that the appliance complies with Regulation (EU) 2019/2017. The full text of the EU declaration of conformity can be consulted at: www.wisberghome.com if you search by item number.
WBWM1400A9WNB
Wisepick Productions B.V. hereby declares that the appliance complies with Regulation (EU) 2019/2017. The full text of the EU declaration of conformity can be consulted at: www.wisberghome.com if you search by item number.
Contact details Wisberg
Customer service can be reached at: www.wisberghome.com
Wisepick Productions B.V.
Weena 664
3012 CN Rotterdam
The Netherlands
Made in China

1. SAFETY
1.1. SAFETY WARNINGS AND REGULATIONS

WARNING!
Please make sure that you have completely read and understood the safety instructions, before you install, use or perform maintenance on the device. This will prevent possible material damage and immaterial damage to you or others, the device, your other property or the property of others.
- Always be alert and careful. Do not use electrical appliances if you suffer from impaired concentration or lack of awareness, or if you are under the influence of drugs, alcohol or medications. Even the slightest distraction can lead to serious accidents and injuries when using electrical appliances.
- RISK OF POISONING. Dishwasher detergents contain toxic substances. Always follow the instructions of the dishwasher detergent.
RISK OF POISONING. Do not drink the water from the appliance. - EXPLOSION HAZARD. Do not remove the power cable from the earthed socket in the presence of flammable gases.
- EXPLOSION HAZARD. Do not place the appliance in a corrosive or explosive atmosphere.
- EXPLOSION HAZARD DUE TO FLAMMABLE SUBSTANCES. Do not place flammable objects or objects soaked with flammable products in the appliance.
- RISK OF SUFFOCATION. Never let children play with the packaging material. Keep the packaging material out of reach of children.
- RISK OF SUFFOCATION. Small children or pets can climb into the appliance. Keep the door closed as much as possible and check the appliance before starting a wash.
- RISK OF SUFFOCATION. Children, legally incompetent persons and domestic animals must be supervised while using the appliance. The appliance contains small parts. Children must be supervised to ensure that they do not play with the appliance.
- SUFFOCATION HAZARD DUE TO OXYGEN DEFICIENCY. Never use the appliance in small spaces if people are present who are unable to leave the space on their own, unless there is constant supervision.
DANGER OF ENTRAPMENT DUE TO TILTING THE APPLIANCE. Always place the appliance on a flat and stable surface.
DANGER OF ENTRAPMENT DUE TO TILTING THE APPLIANCE. Do not climb, sit or stand on the appliance.
DANGER OF ENTRAPMENT DUE TO TILTING THE APPLIANCE. Always wear protective gloves and closed shoes when moving the appliance.
FIRE HAZARD DUE TO SHORT CIRCUIT.
-
Do not use this appliance with an extension lead or power strip.
-
Do not twist or kink the power cable or roll the cable up. This can damage the cable's insulation.
-
Never pull on the power cable to move the appliance or to unplug it from the earthed socket.
- Before use, check that the voltage on the socket you want to use matches that on the type plate of the appliance (220 - 240V~ 50Hz). Only connect the appliance to an earthed power socket. Damage caused by faulty voltage is not covered by the guarantee.
- Make sure you install the appliance in such a way that the power cable is always accessible.
FIRE HAZARD DUE TO OVERHEATING.
-
Do not install the appliance within 20~cm of other heat sources.
-
Keep the power cable away from heat, oil, sharp edges or corners and moving parts.
- Never use a timer or separate remote control that turns the device on automatically.
-
Never place the appliance on a carpet to prevent the air vents from being blocked.
-
Never cover the device.
-
Do not block the air flow to the air inlets or outlets of the device.
- Do not install the appliance under a worktop or in a cabinet. This appliance is not intended as a built-in appliance.
ELECTROCUTION HAZARD DUE TO SHORT CIRCUIT.
-
Always place the device on a dry and moisture-resistant surface.
-
Never use the device in a damp space, like a bathroom, or nearby a bath, shower or swimming pool.
- Never use the device if a part is damaged or faulty. Replace a damaged or faulty device immediately. Disconnect the power cable from the wall socket and contact customer service.
- Only use the power cable installed on the appliance from the factory. Do not change the power cable.
- The connector has an earth connection. Do not remove the earth contacts from the plug.
- Never replace the power cable yourself. The power cable may only be replaced by an authorised service technician.
-
Never use the device if the power cable is damaged. The power cable may only be replaced by an authorised service technician.
-
Never insert objects into the ventilation openings.
-
Never operate the device with wet hands.
-
Do not remove the power cable from the earthed socket with wet hands.
-
Do not pour water over the appliance.
CAUTION!
- TRIP HAZARD DUE TO LOOSE CABLES. Never leave the power cable in such a way that someone could trip over it or accidentally pull it.
- RISK OF BURNS. The door can become hot during use. Do not touch the door during or immediately after a laundry programme. Keep children away from the appliance during a laundry programme.
RISK OF BURNS. The appliance may contain hot water. Do not clean the drain pump during or immediately after a wash. - RISK OF INJURY FROM LIFTING HEAVY OBJECTS. Always move the appliance with two people. Use two hands when moving, lifting or turning the appliance.
TICE!
-
RISK OF SKIN IRRITATION. Do not use a fabric softener for baby clothes in the first three to six months after birth. Fabric softeners contain fragrances and dyes that can irritate your baby's skin.
-
RISK OF DAMAGE TO THE APPLIANCE OR LAUNDRY. If clothes have been hand washed first, rinse and wring the laundry carefully before placing it in the appliance.
- RISK OF DAMAGE TO THE APPLIANCE OR LAUNDRY. Do not wash clothes that are not suitable for the chosen laundry programme.
- RISK OF DAMAGE TO THE APPLIANCE OR LAUNDRY. Do not wash clothes soaked with highly flammable substances such as petrol, alcohol or turpentine.
RISK OF DAMAGE TO THE APPLIANCE OR LAUNDRY. Do not wash any waterproof items.
RISK OF DAMAGE TO THE DEVICE.
-
The transport protection must be removed from the appliance before switching the appliance on. If the drum rotates while the transport protection is still attached, the appliance will damage itself.
-
This appliance must not be used by children under 8 years of age.
-
This device is not meant for use by persons (including children) with limited physical, sensory or mental capacity or with lack of experience and knowledge, unless they are under supervision or received instruction regarding the use of the device from someone who is responsible for their safety.
-
Use only the original accessories provided for the installation.
- Never connect the supply hose to a hot water tap.
-
Do not use tools for securing the supply hose.
-
Do not twist or kink the supply and discharge hoses or roll up the supply and discharge hoses.
- Make sure that the power cable is not trapped under the appliance.
- Make sure that no unwanted objects enter the appliance. Always check bags of clothing.
- Do not force the door shut. If the door does not close properly, check if any laundry is trapped or if the appliance is too full.
- Do not force the door open when the door lock is activated.
- Never clean the appliance with aggressive or abrasive cleaners, or sharp objects.
- Cleaning and user maintenance must not be carried out by children without supervision.
- Never drop the appliance and avoid bumping. Dropping or bumping the appliance may affect the proper operation of the appliance. Do not use the appliance if it has been dropped.
- Do not use the appliance outdoors. This appliance is only intended for use indoors.
- Use the appliance only in domestic and similar applications, such as staff kitchen areas in shops, offices and other work environments, farms, customer use in hotels, motels and other living environments, and bed & breakfast-like environments. The appliance is not intended for professional use.
- Do not operate the appliance in non-stationary locations such as ships and campervans.
RISK OF LEAKAGE.
- Shut off the tap if you are absent for an extended period of time (e.g. during holidays), especially if there is no drainage in the floor near the appliance, for example a pit.
- Do not insert the discharge hose deeper than 15cm into the drain pipe to prevent the water from flowing back during pumping.
- Do not install the appliance where the temperature can drop below 0^ to prevent frost damage.
- Never reuse the old supply hose. Always use the new supply hose supplied with the appliance.
- Do not connect the supply hose to a water supply at a water pressure below 0.05MPa or above 1MPa .
1.2. EXPLANATION OF GRAPHIC SYMBOLS ON THE PRODUCT AND PACKAGING
| SYMBOL MEANING | |
| CE | The CE marking on this appliance indicates that Wisepick Productions B.V. declares that this appliance meets the requirements of the relevant European legislation relating to health, safety and environmental protection. The declaration of conformity is available on request from Wisepick Productions B.V. See Foreword for the contact details. |
| Indicates that the instructions for use must be read carefully before continuing to use the appliance. | |
| This symbol indicates that the appliance must not be lifted by one person alone. | |
| This is a class I appliance. The metal parts of the appliance are connected to a protective earthing conductor, the so-called earth. | |
| This symbol on the appliance, accessories or packaging indicates that this appliance must not be disposed of with ordinary household waste but must be returned to a collection point. | |
2. INFORMATION ABOUT THE DEVICE
2.1.DESCRIPTION OF THE DEVICE
The Wisberg WBWM1400A8WNB and WBWM1400A9WNB are free-standing washing machines suitable for domestic use. Via the control panel, you can choose between 14 different laundry programmes.
The washing machines have a weighing function that can adjust the laundry programme based on the amount of clothing in the drum.
2.2. GENERAL SPECIFICATIONS
| Article number WBWM1400A8WNB WBWM1400A9WNB | ||
| Dimensions (w × h × d) 850 × 595 × 540 mm 850 × 595 × 59 mm 99 mm | ||
| Weight 63 kg 61 kg | ||
| Appliance type | Freestanding washing machine | |
| Capacity / filling weight | 8 kg | 9 kg |
| Revolutions per minute | 1400 | |
| Front loading diameter | 330 mm | |
| Power supply | 220 – 240 V ~ 50 Hz | |
| Energy consumption | 1900 W | 1950 W |
| Sound level | 40 dB | |
| Operating temperature | 5 °C – 40 °C | |
| Water supply | Cold water | |
| Minimum water pressure | 0.05 MPa | |
| Maximum water pressure | 1 MPa | |
2.3. TYPE PLATE
The most important information of the device can also be found on the type plate. The appliance's type plate can be found on page 2.
2.4. SPARE PARTS
Spare parts are available on the consumer market for up to 10 years after the introduction of the appliance. Please note that some spare parts are only available to professional repairers. To order spare parts or for more information, go to: www.wisberghome.com.
2.5. WARRANTY
This appliance comes with a guarantee period of three years after purchase. For more information on guarantee conditions, please visit www.wisberghome.com. In any case, you must have the proof of purchase with purchase and/or delivery date in order to be able to claim the guarantee.
3. INSTALLATION
Before installing the appliance, carefully review the safety information in Section 1.
3.1. REQUIREMENTS ON THE LOCATION OF INSTALLATION

WARNING!
- FIRE HAZARD DUE TO SHORT CIRCUIT. Before use, check that the voltage on the socket you want to use matches that on the type plate of the appliance (220-240V ~ 50Hz). Only connect the appliance to an earthed power socket. Damage caused by faulty voltage is not covered by the guarantee.
- FIRE HAZARD DUE TO SHORT CIRCUIT. Make sure you install the appliance in such a way that the power cable is always accessible.

RISK OF INJURY FROM LIFTING HEAVY OBJECTS. Always move the appliance with two people. Use two hands when moving, lifting or turning the appliance.

RISK OF DAMAGE TO THE APPLIANCE. Make sure that the power cable is not trapped under the appliance.
RISK OF DAMAGE TO THE APPLIANCE. Never connect the supply hose to a hot water tap.
Place the appliance at a location that satisfies the following conditions:
- A flat, stable, heat-resistant and moisture-resistant surface.
In the case of a wooden floor, make sure the floor is solid and stable. If necessary, reinforce the floor. - Ambient temperature between 5 - 40^ .
- At least 2cm of space on all sides.
- Not in direct sunlight
Well ventilated - Not directly next to heat sources, such as heaters or stoves
An earthed socket within 150~cm - A stop cock within 150~cm . This is a tap with a 3/4'' thread.
- A sink siphon or drain pipe within 150~cm . If a separate drain pipe is chosen, it must have a minimum internal diameter of 4 cm and be present at a maximum height of 100~cm .
Are one or more of the above connections missing? If so, call on a qualified technician to install the required connections before installing the appliance.
3.2. REMOVE AND CHECK THE PACKAGING

WARNING!
RISK OF SUFFOCATION. Never let children play with the packaging material. Keep the packaging material out of reach of children.
- Remove the packaging material from the device.
- Lift the appliance with two people and remove the packaging under the appliance.
- Check that the styrofoam triangle underneath the appliance has also been removed. If not, place the appliance gently on its side and remove the styrofoam triangle.
- Remove the water supply hose from the drum.
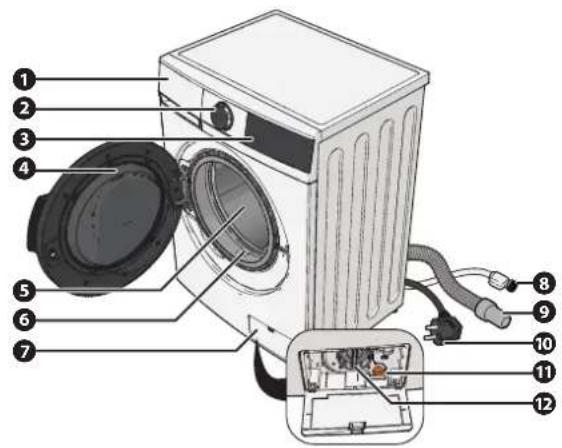
- Check the contents of the packaging using the picture in section 3.3. Main parts.
If parts are missing or damaged, please contact the Customer Service of Wisberg: www.wisberghome.com.
3.3. MAIN PARTS
Detergent tray
Control button
3 Operating panel
4 Door
5 Drum
6 Door seal
7 Maintenance hatch
Supply hose
Discharge hose
10 Power cord
1 Drain hose
12 Filter
3.4. REQUIRED TOOLS
Level
- Spanner M13
- Spanner M17
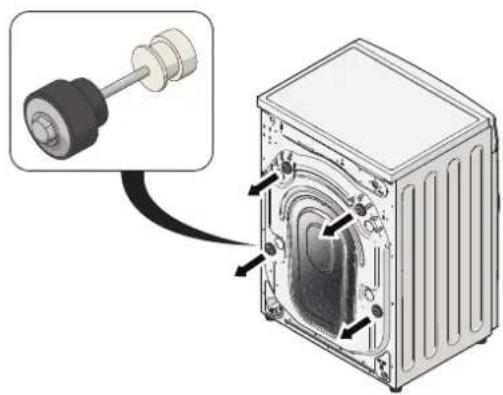
3.5. REMOVING THE TRANSPORT PROTECTION
- Loosen the four bolts of the transport protection.
- Remove the transport protection (4×) with an M13 spanner. Some force is required to remove the bolts. Make sure that the rubber and white plastic also come out of the appliance.
- Save for future use.
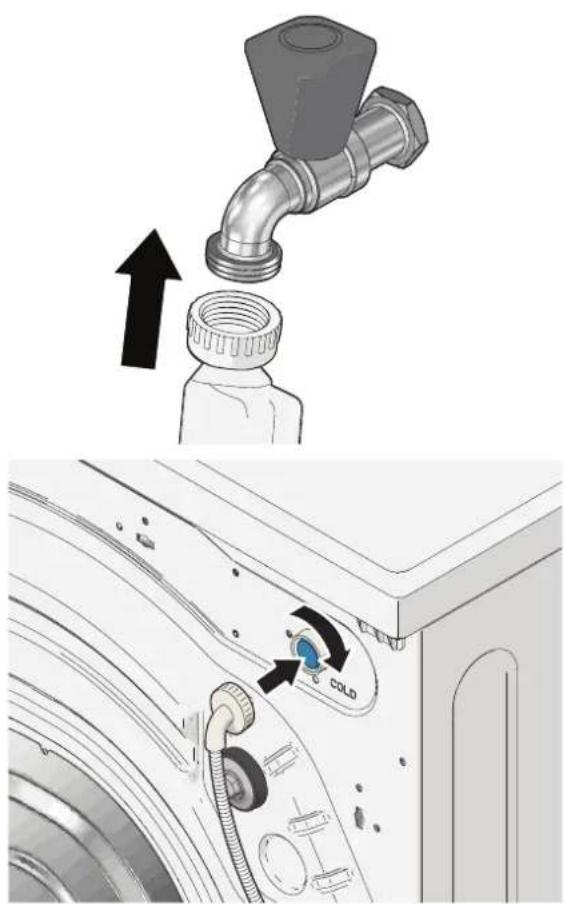
3.6. CONNECTING THE SUPPLY HOSE
- Place a bucket or washing-up bowl under the stop cock.
- Turn the stop cock to its open position and let the water run until clear water comes out of the stop cock.
- Connect the supply hose to the stop cock.
- Connect the other side of the supply hose to the water inlet.
- Check that there is no kink in the supply hose.
- Slowly open the stop cock and check for leaks. If leakage occurs, check that the supply hose is connected correctly and completely. If there is no leak, the supply hose is connected correctly.
- Fully open the stop cock.

TICE!
RISK OF DAMAGE TO THE APPLIANCE. Never connect the supply hose to a hot water tap.
RISK OF DAMAGE TO THE APPLIANCE. Do not use tools for securing the supply hose.
3.7. CONNECTING THE DISCHARGE HOSE
The drain hose can be connected in two ways:
- on a siphon (see section 3.7.1.)
- on a drain pipe (see section 3.7.2.)
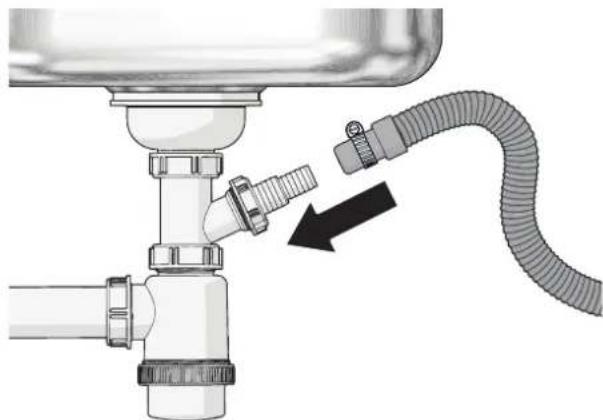
3.7.1. CONNECTING THE DISCHARGE HOSE TO A SIPHON
The dishwasher connection to the siphon must have a minimum diameter of 112 inches and be present at a maximum height of 100 cm.
- Remove the dishwasher connection from the siphon.
- Remove the rubber stopper from the washing machine connection.
- Put the washing machine connection back on the siphon.
- Slide a hose clamp around the end of the drain hose. The hose clamp is not included. The washing machine connection to the siphon must have a minimum internal diameter of 112 inches and be present at a maximum height of 100 cm.
- Slide the discharge hose over the dishwasher connection to the siphon.
- Tighten the hose clamp with a screwdriver.
NOTE
- Check for leaks during the first wash. If leakage occurs, check that the drain hose is connected correctly and completely. If there is no leakage, the drain hose is connected correctly.
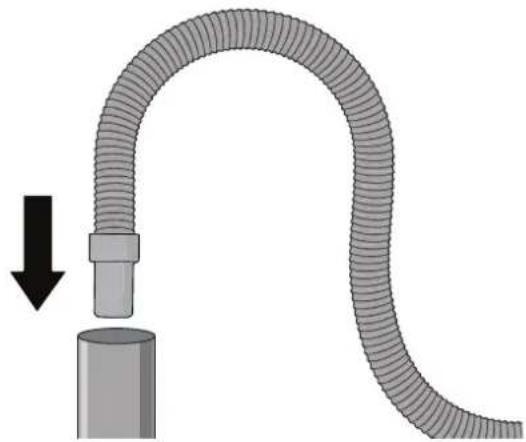
3.7.2. CONNECTING THE DISCHARGE HOSE TO A DRAIN PIPE
Insert the discharge hose into the drain pipe.
Do not insert the discharge hose deeper than 1.5cm into the drain pipe to prevent the water from flowing back during pumping.
NOTE
If you want to connect the drain hose of the washing machine and a dryer to the same drain pipe, first install a y-piece on the drain pipe.
The loose drain pipe must have a minimum diameter of 4cm and be present at a maximum height of 100~cm
It is advisable to attach the discharge hose to the wall with a hose bracket to prevent kinks or blockages in the discharge hose.
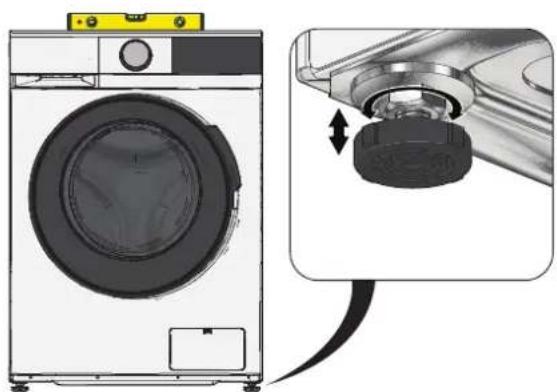
3.8. LEVEL THE APPLIANCE
- Carefully slide the appliance into place.
- Place a spirit level on top of the appliance to check that the appliance is level.
- If the appliance is not level, adjust the adjusting feet to level the appliance:
a. Loosen the adjusting foot bolt with an M17 spanner.
b. Turn the adjusting foot in or out.
c. Tighten the bolt again.
The maximum height of the adjusting feet is 5cm
3.9. TO CALIBRATE THE APPLIANCE
- Check that the drum is empty.
- Insert the power cable into the earthed socket.
- Press and hold the Standby button until the control panel lights up.
- Press and hold the accelerated programme button and temperature button until t19 appears on the control panel.
- Press the start/pause button.
The appliance is calibrated. When the appliance is ready, **** will appear on the control panel.
3.10. REMOVE FACTORY RESIDUE
Before using the appliance, it is recommended to run the appliance empty once in order to remove possible manufacturing residues or odours:
- Select the cotton programme with the selector dial.
- Repeatedly press the temperature button until 90^ appears on the control panel.
- Press the start/pause button to start the laundry programme.
- Check if there is any leakage at the drain hose.

- Check for leaks during the first wash. If leakage occurs, check that the drain hose is connected correctly and completely. If there is no leakage, the drain hose is connected correctly.
4. USE
Before using the appliance, carefully review the safety information in Section 1.

WARNING!
- RISK OF IRREPARABLE DAMAGE TO THE APPLIANCE. The transport protection must be removed from the appliance before switching the appliance on. If the drum rotates while the transport protection is still attached, the appliance will damage itself. See section 3.5. to remove the transport bolts.

RISK OF DAMAGE TO THE APPLIANCE OR LAUNDRY. Do not wash clothes that are not suitable for the chosen laundry programme.
RISK OF DAMAGE TO THE APPLIANCE OR LAUNDRY. Do not wash clothes soaked with highly flammable substances such as petrol, alcohol or turpentine.
RISK OF DAMAGE TO THE APPLIANCE OR LAUNDRY. Do not wash any waterproof items.
4.1. OPERATING PANEL
13 Laundry programme selection
14 Operating panel
15 Standby button
16 Start-delay button
1 Temperature control
18 Centrifuge button
19 stain function button
20 Function button
2 Boost button
Start/Pause button
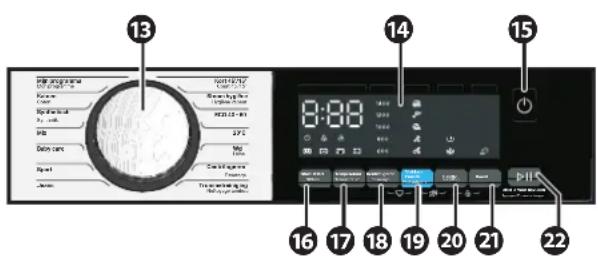
4.1.1. OPERATING PANEL
3 Timer indicator: start delay
Door lock indicator
Child safety lock indicator
26 Numeric display
Speed indicators
28 Stain function indicators
29 Pre-wash indicator
50 Washing indicator
Rinsing indicator
Centrifuge indicator
Pre-wash indicators
Accelerated programme indicator
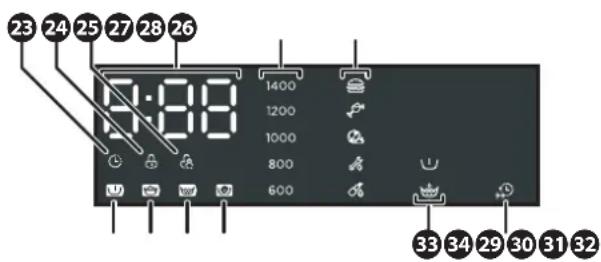
After 15 minutes of inactivity, the control panel switches off automatically to save energy.
4.2. PREPARING FOR A WASH
-
Prepare the laundry:
-
Read the washing instructions on the washing labels.
- Sort the laundry according to colour and specific washing instructions.
Empty any bags of clothing. - Tie laces or other long pieces of textile.
- Close belts, zips, and buttons.
Put small garments in a laundry net. -
Turn garments inside out to prevent lint and fading.
-
Fill the appliance. Please refer to section 4.4. for the filling weight per laundry programme.
- For optimum energy and water saving, always fill the appliance to the maximum capacity of the laundry programme. Close the door.
4.3. TURNING THE APPLIANCE ON AND OFF
- Press and hold the Standby button until the control panel lights up. The appliance is turned on.
- Press and hold the Standby button until the control panel goes off. The appliance is turned off.
4.4. STARTING THE LAUNDRY PROGRAMME
- Select the desired laundry programme using the selector dial.
- If necessary, adapt the programme, see section 4.5. for the possibilities.
- Press the start/pause button.
The following table provides an overview of a number of laundry programmes. Please note that the filling weight of the machine depends on the model you purchased (WBWM1400A8WNB or WBWM1400A9WNB).
The standard programmes in the table below can be adapted, such as temperature, programme time and rotation speed; see section 4.5. for this.
| My Programme with changed settings can be selected. | ||||||||||||||||||
| My Programme with this function, a programme saved. | ||||||||||||||||||
| My Programme with changed settings can be selected. | ||||||||||||||||||
| My Programme with this function, a programme saved. | ||||||||||||||||||
| My Programme with changed settings can be selected. | ||||||||||||||||||
| My Programme with this function, a programme saved. | NOTINION | |||||||||||||||||
| My Programme with this function, a programme saved. | ||||||||||||||||||
| My Programme with this function, a programme saved. | ||||||||||||||||||
| My Programme with this function, a programme saved. | ||||||||||||||||||
| My Programme with this function, a programme saved. | ||||||||||||||||||
| My Programme with this function, a programme saved. | ||||||||||||||||||
| My Programme with this function, a programme saved. | ||||||||||||||||||
| My Programme with this function, a programme saved. | ||||||||||||||||||
| My Programme with this function, a programme saved. | ||||||||||||||||||
| My Programme with this function, a programme saved. | ||||||||||||||||||
| My Programme with this function, a programme saved. | ||||||||||||||||||
| My Programme with this function, a programme saved. | ||||||||||||||||||
| My Programme with this function, a programme saved. | ||||||||||||||||||
| My Programme with this function, a programme saved | 4kg 4.5kg 40°C 0.471400 | 8kg 9kg 90°C 2.011200 | 8kg 9kg 90°C 2.011400 | 8kg 9kg 90°C 3.391400 | 8kg 9kg Your choiceYour choiceYour choiceYour choiceYour choiceYour choiceYour choiceYour choiceYour choiceYour choiceYour choiceYour choiceYour choiceYour choiceYour choiceYour choiceYour choiceYour choiceYour choiceYour choiceYour choiceYour choiceYour choiceYour choiceYour choiceYour choiceYour choiceYour choiceYour choiceYour choiceYour choiceYour choiceYour choiceYour choiceYour choiceYour choiceYour choiceYour choiceYour choiceYour choiceYour choiceYour choiceYour choiceYour choiceYour choiceYour choiceYour choiceYour choiceYour choiceYour choiceYour choice Your choice Your choice Your choice Your choice Your choice Your choice Your choice Your choice Your choice Your choice Your choice Your choice Your choice Your choice Your choice Your choice Your choice Your choice Your choice Your choice Your choice Your choice Your choice Your choice Your choice Your choice Your choice Your choice Your choice Your choice Your choice Your choice Your choice Your choice Your choice Your choice Your choice Your choice Your choice Your choice Your choice Your choice Your choice Your choice Your choice Your choice Your choice Your choice Your choice Your choice Y | |||||||||||||
| PROGRAMME | FUNCTION | FILLING WEIGHT WBW- | 60°C 1:35 | 1400 | |||||
| Jeans Special programme for washing jeans, at low temperature to prevent shrinkage and damage. Turn the laundry inside out. | 8 kg 9 kg | 60°C 1:35 | 1400 | ||||||
| Short 45'/15" Quick programme. This laundry programme is suitable for a fast wash of up to 2 kg of slightly soiled clothing. Select the quick programme to activate the 45-minute programme. Press the boost button to activate the 15-minute programme. | 2 kg 2 kg | 40°C 0:45 | 1200 | ||||||
| Steam hygiene | The steam programme is suitable for everyday laundry. Steam reduces a large proportion of bacteria and it reduces unpleasant odours. | 4 kg 4.5 kg | 90°C 2:28 | 1200 | |||||
| ECO 40 - 60 Standard eco laundry programme, suitable for cleaning normally soiled cotton laundry, for which the washing label indicates that it can be washed at 40°C or 60°C, together in the same cycle. | 8 kg 9 kg | 39°C 36°C | 3:38 3:48 | 1400 | |||||
| 4 kg 4.5 kg | kg 30°C 32°C | 2:48 | 2:54 | 1400 | |||||
| 2 kg 2 kg | 23°C 25°C | 2:48 | 2:54 | 1400 | |||||
| 20°C | Special programme for low temperatures and up to half the maximum load capacity, for easy-care and/or synthetic materials. | 4 kg 4.5 kg | 20°C 1:01 | 1200 | |||||
| Wool | This program is suitable for clothing made of wool, silk or viscose with hand washing or machine washing advice. Delicate laundry programme to prevent shrinkage, with longer programme breaks to allow the textile to rest in the detergent. | 2 kg 2 kg | 40°C 1:07 | 800 | |||||
| PROGRAMME | FUNCTION | FILLING WEIGHT WBW- | M1400A8WNB | FILLING WEIGHT WBW- | M1400A9WNB | FILLING WEIGHT WBW- | HIGHEST TEMPERATURE WBWM1400A8WNB | HIGHEST TEMPERATURE WBWM1400A9WNB | HIGHEST TEMPERATURE WBWM1400A8WNB | HIGHEST TEMPERATURE WBWM1400A9WNB | DURATION (HOURS:MIN- UTES) WBWM1400A9WNB | DURATION (HOURS:MIN- UTES) WBWM1400A9WNB | DURATION (HOURS:MIN- UTES) WBWM1400A9WNB | DURATION (HOURS:MIN- UTES) WBWM1400A9WNB |
| Centrifuging Additioal spin function where the spin speed can be set. Not suitable for delicate fabrics such as wool, silk, viscose. | 8 kg 9 kg | None 0:12 | 1400 | |||||||||||
| Drum cleaning With the drum cleaning function, the machine is cleaned at high temperature to remove dust and bacteria. The drum cleaning function must be switched on once or twice a month. This function must also be switched on when the appliance is first used. | Do not add any laundry | Do not add any laundry | 90°C 1:18 None | |||||||||||
The ECO 40-60 programme is used to check compliance with EU eco design rules. Laundry for 40^ and laundry for 60^ can be washed with this programme. The programme has only one temperature and cannot be adjusted. Do you want to wash the laundry at 60^ to kill bacteria, for example? Then do not choose this programme. In that case, choose the regular cotton programme or the hygiene programme.
Sections 4.15. and 4.16. set out the detailed specifications of these laundry programmes with regard to water and energy consumption, duration and moisture percentage.
4.5. ADJUSTING LAUNDRY PROGRAMMES
- Turn the selector dial to select a laundry programme.
- The following functions can be used to adjust the laundry programme.
| NAME POSSIBLE OPTIONS DESCRIPTION | ||
| Start delay | 0:30 to 24:00 | This function can be used to delay the start of a laundry programme. Select the desired laundry programme (section 4.4.). Press the timer button. The text display indicates the delay time in hours and minutes. Press the timer button several times to set the desired delay time. Press the start/pause button. The laundry programme will start after the set time. |
| Temperature | 20°C | This function allows the standard maximum set wash temperature of a laundry programme to be adjusted. Select the desired laundry programme (section 4.4.). Press the temperature button. The text display indicates the selected temperature. Press the temperature button several times to set the desired temperature. Press the start/pause button to start the laundry programme with the changed setting. |
| 30°C | ||
| 40°C | ||
| 60°C | ||
| 90°C | ||
| NAME POSSIBLE OPTIONS DESCRIPTION | |||
| Centrifuging 600 rpm | 800 rpm1000 rpm1200 rpm1400 rpm | This function allows the standard maximum speed of a laundry programme to be adjusted. On the speed indicator, the selected speed will light up.Select the desired laundry programme (section 4.4.). Press the centrifuge button. The text display indicates the selected speed. Press the button several times to set the desired speed.Press the start/pause button to start the laundry programme.A higher spin speed causes a higher noise level and drier laundry. | |
| Stain function Food With this function, the standard laundry programme is expanded with a stain removal program Select the desired laundry programme (section 4.4.). Press the button for the stain removal programme.The selected programme lights up on the control panel. Press the button several times to set the desired programme.Press the start/pause button to start the laundry programme. | |||
| Functions: Pre-wash and rinse function | U | Pre-wash with(pre-wash)detergent | With this function, the standard laundry programme can be expanded with a pre-wash or rinse function.Select the desired laundry programme (section 4.4.). Press the settings button.The pre-wash indicator lights up on the control panel. The pre-wash function is enabled.Press the button again to select the rinse function.Press the button again to select both the pre-wash and rinse function.Press the button again to deactivate both functions.Pre-wash function:You use this programme to soak stains before the main programme. Place soap in the pre-wash compartment of the soap tray, see section 4.10..Rinse function:Thanks to the additional rinse function, your clothes are more thoroughly rinsed of detergent. The soap tray washes clean automatically, keeping your laundry fresh |
| + | Additional rinse function | ||
| U | Pre-wash + rinse | ||
| - None | |||
| Boost Enabled Shorten a selected laundry program indicator lights up. The text display indicates the new duration of the programme. | |||
| - Not enabled | |||
4.6. OTHER FUNCTIONS
| Function button + Boost button (3 sec) | Child lock 'CL' Enabled. On the control panel, "CL" flashes. | Locking the control panel. Press the buttons again to switch the child safety lock off again. Provided that the appliance remains connected to the earthed socket, this setting is maintained. | ||
| - Not enabled | ||||
| stain function button + Function button (3 sec) | Switching sound signals on and off All sound | signals are muted. Press the buttons again to turn on the sound signals. Provided that the appliance remains connected to the earthed socket, this setting is maintained. | ||
| Drum cleaning | Drum cleaning Use the drum cleaning programme once | or twice a month to clean the washing machine's drum. Do not put any laundry in the machine during the drum cleaning program. Do not use any detergent or cleaning agent during this programme. For more maintenance and cleaning instructions, see section 5.. | ||
| Centrifuging Centrifuge | only Use the centrifuge programme if there is a lot of water left in the laundry after a laundry programme. | |||
4.7. OPENING AN APPLIANCE DURING A LAUNDRY PROGRAMME
To pause the programme, press the start/pause button. The drum stops rotating. When the drum has come to a complete stop, the door lock will unlock. The door can now be opened.
To restart the programme:
- Close the door.
- Press the start/pause button again to continue the programme. The door lock will switch on and the programme will be continued.
4.8. CANCELLING A LAUNDRY PROGRAMME
- To pause the programme, press the start/pause button. The drum stops rotating.
- When the drum has come to a complete stop, the door lock will unlock.
- If there is still water in the appliance, the door will remain closed. Select another laundry programme, or resume the laundry programme until the water is pumped away.
- Press and hold the Standby button until the control panel goes off. The appliance is turned off. Press and hold the Standby button until the control panel lights up. The appliance is turned on and the laundry programme is cancelled.
4.9. SAVING A MODIFIED LAUNDRY PROGRAMME (MY PROGRAMME)
Select a programme, change the temperature, the programme duration and the centrifuge speed and/or a stain removal function as desired (see section 4.5.).
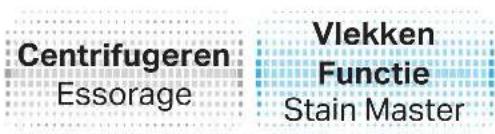
You can save a modified laundry programme by pressing and holding down the centrifuge button and the stain function button for four seconds. The choice is confirmed by a beep.
This programme is available from that moment by selecting the laundry programme.
4.10. ADDING DETERGENTS
Detergent tray release button
Detergent compartment
Fabric softener compartment
Pre-wash detergent compartment
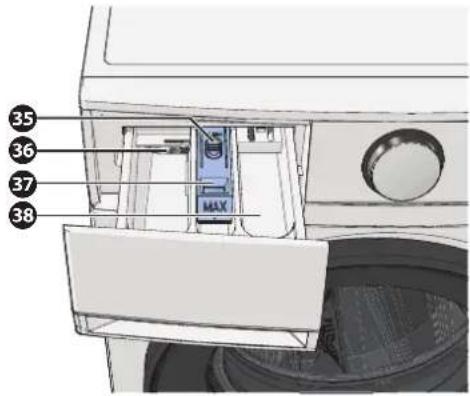
For more information on what detergents to use, please refer to the laundry programmes in section 4.13..

TICE!
RISK OF SKIN IRRITATION. Do not use a fabric softener for baby clothes in the first three to six months after birth. Fabric softeners contain fragrances and dyes that can irritate your baby's skin.
4.11. STARTING THE WASH
-
Press the start/pause button to start the wash.
-
The door locks and the door lock indicator lights up.
The indicators at the bottom left of the control panel show the phase of the programme.
The text indicator shows the remaining duration of the wash.
4.12. THE END OF A PROGRAMME
When the laundry programme is finished, a beep will sound and END will appear on the control panel.
- Press and hold the Standby button until the control panel goes off. The appliance will switch off.
- Remove the laundry from the washing machine.
- To prevent foul odours, leave the appliance door open so that the drum can dry.
If the washing machine is not used for a long time, close the stop cock. For example, when you go on holiday.
4.13. DETERGENT RECOMMENDATIONS
The following table shows what detergents you can use in the laundry programmes. Both washing powders and liquid detergents are suitable for this machine.
| PROGRAMME DETERGENT | FABRIC SOFTENER PRE-WASH DETERGENT* | ||
| Cotton Yes Optional Optional | |||
| Synthetic Yes Optional Optional | |||
| Mix Yes Optional Optional | |||
| Baby care Yes Optional Optional | |||
| Sports Yes Optional Optional | |||
| Jeans | Yes Optional Optional | ||
| Short 45'/15' | Yes Optional No | ||
| Steam hygiene | Yes Optional Optional | ||
| ECO 40 - 60 | Yes Optional No | ||
| 20°C | Yes Optional No | ||
| Wool | Yes Optional No | ||
| Centrifuging | No | No | No |
| Drum cleaning | No | No | No |
| TYPE OF LAUNDRY | TYPE OF DETERGENT | TYPE OF DETERGENT PROGRAPE | RECOMMENDED LAUNDRY PROGRAMME | WASH TEMPER- M1400A8WNB | RECOMMENDED WASH TEMPERATURE- M1400A8WNB |
| White laundry consisting of boil-proof cotton or linen. | Heavy detergent with bleach and whiteners. | Cotton 40/90 °C 40°C | |||
| ECO 40 - 60 | |||||
| Mix | |||||
| Coloured laundry consisting of cotton or linen. | Heavy detergent without bleach or whiteners. | Cotton 20/30/40 | °C | 40°C | |
| ECO 40 - 60 | |||||
| Mix | |||||
| Sports | |||||
| Coloured laundry consisting of easy-care or synthetic materials. | Coloured detergent or light detergent without whiteners. | 20°C | 20°C | 20°C | |
| Delicate textiles, silk, and viscose. | Mild detergent. | Short 45'/15' | 20°C | 20°C | |
- Only use the Pre-wash compartment if you have selected the Pre-wash function.
For the best results:
Use detergent suitable for washing machines and the laundry to be washed.
- Dilute syrupy detergent with water.
Use less detergent when using extra concentrated detergent.
Use less detergent with a small wash.
Use more detergent with a large or very dirty wash.
Do not add any laundry beads in the detergent tray. Place laundry beads directly into the drum.
4.14. LAUNDRY RECOMMENDATIONS
Refer to the following table to determine which programmes can be selected for each specific type of laundry.
4.15. EXTENSIVE LAUNDRY PROGRAMME SPECIFICATIONS WISBERG WBWM1400A8WNB
| NAME | CAPACITY | TUBE | TEMPERA- | MAX TUBE* | DURA- | ENERGY TION | CON- SUMP- | WATER SUMP- | WATER CON- |
| Cotton* | 8 kg | 60°C | 60°C | 3:44 | 1.498 kWh | 71 L | 53% | ||
| Mix* 8 kg 40°C 40° | °C 1:20 0.75 | kWh 71 L65% | |||||||
| Mix* 60 °C 8 kg 60 | °C 60°C 1:30 | 1.263 kWh | 71 L65% | ||||||
| Baby care* | 8 kg | 60°C | 60°C | 2:01 | 1.317 kWh | 71 L | 65% | ||
| Quick 45'/15** | 2 kg | 20°C | 20°C | 0:45 | 0.131 kWh | 31 L | 70% | ||
| ECO 40 - 60*** | 8 kg | 39°C | 3:38 | 0.752 kWh | 61 L | 53.9% | |||
| 4 kg | 30°C | 2:48 | 0.412 kWh | 45 L | 53.9% | ||||
| 2 kg | 23°C | 2:48 | 0.216 kWh | 36 L | 53.9% | ||||
| 20 °C* | 4 kg | 20°C | 20°C | 1:01 | 0.183 kWh | 44 L | 65% |
*The value of this programme is indicative and may differ from reality.
**The maximum temperature is reached for a minimum of five minutes during a wash
***This laundry programme is suitable for cleaning normally soiled cotton laundry, for which it is indicated that it can be washed at 40^ or 60^ , together in the same cycle. This laundry programme dries the laundry so well that it can be stored in a cupboard straight away. This programme is used to check compliance with EU eco design rules.
4.16. EXTENSIVE LAUNDRY PROGRAMME SPECIFICATIONS WISBERG WBWM1400A9WNB
| NAME | CAPACITY | TEMPERA- | MAX. TURE* | TURNDURATION | DURA- | ENERGY CON- SUMP- | WATER CON- SUMP- | WATER CON- SUMP- | WATER CON- SUMP- |
| Cotton* | 9 kg | 60°C | 60°C | 3:44 | 1.603 kWh | 78 L | 53% | ||
| Mix* | 9 kg | 40°C | 40°C | 1:20 | 0.813 kWh | 78 L | 65% | ||
| Mix* 60 °C | 9 kg | 60°C | 60°C | 1:30 | 1.368 kWh | 78 L | 65% | ||
| Baby care* | 9 kg | 60°C | 60°C | 2:01 | N/A | N/A | 65% | ||
| Quick 45'/15"* | 2 kg | 20°C | 20°C | 0:45 | 0.131 kWh | 31 L | 75% | ||
| ECO 40 - 60*** | 9 kg | 36°C | 3:48 | 0.808 kWh | 67 L | 53.9% | |||
| 4.5 kg | 29°C | 2:54 | 0.498 kWh | 49 L | 53.9% | ||||
| 2 kg | 23°C | 2:54 0.22 | 5 kWh 36 L | 53.9% | |||||
| 20 °C* | 4.5 kg | 20°C | 20°C | 1:01 | 0.189 kWh | 48 L | 65% | ||
*The value of this programme is indicative and may differ from reality.
**The maximum temperature is reached for a minimum of five minutes during a wash
***This laundry programme is suitable for cleaning normally soiled cotton laundry, for which it is indicated that it can be washed at 40^ or 60^ , together in the same cycle. This laundry programme dries the laundry so well that it can be stored in a cupboard straight away. This programme is used to check compliance with EU eco design rules.
5. CLEANING AND MAINTENANCE
Before servicing and cleaning the appliance, carefully review the safety information in Section 1.

WARNING!
ELECTROCUTION HAZARD DUE TO SHORT CIRCUIT. Always remove the plug from the earthed socket before cleaning the appliance.
ELECTROCUTION HAZARD DUE TO SHORT CIRCUIT. Do not pour water over the appliance.

TICE!
RISK OF DAMAGE TO THE DEVICE.
- Never clean the appliance with aggressive or abrasive cleaners, or sharp objects.
- Cleaning and user maintenance must not be carried out by children without supervision.
5.1. GENERAL CLEANING AND DRUM CLEANING
When in intensive use, clean the appliance once a month, run the drum cleaning programme once or twice a month.
- Clean the outside of the appliance with a soft cloth and a diluted, non-abrasive cleaning agent.
- Dry the outside of the appliance with a soft, dry cloth.
- Remove objects and dust from the door seal.
- Clean the door and door seal with a soft cloth and a diluted, non-abrasive cleaning agent.
- Start the drum cleaning programme. Do not put any laundry in the washing machine.
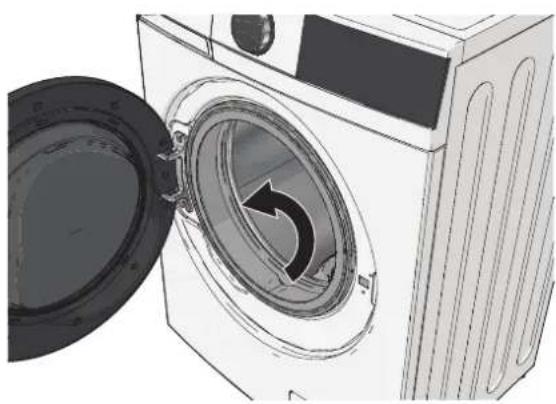
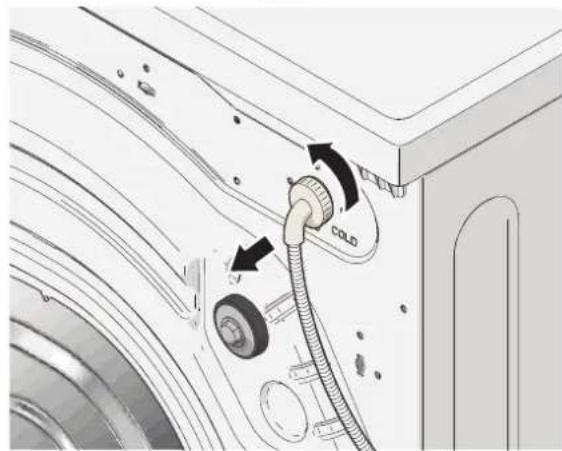
5.2. CLEANING THE WATER FILTER
- Clean the water filters of the water supply every three months.
- Close the stop cock.
- Put a bucket or washing-up bowl under the stop cock. Disconnect the water supply hose from the stop cock.
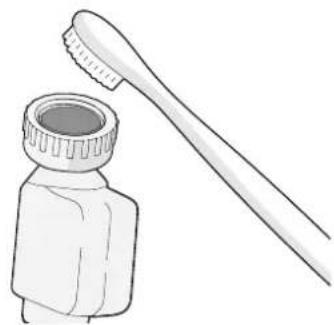
- Drain the supply hose into the bucket or washing-up bowl. Clean the filter in the supply hose with a small brush.
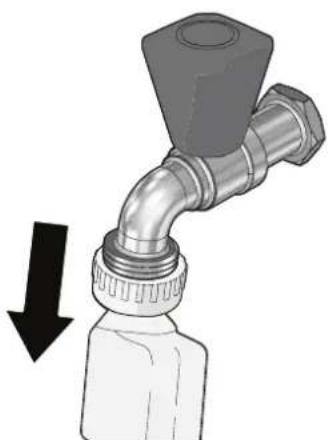
- Clean the filter in the supply hose with a small brush.
- Disconnect the supply hose from the appliance.
- Clean the filter in the appliance with a small brush.
- Replace the supply hose as described in section 3.6..
Z

5.3. CLEANING THE DETERGENT TRAY
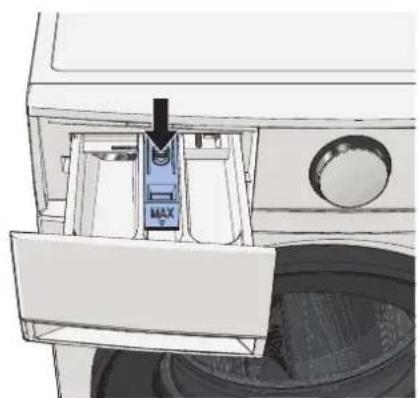
- Open the detergent tray.
- Press and hold the release button in the detergent tray and pull the tray out of the appliance.
- Pull up the front of the blue flap in the tray to remove the blue flap from the detergent tray.
- Clean the blue flap and detergent tray under running water.
- Pay extra attention to the flow of the fabric softener compartment. If it becomes clogged, it may cause leakage.
- Clean the opening for the detergent tray in the appliance with a brush.
- Put the blue flap back into the detergent tray.
- Put the detergent tray back into the appliance.
RISK OF BURNS. The appliance may contain hot water. Do not clean the drain pump during or immediately after a wash. Clean the drain pump every three months.

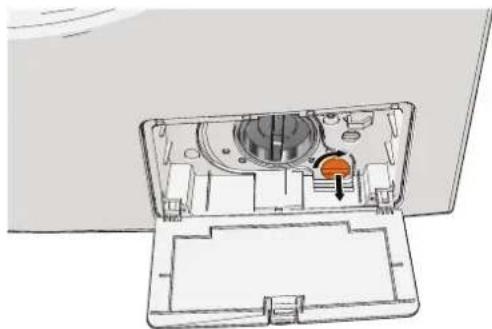
- Open the maintenance hatch.
- Turn the orange plug a quarter turn until the grip is positioned vertically.
- Pull the orange plug with the drain hose out of the appliance.
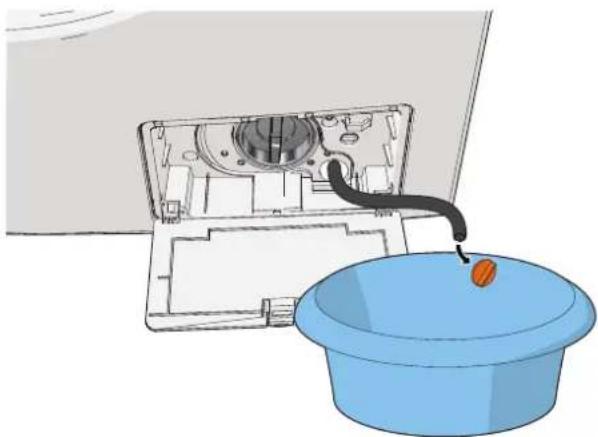
- Hold the end of the drain hose above a bucket or washing-up bowl.
- Pull the orange plug out of the drain hose. Wait until all the water has run out of the drain hose.
- Put the orange plug back in the drain hose.
- Place the drain hose with the orange plug back into the appliance vertically.
- Turn the orange plug a quarter turn until the grip is positioned horizontally.
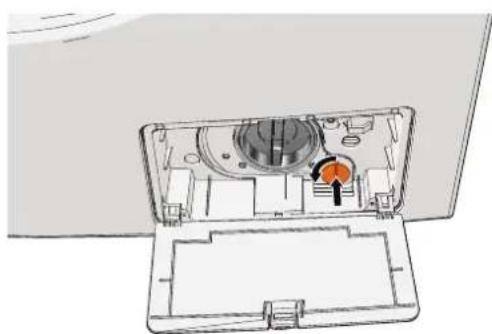
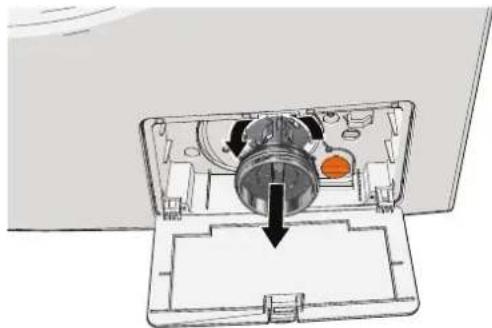
- Rotate the filter anticlockwise to remove the filter.
- Remove objects and dust from the filter and filter opening.
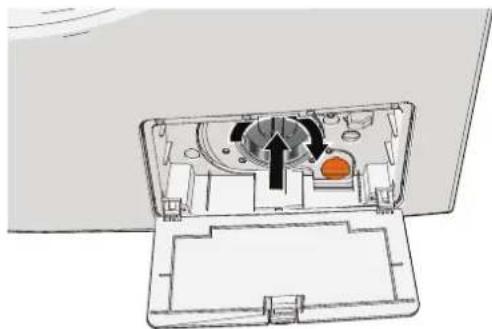
- Put the filter back in the filter opening and tighten the filter clockwise.
- Close the maintenance hatch.
6. TROUBLESHOOTING

WARNING!
ELECTROCUTION HAZARD DUE TO SHORT CIRCUIT. Do not perform any repairs to the appliance that are not described in this manual. The appliance may only be repaired by an authorised service technician.
NOTE
Some problems can be easily solved by yourself using the table below. If the descriptions below do not solve your problem, please contact our customer service team: www.wisberghome.com
Only a qualified electrician or authorised person may solve the faults not contained in this manual. Repairs carried out by unauthorised persons may cause injury and/or serious damage to persons and property.
6.1. PROBLEMS WITH THE APPLIANCE
| PROBLEM POSSIBLE CAUSE SOLUTION | ||
| The appliance will not start. The power cable is not properly inserted in the earthed socket. | Insert the power cable properly into the earthed socket. | |
| There is no voltage on the earthed socket. | Check that the earthed socket is working. | |
| A fuse has tripped or broken. Check fuses | and replace fuses if necessary. | |
| The door is not closed properly. Close the door properly and press the start/pause button. | door properly and press the start/pause button. | |
| The appliance is overloaded. Put less laundry in the appliance at the same time. | dry in the appliance at the same time. | |
| There's clothing trapped inside the appliance. | Remove the laundry from the appliance and put the laundry in again. | |
| The door doesn't open. The laundry programme is not yet complete. | Ensure the laundry programme is complete. | |
| Door protection is enabled. | Wait until the drum is completely stationary. Sometimes it takes time until the door protection switches off. | |
| Unplug the power cable from the earthed socket and plug the power cable back into the earthed socket. | ||
| The door does not close properly. | There was laundry between the door. | Remove laundry that is trapped by the door. Push the laundry well into the drum. |
| The washing machine is overloaded. | Put less laundry in the machine and try to close the door again. | |
| There is a leak somewhere. The supply or drain hose is not properly connected. | Check the connections of the supply and drain hose. If necessary, recouple the hoses. Replace broken hoses. | |
| The drain hose hangs more than 15 cm in the drain. | Ensure that the drain hose does not hang further than 15 cm in the drain. | |
| The drain hose is blocked. Remove blockages from the drain hose. | ||
| The drain is blocked. Clear the drain. | ||
| The detergent tray is leaking. Clean the detergent tray according to section 5.3.. | ||
| The door is leaking; there was laundry between the door. | Press the start/pause button to pause the laundry programme. Open the door and put the laundry well in the drum. Close the door and restart the laundry programme. Check whether the leak persists. | |
| The door is leaking; the door seal is worn or torn. | Disconnect the machine from the power supply and remove the laundry from the machine. Please contact Wisberg. | |
| The base plate is leaking; too much detergent has been used | Disconnect the appliance from the power supply. Tilt the washing machine backwards and check for water coming out of the machine. If this is the case, place something under the front adjustable feet of the appliance so that the appliance remains tilted. Allow the machine to dry for a day in this way. Then put the machine upright again. At the next wash, use less detergent and check if the leak occurs again. | |
| The base plate is leaking; there is an internal leak. | Please contact Wisberg. | |
| A lot of foam is created during a wash. Too much detergent used Use less detergent next time. | ||
| There is limescale build up on the drum. Too little detergent has been used. Use more detergent next time. | ||
| Detergent remains in the laundry tray after washing. | There is insufficient pressure on the water. | Clean the water supply according to section 5.2.. |
| The detergent is too thick or clumps. Clean the detergent tray according to section 5.3.. Check that the detergent used is suitable for machine washing. | ||
| If you are using powdered detergent in combination with softeners, first add the detergent and then the softener. | ||
| Dilute detergent that is too thick with water. | ||
| Fabric softener or water remains in the fabric softener compartment. | The drain (suction siphon) of the fabric softener compartment is blocked. | Clear the drain of the fabric softener compartment and clean the detergent tray according to section 5.3.. If necessary, use the rinse function (see section 4.5.). |
| The control panel and indicators are not working. | There are problems in the electronic connections. | Remove the power cable from the earthed socket and plug the power cable back into the earthed socket. |
| The appliance makes an exceptional amount of noise. | Transport bolts have not been removed. | Remove the transport bolts. |
| The appliance is not level. Level the appliance according to section 3.8.. | ||
| The machine is placed on a thin floor (for example a wooden surface). | If possible, choose a location in the corner of the room as much as possible. This minimises vibrations. | |
| Consider placing the appliance on a solid floor (for example, a concrete surface). | ||
| The machine makes a lot of noise when pumping and centrifuging. This is normal. You don't have to do anything. | ||
| The appliance stinks. The appliance must be cleaned. Clean the appliance according to section 5.. | ||
| Water remains in the machine after a wash. | The drain hose is clogged. Clean the drain | pump according to section 5.4.. |
| Remove any blockages from the drain hose. | ||
| The drain is blocked. Clear the drain. | ||
6.2. PROBLEMS WITH CLEAN LAUNDRY
| PROBLEM POSSIBLE CAUSE SOLUTION | ||
| Detergent remains in the laundry after a wash. | Use less detergent next time. Too much detergent used | detergent used |
| The laundry turns grey. Too little detergent has been used. Use more detergent next time. | ||
| Limescale builds up on the laundry. | ||
| The laundry stinks. | The appliance must be cleaned. Clean the appliance according to section 5., and/or run the hygiene or baby care program. | appliance according to section 5., and/or run the hygiene or baby care program. |
| The laundry is not clean. | The wrong program has been selected. | See section 4.4. for the right programme. Some programmes wash at a low temperature, or use a maximum filling weight. If the filling weight for that specific programme is exceeded, or a programme with too low a temperature has been chosen, the laundry cannot be washed completely. |
| Using additional functions: Using the stain removal programme to remove specific stains. See section 4.5.. Use the pre-wash and rinse function. See section 4.5.. | ||
| Too little, or wrong detergent | Use more detergent or use another detergent; refer to the instructions on the detergent packaging. | |
6.3. FAULT CODES ON THE CONTROL PANEL
| ERRORMESSAGE EXPLANATION POSSIBLE CAUSE POSSIBLE SOLUTION | |||
| CL The child safety lock is activated. | You have activated the child safety lock. | See section 4.6.. | |
| E30 The door is not closed properly. | The door is not completely closed. | Close the door properly and press the start/pause button. | |
| E10 There is a problem with the water supply. | There is a kink in the supply hose. | Remove the kink from the supply hose. | |
| The water supply filters are contaminated. | Clean the water supply filters according to section 5.2.. | ||
| The supply water pressure is not high enough. | Ensure that the supply hose is connected to a water supply with a water pressure of at least 0.05 MPa. | ||
| The stop cock is closed. Open | the stop cock. | ||
| E21 There is a problem with water drainage. | The drain hose is blocked. | Remove blockages from the drain hose. | |
| The water drainage is blocked. | Unblock the water drainage. | ||
| E12The appliance has detected too much water in the drum. | There is too much water in the drum. | Press the start/pause button to continue the laundry programme. | |
| EXX Other error messages. | - | Press the start/pause button to continue the laundry programme. | |
7. TAKING OUT OF SERVICE
- Unplug the power cable from the earthed socket.
- Close the stop cock.
- Place a bucket or washing-up bowl under the ends of the supply hose and discharge hose. Water can leak out of the supply hose and discharge hose during disconnection.
- Disconnect the water stop and supply hose from the stop cock and the appliance.
- Remove or uncouple the drain hose from the siphon or water drain pipe.
- Clean the appliance. Follow the instructions in section 5..
7.1. TRANSPORT AND STORAGE
CAUTION!
DANGER OF ENTRAPMENT DUE TO TILTING THE APPLIANCE. Always wear protective gloves and closed shoes when moving the appliance.
RISK OF INJURY FROM LIFTING HEAVY OBJECTS. Always move the appliance with two people. Use two hands when moving, lifting or turning the appliance.
TICE!
RISK OF DAMAGE TO THE DEVICE. Never drop the appliance and avoid bumping. Dropping or bumping the appliance may affect the proper operation of the appliance. Do not use the appliance if it has been dropped.
- Screw the transport bolts back into the appliance.
- Pack the appliance in its original packaging. If the original packaging is no longer present, pack the appliance in soft packaging material such as bubble plastic or a blanket to prevent damage.
If you need to move the appliance over longer distances, use a hand truck.
8. SAFE DISPOSAL
8.1. DISPOSING OF PACKAGING MATERIAL
The packaging material consists of various materials. When disposing of packaging material, follow national and local regulations regarding the environmentally friendly disposal of packaging material.
8.2. DISPOSING OF THE APPLIANCE

The materials used in this appliance and marked with this symbol are recyclable. The marking indicates that this product should not be disposed of with household waste throughout the EU.
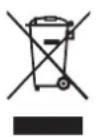
This symbol indicates that the appliance must not be disposed of with other household waste within the EU. By properly disposing of the appliance, you help prevent potential hazards to the environment and public health. Recycling materials contributes to the conservation of our natural resources. Therefore, do not dispose of waste electronic appliances along with household waste. When disposing of the appliance, follow national and local regulations regarding the environmentally friendly disposal of electronic appliances. You can also contact Wisepick Productions B.V. if you do not want to use the appliance anymore or to return the appliance.
Wisberg contact details
Customer service can be reached at: www.wisberghome.com
Wisepick Productions B.V.
Weena 664
3012 CN Rotterdam
The Netherlands
Made in China
ER
FR - NOTICE D'UTILISATION
LAVE-LINGE
WBWM1400A8WNB
WBWM1400A9WNB
SOMMAIRE
Avant-propos
68
1. Sécurité 69
Wisepick Productions B.V.
Weena 664
3012 CN Rotterdam
Pays-Bas
Fabrique en Chine
1. SÉCURITÉ
1.1. AVERTISSEMENTS DE SECURITE ET RÉGEMENTATION

AVERTISSEMENT!
Wisepick Productions B.V.
Weena 664
3012 CN Rotterdam
Pays-Bas
Fabrique en Chine
Wisepick Productions B.V.
Weena 664
3012 CN, Rotterdam
The Netherlands
Made in China V1.0 - 07/2024