C2 - Water filter Fluval - Free user manual and instructions
Find the device manual for free C2 Fluval in PDF.
| Brand | Fluval |
| Model | C2 |
| Product Type | Aquarium water filter |
| Dimensions (approx.) | 20 x 15 x 25 cm |
| Weight (approx.) | 1.5 kg |
| Power Supply | 120 V or 230 V, 50/60 Hz |
| Maximum Flow Rate | 450 L/h (120 V) / 400 L/h (230 V) |
| Minimum Flow Rate | 235 L/h (120 V) / 210 L/h (230 V) |
| Number of Filtration Stages | 5 stages (mechanical, chemical, biological) |
| Main Functions | Mechanical filtration (foam/polyester), chemical (activated carbon), biological (Bio-Screen and C-Nodes) |
| Maintenance and Cleaning | Regular cleaning of foams with aquarium water; replace carbon every 4 to 6 weeks; clean Bio-Screen every 2-3 months; rinse C-Nodes every 6 months; clean motor and impeller assembly every 3 months |
| Safety | Unplug before maintenance; do not run dry; avoid water contact with plugs; do not use for swimming pools |
| Spare Parts and Repairability | Parts list with references: A20265 (canister), A20268 (biological chamber), A20271 (chemical basket), A20274 (lid), A20277 (mechanical frame), A20280 (U-tube), A20282 (inlet tube), A20284 (extension), A20286 (impeller cover assembly), A20297 (impeller), A20288 (motor seal), A16000 (motor), A20290 (leveling disk) |
| General Information | 2-year warranty; domestic indoor use; max water temperature 35 °C |
Frequently Asked Questions - C2 Fluval
User questions about C2 Fluval
0 question about this device. Answer the ones you know or ask your own.
Ask a new question about this device
Download the instructions for your Water filter in PDF format for free! Find your manual C2 - Fluval and take your electronic device back in hand. On this page are published all the documents necessary for the use of your device. C2 by Fluval.
USER MANUAL C2 Fluval
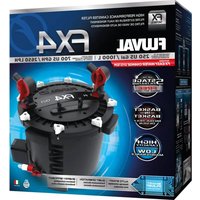
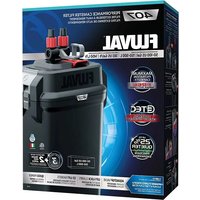
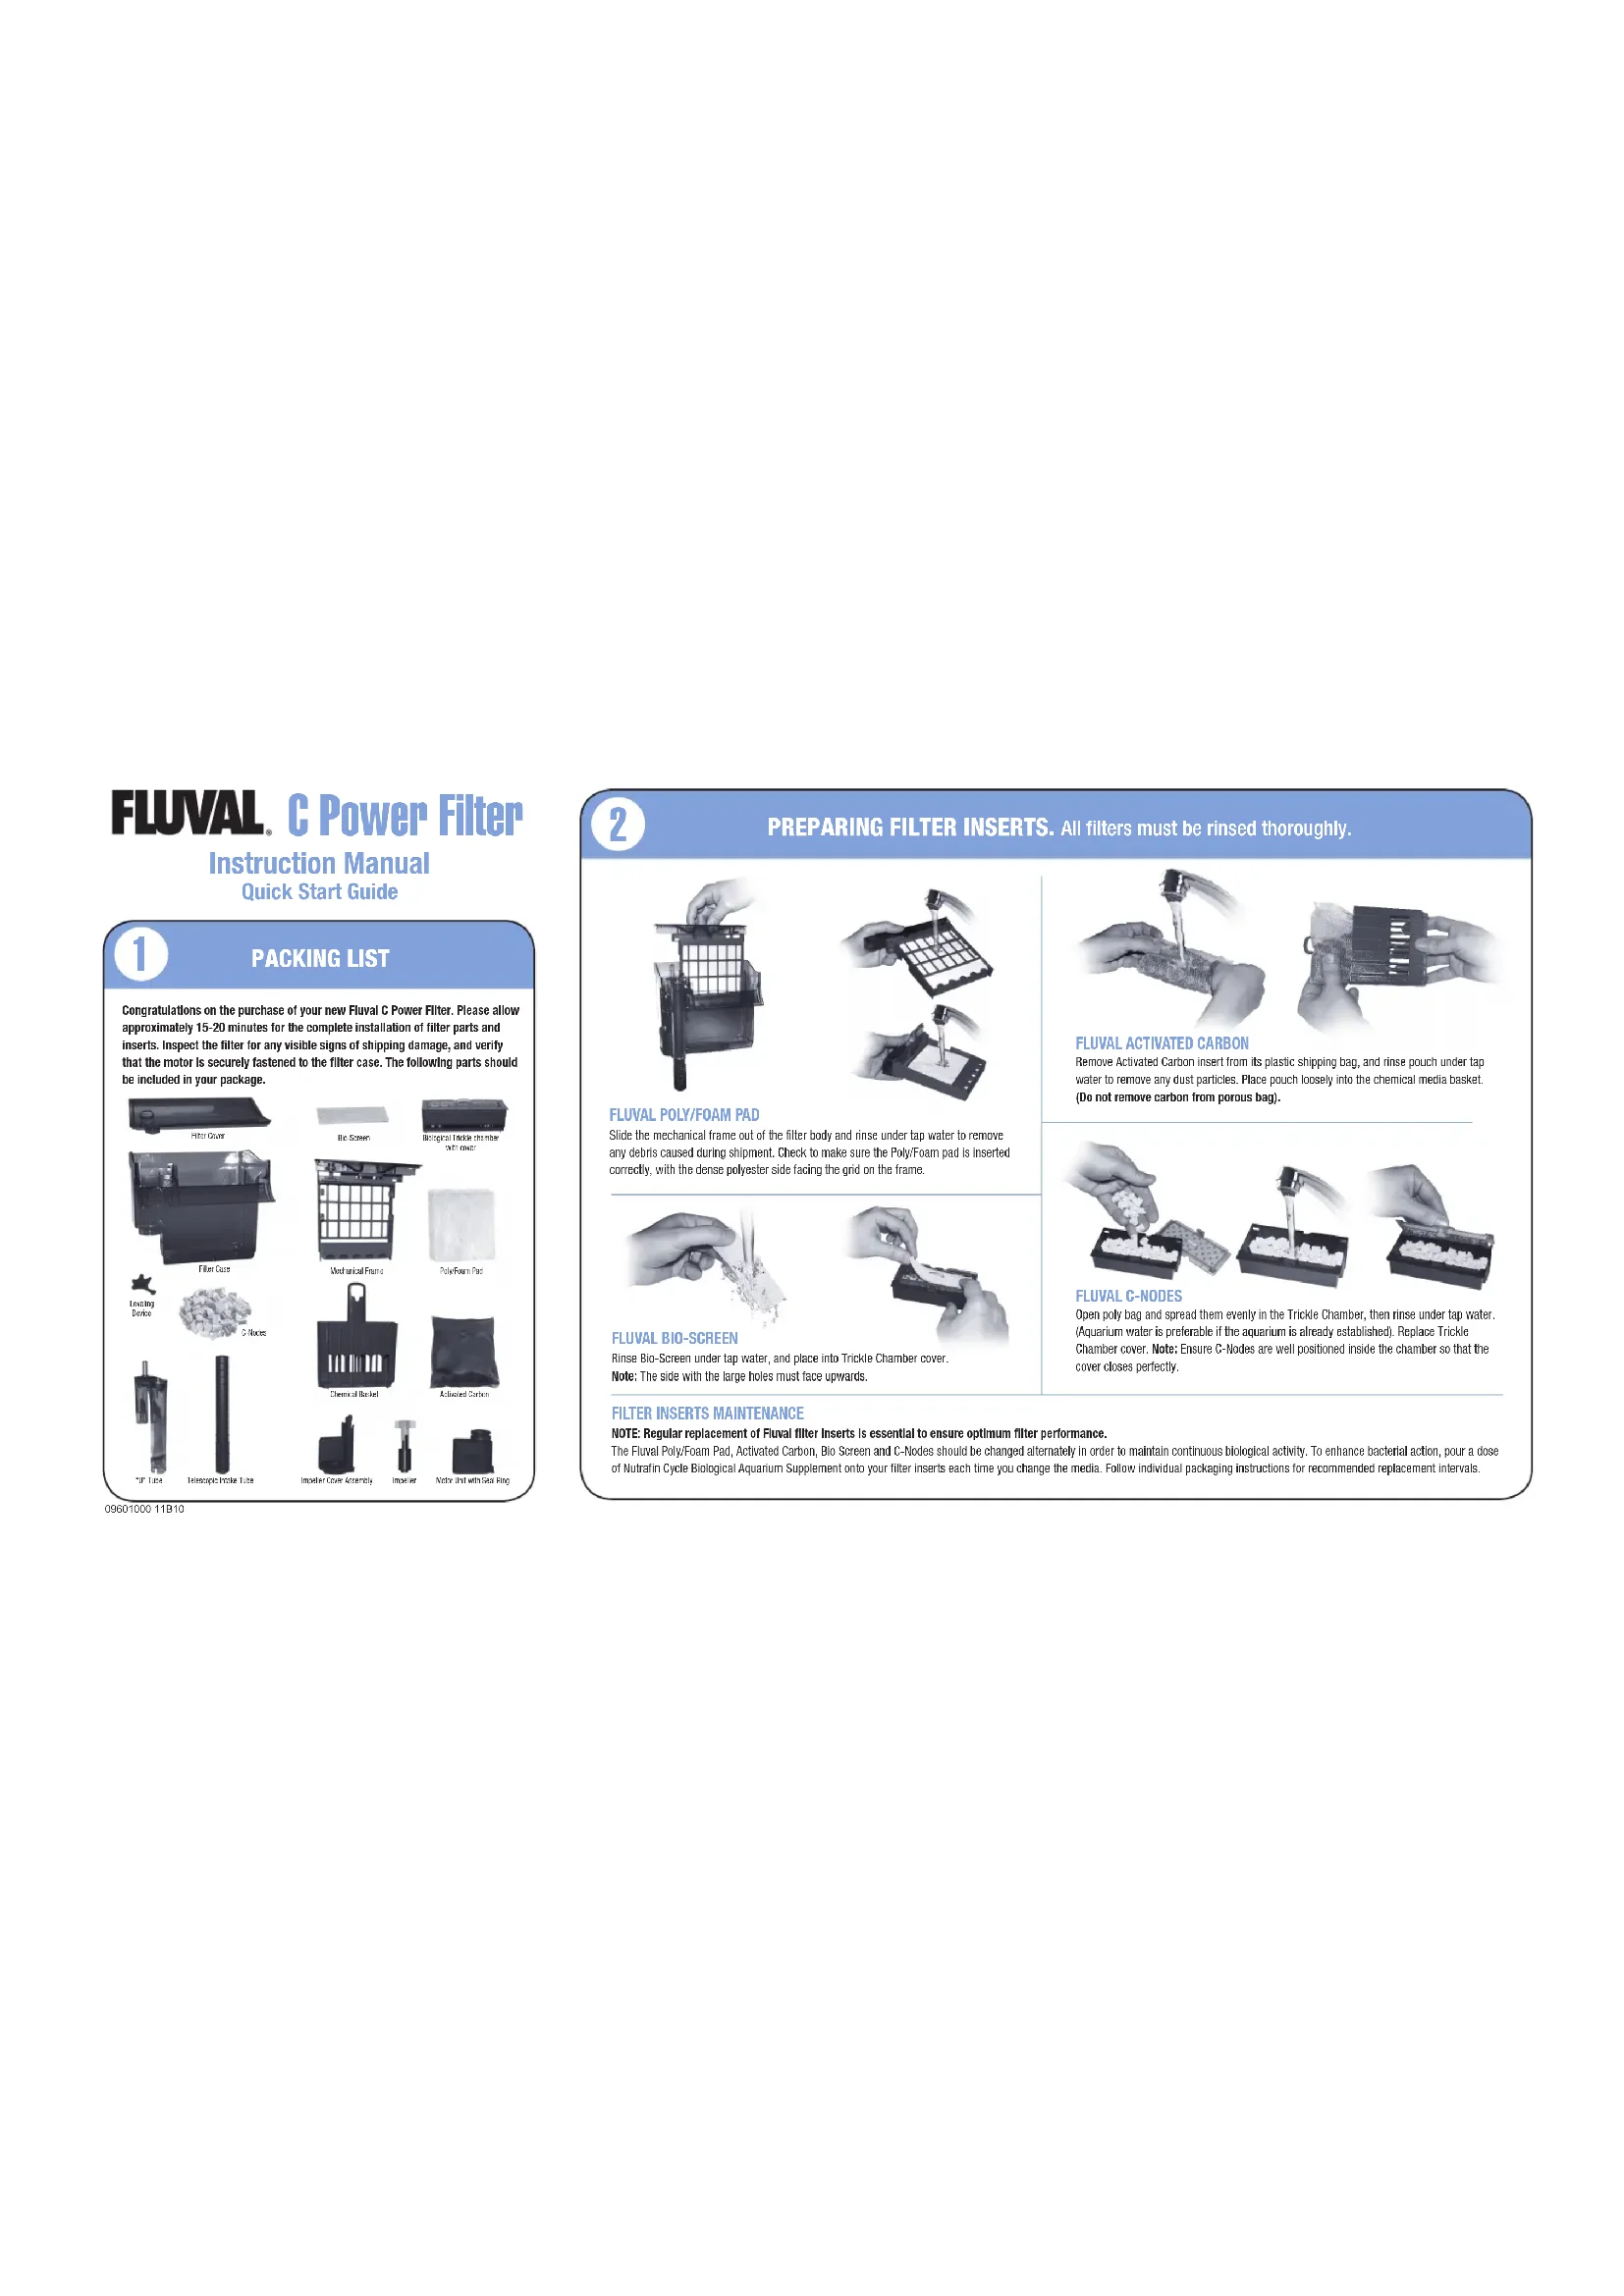
FLUVAL. C Power Filter
Instruction Manual
Quick Start Guide
0963100011810
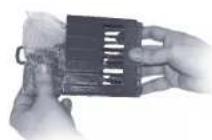
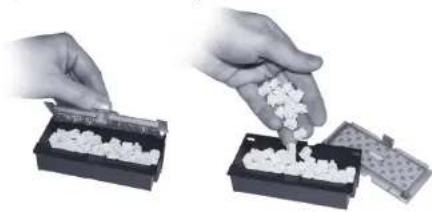
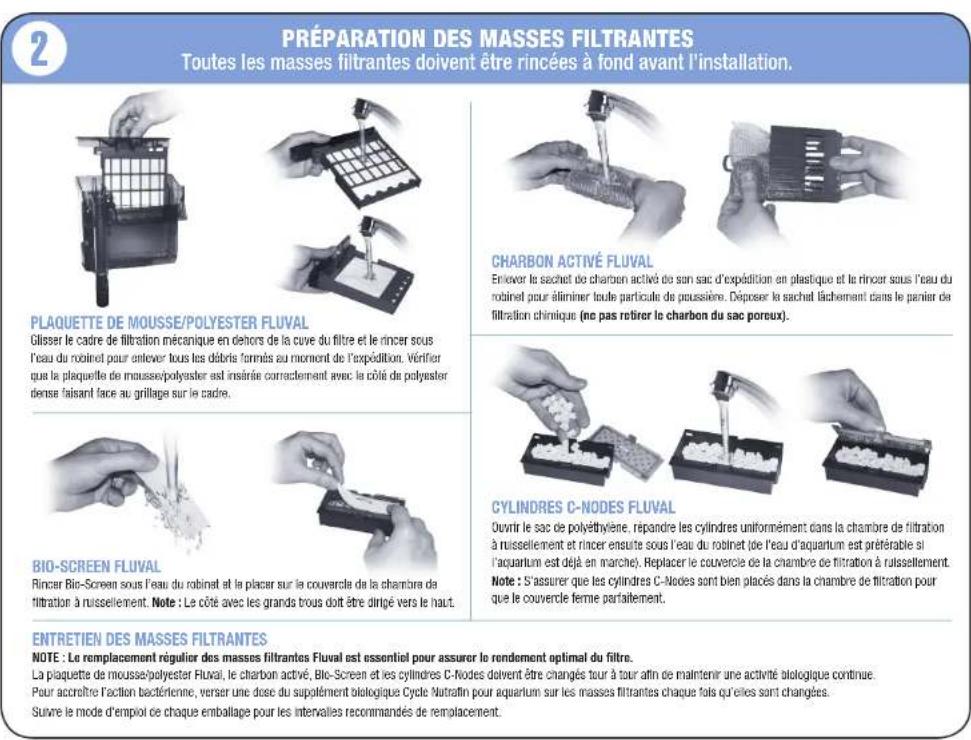
PREPARING FILTER INSERTS. All filters must be rinsed thoroughly.
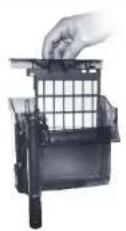
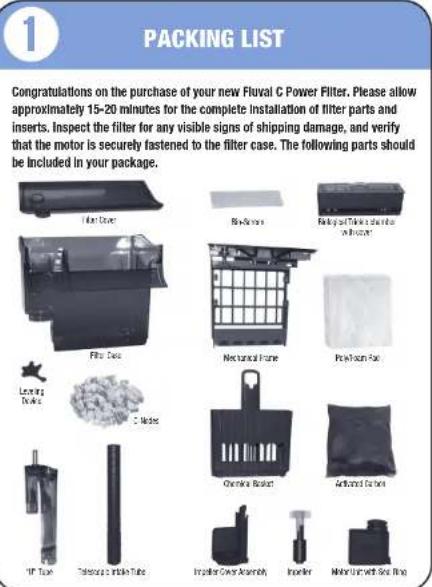
FLUVAL POLY/FOAM PAD
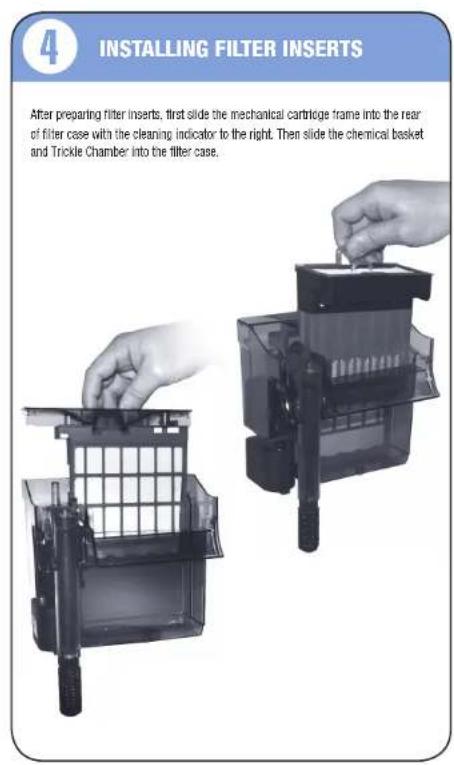
Slide the mechanical frame out of the filler body and rinse under tap water to remove any debris caused during shipment. Check to make sure the PolyFoam pad is inserted correctly, with the dense polyester side facing the grid on the frame.


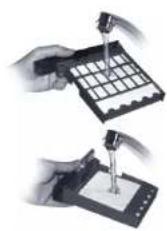
FLUVAL BIO-SCREEN
Rinse Bio-Screen under tap water, and place into Trickle Chamber cover. Note: The side with the large holes must face upwards.

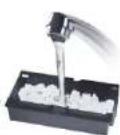
FLUVAL ACTIVATED CARBON
Remove Activated Cartoon insert from its plastic shipping bag, and rinse pouch under tap water to remove any dust particles. Place pouch loosely into the chemical media basket (Do not remove carbon from porous bag).

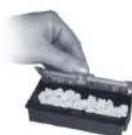
FLUVAL C-NODES
Open poly bag and spread them evenly in the Trickle Chamber, then rinse under tap water. (Aquarium water is preferable if the aquarium is already established). Replace Trickle Chamber cover. Note: Ensure C-Nodes are well positioned inside the chamber so that the cover closes perfectly.
FILTER INSERTS MAINTENANCE
NOTE: Regular replacement of Fluval filter inserts is essential to ensure optimum filter performance.
The Flua PolyFoam Pad Activated Carbon, Bio Screen and C-Notes should be changed alternately in order to maintain continuous biological activity. To enhance bacterial action, pour a dose of Nutraltin Cyclical Biological Aquarium Supplement onto your filter inserts each time you change the media. Follow individual packaging instructions for recommended replacement intervals.
REPLACEMENT PARTS
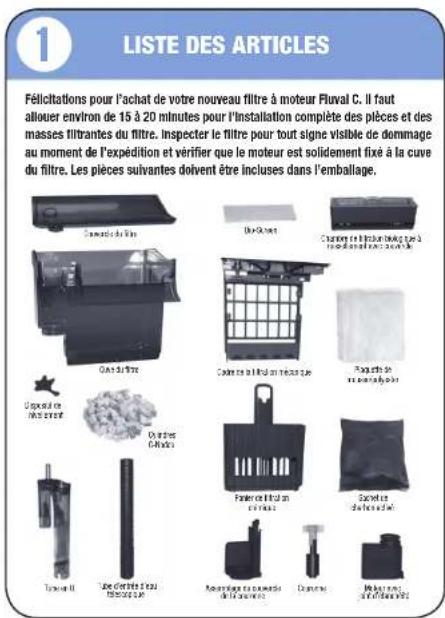
To re-order parts for your Fluval C Power Filter, please refer to the parts list below.
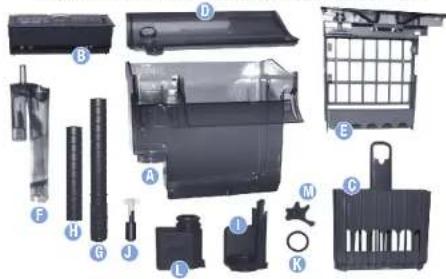
| ITEM | C2 | C3 | C4 |
| A Filter Case | A20265 | A20266 | A20267 |
| B Biological Trickle Chamber with cover | A20288 | A20269 | A20270 |
| C Chemical Basket | A20271 | A20272 | A20273 |
| D Filter Cover | A20274 | A20275 | A20276 |
| E Mechanical Frame | A20277 | A20278 | A20279 |
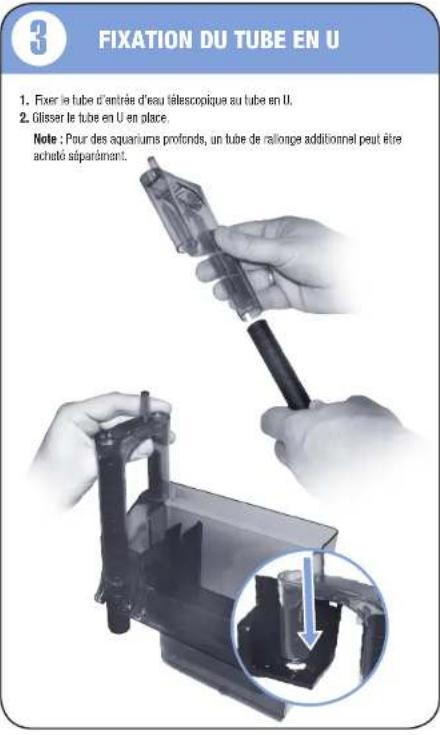
| F "U" Tube | A20280 | A20280 | A20281 |
| G Telescopic Intake Tube | A20282 | A20282 | A20283 |
| H Extension Tube | A20284 | A20284 | A20285 |
| I Impeller Cover Assembly | A20286 | A20286 | A20287 |
| J Impeller | A20297 | A20298 | A20299 |
| K Motor Seal Ring | A20288 | A20288 | A20288 |
| L Motor Unit | A16000 | A16000 | A16000 |
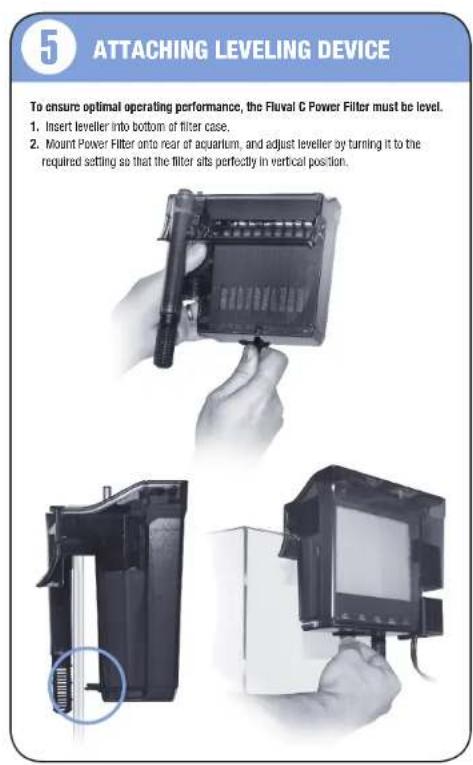
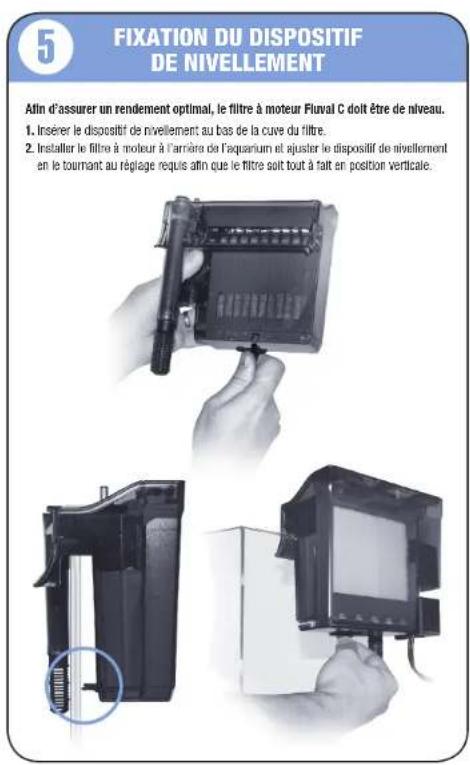
| M Levelling Device | A20290 | A20290 | A20290 |
IMPORTANT SAFETY INSTRUCTIONS
WARNING - To guard against injury, basic safety precautions should be observed, including the following:
- For the complete enjoyment, use and understanding of this product
READ AND FOLLOW ALL SAFETYINSTRUCTIONSand all importers' policies on the Future Filter by
Failure to do so may result in damage to the unit.
- DANGER- to avoid positive electrical shock, special care should be taken since water is employed in the use of this equipment. For each of the following situations, do not attempt repairs yourself: return the Ruval Power Filter for repair to an authorized service facility for service or discard the appliance.
- If the Flexor Motor Unit falls into the water DO NOT reach for it First unplug it and then retrieve it. If any of the electrical components of the Power Filter get wet, unplug it immediately.
IL. If the Motor Unit shows any sign of abnormal water leakage or if RCS (or SFCI- Ground Fault Current interrupter) switches off, disconnect the power supply cord from the wall socket and remove pump from water.
III. Carefully examine the Power Filter after installation. It should not be plugged in if there is water on or parts not intended to be wet.
IV. Do not operate any appliance if it has a damaged cord or plug, or if it is malfunctioning or if it is dropped or damaged in any manner. The power cord of this appliance cannot be replaced; if the cord is damaged, the appliance should be discarded. Never cut the cord.
V. To avoid the possibility of the Power Filter's plug or socket getting wet, position the unit to one side of a wall mounted socket to prevent water from dropping onto the socket or plug. A "drip loop" (A) should be arranged. The "coil loop" is the part of the cord below the level of the socket or the connector if an extension cord is used, to prevent water travelling along the cord and coming into contact with the socket. If the plug or socket does get wet, DO NOT unplugging the cord. Disconnected the fuse or circuit breaker that supplies power to the appliance. Then unplug and examine for presence of water in the socket. - WARNING - Close supervision is necessary when any appliance is used by or near children. This appliance is not intended for use by persons (including children) with reduced physical, sensory or mental capabilities, or lack of experience and knowledge, unless they have been given supervision or instruction concerning use of the appliance by a person responsible for their safety. Children should be supervised to ensure that they do not play with the appliance.
- To avoid injury, do not contact moving parts or not parts such as heaters, reflectors, lamp bulbs, lamps etc.
- CAUTION - Always unplug or disconnected at appliances in the aqueduct from electrical supply before placing hands in water, before pulling on or taking off parts and whilst the equipment is being installed, maintained or handled. When inserting or removing the pump from the water, always pull out the main electrical plug. Never park cord to pull plug from outlet. Grasp the plug and pull to disconnect. Always unplug appliances from the socket when not in use.
- This is an aquarium filter-pump. Do not use this pump for other than its intended use (i.e. do not use in swimming pools, bathrooms, etc.). The use of attachments not recommended or sold by the appliance manufacturer may cause an unsafe condition, and will invalidate your warranty.
Do not use this pump in swimming pools or other situations where people are Immersed.
- The pump is suitable for use in water temperatures up to 35^ .
- Do not use lime as it can interfere with the ability of lime to
7. This pump is suitable for INDOOR HOUSEHOLD use only. Do not install or store the appliance when it will be exposed to the weather or to temperatures above freezing.
8. Make sure an appliance mounted on a tank is securely installed before operating it, and that the electrical connections are in accordance with data on the rating rules. Do not allow pump run dry.
9. If an extension cord is necessary, a cord with proper rating should be used. A cord rated for less than or more than the appliance rating may overheat. Care should be taken to arrange the cord so that it will not be tripped over or pulled. The connection should be carried out by a qualified electrical installer.
10 SAVE THESE INSTRUCTIONS
For the complete use and understanding of this power filler it is recommended that this manual is thoroughly read and understood. Failure to do so may result in damage to this filler.
2 YEAR WARRANTY
To register your warranty on line or for more information on this and other products go to: www.haagen.com The Flexus C Fillers are guaranteed against defects in material or workmanship under normal aquarium usage and services for 2 years. We offer a 2 year guarantee on all non-redeasable parts which means that the filler will be replaced or replaced at the manufacturer's discretion. Free of charge, when the complete pump is returned with proof of purchase and postage paid. This warranty does not apply to any filter that has been subjected to misuse, negligence, or tampering. Riskily is assumed with respect to loss or damage to livestock or personal property irrespective of the cause thereof.
FOR AUTHORIZED WARRANTY REPAIR SERVICE
For Authorized Warranty Service please return well packaged and by registered post to the address below, enclosing dated receipt and reason for return. If you have any queries or comments about the operation of this product, please let us try to help you before you return the product to your retailer. Most queries can be handled promptly with a phone call. When you call for write, please have all relevant information such as model number, age of product, details of asylum set-up, as well as the nature of the problem. When you call (or write), please have all relevant information, such as model number and other part numbers available, as well as the nature of the problem.
CANADA: Hagen Industries, Consumer Repair, 3235 Guinette, Montreal QC H4S 1N2
U.S.A: Roll C. Hagen (U.S.A.) Corp., 305 Forbes Blvd, Marsfield, MA 02048
UK Rolf C. Hagen (UK) Ltd, Customer Service Department California Drive, Whitland Ind. East., Carlsbad, West Yorkshire WF1 50H — phone: agher_uk.sutel@heng.com
CALL US ON OUR TOLL-FREE NUMBER: Canada only: 1-800-554-2438 between 9:00 a.m. and 4:30 p.m. Eastern Standard Time. Ask for Customer Service.
U.S. only: 1-800-724-2436 between 9:00 a.m. and 4:00 p.m. Eastern Standard Time, Ask for Customer Service. U.K. only: Helpline Number 01977 556622 Between 9:00 AM and 5:00 PM Monday to Friday (excluding Bank Holidays).
RECYCLING
This product bears the selective sorting symbol for waste electrical and electronic equipment (WEEC). This means that this product must be handled pursuant to European Directive 2002/96EC in order to be recycled or dismantled to minimize its impact on the environment. Check with your local Environmental Agency for possible disposal instructions or take to an official council registered refuse collection point. Electronic products not included in the selective sorting process are potentially dangerous for the environment and human health due to the presence of hazardous substances.

HOW IT WORKS
The Flxed C Power Filter flows water from the aqueduct through the intake tube into the motor which then pumps water out of the impuller assembly. The motor pushes the flow of unfiltered water through filter inserts to trap particles, debris, and purify the water. The New Flxed C series filtration system offers the ultimate multisage filtration available in the market. With 2 x Mechanics, 1 x Chemicals and 2 x Biological, each stage operates independently.
Unsurpassed Mechanical
Chemical, and Biological filtration
A healthy aquarium requires "bifidical" bacteria, liveborne and harmless, beneficial bacteria are essential in the removal of taxic amnioc and nitrile. With cartilage filtration systems, when you
throw away the cartilage, you throw away beneficial bacteria. It can take weeks for the bacteria to re-coarse resulting in a stressful environment. The Fucilin S stage fibrosis system is different. Only one of the fibrosis
components is changed at a time. This ensures that the maximum amount of beneficial bacteria remains. There is never a sudden depletion of bacteria so biological filtration remains always at high effective levels. Stage 1 & 2: Mechanical — Poly/ Foam Pad
Effective mechanical filtration is essential for efficient chemistry and biological filtration. The large surface area of the Pulp-Film pad effectively performs two stages of Mechanical filtration. The first stage of porous foam traps large particles and the second stage of dense polyester captures the debris.
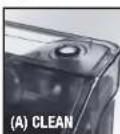
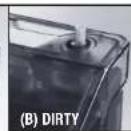
Note: The mechanical frame is equipped with a cleaning indicator (A) located on the top portion of the frame. When fully visible (B), the mechanical Poly/Foam pad requires maintenance.
Stage 3: Chemical — Activated Carbon Insert
Fluid Activated Carbon Filter Insert contains 100% premium research grade carbon. Premium research grade carbon provides large amounts of surface area for adsorption of undesirable impurities. The activated carbon filter insert removes unwanted odors, discoloration and impurities, resulting in a crystal clear aquacarium.
Stage 4: Biological — Bio-Screen
An additional hydraulic circuit component part of the intake water to the XELN innovative Bio-Screen coated at the top of the Trickle Chamber cover. Flow's Bio-Screen removes any debris before dropping into the biological chamber. It also ensures that the water pumped to the Trickle Chamber is evenly spread through all areas before it drips on the C-odes, which are contained in the chamber. The motion of water dropping slowly through the grids mimics the rain. This process assures that additional oxygen is dissolved into the water before returning to the aquarium, for a more efficient biological filtration.
Stage 5: Biological - C-Nodes
The surface of the C-Nodes is made up of a complex pore system that provides optimal living space for beneficial bacteria to thrive and enhance the removal of ammonia and nitrites. The new "Star Shape" provides a higher filtration surface and more biological power than a traditional cartridge, resulting in a healthy aquarium environment.
PATENTED REFILTRATION SYSTEM
For a healthy aquarium and clear water
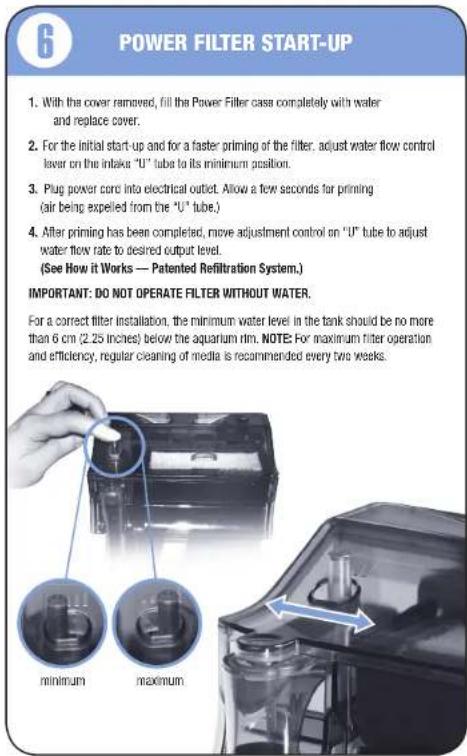
Sometimes decrease thin and parts require a gentler water flow. Flow's automated filtration system allows you to control the flow rate without compromising filtration efficiency. When the flow rate is reduced, up to 50% of the water within the filter chamber is re-processed multiple times. More impurities are filtered out, creating a healthier tank with sparking clean and clear water.
NOTE: A reduced flow rate is also recommended during feeding, to ensure more efficient food consumption and less waste.
FLUVALC POWER FILTERS FLOW RATES
| MODEL # C2 C3 C4 | ||||||
| 120V 230V 120V | 230V 120V | 230V | ||||
| gph | Iph | gph | Iph | gph | Iph | |
| Maximum Flo Rate | 119 | 400 | 153 | 480 | 264 | 900 |
| Minimum Flo Rate | 62 | 210 | 80 | 330 | 159 | 480 |
No special maintenance is required to clean the external sides of the filter, other than periodic cleaning with a damp cloth (never use chemical products or detergents). Simple lemon juice may be useful for removing carcassous excitation. Rinse thoroughly afterwards to eliminate acid residue. Following a routine maintenance schedule will result in a healthier aquanum, and extend the life of the filter. Ruval C Power Fibers have been designed to facilitate these tasks, as they can be done within a matter of minutes.
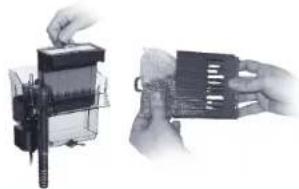
Poly/Foam Pad Remove mechanical frame from the filter body and place an empty bucket. Remove Poly Foam Pad from frame, and rinse using water taken from the aquacemod. No use tap water as this will kill the beneficial bacteria in your foam. NEVER use soap or detergents as these products could be harmful to the inhabitants of your aquacemod. After rinsing, reassemble the Poly/Foam Pad into the mechanical frame. Then slide the frame into the rear of the filter case with the cleaning indicator to the right. Note: Make sure that the dense polyester side is facing the grid on the frame. For best results, replace every 4-6 weeks.
Activated Carbon Insert Remove filler cover. Pull out the chemical basket and Tricks Chamber from filler body. Separate the 2 electrodes then remove insert from Chemical basket. Replace with new insert. For best results, replace every 2-4 weeks.
Bio-Screen Remove filter cover. Using the tap, pull open the Trideal Chamber Cover and remove it. Place cover in the sink or a bucket, and rinse with the Bio-Screen, using water taken from the aquacunm. Do not use tap water as this will kill the beneficial bacteria in your foam. For best results, replace every two to three months.

Biological C-Nodes
Using the last, pap to open the Trickle Chamber Cover and remove it. Lightly since the C-Nodes with aquarium water or mixane 1/2 the quantity every 6 months. Never replace all the C-Nodes at one time, as the valuable colonies of beneficial bacteria would be lost. For best results, completely fill the cartridge with additional C-Nodes, but be sure to allow the cover to close easily.
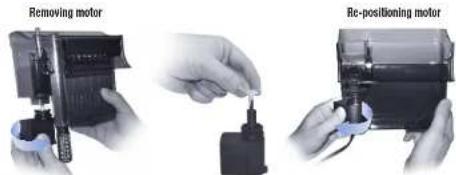
Impeller and Motor
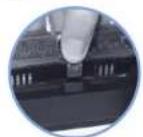
- Imply the powder coat. Remove cover, filter拭acles and discard water remaining in fiber case. Remember motor by boxing a 1/4- turn gently in the direction of the arrow on the motor. Ease the motor drain slowly to prevent damage to the filter and motor guide. Pull impeller out of the impeller well, and rinse to remove accumulated slime deposits. If the impeller well needs cleaning, scrub it gently with a Final Cleaning Brush (cold separately). A groove saw or impeller will brush (not supplied) can be used to remove more stubborn deposits. It is recommended to wait motor assist into to prevent damage before painting into filter case.
Note: It is recommended to replace the motor D-ring on a yearly base to prevent leaking. Re-position the magnetic impeller on the shaft and insert into the impeller well. Re-position the motor in the filer case.
Water Intake Components
The telescopic intake tube. "U" tube and impeller cover can be cleaned using a filter stem brush to remove any built-up of debris.
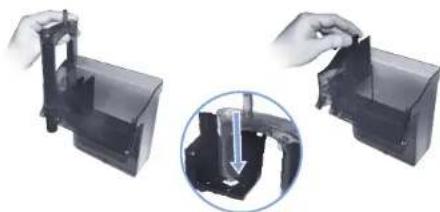
To remove the impeller cover assembly: gently grasp the impeller cover and pull.
To insert the impeller cover assembly: place the impeller cover and gently push it down until it "close".
Note: For an optimal performance it is recommended to clean the Impeller cover assembly once a year. The motor should be thoroughly cleaned every three months. When all parts have been cleaned and thoroughly rinsed, reasonable this filter and replace onto aquacore. (See Quick Start Guide 2, 3 and 4.) Follow operating instructions to restart and prime core power. (See Power Filter Start-up.)
AVAILABLE SEPARATELY
Alternate Filter Inserts
We offer the following alternative chemical stage inserts as superior solutions to your filtration system.
Fluviol Ammonia Remover Filter Insert Ammonia removal is a natural on-exchange media designed to remove toxic ammonia as water passes over it. Controlling ammonia levels reduces stress on fish. Use this to provide a healthy environment when sedding up a new aquarium or maintaining one that contains a higher than average fish stock.
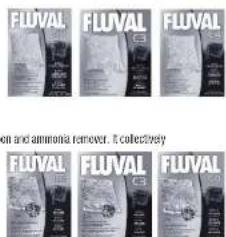
Fluval Zoo-Carb Filter Insert
Zeo Carb filler insert is a blend of premium activated carbon and ammonia removal. I collect every
emulates impurities, oocns and discovination, while simultaneously removing toxic ammonia, resulting in a crystal clear and healthy aquarium. Water quality is the most important aspect of keeping fish. Maintaining the optimum water quality will help you keep your fish healthy and happy, and make the aquarium a beautiful and exciting haven to your home.
NUTRAFIN WATER CARE PRODUCTS
Nutraflin Aqua Plus
Tap Water Conditioner makes tap water safe for fish.
NutraTin Cycle
Biological aqua-urium supplement introduces benchical
COCBIA


Q. What if the power filter motor doesn't start or makes a mechanical noise?
A. First check that all the filters' components have been correctly instated. Then check to make sure
the impeller blades are free moving on magnet assembly.
Q.Why wnt the power fitter motor re-start and performing titer insert maintenance?
A Make sure the unit has been plugged back into the power outlet and that all parts are thoroughly
Cean and repaced as cieed. See Power Hiner Naimnance)
Q.What should I do if the priming process doesn't occur?
A. All points are strictly
-Filter case in consistency:1
1. The code is complete, and with error
"II" time is correctly processed
The minimum water level inside the tags no more than 6 cm (2.25 m depth below the aquarium)
Q. Why is the water cloudy in my new aquarium?
A. Bacterial cloudiness may occur during the first week of a new aquarium set-up and may last up to
s weeks. If the condition persists, consult your local aquanum professional.
Q. What happens if I forget to clean my filter inserts?
A. IN THE PAPER, HIER A GAIN UNDOUBLED FOR DOING, THE HIER INHERS BECOME CLOTED WITH DADERS.
The accuracy of the filtration is very low, and the filter inserts require immediate cleaning or
reacemert [Seer hrrnrs Marlenent]
Q. WHEN SHOULD I OPERATE A REDUCED NOW?
A Reduced flow is most helpful during feeding times, or when the input suction or output stream is
too strong for small or delicate hair. (See How It Works — Palarmed Hairline System.)
Q. Why should I use only aquanum water to rinse my filter inserts after they are installed?
Most cities and counties of color chemicals are similar human bacteria in driving water for human consumption. These additives, white harmless to us, are very toxic to fish.
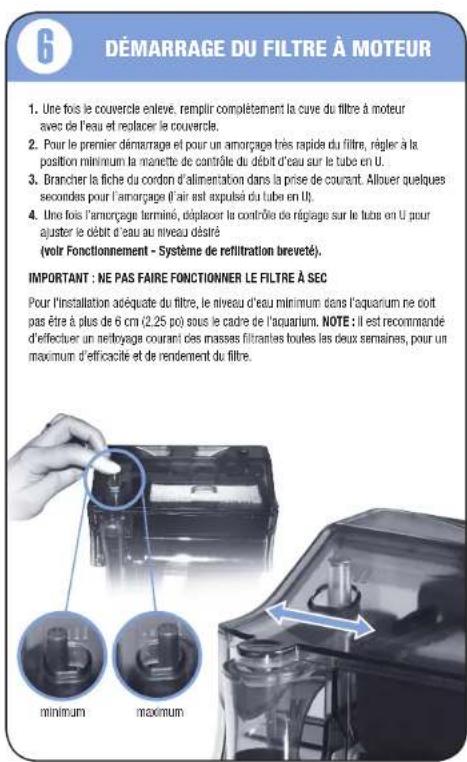
GUIDE DE DEMARRAGE RAPIDE DU FILTRÉ À MOTEUR FLUVALC

PIECES DE RECHANGE
Loudes pies pices act inalles ccomment