
PES-PD-SNI - Faucet FRANKE - Free user manual and instructions
Find the device manual for free PES-PD-SNI FRANKE in PDF.

| Product Type | Kitchen Faucet |
| Brand | Franke |
| Model | PES-PD-SNI |
| Mounting Hole Diameter | 35 mm (1 3/8 in) |
| Operating Pressure (Ideal) | 45 PSI / 3 bar / 300 kPa |
| Operating Pressure (Maximum) | 70 PSI / 5 bar / 500 kPa |
| Operating Pressure (Minimum) | 14.5 PSI / 1 bar / 100 kPa |
| Water Temperature (Ideal) | 60 °C (140 °F) |
| Water Temperature (Maximum) | 70 °C (158 °F) |
| Compliance | ASME A112.18.1 / CSA B125.1, NSF/ANSI/CAN 61-2020, NSF 372 |
| Package Contents | Aerator key, faucet assembly, lower O-ring, rubber washer, plastic flange, mounting plate, tightening nut, supply hoses, quick-connect fitting, weight |
| Installation | 35 mm hole required, do not use putty |
| Maintenance | Clean aerator regularly; avoid harsh detergents |
| Cartridge Replacement | Ceramic disc cartridge (ref. F4704); 2.5 mm hex key tool |
| Main Replacement Parts | Handle (F4701), cartridge cap (F4702), locking nut (F4703), cartridge assembly (F4704), aerator (F4402), quick-connect fitting (F4708), adjustable weight (F4709), mounting kit (F4710) |
| Customer Service | Phone: 1-800-626-5771; Email: ks-customerservice.us@franke.com |
Frequently Asked Questions - PES-PD-SNI FRANKE
User questions about PES-PD-SNI FRANKE
0 question about this device. Answer the ones you know or ask your own.
Ask a new question about this device
Download the instructions for your Faucet in PDF format for free! Find your manual PES-PD-SNI - FRANKE and take your electronic device back in hand. On this page are published all the documents necessary for the use of your device. PES-PD-SNI by FRANKE.
USER MANUAL PES-PD-SNI FRANKE
natural_image
Line drawing of two identical U-shaped kitchen sink fixtures with handles and shafts (no text or symbols)PES-PD-CHR PES-PD-MBK PES-PD-SNI PES-PDX-CHR PES-PDX-SNI
EN Installation manual Kitchen Faucet
Installation instructions 5
Cleaning and maintenance 7
Replacing the cartridge 7
General maintenance 7
Spare/replacement list 8
Contents in box
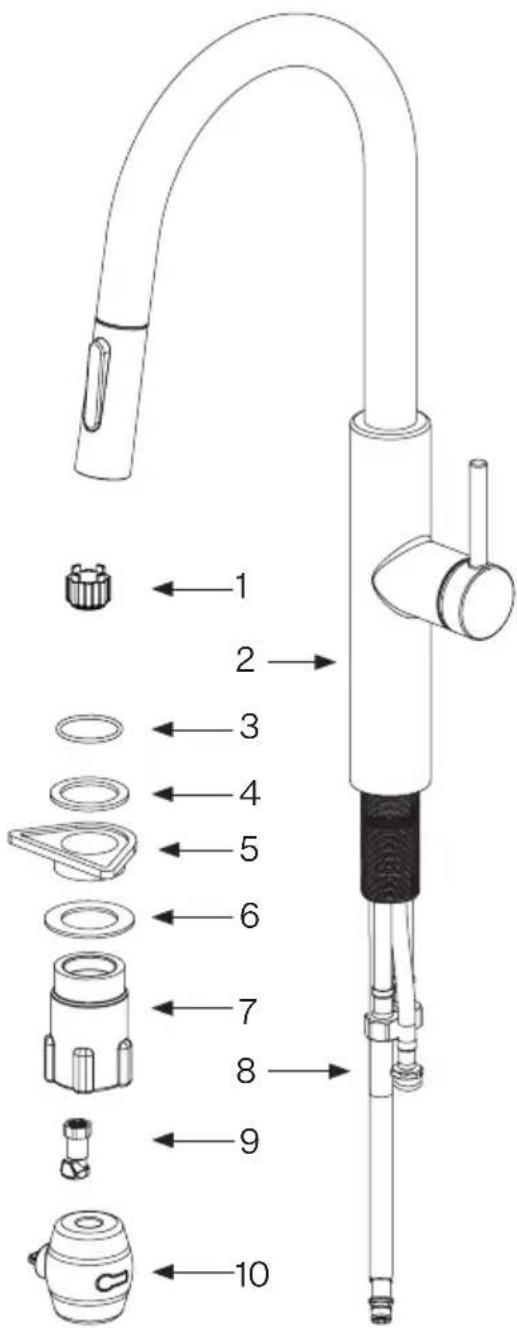
- Aerator Key
- Faucet Assembly
- Base-O-ring
- Rubber Washer
- Plastic Flange
- Fixing Plate
- Fixing Nut
- Supply Hoses
- Quick Connect Fitting
- Weight
Technical data
| Operating data Value | |
| Operating pressure (ideal) 45 PSI 3 bar 300 kPa | |
| Operating pressure (max.)* 70 PSI 5 bar 500 kPa | |
| Operating pressure (min.)* 14.5 PSI 1 bar 100 kPa | |
| Water temperature (ideal) 140°F 60°C | |
| Water temperature (max.) 158°F 70°C | |
| Hole Size For Faucet 1 3/8" | 35 mm |

Certifies this faucet complies with ASME A112.18.1 / CSA B125.1, NSF/ANSI/CAN 61-2020 (AB100 compliant, Q<1) & NSF 372. The faucet also complies with water usage requirements of the California Energy Commission and the US Department of Energy.
Installation instructions
- Remove all contents from the package and check for completeness.
- Turn off water supply.
- Cut a mounting hole 1 3/8" diameter (35 mm) in the desired mounting surface (if one isn't available).
- Ensure Base O-ring (2) is in place in the Faucet Base (1) (fig. 2A).
- Insert the faucet into the hole, hoses first (fig. 2B).

Attention: Base-O-Ring (2) should be sitting between the countertop and faucet base.
Do not use putty or other sealant at this location.
Notes: Solid surface installation: The countertop mounting surface needs to
be flat and free of debris; otherwise the faucet may not sit properly and could leak.

EN
- Install the mounting hardware to the mounting shank of the Faucet Base (1) underneath the mounting surface in the following order: Rubber Washer (3), Plastic Flange (4) and Fixing Plate (5) (fig. 2B).
- Secure the faucet by tightening the Fixing Nut (6) onto the mounting shank of the Faucet Base (1) hand tight (fig. 2B).
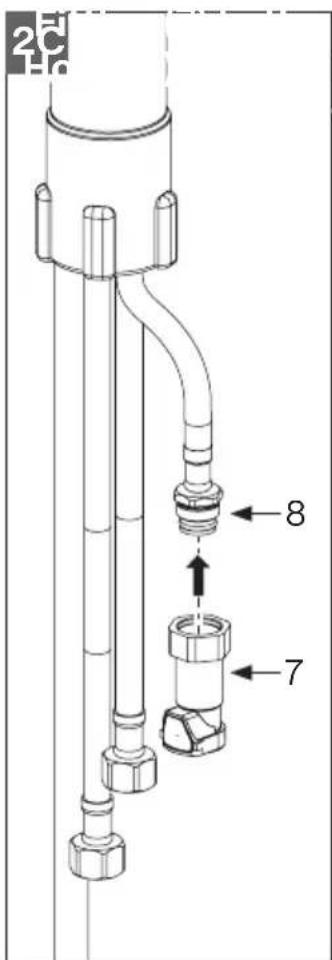
- Thread the Quick Connect Fitting (7) to the Spray Supply Hose (8) by hand - no tools (fig. 2C).
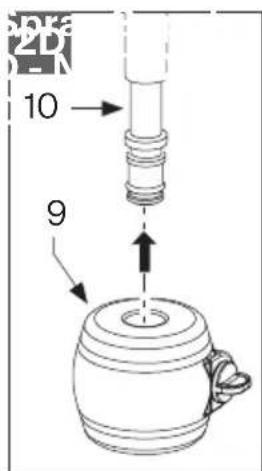
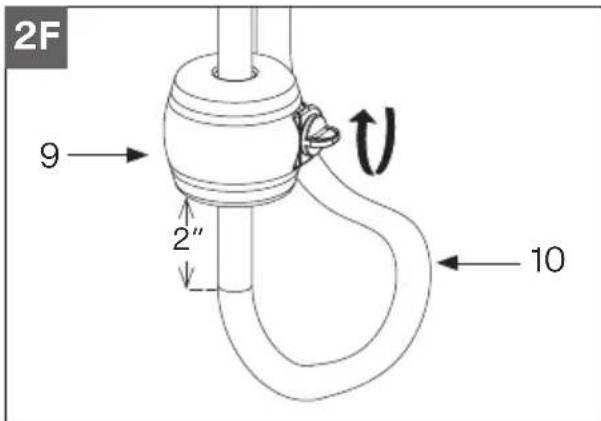
- Slide the Weight (9) onto the Spray Hose (10) and leave it loose (fig. 2D).
-
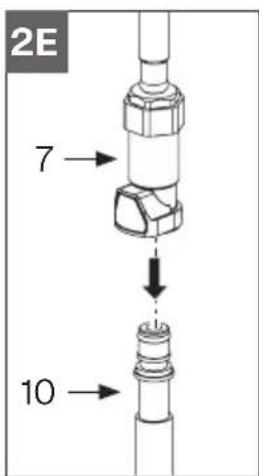
Connect the other end of the Quick Connect Fitting (7) to the end of the Spray Hose (10) simply by pressing it in until it clicks. To disconnect, press the button on the side of the Quick Connect Fitting (7) (fig. 2E).
-
Secure the Weight (9) approximately 2" (50 mm) above the bend in the bottom of the Spray Hose (10) by turning the adjustment knob clockwise by hand until it is snug (fig. 2F).
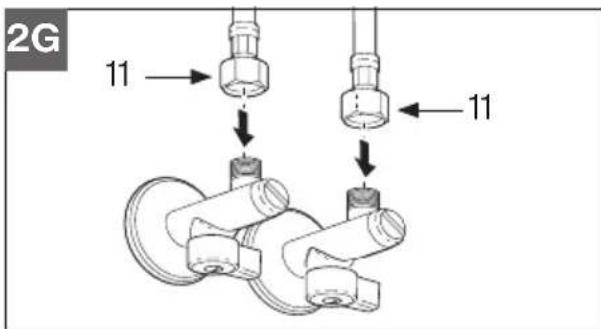
- Connect the Flexible Supply Hoses (11) to the water supply in the home (fig. 2G).
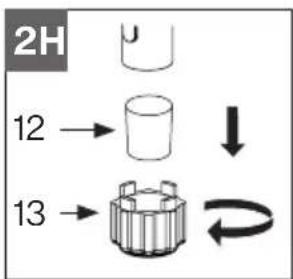
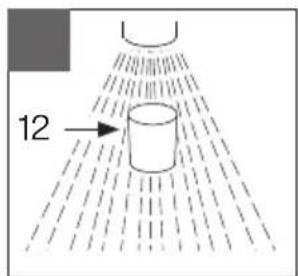
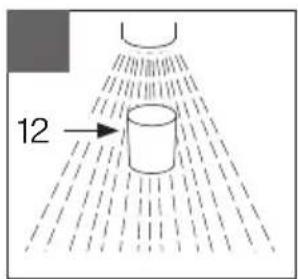
- Remove the Aerator (12) using the Aerator Key (13) (fig. 2H).
flowchart
graph TD
    A["2H"] --> B["12"]
    B --> C["13"]
    C --> D["↓"]
    D --> E["→"]
    E --> F["→"]
    F --> G["→"]
    G --> H["→"]
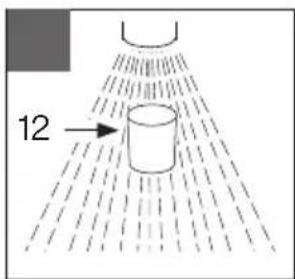
- Turn on water, flush the faucet and Aerator (12) to remove any debris and check for leaks (fig. 2l).
- Reinstall the Aerator (12) and ensure everything is functioning property.
Cleaning and maintenance
Replacing the cartridge
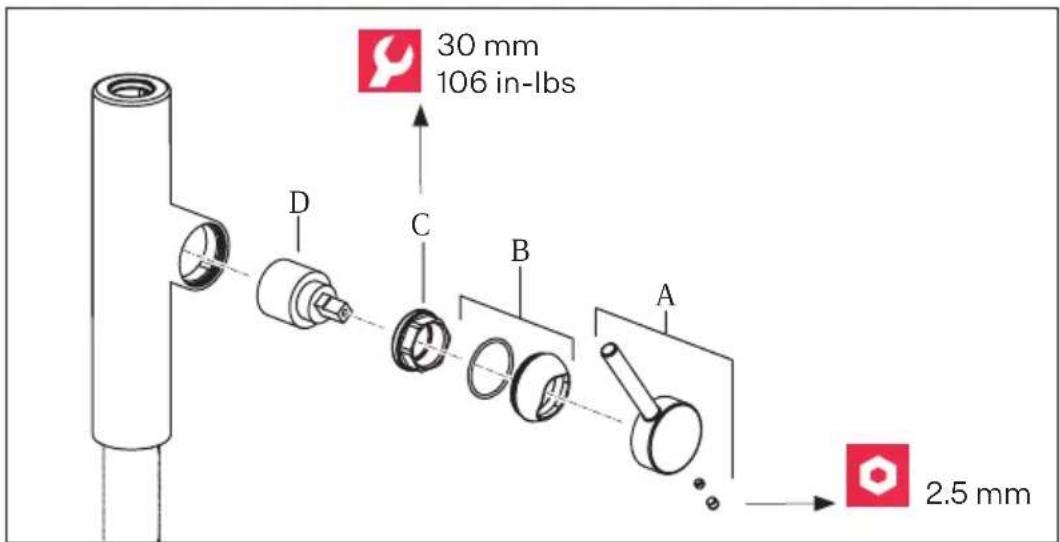
- Shut off the water supply to the faucet.
- Turn on the faucet briefly to relieve any pressure inside the faucet.
- Move the faucet handle to the "OFF" position.
- Remove handle set screw cover from the handle assembly.
- Remove the set screw from the handle assembly using a 2.5 mm hex key.
- Pull the Lever Handle (A) and Cartridge Cap (B) from the faucet body.
- Unscrew the cartridge Lock Nut (C).
- Lift ceramic Disc Cartridge (D) from the body and replace it with a new one. Ensure the two lugs on bottom of the cartridge sit properly in the allocated holes at the base of the body.
- Re-assemble faucet in reverse order.
- Test for leakage.
General maintenance
Clean aerator periodically for any buildup.
Do not use harsh detergents, solvents, chemical agents, metallic sponges etc. that could harm the surface and damage the finish. Clean only with a soft sponge and soapy water.
Do not store chemicals or cleaning agents in the immediate vicinity of the faucet and connection hoses. Chemical vapors could cause damage.
Spare/replacement list
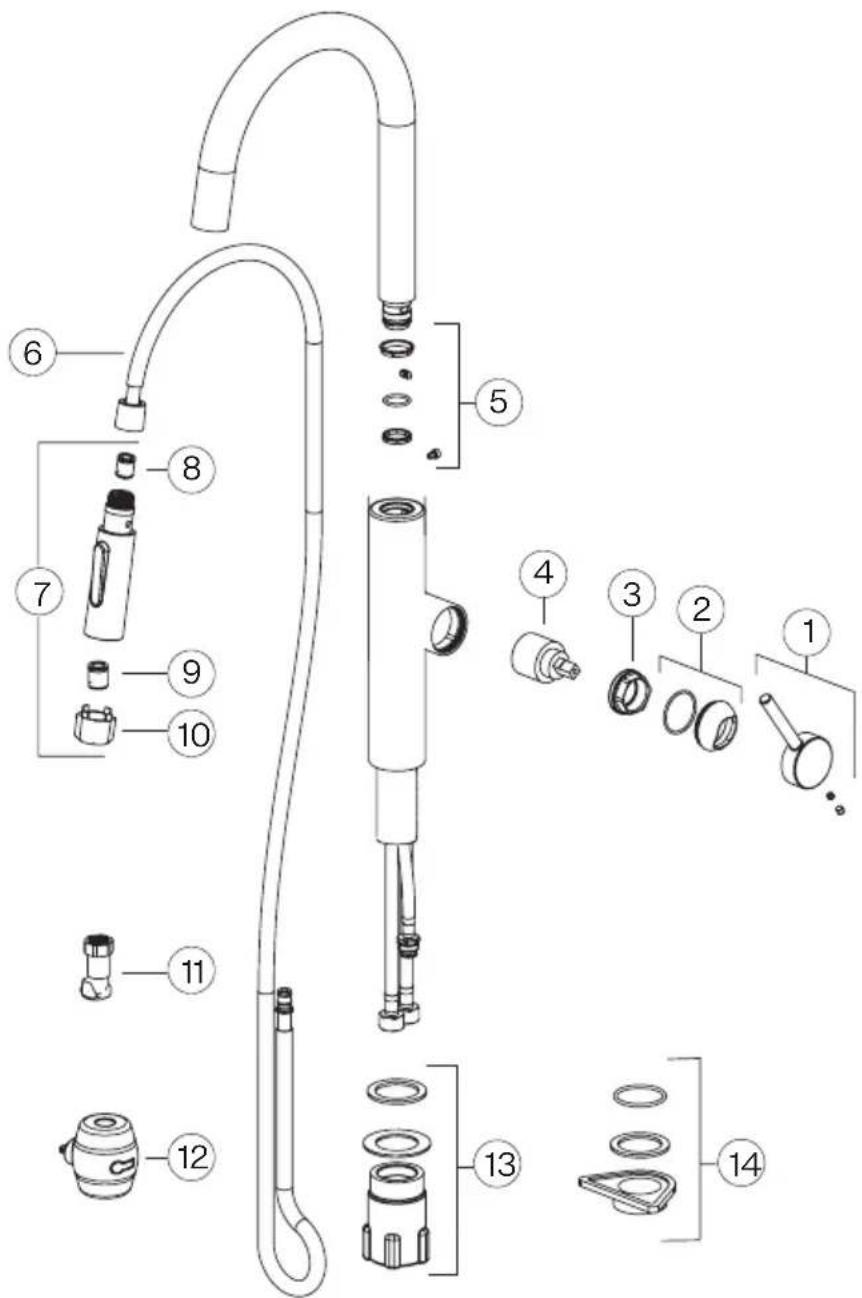
| 1 | F4701* Handle Assembly | 8 | F4707 Check Valve |
| 2 | F4702* Cartridge Cap | 9 | F4402 Inner Aerator |
| 3 | F4703 Lock Nut | 10 | F4312 Aerator Key |
| 4 | F4704 Cartridge Assembly | 11 | F4708 Quick Connect Fitting |
| 5 | F4705 Spout Bushing Kit | 12 | F4709 Adjustable Weight |
| 6 | F4706 Pull Out Hose | 13 | F4710 Fixing Kit |
| 7 | F4712* Spray Head Assembly | 14 | F4711 Mounting Kit |
* Must Specify Finish
For any further information about our products, about the installation of them or about the warranty please contact our customer service department:
Franke Home Solutions
North America, LLC
800 Aviation Parkway
Smyrna, TN 37167, USA
Phone: 1-800-626-5771
HS-Warranty.US@Franke.com
Franke Kindred Canada Ltd.
1000 Franke Kindred Way
Midland, ON LR4 4K9
Phone: 1-866-687-7465
HS-Warranty.CA@Franke.com

Warranty website: https://www.franke.com/us/en/hs/support/warranty.html

Franke Home Solutions
North America, LLC
800 Aviation Parkway
Smyrna, TN 37167, USA
Franke Home Solutions
North America, LLC
800 Aviation Parkway
Smyrna, TN 37167, USA
Téléphone: 1-800-626-5771
HS-Warranty.US@Franke.com
Franke Kindred Canada Ltd.
1000 Franke Kindred Way
Midland, ON LR4 4K9
Téléphone: 1-866-687-7465
HS-Warranty.CA@Franke.com

Site Web de la garantie : https://www.franke.com/us/en/hs/support/warranty.html

Canada
Franke Kindred Canada Ltd.
1000 Franke Kindred Way
Midland, ON LR4 4K9
Phone: 1-866-687-7465
USA, Mexico
Franke Home Solutions North America, LLC
800 Aviation Parkway
Smyrna, TN 37167, USA
Phone: 1-800-626-5771

Brand : FRANKE
Model : PES-PD-SNI
Category : Faucet