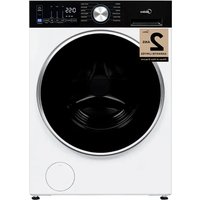
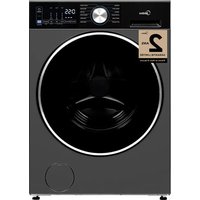
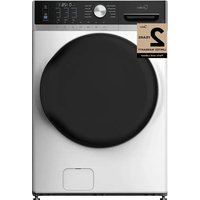
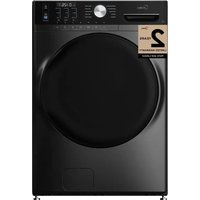
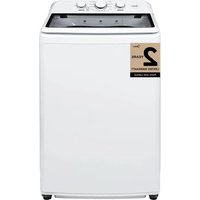
MLTW51A2BWW - Washing machine MIDEA - Free user manual and instructions
Find the device manual for free MLTW51A2BWW MIDEA in PDF.

| Product Type | Top Load Washer |
| Brand | Midea |
| Model | MLTW51A2BWW |
| Capacity | 5.2 cu. ft. (approx. 147 L) |
| Power Supply | 120 V~, 60 Hz, 15 A |
| Water Pressure | 14 – 116 psi (100 – 800 kPa) |
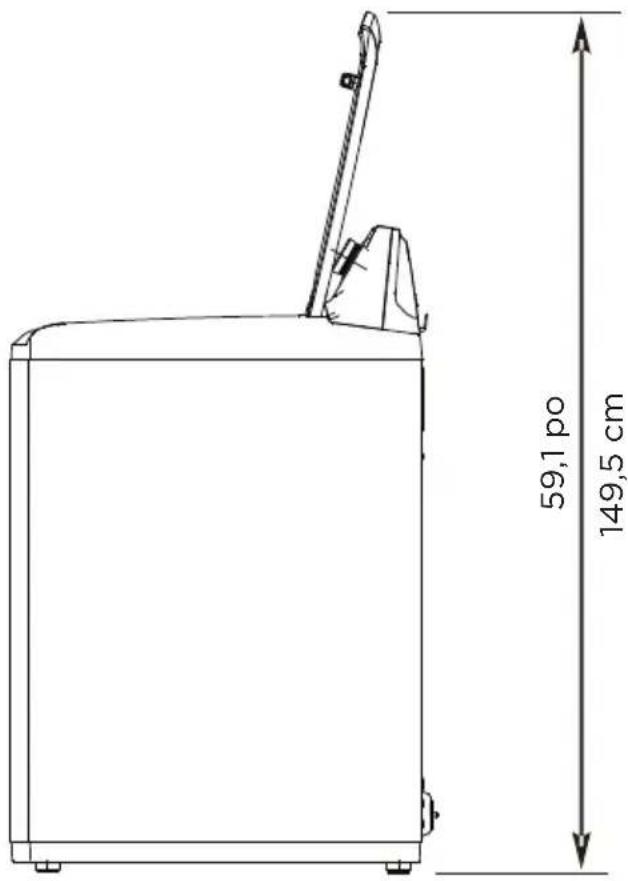
| Dimensions (H × W × D) | 112.0 × 68.6 × 99.0 cm |
| Approximate Weight | Approximately 65 kg (not provided by manufacturer) |
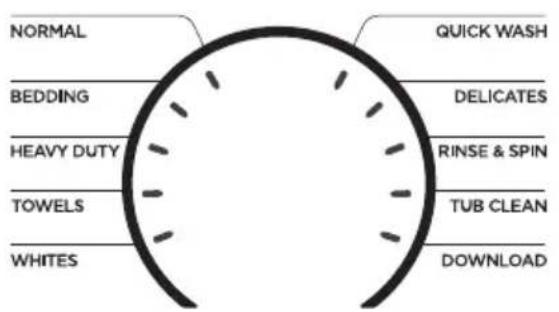
| Wash Cycles | Normal, Bedding, Heavy Duty, Towels, Whites, Quick Wash, Delicates, Rinse & Spin, Tub Clean, downloadable cycles |
| Options | Temperature, Soil Level, Water Level, Extra Rinse, Fabric Softener, Spin Only, Signal, Delay Start (up to 24 h), My Cycle |
| Smart Features | Built-in Wi-Fi, MSmartHome app, remote control |
| Safety | Control Lock (child safety), lid lock, stop if lid open, grounding |
| Maintenance | Tub Clean cycle, exterior and interior cleaning, hose filter |
| Error Codes | E1 (fill), E2 (drain), E3 (lid), E4 (unbalance), E5 (level), F2 (memory), F5 (load sensor), F8 (water sensor), Fd (lock), C9 (circuit), CL (child lock with lid) |
| Warranty | 2-year limited, 3-month extension upon registration |
| Installation Requirements | Hot/cold water connection, level, drain at 122 cm min, clearance: sides 2.5 cm, rear 15.2 cm, top 61 cm |
Frequently Asked Questions - MLTW51A2BWW MIDEA
User questions about MLTW51A2BWW MIDEA
0 question about this device. Answer the ones you know or ask your own.
Ask a new question about this device
Download the instructions for your Washing machine in PDF format for free! Find your manual MLTW51A2BWW - MIDEA and take your electronic device back in hand. On this page are published all the documents necessary for the use of your device. MLTW51A2BWW by MIDEA.
USER MANUAL MLTW51A2BWW MIDEA
Before using this product, please read this manual carefully and keep it for future reference.
The design and specifications are subject to change without prior notice for product improvement. Consult with your dealer or manufacturer for details.
version A
USER MANUAL & INSTALLATION INSTRUCTIONS
natural_image
Line drawing of a rectangular kitchen appliance with a lid and base (no text or symbols)Dear user
THANK YOU for letting Midea help you “make yourself at home.” This manual is part of our commitment to your total satisfaction. Please read this manual carefully before use and keep it in a convenient place for future reference.
To help us serve you better, please consider registering your product using our convenient Midea app Msmartlife, by visiting www.midea.com or by texting a picture of your proof of purchase to 1-844-224-1614.
SAFETY INSTRUCTIONS ....4
FEATURES 11
Package contents 11
Main components ....12
OPERATION REQUIREMENTS ...... 13
Electrical requirements ....13
Water requirements ....14
Drainage requirements ....14
INSTALLATION INSTRUCTIONS 15
Unpacking your washer ....15
Choosing a location ....16
Tools you will need 18
Connecting the water hoses 19
Connecting the drain hose 22
Level your washer 23
Power on....24
Run a test cycle 25
WASHER USE ....26
Control panel....26
Washing a load of laundry 29
Setting the control lock 33
Washer options and settings....34
Smart control 35
WASHER CARE ....38
Cleaning and Maintenance 38
BEFORE YOU CALL FOR SERVICE ....40
Troubleshooting tips....40
Error codes 42
WARRANTY....44
READ AND KEEP THESE INSTRUCTIONS FOR FUTURE REFERENCE
This manual contains important information on the installation, use, and care of your appliance. Please read this manual carefully before installation and operation of this machine to prevent injury and property damage.
Warnings and Important Safety Instructions in this manual DO NOT cover all possible conditions and situations that may occur. It is your responsibility to use common sense, caution and care when installing, maintaining and operating your washer.
CAUTION RISK OF ELECTRIC SHOCK DO NOT OPEN

SAFETY INSTRUCTIONS
YOUR SAFETY AND THE SAFETY OF OTHERS ARE VERY IMPORTANT
To prevent injury to the user or other people and property damage, the instructions shown here must be followed. Incorrect operation due to ignoring of instructions may cause harm or damage, including death.
The level of risk is shown by the following indications.
This indicates that hazards or unsafe practices may cause serious personal injury or death.
To reduce the risk of fire, explosion, electric shock or personal injury when using your washing machine, you SHOULD follow these basic safety precautions.

This indicates that hazards or unsafe practices may cause minor personal injury or property damage.

This symbol indicates that there are important operating and maintenance instructions in the literature accompanying your washing machine.

WARNING
State of California Proposition 65 Warnings.
The California Safe Drinking Water and Toxic Enforcement Act requires the Governor of California to publish a list of substances known to the State of California to cause cancer, birth defects or other reproductive harm and requires businesses to warn of potential exposure to such substances. This product contains a chemical known to the State of California to cause cancer, birth defects or other reproductive harm. This appliance can cause low-level exposure to some of the substances listed, including benzene, formaldehyde and carbon monoxide. Cancer and Reproductive Harm - www.P65Warnings.ca.gov.

WARNING
Do not store or use gasoline or other flammable vapors and liquids in the vicinity of this or any other appliance.
IMPORTANT SAFETY INSTRUCTIONS

WARNING
- Read all instructions before using the appliance.
- Use this appliance only for its intended purpose as described in this Owner's Manual.
- Before use, the appliance must be properly installed as described in this manual.
- ALWAYS follow the fabric care instructions supplied by the garment manufacturer.
- Do not wash articles that have been previously cleaned in, washed in, soaked in, or spotted with gasoline, dry-cleaning solvents, other flammable or explosive substances as they give off vapors that could ignite or explode.
- Do not allow children to play on or in the appliance. Close supervision of children is necessary when the appliance is used near children.
- Before the appliance is removed from service or discarded, remove the lid of the washing compartment.
- Do not reach into the appliance if the tub is moving.
- Do not install or store this appliance where it will be exposed to the weather or freezing temperatures.
- Do not tamper with the controls.
- Do not repair or replace any part of the appliance or attempt any servicing unless it is specifically recommended in the user maintenance instructions or in published user repair instructions that you understand.
- Hydrogen gas is explosive. If the hot water system has not been used for two weeks or more, before using a washer, turn on all hot water faucets and let the water flow from each for several minutes. This will release any accumulated hydrogen gas. The gas is flammable, so do not smoke or use an open flame during this time.
- Keep the area underneath and around your appliance free of combustible materials (lint, paper, rags and so on), gasoline chemicals, and other flammable vapors and liquids.
- Do not place items exposed to cooking oil in your washer. Items contaminated with cooking oil may contribute to a chemical reaction that could cause a load to catch fire.
- This washer is not designed for maritime use or for mobile installations such as in RVs aircraft and other mobile platforms.
- Turn off the water faucets and unplug the washer if the machine is to be left for an extended period of time, such as during vacations.
- Packaging material can be dangerous for children. There is a risk of suffocation! Keep all packaging away from children.
- Always check the inside of the washer for foreign objects before loading laundry. Keep the lid closed when not in use.

WARNING
- Plug the power cord into an AC 120V/60Hz wall socket rated at 15 amps or higher. Use the socket for this washer only. Do not use an extension cord.
- Sharing a wall socket with another appliance, using a power strip, or extending the power cord may result in electric shock or fire.
- Do not use an electric transformer. It may result in electric shock or fire.
- Make sure that the power voltage, frequency and current match the product's specifications. Failing to do so may result in electric shock or fire.
- Remove all foreign substances such as dust or water from the power plug terminals and contact points using a dry cloth on a regular basis.
- Unplug the power plug and clean it with a dry cloth.
- Failing to do so may result in electric shock or fire.
- Plug the power plug into the wall socket in the right direction so that the cord runs towards the floor.
- If you plug the power plug into the socket in the opposite direction, the electric wires within the cable may be damaged and this may result in electric shock or fire.
- Plug the power plug into the wall socket firmly. Do not use a damaged power plug or loose wall socket, because this may result in electric shock fire.
- Do not pull or excessively bend the power cord. Do not twist or tie the power cord.
- Do not hook the power cord over a metal object. Place a heavy object on the power cord, insert power cord between objects, or push the power cord into the space behind the appliance, because this may result in electric shock or fire.
-
Do not pull the power cord when unplugging the power plug.
-
Unplug the power plug by holding the plug.
-
Failing to do so may result in electric shock or fire.
-
If the power plug or power cord is damaged, contact your nearest service center.
- Do not install on carpet. Install the washer on a level and solid floor that can support its weight. Failure to do so may result in abnormal vibration, noise or problems with the product.
- The washer is heavy. Two or more people may be needed to install and move the appliance. Failure to do so may result in bodily or other injuries.
- Store and install the washer where it will not be exposed to temperatures below freezing or exposed to outdoor weather conditions. Failure to do so may result in serious leak damage.
- Position the appliance so that the power plug is easily accessible. Failure to do so may result in electric shock or fire due to an electrical short circuit.
- Failure to follow all of the safety warnings in this guide may result in property damage or injury to persons.
Use and Maintenance warnings and Precaution
- If the appliance is flooded, cut the power immediately and contact your nearest service center.
- If the appliance emits a strange noise, a burning smell or smoke, unplug the power plug immediately and contact your nearest service center. Failure to do so may result in electric shock or fire.
- In the event of a gas leak (such as propane or LP gas) ventilate the area immediately. Do not turn any appliance or light on or off.
- Do not use a ventilating fan.
- A spark may result in an explosion or fire.
-
Do not force the washer lid open while the washer is operating (hightemperature washing, drying or spinning).
-
Water flowing out of the washer may cause burns or cause the floor to be slippery. This may result in injury.
-
Forcing the lid open can damage the product or cause injury.
-
Make sure to remove the packaging (sponge, styrofoam) attached to the bottom of the washer before using it.
- Do not insert your hand or a metal object under the washer. This may result in injury.
- Do not attempt to operate this appliance if it is damaged, malfunctioning, partially disassembled or has missing or broken parts, including a damaged cord or plug. This may result in electric shock, fire or death.
- Do not touch the power plug with wet hands. This may result in electric shock.
- Do not turn the appliance off by unplugging the power plug while the washer is in operation. Plugging the power plug into the wall socket again may cause a spark and result in electric shock or fire.
- Keep all packaging material well out of the reach of children, as packaging materials can be dangerous to children. If a child places a bag over his or her head, he or she may suffocate.
- Do not let children or infirm persons use this washer unsupervised. Failure to do so may result in electric shock, burns or injury.
-
Do not attempt to repair, disassemble or modify the appliance yourself.
-
Do not use any fuse (such as copper, steel wire etc.) other than the standard fuse.
- If you need to repair or reinstall the appliance, contact your nearest service center.
-
Failure to do so may result in electric shock, fire, problems with the product or injury.
-
If any foreign substance such as water enters the appliance in any area other than the tub, unplug the power plug and contact your nearest service center. Failure to do so may result in electric shock or fire.
-
If the water supply hose comes loose from the faucet and floods the appliance, unplug the power plug. Failure to do so may result in electric shock or fire.
-
Do not mix chlorine bleach with ammonia or acids such as vinegar. Incorrect usage can produce poisonous gas, resulting in serious injury.
- Do not reach into the washer while parts are moving. Before loading, unloading or adding items, press the Start Pause button and allow the tub to come to a complete stop before reaching inside. Failure to do so may result in electric shock injury or fire.
- Do not allow children to play on or in the washer. Close supervision of children is necessary when the washer is used near children. As children grow, teach them the proper, safe use of all appliances. Failure to do so may result in serious injury.
- Keep laundry products out of reach of children. Observe all warnings on product labels and follow them. Failure to do so may result in serious injury.
- Disconnect this appliance from the power supply before attempting any user maintenance. Pressing the Power button does not disconnect this appliance from the power supply. Failure to do so may result in electric shock, injury or fire.
- Do not clean the appliance by spraying water directly onto it.
- Do not use benzene, thinner or alcohol to clean the appliance. This may result in discoloration, deformation, damage, electric shock or fire.
- Unplug the power plug when the appliance is not being used for long periods of time or during a thunder/lightning storm. Failure to do so may result in electric shock or fire.
- Keep hands and foreign objects clear of the lid and latch area when closing the lid. Failure to do so may result in personal injury.
- If the washer is contaminated by a foreign substance such as detergent, dirt, or food waste, unplug the power plug and clean the washer with a damp, soft cloth. Failure to do so may result in discoloration, deformation. Damage or rust.
- The clear portion of the lid can be broken by a strong impact. Take care when using the washer. If the clear portion is cracked or broken, it may result in injury.
- After a water supply failure or when reconnecting the water supply hose, open the faucet slowly.
- Open the faucet slowly after a long period of non-use. The air pressure in the water supply hose or the water pipe may result in damage to a part or in water leakage.
- If a drain error occurs during an operation, check if there is a draining problem. If the washer is used when it is flooded because of a draining problem, it may result in electric shock or fire due to an electrical short circuit. Do not insert your hand or a metal object under the washer. This may result in injury.
- Insert laundry into the washer completely so that the laundry does not get caught in the lid. If laundry gets caught in the lid, it may result in damage to the laundry or the washer, or result in water leakage.
- Make sure that the faucet is turned off when the washer is not being used.
- Make sure that the water supply hose connectors are properly tightened. Failure to do so may result in property damage or injury.
-
Open the faucet and check if the water supply hose connector is firmly tightened and that there is no water leaking before using the product. If the water supply hose connectors are loose, it may result in water leakage.
-
Do not stand on top of the appliance or place objects (such as laundry, lighted candles, lighted cigarettes, dishes, chemicals, metal objects, etc.) on the appliance. This may result in electric shock, fire, problems with the product, or injury.
- Do not operate the appliance with wet hands. This may result in electric shock.
- Do not spray volatile material such as insecticide onto the surface of the appliance. As well as being harmful to humans, it may also result in electric shock, fire or problems with the product.
- Do not place an object that generates an electromagnetic field near the washer. This may result in injury due to a malfunction.
- Since the water drained during a high temperature wash or drying cycle is hot, do not touch the water. This may result in burns or injury.
- Do not wash, spin or dry water-proof seats, mats or clothing.
- Do not wash thick, hard mats even if the washer mark is on the care label. This may result in injury or damage to the washer, walls, floor or clothing due to abnormal vibrations.
- Do not operate the washer when the detergent dispenser is removed. This may result in electric shock or injury due to water leakage.
- Do not insert your hand into the detergent dispenser after opening it. This may result in injury because your hand may be caught.
- Do not place any non-laundry objects, such as shoes, food waste or animals into the washer. This can cause abnormal vibrations that can damage the washer, and in the case of pets, cause severe injury or death.
- Do not press the buttons using sharp objects such as pins, knives, or fingernails. This may result in electric shock or injury.
- Do not wash laundry contaminated by oils, creams or lotions usually found in skin-care shops or massage clinics. This may result in the rubber seal becoming deformed and water leakage.
- Make sure that the water inlet pipe is connected and the tap is opened before washing clothes.
- Do not leave metal objects (safety pins, hair pins, and so on) or bleach in the tub for long periods of time. This may cause the tub to rust.
- If rust appears on the surface of the tub, apply a neutral cleansing agent to the surface and use a sponge to clean it. Never use a metal brush.
- Do not use hot water from water cooling/heating devices. This may result in problems with the washer.
- Do not use natural hand-washing soap in the washer. If it hardens and accumulates inside the washer, it may cause problems with the product, discoloration, rust or bad odors.
- If using a washing net with this machine (not provided), do not wash laundry items such as bedding in the washing net. Doing so may result in injury due to abnormal vibrations. Place only smaller items such as lace socks and lingerie in the washing net.
- Do not use hardened powdered detergent. If it accumulates inside the washer, it may result in water leakage.
- Do not wash throw rugs or doormats. Doing so may cause sand to accumulate inside the washer, resulting in mechanical problems. SAVE THESE INSTRUCTIONS.

WARNING
Grounding/Earthing
- This appliance must be properly grounded.
- Do not ground the appliance to a gas pipe, plastic water pipe or telephone line.
- Improper grounding may result in electric shock, fire, explosion or problems with the product.
- Never plug the power cord into a socket that is not grounded correctly. Make sure that the socket you use is grounded in correctly. Make sure that the socket you use is grounded in accordance with local and national codes.

WARNING
Grounding/Earthing
- Do not install this appliance near a heater or inflammable material.
- Do not install this appliance in a humid, oily or dusty location, or in a location exposed to direct sunlight or water (rain drops).
- Do not install this appliance in a location where gas may leak. Failure to do so may result in electric shock or fire.
- If the washer is moved to a new location, have it checked and reinstalled by a qualified service technician. Failure to follow this warning may result in electric shock or fire.
- Do not pull power cord or drain outlet hose to move appliance to desired location place.
FEATURES
Package Contents
Make sure that the following items came with your washer
natural_image
Simple line drawing of an arched pipe or clamp with a handle (no text or symbols)Drain Hose Guide
natural_image
Stacked document pages with a black bookmark and white cover (no visible text or symbols)Manual
Tie (x1)
Filter (x2)
NOTE:
- Use the filters to replace the rubber washers in the water hoses (faucet sides).
Main Components
Electrical requirements

WARNING
To reduce the risk of fire, electric shock, or injury to persons, read the SAFETY INSTRUCTIONS before operating this appliance.
Use a 120 Volt, 60Hz, 15 amp fuse or circuit breaker. We recommend an individual branch circuit that serves only your washer.

WARNING
Never use an extension cord.
Electrical grounding is required for your washer.
You must ground your washer. In the event of a malfunction or breakdown, grounding reduces the risk of electric shock by providing a path of least resistance for the electric current.
Your washer is equipped with a power cord with a three-pronged grounding plug for use in a correctly installed and grounded outlet.
The outlet must be correctly installed and grounded in accordance with all local codes and ordinances.

WARNING
- You are responsible for providing adequate electrical services for your washer.
- An incorrectly connected equipment-grounding conductor can increase the risk of electrical shock. Check with a qualified electrician or serviceperson if you are not sure whether your washer is grounded correctly.
- Do not modify the power cord plug that came with your washer. If the plug does not fit the outlet, have the correct type outlet installed by a qualified electrician.
- To prevent unnecessary risk of fire, electrical shock or personal injury, all wiring and grounding must be done in accordance with the National Electrical Code ANSI/FNPA, No.70 Latest Revision and local codes and ordinances.
- Never connect the ground wire to plastic plumbing lines, gas lines or hot water pipes.
- Failure to closely follow these instructions may result in an abnormal vibrating and out-of-balance condition that could result in physical injury, property damage, and/or appliance damage.
Water requirements
To fill your washer in the correct amount of time, the water pressure needs to be between 14 and 116 psi (100 to 800 kPa).
If the water pressure is less than 14 psi (100 kPa):
- The water valve may fail or may not shut off completely.
- The time it takes to fill your washer may be longer than the time your washer controls allow. Your washer will turn off and report an error. A time-limit is built into the controls to prevent flooding in your home if a hose becomes loose.
- Water inlet hoses must be purchased separately. You can buy inlet hoses in various lengths up to 8 ft. (240 cm).
To avoid the possibility of water damage:
- Make sure that the water faucets are easily accessible.
- Turn off the faucets when you are not using your washer.
- Periodically check to make sure that water is not leaking from the water hose fittings.
Drainage requirements
The recommended height for the drain standpipe is 48 in. (122 cm).
The drain hose must be routed through the drain hose clip to the standpipe.
The standpipe must be large enough to accept the outside diameter of the drain hose.
INSTALLATION INSTRUCTIONS
Unpacking your washer

WARNING
- Packing materials can be dangerous to children. Keep all packing materials (plastic bags, polystyrene, and so on) well out of the reach of children.
- Do not operate your washer on the foam base cushion. Doing so will result in serious vibration, which could cause equipment damage or result in physical injury.
- Certain internal parts are intentionally not grounded and may present a risk of electric shock only during servicing.
Service Personnel - Do not contact the following parts while the appliance is energized: Electrical Valve, Drain Pump and Main Motor and Retractor.
Remove the packing box and lift the washer up and away from the foam base cushion. Open the lid of the washer to take out all accessories including the protective foam.
Choosing a location

WARNING
- Do not install your washer in areas where water may freeze, because your washer always retains some water in its water valve, pump and hose areas. Frozen water can damage the valve, pump, hoses and other components.
- Never install on a platform or weakly supported structure.
For best performance, you must install your washer on a solid, level floor.
Wooden floors may need to be reinforced to minimize vibration or unbalanced load situations.
Carpeting and soft tile surfaces can contribute to excessive vibration, which can cause your washer to move slightly during the spin cycle.
Washer dimensions and installation measurements
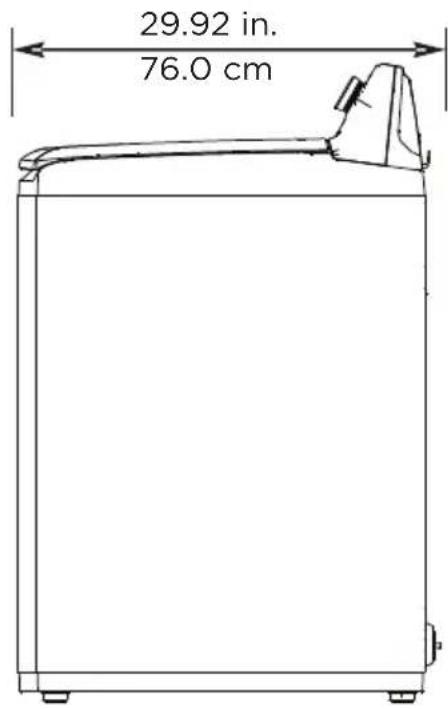
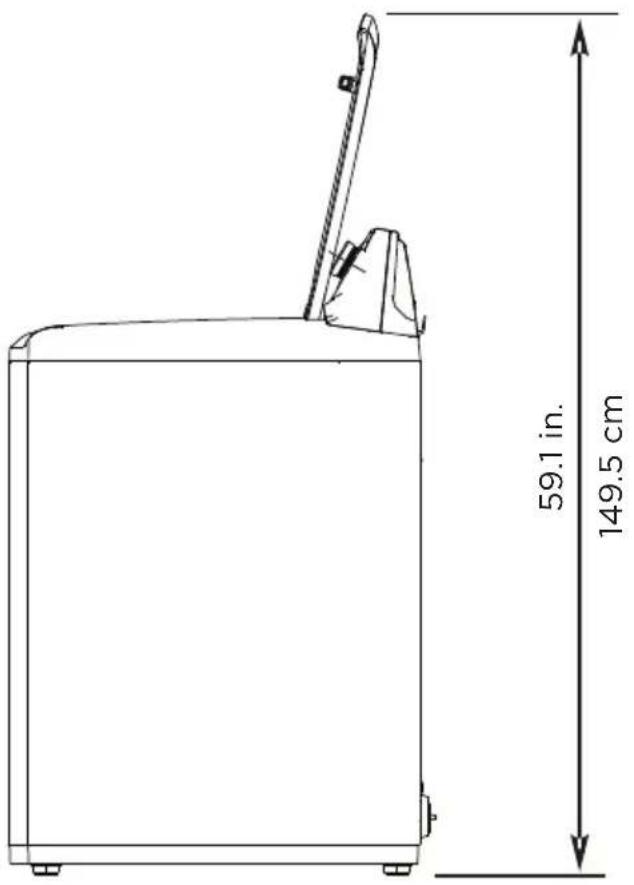
* Required spacing
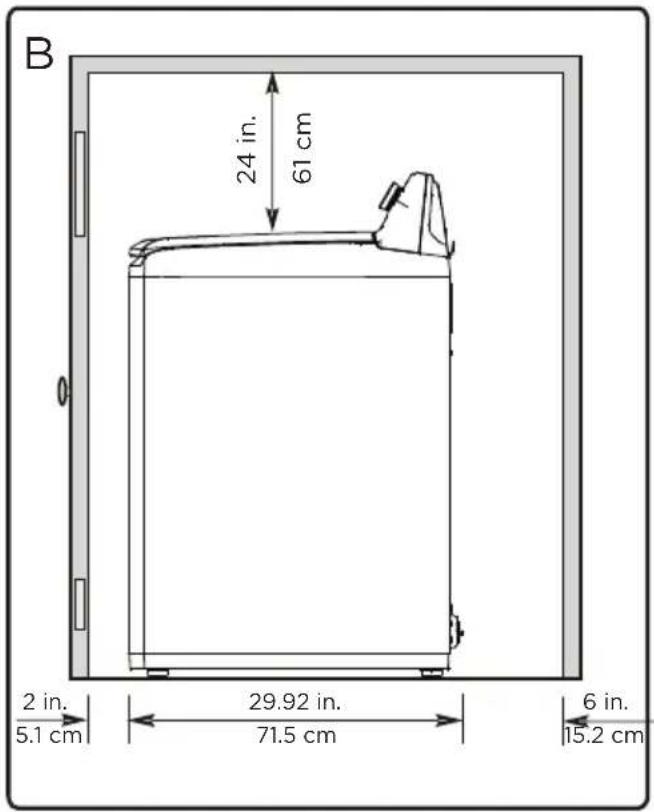
Installing in an alcove or closet
Minimum clearances between your washer and adjacent walls or other surfaces are:
• Either side: 1 in. (2.5 cm)
- Rear: 6 in. (15.2 cm)
- Closet Front: 2 in. (5.1 cm)
- Top: 24 in. (61 cm)
- Gap between the end of water valve and the wall: 6 in. (15.2 cm)
If you install your washer and dryer side-by-side in a closet, the closet front must have an unobstructed air opening of at least 72 square inches (465 square cm).
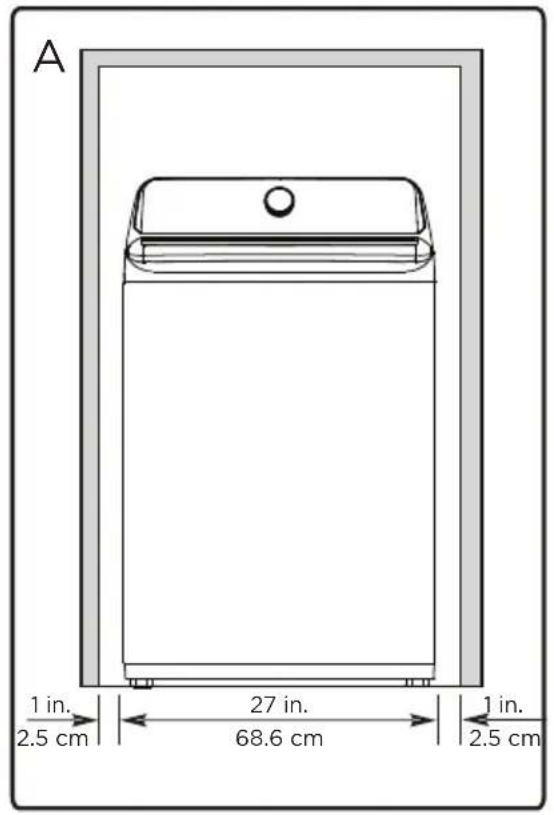
A. Recessed area
B. Side view - closet or confined area

WARNING
- Appliance is located on a hard, level surface without carpeting or soft flooring that can obstruct ventilation.
• Is away from direct sunlight. - Has adequate ventilation.
• Is not exposed to freezing temperatures (32 F or 0°C).
• Is away from heat sources such as oil or gas. - Has enough space so that the washer does not rest on its power cord.
Tools you will need
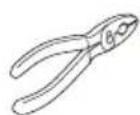

Pliers Level Adjustable
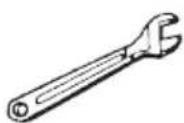
wrench that opens to 1" (25 mm)
Connecting the water hoses
NOTE: The water supply hoses are not supplied with your washer and must be purchased separately.

Caution
- Use new water supply hoses. Using old hoses can result in leakage or overflow that can damage your property.
-
Do not connect multiple water supply hoses together to increase the length of the hose. Hoses connected this way can leak and cause electrical shock. If a hose is too short, replace the hose with a longer, high-pressure hose.
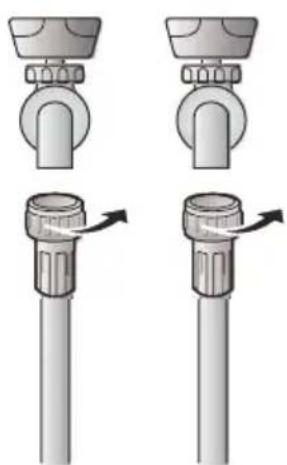
-
Make sure that there are rubber washers inside the fittings at both ends of each new water hose. Remove the rubber washers in faucet side and replace with filters. Installing the water supply hoses without rubber washers can cause water leakage.

natural_image
Diagram showing two types of optical lenses with arrows pointing to each lens (no text or labels)- Tighten the hose and faucet fittings by hand until they are snug, then tighten them an additional two-thirds of a turn with pliers or a wrench. Pull the water supply hoses downwards to make sure that they are connected securely.
natural_image
Illustration of a three-step mechanical assembly with no text or symbols
Caution
Do not overtighten the fittings or apply tape or sealant to the faucets or water supply intake. This can damage the fittings.
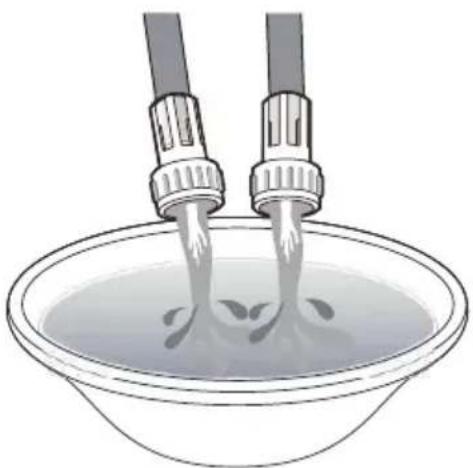
- Place the unconnected ends of the hoses into a bucket and turn on the faucets connected to the water supply hoses for 10 or 15 seconds to remove any foreign substances. Turn off the faucets.
natural_image
Illustration of two hairless sensors pouring liquid into a bowl (no text or symbols)- Connect the ends of the water supply hoses to the water supply intake connections at the top of the washer. Make sure that the rubber washers are in place. The water supply hose connected to the hot faucet must be connected to the hot water supply intake and the water hose connected to the cold faucet must be connected to the cold water supply intake.
NOTE: If you do not want to use the hot water supply hose, insert a water intake cap into the hot water supply intake hole. In this case you must select the Tap Cold option for the water temperature.
NOTE: No intake cap is provided with your washer. It must be purchased separately.
- Tighten the fittings by hand until they are snug, and then tighten them an additional two-thirds of a turn with a pliers.
natural_image
Technical illustration of a pliers tool with a threaded component labeled 'COLD' (no other text or symbols)
Caution
- Do not overtighten the fittings or apply tape or sealant to the faucets or water supply intakes. This can damage the fittings.
-
Make sure that the water supply hoses are not twisted or bent. A bent or twisted hose can leak and cause an electric shock due to the water leakage. To ensure the correct water usage, connect both hot and cold water faucets. If either or both are not connected, an error code could occur.
-
Turn on the hot and cold water supplies and check all the water supply intake connections and the faucets for water leaks.
Connecting the drain hoses

Caution
Make sure that the connection between the drain hose and the wash basin, standpipe or laundry tub is not airtight.
• Over the edge of wash basin - Secure the guide to the side of the basin wall with a hook, tape it or tie it with a piece of cord to prevent the drain hose from moving.
natural_image
Illustration of a bathroom sink with a hand valve and a close-up view of the handle (no text or symbols)- In a standpipe - The standpipe must be no shorter than 39 in. (99 cm) and no longer than 96 in. (244 cm).
- In a laundry tub - The laundry tub must be no shorter than 39-in. (99 cm) and no higher than 96-in (244 cm) maximum.
Level your washer

Caution
Do not use your washing machine without leveling. If your washer is not level, it may:
• Vibrate excessively which can cause your washer to malfunction.
• Make excessive noise.
- Indicate error codes when the washer is running.
Extend the leveling feet only as much as is necessary. If the feet are extended too much, your washer may vibrate.
Determine if the washer is level by checking the position of the tub or by using a level.
- Slide the washer into position.
- Open the lid of the washer, then pour water into the tub to the leveling circle. If the washer is level, the water will touch the leveling circle all the way around. If the washer is not level, the water will only touch part of the leveling circle.
- If your washer is not level, carefully tilt your washer just enough to adjust the leveling feet on the bottom of your washer. Extend the feet only as much as is necessary. If the feet are extended too much, your washer may vibrate.
natural_image
Line drawing of a washing machine with four circular buttons at the bottom (no text or symbols)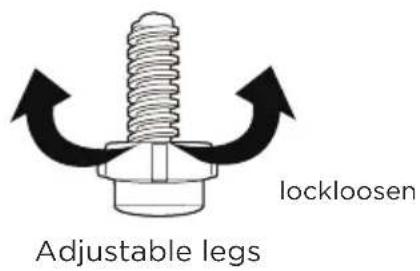
Power on
Plug the power cord into a well-grounded, 3-prong, 120 Volt 60 Hz approved electrical outlet, protected by a 15-amp fuse or comparable circuit breaker. Your washer is grounded through the third prong of the power cord.
Run a test cycle
Run a test cycle to make sure that your washer is properly installed.
- Load about 6 pounds (2.7 kg) of laundry into the tub.
- Select the Cycles knob to turn on your washer.
- Turn the cycle selector to select the Rinse & Spin cycle.
- Press the Start Pause button to start the test cycle. Your washer should not rock or vibrate excessively when water fills the tub or when washing or spinning. The washer should drain well during the spin cycle.

Caution
- If you detect any water leaks while the washer is filling or draining, check the water connections. See Connect the water hoses on page 19 or Connect the drain hose on page 22.
- If the washer rocks and/or vibrates excessively, level it again. See Level your washeron page 23.
WASHER USE
Control panel
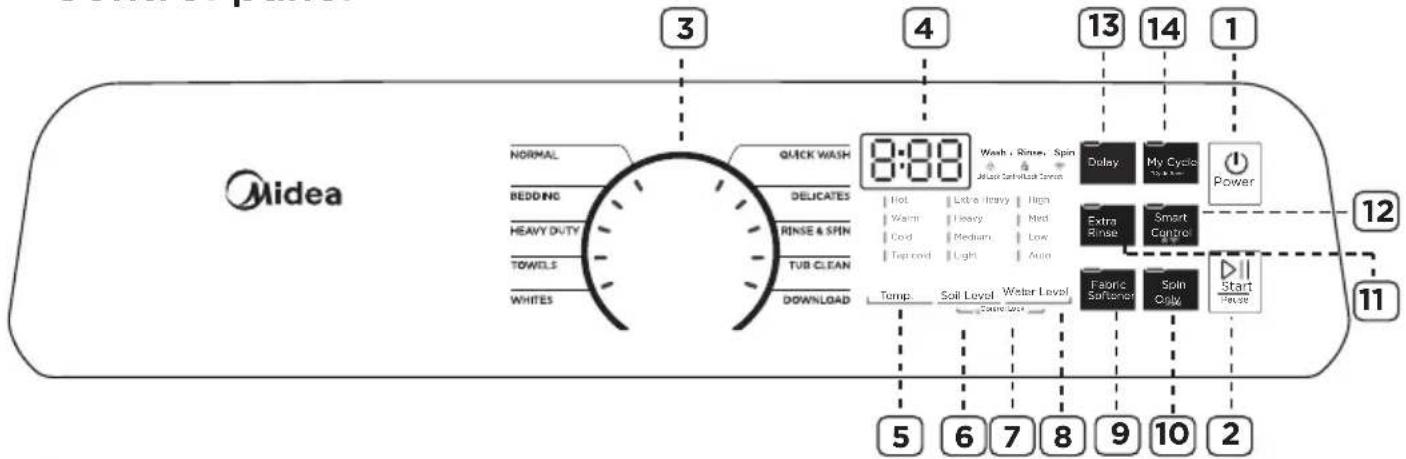
1 POWER
Press to turn on your washer. Press again to turn off your washer. If you leave your washer on and do not press the START PAUSE button within 10 minutes, your washer will automatically turns off.
② START PAUSE
Press once to start the wash cycle. Press again to pause the cycle. If you pause the cycle, you can add or remove items, but you cannot change any settings. Press again to restart the cycle.
3 Cycle selector
Turn to select a wash cycle. The cycle you select determines the wash pattern for the cycle. For more information, see Washer options and settings on page 34.
4 Digital display
The initial display is the total time for the cycle you select.
While your washer is running, the display shows the cycle process and time remaining in the cycle.
NOTE: the time shown is an estimate based on normal operating conditions. External factors (such as the load size, room temperature, incoming water temperature, and water pressure) can affect actual time.
If you set a delay time for the start of the cycle, the display shows the time when the cycle will start.
⑤ Temp.
Press to select the washing water temperature. The rinse water temperature is always cold.
6 Soil Level
Press to select the soil level. Different soil levels result in different washing times and wash cycle settings. For more information, see Washer options and settings on page 34.
7 Control Lock
Press and hold the Soil Level and Water Level buttons at the same time for 3 seconds to turn on the child lock function. Press and hold these buttons again for 3 seconds to turn off the function. When the child lock function is turned on, the only button that works is the POWER button and the Soil Level and Water Level buttons you use to turn off.
8 Water Level
Press to select the water level. washing times and wash cycle setting. For more information, see Program function on Page 34.
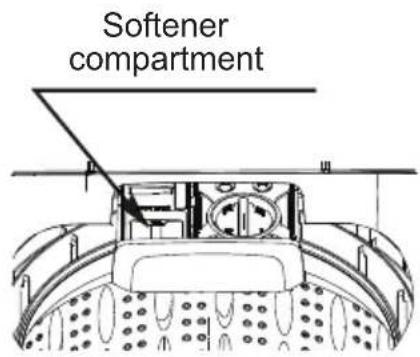
9 Fabric Softener
Add liquid fabric softener to the fabric softener compartment, and then press this button. The fabric softener will be added to the cycle at the correct time.
10 Spin Only/Signal
Press to select the Spin Only. This function will drain water and spin. Press again to cancel.
Hold button for 3 seconds to turn on end of cycle signal. Press again for 3 seconds to cancel.
11 Extra Rinse
Press to add an extra rinse to the wash cycle. Press again to cancel.
12 Smart Control
Press[Smart Control] 3 seconds to connect your washer to the SmartHome APP on your phone.
See Page 35 for instructions on downloading the SmartHome APP.
This is the wireless network switch, if you want to make your appliance connect to the internet, you need turn on this button.
After connecting your device to wireless network, press [Smart Control] once, indicating that it has entered the remote control state.
Smart phone smart control should meet the following conditions:
- The appliance should connect to the internet;
- The door of drum should be closed.
Remark:
- If the door is open in anytime, the smart control function will be failure.
- The smart control function is turned off at the end of each cycle automatically, if you want to use smart control function again, you need turn on it again.
13 Delay
Press to select a time when you want the cycle to begin. You can set the time up to 24 hours in advance in one-hour increments. The display shows the time when the cycle will start. For more information, see Set a delayed start time on page 31.
14 My Cycle
Press and hold for 3 seconds to remember your favorite washing cycle. Press once to load your favorite cycle settings.
Washing a load of laundry

WARNING
To reduce the risk of fire, electric shock, or injury to persons, read the SAFETY INSTRUCTIONS before operating this appliance.
Selecting a detergent
Your washer is designed to use high efficiency (HE) detergents.
- For the best cleaning results, use an HE detergent. We recommend that you do not use a regular detergent. HE detergents contain suppressors that reduce or eliminate suds. When fewer suds are produced, the load tumbles more efficiency and cleaning is maximized.
-
Reducing the amount of detergent may reduce the quality of cleaning. Make sure that you:
-
Pre-treat stains.
- Sort carefully by colour and soil level.
- Avoid overloading.
1. Turn on your washer
Press the Power button to turn on your washer. Your washer's initial settings are:
- Normal on cycle selector with -- displayed on the digital display.
• Medium for the Soil Level.
• Warm for the Temp.
• Water Level for the Auto.
2. Load your washer

Caution
Before loading your laundry, make sure that you remove coins, keys, and other hard objects and close zippers. These items may damage clothes.
- Sort laundry by fabric type, soil level, color, and load size.
- Fill the tub with dry, unfolded clothes. Load the tub no more than 3/4 full.
NOTE:
• Overloading may reduce washing efficiency, cause excess wear, and possibly cause creasing or wrinkling of the load.
- Wash delicate items such as bras, hosiery and other lingerie on the Delicates cycle with similar lightweight items.
- When washing big, bulky items (such as rugs or pillows) or a few smaller items (such as stuffed toys or one or two sweaters) that do not fill the tub completely, add a few towels to improve spin performance.
• Always use the Bedding cycle for bedding items. - When washing heavily soiled loads, do not overload your washer to ensure good cleaning results.
2. Add detergent and additives to the compartment
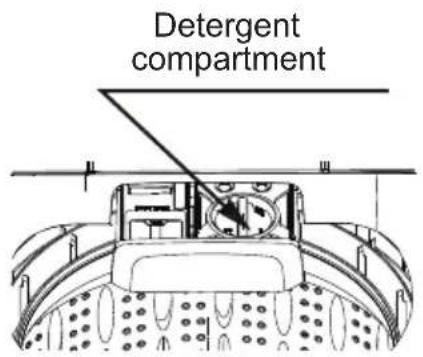
Loading the liquid or powder detergent compartment
- Pour the recommended amount of laundry detergent directly into the compartment before starting your washer.
- If you are using color-safe bleach, add it with the detergent to the detergent compartment.
NOTE:
- When adding color-safe bleach with detergent, both laundry products should be in the same form (liquid).
- If the washer doesn't have a detergent compartment, add the detergent to the tub.
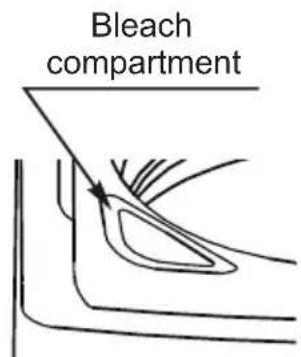
Loading the bleach compartment (liquid bleach only)
- Add chlorine bleach to the bleach compartment. Do not over-fill the compartment.
- There is no water inlet to the bleach dispenser, so the bleach will directly enter the tub when you pour it in.

Caution
- Avoid splashing or over-filling the compartment.
- Never pour undiluted liquid chlorine bleach directly onto the load or into the tub. Doing so can damage fabrics, by weakening of the fibers or stripping the color.
NOTE: Do not pour color-safe bleach into the bleach compartment. Instead, add it to the detergent compartment.
Loading the fabric softener compartment
- Pour the recommended amount of liquid fabric softener into the softener compartment. The dispenser automatically releases liquid fabric softener at the correct time during the rinse cycle.
Caution
- Use the softener compartment ONLY for liquid fabric softeners.
- Do not use the Downy Ball® in the fabric softener compartment.
- Do not use liquid fabric softener that is too sticky as it may not mix with the water sufficiently.
- Be sure to select the Fabric Softener option when using fabric softener so that it is released in the rinse portion of the cycle.
3. Select the appropriate cycle and options for the load
- Turn the cycle selector to select a washing cycle. For information on wash cycles, see Washer options and settings on page 34.
- Optional: Use the control panel buttons (like Fabric Softener) to customize the washing cycle. For descriptions of buttons, see Control panel on page 27. For information about which buttons are available for each cycle type, see Washer options and settings on page 34.
4. (Optional) Set a delayed start time
You can program a wash cycle, then set a time when you want a wash cycle to begin.
- Press the Delay button to turn on the delay start time function.

- Press the Delay button repeatedly to select the delay time you want. The delay start time, in hours, will be shown on the display, in sequence, from 0 to 24, then back to 0. You can also press and hold the Delay button to quickly adjust the time until the desired time appears on the display.
- If you want to change the wash cycle settings while you are setting the delay start time, turn the cycle selector. To return to setting the delay start time function, repeat Steps 1 and 2.
NOTE:
- Once the number of delay hours is reached by pushing the Delay button, release the button for three seconds and it will be set. The delay light will remain on.
- After the delay time is set, if you wish to change the delay setting, press the Delay button again until the desired hour is reached. Release the button for three seconds and it will be set.
- If you decide to cancel the delay setting, you can either turn the cycle selector or push the Delay button until 0 is reached.
- Ideally, you should set your cycle before setting the Delay, because turning the cycle selector after the delay is set cancels the delay.
- The Delay Start Time cannot be changed after the program has started.
- To cancel the delay start time function before you save the setting, press the Delay button until 0 appears on the display, or turn the cycle selector knob.
IMPORTANT:
- You can change settings or cancel the delay start time function anytime before you press the Start Pause button by turning the cycle selector. The delay start time cannot be changed after you press the Start Pause button.
- If you pressed the Start Pause button, you can cancel the delay start time function by pressing the Power button to turn off your washer, then pressing the Power button again to turn it back on.
5. Start your washer
- Press the Start Pause button.
NOTE:
- If you have not set a delayed start time or if the delay time has expired, your washer starts the cycle and the Wash light turns on.
- As your washer moves from stage to stage in the wash cycle, the related light turns on (such as Rinse or Spin).
- If you set a delayed start time, the Delay light turns on and your washer starts counting down the start time.

flowchart
graph LR
    A["Wash"] --> B["Rinse"]
    B --> C["Spin"]
- If you need to pause the cycle (for example to add or remove items or adjust the load), press the Start Pause button, then open the lid. Your washer stops. When you are ready to resume washing, close the lid, then press the Start Pause button.
6. Unload your laundry
When the wash cycle is complete:
• The Screen shows End.
- Your washer beeps six timesafter the cycle is done.
- Your washer unlocks the lid.

- Open the lid and remove the laundry.
Setting the Control Lock
Your washer has a Control Lock function to prevent children from playing with your washer. When you turn on the Control Lock, the only buttons that work are the Power button and the Soil Level and Water Level buttons you use to turn off the Control Lock.
- Press and hold both the Soil Level and Water Level buttons for three seconds. The Control Lock light turns on.

• To turn off the Control Lock, press and hold both the Soil Level and Water Level buttons for three seconds.
NOTE:
- If your washer is not turned on, the Control Lock can still remain set. Press the Power button, turn on the Control Lock function, then press the Power button to turn off your washer. When you want to use your washer, you need to turn off the lock function.
- If you turn on the Control Lock function while the washer lid is open, E3 appears on the display. If you do not close the lid within 20 seconds, your washer sounds an alarm, displays CL, and drains all the water in the tub. To clear the alarm, press the Power button to turn off your washer.
Washer options and settings
• Maximum load weight^ 18.65 lbs (8.46 kg) (Dry clothes)
- Bolded options are initial settings.• (dots) indicate options functions you can select.
| Cycle | Fabric type | Soil level | Temp. | Water level | Delay | My Cycle | Extra rinse | Fabric softener | Smart Control | Signal |
| Normal | Cotton, linen Towels, Shirts Sheets, Jeans Mixed loads | Extra Heavy Heavy Medium Light | Hot Warm Cold Tap Cold | High Med Low Auto | ● | ● | ● | ● | ● | ● |
| Bedding | Large items like blankets and comforters | Extra Heavy Heavy Medium Light | Hot Warm Cold Tap Cold | High Med Low Auto | ● | ● | ● | ● | ● | ● |
| Heavy Duty | Heavily soiled cotton fabrics | Extra Heavy Heavy Medium Light | Hot Warm Cold Tap Cold | High Med Low Auto | ● | ● | ● | ● | ● | ● |
| Towels | Towels | Heavy Medium Light | Hot Warm Cold Tap Cold | High Med Low Auto | ● | ● | ● | ● | ● | ● |
| Whites | White Fabric | Extra Heavy Heavy Medium Light | Hot Warm Cold Tap Cold | High Med Low Auto | ● | ● | ● | ● | ● | ● |
| Quick Wash | Lightly soiled and small loads | Medium Light | Hot Warm Cold Tap Cold | Med Low | ● | ● | ● | ● | ● | ● |
| Dellcates | Dress shirts Blouses Nylons Sheer/lacy | Heavy Medium Light | Hot Warm Cold Tap Cold | Med Low | ● | ● | ● | ● | ● | ● |
| Rinse & Spin | Tap Cold | High Med Low Auto | ● | ● | ● | ● | ● | ● | ||
| Tub Clean | See page 36 | Extra Heavy | Hot | High | ● | ● | ● | ● | ||
| Spin Only | ● | ● | ● | ● | ||||||
| Download - Active Wear | Sportswear | Extra Heavy Heavy Medium Light | Hot Warm Cold Tap Cold | High Med Low Auto | ● | ● | ● | ● | ● | ● |
| Download - Baby Care | raew | Heavy Medium Light | Hot Warm Cold Tap Cold | High Med Low | ● | ● | ● | ● | ● | ● |
| Download - Prem Press | Chemical fiber cloth | Heavy Medium Light | Warm Cold Tap Cold | High Med Low Auto | ● | ● | ● | ● | ● | ● |
| Download - Sanitize | Sterilization sustained 60 C | Extra Heavy Heavy Medium Light | Hot Warm Cold Tap Cold | High Med Low Auto | ● | ● | ● | ● | ● | ● |
Download
You can click to select a cycle and set it as a panel cycle. This cycle will be synchronized to the "download" cycle labeled on your wash panel, making it convenient for you to use quickly.
Smart Control
Use Your Appliance with the SmartHome App
Before you start, make sure that:
- Your smartphone is connected to home wireless network, and you know the network password.
- Make sure you are near the home appliance.
- The 2.4GHz band wireless signal is enabled on your wireless router.
Follow the below steps to enter the remote control state
Download the SmartHome app
On an app market (Google Play Store, Apple App Store), search for "SmartHome" and find the SmartHome app. Download and install it on your phone. You can also download the app by scanning the QR code below.

Register and log in
Open the SmartHome app, and create a new account to start (you can also register through a third-party account). If you already had an existing account, use the account to log in.

Connect your devices to SmartHome
-
Please make sure your mobile phone is connected to wireless network If not, go to Settings and turn on the wireless connection, select and connect to a wireless network Also please turn on the Bluetooth on your phone. If not, go to Settings and turn it on.
-
Please power on your devices.
- Open SmartHome app on your phone.
-
If a message of "Smart devices discovered nearby" appears, click to add.
-
If no message appears, select "+" on the page and select your device in the list of nearby devices available. If your device is not listed, please add your device manually by the device category and device model.
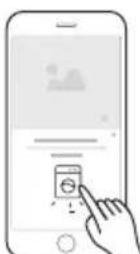
- Connect your device to wireless network according to the instructions on app, if the connection fails, please follow the instructions provided by the app to continue with the operation.
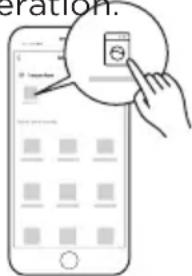
7. Start the remote control
Press smart control button once on the washer, then the machine will enter the remote control state and you can start the machine remotely, which means it has entered the remote control state and you can start to control remotely.
WiFi Status Light
 | Slowly flashing Waiting for connection |
| Quickly flashing Connecting | |
| Light is on Connected to your wireless router |

Note!
• Make sure your devices are powered on.
- Keep your mobile phone close enough to your device when you are connecting network to your device.
- Connect your mobile phone to the wireless network at home, and make sure you know the password of the wireless network.
- Check if your router supports 2.4 GHz wireless network band and turn it on. If you are not sure whether the router supports 2.4 GHz band, please contact the router manufacturer.
- The device cannot connect to the wireless network that requires authentication, and it usually appears in public area such as hotels, restaurants, etc. Please connect to a wireless network that does not require authentication.
- It is recommended to use a wireless network name that only contains letters and numbers.
- If your wireless network name contains special characters, please modify it in the router.
- Turn off the WLAN+ (Android) or WLAN Assistant (iOS) function of your mobile phone when connecting network to your devices.
- In the case that your device connected to wireless network before but it needs to reconnect, please click "+" on app Home page, and add your device again by the category and model according to the instructions on app.
- Operating Temperature: -20°C \~85°C
- The Max RF Output Power: wireless network : E.I.R.P.: 18dBm, Bluetooth LE: 10dBm. Frequency band of operation:2400-2483.5MHz
Procedures to reset the Wireless Network configuration.
- Press [Smart Control] 3 seconds to turn on the wireless network function and re-enter the network configuration process.
- "AP" will be displayed on the digital display.
- Reconnect to the network based on the content of previous page.
WASHER CARE

Caution
Turn off the water faucets after final use. This shuts off the water supply to your washer and prevents the possibility of damage from escaping water. Leave the lid open to let the inside of your washer dry out.

WARNING
Certain internal parts are intentionally not grounded and may present a risk of electric shock only during servicing. Service Personnel – Do not contact the following parts while the appliance is energized: Electrical Valve, Drain Pump and Main Motor and Retractor.
CLEANING AND MAINTENANCE
Cleaning the exterior
Use a soft cloth to wipe up all detergent, bleach, or other spills as they occur.
Cleaning the interior
- Clean the interior of your washer periodically to remove any dirt, soil, odor, mold, mildew, or bacterial residue that may remain in your washer as a result of washing clothes.
- Failure to follow these instructions may result in unpleasant conditions, including odors or permanent stains in your washer or on your laundry.
• To remove hard water deposits, use a cleaner labeled "Washer safe".
Cleaning the control panel
- Clean with a soft, damp cloth. Do not use abrasive powders or cleaning pads.
- Do not spray cleaners directly on the panel. The control panel finish may be damaged by some laundry pre-treatment soil and stain remover products. Apply such products away from your washer and wipe up any spills or over-spray immediately.
Cleaning the detergent, bleach, or softener compartment
- Clean with a soft, damp cloth. Do not use abrasive powders or cleaning pads.
- Do not spray cleaners directly on the panel. The control panel finish may be damaged by some laundry pre-treatment soil and stain remover products. Apply such products away from your washer and wipe up any spills or over-spray immediately.
Cleaning the tub
The Tub Clean cycle is a self-cleaning cycle that removes the causes of odors that may occur inside your washer without using a cleaning agent. We suggest cleaning the tub about once a month.

Caution
Never use the tub clean cycle when laundry is in your washer. This may damage the laundry or your washer.
- With the tub empty, add one cup of chlorine bleach to the bleach dispenser.
- Turn the control knob to power on.
- Turn the cycle selector to Tub Clean. With the tub empty, add one cup of chlorine bleach to the bleach dispenser.
- Press the Start Pause button.
Storing your washer
You can damage your washer if you do not remove water from hoses and internal components before storage.
To prepare your washer for storage:
- Select the Quick Wash cycle and add bleach to the washer. Run your washer through the cycle without a load.
- Turn the water faucets off and disconnect the inlet hoses.
- Unplug your washer from the electrical outlet and leave your washer lid open to let air circulate inside the tub.

Caution
If your washer has been stored in below-freezing temperatures, allow time for any leftover water in your washer to dry out before use.
BEFORE YOU CALL FOR SERVICE...
Troubleshooting Tips
Save time and money! Review the charts on the following pages first and you may not need to call for service.
| Problem Solutions | |
| Washer does not start | Make sure that your washer is plugged in.Make sure that the lid is closed.Make sure that the water source faucets are open.Make sure that you press the Start Pause button to start your washer.Before your washer starts to fill, it makes a series of clicking noises to make sure that the lid is locked and to do a quick drain.Make sure that the Child Lock is not activated. See Setting the Control Lock on page 33.Make sure that the Delay option is not turned on. See (Optional) Set a delayed start time on page 31.Check the fuse or reset the circuit breaker. |
| No water or not enough water | Make sure that both faucets are fully turned on.Make sure that the water pressure is in the range listed in Water requirements on page 14.Make sure that the water inlet hoses are not kinked. Straighten if necessary.Disconnect the hoses and clean the screens. The hose filter screens may be clogged. |
| When washer has excessive vibration or noise | Make sure that your washer is set on a level surface. If the surface is not level, adjust your washer's feet to level your washer.Make sure that your washer is not touching any other object.Make sure that the laundry load is balanced.During the spin process, if clothes are piled to one side of the tub, your washer may stop because of the imbalance. Your washer tries up to three times to solve the problem automatically. If the washer cannot solve the problem, try to manually redistribute clothes inside the tub. |
Problem Solutions
| Washer stops | Make sure that the power outlet is a working outlet.Check the fuse or reset the circuit breaker.Close the lid, then press the Start Pause button to start your washer. For your safety, your washer does not spin unless the lid is closed.Before your washer starts to fill, it makes a series of clicking noises to make sure that the lid is locked and to do a quick drain.Sometimes your washer may pause between stages in the cycle. Wait to see if your washer starts again.Disconnect the inlet hoses and clean the screens periodically. The hose filter screens may be clogged. |
| Lid is locked or will not open | Press the Start Pause button to pause the washer. You cannot open the lid if the washer is running.After you pause the washer, it may take a few seconds for the lid lock to release.If the lid is locked when your washer is not running, press the Power button to turn on your washer.If power fails while your washer is running, when power is restored, the lid unlocks. Your washer waits three minutes then runs the rest of the cycle. |
| Washer does not drain or spin | Check the fuse or reset the circuit breaker.Close the lid, then press the Start Pause button to start your washer. For your safety, your washer does not spin unless the lid is closed.Make sure that the drain hose is not kinked. Straighten as necessary.Make sure that the height of the drain hose is within specified limits. See Drainage requirements on page 14.The pipes to your sewer system may be clogged. Contact a plumber or qualified repair professional. |
| The water temperature is not correct | Make sure that you have selected the correct temp.Make sure that the water source faucets are fully opened.Make sure that the hoses are connected to the correct faucet and water intake connections on your washer, then flush the lines. See Connect the water hoses on page 19.Disconnect the hoses and clean the screens. The hose filter screens may be clogged. |
| Problem Solutions | |
| Load is too wet at the end of the cycle | Use a high-efficiency detergent to reduce oversuhsing. See Selecting a detergent on page 29.The load may be too small. Very small loads (one or two items) may become unbalanced and not spin out completely. |
| Water leaks | Make sure that all hose connections are tight. See Connect the water hoses on page 19 and Connect the drain hose on page 22.Make sure that the end of the drain hose is correctly inserted and secured to the drainage system. See Connect the drain hose on page 21.Avoid overloading.Use a high-efficiency detergent to reduce oversuhsing. See Selecting a detergent on page 29. |
| Oversuds condition | Use a high-efficiency detergent to reduce oversuhsing. See Selecting a detergent on page 29.If you have"soft" water, reduce the amount of detergent.For small or lightly soiled loads, reduce the amount of detergent. |
| Prevent odor | Periodically run a Tub Clean cycle to clean the tub.See Cleaning the tub on page 38.Use a high-efficiency detergent to reduce oversuhsing. Excessive suds collect in nooks and crannies and cause odor. See Selecting a detergent on page 29.Dry the interior of your washer after the total cycle has finished. |
ERROR CODES
| Description Reason Solutions | ||
| E1 | Your washer takes more than 30 minutes to fill With water at the low water level, 45 mins at medium water level, or 60mins at the high water level. | Make sure that the lid is not open.Make sure that water is not leaking. See No water or not enough water on page 40.Contact Midea service center. |
| E1 | After water finishes enter your washer, the water level has not changed in 10 mins. | Make sure that the lid is not open.Make sure that water is not leaking. See No water or not enough water on page 40. |
| E2 | The unit takes more than 10 minutes to drain. | See Washer does not drain or spin on page 41. |
| E3 | The lid is open. The washer is not level. | Close the lid.Level the washer see Level your washer on page 23. |
| E4 | Your washer is out of balance more than three times in spin operation. | Relevel the load, if can not solve, Contact Midea service center. |
| E5 | Your washer is not level. Impact switch failed. | Adjust the washer level refer to installation.If the situation continues call Midea service center. |
| F2 | The EEPROM failed | Contact Midea service center. |
| F5 | Load sensing failed. | Contact Midea service center. |
| F8 | Water level sensor failed. | Contact Midea service center. |
| Fd | Lid lock failed. | Contact Midea service center. |
| C9 | The PCB failed. | Contact Midea service center. |
| CL | The lid has been open for over 20 seconds with the Control Lock function activated. | Press the Power button to turn off your washer.Turn off the Child Lock function see Setting the Control Lock on page 33.Contact Midea service center. |
2 YEAR LIMITED WARRANTY
This warranty is provided to the original purchaser at retail (the "Purchaser" or "you") by Midea America (Canada) Corp. ("Midea" or "we"), which warrants all parts of this Product, as described below. Midea warrants this Product to the Purchaser for personal, family or household use. This warranty covers performance and quality issues in materials and workmanship that appear under normal use and maintenance appearing within two years from the date of purchase. This warranty gives you specific rights, and you may also have other rights that vary from state to state.
WARRANTY LIMITATIONS
This warranty is given only to the original purchaser at retail in either the United States or Canada and may not be transferred to any subsequent buyer. This warranty does not apply to purchasers of our products for use or resale in a business; a separate commercial warranty may protect those purchasers.
This warranty does not cover any Product failure caused by:
(a) Abuse, damage or use of the Product in violation of the Product instructions.
(b) Modification to any Product or part.
(c) Failure to maintain the Product or part as described in accordance with the Product instructions.
(d) Faulty installation or application.
(e) Use of parts or accessories not compatible with this Product.
(f) Floods, fires, winds, lightning, accidents, corrosive atmosphere, or other conditions beyond Midea's control.
(g) Interruption in electrical service or inadequate electrical service.
(h) Replacement of fuses and replacement or resetting of circuit breakers.
(i) Frozen or broken water pipes, water damage, moisture intrusion, mold or other biological growth.
(j) The use, combination or linking of the Product to other products, processes or materials not provided by Midea.
WARRANTY REMEDY
If any quality or performance issue covered by this warranty is discovered during the warranty period, we will, at our option, repair or replace any such Product. This warranty is limited to Product repair or replacement by an authorized Midea servicer or dealer and does not cover any shipping cost, labor cost, customs duties, inland logistics cost, or cost of service, including any diagnostics, removal, transportation, or reinstallation costs. If we ask, you must return the Product to us.
WARRANTY DISCLAIMER; EXCLUSION OF DAMAGES
This is the only express warranty to consumers that we offer on our Products. ANY IMPLIED WARRANTIES BY MIDEA, INCLUDING BUT NOT LIMITED TO WARRANTIES OF MERCHANTABILITY AND FITNESS FOR PARTICULAR PURPOSE, ARE LIMITED TO THE DURATION OF THIS EXPRESS WARRANTY. Some states and provinces do not allow the exclusion of express warranties and/or limitations on how long an implied warranty lasts, so the above exclusion and/or limitation may not apply to you.
THE REMEDY DESCRIBED ABOVE IS THE ONLY ONE THAT WE WILL PROVIDE, EITHER UNDER THIS WARRANTY OR UNDER ANY WARRANTY ARISING BY OPERATION OF LAW. WE WILL NOT BE RESPONSIBLE FOR ANY CONSEQUENTIAL OR INCIDENTAL DAMAGES ARISING FROM THE BREACH OF THIS WARRANTY OR ANY OTHER WARRANTY, WHETHER EXPRESS OR IMPLIED, NEGLIGENCE OR OTHER TORT, OR ON ANY STRICT LIABILITY THEORY, INCLUDING BUT NOT LIMITED TO LOST PROFITS. Some states do not allow the exclusion or limitation of incidental or consequential damages, so the above exclusion may not apply to you.
WARRANTYCLAIMS PROCESS
For more information or to make a warranty claim, please visit:
https://www.midea.com/ca/support
Or contact us at:
Telephone: 1-888-365-2230
Email: CanadaSupport@midea.com
You must have Your bill of sale, delivery slip, or appropriate proof of purchase to submit a warranty claim. The date of purchase establishes the warranty period, should service be required.
DISPUTE RESOLUTION
ARBITRATION CLAUSE. IMPORTANT. PLEASE REVIEW THIS ARBITRATION CLAUSE. IT AFFECTS YOUR LEGAL RIGHTS.
(a) Parties: This arbitration clause (this "Arbitration Clause") affects your rights against Midea and any of its affiliates or employees or agents, successors, or assigns, all of whom together are referred to below as "we" or "us" for ease of reference.
(b) ARBITRATION REQUIREMENT: EXCEPT AS STATED BELOW, ANY DISPUTE BETWEEN YOU AND ANY OF US SHALL BE DECIDED BY NEUTRAL, BINDING ARBITRATION RATHER THAN IN COURT OR BY JURY TRIAL. "Dispute" will be given the broadest possible meaning allowable by law. It includes any dispute, claim, or controversy arising from or relating to your purchase of this Product, any warranty upon the Product, or the Product's condition. It also includes determination of the scope or applicability of this Arbitration Clause. The arbitration requirement applies to claims in contract and tort, pursuant to statute, or otherwise.
(c) CLASS-ARBITRATION WAIVER: ARBITRATION IS HANDLED ON AN INDIVIDUAL BASIS. IF A DISPUTE IS ARBITRATED, YOU AND WE EXPRESSLY WAIVE ANY RIGHT TO PARTICIPATE AS A CLASS REPRESENTATIVE OR CLASS MEMBER ON ANY CLASS CLAIM YOU MAY HAVE AGAINST US OR WE AGAINST YOU, OR AS A PRIVATE ATTORNEY GENERAL OR IN ANY OTHER REPRESENTATIVE CAPACITY, TO THE MAXIMUM EXTENT PERMITTED BY LAW. YOU AND WE ALSO WAIVE ANY RIGHT TO CLASS ARBITRATION OR ANY CONSOLIDATION OF INDIVIDUAL ARBITRATIONS.
(d) Discovery and Other Rights: Discovery and rights to appeal in arbitration are generally more limited than in a lawsuit. This applies to both you and us. Other rights that you or we would have in court may not be available in arbitration. Please read this Arbitration Clause and consult the rules of the arbitration organizations listed below for more information.
(e) SMALL CLAIMS COURT OPTION: YOU MAY CHOOSE TO LITIGATE ANY DISPUTE BETWEEN YOU AND ANY OF US IN SMALL CLAIMS COURT, RATHER THAN IN ARBITRATION, IF THE DISPUTE MEETS ALL REQUIREMENTS TO BE HEARD IN SMALL CLAIMS COURT.
(f) Governing Law: For residents of the United States, the procedures and effect of the arbitration will be governed by the Federal Arbitration Act (9 U.S.C. § 1 et seq.) rather than by state law concerning arbitration. For residents of Canada, the procedures and effect of the arbitration will be governed by the applicable arbitration law of the province in which you purchased your Product. The law governing your substantive warranty rights and other claims will be the law of the state or province in which you purchased your Product. Any court having jurisdiction may enter judgment on the arbitration award.
(g) Rules of the Arbitration: If the amount in controversy is less than \250,000, the arbitration will be decided by a single arbitrator. If the amount in controversy is greater than or equal to \250,000, the arbitration will be decided by a panel of three arbitrators. The arbitrator(s) will be chosen pursuant to the rules of the administering arbitration organization. United States residents may choose JAMS (1920 Main Street, Ste. 300, Irvine, CA 92614, www.jamsadr.com), or, subject to our approval, any other arbitration organization. In addition, Canadian residents may choose the ADR Institute of Canada (234 Eglinton Ave. East, Suite 405, Toronto, Ontario, M4P 1K5, www.amic.org). These organizations' rules can be obtained by contacting the organization or visiting its website. If the chosen arbitration organization's rules conflict with this Arbitration Clause, the provisions of this Arbitration Clause control. The award of the arbitrator(s) shall be final and binding on all parties.
(h) Location of the Arbitration Hearing: Unless applicable law provides otherwise, the arbitration hearing for United States residents will be conducted in the federal judicial district in which you reside (in your hometown area) or, for Canadian residents, in the province in which you reside, and, if you choose, will be in-person.
(i) Costs of the Arbitration: Each party is responsible for its own attorney, expert, and other costs and fees unless applicable law requires otherwise. Notwithstanding the preceding sentence, and unless applicable law requires otherwise, if you are a consumer under the JAMS rules or the rules of another agreed upon arbitration administrator, Midea will pay or reimburse you for all reasonable fees or costs to the extent required by law or the applicable arbitration administrator's rules. Whether or not required by law or such rules, if you prevail at arbitration on any claim against Midea, Midea will reimburse you for any reasonable fees paid to the arbitration administrator in connection with the arbitration proceedings. Under no circumstances will Midea seek from you payment or reimbursement of any reasonable fees that Midea incurs in connection with the arbitration. If you are required to advance any fees or costs to JAMS or other agreed upon arbitration administrator, but you ask Midea to do so in your stead, Midea will consider and respond to your request.
(j) Survival and Enforceability of this Arbitration Clause: This Arbitration Clause shall survive the expiration or termination, or any transfer, of the warranty on your Product. If any part of this Arbitration Clause, except waivers of class-action rights, is found to be unenforceable for any reason, the remainder of this clause and the warranty shall remain enforceable. If, in a case in which class-action allegations have been made, the waiver of class-action rights under this warranty is found to be unenforceable with respect to any part of the dispute, the parts of the dispute as to which the waiver of class-action rights have been found unenforceable will be severed and will proceed in court without reference or application of this Arbitration Clause. Any remaining parts will proceed in arbitration.
QUEBEC RESIDENTS
The arbitration provisions of this warranty shall not apply to residents of Quebec
natural_image
Line drawing of a rectangular trash bin with a lid and base (no text or symbols)Prolongation
natural_image
Simple line drawing of an arched pipe or clamp with a handle (no text or symbols)natural_image
Stack of books or documents with a bookmark icon on the left (no visible text or symbols on covers)Robinet

Sangle (x1)
Filtre (x2)
REMARQUE :
* Espacement requis
natural_image
Diagram showing two types of optical lenses with arrows pointing to each lens (no text or labels)natural_image
Diagram showing three different mechanical or electrical component configurations with arrows indicating rotation (no text or symbols present)
Mise en garde
natural_image
Illustration of two hairless sensors pouring liquid into a bowl (no text or symbols)natural_image
Technical illustration of a pliers tool with a threaded component labeled 'COLD' (no other text or symbols)
Mise en garde
natural_image
Illustration of a bathroom sink with a hand valve and a close-up view of the handle (no text or symbols)natural_image
Line drawing of a washing machine with side-mounted buttons and ventilation slots (no text or symbols)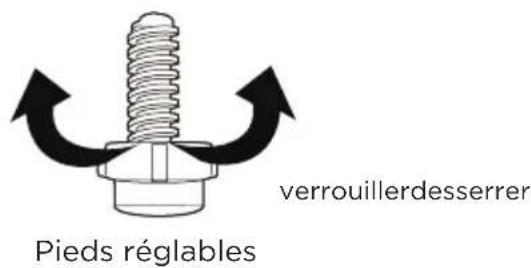
9 Fabric Softener (ASSOUPLISSANT)
14 My Cycle (Mon cycle)

https://www.midea.com/ca/support