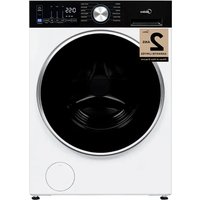
MLHW31S2BBG - Washing machine MIDEA - Free user manual and instructions
Find the device manual for free MLHW31S2BBG MIDEA in PDF.

User questions about MLHW31S2BBG MIDEA
0 question about this device. Answer the ones you know or ask your own.
Ask a new question about this device
Download the instructions for your Washing machine in PDF format for free! Find your manual MLHW31S2BBG - MIDEA and take your electronic device back in hand. On this page are published all the documents necessary for the use of your device. MLHW31S2BBG by MIDEA.
USER MANUAL MLHW31S2BBG MIDEA
Front Loading Washer
Power supply: 120V\~ Circuit: 11A
Warning:
Before using this product, please read this manual carefully and keep it for future reference. The design and specifications are subject to change without prior notice for product improvement. Consult with your dealer or manufacturer for details.
USER MANUAL & INSTALLATION INSTRUCTIONS
natural_image
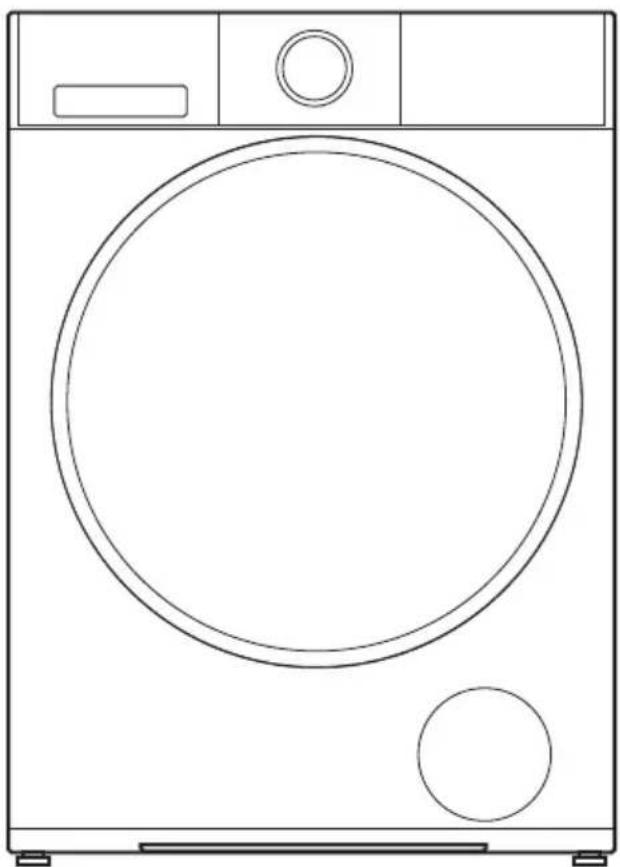
Line drawing of a washing machine with circular vent and side buttons (no text or symbols)MODEL NUMBER
MLHW31S2BBW
MLHW31S2BBG
www.midea.com/ca
THANK YOU LETTER
Thank you for choosing Midea! Before using your new Midea product, please read this manual thoroughly to ensure that you know how to operate the features and functions that your new appliance offers in a safe way.
Contents
Thank You Letter....01
Safety and Precautions....02
Safety and precautions....02
Important safety instructions....03
Grounding instructions....06
Before operating this machine 06
Protecting the Machine....06
Handling the Machine....06
Washing Clothes....07
Installation Requirements....08
Installation requirements....08
Tools and parts....08
Location requirements....09
Installation clearances....09
Electrical requirements....09
Washer dimensions....10
Unpacking the washing machine....10
Installation Instructions....11
Dispose of the packing materials.... 11
Remove transport foam volts 11
Select the location....11
Connect inlet pipe....11
Drain system options....12
Level the washer....13
Electrical connection....13
Operating Instructions.... 14
Operating Instructions.... 14
Prepare before washing clothes.... 14
Control Panel....17
Special Functions 19
Washing clothes for the first time.... 20
Select the laundry cycle.... 21
Table of washing procedures.... 2
App setup and operation.... 2
Care and Cleaning 25
Troubleshooting Tips....29
Error Codes.... 30
Appendix....31
Certifications....32
Technical Specifications....33
Warranty....34

Read all instructions and explanations before use. Follow the instructions carefully. Keep the operation instructions handy for later use. If the appliance is sold or passed on then ensure that the new owner always receives these operation instructions.
Safety and Precautions
Safety and precautions
This manual contains important information on the installation, use, and care of your appliance. Please read this manual carefully before installation and operation of this machine to prevent injury and property damage.
WHAT YOU NEED TO KNOW ABOUT SAFETY INSTRUCTIONS
Warnings and important safety instructions in this manual DO NOT cover all possible conditions and situations that may occur. It is your responsibility to use common sense, caution and care when installing, maintaining and operating your washer.
IMPORTANT SAFETY SYMBOLS AND PRECAUTIONS

WARNING
This indicates that hazards or unsafe practices may cause serious personal injury or death.
To reduce the risk of fire, explosion, electric shock, or personal injury when using your washer, these basic safety precautions SHOULD be followed.
State of California Proposition 65 Warnings

WARNING
The California Safe Drinking Water and Toxic Enforcement Act requires the Governor of California to publish a list of substances known to the State of California to cause cancer, birth defects, or other reproductive harm, and requires businesses to warn of potential exposure to such substances.
This product contains a chemical known to the State of California to cause cancer, birth defects, or other reproductive harm. This appliance can cause low-level exposure to some of the substances listed, including lead, cadmium and phthalate.
WARNING: Risk of reproductive harm from exposure to Lead. See www.P65Warnings.ca.gov.

WARNING - To reduce the risk of fire, electric shock, or injury to persons when using your appliance, follow basic precautions, including the following:
- Read all instructions before using the appliance.
- Do not wash articles that have been previously cleaned in, washed in, soaked in, or spotted with gasoline, dry-cleaning solvents, or other flammable or explosive substances, as they give off vapours that could ignite or explode.
- Do not add gasoline, dry-cleaning solvents, or other flammable or explosive substances to the wash water. These substances give off vapours that could ignite or explode.
- Under certain conditions, hydrogen gas may be produced in a hot-water system that has not been used for 2 weeks or more. HYDROGEN GAS IS EXPLOSIVE. If the hot-water system has not been used for such a period, before using a washing machine, turn on all hot-water faucets and let the water flow from each for several minutes. This will release any accumulated hydrogen gas. As the gas is flammable, do not smoke or use an open flame during this time.
- Always unplug the washing machine from the power supply before attempting any service. Disconnect the power cord by grasping the plug, not the cord.
- To reduce the risk of fire, clothes, cleaning rags, mop heads and the like which have traces of any flammable substance, such as vegetable oil, cooking oil, petroleum based oils or distillates, waxes, fats, etc. must not be placed in the washing machine. These items may contain flammable substances which, even after washing, may smoke or catch fire.
- Never place items in the washer that have been dampened with gasoline or any combustible or explosive substance. Do not wash or dry anything that has been soaked in or spotted with any type of oil (including cooking oils). Doing so can result in fire, explosion, or death.
- Risk of Suffocation and Injury from Entrapment: Do not allow children to play on or in the appliance. Close supervision of children is necessary when the appliance is used near children.
- Pets and kids may climb into the machine. Check the machine before every operation.
- Glass door or protector may be very hot during the operation. Keep kids and pets far away from the machine during the operation.
- This machine is not intended for use by persons (including kids) with reduced physical, sensory or mental capabilities, or lack of experience and knowledge, unless they have been given supervision or instruction concerning use of the machine by a person responsible for their safety.
- Kids should be supervised to ensure that they do not play with the machine.
- When children become old enough to operate the appliance, it is the legal responsibility of the parents or legal guardians to ensure that they are instructed in safe practices by qualified persons.
Safety and Precautions
Important safety instructions
SAVE THESE INSTRUCTIONS

- Do not machine wash fiberglass materials (such as curtains and window coverings that use fiberglass materials.) Small particles may remain in the washing machine and stick to fabrics in subsequent wash loads causing skin irritation.
- Before the appliance is removed from service or discarded, remove the door and cut off the power cord.
- Do not reach into the appliance if the tub or agitator is moving.
- Do not install or store this appliance where it will be exposed to the weather.
- Do not tamper with controls.
- Do not repair or replace any part of the appliance or attempt any servicing unless specifically recommended in the user-maintenance instructions or in published user-repair instructions that you understand and have the skills to carry out.
- Pull out its plug from the power socket before cleaning or maintenance.
- Make sure that all pockets are emptied.
- Sharp or rigid items such as coins, nails, screws, or etc. may cause serious damage to this machine.
- Pull out its plug and cut off water supply after the operation.
- Please check whether the water inside the drum has been drained before opening its door. Please do not open the door if there is any water visible,
- Do not try to repair the machine by yourself.
- If the plug (power cord) is damaged, it shall be replaced by the manufacturer or a service agent to avoid any danger.
- Take care that the power voltage and frequency shall be identical to those of the washing machine.
- Do not use any socket with rated current less than that of the washing machine. Never pull out the power cord plug with wet hands.
- To ensure your safety, the power cord plug must be inserted into an grounded three-pole socket. Check carefully and make sure that your socket is properly and reliably grounded
- This machine shall be repaired only by an authorized service center and only authentic accessories can be used.
- An appliance shall be clearly and permanently marked with a warning that the appliance is intended for use only with fabrics that have been washed with water as a cleaning agent.
- Do not use replacement parts that have not been recommended by the manufacturer (e.g. parts made at home using a 3D printer).
Safety and Precautions
Important safety instructions
SAVE THESE INSTRUCTIONS

- If connected to a circuit protected by fuses, use time-delay fuses with this appliance.
- Do not dry articles that have been previously cleaned in, washed in, soaked in, or spotted with gasoline, dry-cleaning solvents, or other flammable or explosive substances, as they give off vapours that could ignite or explode.
- Do not use fabric softeners or products to eliminate static unless recommended by the manufacturer of the fabric softener or product.
- Do not use heat to dry articles containing foam rubber or similarly textured rubber-like materials.
The interior of the appliance should be cleaned periodically by qualified service personnel.
- Do not place items exposed to cooking oils in your dryer. Items contaminated with cooking oils may contribute to a chemical reaction that could cause a load to catch fire.
Safety and Precautions
Grounding instructions

WARNING
- This appliance must be grounded. In the event of a malfunction or breakdown, grounding will reduce the risk of electric shock by providing a path of least resistance for the electric current. This appliance is equipped with a cord that has an equipment grounding conductor and a grounding plug. The plug must be plugged into an appropriate outlet that is properly installed and grounded in accordance with all local codes and ordinances.
WARNING-Improper connection of the equipment grounding conductor can result in electric shock. Connect to individual branch circuit. Check with a qualified electrician or serviceman if you are in doubt as to whether the washer is properly grounded.
DO NOT modify the plug provided with the appliance if it will not fit the outlet.
Please have a proper outlet installed by a qualified electrician.
Before operating this machine

WARNING
- Packing materials may be dangerous to children. Please keep all packing materials (plastic bags, foams etc) far away from children.
- Do not install the washing machine in bathrooms, very wet rooms, or rooms that contain explosive or caustic gases.
- Make sure that the water and electrical devices are connected by a qualified technician in accordance with the manufacturer's instructions and local safety regulations.
- Remove all packaging and transport bolts from the machine. Otherwise, washing machine may be seriously damaged while washing the clothes.
- Before washing the clothes for the first time, run the washing machine with the cotton and hot water cycles without clothes inside.
- This washing machine is for indoor use only.
Protecting the Machine

WARNING
- Do not climb up and sit on top cover of the machine.
- Do not lean against machine door.
- Please do not close the door with excessive forces. If it is found difficult to close the door, please check if the excessive clothes are put in or distributed well.
Handling the Machine

WARNING
- Transport bolts shall be reinstalled to the machine by a specialized person.
- The accumulated water shall be drained out of the machine.
- Handle the machine carefully. Never hold each protruded part on the machine while lifting.
Machine door can not be used as the handle during the conveyance.
Safety and Precautions
Washing Clothes

WARNING
- Connect cold water to the machine. Hot water may also be connected according to local regulations and availability in your home.
- Your washing machine is only for home use and is only designed for the textiles suitable for machine washing.
- Flammable and explosive or toxic solvents are forbidden. Gasoline and alcohol etc. shall not be used as detergents. Please only select the detergents suitable for machine washing, especially for front loading.
- Do not wash carpets with this machine.
- Be careful of burning when the washing machine drains hot washing water.
- Never refill the water by hand during washing.
- After the program is completed, please open the door after the bell or disconnect the power supply to the machine.
- Please remember to disconnect water and power supply immediately after the clothes are washed.
- Always follow the fabric care instructions recommended by the clothing manufacturer.
- Do not use the washing machine if it has a worn power cord or loose plug. Contact an authorized service agent.
- Do not operate the washing machine if any guards, panels and /or fasteners except transport fixing bolts have been removed. Check the fill hose connections on a regular basis to ensure that they are tight and not leaking.
- Do not operate the washing machine if parts are missing or broken.
- Do not touch the door if washing at high temperatures.
Note:
- The important safeguards and warnings indicated in this manual do not cover all possible conditions which may occur. Common sense, caution and care must be exercised when installing, maintaining or operating the washing machine.
- Always contact your dealer, distributor, service agent or the manufacturer about any problems or conditions that you do not understand.
Installation Requirements
Installation requirements

- This machine must be grounded properly. If there is any short circuit, grounding can reduce the danger of electrical shock.
This machine is equipped with power cord, which includes plug, grounding wire at grounding terminal.
- The washing machine shall be operated in a circuit separate from other electrical appliances. Otherwise, the power protector may be tripped or a fuse may be burned out.
Failure to comply with these warnings could result in serious personal injuries.
Note: Environmental Protection
- If you plan to dispose of this machine, please comply with the local waste disposal regulations. Cut off the power cord so that it will not be put into reuse. Remove the door so that kids and animals will not be trapped in the machine.
- Do not use an excessive amount of detergent.
- Decontaminant and bleacher can be used to pre-treat the stains on the clothes only when very necessary.
Tools and parts
Gather the required tools and parts before starting installation. The parts supplied are in the washer drum.
1/4" nut driver
3/8" socket with ratchet
3/8" open-end wrench
Adjustable wrench or 7/16" socket with ratchet
Adjustable wrench or 9/16" open-end wrench
Channel-lock adjustable pliers
Carpenter's level
Water Hoses(2)
Transport Hole Plug
Drain Hose Guide
Installation Requirements
Location requirements
Selecting the proper location for your washer improves performance and minimizes noise and possible washer “walk.” Your washer can be installed under a custom counter, or in a basement, laundry room, closet, or recessed area. See “Drain System.” Companion appliance location requirements should also be considered. Proper installation is your responsibility.
You will need
- A water heater set to deliver 120^ F (49 C) water to the washer.
- A grounded electrical outlet located within 6 ft. (1.8 m) of where the power cord is attached to the back of the washer. See “Electrical Requirements.”
- Hot and cold water faucets located within 4 ft.(1.2 m) of the hot and cold water fill valves, and water pressure of 20-100 psi (137.9-689.6 kPa).
- A level floor with a maximum slope of 1" (25 mm) under entire washer. Installing the washer on soft floor surfaces, such as carpets or surfaces with foam backing is not recommended.
- A sturdy and solid floor to support the washer, which has a total weight (water and load) of 200lbs.
- Do not operate your washer in temperatures below 32^ F (0 C). Some water can remain in the washer and can cause damage in low temperatures.
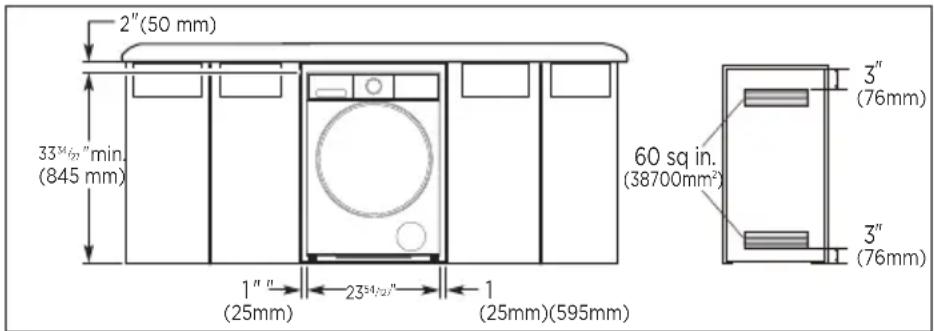
Installation clearances
- The location must be large enough to allow the washer door to be fully opened.
- Additional spacing should be considered for ease of installation and servicing. The door opens more than 90° and it is not reversible.
- Additional clearances might be required for wall, door, and floor moldings.
- Additional spacing of 25mm on all sides of the washer is recommended to reduce noise transfer.
- Companion appliance spacing should also be considered.
Electrical requirements
WARNING

Electrical Shock Harzard
Connect to grounded 3 prong outlet with an individual 15 amp branch circuit protected by a 15 amp circuit breaker.
Connect to individual branch circuit.
Do not remove ground prong.
Do not use an adapter.
Do not use an extension cord.
Failure to follow these instructions can result in electrical shock, fire, or death.
Installation Requirements
Electrical requirements
- A 120V, 60 Hz, AC-only, 15- or 20-amp, fused electrical supply is required. Use a time-delay fuse or circuit serving only this appliance.
- This washer is equipped with a power supply cord with a 3-prong grounding plug.
- To minimize possible shock hazard, the cord must be plugged into a mating, mating, 3-prong, grounding type outlet, grounded in accordance with local codes and ordinances. If a mating outlet is not available, it is the personal responsibility and obligation of the customer to have the properly grounded outlet installed by a qualified electrician.
- If codes permit and a separate ground wire is used, it is recommended that a qualified electrician determine that the ground path is adequate.
5.Do not ground to a gas pipe. - Check with a qualified electrician if you are not sure the washer is properly grounded.
- Do not have a fuse in the neutral or ground circuit.
Washer dimensions
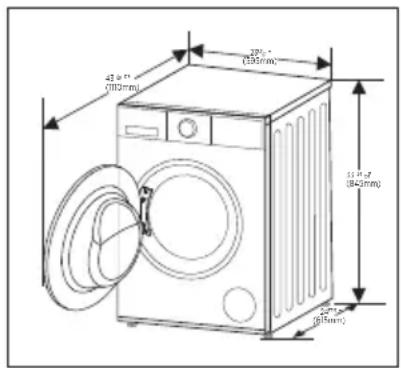
The dimensions shown are for the recommended spacing. Custom dercounter installation
Unpacking the washing machine
Unpack your washing machine and check if there is any damage during the transportation.
Also make sure that all the items (as shown in “) in does not be part's'ag are received.
If there is any damage to the washing machine during the transportation, or any item is missing, please contact the local dealer immediately.
Installation Instructions
Dispose of the packing materials
The packing materials of this machine may be dangerous to kids. Please dispose them properly and avoid easy access by children. Please dispose of the related packing materials according to the relevant local regulations. Please do not throw the packing materials away together with other daily garbage.
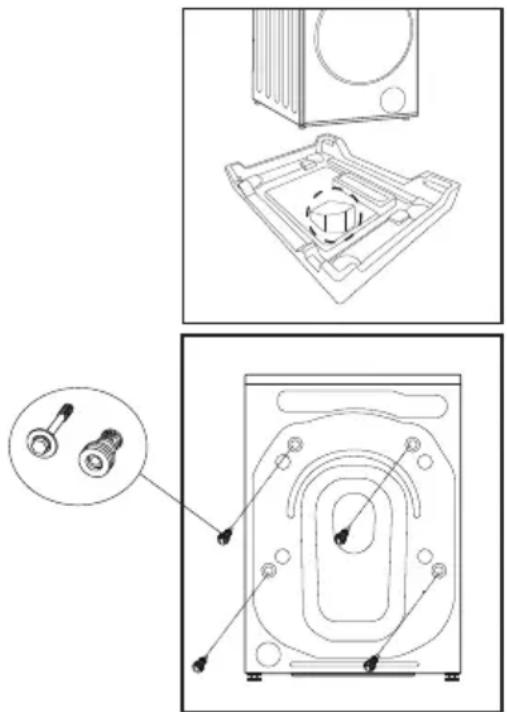
Remove transport and foam bolts
Remove all foam from the machine. On the bottom side of the unit, there is an additional small triangle of foam that must be removed. Check to see if the small triangle was removed with the foam on the bottom of the unit. If you do not see the triangle, lay the unit down on the side to remove the small triangle of foam manually.
Before using the washing machine, the transport bolts must be removed from the backside of the machine. Please take the following steps to remove the bolts:
- Loosen all bolts and plastic spacers (including rubber grommets) with a spanner, then remove them.
- Cover the holes with the transport hole plugs.
- Keep the transport bolts properly for future use.
Select the location
Please install the washing machine in a location with the following characteristics:
- Rigid, dry, and level surface (if not level, please see the Level the washer section for further instructions).
- Avoid direct sunlight.
- Sufficient ventilation.
- Room temperature above 5°C.
- Far away from heat sources such as coal or gas.
Make sure that the washing machine will not stand on power cord.
Do not install the washing machine on a carpeted floor.
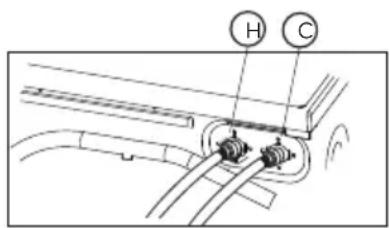
Connect inlet pipe
Connect the inlet pipe as indicated in the figure. If applicable, please connect the hot water valve to a hot water tap.
The hot inlet pipe is labeled "H" and the cold inlet pipe is labeled "C".
Installation Instructions
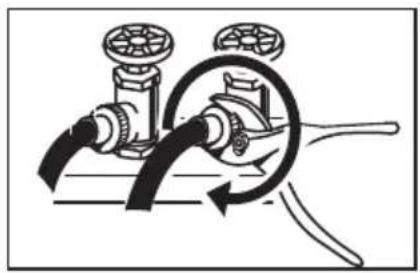
inlet pipeConnect
- Connect the elbow of the inlet pipe to the tap and fasten it clockwise.
- Connect the other ends of the inlet pipes to the inlet valves at the back of the washing machine.
Fasten the pipe clockwise tightly.
natural_image
Diagram of a mechanical valve assembly with rotating components (no text or labels)Note: If there is any leakage after connection, please repeat the steps above to ensure that the inlet pipe connections are tight. The provided inlet pipe should be compatible with the most common type of tap. If the tap is too square or too big to connect to the inlet pipe, please change the tap to a standard model.
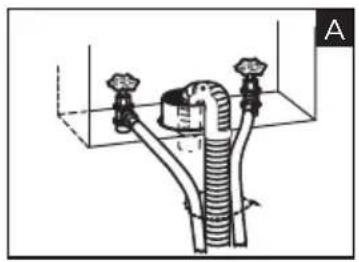
Drain system options
Standpipe drain system - wall or floor (views A & B). The standpipe drain requires a minimum diameter standpipe of 2" (50 mm). The minimum carry-away capacity can be no less than 17 gal. (64 L) per minute. The top of the standpipe must be between 60-100 cm high (as measured from the bottom of the washer).
natural_image
Technical diagram of a pipe system with two valves and a central pipe fitting (no text or labels)
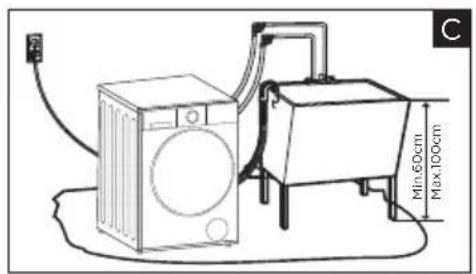
Laundry tub drain system (view C).
The laundry tub needs a minimum 20 gal. (76 L) capacity. The top of the laundry tub must be at least 60cm above the floor.
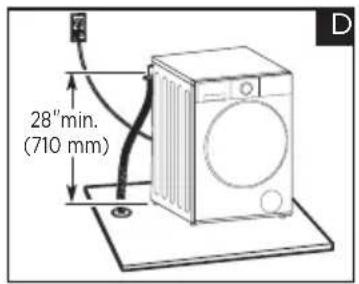
Floor drain system (view D).
The floor drain system requires a siphon break that may be purchased separately. Please see Tools and Parts section for more information. The siphon break must be a minimum of 28"(710 mm) from the bottom of the washer. Additional hoses might be needed.
Installation Instructions
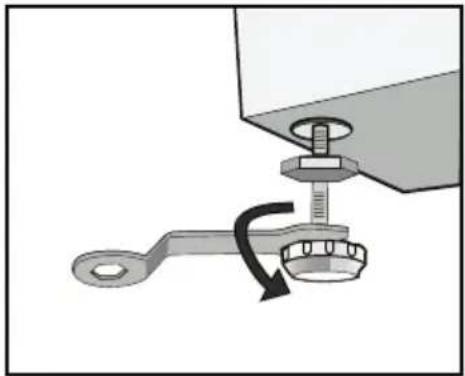
Level the washer
-
When positioning the washing machine, please first check if the legs are tightly attached to the washing machine cabinet. If not, please use your hands or a spanner to turn them to their original positions, then tighten the nuts again with a spanner.
-
After positioning the washing machine, check to see if the legs are stable by pressing each of the four corners of the machine. If the washing machine wobbles when you press down on one of the corners, adjust the leg for that corner.
-
Lock the washing machine legs in place. Loosen the lock nut with a spanner and turn the leg with your hand until it reaches the floor. Hold the leg stable with one hand as you tightly fasten the lock nut to the cabinet.
-
After all legs are locked, press the four corners of the machine again, one by one. If any of the corners are still unstable, repeat Steps 2 and 3.
natural_image
Mechanical assembly diagram showing a wrench and nut assembly with a curved arrow indicating rotation (no text or symbols)
natural_image
Diagram of a mechanical component with bidirectional arrows indicating movement or force (no text or symbols)- Put a solid cylinder (e.g. a soda can) at one edge of the top cover of the washing machine. Repeat with all four sides. If the cylinder stays stable, the washing machine is level. If it rolls downwards, the washing machine is not level. The cylinder will roll in the direction of lower ground. Raise the two legs in the direction the cylinder rolled towards until the washing machine is level. Repeat Steps 1-3 to make sure the bottom legs are flush against the ground and the lock nuts are tightly locked.
Electrical connection
- As the maximum current through the unit is 12A when you are using its heating function, please make sure the power supply system (current, power voltage and wire) at your home can meet the normal loading requirements of the electrical appliance.
- Please connect the power to a socket which is correctly installed and properly grounded.
- Make sure the power voltage at your place is same as the voltage in the machine's rating label.
- The power plug must match the socket and cabinet must be properly and effectively grounded
- Do not use a multi-purpose plug or socket as extension cord.
- Do not connect and pull out plug with wet hands.
- When connecting and pulling out the plug, hold the plug tightly and then pull it out. Do not pull the power cord forcibly.
- If the power cord is damaged or has any sign of being broken, a special power cord must be selected or purchased from its manufacturer or service center for replacement.
Operating Instructions
Operating instructions

WARNING
WARNING - To reduce the risk of fire, electric shock, or injury to persons, read these IMPORTANT SAFETY INSTRUCTIONS before operating this appliance.
Prepare before washing clothes
Please read these instructions carefully to avoid damage to your washing machine or clothes.
Check if new clothes will lose their color.
Pour a teaspoon of liquid detergent onto a damp white towel. Rub a non-visible corner of the garment with the towel, then check to see if the towel is stained with the garment's original color.
Hand-wash scarves and other clothes could easily lose color separately before putting them in the washing machine.
Brush stains on collars, sleeves, and pockets gently with liquid detergent before machine-washing for the best results.
Wash temperature-sensitive clothes according to their laundry labels to prevent color changes or distortion.
Keep in Mind:
Never leave clothes in the washing machine for a long period of time. If you do not wash clothes in time, the clothes may become moldy and develop spots.
natural_image
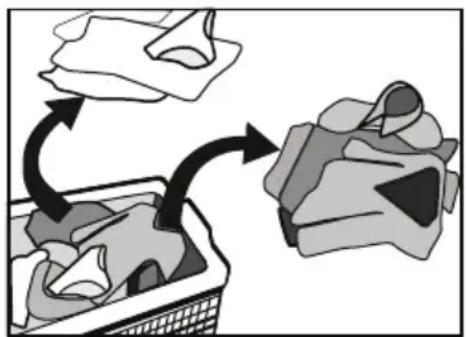
Illustration of a food item being processed into a basket, showing a bag and container with arrows indicating process flow (no text or symbols)Clothes that cannot be washed by washing machine.
Ties, waistcoats, suits, and jackets may shrink or become damaged if immersed in water.
Clothes made up of blended and synthetic fibers may also be affected by color bleed.
Please check laundry care labels before machine-washing clothes.
Ruffles and intentional wrinkles, embossed details, and resin in garments may be damaged when immersed in water. Silk, fur products, and fur decorations are also all easily damaged.
Clothes with many decorative details, long dresses, and traditionally-dyed clothing may all suffer from color bleeding.
Please do not wash clothes without laundry care labels and washing requirements.
Never wash clothes stained with chemicals such as gasoline, petroleum, benzene, paint thinner and alcohol.
Operating Instructions
Prepare before washing clothes
Please pay attention with regard to detergents
Select low-foam detergent, washing powder, or special washing powder for drum washing according to fiber types (cotton, synthetic fiber, soft products and wool products), colors, washing temperatures, degrees of soil, and garment types. Choosing the wrong detergent can cause excessive foaming and overflow, along with other similar accidents.
Bleach is highly alkaline and can damage clothes. Please use as little bleach as possible.
Powder detergents can easily leave residue in clothes, which can cause bad odors, so please ensure they are sufficiently rinsed.
Detergent will not dissolve easily if there is too much detergent or too low of a water temperature. Residual detergent can remain in clothes, pipes, and washing machines. Please ensure that you use the correct amount of detergent.
Detergent amount should be determined by clothing weight, clothing cleanliness, and local water hardness, as well as the recommendations from the detergent manufacturers. Please consult your local water company if you do not know your water hardness.
Note:
Keep detergents and additives in safe and dry places, out of reach of children.
Please remove items from pockets.
Please check the pockets of clothes to be washed and empty them of rigid items, such as decorations or coins, to prevent abnormal functioning or damage to the washing machine.
Separate laundry according to the following characteristics:
Fiber type: Laundry care labels will use symbol types to represent cotton, blended fiber, synthetic fiber, silk, wool and artificial fiber.
Color: Separate white and colorful clothes. All new colorful clothes should be washed separately.
Size: Clothing articles of different sizes should be washed together for more effective washing.
Sensitivity: soft and delicate clothing should be washed separately. Select the DELICATES cycle for new pure wool garments, curtains, silks, and other delicate items.
Check the laundry care labels for all clothes.
Sort through clothes and remove all hooks from curtains before washing.
Clothing decorations may damage the washing machine. Turn clothes with buttons or embroidery inside-out before washing.
Operating Instructions
Prepare before washing clothes
Tidy up fasteners:
Zip up zippers, tie loose bands or ribbons together, and close hooks, buttons, and other fastenings before washing.

Fasten all bra hooks, buttons, or zips and place bras in a closed delicates bag to prevent steel wires from damaging the machine.
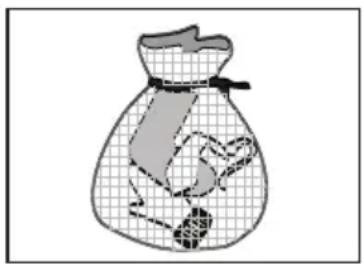
Place especially delicate garments, such as laced curtains, straight jackets, and small articles (tights, handkerchiefs, ties etc.), into a delicates bag for washing.
When washing a single big and heavy garment, such as Turkish towels, jeans, wadded jackets etc., the washing machine may behave abnormally due to the lack of balance. Please add one or two more items of clothing and wash them together to ensure the machine drains smoothly.
natural_image
Illustration of a bag with a patterned design and a small object inside (no text or symbols)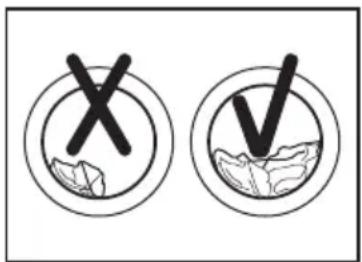
Clean dust, stains, and pet hair before washing.
Excessive dust, stains, and pet hair can cause friction that damages clothing and prevents the washing machine from operating normally.
To protect baby skin.
Baby articles (baby clothes and towels) including napkins shall be washed separately.
Baby clothes may become unsanitary if washed together with adults' clothes. Increase the rinsing time to ensure thorough rinsing and cleaning without detergent residue.
For the best results, hand-wash clothing parts that are easily stained, such as white socks, collars, and sleeves, before machine-washing.
Please use powder or liquid detergent. Soap could leave residue on clothing if used.
Clothes that pill easily should be turned inside-out before washing.
Clothes that pill easily should be washed separately to avoid leaving threads and residue on other garments. Black clothes and cotton clothes should be washed separately, because they can easily pick up threads and fabric residue if washed together. Please check before washing.
Do not wash waterproof materials (ski suits, placemats, shower curtains) with the washing machine.
Do not machine-wash clothes that cannot easily absorb water, or there may be a risk of overflow, abnormal vibration, or damage to your clothes while rinsing and draining. Do not wash placemats, raincoats, umbrellas, ski suits, car covers, or sleeping bags in the washing machine.
Cautions during Draining.
Normally, water from washing is drained through the drain hole. If waterproof items are washed in the washing machine, water can gather or pool in a different direction, preventing draining and unbalancing the washing machine.
Operating Instructions
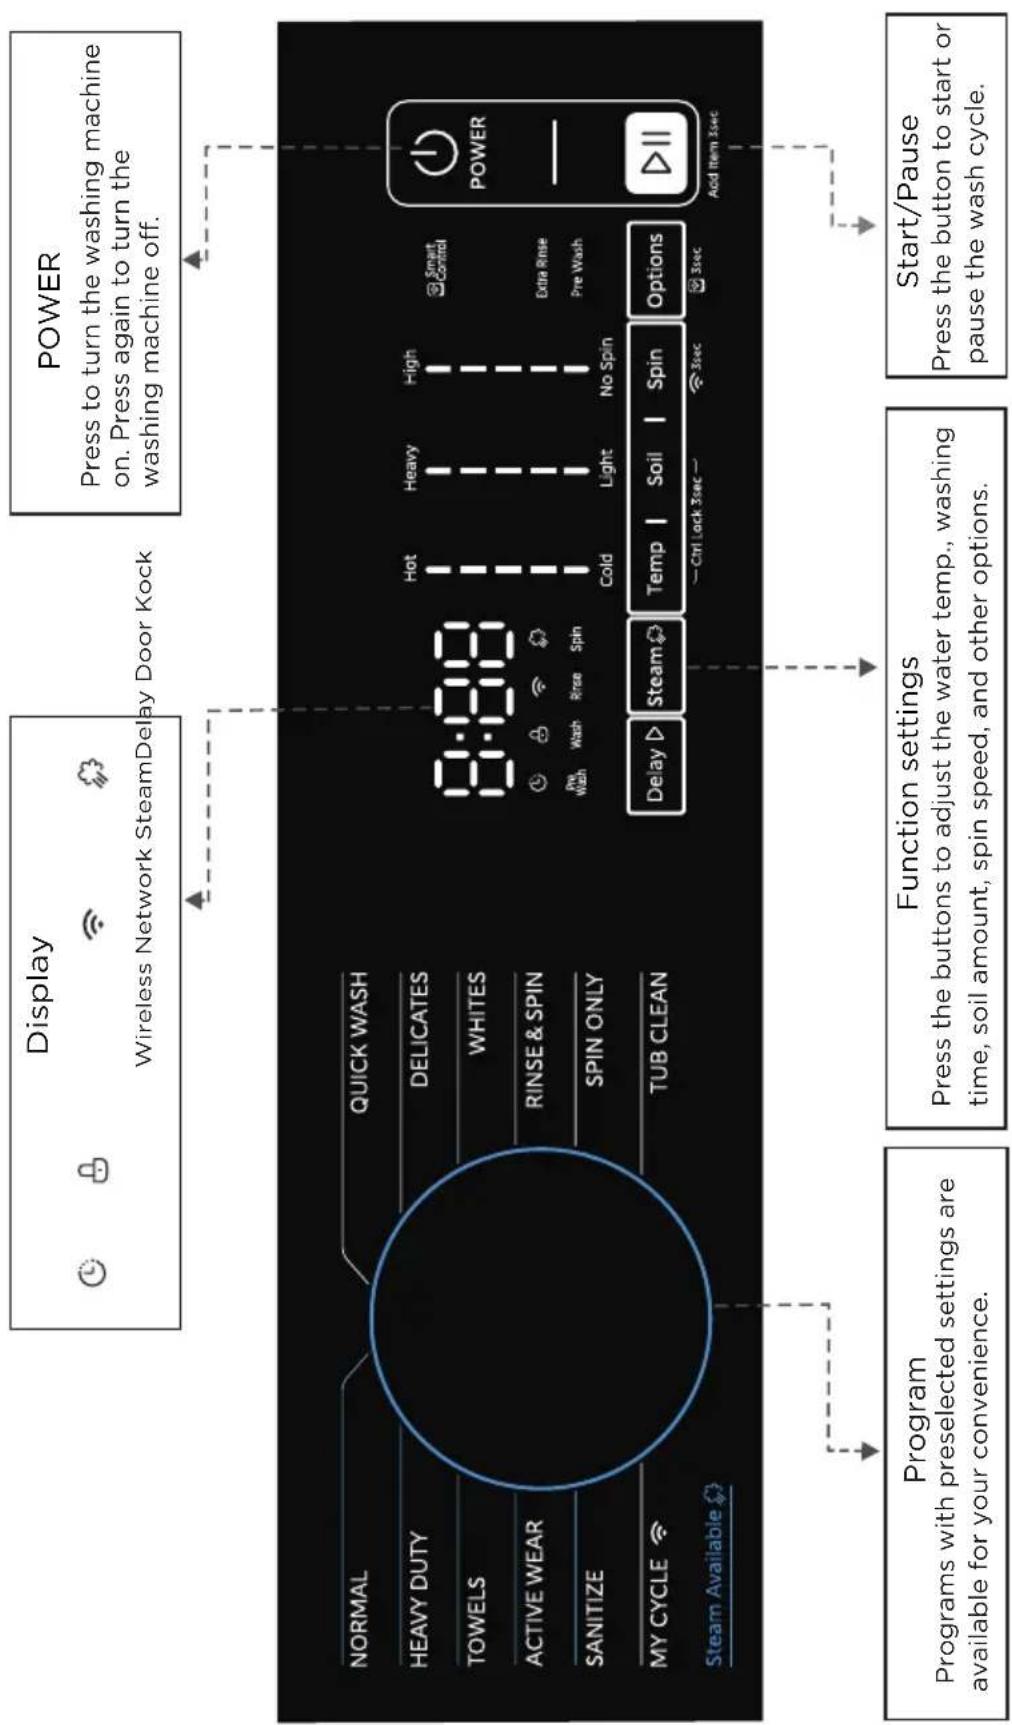
Control Panel
flowchart
graph TD
    A["Program Programs with preselected settings are available for your convenience."] --> B["Function settings"]
    B --> C["Start/Pause Press the button to start or pause the wash cycle."]
    D["Display Wireless Network SteamDelay Door Kock"] --> E["Power Press to turn the washing machine on. Press again to turn the washing machine off."]
    E --> F["8:00:1:11:11:11:11:11:11:11:11:11:11:11:11:11:11:11:11:11:11:11:11:11:11:11:11:11:11:11:11:11:11:11:11:11:12"]
    F --> G["Delay ▷ Steam ▼ Temp | Soil | Spin | Options"]
    G --> H[3sec 3sec 3sec 3sec 3sec 3sec 3sec 3sec 3sec 3sec 3sec 3sec 3sec 3sec 3sec 3sec 3sec 3sec 3sec 3sec 3sec 3sec 3sec 3sec 3sec 3sec 3sec 3sec 3sec 3sec 3sec 3sec 3sec 3sec 4sec 4sec 4sec 4sec 4sec 4sec 4sec 4sec 4sec 4sec 4sec 4sec 4sec 4sec 4sec 4sec 4sec 4sec 4sec 4sec 4sec 4sec 4sec 4sec 4sec 4sec 4sec 4sec 4sec 4sec 4sec 4sec 4sec 4secs
    style A fill:#f9f,stroke:#333
    style B fill:#ccf,stroke:#333
    style C fill:#cfc,stroke:#333
    style D fill:#fcc,stroke:#333
    style E fill:#cff,stroke:#333
    style F fill:#ffc,stroke:#333
    style G fill:#cfc,stroke:#333
    style H fill:#fcc,stroke:#333
    style I fill:#cfc,stroke:#333
    style J fill:#fcc,stroke:#333
    style K fill:#cfc,stroke:#333
    style L fill:#fcc,stroke:#333
    style M fill:#cfc,stroke:#333
    style N fill:#fcc,stroke:#333
    style O fill:#cfc,stroke:#333
    style P fill:#fcc,stroke:#333
    style Q fill:#cfc,stroke:#333
    style R fill:#fcc,stroke:#333
    style S fill:#cfc,stroke:#333
    style T fill:#fcc,stroke:#333
    style U fill:#cfc,stroke:#333
    style V fill:#fcc,stroke:#333
    style W fill:#cfc,stroke:#333
    style X fill:#fcc,stroke:#333
    style Y fill:#cfc,stroke:#333
    style Z fill:#fcc,stroke:#333
    style AA fill:#cfc,stroke:#333
    style AB fill:#fcc,stroke:#333
    style AC fill:#cfc,stroke:#333
    style AD fill:#fcc,stroke:#333
    style AE fill:#cfc,stroke:#333
    style AF fill:#fcc,stroke:#333
    style AG fill:#cfc,stroke:#333
    style AH fill:#fcc,stroke:#333
    style AI fill:#cfc,stroke:#333
    style AJ fill:#fcc,stroke:#333
    style AK fill:#cfc,stroke:#333
    style AL fill:#fcc,stroke:#333
    style AM fill:#cfc,stroke:#333
    style AN fill:#fcc,stroke:#333
    style AO fill:#cfc,stroke:#333
    style AP fill:#fcc,stroke:#333
    style AQ fill:#cfc,stroke:#333
    style AR fill:#fcc,stroke:#333
    style AS fill:#cfc,stroke:#333
    style AT fill:#fcc,stroke:#333
    style AU fill:#cfc,stroke:#333
    style AV fill:#fcc,stroke:#333
Notes: 1. The Control Panel diagram is just for reference. Please take the appearance of the actual product as the standard. 2. The design and specifications of this product are subject to change without written notice. Consult our website for details or call the service line for assistance.
Operating Instructions
Control Panel
Cycles and Options
- QUICK WASH
Extra-short program suitable for lightly soiled clothing, such as small amounts of laundry.
- DELICATES
For delicate, washable textiles, e.g. silk, satin, synthetic fibres or blended fabrics.
- WHITES
Special cycle for white clothes.
- RINSE&SPIN
Extra rinse with spin.
- SPIN ONLY
Extra spin with selectable spin speed.
- TUB CLEAN
This program is specifically configured to clean the drum and tube. high-temperature sterilization to make machine-washing more eco-friendly. Do not add clothes or other laundry during the Tub Clean function. Customers can use the Tub Clean function regularly on an as-needed basis.
- NORMAL
For wear-resistant, heat-resistant textiles made of cotton or linen.
- HEAVY DUTY
For washing heavy laundry like comforters or towels.
-TOWELS
Optimized for towels. Uses higher water temperature and stronger washing to remove dirt and ensure thorough cleaning.
- ACTIVE WEAR
Optimized for activewear.
- SANITIZE
Uses higher temperature wash for extended time to sanitize clothes.
-MY CYCLE
By using the SmartHome App, you can download additional cycles for your appliance. The control panel offers a limited number of cycles, but the app provides a wider selection. You can select a cycle in the app and apply it directly to the appliance. The default setting course is DENIM.
- DENIM
A specialized washing program designed for denim fabrics. It ensures thorough cleaning while preserving the color and texture of your jeans and other denim items.
-ECO COLD
An energy-saving washing program that uses cold water to efficiently clean clothes while reducing energy consumption.
-JUICE&FOOD STAINS
A targeted washing program designed to effectively remove tough juice stains, food stains, and other organic residue.
-OVERNIGHT WASH
A quiet and efficient washing program designed for overnight use, ensuring clean clothes by morning.
-SINGLE ITEM/SMALL LOAD
A quick and efficient washing program designed for single items or small loads, saving time and energy.
-SWEAT STAINS
Designed to remove sweat stains and odors, ensuring your clothes stay fresh and clean.
- SWIM WEAR
A gentle wash program designed for swim wear and delicate fabrics, using low temperature and mild washing to protect elastic materials.
-PERM PRESS
A program set to wash at moderate strength. This function can be used to reduce the wrinkles of clothes.
-COLORS/DARK
Optimized for washing colored and dark fabrics, preserving vibrancy and preventing fading.
Operating Instructions
Control Panel
-DEEP WASH
Provides intensive cleaning for heavily soiled fabrics, ensuring a thorough wash.
These programs (DENIM/ ECO COLD/ JUICE&FOOD STAINS/ OVERNIGHT WASH/ SINGLE ITEM/ SMALL LOAD/SWEAT STAINS/ SWIM WEAR/ PERM PRESS/ COLORS/DARK/ DEEP WASH) can only be selected by .the SmartHome app on your mobile phone
Special Functions
-Ct∅hllokck(ck)
Use this function to prevent children from operating the machine during a washing procedure. When Child Lock is selected, only the Power button works. You will be able to power the button on/off, but you will not be able to select or adjust any washing functions.
After the machine has begun a laundry cycle, press the Temp and Soil buttons and hold for three seconds. The buzzer will beep when Child Lock is activated, locking the Start/Pause button and the function and cycle selectors. Press and hold Temp and Soil again to unlock and deactivate Child Lock. Child Lock will remain even if the machine powers off and on again. The Child Lock function will not unlock (unless deactivated manually) until the laundry cycle is complete.
-Delay
The Delay function allows you to delay starting a wash cycle for up to 24 hours.
Set the Delay function:
- Select a laundry cycle.
- Press the Delay button to choose the delay time within a range of 0-24 hours.
- Press Start/Pause to begin the Delay timer. Once the timer runs out, the laundry cycle will begin.
Cancel the Delay function:
Before starting a laundry cycle, press the Delay button until the display reads OH. If the laundry cycle has already begun, press the POWER.
Notes: If there is a power outage while the washing machine is in operation, the selected cycle and options will be remembered. When power is restored, the machine will continue with the remaining time in the cycle.
- Add a garment
Additional clothes can be added during a laundry cycle. For safety reasons, the washing machine door cannot be opened while the drum of the washing machine is rotating and there is a large amount of high-temperature water inside.
To add clothes, follow the steps below:
- Press Start/Pause for 3 seconds.
- Wait until the drum stops rotating. The door lock will unlock.
- Load your additional clothes and close the door.
- Press the Start/Pause button again to resume the laundry cycle.
-Extra Rinse Press to select the Extra Rinse function.
-Soil Press to select different soil levels (from light to heavy).
The washing time will increase or decrease depending on the soil level.
-Temp Press to select the temperature (from cold to hot).
-Spin Press to change the spin speed (from no spin to high).
-Pre wash Press to add an extra wash before the main laundry cycle. This function is ideal for dust and soil on the surface of the clothes. Add detergent to Compartment I (labeled in the image below) when using this function.
-Steam Select to reduce the wrinkles of clothes.
-Options Press [Options] to select "Pre Wash" and "Extra Rinse".
Operating Instructions
The Special function
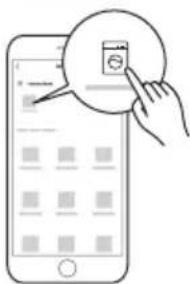
-Wireless Network Press [Spin] for 3 seconds to connect the washing machine to the internet via smartphone app. Go to the settings, turn on the wireless connection, and select an AP (Access Point).
-Remote Control After holding [Options] for 3 seconds, the mobile phone icon will light up in the machine, indicating that it has entered the remote control state. Smartphone remote control should meet the following conditions:
- The appliance should be connected to the internet.
- The door of drum should be closed.
Remark:
-. If the door is opened at any time, the remote control function will be deactivated.
-. The remote control function will automatically deactivate at the end of each cycle. You must manually reactivate the remote control function to use it again.

Note!
- The detail of connect wireless network, please check “ ” App Setup and Operation.
Washing clothes for the first time
Before washing, please make sure that the machine is installed properly. Your appliance was thoroughly checked before it left the factory. To remove any residual water and to neutralize
potential odors, it's recommended to clean your appliance before first use. For this reason, we recommend that you clean the inner drum by running the Tub Clean or another program with high temperature before using. Do not add laundry or detergent when running the Tub Clean program.
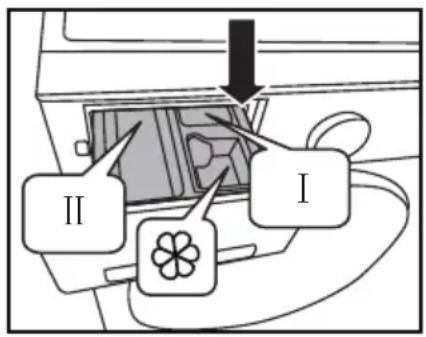
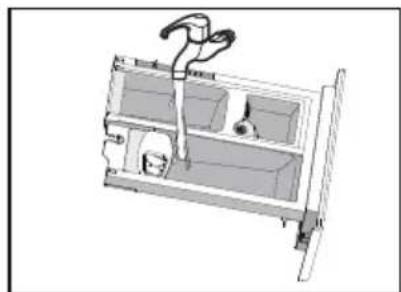
The drawer is divided into the following compartments:
I: Pre-wash detergent or washing powder.
II: Main detergent, stain remover, or bleaching products.
Washing additives, such as fabric softener.
Adding detergent to the washing machine:
- Pull out the drawer.
- Add pre-wash detergent into Case I (if necessary).
- Add detergent into Case II.
- Add softener into Case ✿ (if necessary).
Notes:
- If the detergent is clumped or ropy, please dilute it with some water before adding it to the detergent box. This prevents the detergent box intake from becoming blocked and overflowing while adding water.
- Please use the correct type of detergent for the washing temperature for the best effect, including less water use, and minimal energy consumption.
Operating Instructions
Washing clothes for the first time
Start up washing machine
Connect the power supply. Check whether the water pipes are properly connected. Open the tap completely. Put the clothes to be washed into the machine and add the detergent.
Then press the "Power" button, select the proper procedures and functions, and press the "Start/Pause" button.
Select the laundry cycle
The proper washing cycle should be selected based on the type, quantity, and soil level of the clothes to be washed, along with the washing temperature table below (ranging from Hot to Cold in five levels).
| 5 (Hot) | Maximum cleaning and sanitization for heavy soil and heat-resistant fabrics, such as work uniforms, kitchen towels, and baby clothes. |
| 4 ( )Warm+ | Strong cleaning for heavy soil and heavy fabrics, such as towels, sportswear, and thick linens. |
| 3 ( )Warm | Standard cleaning for moderate soil and durable fabrics, such as cotton shirts, bed sheets, and pillowcases. |
| 2 ( )Warm- | Mild cleaning suitable for light to moderate soil and blended fabrics, such as cotton blends and polyester. |
| 1 ( )Cold | Gentle cleaning for light soil and delicate fabrics, such as silk, wool, and lace. |
Operating Instructions
Table of washing procedures
Energy test program: NORMAL
These programs (DENIM/ ECO COLD/ JUICE&FOOD STAINS/ OVERNIGHT WASH/ SINGLE ITEM/ SMALL LOAD/SWEAT STAINS/ SWIMWEAR/ PERM PRESS/ COLORS/DARK/ DEEP WASH) can only be selected by the SmartHome app on your mobile phone.
Fill the tub with dry, unfolded clothes. Load the tub no more than 3/4 full. For best performance, the maximum load size should be less than 7.94 lbs. (3.6 kg).

Note!
- The parameters in this table are only reference. The actual parameters may be different from the parameters in the above table.
Operating Instructions
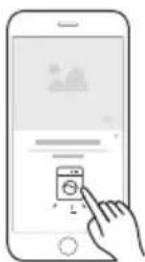
App Setup and Operation
Use Your Appliance With the SmartHome App
Before you start, make sure that:
- Your smartphone is connected to your home wireless network, and you know the network password.
- Make sure you are near the home appliance.
- The 2.4GHz band wireless signal is enabled on your wireless router.
Follow the below steps to enter the remote control state
Download the SmartHome App
On an app market (Google Play Store, Apple App Store), search for "SmartHome*" and find the SmartHome app. Download and install it on your phone. You can also download the app by scanning the QR code below.
Register and Log In
Open the SmartHome app, and create a new account to start (you can also register through a third-party account). If you already have an existing account, use that account to log in.
Connect Your Devices to SmartHome
- Please make sure your mobile phone is connected to a wireless network. If it is not, go to Settings and enable Wireless Networks and Bluetooth.
- Please power on your devices.
- Open the SmartHome app on your phone.
- If a "Smart devices discovered nearby" message appears, click to add.
- If no message appears, select "+" on the page and select your device in the list of nearby devices available. If your device is not listed, please add your device manually with the device category and device model.
- Connect your device to the wireless network according to the instructions on the app. If the connection fails, please follow the instructions provided by the app to continue with the operation.


Operating Instructions
Start the Remote Control
Rotate the knob randomly to indicate one of the programs, and press [ ] continuously until the remote control icon lights up, which means that the remote control function is active and you can control your washing machine remotely.
Wireless Network Status Light
| Slowly flashing | Waiting for connection |
| Quickly flashing | Connecting |
| Quickly flashing solid | Connected to your wireless router |

Note!
- Make sure your devices are powered on.
- Keep your mobile phone close enough to your device when you are connecting your device to the network.
- Connect your mobile phone to the wireless network at home, and make sure you know the password of the wireless network.
- Check if your wireless router supports 2.4 GHz band and turn it on. If you are not sure whether the router supports 2.4
GHz band, please contact the router manufacturer. - The device cannot connect to a wireless network that requires authentication, which usually appears in public areas such as hotels, restaurants, etc. Please connect to a wireless network that does not require authentication.
- Turn off the WLAN+ (Android) or WLAN Assistant (iOS) function of your mobile phone when connecting your device to the network.
- In the case that your device connected to a wireless network before but now needs to reconnect, please click "+" on the Home page, and add your device again by the device category and model according to the instructions on the app's.
Care and Cleaning
Care and cleaning
Before you start, please do pull out the power plug or disconnect power and close the tap.

- Do not use solvents. Solvents may damage the washing machine or generate toxic, explosive gases..
- Never use water to sprinkle and wash the washing machine.
- Do not use detergents that contain PCMX to clean the washing machine.
- Certain internal parts are intentionally not grounded and may present a risk of electric shock only during servicing. Service Personnel-Do not contact the following parts while the appliance is energized: Water Inlet Valve, Drain Pump, Water Level Sensor and Door Lock
Cleaning and Maintenance of Washing Machine Cabinet
Proper maintenance on the washing machine can extend its working life. The surface can be cleaned with diluted non-abrasive neutral detergents when necessary. If there is any water overflow, use a wet cloth to wipe it off immediately. No sharp items are allowed to strike the cabinet.
Notes: Do not use formic acid and its diluted solvents or equivalents.
Clean Internal Drum
The rusts left inside the drum by metal articles shall be removed immediately with chlorine-free detergents.
Never use steel wool.
Restoring a Frozen Washing Machine
If the temperature drops below zero and the water in your washing machine gets frozen, follow the directions below:
- Disconnect the power supply for the washing machine.
- Wash the tap with warm water to loosen the inlet pipe.
- Take down the inlet pipe and immerse it in warm water.
- Pour warm water into the washing drum and wait for 10 minutes.
- Reconnect the inlet pipe to the tap and check whether the inlet and outlet are working normally. Repeat with the other inlet pipe (if applicable).
Notes: When the washing machine is reactivated, make sure the ambient temperature is above 0^ C.
Freezing prevention measures
If your washing machine is located in the room where it can get frozen easily, please drain the remaining water inside drain pipe and inlet pipe thoroughly.
Remove the remaining water in inlet pipe:
- Close the tap.
- Screw off the inlet pipe from tap and put its end into a container.
- Start up any cycle except a single Wash or Drain cycle. Any water will drain out of the inlet within 40 seconds.
- Reconnect the inlet pipe to the tap.
Care and Cleaning
Care and cleaning
Remove the remaining water in the drain pump

To avoid burning, only do this after the hot water inside the machine cools down.
Clean detergent drawer
- Pull out the drawer and find the button A as shown in the right diagram
- Press down button A and take off the drawer along the direction of the arrow shown in the right diagram.
- Clean the dispenser drawer and the softener cover under water.
- Finish clean and push the drawer back into original position.
Clean inlet filter
Clean the inlet filter if there is no water or an insufficient amount of water when the tap is opened.
Clean the tap filter:
- Close the tap.
- Select any cycle except for Wash or Drain.
- Press the Start/Pause button and keep the laundry cycle running for about 40 seconds.
- Remove the inlet pipe from the tap.
- Use water to wash the filter.
- Reconnect the inlet pipe.
Wash the washing machine filter:
- Unscrew the inlet pipe from the backside of the machine.
- Pull out the filter with long-nose pliers.
- Wash the filter.
- Reinstall the filter.
- Open the tap and make sure there is no water leakage.
- Close the tap.

natural_image
Illustration of a hand holding a ring with liquid, partially submerged in a circular container (no text or symbols)
natural_image
Technical line drawing of a mechanical or architectural component with no visible text or symbols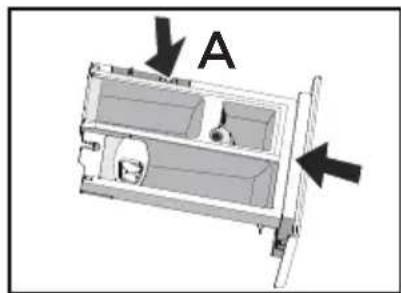
natural_image
3D diagram of a mechanical device with labeled component A, showing internal compartments and directional arrows (no text or symbols beyond labels)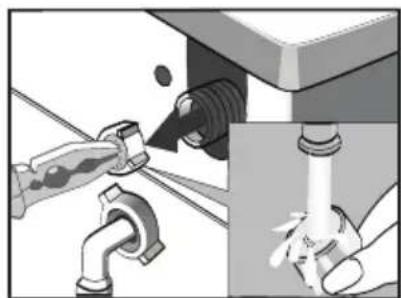
natural_image
Illustration of a pipe repair operation showing valve installation and piping connection (no text or symbols)Care and Cleaning
Care and cleaning

WARNING
Pull out the power plug to avoid electrical shock before cleaning the machine. After using the washing machine, pull out the power cord and close the door tightly to ensure child safety.
Remove foreign matter
Drain Pump Filter:
The drain pump filter can filter out stray threads and small objects from your laundry. Clean the filter periodically to ensure the normal operation of the washing machine.

WARNING
Inspect and clean the filter regularly, depending on how frequently you use the washing machine and the soil level of your clothes. Inspect the filter if the machine does not empty or spin.
The machine may make unusual noises during draining due to objects such as safety pins, coins, etc. blocking the pump filter.
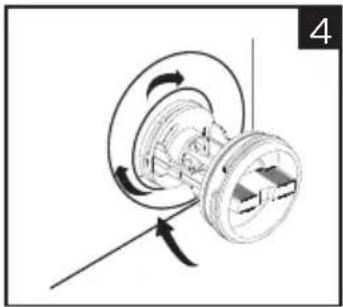
Clean the filter by following the instructions below:
natural_image
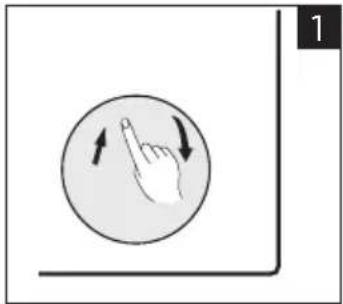
Simple diagram showing a hand pointing at a circular button with directional arrows (no text or symbols)Open the lower cover cap.
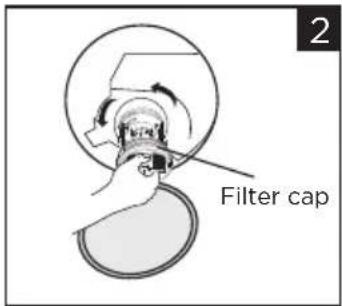
Turn the filter cap counterclockwise to remove the filter.
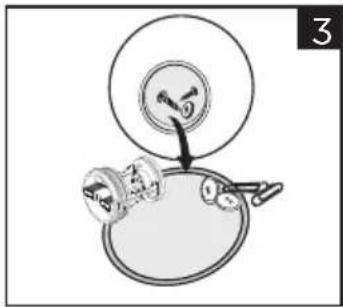
Remove extraneous matter.
natural_image
Mechanical diagram showing a rotating assembly with directional arrows indicating motion (no text or symbols)Replace the filter and turn it counterclockwise to lock it in place, then replace the lower cover cap.
Warning!
Depending on the laundry cycle selected, there may be hot water in the drain pump during the laundry cycle.
Never remove the pump cover cap during a laundry cycle. Always wait until the cycle is complete and the appliance is empty. When replacing the filter and cover, make sure they are securely re-tightened.
Care and Cleaning
Care and cleaning
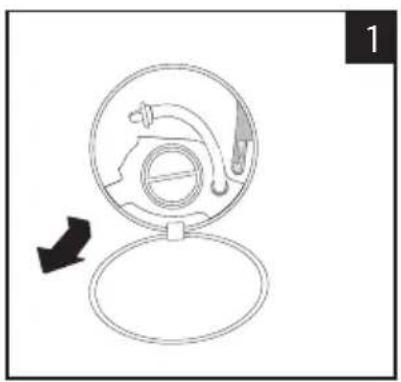
Emergency Door Release
In case of power failure or other circumstances where the door cannot be opened, there is an emergency door release.
Pull down the emergency pull cord in the filter door and replace it after opening the door.
natural_image
Diagram of a mechanical device with a circular housing and a handle, showing a rotation arrow (no text or symbols)- Open the filter door.
natural_image
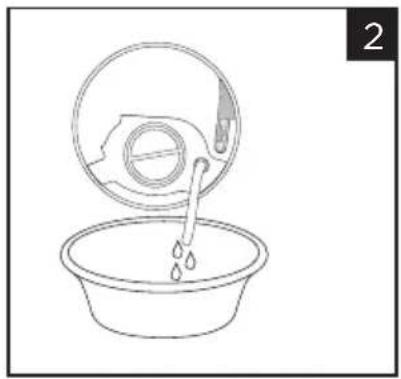
Line drawing of a bucket with liquid being poured into a basin (no text or symbols)- Drain the cooled water in the drum.
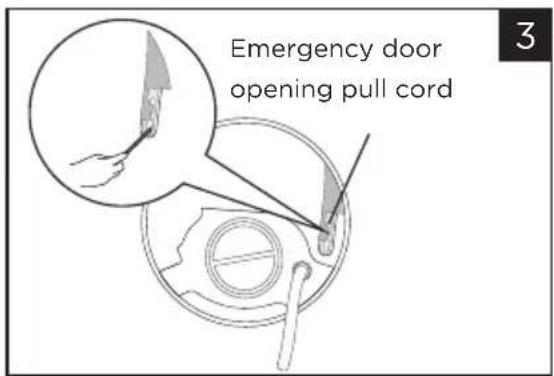
- Insert a tool into the pull ring and pull it downward to unlock the washing machine door.
Warning!
You cannot use the emergency door release during a laundry cycle. Open the door after the water has cooled to avoid getting burned by the residual high-temperature water in the machine tub.
Troubleshooting Tips
Troubleshooting Tips
If the washing machine does not start or stops during operation, try to find a solution in the table below. If your problem is still not resolved, call the service center for assistance.
| Troubles | Proper reason | Solution |
| Washing machine cannot start up | Washing machine was not set up properly. | Check if the door is closed tightly.Check if power plug is inserted well.Check if the water supply tap is open.Check if the POWER button was pressed.Check if the Start/Pause was pressed.button |
| Door cannot be opened | Machine's safety protection design is active. | Disconnect the power and restart the machine. |
| Heating fault | NTC is damaged and/or the heating pipe is aging. | You can only wash clothes without heating the water.Contact the service center promptly to restore heating capabilities. |
| Water leakage | The inlet pipe, drain hose, tap, and/or washing machine are not tightly connected.Drain pipe in the room is blocked. | Check and fasten water pipes.Clean up drain hose and ask a specialist to repair it if necessary. |
| Water overflows from the bottom of the machine | The inlet pipe is not connected tightly.The drain hose has water leakage. | Fix the inlet pipe.Replace the drain hose. |
| Indicator or display does not light | Power is disconnected.PC board has problems.Harness has connection problem. | Check if the power is shut down and power plug is connected correctly.If that does not fix the issue, please call the service line. |
| Detergent residue in the box | Washing powder is dampened and clumps together. | Clean and wipe the box.Use detergent or special detergent for the drum. |
| Clothes are still dirty after washing | The clothes are too dirty.Insufficient detergent quantity. | Select the correct laundry cycle.Add the correct detergent quantity according to the instructions on the detergent package. |
| Abnormally loud noise and/or vibration | Inner drum is unbalanced. | Check if the transport bolts have been removed.Check if the cabinet is installed on a solid and level floor.Check if there are any barrettes or metal articles inside.Check if the legs in the washing machine are adjusted to be level. |
Error Codes
Error Codes
| Description | Proper reason | Solution |
| E30 | Door is not closed properly | Restart after the door is closedCheck if any clothes are stuck in the gap |
| E10 | Water intake problem while washing | Check if the water pressure is too lowStraighten the water pipeCheck if the inlet valve filter is blocked |
| E21 | Water draining taking too long | Check if the drain hose is blocked |
| E12 | Water overflow | Restart the washer |
| EXX | Others | Please try again first. Call the service line if you still experience issues. |

Note!
- After checking, reactivate the machine and retry your selected cycle. If the problem occurs again or the display shows an error code, call the service line for assistance.
Appendix
Appendix
Care Label
| Graphic Symbol | Illustration | Graphic Symbol | Illustration |
 | Hand Wash | No Machine Wash | |
 | Washing (including Machine Wash and Hand Wash) | Do not Wash | |
 | Dry Clean | No Dry Clean | |
 | Warmly Dry Clean | No Wring | |
 | Bleach | No Bleach | |
 | Tumble dry | Do not Tumble Dry | |
 | Iron | Do not Iron | |
 | Steam Iron | Iron with Cloth | |
 | Medium Temperature and Max. Temperature 150 C | Dry after Wash | |
 | Line Dry | Line Dry in Shade |

WARNING
To avoid fire, electrical shock and other accidents, please remember the following reminders:
- Only the voltage indicated in power label can be used. If you are not clear of voltage in your home, please contact the local power bureau.
- When you are using the heating function, the maximum current through the washing machine will reach 12A. Please make sure the power supply units (current, voltage and cable) can meet the normal load requirements for the machine.
- Protect the power cord properly. The power cord should be secured so that it does not get damaged or become a tripping hazard. Pay special attention when plugging the power cord into the socket and make sure it is secure.
- Do not overload a wall-mounted socket or use an extension cable. Overloading the wiring may cause fire or electrical shock. Do not pull out power plug with wet hand.
- To ensure your safety, power plug shall be inserted into an grounded three-pole socket. Carefully check and ensure that your socket is properly and reliably grounded.
Certifications
Certifications
Please note that changes or modifications of this product is not expressly approved by the party responsible for compliance could void the user's authority to operate the equipment.
The antenna(s) used for this transmitter must be installed and operated to provide a separation distance of at least 20 cm from all persons and must not be collocated or operating in conjunction with any other antenna or transmitter. Installers must ensure that 20cm separation distance will be maintained between the device (excluding its handset) and users.
Federal Communications Commission (FCC) Compliance Statement for USA
This device complies with part 15 of the FCC rules. Operation is subject to the following two conditions: (1) This device may not cause harmful interference, and (2) this device must accept any interference received, including interference that may cause undesired operation.
Note: This equipment has been tested and found to comply with the limits for a Class B digital device, pursuant to part 15 of the FCC rules. These limits are designed to provide reasonable protection against harmful interference in a residential installation. This equipment generates, uses and can radiate radio frequency energy and, if not installed and used in accordance with the instructions, may cause harmful interference to radio communications. However, there is no guarantee that interference will not occur in a particular installation. If this equipment does cause harmful interference to radio or television reception, which can be determined by turning the equipment off and on, the user is encouraged to try to correct the interference by one or more of the following measures:
- Reorient or relocate the receiving antenna.
- Increase the separation between the equipment and receiver.
- Connect the equipment into an outlet on a circuit different from that to which the receiver is connected.
- Consult the dealer or an experienced radio/TV technician for help.
This equipment complies with FCC radiation exposure limits set forth for an uncontrolled environment.
FCC Supplier's Declaration of Conformity
Product Name: Front Load Washing Machine
Model number: MLHW31S2BBW/MLHW31S2BBG
Suppliers Name: Midea America Corp.
Suppliers Address (USA): 300 Kimball Dr. Parsippany, NJ 07054
Suppliers Website: http://midea.com/us
Contact Email/Telephone: 1-866-646-4332
Industry Canada (IC) Compliance Statement for Canada
This device complies with Industry Canada license-exempt RSS standard(s). Operation is subject to the following two conditions: (1) this device may not cause interference, and (2) this device must accept any interference, including interference that may cause undesired operation of the device.
CAN ICES-003(B)/NMB-003(B)
Midea is not responsible for any changes or modifications not expressly approved by Midea. Such modifications could void the user's authority to operate the equipment.
Contains FCC ID: 2ADQOMWB-SWB01
Contains IC ID: 12575A-WB01

Technical Specifications
Technical specifications
Model: MLHW31S2BBW/MLHW31S2BBG
| Parameter | |
| Power Supply | 120V~, 60Hz |
| Dimension(W*D*H) | 595*615*845mm |
| Net Weight | 72kg (158.7lb) |
| Drum Size | 3.1 cu.ft. |
| Rated Current | 11A |
| Standard Water Pressure | 0.1-0.8MPa |
2 YEAR LIMITED WARRANTY
This warranty is provided to the original purchaser at retail (the "Purchaser" or "you") by Midea America (Canada) Corp. ("Midea" or "we"), which warrants all parts of this Product, as described below. Midea warrants this Product to the Purchaser for personal, family or household use. This warranty covers performance and quality issues in materials and workmanship that appear under normal use and maintenance appearing within two years from the date of purchase. This warranty gives you specific rights, and you may also have other rights that vary from state to state.
WARRANTY LIMITATIONS
This warranty is given only to the original purchaser at retail in either the United States or Canada and may not be transferred to any subsequent buyer. This warranty does not apply to purchasers of our products for use or resale in a business; a separate commercial warranty may protect those purchasers.
This warranty does not cover any Product failure caused by:
(a) Abuse, damage or use of the Product in violation of the Product instructions.
(b) Modification to any Product or part.
(c) Failure to maintain the Product or part as described in accordance with the Product instructions.
(d) Faulty installation or application.
(e) Use of parts or accessories not compatible with this Product.
(f) Floods, fires, winds, lightning, accidents, corrosive atmosphere, or other conditions beyond Midea's control.
(g) Interruption in electrical service or inadequate electrical service.
(h) Replacement of fuses and replacement or resetting of circuit breakers.
(i) Frozen or broken water pipes, water damage, moisture intrusion, mold or other biological growth.
(j) The use, combination or linking of the Product to other products, processes or materials not provided by Midea.
WARRANTY REMEDY
If any quality or performance issue covered by this warranty is discovered during the warranty period, we will, at our option, repair or replace any such Product. This warranty is limited to Product repair or replacement by an authorized Midea servicer or dealer and does not cover any shipping cost, labor cost, customs duties, inland logistics cost, or cost of service, including any diagnostics, removal, transportation, or reinstallation costs. If we ask, you must return the Product to us.
WARRANTY DISCLAIMER; EXCLUSION OF DAMAGES
This is the only express warranty to consumers that we offer on our Products. ANY IMPLIED WARRANTIES BY MIDEA, INCLUDING BUT NOT LIMITED TO WARRANTIES OF MERCHANTABILITY AND FITNESS FOR PARTICULAR PURPOSE, ARE LIMITED TO THE DURATION OF THIS EXPRESS WARRANTY. Some states and provinces do not allow the exclusion of express warranties and/or limitations on how long an implied warranty lasts, so the above exclusion and/or limitation may not apply to you.
THE REMEDY DESCRIBED ABOVE IS THE ONLY ONE THAT WE WILL PROVIDE, EITHER UNDER THIS WARRANTY OR UNDER ANY WARRANTY ARISING BY OPERATION OF LAW. WE WILL NOT BE RESPONSIBLE FOR ANY CONSEQUENTIAL OR INCIDENTAL DAMAGES ARISING FROM THE BREACH OF THIS WARRANTY OR ANY OTHER WARRANTY, WHETHER EXPRESS OR IMPLIED, NEGLIGENCE OR OTHER TORT, OR ON ANY STRICT LIABILITY THEORY, INCLUDING BUT NOT LIMITED TO LOST PROFITS. Some states do not allow the exclusion or limitation of incidental or consequential damages, so the above exclusion may not apply to you.
WARRANTY CLAIMS PROCESS
For more information or to make a warranty claim, please visit:
https://www.midea.com/ca/support
Or contact us at:
Telephone: 1-888-365-2230
Email: CanadaSupport@midea.com
You must have Your bill of sale, delivery slip, or appropriate proof of purchase to submit a warranty claim. The date of purchase establishes the warranty period, should service be required.
DISPUTE RESOLUTION
ARBITRATION CLAUSE. IMPORTANT. PLEASE REVIEW THIS ARBITRATION CLAUSE. IT AFFECTS YOUR LEGAL RIGHTS.
(a) Parties: This arbitration clause (this "Arbitration Clause") affects your rights against Midea and any of its affiliates or employees or agents, successors, or assigns, all of whom together are referred to below as "we" or "us" for ease of reference.
(b) ARBITRATION REQUIREMENT: EXCEPT AS STATED BELOW, ANY DISPUTE BETWEEN YOU AND ANY OF US SHALL BE DECIDED BY NEUTRAL, BINDING ARBITRATION RATHER THAN IN COURT OR BY JURY TRIAL. "Dispute" will be given the broadest possible meaning allowable by law. It includes any dispute, claim, or controversy arising from or relating to your purchase of this Product, any warranty upon the Product, or the Product's condition. It also includes determination of the scope or applicability of this Arbitration Clause. The arbitration requirement applies to claims in contract and tort, pursuant to statute, or otherwise.
(c) CLASS-ARBITRATION WAIVER: ARBITRATION IS HANDLED ON AN INDIVIDUAL BASIS. IF A DISPUTE IS ARBITRATED, YOU AND WE EXPRESSLY WAIVE ANY RIGHT TO PARTICIPATE AS A CLASS REPRESENTATIVE OR CLASS MEMBER ON ANY CLASS CLAIM YOU MAY HAVE AGAINST US OR WE AGAINST YOU, OR AS A PRIVATE ATTORNEY GENERAL OR IN ANY OTHER REPRESENTATIVE CAPACITY, TO THE MAXIMUM EXTENT PERMITTED BY LAW. YOU AND WE ALSO WAIVE ANY RIGHT TO CLASS ARBITRATION OR ANY CONSOLIDATION OF INDIVIDUAL ARBITRATIONS.
(d) Discovery and Other Rights: Discovery and rights to appeal in arbitration are generally more limited than in a lawsuit. This applies to both you and us. Other rights that you or we would have in court may not be available in arbitration. Please read this Arbitration Clause and consult the rules of the arbitration organizations listed below for more information.
(e) SMALL CLAIMS COURT OPTION: YOU MAY CHOOSE TO LITIGATE ANY DISPUTE BETWEEN YOU AND ANY OF US IN SMALL CLAIMS COURT, RATHER THAN IN ARBITRATION, IF THE DISPUTE MEETS ALL REQUIREMENTS TO BE HEARD IN SMALL CLAIMS COURT.
(f) Governing Law: For residents of the United States, the procedures and effect of the arbitration will be governed by the Federal Arbitration Act (9 U.S.C. § 1 et seq.) rather than by state law concerning arbitration. For residents of Canada, the procedures and effect of the arbitration will be governed by the applicable arbitration law of the province in which you purchased your Product. The law governing your substantive warranty rights and other claims will be the law of the state or province in which you purchased your Product. Any court having jurisdiction may enter judgment on the arbitration award.
(g) Rules of the Arbitration: If the amount in controversy is less than \250,000, the arbitration will be decided by a single arbitrator. If the amount in controversy is greater than or equal to \250,000, the arbitration will be decided by a panel of three arbitrators. The arbitrator(s) will be chosen pursuant to the rules of the administering arbitration organization. United States residents may choose JAMS (1920 Main Street, Ste. 300, Irvine, CA 92614, www.jamsadr.com), or, subject to our approval, any other arbitration organization. In addition, Canadian residents may choose the ADR Institute of Canada (234 Eglinton Ave. East, Suite 405, Toronto, Ontario, M4P 1K5, www.amic.org). These organizations' rules can be obtained by contacting the organization or visiting its website. If the chosen arbitration organization's rules conflict with this Arbitration Clause, the provisions of this Arbitration Clause control. The award of the arbitrator(s) shall be final and binding on all parties.
(h) Location of the Arbitration Hearing: Unless applicable law provides otherwise, the arbitration hearing for United States residents will be conducted in the federal judicial district in which you reside (in your hometown area) or, for Canadian residents, in the province in which you reside, and, if you choose, will be in-person.
(i) Costs of the Arbitration: Each party is responsible for its own attorney, expert, and other costs and fees unless applicable law requires otherwise. Notwithstanding the preceding sentence, and unless applicable law requires otherwise, if you are a consumer under the JAMS rules or the rules of another agreed upon arbitration administrator, Midea will pay or reimburse you for all reasonable fees or costs to the extent required by law or the applicable arbitration administrator's rules. Whether or not required by law or such rules, if you prevail at arbitration on any claim against Midea, Midea will reimburse you for any reasonable fees paid to the arbitration administrator in connection with the arbitration proceedings. Under no circumstances will Midea seek from you payment or reimbursement of any reasonable fees that Midea incurs in connection with the arbitration. If you are required to advance any fees or costs to JAMS or other agreed upon arbitration administrator, but you ask Midea to do so in your stead, Midea will consider and respond to your request.
(j) Survival and Enforceability of this Arbitration Clause: This Arbitration Clause shall survive the expiration or termination, or any transfer, of the warranty on your Product. If any part of this Arbitration Clause, except waivers of class-action rights, is found to be unenforceable for any reason, the remainder of this clause and the warranty shall remain enforceable. If, in a case in which class-action allegations have been made, the waiver of class-action rights under this warranty is found to be unenforceable with respect to any part of the dispute, the parts of the dispute as to which the waiver of class-action rights have been found unenforceable will be severed and will proceed in court without reference or application of this Arbitration Clause. Any remaining parts will proceed in arbitration.
QUEBEC RESIDENTS
The arbitration provisions of this warranty shall not apply to residents of Quebec
natural_image
Line drawing of a washing machine with circular vent and side buttons (no text or symbols)NUMÉROS DE MODÈLE
MLHW31S2BBW
MLHW31S2BBG
www.midea.com/ca
LETTRE DE REMERCIEMENT
Certifications.... 32
natural_image
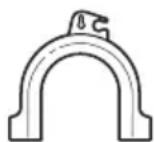
Technical line drawing of a mechanical device with exploded and assembled views (no text or symbols)natural_image
Diagram of a mechanical valve assembly with rotating components (no text or labels)natural_image
Technical diagram of a mechanical assembly with two valves and a coiled pipe (no text or labels)
The floor drain system requires
natural_image
Mechanical assembly diagram showing a wrench and nut assembly with a curved arrow indicating rotation (no text or symbols)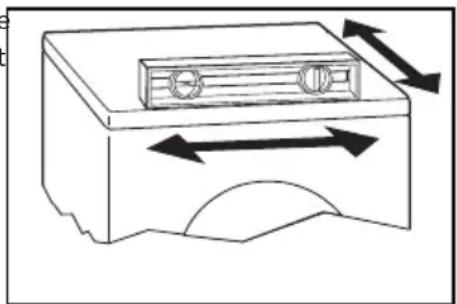
natural_image
Diagram of a mechanical component with bidirectional arrows indicating movement or force (no text or symbols)natural_image
Illustration of a food item being processed into a basket, showing a bag and container (no text or symbols)À retenir :
natural_image
Illustration of a bag with a ribbon and patterned interior (no text or symbols)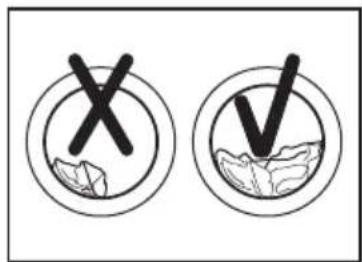

Mode d'emploi
natural_image
Illustration of a hand pressing down on a circular component with a curved arrow indicating rotation (no text or symbols)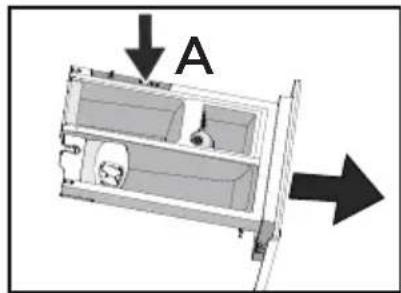
natural_image
Technical line drawing of a mechanical assembly with faucet and housing (no text or symbols)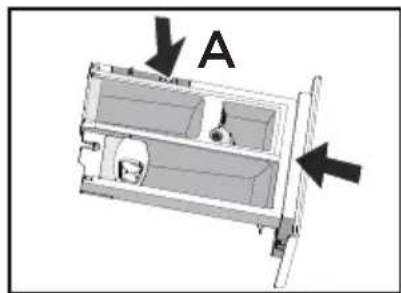
natural_image
Diagram of a mechanical device with labeled component A, showing internal components and directional arrows (no text or symbols beyond labels)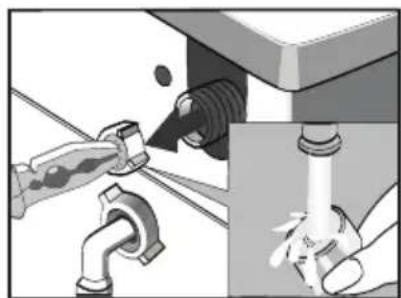
natural_image
Illustration of a hand using a pipe to adjust or install a valve, showing mechanical components and wiring (no text or symbols)natural_image
Simple diagram showing a hand pointing at a circular button with directional arrows (no text or symbols)natural_image
Mechanical assembly diagram showing a rotating component with directional arrows indicating motion (no text or symbols)natural_image
Diagram of a mechanical device with a circular housing and a ring, showing a directional arrow (no text or symbols)natural_image
Line drawing of a bucket with liquid being poured into a basin, no text or symbols presenthttps://www.midea.com/ca/support