MRT14D2BWW - Fridge MIDEA - Free user manual and instructions
Find the device manual for free MRT14D2BWW MIDEA in PDF.

| Product Type | Refrigerator with freezer compartment |
| Brand | Midea |
| Model | MRT14D2BWW |
| Total Volume | 14.2 cu.ft (approx. 402 L) |
| Width | 70.0 cm |
| Height | 154.0 cm |
| Depth | 73.1 cm |
| Rated Voltage | 115 V AC, 60 Hz |
| Rated Current | 1.2 A |
| Required Clearance | More than 100 mm on each side for air circulation |
| Control Panel | SETTING button with LED display for temperature adjustment (COLD, NORMAL, COLDEST, SUPER COOLING) |
| SUPER COOLING Function | Operates at full capacity for 6 hours to cool down quickly |
| Panel Lock | Auto lock after 15 seconds of inactivity; unlock by pressing for 3 seconds |
| Defrost | Automatic (air cooling); manual defrost possible by unplugging the appliance |
| Interior Light | LED lamp replaceable only by a professional |
| Door Reversal | Possible, parts provided, detailed procedure in the manual |
| Cleaning | With a soft cloth and mild detergent; avoid abrasives and solvents |
| Electrical Compatibility | Grounded outlet required |
| Warranty | 1 year parts and labor (USA and Canada); extension possible |
| Country of Manufacture | Not specified, Chinese brand |
Frequently Asked Questions - MRT14D2BWW MIDEA
User questions about MRT14D2BWW MIDEA
0 question about this device. Answer the ones you know or ask your own.
Ask a new question about this device
Download the instructions for your Fridge in PDF format for free! Find your manual MRT14D2BWW - MIDEA and take your electronic device back in hand. On this page are published all the documents necessary for the use of your device. MRT14D2BWW by MIDEA.
USER MANUAL MRT14D2BWW MIDEA
natural_image
Simple line drawing of a refrigerator with two doors and a side panel (no text or symbols)Refrigerator
TOP MOUNTED FREEZER SERIES
USER MANUAL
MRT14D2BST/MRT14D3BST
MRT14D2BBB/MRT14D3BBB
MRT14D2BWW/MRT14D3BWW
Warning notices: Before using this product, please read this manual carefully and keep it for future reference. The design and specifications are subject to change without prior notice for product improvement.
Consult with your dealer or manufacturer for details.
The diagram above is just for reference. Please take the appearance of the actual product as the standard.
LANGUAGES
EN English
FR French
ES Spanish
Free 3 months
extension of the
original limited warranty
period!* Simply text a
picture of your proof of
purchase to:
1-844-224-1614
*The warranty extension is for the three months
immediately following
the completion of the product's original warranty
period. Individuals do not need to register the
product in order to get all the rights and remedies
of registered owners under the original limited
warranty
THANK YOU LETTER
Thank you for choosing Midea! Before using your new Midea product, please read this manual thoroughly to ensure that you know how to operate the features and functions that your new appliance offers in a safe way.
CONTENTS
THANK YOU LETTER 01
SPECIFICATIONS 02
PRODUCT OVERVIEW 03
PRODUCT INSTALLATION 04
OPERATION INSTRUCTIONS 11
CLEANING AND MAINTENANCE 14
TROUBLESHOOTING 16
WARRANTY 18
SPECIFICATIONS
| Product model | MRT14D2B**/MRT14D3B** |
| Total Storage Volume 14.2 cu.ft. | |
| Rated Voltage | 115V~/60Hz |
| Rated Current 1.2A | |
| Overall Dimension (H x W x D) | 60.6 in x 27.6 in x 28.8 in |
PRODUCT OVERVIEW
Names of components

1 Freezer glass shelf 5 Fruit and vegetable box
2 Refrigerator glass shelf 1 6 Freezer door trays
3 Tray(Optional) 7 Refrigerator door tray 1
4 Refrigerator glass shelf 2 8 Refrigerator door tray 2
ATTENTION
The picture above is only for reference. The actual configuration will depend on the physical product or statement by the distributor.
When the refrigerator is powered on for the initial time, storing too much food may adversely affect the cooling effect of the refrigerator.
Do not block the air outlet during food storage, which may adversely affect the cooling effect. If the temperature in fridge compartment is cold, please adjust the switcher to the weaker position. If the temperature in fridge compartment is not cold enough, please adjust the switcher to the strong position.
PRODUCT INSTALLATION
Installation Instructions
Finding a suitable location
- This refrigerator is designed to be free standing only, and should not be recessed or built-in.
- The refrigerator should be placed in a well-ventilated indoor place; the ground shall be flat and sturdy.
- Keep away from heat and avoid direct sunlight. Do not place the refrigerator in moist or watery places to prevent rust or reduction of insulating effect.
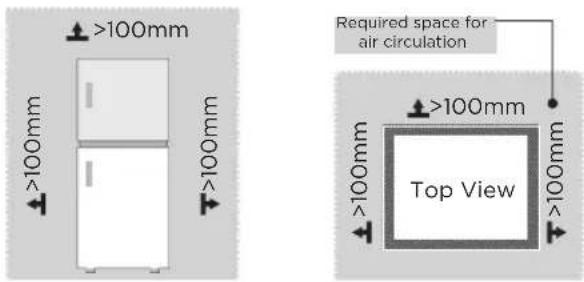
Dimensions and Clearances
- Too small of a distance from adjacent items may result in the degradation of freezing capability and increased electricity costs. Allow over 100 mm of clearance from each adjacent wall when installing the appliance.
Providing a proper power supply
- Check your local power source. This refrigerator requires a AC115 V, 60 Hz power supply.
- Use a receptacle that accepts the grounding prong. The power cord is equipped with a 3-prong (grounding) plug which mates with a standard 3-prong (grounding) wall outlet to minimize the possibility of electric shock hazard from this refrigerator.

CAUTION
The refrigerator should always be plugged into its own individual electrical outlet which has a voltage rating that matches the rating plate. Never unplug your refrigerator by pulling on the power cord. Always grip the plug firmly and pull straight out from the outlet.
Start to use
- The refrigerator shall stay for 2 hours before connecting power when it is firstly started.
- The refrigerator shall run 2 to 3 hours before loading fresh or frozen foods; the refrigerator shall run for more than 4 hours in summer in advance considering that the ambient temperature is high.
Space requirement diagram (when the door is open and when the door is closed)
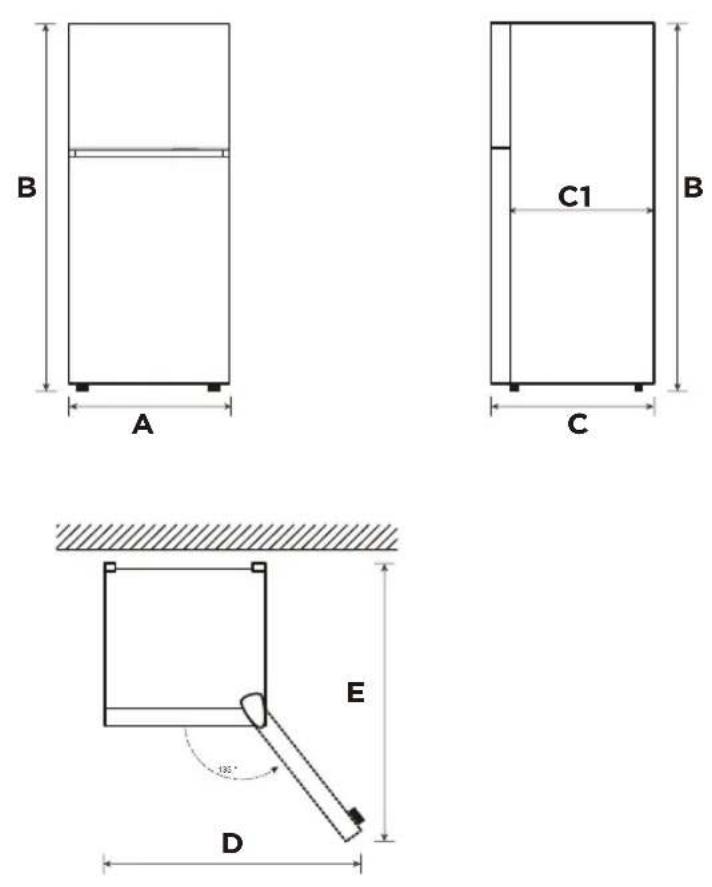
| Width | Overall Height | Depth | Depth Only Cabinet | Door Open 135° Width | Doors Open 135° Depth |
| A B C | C1 D E | ||||
| 700 1540 | 731 650 | 1085 1310 |
Notice: All dimensions in mm
Door right-left change
List of tools to be provided by the user
 | Cross screwdriver |
 | Allen wrench |
 | Putty knife, Thin-blade screwdriver |
 | 5/16" socket and ratchet |
 | Masking tape |
Parts to be used for door reverse
| SN Parts Quantity Notes | ||
| 1 Upper hinge 1 | Pre-installed on the box and still needs to be used when changing the door | |
| 2 Upper hinge cover 1 | ||
| 3 Upper hinge axle sleeve 1 | ||
| 4 Upper hinge screw 3 | ||
| 5 Hole cover 1 | ||
| 6 Middle hinge screw 2 | ||
| 7 Middle hinge 1 | ||
| 8 Hole plug | 2 | |
| 9 Adjustable foot | 1 | |
| 10 Center sill screw | 2 | |
| 11 Center sill screw cap | 1 | |
| 12 Lower hinge screw 3 | ||
| 13 Lower hinge 1 | ||
| 14 Stopper | 2 | |
| 15 Stopper screw | 2 | |
| 16 Right door self-locking | 2 | Pre-installed on the door body, removed when changing the door, and retained |
| 17 Left door self-locking | 2 | Put it in the accessory bag and use it when changing the door |
| 18 Screw self-locking 2 | Pre-installed on the door and still needs to be used when changing the door | |
| 19 Hole plug | 1 |
EN
Step
- Unplug your refrigerator and remove all food from refrigerator.
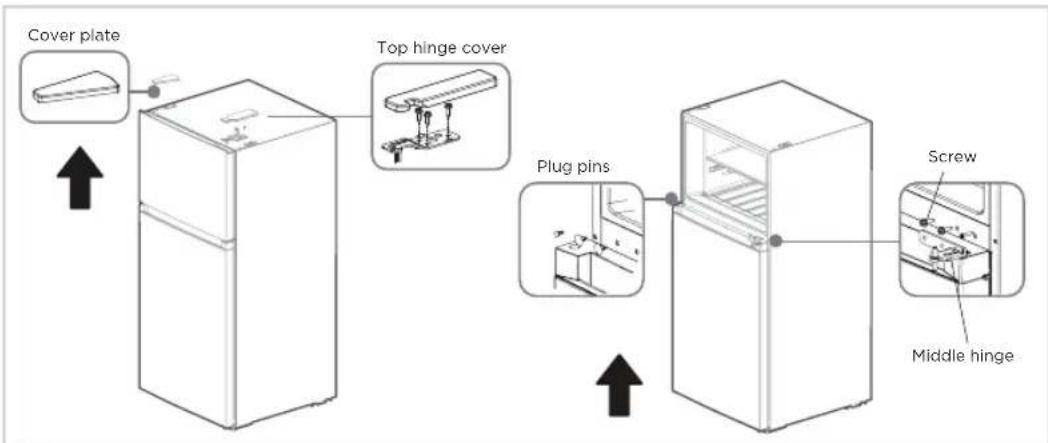
- Remove the top hinge cover, screws and upper hinge on the top of the cabinet, and the cover plate on the left; take out the freezing door upwards.
- Unscrew the hinge screws, remove the middle hinge, remove the plug pins, and take out the refrigeration door upwards.
ATTENTION
Images show a refrigerator that opens on the left side. Your refrigerator may open on the right side.
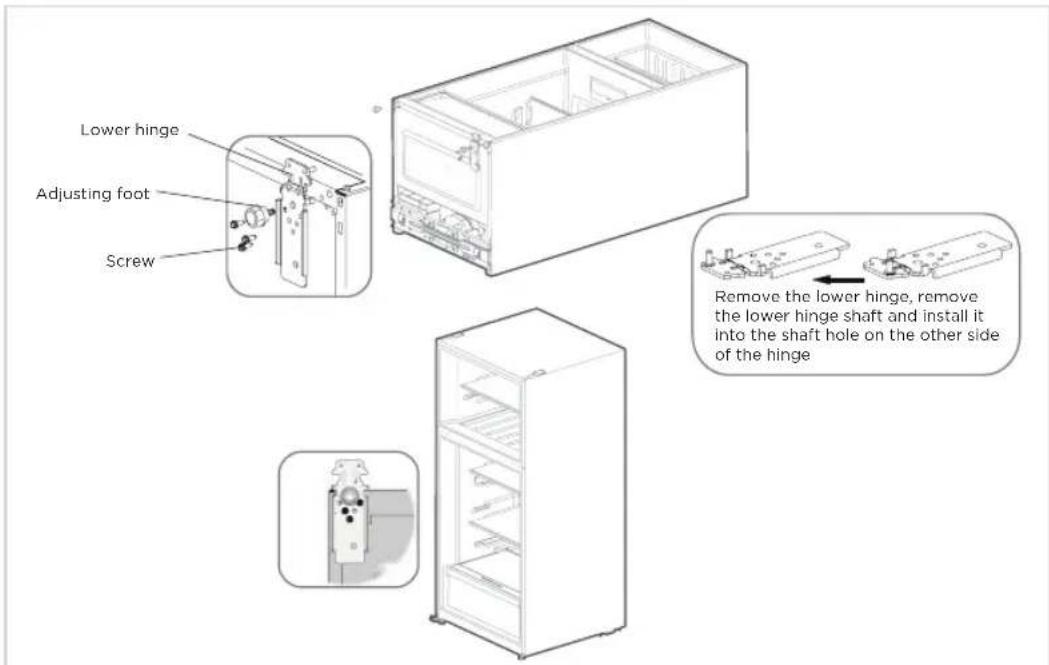
- Put the refrigerator down, unscrew the lower hinge screw and adjusting foot, remove the lower hinge, remove the lower hinge shaft and install it into the shaft hole on the other side of the hinge.
- Install the lower hinge and tighten the screws on the left side of the refrigerator, install two adjusting feet, and erect the refrigerator.
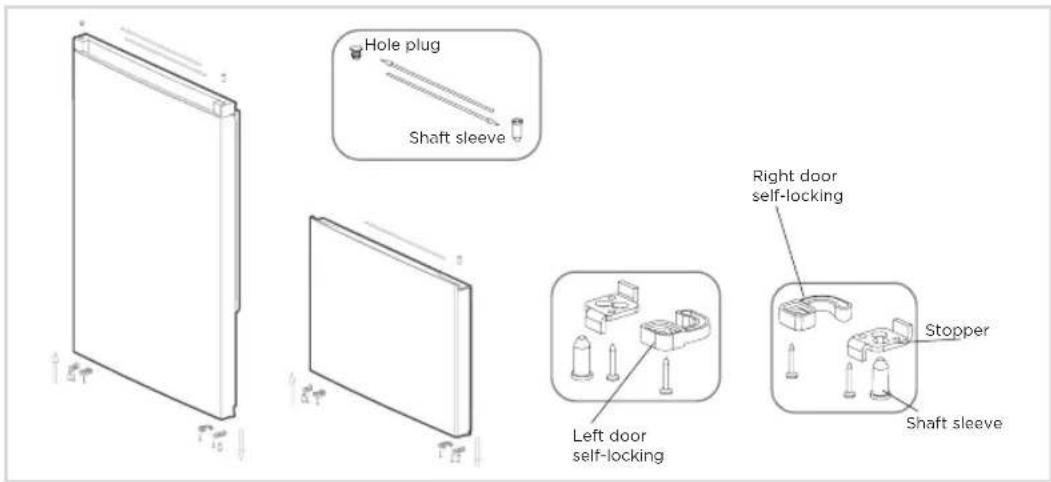
- Unscrew and remove the shaft sleeves, stopper and right door self-locking screws of the two door bodies, take out the left door self-locking from the accessory bag, and install it to the left corner of the door body together with the stopper and shaft sleeves. Take out the hole plug and shaft sleeve on the upper part of the refrigeration door and adjust their positions before installing them into the door body. Take out the shaft sleeve on the freezing door and install it on the other side.
- Install the refrigerated door on the lower hinge, install the center beam screws, middle hinge and tighten the screws on the left side, and cover the plug pins, center beam screws and screw caps on the right side.
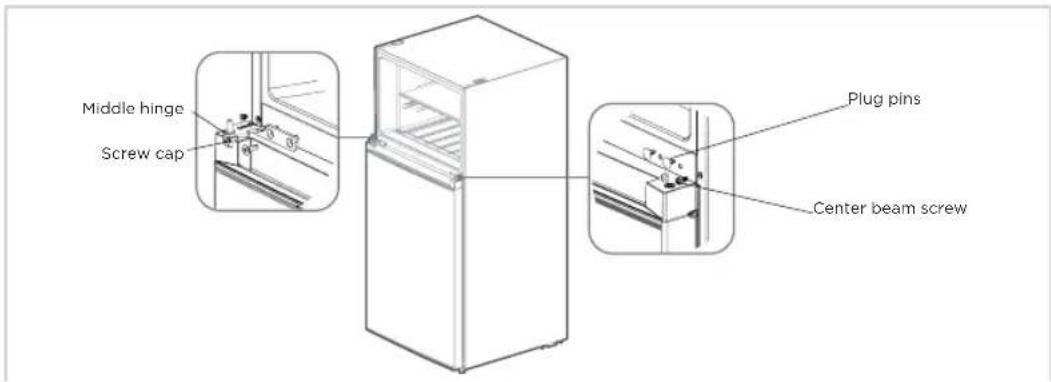
- Install the freezing door on the middle hinge, remove the upper hinge shaft and install it into the shaft hole on the other side of the hinge, install the upper hinge and tighten the screws, and install the upper hinge cover and the right hole cover.
- The door change is completed.
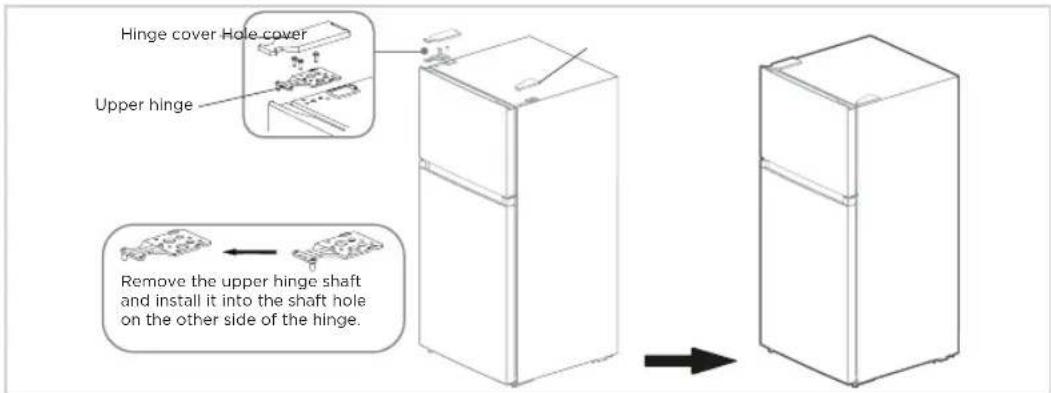
ATTENTION
The picture above is only for reference. The actual configuration will depend on the physical product or statement by the distributor.
Leveling feet
To avoid vibration, the unit must be leveled.
If required, adjust the leveling screws to compensate for the uneven floor.
The front should be slightly higher than the rear to aid in door closing.
Leveling screws can be turned easily by tipping the cabinet slightly.
Turn the leveling screws counterclockwise to raise the unit, clockwise to lower it.
Moving the appliance
- Remove all food from inside the appliance.
- Pull the power plug out, insert and fix it into the power plug hook at the rear or on top of the appliance.
- Tape parts such as shelves and the door handle to prevent from falling off while moving the appliance.
- Move the appliance with more than two people carefully. When transporting the appliance over a long distance, keep the appliance upright.
- After installing the appliance, connect the power plug into a socket outlet to switch on the appliance.
ATTENTION
Precautions before operation:
Before making changes the refrigerator must be disconnected from power.
Precautions should be taken to prevent any personal injury.
Changing the light
- Any replacement or maintenance of the LED lamps is intended to be made by the manufacturer, its service agent or similar qualified person.
Connecting the appliance
After installing the appliance, connect the power plug into a socket outlet.
ATTENTION
After connecting the power supply cord (or plug) to the outlet, wait 2 or 3 hours before you put food into the appliance. If you add food before the appliance has cooled completely, your food may spoil.
Tips for energy saving
- Do not place the appliance near cookers, radiators or other heat sources. If the ambient temperature is high, the compressor will run more frequently and for longer, resulting in increased energy consumption.
- Ensure that there is sufficient ventilation at the base of the appliance, on the sides of the appliance and at the back of the appliance. Never cover ventilation openings.
- Please also observe the spacing dimensions in the chapter "Installation".
- The arrangement of drawers, shelves and racks as shown in the illustration offers the most efficient use of energy and should therefore be retained as far as possible. All drawers and shelves should remain in the appliance to keep the temperature stable and save energy.
- To obtain a larger storage space (e.g. for large refrigerated/frozen goods), the middle drawers can be removed. The top and bottom drawers and shelves should be removed last if necessary.
- An evenly filled refrigerator/freezer compartment contributes to optimal energy use. Therefore, avoid empty or half-empty compartments.
- Allow warm food to cool before placing it in the refrigerator/freezer. Food that has already cooled down increases energy efficiency.
- Allow frozen food to defrost in the refrigerator. The coldness of the frozen food reduces the energy consumption in the refrigerator compartment and thus increases the energy efficiency.
- Open the door only as briefly as necessary to minimise cold loss. Opening the door briefly and closing it properly reduces energy consumption.
- The door seals of your appliance must be perfectly intact so that the doors close properly and energy consumption is not increased unnecessarily.
OPERATION INSTRUCTIONS
Control Panel
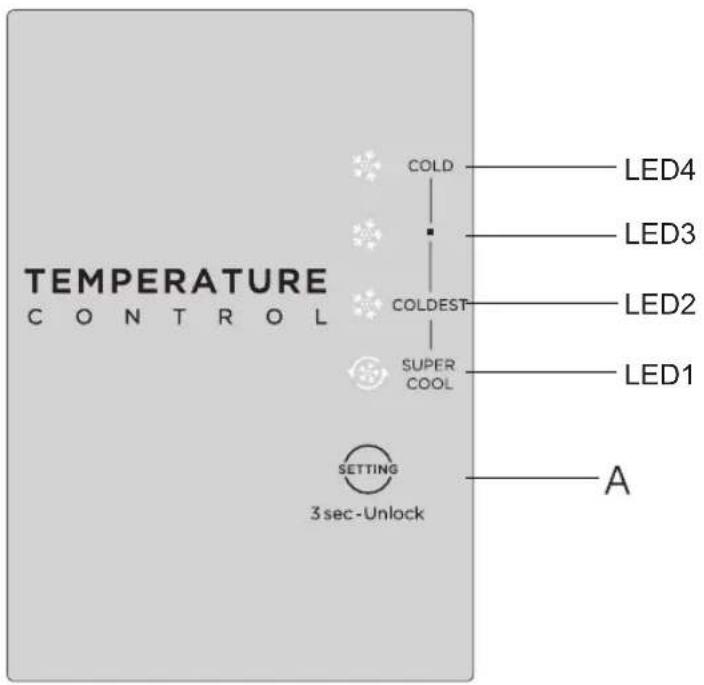
EN
| Key | |
| A Setting Button | |
| Display screen | |
| LED4 | COLD |
| LED3 | ■ |
| LED2 | COLDEST |
| LED1 | SUPER COOL |
ATTENTION
The actual control panel may differ from model to model.
Operating instructions
Temperature setting
• Each time the temperature setting button A is pressed once, the temperature setting changes one time. After the temperature setting has been completed, the refrigerator will run according to the set value after 15s.
- When Super Cool mode is activated, the fridge will run at its maximum capacity to faster reach the coolest setting and lasting longest for 6 hours.
The shift regulation is:

flowchart
graph LR
    A["COLD"] --> B["(normal)"]
    B --> C["COLDEST"]
    C --> D["SUPER COOL"]
Note: The temperature of each gear is within ± 2^ of the set temperature, and the actual situation is slightly different according to the load situation.
Fault indication
- when electrify the refrigerator for first time, the display screen shines fully for 3 seconds, and then the refrigerator runs according to coldest. In case of a failure, the corresponding LED blinks. In case of no failures, it shows the temperature setting of refrigerator.
EN
Fault Code Fault Description
LED1/LED2 flashing Refrigerator temperature sensor faults
LED1/LED3 flashing Freezing frost sensor faults
LED1/LED4 flashing Ambient temperature sensor failure
Lock/Unlock
- When the temperature control panel is in lock state, it needs to long press temperature setting key for 3 seconds for unlocking the panel, all LEDs will blink for 2 seconds when panel is unlocked. When the temperature control panel is in unlock state, if there is no operation on control panel within 15 seconds, it will enter into lock state automatically.
Tips on storing food
Freezer compartment
- The freezer is designated for the storage of food frozen at very low temperature, long-term storage of frozen food, and for the production of ice.
- Only use the shelves in the door of the freezer to store frozen food, not for storing hot food designated for freezing.
- Do not put fresh and frozen food next to each other. The frozen food may thaw.
- When freezing fresh food (such as meat, fish or chopped meat), cut them into parts that can be used at the same time.
- Storing frozen food: instructions are usually stated on the packages, which must be followed. If there is no information on the packaging, food should not be stored for longer than three months from the date of purchase.
- When purchasing frozen food, make sure that it was frozen at a suitable temperature and that the packaging is not damaged.
- Frozen food should be kept in suitable packages to retain the quality and should be returned to the freezer compartment as soon as possible.
- If a package of frozen food shows moisture or abnormal bulging, it is probable that it was stored at the wrong temperature and the content is spoiled.
- The storage period for frozen food depends on the room temperature, the thermostat setting, the frequency of opening the door of the freezer, the type of food and the time of transporting the product from the shop to the household. Always follow the instructions printed on the packaging and never exceed the maximum storage time stated on the package.
Refrigerator compartment
- To reduce moisture and subsequent ice build-up, never put liquid into the refrigerator in unsealed containers. Frost tends to concentrate in the coolest parts of the evaporator. Storing uncovered liquids results in a more frequent need for defrosting.
- Never put warm foods in the refrigerator. These should first cool down at room temperature and then be placed so as to ensure adequate air circulation in the refrigerator.
- Foods or food containers should not touch the back wall of the refrigerator because they could freeze to the wall. Do not keep regularly opening the door of the refrigerator.
- Meat and clean fish (packed in a package or plastic foil) can be placed in the refrigerator, which can be used in 1–2 days.
- Fruit and vegetables without packaging can be placed in the part designated for fresh fruit and vegetables.
ATTENTION
The optimal temperature setting of each compartment depends on the ambient temperature. Above optimal temperature is based on the ambient temperature of 25^ C.
Storage of too much food during operation after the initial connection to power may adversely affect the freezing effect of the refrigerator. Foods stored shall not block the air outlet; or otherwise the freezing effect will also be adversely affected.
When store beverages at coldest setting, inside fruits and vegetables are at risk of freezing, please set on towards less cooling if coldest setting is very cool.
CLEANING AND MAINTENANCE
Defrosting
- The refrigerator is made based on the air-cooling principle and thus has automatic defrosting function. Frost formed due to change of season or temperature may also be manually removed by disconnection of the appliance from power supply or by wiping with a dry towel.
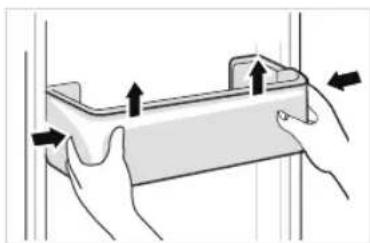
Cleaning of door tray
- According to the direction arrow in the figure below, use both hands to squeeze the tray, and push it upward, then you can take it out.
• After washing the tray having been taken out, you can adjust its installing height in accordance with your requirement.
natural_image
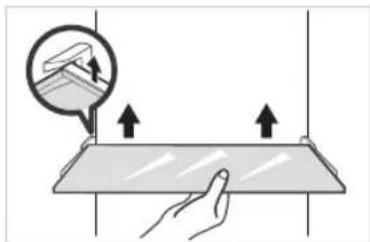
Illustration of hands holding a rectangular object with arrows indicating movement or force (no text or symbols)Cleaning of glass shelf
- As the innermost part of the refrigerator liner where contacting the shelves has a backstop, you shall raise the shelves upward, then you can be able to take it out.
- Adjust or clean the shelves according to your requirement.
natural_image
Illustration of a hand pressing down on a surface with arrows indicating movement or force (no text or symbols)Cleaning the fruit and vegetable box
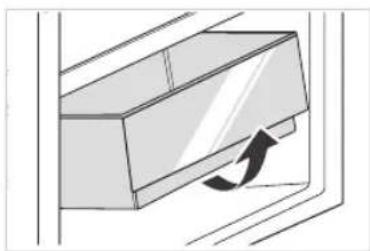
- Remove the contents of the drawer. Hold the handle of the vegetable drawer and pull it out completely until it stops.
- Lift the vegetable drawer up and remove it by pulling it out.
natural_image
Diagram of a door handle with an arrow indicating clockwise motion (no text or symbols)ATTENTION
Soft towels or sponge dipped in water and non-corrosive neutral detergents are suggested for cleaning. The freezer of shall be finally cleaned with clean water and dry cloth. Open the door for natural drying before the power is turned on. Do not use hard brushes, clean steel balls, wire brushes, abrasives, such as toothpastes, organic solvents (such as alcohol, acetone, banana oil, etc.), boiling water, acid or alkaline items clean refrigerator considering that this may damage the fridge surface and interior.
Stop using
Power failure:
In case of power failure, even if it is in summer, foods inside the appliance can be kept for several hours; during the power failure, the times of door opening shall be reduced, and no more fresh food shall be put into the appliance.
Long-time nonuse:
The appliance shall be unplugged and then cleaned; then the doors are left open to prevent odor.
Moving:
Before the refrigerator is moved, take all objects inside out, fix the glass partitions, vegetable holder, freezing chamber drawers and etc. with tape, and tighten the leveling feet; close the doors and seal them with tape. During moving, the appliance shall not be laid upside down or horizontally, or be vibrated; the inclination during movement shall be no more than 45^ .
ATTENTION
The appliance shall run continuously once it is started. Generally, the operation of the appliance shall not be interrupted; otherwise the service life may be impaired. Foods can be preserved for a couple of hours even in summer in case of power failure; it is recommended to reduce the frequency of opening door.
TROUBLESHOOTING
The following simple issues can be handled by the user. Please call the after-sale service department if the issues are not solved.
| Problem Possible reason | |
| Failed operation | ·Check whether the appliance is connected to power or whether the plug is in well contact |
| ·Check whether the voltage is too low | |
| ·Check whether there is a power failure or partial circuits have tripped | |
| Odor | ·Odorous foods shall be tightly wrapped |
| ·Check whether there is any rotten food | |
| ·Clean the inside of the refrigerator | |
| Long-time operation of the compressor | ·Long operation of the refrigerator is normal in summer |
| ·When the ambient temperature is high it is not suggestible having too much food in the appliance at the same time | |
| ·Food shall get cool before being put into the appliance | |
| ·The doors are opened too frequently | |
| Light fails to get lit | ·Check whether the refrigerator is connected to power supply and whether the illuminating light is damaged |
| ·Have the light replaced by a specialist | |
| Door can not be properly closed | ·The door is stuck by food packages |
| ·Too much food is placed | |
| ·The refrigerator is tilted | |
| Loud noises | ·Check whether the floor is level and whether the refrigerator is placed stably |
| ·Check whether accessories are placed at proper locations | |
| Door seal fails to be tight | Remove foreign matters on the door seal |
| Heat the door seal and then cool it for restoration (or blow it with an electrical drier or use a hot towel for heating) | |
| Water pan overflows | There is too much food in the chamber or food stored contains too much water, resulting in heavy defrosting |
| The doors are not closed properly, resulting in frosting due to entry of air and increased water due to defrosting | |
| Hot housing | Heat dissipation of the built-in condenser via the housing, which is normal when housing becomes hot due to high ambient temperature, storage of too much food or shutdown of the compressor is shut down, provide sound ventilation to facilitate heat dissipation |
| Surface condensation | Condensation on the exterior surface and door seals of the refrigerator is normal when the ambient humidity is too high. Just wipe the condensate with a clean towel |
| Abnormal noise | Buzz: The compressor may produce buzzes during operation, and the buzzes are loud particularly upon start or stop. This is normal |
| Creak: Refrigerant flowing inside of the appliance may produce creak, which is normal | |
WARRANTY
MIDEA REFRIGERATOR LIMITED WARRANTY
ATTACH YOUR RECEIPT HERE. PROOF OF PURCHASE IS REQUIRED TO OBTAIN WARRANTY SERVICE.
Please have the following information available when you call the Customer Service Center:
■ Name, address and telephone number
■ Model number and serial number
■ A clear, detailed description of the problem
■ Proof of purchase including dealer or retailer name and address
IF YOU NEED SERVICE:
- Before contacting us to arrange service, please determine whether your product requires repair. Some questions can be addressed without service. Please take a few minutes to review the Troubleshooting section of the User Manual, or visit http://us.Midea.com/support
- All warranty service is provided exclusively by our authorized Midea Service Providers, in the U.S. and Canada.
Midea Customer Service
In the U.S.A. or Canada, call 1-866-646-4332.
If outside the 50 States of the United States or Canada, contact your authorized Midea dealer to determine whether another warranty applies.
EN
1 YEAR PARTS AND LABOR
WHAT IS COVERED
FIRST YEAR LIMITED WARRANTY (PARTS AND LABOR)
Midea will repair or replace, without charge, any defects due to faulty materials or workmanship for one full year from the date of purchase. For further detail of warranty coverage and warranty repair information, visit www.midea.com or call 1-866-646-4332.
Consumer will be responsible for:
■ Diagnostics, removal, transportation and reinstallation cost required because of service.
Costs of service calls that are a result of items listed under NORMAL RESPONSIBILITIES OF THE CONSUMER**
NORMAL RESPONSIBILITIES OF THE CONSUMER\*\*
This warranty applies only to products in ordinary household use, and the consumer is responsible for the items listed below:
- Proper use of the appliance in accordance with the instructions provided with the product.
- Routine maintenance and cleaning necessary to keep the good working condition.
- Proper installation by an authorized service professional in accordance with instructions provided with the appliance and in accordance with all local plumbing, electrical and / or gas codes.
-
Proper connection to a grounded power supply of sufficient voltage, replacement of blown fuses, repair of loosened connections or defects in house wiring.
-
Expenses for making the appliance accessible for servicing.
-
Damages to finish after installation.
YOUR SOLE AND EXCLUSIVE REMEDY UNDER THIS LIMITED WARRANTY SHALL BE PRODUCT REPAIR OR REPLACEMENT AS PROVIDED HEREIN. Service must be provided by a Midea designated service company. This limited warranty is valid only in the 50 States of the United States or Canada and applies only when the major appliance is used in the country in which it was purchased. This limited warranty is effective from the date of original consumer purchase. Proof of original purchase date is required to obtain service under this limited warranty.
WHAT IS NOT COVERED
- Failure caused by damage to the unit while in your possession (other than damage caused by defect or malfunction), by its improper installation, or by unreasonable use of the product, including without limitation, failure to provide reasonable and necessary maintenance or to follow the written Installation and Instruction Manual.
- Products purchased "as-is" or refurbished are not covered by this warranty.
- Food loss caused by refrigerator or freezer failure.
- Service calls to repair or replace consumables such as water filters, light bulbs air filters etc., or handles, knobs and other cosmetic parts.
- Product that has been transferred from its original owner.
- Interior or exterior rust on the unit.
- Damages caused by services performed by persons other than authorized Midea servicers; use of parts other than Midea replacement parts; obtained from persons other than such Midea customer service; or external causes such as abuse, misuse, inadequate power supply or acts of God.
- Service calls resulting from improper installation of your product.
- Service calls to instruct you on the use of your product.
- Surcharges including, but not limited to, any after hour, weekend, or holiday service calls, tolls, ferry trip charges, or mileage expense for service calls to remote areas, including the state of Alaska.
- If the unit is put to commercial, business, rental, or other use or application other than for consumer use, we make no warranties, express or implied, including but not limited to, any implied warranty of merchantability or fitness for particular use or purpose.
- Product that has been removed outside the USA or Canada.
- Products without original serial numbers or products that have serial numbers which have been altered or cannot be readily determined.
NOTE: Some states do not allow the exclusion or limitation of incidental or consequential damages. So this limitation or exclusion may not apply to you.
The cost of repair or replacement under these excluded circumstances shall be borne by the customer.
DISCLAIMER OF IMPLIED WARRANTIES
IMPLIED WARRANTIES, INCLUDING ANY IMPLIED WARRANTY OF MERCHANTABILITY OR IMPLIED WARRANTY OF FITNESS FOR A PARTICULAR PURPOSE, ARE LIMITED TO ONE YEAR OR THE SHORTEST PERIOD ALLOWED BY LAW. Some states and provinces do not allow limitations on the duration of implied warranties of merchantability or fitness, so this limitation may not apply to you. This warranty gives you specific legal rights, and you also may have other rights that vary from state to state or province to province.
DISCLAIMER OF REPRESENTATIONS OUTSIDE OF WARRANTY
Midea makes no representations about the quality, durability, or need for service or repair of this major appliance other than the representations contained in this warranty. If you want a longer or more comprehensive warranty than the limited warranty that comes with this major appliance, you should ask Midea or your retailer about buying an extended warranty.
LIMITATION OF REMEDIES; EXCLUSION OF INCIDENTAL AND CONSEQUENTIAL DAMAGES
YOUR SOLE AND EXCLUSIVE REMEDY UNDER THIS LIMITED WARRANTY SHALL BE PRODUCT REPAIR AS PROVIDED HEREIN. MIDEA SHALL NOT BE LIABLE FOR INCIDENTAL OR CONSEQUENTIAL DAMAGES. Some states and provinces do not allow the exclusion or limitation of incidental or consequential damages, so these limitations and exclusions may not apply to you. This warranty gives you specific legal rights, and you also may have other rights that vary from state to state or province to province.
05/19
Extension gratuite
INSTALLATION DU PRODUIT 04
INSTRUCTIONS D'OPÉRATION ....11
NETTOYAGE ET ENTRETIEN ....14
DÉPANNAGE 16
GARANTIE....18
SPÉCIFICATIONS
INSTALLATION DU PRODUIT
natural_image
Illustration of hands holding a rectangular object with arrows indicating force or movement (no text or symbols)natural_image
Illustration of a hand holding a flat surface with upward arrows, no text or symbols presentnatural_image
Diagram of a door handle with an arrow indicating clockwise motion (no text or symbols)ATTENTION
natural_image
Illustration of hands holding a rectangular object with arrows indicating force or movement (no text or symbols)natural_image
Illustration of a hand pressing down on a flat surface with upward arrows, no text or symbols presentnatural_image
Diagram of a door handle with an arrow indicating clockwise motion (no text or symbols)ATENCIÓN
make yourself at home