
21611 - Lawn mower TORO - Free user manual and instructions
Find the device manual for free 21611 TORO in PDF.

| Product Type | Self-propelled Lawn Mower |
| Brand | Toro |
| Model | 21611 |
| Power Source | 60V Lithium-ion Battery |
| Battery Model | 88640, 60 V, 4.0 Ah, 216 Wh |
| Charger Model | 88610, input 120V AC, output 60V DC |
| Cutting Width | 53 cm (21 in) |
| Cutting Height | 25 to 102 mm (1 to 4 in), adjustable to 8 positions |
| Self-propelled | Yes, speed adjustment |
| Mulching Function | Yes, ready to use |
| Foldable Handlebar | Yes, for vertical storage |
| Weight (estimated) | Approximately 25 kg |
| Folded Dimensions (L x W x H) (estimated) | Approximately 90 x 55 x 45 cm |
| Number of Blades | 1 rotating blade |
| Adjustable Blade Speed | 2 positions: Auto and Max |
| Safety Control Bar | Engine stops when released |
| Starting | Electric (button) |
| Maintenance | Clean deck after each use, bearing lubrication not required |
| Blade Replacement | Possible, use genuine Toro parts |
| Operating Temperatures | Battery: 5°C to 40°C; Machine: 0°C to 40°C |
| Warranty | Consult manual or dealer |
Frequently Asked Questions - 21611 TORO
User questions about 21611 TORO
0 question about this device. Answer the ones you know or ask your own.
Ask a new question about this device
Download the instructions for your Lawn mower in PDF format for free! Find your manual 21611 - TORO and take your electronic device back in hand. On this page are published all the documents necessary for the use of your device. 21611 by TORO.
USER MANUAL 21611 TORO
EN 21in 60V Lawn Mower
2161 1, 2161 1T
ES Cortacésped 60 V de 53 cm (21")
2161 1, 2161 1T
FR T ondeuse 60 V de 53 cm (21 po)
2161 1, 2161 1T
Operator's Manual
21in 60V Lawn Mower
Model No. 2161 1 —Serial No. 400000000 and Up Model No. 2161 1T —Serial No. 400000000 and Up
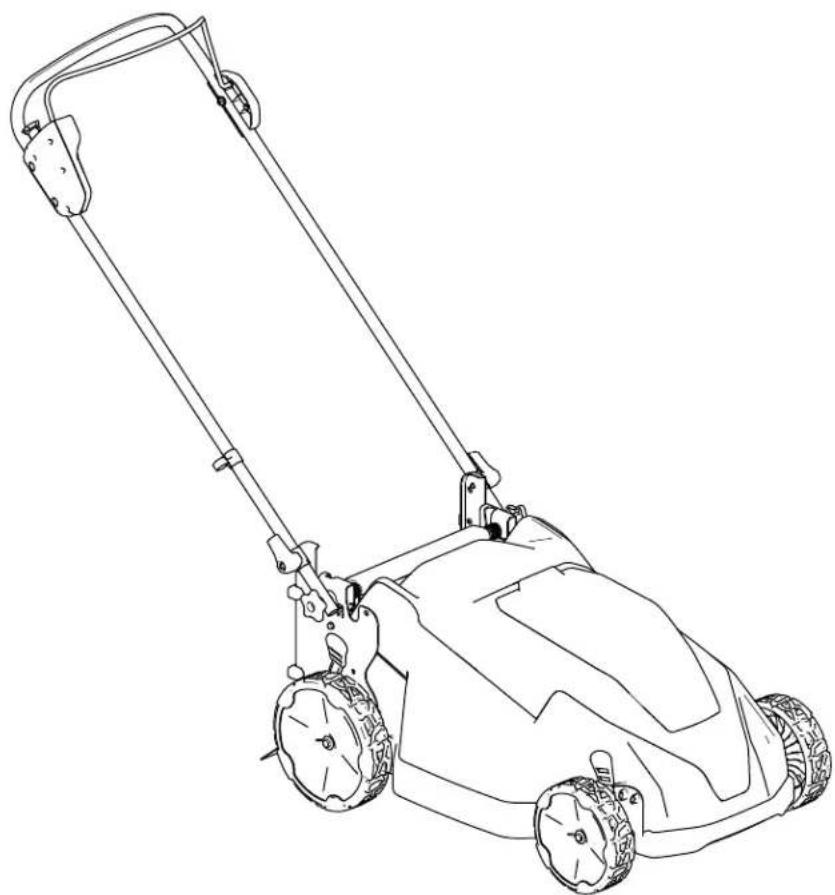
natural_image
Line drawing of a lawn mower with handle and wheels (no text or symbols)
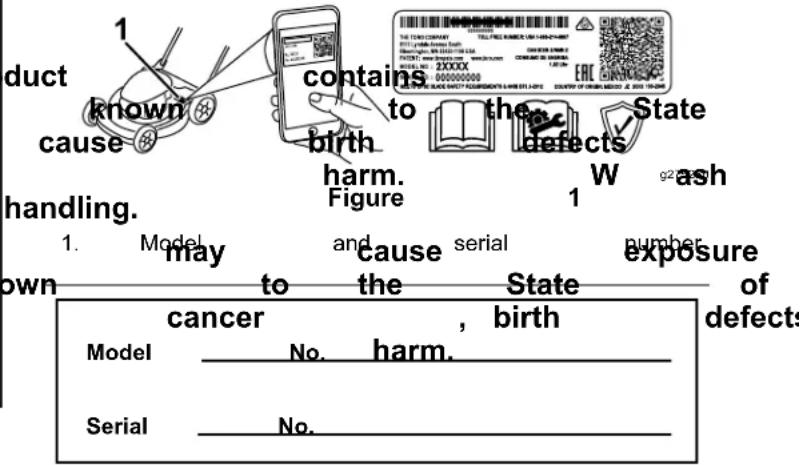
For assistance, please see www .T oro.com/support for instructional videos or contact 1-888-384-9939 before returning this product.
| Whenever additional Dealer and serial identifies on the product. | you need information, or T oro numbers the location product. | Customer of W rite | 1 |
| Important: | W | ith | your | ||
| scan | the | QR | code | on | |
| equipped) | to | access | |||
| product | information. | ||||
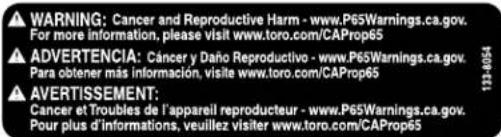
⚠️ W ARNING
CALIFORNIA Proposition 65 W arning
| The power cord lead, California or other hands | a chemical to reproductive after | |
| Use to California or other | of this chemicals to cause reproductive | |
Introduction
| This to primarily on brush T oro packs lithium-ion purposes dangerous | rotary-blade, used for residential properties or for agricultural lithium-ion are designed battery other to you |
| Model | 2161 | 1T | does |
| charger | . |
| Read and injury operating | this maintain and | information your product the product |
| V isit safety help | www tips, finding | .T oro.com training a dealer |
Safety-Alert
| The manual messages walk-behind | safety-alert and homeowners. | on that lawn | symbol the mower | machine it |
| grass | on It is | well maintained designed | the you | |
| battery to chargers. | charges. | packs. Figure Safety-alert | these only | g000502 by symbol |
| their and bystanders. | intended | using | these use | could |
| The not safety-alert that alerts is followed | you by the word to learn how indicates and to an avoided, responsible and safely symbol to unsafe | |
| CAUTION carefully | ||
| product DANGER which, injury properly. | properly if Y not you | indicates and to an avoided, responsible and safely |
| Wor ARMING materials, injury to register | information indicates not access avoided, your | info product. | |
| CAUTION which, injury | indicates not avoided, | a n | |
| This information. | manual | uses Important | two |
© 2023—The
81 1 1 L yndale
Bloomington,
T oro®
A venue
MN
Company
[Non-Text]
South 2
55420
Contact
us at w'
Printed
All Rights
in
Resen
mechanical information and Note emphasizes general information worthy of special attention.
Contents
Safety
IMPORT INSTRUCTIONS
ANT
W ARNIN
| Safety-Alert Symbol | |||
| Safety | |||
| Safety and Instructional Decals | |||
| Setup | |||
| 1 | Unfolding | the | Handle |
| Product | Overview | ||
| Specifications | |||
| Attachments/Accessories | |||
| Before | Operation | ||
| Installing | the | Battery | |
| Adjusting | the | Cutting | |
| Recycling | the | Clippings | |
| During | Operation | ||
| Starting | the | Machine | |
| Adjusting | the | Blade | |
| Shutting | Of | f the | Machi |
| Removing | the | Battery | |
| Machine | |||
| Operating | T | ips | |
| After | Operation | ||
| Charging | the | Battery | |
| Cleaning | the | Machine | |
| Folding | the | Handle | |
| Storing | the | Machine | |
| Position | |||
| Maintenance | |||
| Lubricating | the | Machin | |
| Replacing | the | Blade | |
| Preparing | the | Battery | |
| Recycling | |||
| Storage | |||
| T roubleshooting | |||
| When safety to personal | using precautions | electric | |
| the injury | risk, includ | ||
Read All Instructions
I. T raining
-
Pack the operator . . . . . . of . the . an yeight accidents . . . . . . or . hazards their . . property . . . . .
-
Do not allow children machine; battery pack, local regulations may operator
-
Do not from the children operate or service this people who are responsible with the instructions, pack operate or service the
-
. . . Before . . . . using . . . . the . . . mac battery the V charge to w , read cautionary . . . . markings . . .
-
· · · Become · · · · · · · familiar · · · · · · · with use · of · the · · · · machine, · · · · · · · · · charger · · · · · · · · · · · · · · Pack for
II. . . Preparation.
not plug the battery charger into an outlet other than 120V. For a different style of connection, use an attachment configuration for
before adjusting, servic the machine.
8: plug Remove adapter power outlet the of the prop button from the if battery needed machine
unattended or modified or before
- Do , which not force may the exhibit that job results better in and fire, do the that job better
was designed.
- Do not use a damaged pack or battery charge unpredictable explosion, or risk of injury
to the Stav battery alert—W charger an Authorized sense Service atch common when
Do not use the machine the influence with only of alcohol the batt
by T oro. 1. Do not charge suitable may create use a battery-operat rain for battery pack.
-
If the supply cord damaged, contact to replace it.
-
Operate the machine pack in a well-ventilated weather appropriate
the machine when the instructions and do
-
Use external and caution the machine outside of the specified in toward the you. instructions.
-
damageep proper batteryfooting of firespecially on slopes.
-
Charge the battery only .
of ear slopes, appropriate never up cloth caution long when pants; changing substanti not mow exceedingly (not barefoot or we run with the machine ie back protection.
-
Follow all charging not charge the battery temperature range Otherwise, you may and increase the risk
-
loose Do clothing direct or the loosedis caurylone. in Anovirid dischappag in dusty or operating; conditions yois. recommended. the blade(s) other than grass.
-
Dress properly—W including eye protection; slip-resistant and footwear sandals); and hearing hair and do not wear jewelry that can get W ear a dust mask Use of rubber gloves
III. Operation
- Contact with the injury . Keep your cutting area and all Keep clear of any discharge
16 W atch for holes, ru moving blade objects. will cause uneven nds to lose and your feet away from moving parts of the mach
-
Using this machine intended use could bystanders.
-
W opening grass or leaves you slip and contact wet purposes other Do to prove conditions dangerous
-
Disengage the self-prope before starting the machine.
-
If the machine strikes propel vibrate, immediately drive (if equipped) remove the electric-start nine. battery pack, and wait before when examining the Make all necessary operation starting—Ensure on operation is removed from
-
before Stop connecting machine th but the machine. before loading
-
Do not tilt the machine
-
Prevent unintentional the electric-start button electric-start switch 19 battery pack and handling
-
Use your full attention 20. machine. Do not engage causes distractions; damage may occur .
-
Stop the machine, button, remove the machine, and wait
-
Undrile apesaving condition age eject irliquidany activity conta contherwise, into contajry orwith water . If the liquid conta medical help. remove the liquid pack may electric-start battery from irritation for all movement to stop
IV. Maintenance and Storage
-
Stop the machine, remove the electric-start button, remove the battery pack from the machine, and wait before adjusting, the machine.
-
When you are not indoors in a dry, secure of children.
1 for alDo movement expose to a sbat servicingr excessive cleaning, temperatureor above temperature
-
Do not attempt to repair explosion. the machine except indicated in the instructions. CAUTION—A Have an Service Dealer perform present service a risk on using identical replacement burn. parts.
-
W ear gloves and eye • Protection disassemble when the machine. Replace the battery
-
Sharpen balance. a dull blade T onoro both battery edges pack to no Clean the blade battery and packsure may that ca balanced. • Keep battery packs
-
Replace the blade if children bent, andrn, in the cra An unbalanced blade youses are revaluation, to use v could damage the motor or cause personal injury .
-
When servicing the instruction is aware that blade can still move even though the power source is of f.
-
Check the grass collection bag frequently deterioration with a T oro or wear, and replace a worn [replacement] bag.
-
For best performance, use only genuine replacement parts and accessories. Other replacement parts and accessories could dangerous, and such use could void the warranty
-
Maintain the machine—Keep cutting edge sharp and clean for the best and safest performance. Keep handles dry, clean, from oil and grease. Keep guards in place working order. Keep blades sharp. Use replacing replacement blades only.
-
Check the machine for damaged parts—If are damaged guards or other parts, determine whether the machine will operate properly Check for misaligned and binding moving broken parts, mounting, and any other conc that may affect its operation. Unless indicated in the instructions, have an Authorized Server Dealer repair or replace a damaged guard part.
-
When the battery pack is not in use, keep away from metal objects such as paper cl coins, keys, nails, and screws that can make connection from 1 terminal to another. Sho the battery terminals may cause burns or
-
Check the blade and motor mounting frequently for tightness.
Safety and Instructional Decals

Safety decals and instructions are easily visible to the operator and are located near any area
of potential
danger
. Replace
any decal
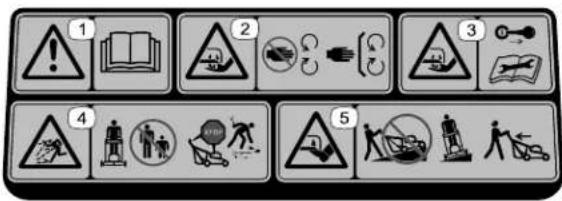
140-2395
Model
88610

decal144-3098
- W arning—read 4. Operator 's
Thrown the object hazard—keep away; shut of f the and wait for all moving parts to stop before leaving the machine; up debris before Model Cutting/dismemberment hazard, mower of the foot, bladawagto not from up or deep slopes; nsbields in across slopes; behind you when in reverse.
bystanders 144-3098 e engine
- Cutting/dismemberment 5. hazard of the blade—stay moving parts; guards and place.
Cutting/dismemberment hazaland, mower of the foot, bladewayo not from up or dceap slopes; rsbields in across slopes; behind you when in reverse.
- Cutting/dismemberment hazard of the blade—remove and read the Manual before maintenance.
hand, mower the key Operator's performing
mowing.88640 pick
decal140-2155

94-8072
decal94-8072
140-2155
-
Read the Manual
-
Operate keep battery fire
the 's Lithiu away nes.
-
Call2Recyclebattery recycling
-
Do program
not expose
WARNING: Cancer and Reproductive Harm - www.P65Warnings.ca.gov. For more information, please visit www.toro.com/CAProp65 ADVERTENCIA: Cáncer y Daño Reproductivo - www.P65Warnings.ca.gov. Para obtener más información, visite www.toro.com/CAProp65 AVERTISSEMENT: Cancer et Troubles de l'appareil reproducteur - www.P65Warnings.ca.gov. Pour plus d'informations, veuillez visiter www.toro.com/CAProp65
decal133-8054
133-8054
144-3094
decal144-3094
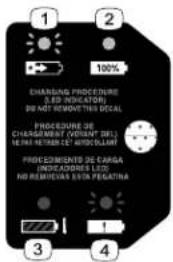
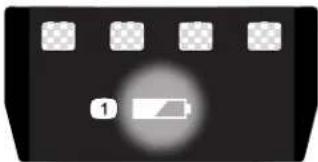
- The battery pack is charging.
-
The battery pack is fully charged.
-
The battery pack is over or under the appropriate temperature range.
- Battery pack charging fault
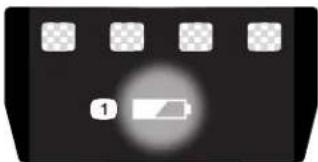
natural_image
Black rectangular object with a circular light source and four small square buttons on top (no text or symbols)137-9461
decal137-9461
- Battery charge status
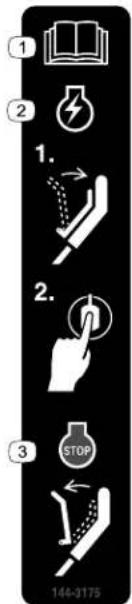
144-3175
decal144-3175
- Read Manual
- T o start squeeze the bar handle button.
the 3. Operator o shut release
the machine, to the and press
'of f the the bar
144-3096
decal144-3096
Setup
Important:
the
first
time,
The
refer
battery
to
pack
Charging
is
not
the
fully
Battery
1
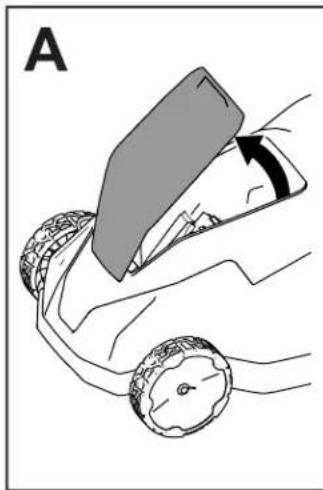
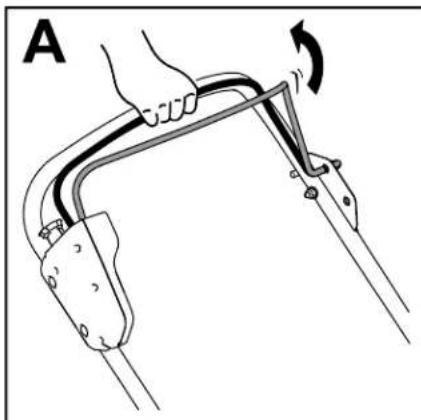
Unfolding
the
Handle
No
Parts
Required
Procedure
Important:
plastic
or
Remove
wrapping
and
on
discard
the
machine.
the
prote
W
ARNIN
Unfolding
condition.
the
handle
improperly
can
Do
not
damage
that
the
the
cable(s)
are
when
fo
- Ensure
routed
• If a
cable
is
damaged,
contact
an
Auth
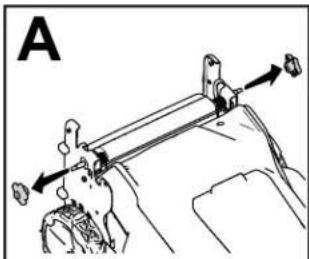
Important: Hold the handle while engaging the handle locks to avoid pinching your hands.
- Remove
the handle
knobs
(A of Figure
natural_image
Diagram of a mechanical device with lever and adjustment mechanism (no text or symbols)
natural_image
Technical line drawing of a mechanical assembly with no visible text or symbols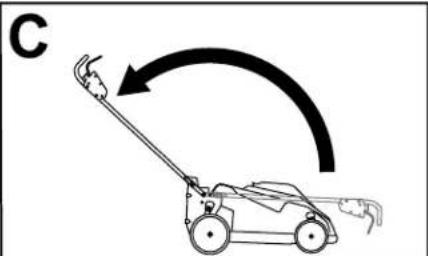
natural_image
Line drawing of a lawn mower with motion arrow indicating clockwise motion (no text or symbols)

natural_image
Diagram showing two motor lawners operating a manual lawn tool, with no text or symbols present.
natural_image
Mechanical assembly diagram showing a lever mechanism with arrows indicating force direction (no text or symbols present)Figure 3
c415126
- Using
the holes
at the ends
of the handle, - Move
the handle
rearward
to the operating - Ensure
that the
cables
are routed
in front - Engage
the handle
locks
until the
pin
Note: You may adjust the height of the hai - Secure
the knobs
to the
handle
bolts
to
Figure 3).
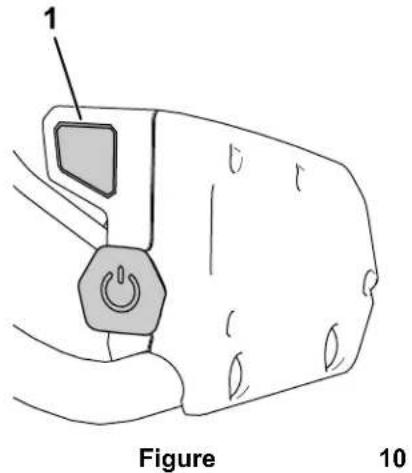
Product Overview
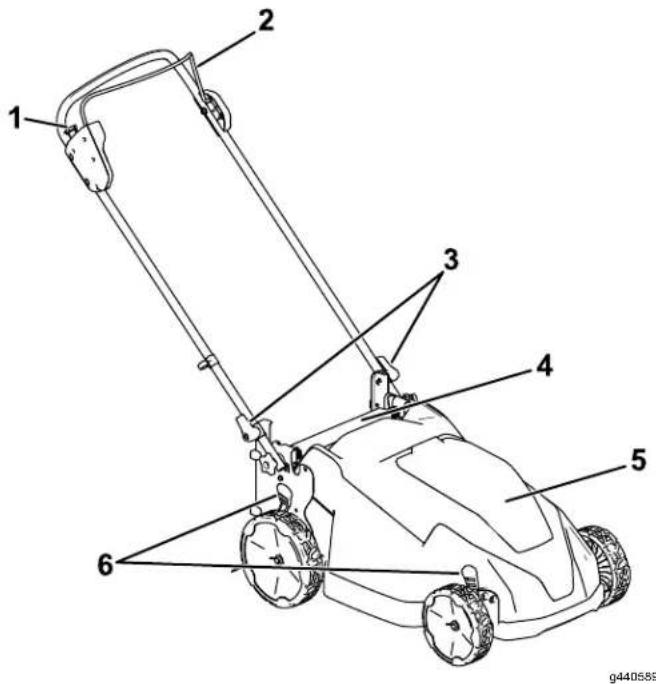
Figure 4
- Electric-start button
- Rear deflector
- Blade-control bar 5. Battery compartment
- Handle lock (2) 6. Cutting-height lever (2)
natural_image
Line drawing of a device with two connected components, one labeled '1' (no text or symbols on the device itself)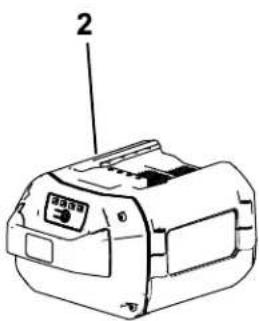
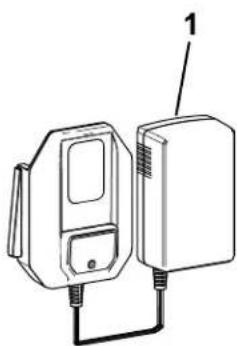
Figure 5
-
Battery charger Model 88610 (included with Model 2161 1)
-
Battery pack (included with 2161 1)
Specifications
Battery
Pack
| Model | 88640 | |
| Battery capacity | 4.0 pack Ah216 Wh | |
| Battery actual | manufacturer voltage varies rating with | |
Battery
Charger
| Model | 88610 | ||
| T ype | AdapterBattery Charger | ||
| Input | 120V | AC | ~2.0A, |
| Output | 60V | MAX | |
Appropriate
T emperature
| Charge/store at | 5°C the (41°F) battery | |||
| Use | the | battery | -30°C pack (-22°F) at | |
| Use | the | machine | 0°C (32°F) | |
*Charging battery
time
will
increas range.
Store
the
machine,
clean,
in
enclosed
Attachments/Accessories
A selection
of T
oro
approve
accessories
may
be
to enhance
and
expand
your
Authorized
or go
to www
distributor
approved
attachments
T o ensure
optimum
perfo
certification
of the
machine,
replacement
parts
40 parts
accessories
could
dangerous,
product
warranty
Operation
Note: Determine the left and right sides of the machine from the normal operating position.
Before Operation
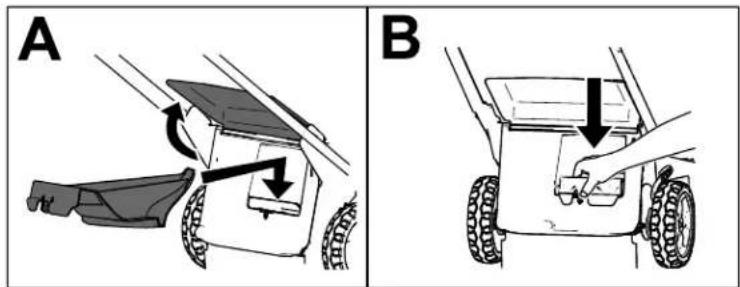
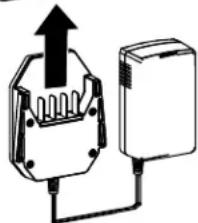
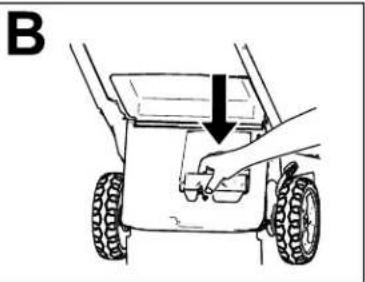
Installing the Battery Pack
| Important: | Use | the | battery | pack | only | in | |||
| to | Specifications | (page) | 10 | ). | |||||
| 1. | Make | sure | that | the | vents | on | the | battery | |
| 2. | Lift | up the | battery-compartment | lid | (A of | ||||
| 3. | Line compartment | up the | cavity until | in it | the locks | battery into | place | pack | with(B of |
| 4. | Close | the | battery-compartment | lid | (C of | ||||
| Note: | If the | battery-compartment | lid | does | |||||
natural_image
Diagram of a car being pulled with a ramp, showing tire arrangement and motion direction (no text or symbols)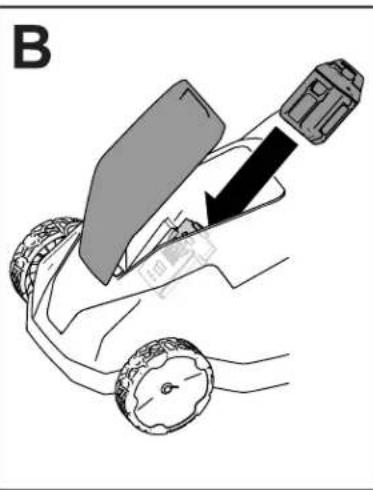
natural_image
Diagram of a car steering wheel with a lever and directional arrow indicating motion (no text or symbols)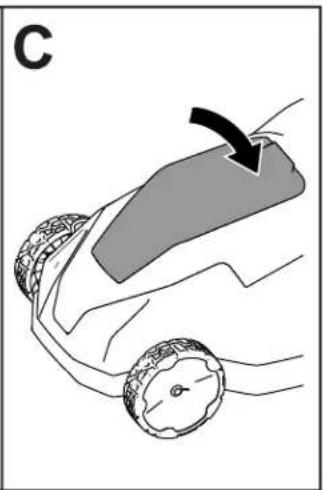
natural_image
Diagram of a car wheel with a curved ramp and directional arrow, no text or symbols presentFigure 6
g408957
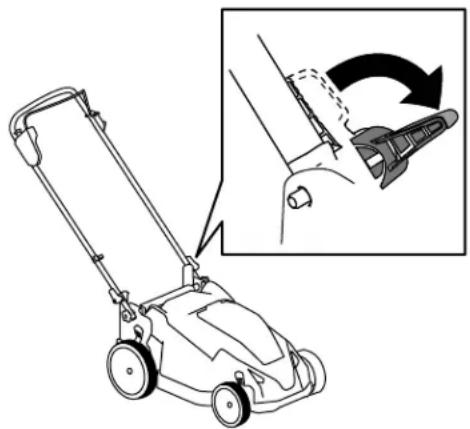
Adjusting the Cutting Height
DANGER
Adjusting the height-of-cut could bring your hands into contact with a moving blade and result in serious injury.
- Shut off the motor, remove the battery the cutting height.
- Do not put your fingers under the ho Adjust the cutting height as desired. Set all
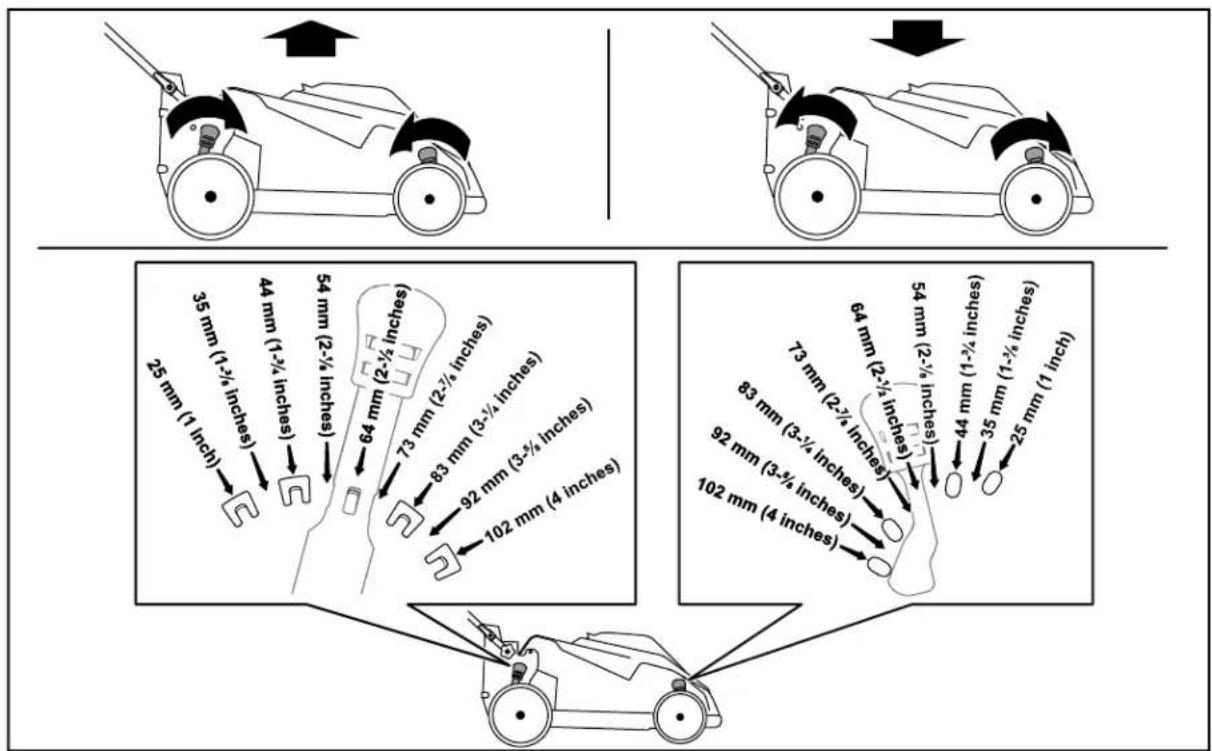
Figure 7
g409959
Recycling the Clippings
Y our machine
comes
from
the
factory
ready
Important:
Ensure
that
the
rear
plug
is
Figure
8 ), and
firmly
push
the
plug
down
natural_image
Two technical diagrams (A and B) showing a vehicle's assembly with arrows indicating motion or force, no text or symbols present.Figure
8
g3781
12
During
Operation
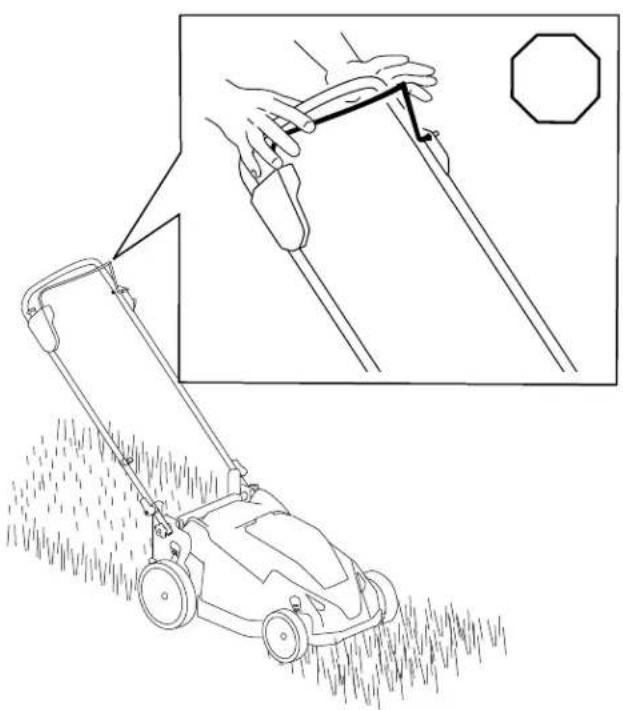
Starting
the Machine
- Ensure (page
that
the
battery
pack
is
charged
- Squeeze
the
blade-control
bar
and
hold
- Press
the
electric-start
button
and
keep

natural_image
Diagram of a hand holding a curved mechanical component with an arrow indicating rotation (no text or symbols present)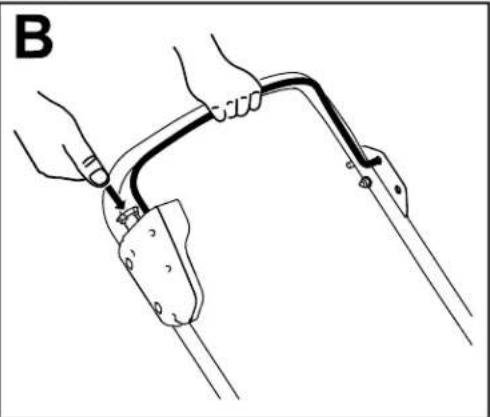
natural_image
Line drawing of a person using a cable to lift a car, no text or symbols presentFigure
9
g409982
Adjusting the Blade Speed
This machine has 2 blade-speed settings: A UTO and M AX.
- When cutting
set to conditions
the
A UTO are
setting, detected
the blade and
sp lad
- When
set to
the
M AX
setting,
the
blade
speed
Press
the
blade-speed
button
on
the
electric-start
- Blade-speed
button
g410773
Shutting
- Release
the
blade-control
natural_image
Line drawing of a lawn mower with a hand holding a tool, showing the blade and blade extension (no text or symbols)Figure
1 1
g410266
Off 2.
Remove the
Battery
Note: remove
Machine battery
Pack bar (A from of Figure the Whenever you the battery
Removing from
-
Lift up
-
Press battery
-
Close
the Machine
the battery-compartment
the battery-pack
pack and remove
the battery-compartment
Operating
General
- Inspect and remove throw
Mowing
the area where all objects
• A void striking deliberately
solid mow over
• If the machine immediately battery pack
strikes shut of f from the
parts to stop, and examine the machine for damage.
- For best performance, install a new T oro blade before the cutting necessary
season
begins
or when
Cutting
Grass
• Cut only about a third of the grass blade at For improved quality of cut, runtime, and cut cut grass at a higher height of cut.
- Do not cut below 51 mm (2 inches) unless grass is sparse or it is late fall when grass begins to slow down.
- When cutting grass over 15 cm (6 inches) mow at the highest cutting height setting a slower; then mow again at a lower setting best lawn appearance. If the grass is too lc machine may plug and cause the motor to
• W et grass and leaves tend to clump on the and cause the machine to plug or the stall. A void mowing in wet conditions.
- Be aware of a potential fire hazard in very conditions, follow all local fire warnings, the machine free of dry grass and leaf debris.
• Alternate the mowing direction. This helps disperse the clippings over the lawn for ever fertilization.
• If the finished lawn appearance is unsatisfactory try 1 or more of the following:
- Replace the blade or have it sharpened.
- W alk at a slower pace while mowing.
- Raise the cutting height on your machine.
- Cut the grass more frequently
- Overlap swath with cutting each swaths instead of cutting pass.
Cutting
Leaves
• After cutting the lawn, ensure that half of shows through the cut leaf cover . Y ou may to make more than a single pass over the
- If there are more than 13 cm (5 inches) of on the lawn, mow at a higher cutting height then again at the desired cutting height.
- Slow down your mowing speed if the machine does not cut the leaves finely enough.
After Operation
Charging the Battery Pack
| Green | Battery pack is charged | |
| Red | Battery pack and/or the appropriate temperature | |
| Red blinking | Battery pack charging | fau |
Important: The battery pack is not fully charged
when you purchase it. Before using the
the first time, place
and charge it until
battery pack is fully
precautions.
Important:
temperatures
range; refer
Note: At any
button on the
charge (LED
Charge
that
to Specifications Storage
tool*Refer for to
the battery to
the Information LED
Important:
for short
If the battery
aremove within
Storage
press the
Cleaning to
T roubleshooting pack
display
ReadThe
periods
päik
the the batter appropriate fr
(page(page 19 10.)
battery-charge-indicator
display the
theer
- Ensure that the are clear of any dust
Service on the Interval battery
and debris.
: After


natural_image
Diagram of a device with an upward arrow and connection point, no text or symbols presentFigure
12
- Battery pack cavity 4
- Battery pack LEDventing indicators areas
- Battery pack terminals
- Line up the cavity
with the tongue on
- Slide the charger
fully seated ( Figure 12 ).
- T o remove the battery
backward out of the
- Refer to the following
indicator light on the
| Indicator light | Indicates | |||
| Of f | No battery | pack | inserte | |
| Green blinking | Battery pack | is charging | ||
Cleaning
under
Service Interval : After
For best results, clean
you have completed me
- Shut of f the machine pack and the safety
- Lower the machine setting.
- Set the machine in refer to Storing the Ma Position (page 17).
-
Using from the a brush or broor underside
-
Important:
machine; components.
- 6.CleanHandle the grass box.
in the battery pack (Figur the charger
into the battery pack ur
pack,
battery pack.
table
battery
to interpret
charger
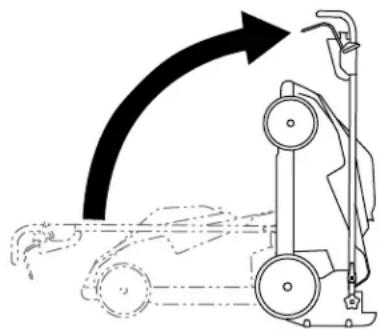
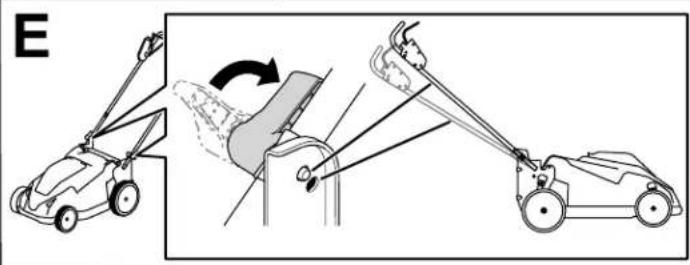
Folding the Handle
⚠️ W ARNING
Folding or unfolding the handle improperly can damage the cables, causing an unsafe operating condition.
- Do not damage unfolding the handle.
• If a cable is damaged, Authorized Service
- Remove
the battery
- Disengage the upper
handle
[Non-Text]
handle
freely
Note:
handle
Hold
locks
the
to
handle
avoid
natural_image
Line drawing of a lawn mower with an inset showing the blade being adjusted for motion (no text or symbols)Figure
13
- Fold
position
the
handle
as
shown
- T o
Handle
unfold
(page
the
handle,
8).
⚠️ W ARNING
Folding or unfolding the handle improperly can damage the cables, causing an unsafe operating condition.
- Do not damage the unfolding the handle.
the If aableable
Authorized
wisen
damaged,folding
Service
| 1. | Remove | contact | the | an battery |
| Dealer | ||||
| 2. | Ensure | that | the | cutting- |
| machine | the | is machine. | mm (1-3) | |
| it is not, | raise | it; refer | ||
| e | Height locks | (page until 12 you). can | ||
| ely | (Figure 13). | |||
| 3. | Disengage | the | handle | |
| 4. | Fold while pinching | the disengaging handle your hands. | ||
| Important: | Route | |||
| of the | handle | locks | ||
| 5. | Engage | the | handle | |
| 6. | Lift move | the front | of the m | |
| it into a storage | ||||
natural_image
Diagram of a vacuum cleaner with airflow direction arrow (no text or symbols)forward
in
toFigure
fully 14
g410317
forward
in
Figure
14
the
cables
[Non-Text]
to
the
outsi
as
you
fold
the
handle.
refer
to
Unfolding
Storing V ertical-Stow
Y ou
minimize
can
store
storage
the Machine
your
machine
space.
in tr
Position
in
the
vertical
F
Maintenance
Remove the electric-start button and battery pack from the machine before maintaining or cleaning the machine.
| Always parts to adjusting, | shut stop, | of f the and servicing, |
| Use only replacement | the | manufacturer parts |
| Inspect machine Dealer | and | maintain repaired |

Figure 15
Lubricating
| Y ou bearings life | do | not have | need | to been |
| of | the machine. |
the Machine
| 4. lubricate 16. lubricated | Install ). | the | the machine; at the | new blade factory |
Replacing
| Service | Interval | : Y early | ||
| Important: | Y ou | will | ||
| install | the | blade | properly | |
| torque | wrench | or are | ||
| this | procedure, | contact | ||
| Dealer | . | |||
| If the | blade | is | damaged | |
| immediately | . If the | blade | ||
| it sharpened | and | balanced, | ||
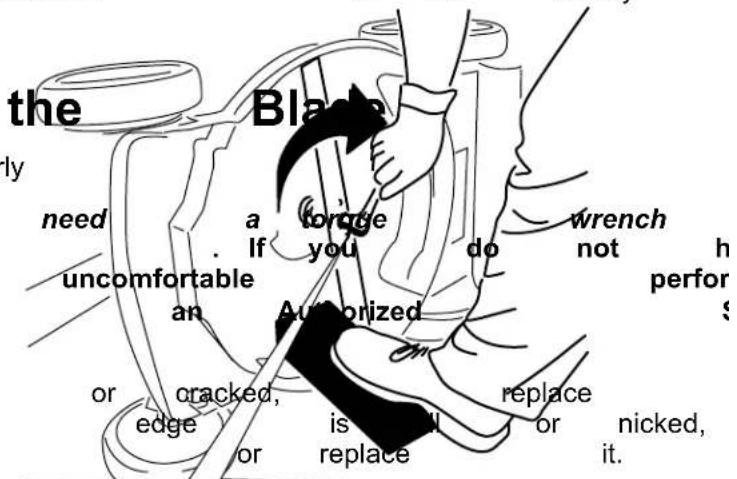
⚠️ W ARNIN
| When move The result | servicing even blade in serious | ||
| the | blade, the contacting | power | the | blade source the | blad |
| personal | injury | . | |||
| and | feet Figure | away | 16 | from | |
| • Keep moving | your blade. | hands |
| • | W | ear | gloves | when |
| 1. | Remove | the | battery | ||
| 2. | Use ( Figure | a | block 15 | of wood |
| 3. | Removeblade | bolt | the ( Figure | blade |
| servicing Important: | the Position | blade | |||||
| blade | pack | facing from torque (60 ft-lb). | the blade | up | toward machine. | ||
| 5. | to Use to hold 82 | ||||||
| 15 | bolt ). | and | blade; | save | |||
Preparing the Battery Pack Storage for Recycling Important:
Important: Upon removal, cover the terminals of charger the battery pack with heavy-duty adhesive tape. appropriate
Do not attempt to destroy).
battery pack or remove
 | Lithium-ion batteryCall2Recycle sealparticipating retailerfacility in the Call2Recycand Canada only).retailer or facility1-800-822-8837If you cannot locatefacility nearby, oris not labeled withplease contact yourinformation on howbattery . If you areand Canada, pleaseT oro distributor . |
Important:
Store
the
only in temperatures
range; re
or disassemble
Important: any
of its
components. you are
for packs the indicators be labeled off-season, with the change recycled turn at any green
a fully battery charged recycling (US or fully
you are ready to use the battery you, please call until
or green www on .call thecycle.org. charger
if green participating on the battery or your rechargeable
the DiscoReckle local municipality (p.e. remove
to button) responsibly outside and recycle of check the US for
- Do not store the machine battery pack installed.
- Clean all foreign material
- When not in use, store button, battery pack, reach of children.
- Keep the machine, b charger away from cor garden chemicals and de-icing
• T o reduce the risk of not store the battery
- Store the machine, charger in an enclosed
T roubleshooting
Perform only the steps described in these instructions. All further inspection, maintenance, and repair work
must be performed by an authorized service
problem yourself.
| Problem | Possible | Cause | Correctiv |
| The machine does | 1 not staff battery is machine.2. The battery pack3. The battery pack4. There is another with the machine. | 1 not Remfuly installed and into the machine, fully installed and2. Remove not charged machine and charge4. Coelectrical an praliorized | then in battery charge |
| The machine does continuously . | 1. There run is ormoistores battery pack.2. The battery is tool. | 1. nAllowon run the the lead battery dry .2not Remolve installed and into the tool making installed and latched. | of theninto |
| The machine does | 1. Thet readiness full pack too low .2. The air vents | power Rembrage . capacity machine and fully pack.are Cleaned. the air | battersvents. |
| The battery pack | 1. lose the battery parkly appropriate temperature where it is ridge. and between 5°C (41°F)2. The machine | 2s overload the grass or walk at a slower | at a |
| The battery charger | 1. The is nd battery working. charger Unplug is over the dratter under the appropriate temperature place where range temperature is and 40°C (104°F).2. The outlet that plugged into that does repair not have outlet. power | 2. the Contad battery your charger repair not have outlet. power | licensed |
| The machine does | not self-propel. or adjustment | 1. Adjust 1. Three self-propel is Recharged. the cable | if |
| The LED indicator charger is red. | 1. Tight battery the batterger Unplug and/or the battery pack is over or range. undhe battery appropriager temperature to a place where temperature and 40°C (104°F). | it between |
| Problem | Possible Cause Corrective | Action |
| The LED indicator charger is blinking | 1. There's an error in the con-unication battery between the battery pack and the charger.2. The battery pack | 1. Remove the battery pack battery charger, unplug charger from the seconds. Plug the outlet again pack on the battery indicator light of still blinking red, again. If the LED the battery charger after 2 attempts, the battery pack facility.2. is contact your if the battery is dispose of the recycling facility. |
| The machine is sound. | profining battery a beaping2. The machine for operation.3. The machine is4. There is another with the machine. | 1. Rensoret charged. the battery pack machine and charge2s in Ensuer unsafe that the extreme angle3.overloaded. the grass or walk at a slower4. Attemptelectrical the other problem actions, if the a contact an Authorized |
| The quality of cut unsatisfactory. | 1. is The decreased blade is dull.2. The cutting deck2. Clean under debris the machine. buil | 1. Ha |
| 1. The blade is dull. The machine has2. The cutting deck is damagedContact an Auth | The machine has | |
| The machine is | vibrating. | 1. Inspect the blade is necessary. |
Notes:
California Proposition 65 W arning Information
What is this warning?
Y ou may see a product for sale that has a warning label like

W ARNING:
Cancer
and
Reproductive
What is Prop 65?
| Prop California. reproductive inform | 65 the | applies It mandates harm. the public | to any The about | company that list, exposure | the which | operating Governor is updated to these | in of California annually chemicals. | selling maintain , includes | ||
| Prop the California chemicals | 65 does the product. government have | does not Moreover been | ban | the , has used | sale Prop clarified in everyday | of products 65 warning that | containing does a Prop products | not 65 for | these mean warning years | the |
| A has | Prop chosen | 65 warning to provide | means | that a warning | a based | company on | has its | either understanding | (1) | evalua |
Does this law apply everywhere?
| Prop limited retailers | 65 | warnings to restaurants, provide | are | required grocery Prop | under stores, 65 warnings | on | California hotels, their | law schools, websites | only and or in | The car |
How do the California warnings compare to
| Prop at the | 65 levels federal | standards that and | are far international | often lower | than | more federal standards. | stringent action | than limits. | federal For | and exempli |
Why don't all similar products carry the warning?
| Products | sold | in | California | require | Prop | 65 | labelling | while | ||
| A company making | similar | involved products | in | a | Prop may | 65 have | lawsuit no | such | reaching requirement. | a settlement |
| The enforcement | of | Prop | 65 | is | inconsistent. | |||||
| Companies product | does | may not | elect mean | not that | to the | provide product | warnings is | free | because of listed | chemi |
Why does T oro include this warning?
| T oro use, exposure, “no warnings, | has T oro | chosen provides as not risk it could | to all range, be sued | provide warnings listed | consumers in chemicals out by the State | with cases provide abundance of California | as based on exposure of caution, or by | much its knowledge |
TORO®
Count on it.
Manual del operador
Cortacésped 60 V de 53 cm (21")
natural_image
Line drawing of a lawn mower with handle and wheels (no text or symbols)
133 - 8054
140
- 2395
-2395
144 - 3175
decal144 - 3175
natural_image
Black control panel with four square buttons and a circular indicator labeled '1' (no readable text or symbols beyond the indicator)137 - 9461
decal137 - 9461
- Estado de carga
de la batería
- Lea el operador
- Para arrancar apriete manillar
144 - 3096
decal144 - 3096
Montaje
Importante:
máquina
por
En
primera
el
momento
vez,
de
consulte
la
compra
Carga
1
Despliegue
del manillar
No
se
necesitan
piezas
Procedimiento
Importante:
plástico
o envoltura
Retire
y deseche
de la
máquina.
la
hoja
pro
ADVERTENCIA
Si
de
despliega
operación
el manillar
inseguras.
de
forma
incorrec
No
dañe
el/los
cable(s)
al plegar
o d
- Asegúrese
de colocar
el/los cable(s)
• Si
un
cable
está
dañado,
póngase
e
Importante:
las manos
queden
Sujete
el
manillar
mientras
atrapadas.
- Retire
los
pomos
del
manillar
( Figura
3

natural_image
Diagram of a mechanical device with lever and clamping mechanism (no text or symbols)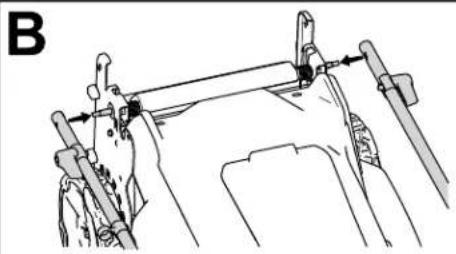
natural_image
Technical line drawing of a mechanical assembly with no visible text or symbols
natural_image
Line drawing of a lawn mower with motion arrow indicating clockwise motion (no text or symbols)
natural_image
Illustration of a lawn mower with tool positioning and motion arrows (no text or symbols)
natural_image
Mechanical assembly diagram showing a lever mechanism with arrows indicating force direction (no text or symbols present)Figura
3
0415126
- Usando
los orificios
de
los
extremos
del
- Mueva
el manillar
hacia
atrás
a
posición
- Asegúrese
de pasar
los cables
por delante
- Mueva
las palancas
de bloqueo
del
el manillar
en la posición
de uso
( Figura
Nota:
Puede
ajustar
la altura
del manillar
- Fije
los pomos
a los
pernos
del manillar
El producto

Figura 4
natural_image
Line drawing of a device with two components connected by a cable (no text or symbols)
g413066
Figura 5
natural_image
Diagram of a robotic car with wheels and a block, labeled 'A' (no text or symbols on the diagram itself)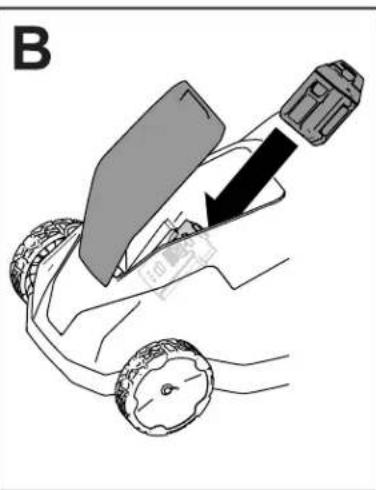
natural_image
Diagram of a car seatbelt being adjusted to lift a vehicle, showing the seatbelt and wheel (no text or symbols)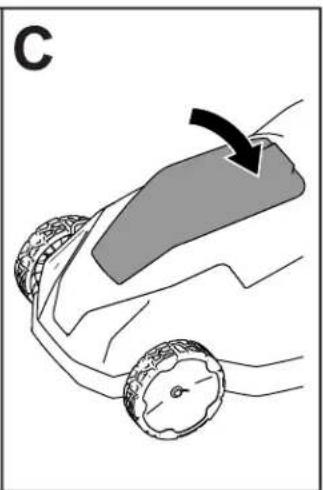
natural_image
Illustration of a car wheel with a curved ramp and a black arrow indicating motion (no text or symbols)Figura
6
g409957
Figura 7
g409959
natural_image
Diagram of a robotic vehicle with labeled parts and motion arrows (no text or symbols)Figura

natural_image
Line drawing of a hand pressing down on a wheeled cart with a downward arrow indicating force or movement (no text or symbols)8
g3781 12
natural_image
Line drawing of a person using a cable to lift a car, showing rope routing and clamping mechanism (no text or symbols)|
|
g409962
natural_image
Diagram of a hand holding a curved mechanical component with an arrow indicating rotation (no text or symbols present)Figura
9
natural_image
Diagram of a device with an upward arrow and connected components (no text or symbols)g347460
Figura 12
- Hueco
de la batería
carga
de
- Zonas
de 5. ventiladora
batería
actual)
- T erminales
de
la
batería
- Alinee
el hueco
lengüeta
del
ador
- Introduzca
el
cargador
esté
completamente
- Para
retirar
la
batería,
atrás
sacarla
- Consulte
indicador
la tabla
LED
del
Limpieza máquina
Intervalo
Para
obtener
de la
máquina
terminado
- Apague
de seguridad.
natural_image
Line drawing of a lawn mower with a close-up inset showing the blade being adjusted (no text or symbols)Figura 13
m = 311
The Ground Truth image displays a single, solid horizontal line. According to Rule 2 (UNDERSCORE & LINE RULES), if the GT contains lines used for stylistic emphasis or as background elements (like ruled paper), the OCR result must ignore them. The OCR content provided is "____", which consists of four underscores. This is incorrect because underscores are not equivalent to a solid line and are not permitted under the “Stylistic/Background Lines (Ignore)” rule. The OCR has hallucinated underscores where none should exist in the GT, violating the “Stylistic/Background Lines (Ignore)” rule. Therefore, the OCR result is inconsistent with the Ground Truth.
m = 311
The Ground Truth image displays a single, solid horizontal line. According to Rule 2 (UNDERSCORE & LINE RULES), if the GT contains lines used for stylistic emphasis or as background elements (like a ruled line on paper), the OCR result must ignore them. The OCR content provided is "____", which consists of four underscores. This is incorrect because underscores are not equivalent to a solid line and are not permitted under the “Stylistic/Background Lines (Ignore)” rule. The OCR has hallucinated text (underscores) where none should exist, violating the rule to ignore stylistic lines. Therefore, the OCR result is inconsistent with the Ground Truth.
The Ground Truth image displays a single, solid horizontal line. According to Rule 2 (UNDERSCORE & LINE RULES), if the GT contains lines used for stylistic emphasis or as background (like ruled paper), the OCR result must ignore them. The provided OCR content is "____", which consists of four underscores. This is incorrect because underscores are not equivalent to a solid line and are not permitted under the “Stylistic/Background Lines (Ignore)” rule. Outputting underscores for a stylistic line violates the rule and constitutes an error. Therefore, the OCR result is inconsistent with the Ground Truth.
ImportanteV
movimiento. la
al realizar la
cuchilla
máquina _el
hacia
mantenimiento
5.
Utilice
el perno
una
de
llave
la
cuchilla
el
perno
de
la
cuchilla
m = 311
ha
st
a_vi
site
e
[Non-Text]
[Non-Text]
[Non-Text]
qu
ie
[Non-Text]
ba
ate
eria
a
[Non-Text]
Si
[Non-Text]
n
0
[Non-Text]
SB
ued
de
1
vu
elv
var
nlo
cal
iza
r
[Non-Text]
[Non-Text]
[Non-Text]
[Non-Text]
•
[Non-Text]
D
es
co
ne
ct
e
e:
stá
[Non-Text]
[Non-Text]
[Non-Text]
et
iqu
eta
da
[Non-Text]
el
[Non-Text]
|
pro
odu
uct
to
[Non-Text]
e
عَلَى
cP
ara
)
(No text)
The Ground Truth image displays a single, solid horizontal line. According to Rule 2 (UNDERSCORE & LINE RULES), this is a stylistic or background line, not a placeholder underscore. Therefore, the OCR result must ignore it and output nothing or only meaningful text. The provided OCR content is "____", which consists of four underscores. This is an incorrect interpretation of the line as a placeholder, violating the rule that stylistic lines must be ignored. The OCR has hallucinated underscores where none should exist based on the GT's visual context. Hence, the OCR result is inconsistent with the Ground Truth.
。
bte
ene
r
,
[Non-Text]
v
。
cor
má
S
eh
e
e
1
10
cti sec
icla
do
[Non-Text]
[Non-Text]
[Non-Text]
[Non-Text]
[Non-Text]
[Non-Text]
r
es
y por
nsa
able
mp
ra
C5
c
.
[Non-Text]
N
0
[Non-Text]
[Non-Text]
5
Im
ac
e
ont
act
0
[Non-Text]
[Non-Text]
[Non-Text]
[Non-Text]
[Non-Text]
(
cqr
当
[Non-Text]
m
•
[Non-Text]
Li
im
pie
,
[Non-Text]
[Non-Text]
[Non-Text]
[Non-Text]
[Non-Text]
CU
ual
qu
ie
r
[Non-Text]
[Non-Text]
[Non-Text]
[Non-Text]
[Non-Text]
[Non-Text]
•
[Non-Text]
C
ua
and
o
[Non-Text]
[Non-Text]
[Non-Text]
[Non-Text]
[Non-Text]
[Non-Text]
[Non-Text]
no
)
[Non-Text]
s
se
[Non-Text]
[Non-Text]
es
sté
n
[Non-Text]
r
ná
qu
ina
a
[Non-Text]
[Non-Text]
[Non-Text]
[Non-Text]
[Non-Text]
[Non-Text]
[Non-Text]
[Non-Text]
el
[Non-Text]
b
not
ón
1
[Non-Text]
[Non-Text]
[Non-Text]
[Non-Text]
,
,
90
I
a,
oo
ra
ad
or
[Non-Text]
[Non-Text]
[Non-Text]
[Non-Text]
61
[Non-Text]
记
so
do
;
[Non-Text]
[Non-Text]
y
,
e
1
•
ca
ng
au
for
[Non-Text]
[Non-Text]
[Non-Text]
[Non-Text]
[Non-Text]
[Non-Text]
[Non-Text]
[Non-Text]
de
,
•
[Non-Text]
M
lar
nte
ng
a
[Non-Text]
[Non-Text]
[Non-Text]
[Non-Text]
[Non-Text]
[Non-Text]
[Non-Text]
[Non-Text]
|
a
[Non-Text]
Form No. 3456 - 250 Rev
natural_image
Line drawing of a lawn mower with handle and wheels (no text or symbols)
140
decar140
133
- 8054
decal133
-2395
natural_image
Pure electrical circuit lines without any symbols137 - 9461
decal137 - 9461
1.
État
de
charge
de
la
batterie
guidon
bouton
de la 3

144 - 3175
decal144 - 3175
- Lisez
l'utilisateur
- Pour démarrer
serrez
guidon
le
natural_image
Diagram of a mechanical device with lever and adjustment mechanism (no text or symbols)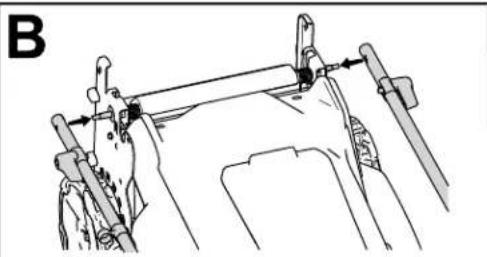
natural_image
Technical line drawing of a mechanical assembly with no visible text or symbols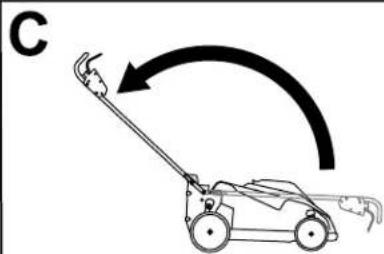
natural_image
Line drawing of a lawn mower with motion arrow indicating clockwise motion (no text or symbols)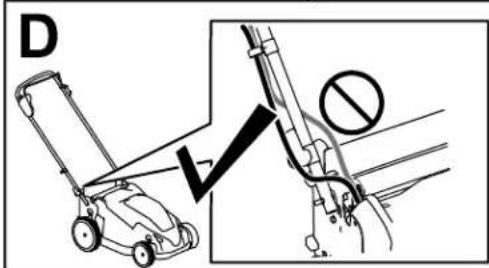

natural_image
Diagram showing two motor lawners operating a cart with a lever mechanism, no text or symbols present
natural_image
Mechanical assembly diagram showing a lever mechanism with arrows indicating force direction (no text or symbols present)Figure
3
0415126
Figure 4
Figure 5
natural_image
Diagram of a person using a cart to lift a vehicle, showing tire movement and angle (no text or symbols)
natural_image
Diagram of a hand holding a device with a black arrow pointing to a component, no text or symbols present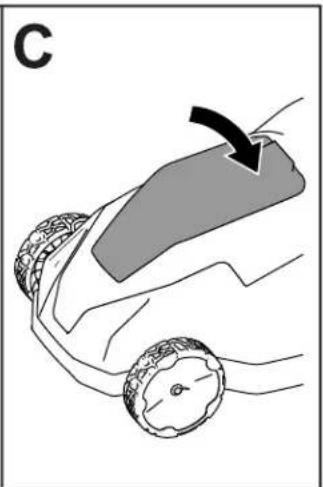
natural_image
Diagram of a car wheel with a curved arrow indicating motion or force direction (no text or symbols)Figure
6
0409957
natural_image
Diagram of a robotic vehicle with labeled parts and directional arrows indicating motion (no text or symbols)Figure
natural_image
Line drawing of a hand pressing down on a wheeled cart with a downward arrow indicating force or movement (no text or symbols)8
g3781
12
Pendant
l'utilisation
Démarrage
- Vérifiez
que
la
batterie
de la machine
est
chargée
et inst:
- Serrez
et maintenez
la
barre
de
commande
- Maintenez
le
bouton
de
démarrage
électriqu

natural_image
Diagram of a hand holding a curved mechanical component with an arrow indicating rotation (no text or symbols present)
natural_image
Line drawing of a person using a tool to lift a curved object, labeled 'B' (no text or symbols on the diagram itself)Figure
9
g409982
m = 311
m = 311
m = 311
m = 311
The Ground Truth image displays a single, solid horizontal line. According to Rule 2 (UNDERSCORE & LINE RULES), if the GT contains lines used for stylistic emphasis or as background elements (like ruled paper), the OCR result must ignore them. The provided OCR content is "____", which consists of four underscores. This is incorrect because underscores are not equivalent to a solid line and are not permitted under the “Stylistic/Background Lines (Ignore)” rule. The OCR has hallucinated underscores where none should exist in the GT, violating the “Stylistic/Background Lines (Ignore)” rule. Therefore, the OCR result is inconsistent with the Ground Truth.
[Non-Text]
[Non-Text]
[Non-Text]
[Non-Text]
[Non-Text]
et l'herbe
et l'herbe
et l'herbe
et l'herbe
[Non-Text]
[Non-Text]
[Non-Text]
[Non-Text]
[Non-Text]
[Non-Text]
[Non-Text]
[Non-Text]
[Non-Text]
[Non-Text]
[Non-Text]
[Non-Text]
[Non-Text]
[Non-Text]
[Non-Text]
[Non-Text]
[Non-Text]
[Non-Text]
Après l'utilisation
natural_image
Diagram showing a device with an upward arrow pointing to its internal components, connected to a separate electrical outlet (no text or symbols present)Figure
12
natural_image
Line drawing of a lawn mower with an inset showing the blade being adjusted for motion (no text or symbols)Figure 13
- Rabattez comme
le guidon montré
natural_image
Diagram of a car being tested with an airbag, showing motion direction (no text or symbols)g410317 en av;
g410315
à la