AMPA922 - Vacuum Cleaner ARTHUR MARTIN - Free user manual and instructions
Find the device manual for free AMPA922 ARTHUR MARTIN in PDF.

User questions about AMPA922 ARTHUR MARTIN
0 question about this device. Answer the ones you know or ask your own.
Ask a new question about this device
Download the instructions for your Vacuum Cleaner in PDF format for free! Find your manual AMPA922 - ARTHUR MARTIN and take your electronic device back in hand. On this page are published all the documents necessary for the use of your device. AMPA922 by ARTHUR MARTIN.
USER MANUAL AMPA922 ARTHUR MARTIN
natural_image
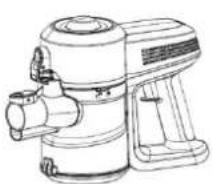
Black and white photo of a handheld vacuum cleaner with blue handle and control panel (no visible text or symbols)ASPIRATEUR BALAI FLEX 22.2V
Modèle : AMPA922
NOTICE D'INSTRUCTIONS
text_image
1 2 3 sière village 5 6 7 8 9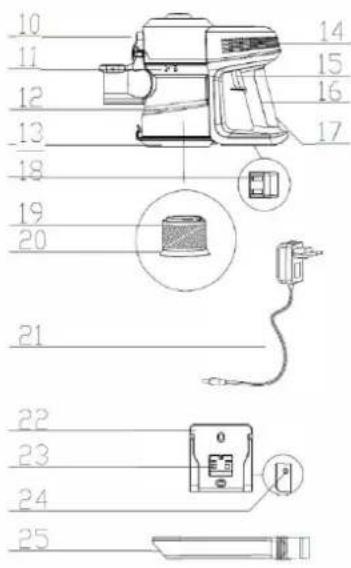
text_image
10 11 12 13 18 19 20 21 22 23 24 25 14 15 16 17EMBALLAGE
| ASPIRATEUR | BATTERIE | TUBE | BROSSE MOTORISEE | SUCEUR PLAT |
| 1 | 1 | 1 | 1 | 1 |
| ADAPTATEUR | STATION DE CHARGE | NOTICE | — | |
| 1 | 1 | 1 | — |
ASSEMBLAGE
·ASSEMBLAGE DU BAC À POUSSIÈRE ASSEMBLÉ AVEC LA PIÈCE PRINCIPALE
natural_image
Technical line drawing of two mechanical pipe fittings (no text or symbols)natural_image
Technical line drawings of a vacuum cleaner assembly (no text or symbols)UTILISATION
·Affichage
natural_image
Technical line drawing of a vacuum cleaner device with attached cable and power outlet (no text or symbols)natural_image
Technical line drawings of a washing machine and its internal components (no text or symbols)text_image
Diagram showing a person walking with a sun symbol above an open box, with a downward arrow indicating direction or change.natural_image
Technical line drawing of a mechanical component with an inset close-up view (no text or symbols)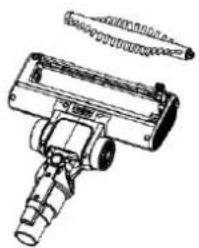
natural_image
Technical line drawing of a mechanical component with cylindrical and flanged parts (no text or symbols)natural_image
Technical line drawing of a vacuum cleaner with attached circuit board and connector (no text or symbols)Maintenance
natural_image
Black and white photo of a handheld vacuum cleaner with extended arm and blue handle (no visible text or symbols)Flexible stick vacuum cleaner 22.2V
Model: AMPA922
INSTRUCTION MANUAL
Read this manual thoroughly before using and save it for future reference
CAUTIONS
THIS MAUAL BEFORE OPERATING THIS MACHINE
- This vacuum cleaner is dry type, please do not use to suck liquids such as water, detergent or other we Do not litter water and other liquids on or into the machine in case of short circuit.
- WARNING: For the purposes of recharging the battery, only use the detachable supply unite provided with the appliance
- Don't use this vacuum cleaner to suck small granule suck as flour, cement, gypsum, plaster powder. or big objects such as toys, paper ball. It will cause the problem like motor shocked and vacuum cleaner blocked.
- Please use dry cloth to clean the machine, and do not the detergent that can make the machine body cl discolored such as petrol and banana oil.
- Please do not use or store the machine in the high tem or low tem environments. It is recommended to the room where temp. from 0 to 40 centigrade. And store it in cool and shade place, do not let it long sunlight.
- Please charge the batteries unit fully when first time to use or after long time storage. If store this vacuum cleaner in long period, please make sure operate and recharging this machine every three months.
- When fully charged or need clean or maintenance, please unplug the adaptor and do not drag the power
- When the operating time is being shorten caused by batteries capacity weaken, can buy new batteries unit change the old batteries unit should be recycle and disposal and do not randomly dispose.
- Battery cells in the battery unit can only be used for this machine and prohibit to use in other means, and recharged with the adaptor that was provided with the machine. Please do not disassemble the batteries to make it touch the liquids in case of damage or electric shock. Do not place batteries unit close to high objects or fire, do not use sharp object inserting batteries unit or damage the batteries unit in case of a
- If the machine can not be worked properly or some parts broken, in case of any danger, in case of any danger, do not disassemble the machine. Please go to pointed maintenance places or professional technicians to check repair or call the after sale service hotline.
- Do not let children use or play with this machine or charge the batteries unit in case of any dangers.
- This appliance can be used by children aged from 8 years and above and persons with reduced physical, sensory or mental capabilities or lack of experience and knowledge if they have been given supervision or instruct concerning use of the appliance in a safe way and understand the hazards involved. Children shall not p the appliance. Cleaning and user maintenance shall not be made by children without supervision.
- The instructions shall give information regarding charging.
- The appliance is only to be used with the power supply unit provided with the appliance.
- This appliance contains batteries that are non-replaceable.
- read operator's manual.
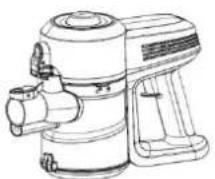
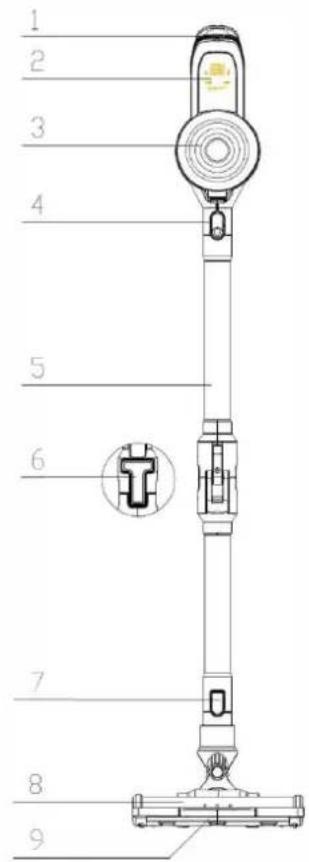
PARTS' DETAIL
- Power control button
- LED display
- Main unit
- Accessory release button
- Electric elbow tube
- Elbow tube button
- Accessory release button
- Motor Floor Brush
- Floor brush roller
-
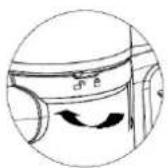
Dust bin release button
-
Dust bin lock & unlock remark
-
Dust bin
-
Dust tank bottom
-
Outlet
-
Power switch button
-
Handle
-
Charger hole
-
Contact sheet
-
Stainless net
-
Filter
-
Charger
-
Wall set
-
Contact shrapnel
-
Charger hole
-
Crevice tool
text_image
1 2 3 4 5 6 7 8 9
text_image
10 11 12 13 18 19 20 21 22 23 24 25 14 15 16 17PACKING DETAILS
| VACUUM UNIT | BATTERIES UNIT | FLEX TUBE | MOTORISED BRUSH | LONG CREIVE NOZZLE |
| 1 | 1 | 1 | 1 | 1 |
| ADAPTOR | DOCKING STUATION | IM | — | |
| 1 | 1 | 1 | — |
PARTS ASSEMBLY
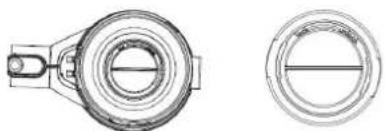
·DUST CUP ASSEMBLY ASSEMBLED WITH THE MAIN PART
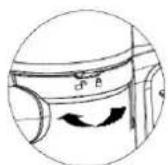
One hand hold the handle, the other hand hole the accessory connector ,finger push the tank release button, the tank counterclockwise, when the mark is match the unlock, take out the tank. check the filter.
Put the filter in the tank, align the triangle to the unlock mark, inset tank and finger push the tank release button, turn the tank clockwise to the lock mark.
natural_image
Technical line drawings of a mechanical component, showing top and side views (no text or symbols)Parts assembly
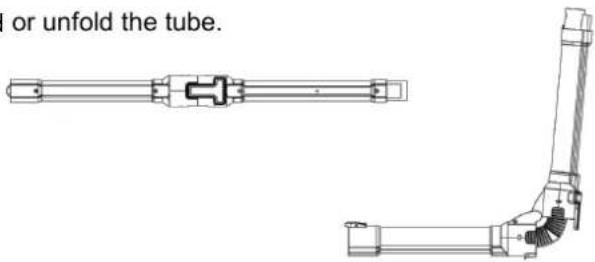
·Bending and unfold the tube
press the tube button to bend or unfold the tube.
text_image
I or unfold the tube.- Connection of tube and floor brush
Insert the upper part into lower connection of the power tube and can hear the sound of locking.
- Connection of accessory brushes with main machine
Insert the accessory brushes into the main hole of the main vacuum cleaners
·connection of main machine and power tube
Insert the upper ends into the main hole of the dust cup and can hear the locking sound
- Connection of power brush and main machine
Insert the upper part of the power brush into the main hole of the main machine
- Connection of power tube with accessory brushes
Insert the accessory brushes onto the power tube until hearing the locking sound
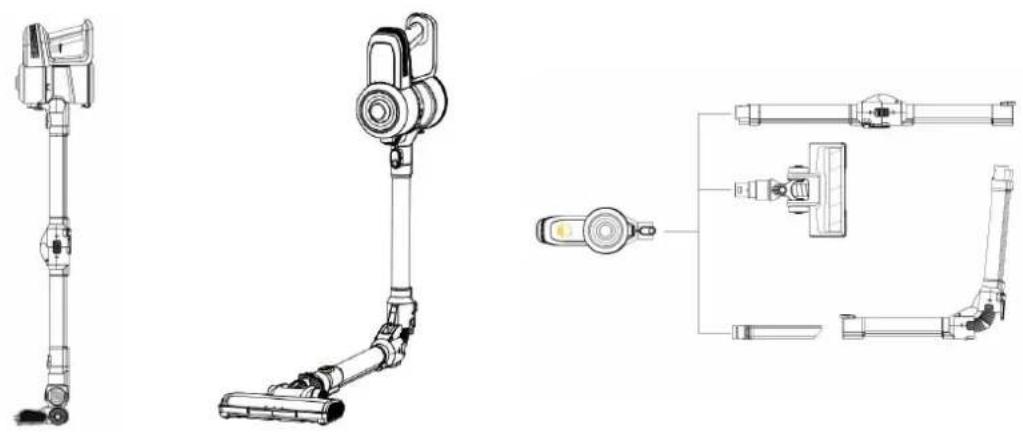
natural_image
Technical line drawings of a vacuum cleaner assembly with exploded and assembled views (no text or labels)USING METHOD
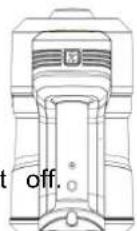
·Film display
1.

To show the power level, low power to light up 3 lights, high grade light 6 lights.
- To show the battery capacity. Data is from 0% to 100% when charging and discharging.
During charging, the battery mark flashes and the number displays from 1 to 100%. When fully charged, the mark is always bright and the number displays 100%.
During discharging, the battery mark is not bright, digital display 100% to 0%, the number began to flicker capacity is less than 10%, digital flicker 5 seconds after extinguishing.
- LOW SPEED, HIGH SPEED, OFF
Power trigger once, turn it on.
Press the power control button to change the power level.
Once is to high level, once again to low level. Power trigger once again, turn
- Use of accessory brush (long crevice nozzle)
Insert the long crevice nozzle onto the main sucking hole, then can use it to clean crevice of sofa and base
- Use of power brush
Insert the power brush onto end of the lower power tube, then insert the upper end to the suction hole of cleaner, then can clean parquet, carpet, tile and some other places.
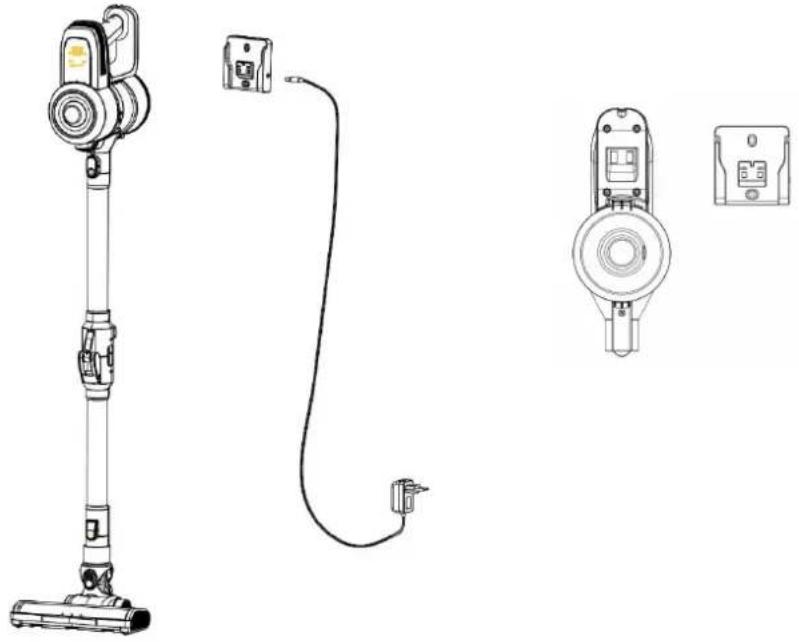
·Vacuum cleaner charging
Please use the designated adaptor to charge the vacuum cleaners
Plug the adaptor and when charge the light will shining in red, when it is full, the light will turn blue
When the batteries unit power off, please recharge it
Can recharge the machine insert in the wall set or charge the unit directly.
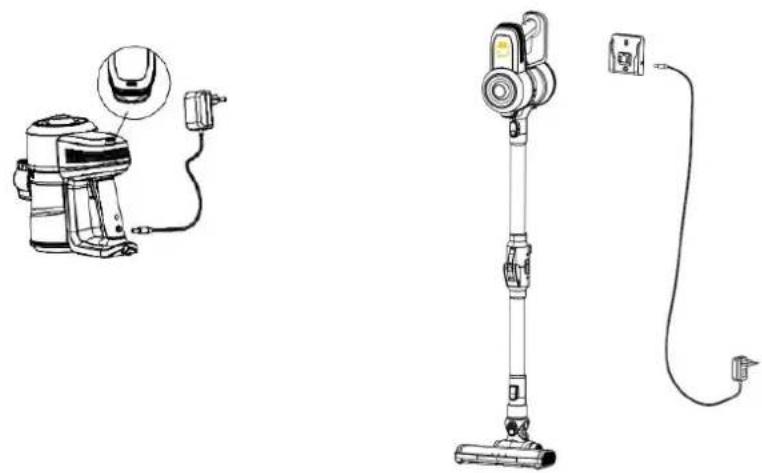
natural_image
Technical line drawing of a vacuum cleaner with attached cable and power cord (no text or symbols)Clean and exchange parts
·Clean after daily use
It is recommended to clean the dust cup after using every time.
·Dust cup cleaning
a) Press the button to release the lower cover of the dust cup to empty the dust.
b) Turn the tank counterclockwise then take out the filter, show and clean or change it.
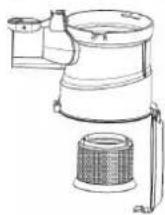
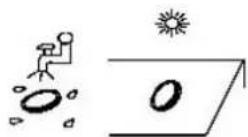
c) Clean the filter under running water and dry it under sunlight.


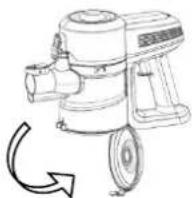
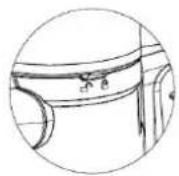
·Cleaning of the power brush
1) turn the lock chip to the "unlock" position, open the cover.
2) Take out the bristle from the brush
3) After cleaning, reassemble the bristle into the brush and turn it to "lock" position.

natural_image
Technical illustration of two mechanical components with a close-up detail showing internal components (no text or symbols)After long period using, the bristle may be jammed by hair or something similar, need to clean it in time in order to make the machine work efficiently.
.Storage
Fix the wall set on the wall, align the bottom of the unit and the wall set, and put the unit into it.insert the charger.
natural_image
Technical line drawings of a vacuum cleaner with attached electrical connectors and wiring (no text or symbols)Maintenance
·Before going to the mending place, please check below points
| NG | problem | solution |
| Motor NG | ● no power | ● charging |
| KPA decrease | ● dust full● Dusty filter● bristle not rotating | ● empty dust cup● clean or change filter● clean motor brush |
| No charging indicator | ● not insert the plug in place | ● insert the plug deeply into the hole |
| Working time decrease | ● Time to charge not enough● Battery ageing | ● Charge with full time● Buy battery unit from designated service centre |
| Bristle no work | ● suck big objects● seized by hair or else | ● clean the bristle and work again |
Product Spec
| Model No. | AMPA922 |
| Nom. Volt 22.2 V | |
| Input | 100-240V~ 50/60Hz 0.5A |
| output 27Vdc,500mA |
REMOVAL OF APPLIANCES USED
Directive 2012/19/EU on waste electrical and electronic Equipment (WEEE) requires that the appliance uses are not disposed of using the normal municipal waste. Old appliances must be collected in order to optimize the recovery and recycling of materials they contain and reduce the impact of human health and the environment.
The symbol of the dustbin is used on all products to remind the obligations for separate collection. Consumer contact their local authorities or dealer regarding the steps to follow for the removal of their old appliance. If proceed with the scrapping of old equipment, be sure to render useless what could be dangerous: disconnect power cable flush with the device.
Danger:
Never attempt to use your appliance, if it shows signs of damage or the power cord or plug is damaged. If cord is defective it is important to have it replaced with the after sales service to eliminate any danger.
Only qualified and authorized persons are authorized to carry out repairs to your appliance. Any repairs not in accordance with standards could significantly increase the level of risk for the user!
Defect resulting from improper handling, degradation or attempted repairs by third parties voids the warranty on product. This also applies in case of normal wear and accessories from the appliance.
Important!
We recommend that you keep the packaging of your device at least for the duration of the warranty. The guide does not apply without the original packaging.
Warranty:
Your device has two years warranty. Accessories and spare parts are only available during the 2 years of the warranty.battery has 6 months warranty .The warranty does not cover wear and breakage following a wrong use product. The customer is responsible for all returns. You remain responsible for the costs and risks associated product shipment; it is therefore recommended to ship the product with an acknowledgement of receipt and trust insurance in case of significant value of the product.
KEEP OUT OF REACH OF CHILDREN
Children should be supervised to ensure that they do not play with the appliance.
Service E-mail : sav@gmtfrance.fr
ARTHUR MARTIN
Arthur Martin is a registered trademark
Used under license from AB Electrolux (publ).
GMT:Global Market Technology