Motion Vision - Speaker Martin Logan - Free user manual and instructions
Find the device manual for free Motion Vision Martin Logan in PDF.


User questions about Motion Vision Martin Logan
0 question about this device. Answer the ones you know or ask your own.
Ask a new question about this device
Download the instructions for your Speaker in PDF format for free! Find your manual Motion Vision - Martin Logan and take your electronic device back in hand. On this page are published all the documents necessary for the use of your device. Motion Vision by Martin Logan.
USER MANUAL Motion Vision Martin Logan
natural_image
Abstract black ink brushstroke design on gray horizontal stripes (no text or symbols)user's manual
Motion®
MARTIN LOGAN
Vision
natural_image
Technical line drawing of a curved mechanical part with a labeled dimension (no text or symbols beyond the label)
dts
Digital Surround

DOLBY.
DIGITAL
VIRTUAL
SPEAKER
Compatible with SWT-2 Equipped
MartinLogan Subwoofer Systems

text_image
CAUTION RISK OF ELECTRIC SHOCK DO NOT OPEN ATTENTION RISQUE DE CHOC ELECTRIQUE NE PAS OUVRIRDo Not Open! Risk of Electrical Sock. Voltages in this equipment are hazardous to life. No user-serviceable parts inside. Refer all servicing to qualified service personnel. To prevent fire or shock hazard, do not expose this module to moisture.

The lightning bolt flash with arrowhead symbol, within an equilateral triangle, is intended to alert the user to the presence of potentially "dangerous voltage" within the product's enclosure that may be of sufficient magnitude to constitute a risk of electric shock to persons.

The exclamation point within an equilateral triangle is intended to alert the user to the presence of important operating and maintenance (servicing) instructions in the literature accompanying the appliance.
MOTION VISION
Tested to comply with FCC standards. FOR HOME OR OFFICE USE

IMPORTANT SAFETY INSTRUCTIONS!
1 Read these instructions.
2 Keep these instructions.
3 Heed all warnings.
4 Follow all instructions.
5 Do not use this apparatus near water.
6 Clean only with dry cloth.
7 Do not block any ventilation openings. Install in accordance with the manufacturer's instructions.
8 Do not install near any heat sources such as radiators, heat registers, stoves, or other apparatus (including amplifiers) that produce heat.
9 Do not defeat the safety purpose of the polarized or grounding-type plug. A polarized plug has two blades with one wider than the other. A grounding type plug has two blades and a third grounding prong. The wide blade or the third prong are provided
for your safety. If the provided plug does not fit into your outlet, consult an electrician for replacement of the obsolete outlet.
10 Protect the power cord from being walked on or pinched, particularly at plugs, convenience receptacles, and the point where they exit from the apparatus.
11 Only use attachments/accessories specified by the manufacturer.
12 Use only with the cart, stand, tripod, bracket, or table specified by the manufacturer, or sold with the

apparatus. When a cart is used, use caution when moving the cart/apparatus combination to avoid injury from tip-over.
-
Unplug this apparatus during lightning storms or when unused for long periods of time.
-
Refer all servicing to qualified service personnel. Servicing is required when the apparatus has been damaged in any way, such as power-supply cord or plug is damaged, liquid has been spilled or objects have fallen into the apparatus, the apparatus has been exposed to rain or moisture, does not operate normally, or has been dropped.
-
To completely disconnect this equipment from the AC mains, disconnect the power supply cord plug from the AC receptacle.
-
The mains plug of the power supply cord shall remain readily operable.
17 CAUTION: Danger of explosion if battery is incorrectly replaced. Replace only with the same or equivalent type (CR2025 3V). Dispose of dead batteries in accordance with local regulation.
-
To prevent overheating, do not cover the apparatus. Install in accordance with the manufacturer's instructions.
-
No naked flame sources, such as candles, should be placed on the product.
-
Do not expose this apparatus to dripping or splashing and ensure that no objects filled with liquids,
such as vases, are placed on the apparatus.
- Batteries (battery pack or batteries installed) shall not be exposed to excessive heat such as sunshine, fire, or the like.
- For apparatus mounted to wall, the apparatus shall be installed on solid wood, bricks, concrete or solid wood columns and battens.
WARNING: This product is intended to be operated ONLY from the AC Voltages listed on the back panel or included power supply of the product. Operation from other voltages other than those indicated may cause irreversible damage to the product and void the products warranty. The use of AC Plug Adapters is cautioned because it can allow the product to be plugged into voltages in which the product was not designed to operate. If the product is equipped with a detachable power cord, use only the type provided with your product or by your local distributor and/or retailer. If you are unsure of the correct operational voltage, please contact your local distributor and/or retailer.
This device complies with part 15 of the FCC Rules and RSS-210 of Canada licence-exempt RSS Standard(s). Operation is subject to the following two conditions: (1) this device may not cause interference, and (2) this device must accept any interference, including interference that may cause undesired operation of the device.
Note: This equipment has been tested and found to comply with the limits for a Class B digital device, pursuant to part 15 of the FCC Rules. The limits are designed to provide reasonable protection against harmful interference in a residential installation. This equipment generates, uses and can radiate radio frequency energy and, if not installed and used in accordance with the instructions, may cause harmful interference to radio communications. However, there is no guarantee that interference will not occur in a particular installation. If this equipment does cause harmful interference to radio or television reception, which can be determined by turning the equipment off and on, the user is encouraged to try to correct the interference by one or more of the following measures:
• Reorient or relocate the receiving antenna.
- Increase the separation between the equipment and receiver.
- Connect the equipment into an outlet on a circuit different from that to which the receiver is connected.
- Consult the dealer or an experienced radio/TV technician for help.
Approved under the verification provision of FCC Part 15 as a Class B Digital Device.
Caution: Changes or modifications not expressly approved by the manufacturer could void the user's authority to operate this device.
The term "IC:" before the radio certification number only signifies that Industry Canada technical specifications were met.
This equipment complies with FCC and IC radiation exposure limits set forth for an uncontrolled environment. This equipment should be installed and operated with minimum distance 20cm between the radiator and your body. This transmitter must not be co-located or operating in conjunction with any other antenna or transmitter.
To reduce potential radio interference to other users, the antenna type and its gain should be so chosen that the equivalent isotropically radiated power (e.i.r.p.) is not more than that permitted for successful communication.
Introduction and Overview....6
Placement and Mounting 6
Location 6
Installing on a Flat Surface....6
On-Wall Installation 6
Connection 10
Power Connection 10
Signal Connection 10
An Introduction to Audio Cables ..... 11
Subwoofer Connection ..... 12
Surround Sound Decoding 15
Digital Inputs (Optical and Coaxial)....15
Analog Inputs (Left/Right RCA) ..... 15
Top Panel Controls 15
Remote Control 16
Changing the Remote's Battery ..... 16
Programming a Second Remote ..... 16
The Menu System 17
Entering and Exiting the Menu ..... 17
An Overview of the Menu Structure ..... 17
Navigating the Menu 18
Menu Options....18
Modes 18
Sub 18
Bass Level 19
Surround 19
Stereo....20
Install 20
Display 20
Power....21
Learn 21
Source Name....22
Reset. 22
Contacting Customer Service 23
General Information 23
Warranty Information 23
Serial Number....23
Service 23
Frequently Asked Questions.... 24
Troubleshooting 25
Specifications 27
Dimensional Drawings 28
Serial Number:
Record your serial number here for easy reference. You will need this information when filling out your warranty registration. The serial number is located on the back of the sound bar and on the product carton.

text_image
Motion Vision MOTION VISIONwall mount installation template
natural_image
Diagram of a wall-mounted device with a circular opening and two light bulbs, labeled 'wall' and 'bracket' (no text or symbols on the diagram itself)
text_image
60 inch (152 cm) digital optical cable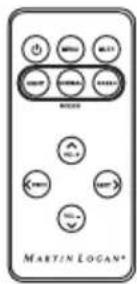
text_image
MARTIN LOGAN* MUSTO HAPPY HAPPY MUSTO HAPPY HAPPY HAPPY HAPPY HAPPY HAPPY HAPPY HAPPY HAPPY HAPPY HAPPY HAPPY HAPPY HAPPY HAPPY HAPPY HAPPY HAPPY HAPPY HAPPY HAPPY HAPPY HAPPY HAPPY HAPPY HAPP Y HAPP Y HAPP Y HAPP Y HAPP Y HAPP Y HAPP Y HAPP Y HAPP Y HAPP Y HAPP Y HAPP Y HAPP Y HAPP Y HAPP Y HAPP Y HAPP Y HAPP Y HAPP Y HAPP Y HAPP Y HAPP Y HAPP Y HAPP Y HAPP Y HAPPY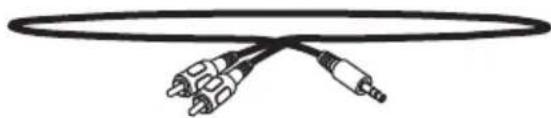
natural_image
Line drawing of a double-slit audio jack with two connected cables (no text or symbols)
text_image
40 inch (101 cm) stereo RCA analog cablestereo 3.5mm headphone to RCA cable
40 inch (101 cm)
text_image
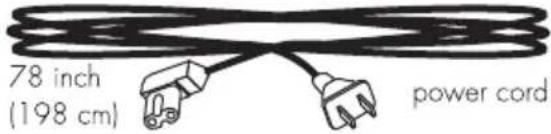
78 inch (198 cm) power cord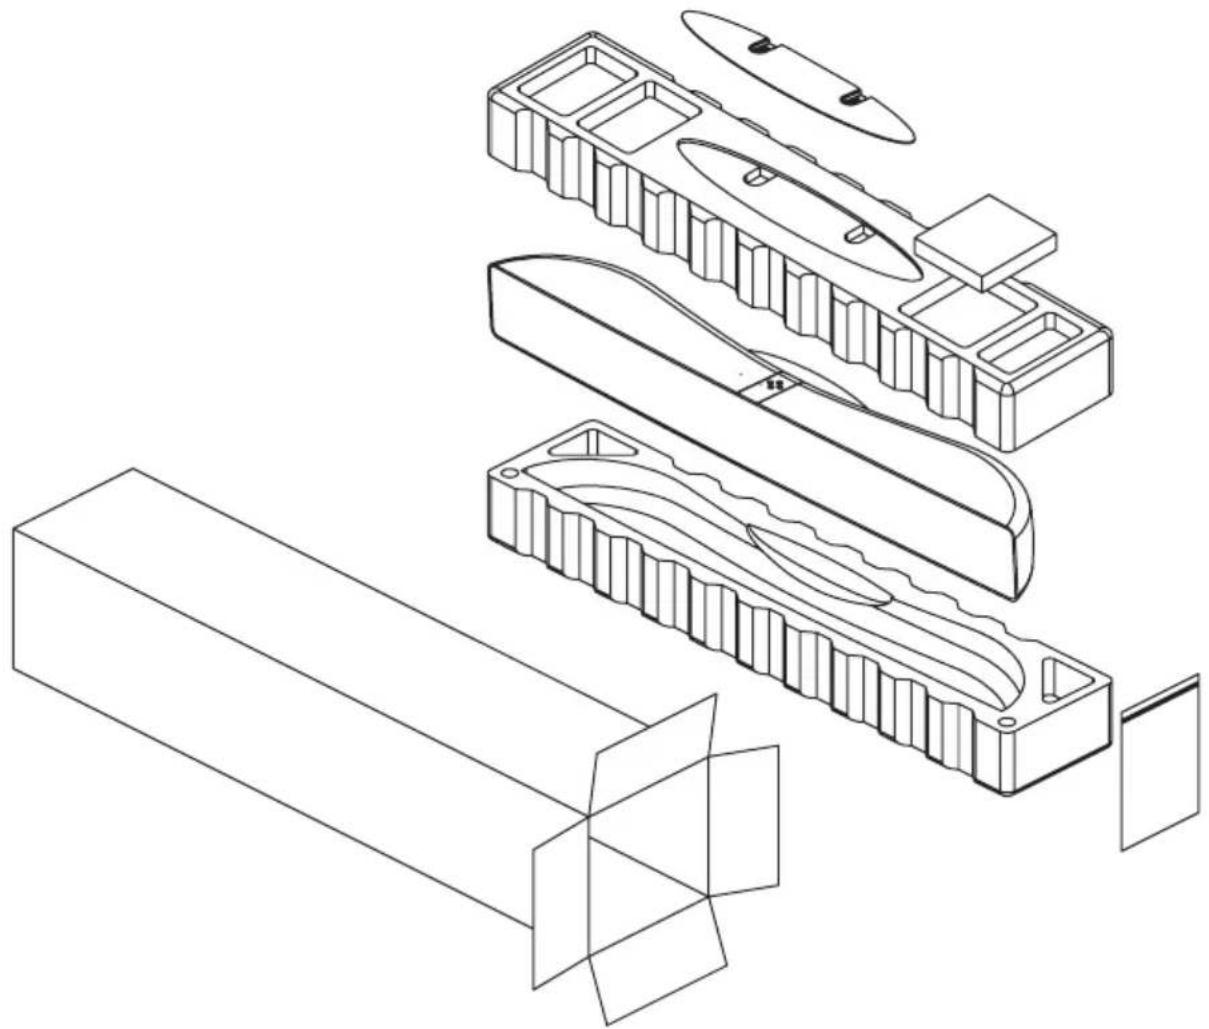
natural_image
Technical line drawing of a mechanical assembly with exploded and assembled views (no text or symbols)INTRODUCTION AND OVERVIEW
Thank you—the MartinLogan owner, for loving what we do, and making it possible for us to do what we love.
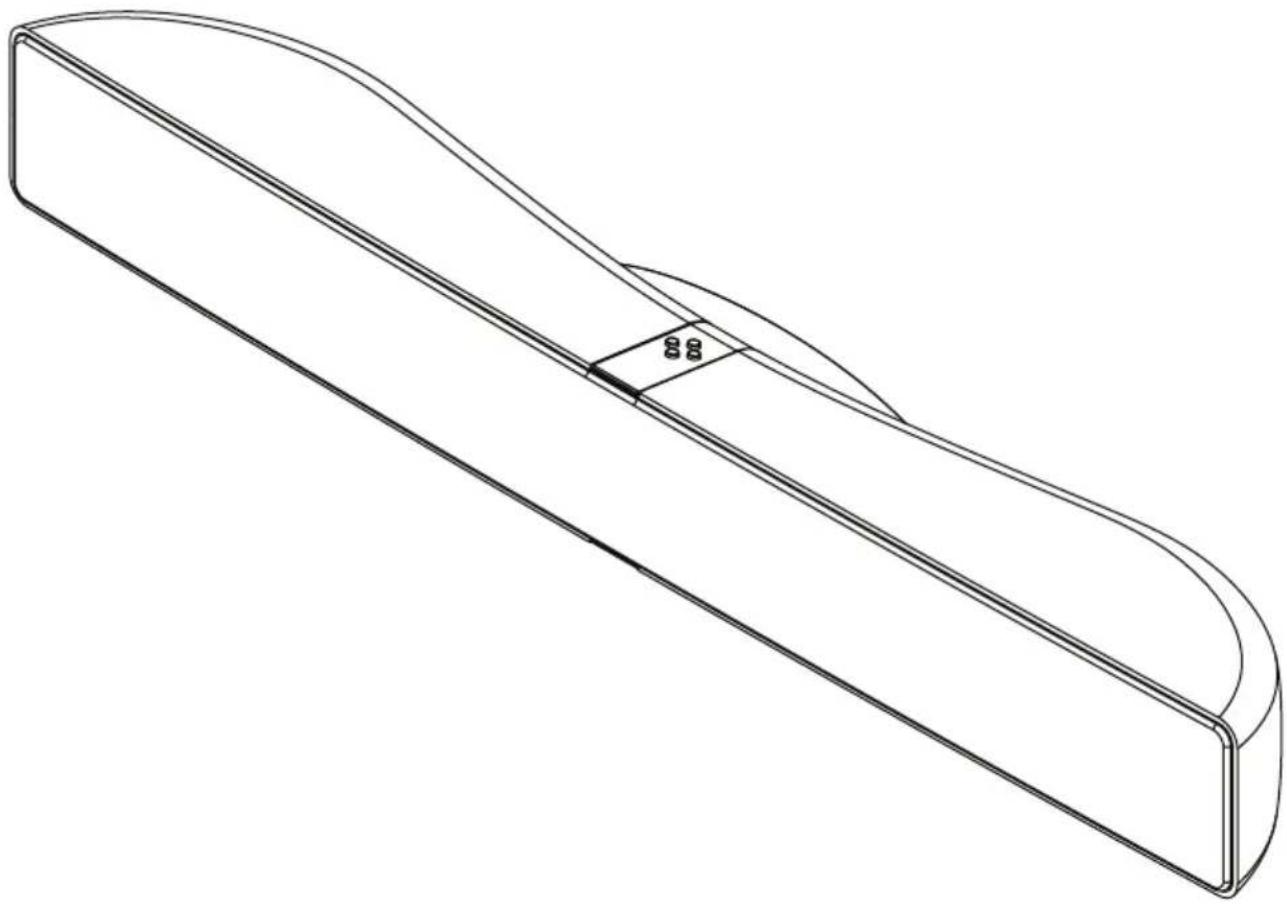
MartinLogan's dedicated in-house engineering and design team developed the Motion Vision soundbar to deliver exceptional multi-channel performance from a single system that easily integrates and installs in a diverse variety of environments—whether table or wall mounted. The Motion Vision produces an enveloping field of richly detailed audio for both music and movies via three tweeters incorporating MartinLogan's award-winning Folded Motion technology, four high-performance woofers, and seven channels of dedicated amplification representing 100 watts of total system power.
Advanced digital signal processing technology allows MartinLogan to replace five dedicated home theater speakers with a one piece solution capable of reproducing multi-channel recordings with unflinching accuracy, resolution, and detail— the inspiration behind every MartinLogan design. The Motion Vision reproduces front left, right, and center channels via the system's dedicated tweeters and woofers. Surround channels are simulated using sophisticated digital signal processing that directs sound from the system's tweeters and woofers throughout the room.
Additionally, for a fully authentic surround sound experience, the Motion Vision's built in SWT-2 wireless transmitter makes connecting a dedicated compatible MartinLogan subwoofer as simple as the push of a button—no wires necessary.
The Motion Vision's simple remote control quickly adjusts volume and selects inputs. The remote also allows you to easily switch between three discrete acoustic modes—'Night' mode (to dial down the bass), 'Bass +' mode (for those moments requiring a little extra thunder), and a 'Normal' mode that restores normal levels.
PLACEMENT AND MOUNTING
LOCATION
We recommend locating the soundbar centered directly above or below your video display. The soundbar menu allows you to optimize acoustic performance for either 'on-wall' or 'on-shelf' installations. You will learn more about accessing these options in the "Controls" section of this manual.
INSTALLING ON A FLAT SURFACE
If you have a surface that provides a wide, level, and stable platform (such as a table or audio/video rack), the soundbar can be placed directly on top.
When installing the system in this configuration, use the soundbar's menu system to choose 'INSTAL > ON.SHLF' [ON SHELF].
Please note: This soundbar is not magnetically shielded and therefore should not be placed directly beneath or on top of a CRT (cathode ray tube) television. The magnetic field of the soundbar will not affect plasma and LCD style televisions.
ON-WALL INSTALLATION
Note: These instructions assume the mounting surface is standard wood frame and sheet rock construction. If you wish to mount to another type of surface, consult a bonded contractor.
WARNING! We strongly recommend locating the wall bracket so at least one of the screw locations attaches to a stud. WARNING

To prevent injury, this apparatus must be securely attached to the floor/wall in accordance with the installation instructions.
Note: When installing the system in this configuration, use the soundbar's menu system to choose 'INSTAL > ON.WALL'.
Required tools (not included):
- Stud finder
- Level
• Electric drill and drill bits
• Phillips screwdriver
Required hardware (included):
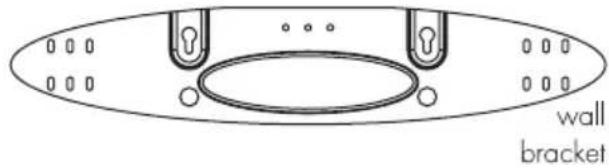
• (1) Installation template
(1) Wall bracket
Required hardware (not included):
• (5) Screws appropriate for mounting surface
• (5) Sheet rock anchors (sized for screws)
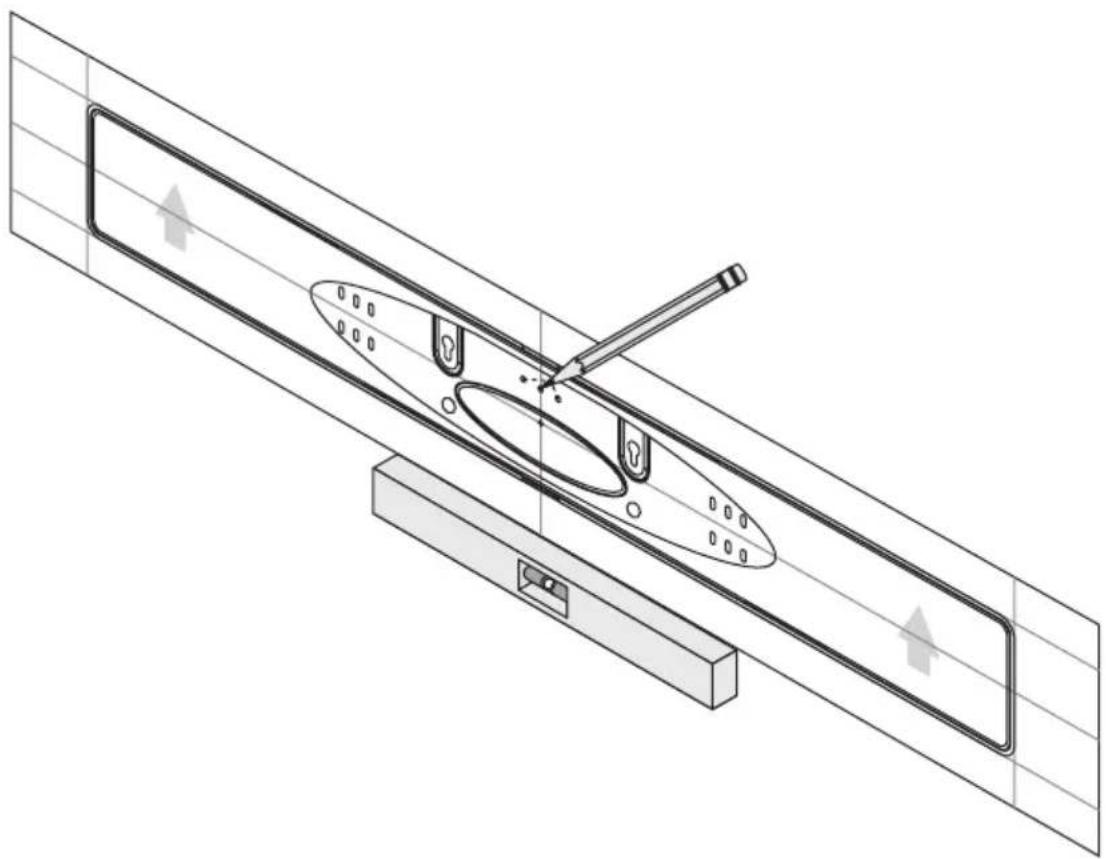
1 Locate mounting location using a level and the installation template (fig 1).
2 Mark the three central pilot hole locations and remove the installation template (fig 1).
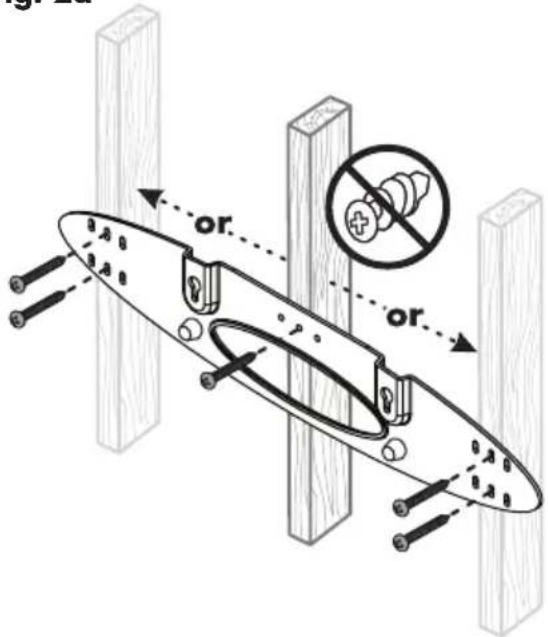
3 Using a stud finder, determine if there is a wall stud directly behind one of the three center screw locations (fig 2a).
Fig. 1
natural_image
Technical line drawing of a mechanical assembly with no visible text or symbolsIf no stud is found: use the center most screw location and drill a pilot hole for the wall anchor. Install a wall anchor at this location. If a wall stud is found: drill a pilot hole into the stud.
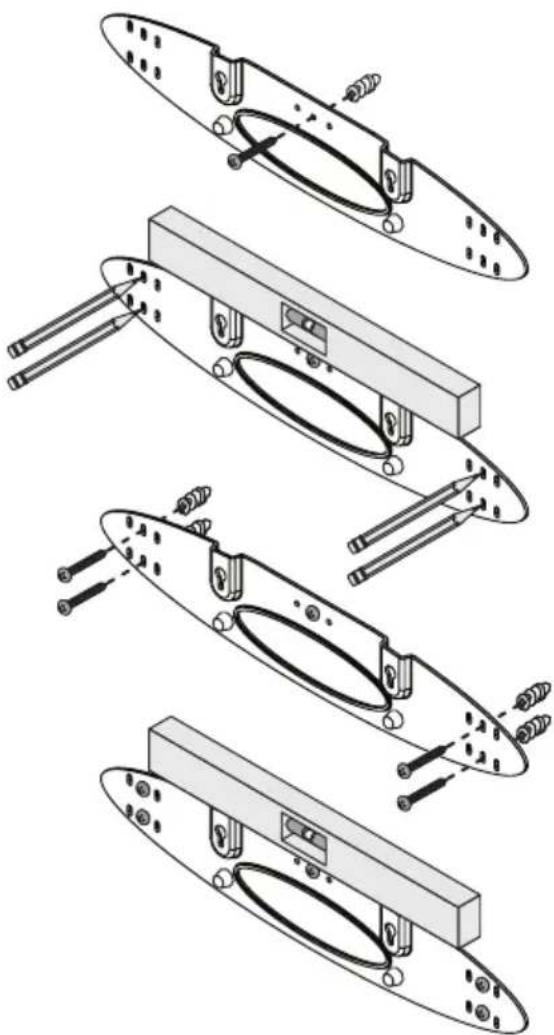
4 Using a screw, attach the wall bracket to the wall. DO NOT tighten (fig 2b).
5 Using a stud finder, determine if a wall stud is directly behind any of the remaining screw locations (fig 2a).
If no stud is found: use the top and bottom center-most screw locations. If a wall stud is found: use the top and bottom screw locations with a stud behind them.
Use a level to square the wall bracket and mark the remaining pilot hole locations (fig 2b).
6 Remove the wall bracket or pivot to access the remaining screw locations (fig 2b).
If no stud is found: drill pilot holes and install wall anchors. If a wall stud is found: drill pilot holes into the stud.
7 Using the screws, attach the wall bracket to the wall. DO NOT fully tighten.
8 Use a level to square the wall bracket. Tighten all screws (fig 2b).
9 Attach audio and power cables as needed. Refer to the 'Connection' section of this manual.
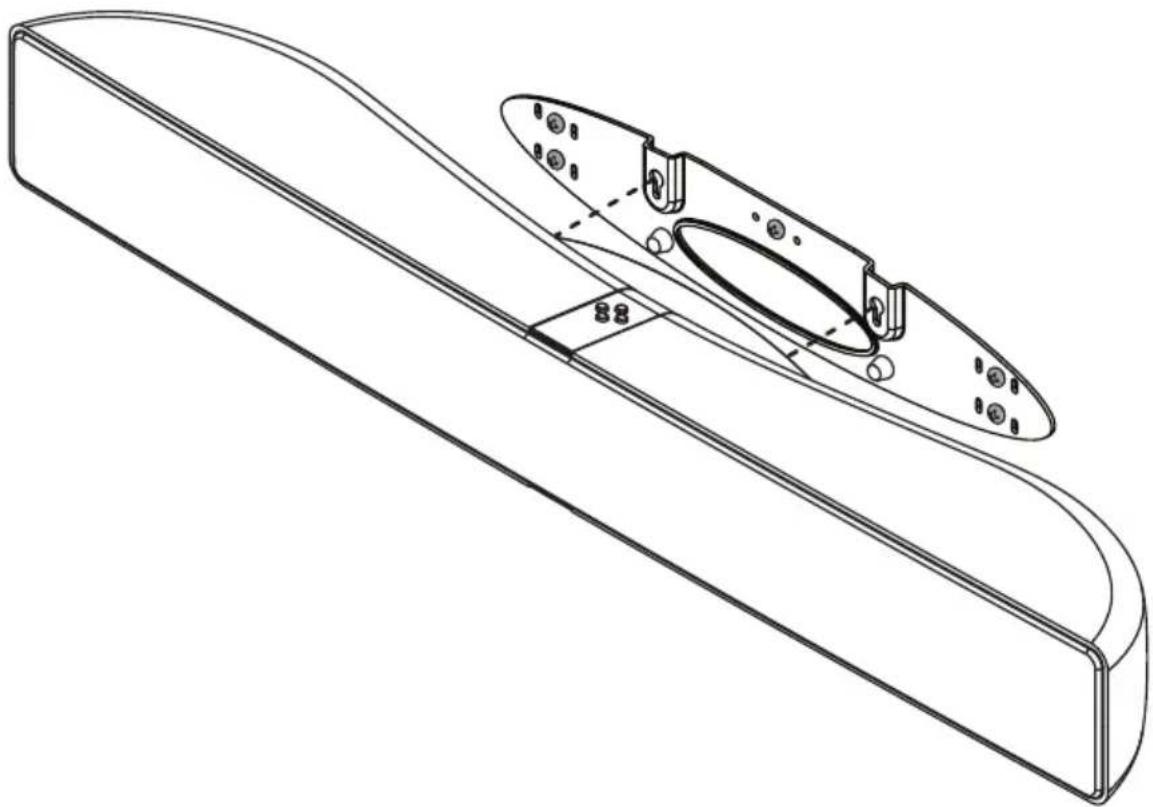
10 Move the soundbar into place and drop the shoulder bolts into the wall bracket keyholes. Before releasing, make sure the soundbar has dropped fully into the keyholes and is held firmly in place (fig. 3).
Fig. 2a
text_image
Technical diagram showing a mechanical assembly with labeled components and a magnified inset showing a screw with no tool.Fig. 2b
natural_image
Exploded view diagram of a mechanical assembly showing four sequential stages of assembly (no text or labels)Fig. 3
natural_image
Technical line drawing of a curved mechanical component with mounting flanges and bolt holes (no text or symbols)CONNECTION
WARNING! Turn your soundbar off before making or breaking any

signal connections! WARNING!
The power cord should not be installed, removed, or left detached from the soundbar while the other end is connected to an AC power source.
POWER CONNECTION
The power cord should be firmly inserted into the AC power receptacle on the rear connection panel of the soundbar, then to any convenient AC wall outlet. The soundbar also integrates a signal sensing power supply that automatically switches off after sensing no audio signal for 30 minutes (this will only occur when the menu's power setting is set to 'Auto').
If you remove your soundbar from the country of original sale, be certain that AC power supplied in any subsequent location is suitable before connecting and operating the soundbar. Substantially impaired performance or severe damage may occur to the soundbar if operation is attempted from an incorrect AC power source.
SIGNAL CONNECTION
When utilizing the soundbar to reproduce audio a television's audio output should be defeated. Some televisions will allow you to turn off the internal speaker via the television's menu system. Other televisions may require you to turn the television's volume to "zero" or "mute".
Additionally, your television may require you to turn on the digital optical or digital coaxial output or and/or configure the output for 5.1 surround sound. Please refer to your television's manual.
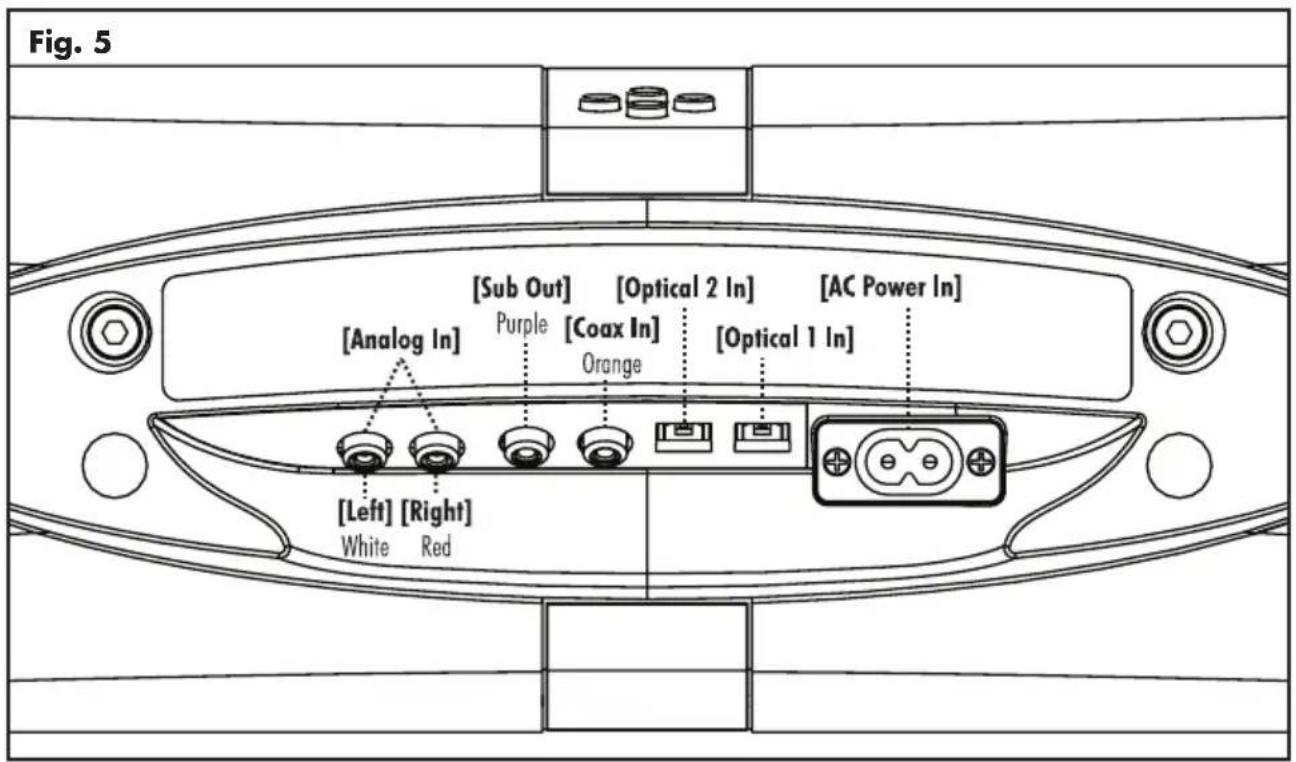
Connections are made at the signal input section on the rear electronics panel of the soundbar. Your soundbar features four audio inputs:
• 2 x Digital Optical inputs
• 1 x Digital Coaxial (RCA) input
• 1 x Left/Right Analog (RCA) input
text_image
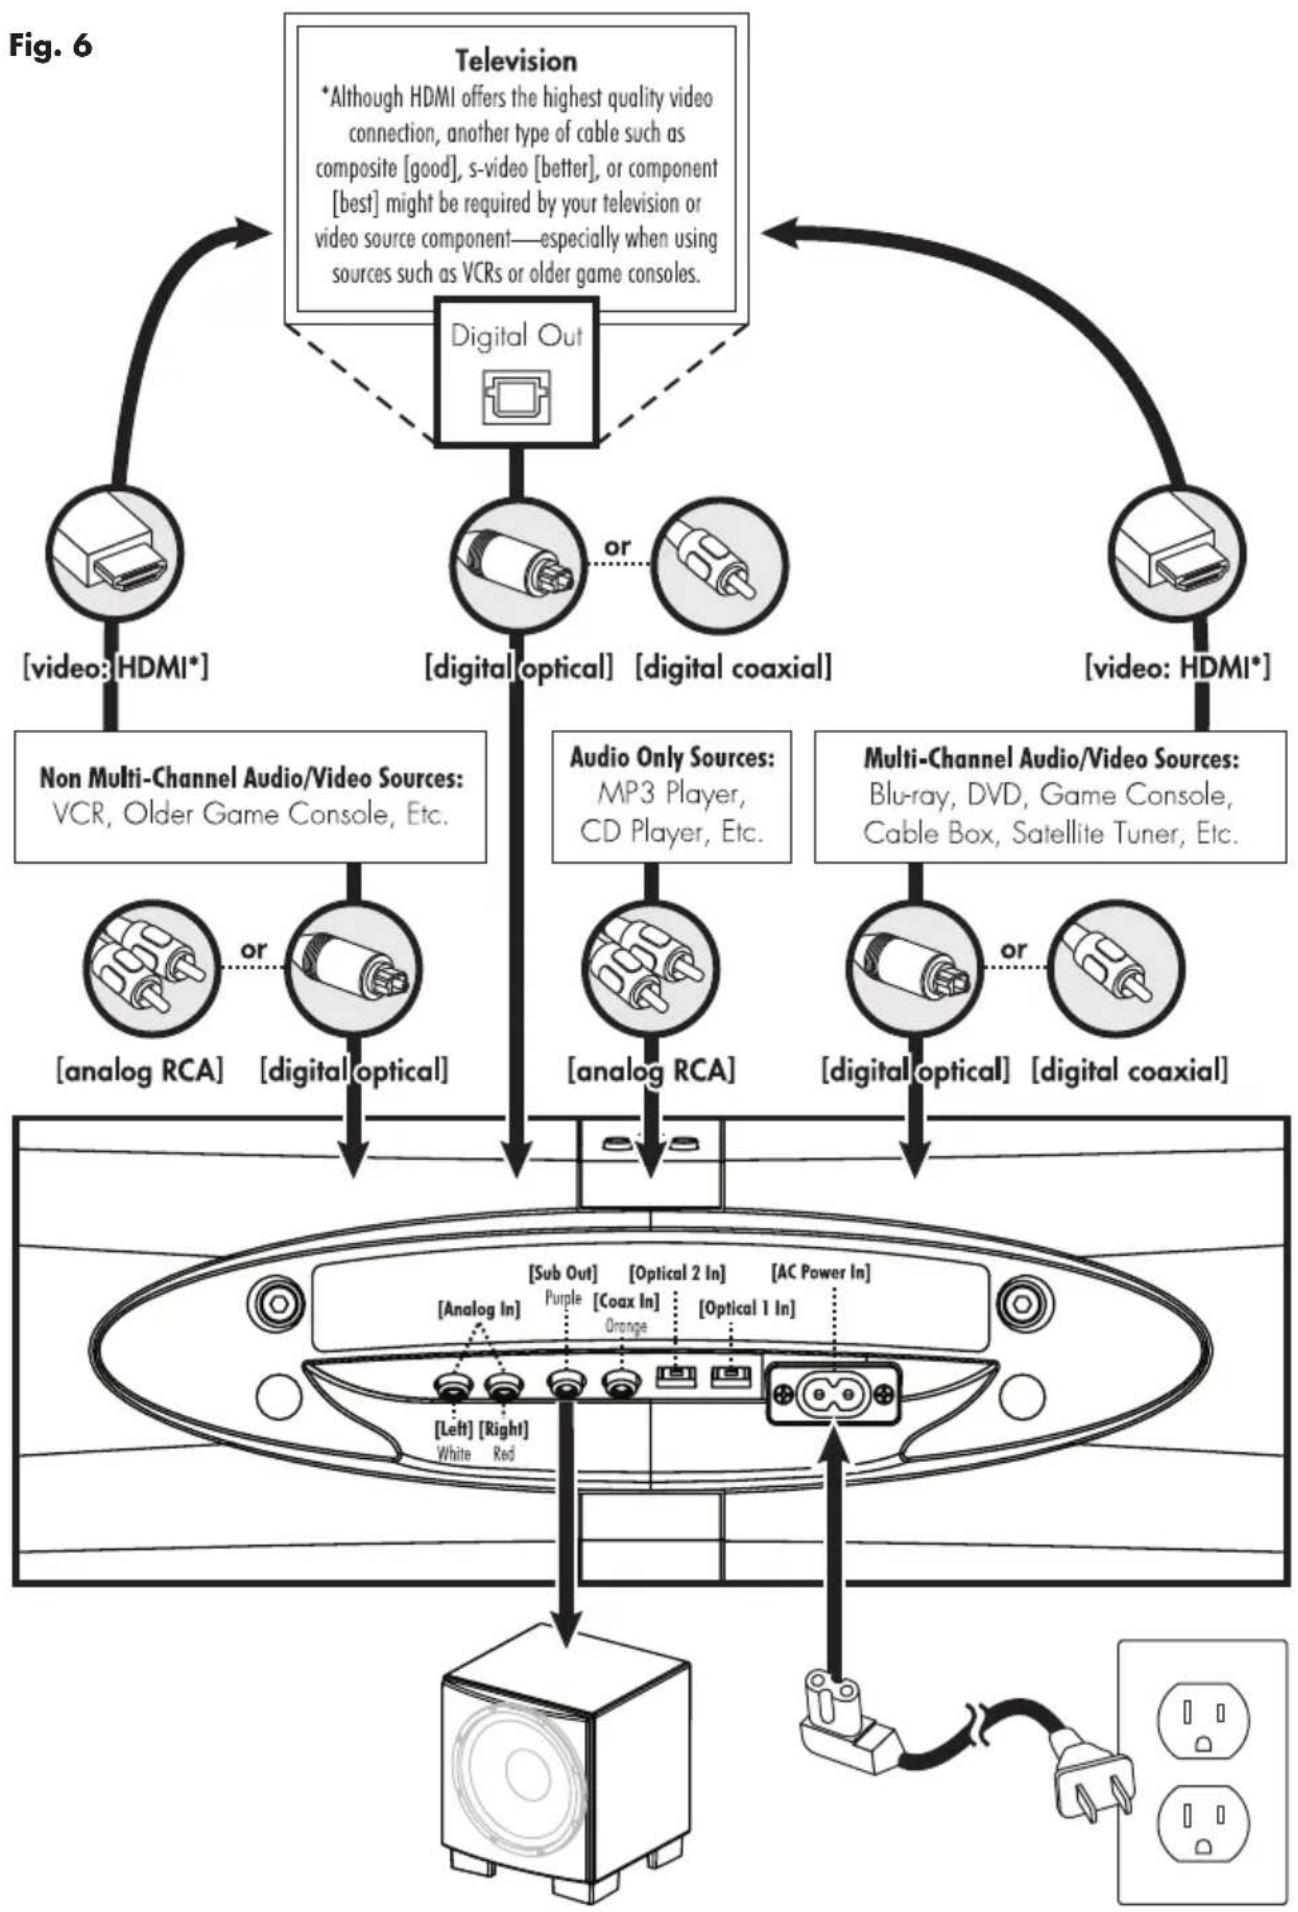
Fig. 5 [Analog In] [Sub Out] [Optical 2 In] [AC Power In] Purple [Coax In] [Optical 1 In] Orange [Left] [Right] White RedWhen connecting your system, there are any variety of configurations that will work, and these methods will vary based on user preference.
Some users will choose to route all sources (such as DVD player, cable box, game console, media streamer, etc.) to their television via a digital (optical or coaxial) connection and use the television to switch between audio/video sources. The advantage of this connection method is that only one audio cable (either a digital optical or digital coaxial cable) needs to connect between the televi-
An Introduction to Audio Cables
natural_image
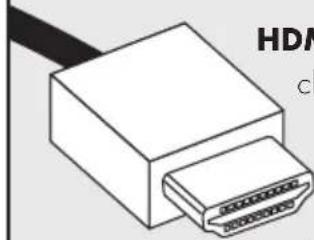
Illustration of a 3-pin connector with a black cable (no text or symbols visible)HDMI: HDMI utilizes one cable to pass high-definition video signals and multi-channel encoded digital audio between a source component and television or receiver. Your soundbar is not equipped with an HDMI input. However, in many installations you will want to use HDMI to connect a video source component to your television (to pass video) and an additional digital optical or digital coaxial cable (to pass audio) to the soundbar.
natural_image
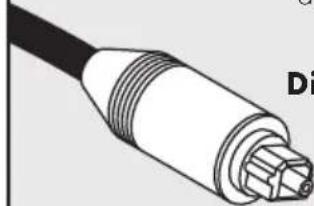
Illustration of a black cable with multiple metallic connectors (no text or symbols)Digital Optical: Digital optical utilizes one cable to pass digital audio information (no video). A digital optical cable offers a high-quality digital connection and passes multi-channel encoded audio between a source component and an audio output device.

text_image
Digital (no FDigital Coaxial: Digital coaxial utilizes one cable to pass digital audio information (no video). A digital coaxial cable offers a high-quality digital connection and passes multi-channel encoded audio between a source component and an audio output device. Please note: The 'RCA' style end of a digital coaxial cable is identical to those found on common left/right analog RCA cables.
However, a cable designed specifically for digital coaxial connections should be employed—do not use a standard left/right analog RCA style cable because it will likely not be up to the task of handling the high bit-rate necessary for a reliable digital connection.
natural_image
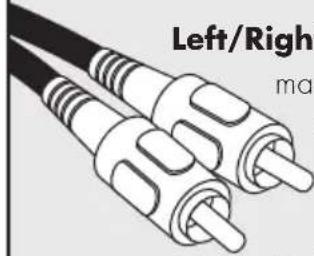
Illustration of two black audio/video cables with no text or symbols on the cables themselvesLeft/Right Analog RCA: Left/right analog RCA cables are used to pass audio information (no video). An analog RCA cable can only be used to pass a single channel of audio information between a source component and audio output device. To achieve two-channels of audio (left/right) you will find that analog RCA cables come bundled as a stereo pair (2 connectors on each end). Analog RCA connections are not capable of passing the digital encoding required to reproduce multi-channel audio and thus should not be used with source components where you desire surround sound output. Older gaming consoles, portable media player docks, VCRs and similar source components (which are not capable of playing multi-channel encoded content) will often offer connection only through left/right analog RCA cables. Additionally, users may find source components such as digital media player docks that utilize a special cable with a 3.5mm 'headphone style' jack on one end, and two analog RCA connectors on the opposite end.
sion and the soundbar—and changing the input on your television will change the audio signal being sent to the soundbar (without having to change the input setting on the soundbar itself). Please note: televisions are not capable of passing multi-channel encoded audio signals and will down-mix these signals to a 2-channel stereo mix before sending them to the television's digital output.
Most users will want to run cables directly from the source to the soundbar while simultaneously running HDMI from each source to the TV for the video signal. This has the advantage of allowing the soundbar to receive multi-channel encoded material. However, some newer source devices turn off their optical/coaxial outputs when their HDMI output is used.
Depending on your number of sources, the TV may be used for switching some sources while audio output from the primary source devices may be directly connected to the soundbar for multi-channel sound.
A few important points to remember when connecting your soundbar:
- Digital optical and digital coaxial connections will provide the highest audio fidelity when connecting to the soundbar.
- If your soundbar is not producing sound or surround sound from your Blu-ray player, DVD player, or other multi-channel audio capable source you may need to set the player's digital audio output to "Bitstream" (also called "Raw", "Direct Digital", or "High Bit Rate"). If "PCM" is selected you'll loose the multi-channel encoded sound. Some players only require you to turn PCM off to configure for multi-channel encoded sound. Please refer to your player's manual.
- In a setup where HDMI is used to connect your audio/video source component to your televi-
sion, you will likely need to run an additional digital optical or coaxial cable between the source component and your soundbar. This extra connection will allow for multi-channel encoded audio to reach the soundbar.
- Audio-only sources capable of only stereo output (such a portable media player docks or CD player) will often connect directly to the soundbar via the left/right analog RCA inputs.

Compatible with SWT-2 Equipped MartinLogan Subwoofer Systems
SUBWOOFER CONNECTION
You may choose to employ a separate subwoofer to reproduce the .1/LFE channel information in multi-channel recordings and/or reinforce bass performance of stereo recordings. Any aftermarket home theater subwoofer can be connected via the soundbar's "LFE Out" RCA connection. We, of course, recommend using a superb MartinLogan subwoofer.
Additionally, this soundbar integrates a built-in SWT-2 subwoofer wireless transmitter compatible with select MartinLogan subwoofers. Subwoofers utilizing SWT-2 technology will reference this wireless system on their connection panel.
Please note: When utilizing a wireless connection it is not necessary to use the SWT-2 wireless transmitter included with the subwoofer.
No Subwoofer
For systems not using a separate subwoofer, use the soundbar's menu system and choose "SUB > NO SUB". This sets the soundbar to reproduce the entire frequency range when playing content.
Wired Subwoofer Connection
Using a high-quality RCA style cable designed for
flowchart
graph TD
    A["Television"] --> B["Digital Out"]
    B --> C["Non Multi-Channel Audio/Video Sources: VCR, Older Game Console, Etc."]
    B --> D["Audio Only Sources: MP3 Player, CD Player, Etc."]
    B --> E["Multi-Channel Audio/Video Sources: Blu-ray, DVD, Game Console, Cable Box, Satellite Tuner, Etc."]
    A --> F["Video: HDMI*"]
    B --> G["Video: HDMI*"]
    F --> H["Analog RCA"]
    F --> I["Digital Optical"]
    G --> J["Analog RCA"]
    G --> K["Digital Optical"]
    H --> L["Sub Out"]
    H --> M["Optical 2 In"]
    H --> N["AC Power In"]
    I --> O["Analog In"]
    I --> P["Purple"]
    I --> Q["Coax In"]
    I --> R["Orange"]
    J --> S["Left Right White Red"]
    K --> T["Right Red"]
    L --> U["Speaker"]
    M --> U
    N --> U
    O --> U
    P --> U
    Q --> U
    R --> U
    S --> U
    T --> U
subwoofer connection, connect "Sub Out" from the soundbar to the "LFE In/Sub In" on the subwoofer.
Use the soundbar's menu system and choose 'SUB > WIRED'.
Reference your subwoofer's manual to learn how to properly adjust the sub's level and phase controls to achieve proper blending with the soundbar. The subwoofer's crossover should be set to "bypass", "LFE". For subwoofers that do not have a "bypass" or "LFE" crossover setting we recommend adjusting the crossover to its highest setting.
Wireless Subwoofer Connection
Press the subwoofer's sync button and hold for 3 seconds. The subwoofer's LED will blink quickly.
Use the soundbar's menu system and choose 'SUB > WIRELS > SYNC'. The soundbar will display 'PSH.BTN' [PUSH BUTTON].
If pairing has completed successfully, the subwoofer's LED will stop blinking and remain on and the soundbar will display 'SYNCED'. Please note: If a link is not established after 30 seconds, the subwoofer's LED will start blinking slowly and the soundbar will display 'FAILED'. Repeat if syncing fails.
Please note: MartinLogan once utilized a wireless subwoofer connection system named "SWT-1". Subwoofers equipped with SWT-1 technology are not capable of wireless connectivity with this soundbar—a wired connection will work for these subwoofers.
WARNING! When operating wirelessly, the subwoofer may be susceptible to RF interference in the 2.4GHz bandwidth from microwave ovens and wireless devices such as WiFi systems, video game consoles, cordless telephones, bluetooth devices, and baby monitors. Generally, this issue (intermittent sound or slight popping noises) is easily resolved by physically separating problematic devices from one another—a distance as little as two feet will often alleviate the interference. In the case of microwave ovens, the interference will only occur when the microwave is operating.
Reference your subwoofer's manual to learn how to properly adjust the sub's level and phase controls. The subwoofer's crossover should be set to "bypass" or "LFE". For subwoofers that do not have a "bypass" or "LFE" crossover setting we recommend adjusting the crossover to its highest setting.
Please note: If you decide to no longer use wireless, turn off the soundbar's wireless transmitter by using the menu system and choosing 'SUB > WIRELS > TRN.OFF' [TURN OFF] or 'SUB > NO SUB'. Doing this will turn off the transmitter and automatically set the soundbar for no sub.
Using a MartinLogan Dynamo Subwoofer
If using a MartinLogan Dynamo family subwoofer, we recommend beginning with the following subwoofer settings:
Low-pass: Bypass
Phase (wired connection): ○
Phase (wireless connection): 180
Volume: Knob set to vertical (12-o'clock to 1-o'clock position)
This soundbar is capable of detecting and automatically decoding multi-channel audio formats, such as those found on DVD and Blu-ray movies.
DIGITAL INPUTS (Optical and Coaxial)
When utilizing a digital connection, the soundbar can process the following formats:

• Dolby Digital
• DTS Digital Surround™
- Digital Stereo
ANALOG INPUTS (Left/Right RCA)
Digitally encoded sound information cannot be transmitted to an analog input. This connection method is adequate for most devices that only offer two channels of output (such as VCRs, CD players, older game consoles, or portable media player docks). Although most surround sound capable devices, such as DVD and Blu-ray players, offer both analog and digital connections, the digital connection should always be employed. If a source device is connected via an analog left/right RCA connection, the 5.1-channel encoded audio content will not be sent to the soundbar.
TOP PANEL CONTROLS
Your soundbar features four buttons on top of the unit to control the following functions:

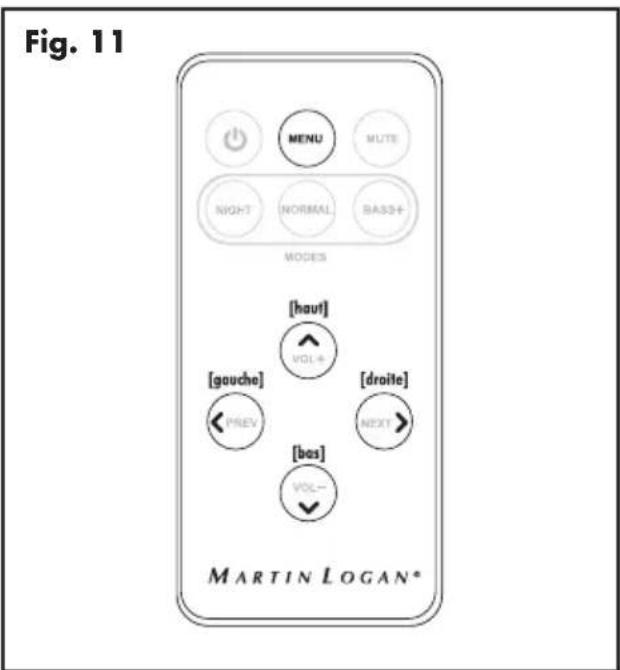
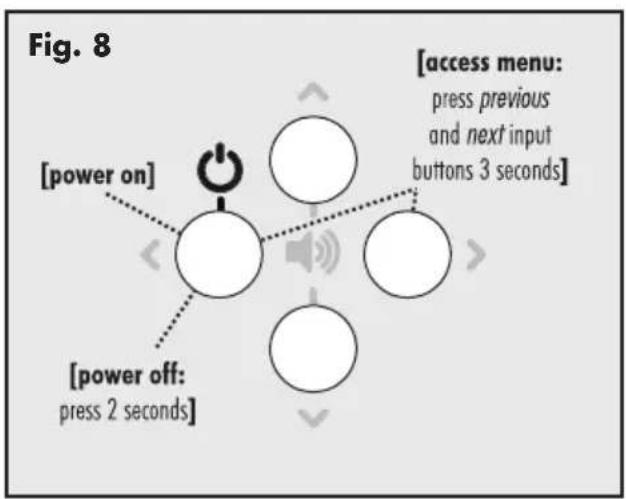
POWER: Turns the soundbar on. Press and for 2 seconds to turn the soundbar off (fig. 8).
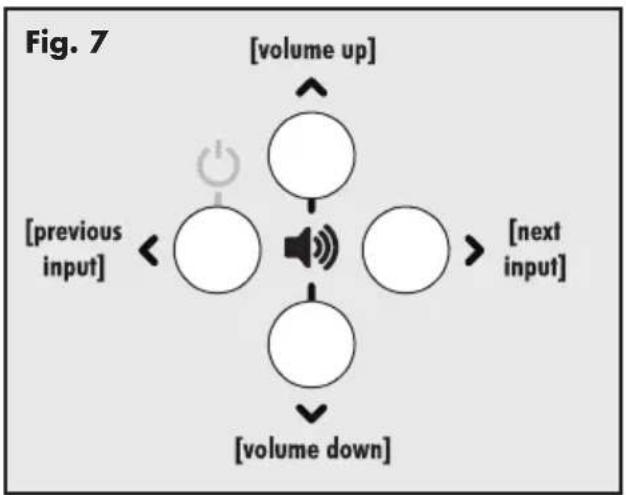
PREVIOUS/NEXT INPUT: Cycles through the inputs. The order of inputs is: Digital Optical 1 > Digital Optical 2 > Digital Coaxial > Left/Right Analog RCA (fig. 7).

VOL+/VOL-: Adjusts volume level (fig. 7).
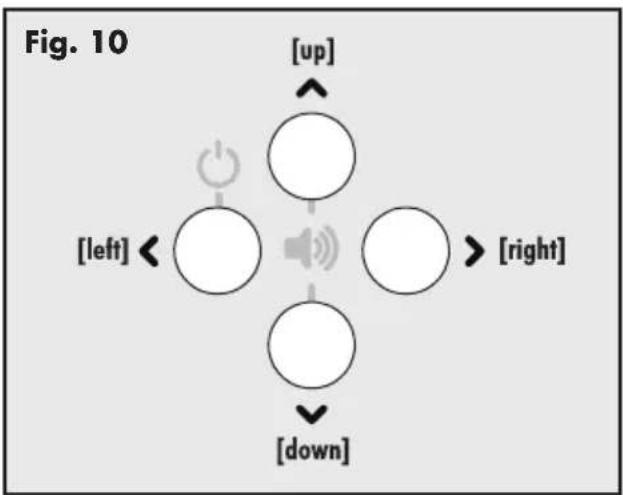
Accessing the Menu: To access the soundbar menu from the top panel controls, press and hold for 3 seconds both the Next and Previous Input (< and >) buttons. After the menu has been activated, the four buttons on the top panel controls will function as up/down/left/right directional buttons allowing you to navigate the menu. Exit the menu by pressing and holding the Power button or repeatedly pressing the left directional button (fig. 8 and fig. 10).
flowchart
graph TD
    A[" "] --> B[" "]
    C[" "] --> D[" "]
    E[" "] --> F[" "]
    G[" "] --> H[" "]
    I[" "] --> J[" "]
    K[" "] --> L[" "]
    M[" "] --> N[" "]
    O[" "] --> P[" "]
    Q[" "] --> R[" "]
    S[" "] --> T[" "]
    U[" "] --> V[" "]
    W[" "] --> X[" "]
    Y[" "] --> Z[" "]
    AA[" "] --> AB[" "]
    AC[" "] --> AD[" "]
    AE[" "] --> AF[" "]
    AG[" "] --> AH[" "]
    AI[" "] --> AJ[" "]
    AK[" "] --> AL[" "]
    AM[" "] --> AN[" "]
    AO[" "] --> AP[" "]
    AQ[" "] --> AR[" "]
    AS[" "] --> AT[" "]
    AU[" "] --> AV[" "]
    AW[" "] --> AX[" "]
    AY[" "] --> AZ[" "]
    BA[" "] --> BB[" "]
    BC[" "] --> BD[" "]
    BE[" "] --> BF[" "]
    BG[" "] --> BH[" "]
    BI[" "] --> BJ[" "]
    BK[" "] --> BL[" "]
    BM[" "] --> BN[" "]
    BO[" "] --> BP[" "]
    BQ[" "] --> BR[" "]
    BS[" "] --> BT[" "]
    BU[" "] --> BV[" "]
    BW[" "] --> BX[" "]
    BY[" "] --> BZ[" "]
    CA[" "] --> CB[" "]
    CC[" "] --> CD[" "]
    CE[" "] --> CF[" "]
    CG[" "] --> DH[" "]
    DI[" "] --> DJ[" "]
    DK[" "] --> DL[" "]
flowchart
graph TD
    A["Power On"] --> B["Access Menu: press previous and next input buttons 3 seconds"]
    C["Power Off: press 2 seconds"] --> B
    D["Power On"] -.-> E["Power Off"]
    F["Power On"] -.-> G["Power Off"]
    H["Power On"] -.-> I["Power Off"]
    J["Power Off"] -.-> K["Power Off"]
REMOTE CONTROL
Your soundbar remote controls these functions:

POWER: Turns the soundbar on and off.
PREV/NEXT: Cycles through the inputs. The order of the inputs is: Digital Optical 1 > Digital Optical 2 > Digital Coaxial > Left/Right Analog RCA.
VOL+/VOL-: Adjusts volume level.
MUTE: Mutes the volume. When muted, the soundbar will display 'MUTE'. Pressing this button a second time will restore the previous volume setting. Additionally, you can turn mute off by pressing either of the volume buttons.
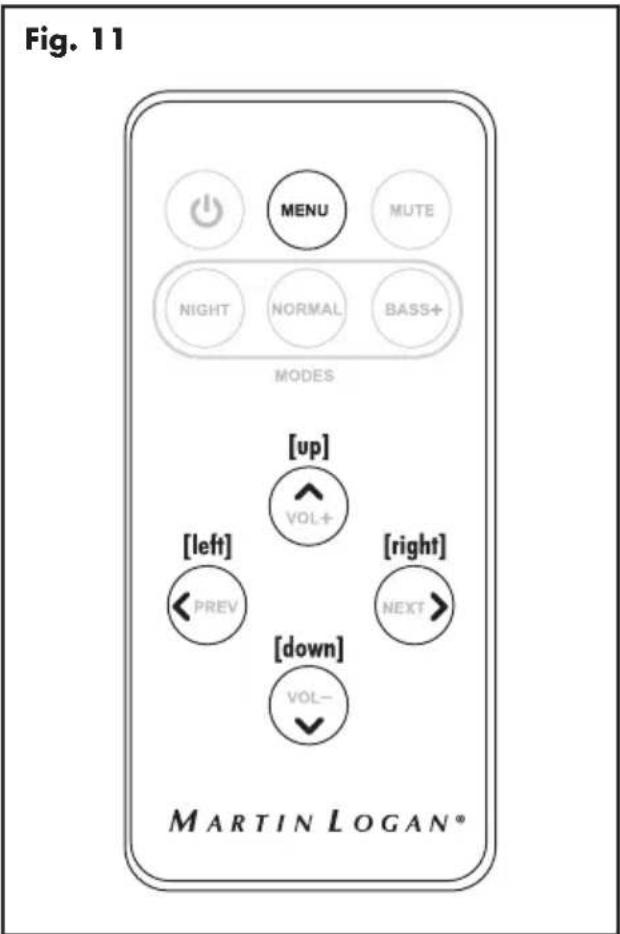
MENU: Enters the soundbar menu. After the menu has been activated, the volume and input buttons will function as up/down/left/right directional buttons, allowing you to navigate the menu. Exit the menu by pushing the menu button again (fig. 11).
MODES - NIGHT: Reduces bass output and compresses the dynamic range.
MODES - BASS+: Increases bass output.
MODES - NORMAL: Restores normal levels.
CHANGING THE REMOTE'S BATTERY
Caution! Danger of explosion if batter is incorrectly replaced. Replace only with the same or equivalent type.

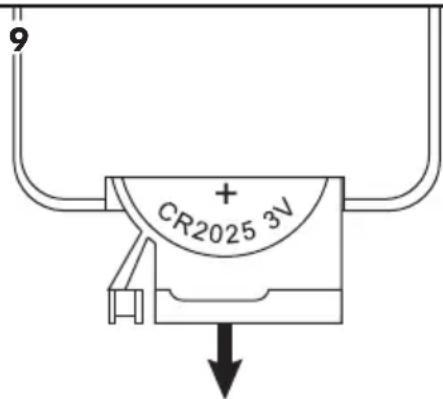
The remote control for your soundbar uses a CR2025 3V type battery. Access the battery by releasing the clip at the back bottom of the remote
control. Viewing the remote from the back, the positive '+' side of the battery should be facing you (fig. 9).
PROGRAMMING A SECOND REMOTE
This soundbar can be programmed to respond to a second remote. See "The Menu System" section of this manual for programming instructions.
Please note: There may be remotes that the soundbar cannot learn or that the soundbar can not learn correctly. Due to the number of available remotes it is impossible to advise which remotes will or will not work.
Please note: When learning from a second remote, you will likely find it does not have buttons that directly correspond with all available soundbar commands. Not all soundbar commands have to be programmed. Some remote controls offer 'function' buttons (F1, F2, etc.) that can be used to program unique soundbar commands such as 'NITE.MD' or 'OPTIC.1'.
Please note: Some remote controls offer discrete 'power on' and a 'power off' buttons. Some offer only a single button to toggle power on and off. The learning function of the soundbar allows you to program for either scenario.
Fig.
text_image
9 + CR2025 3VTHE MENU SYSTEM
ENTERING AND EXITING THE MENU
To access the menu from the remote, press 'Menu'. To exit the menu from the remote, press 'Menu' again or repeatedly press left until the menu exits. To access the menu from the top panel, press
and hold for 3 seconds both the Next and Previous Input (< and >) buttons (fig. 8). To exit, repeatedly press the left directional button. The menu auto exits after 30 seconds.
AN OVERVIEW OF THE MENU STRUCTURE\*\*
*Factory default setting.
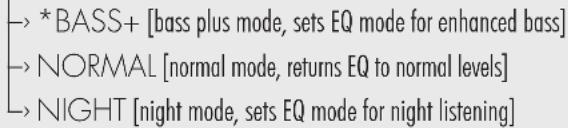
MODES [modes, select EQ listening mode]
text_image
*BASS+ [bass plus mode, sets EQ mode for enhanced bass] NORMAL [normal mode, returns EQ to normal levels] NIGHT [night mode, sets EQ mode for night listening]SUB [subwoofer, select subwoofer configuration]
text_image
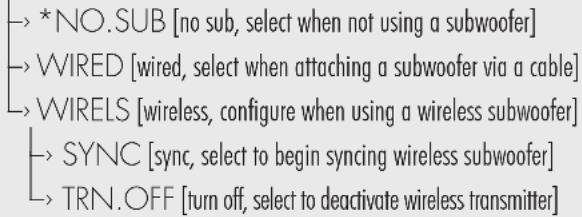
*NO.SUB [no sub, select when not using a subwoofer] WIRED [wired, select when attaching a subwoofer via a cable] WIRELS [wireless, configure when using a wireless subwoofer] SYNC [sync, select to begin syncing wireless subwoofer] TRN.OFF [turn off, select to deactivate wireless transmitter]BASS.LV [bass level, adjust bass level]
text_image
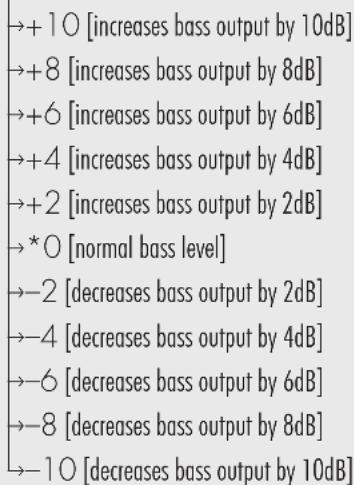
-+1 O [increases bass output by 10dB] ->+8 [increases bass output by 8dB] ->+6 [increases bass output by 6dB] ->+4 [increases bass output by 4dB] ->+2 [increases bass output by 2dB] ->* O [normal bass level] ->-2 [decreases bass output by 2dB] ->-4 [decreases bass output by 4dB] ->-6 [decreases bass output by 6dB] ->-8 [decreases bass output by 8dB] ->-1 O [decreases bass output by 10dB]SURRND [surround, configure surround options for 5.1-channel sources]

text_image
*ON [on, use simulated surrounds for 5.1-channel sources] OFF [off, turns off simulated surrounds for 5.1-channel sources]STEREO [stereo, configure options for 2-channel stereo sources]
text_image
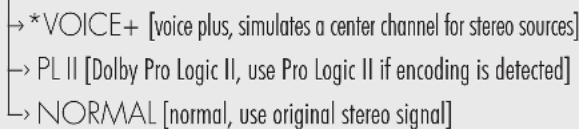
*VOICE+ [voice plus, simulates a center channel for stereo sources] PL II [Dolby Pro Logic II, use Pro Logic II if encoding is detected] NORMAL [normal, use original stereo signal]INSTAL [install, select installation location]

text_image
→ *ON.SHLF [on-shelf, select when set on a flat surface] → ON.WALL [on-wall, select when mounted to a wall]DISPLY [display, select display mode]
text_image
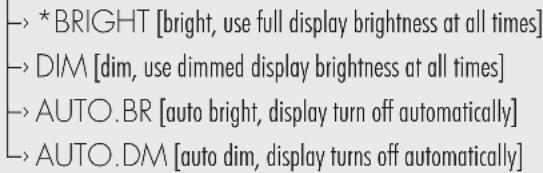
*BRIGHT [bright, use full display brightness at all times] DIM [dim, use dimmed display brightness at all times] AUTO.BR [auto bright, display turn off automatically] AUTO.DM [auto dim, display turns off automatically]POWER [power, configure power on/off behavior]

text_image
*AUTO [auto, soundbar turns itself off and on as needed] >FULL.ON [full on, the soundbar is always powered on]LEARN [learn remote codes for second remote control]
text_image
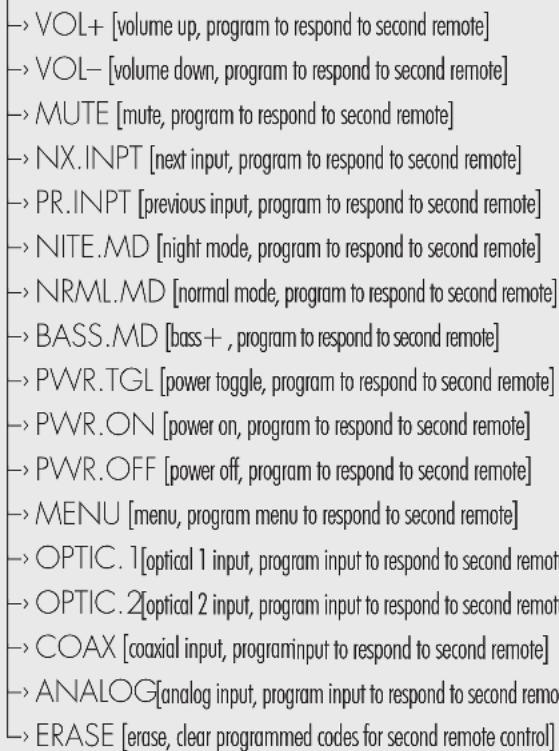
-→ VOL+ [volume up, program to respond to second remote] ->→ VOL- [volume down, program to respond to second remote] ->→ MUTE [mute, program to respond to second remote] ->→ NX.INPT [next input, program to respond to second remote] ->→ PR.INPT [previous input, program to respond to second remote] ->→ NITE.MD [night mode, program to respond to second remote] ->→ NRML.MD [normal mode, program to respond to second remote] ->→ BASS.MD [bass+, program to respond to second remote] ->→ PWR.TGL [power toggle, program to respond to second remote] ->→ PWR.ON [power on, program to respond to second remote] ->→ PWR.OFF [power off, program to respond to second remote] ->→ MENU [menu, program menu to respond to second remote] ->→ OPTIC.1[optical 1 input, program input to respond to second remote] ->→ OPTIC.2[optical 2 input, program input to respond to second remote] ->→ COAX [coaxial input, programinput to respond to second remote] ->→ ANALOG[analog input, program input to respond to second remo ->→ ERASE [erase, clear programmed codes for second remote control]SRC.NAM [source name, assign new names to inputs]
text_image
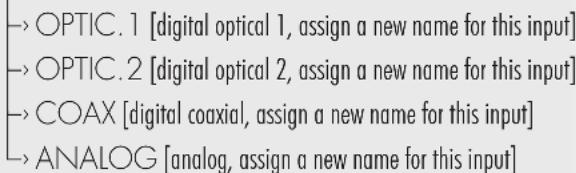
-→ OPTIC. 1 [digital optical 1, assign a new name for this input] -> OPTIC. 2 [digital optical 2, assign a new name for this input] -> COAX [digital coaxial, assign a new name for this input] -> ANALOG [analog, assign a new name for this input]RESET [reset soundbar to original factory settings]

NAVIGATING THE MENU\*\*
The menu is navigated using a 4 direction 'up/down/left/right' navigation system. Up and Down are used to cycle through the menu and sub-menu options. Right is used to access a submenu or to select an option. Left is used to exit a submenu and go back one level (fig. 10 and fig. 11).
MENU OPTION: MODES
MODES: Enter the 'MODES' submenu by pressing the right directional button. Here you may adjust the bass equalization of the soundbar. These options can also be activated directly from the soundbar's remote control.
MODES > BASS+: This mode enhances bass output. Activate by pressing the right directional button and the soundbar will respond with 'SET'.
MODES > NORMAL: This mode returns the bass to normal levels. Activate by pressing the right directional button and the soundbar will respond with 'SET'.
MODES > NIGHT: This mode decreases bass output. Activate by pressing the right directional button and the soundbar will respond with 'SET'.
MENU OPTION: SUB
SUB: Enter the 'SUB' submenu by pressing the right directional button. Here you may configure external subwoofer integration. Please note: When integrating an external subwoofer, you must choose either a wireless connection or a wired connection. Your soundbar does not simultaneously output via both connections. The soundbar can connect to only one wireless subwoofer. However, it is possible to connect multiple wired subwoofers if you utilize a 'Y' splitter attached to the subwoof-
flowchart
graph TD
    A[" "] --> B[" "]
    C[" "] --> D[" "]
    E[" "] --> F[" "]
    G[" "] --> H[" "]
    I[" "] --> J[" "]
    K[" "] --> L[" "]
    M[" "] --> N[" "]
    O[" "] --> P[" "]
    Q[" "] --> R[" "]
    S[" "] --> T[" "]
    U[" "] --> V[" "]
    W[" "] --> X[" "]
    Y[" "] --> Z[" "]
    AA["up"] --> AB[" "]
    AC["down"] --> AD[" "]
    AE["left"] <--_AF[" "]
    AF <--_AG[" "]
    AG <--_AH[" "]
    AH <--_AI[" "]
    AI <--_AJ[" "]
    AJ <--_AK[" "]
    AK <--_AL[" "]
    AL <--_AM[" "]
    AM <--_AN[" "]
    AN <--_AO[" "]
    AO <--_AP[" "]
    AP <--_AQ[" "]
    AQ <--_AR[" "]
    AR <--_AS[" "]
    AS <--_AT[" "]
    AT --> AU[" "]
    AU --> AV[" "]
    AV --> AW[" "]
    AW --> AX[" "]
    AX --> AY[" "]
    AY --> AZ[" "]
    AZ --> BA[" "]
    BA --> BB[" "]
    BB --> BC[" "]
    BC --> BD[" "]
    BD --> BE[" "]
    BE --> BF[" "]
    BF --> BG[" "]
    BG --> BH[" "]
    BH --> BI[" "]
    BI --> BJ[" "]
    BJ --> BK[" "]
text_image
Fig. 11 MENU MUTE NIGHT NORMAL BASS+ MODES [up] VOL+ [left] [right] PREV NEXT > [down] VOL- MARTIN LOGAN®er cable, or if your subwoofer offers an output designed to daisy chain multiple subs.
SUB > NO.SUB: This option configures the soundbar to handle all bass information and will not output information via the subs wired or wireless subwoofer connections. Activate by pressing the right directional button and the soundbar will respond with 'SET'.
SUB > WIRED: This option configures the soundbar to use an external subwoofer connected via a cable to the soundbar's Sub Out RCA connection. Activate by pressing the right directional button and the soundbar will respond with 'SET'. With this option, the wireless sub transmitter is turned off.
Reference your subwoofer's manual to learn how to properly adjust the sub's level and phase controls to achieve proper blending with the soundbar. The subwoofer's crossover should be set to "bypass" or "LFE". For subwoofers that do not have a "bypass" or "LFE" crossover setting, we recommend adjusting the crossover to its highest setting.
SUB > WIRELS: [WIRELESS] Enter the 'SUB > WIRELS' submenu by pressing the right directional button. Here you can sync the soundbar with a compatible wireless subwoofer.
Reference your subwoofer's manual to learn how to properly adjust the sub's level and phase controls to achieve proper blending with the soundbar. The subwoofer's crossover should be set to "bypass" or "LFE". For subwoofers that do not have a "bypass" or "LFE" crossover setting, we recommend adjusting the crossover to its highest setting.
SUB > WIRELS > SYNC: This option will initiate syncing with an SWT-2 equipped wireless subwoofer. With this option, the soundbar's Sub Out RCA connection is turned off. Please note: MartinLogan subwoofers utilizing SWT-2 technology will reference this wireless technology on their connection panel. Please note: At one time MartinLogan utilized a wireless subwoofer connection system named "SWT-1". Subwoofers equipped with SWT-1 technology are NOT capable of wireless connectivity with this soundbar—although a wired connection will work for these subwoofers.
Press the subwoofer's sync button and hold for 3 seconds. The sub's LED will blink quickly. Sync by pressing the right directional button. The soundbar will respond with 'PUSH.BTN'. Pairing of the soundbar and subwoofer may take up to 30 seconds.
If pairing has completed successfully, the sub's LED will stop blinking and remain on and the soundbar will display "SYNCED". If a link is not established, the subwoofer's LED will start blinking slowly and the soundbar will display "FAILED". Repeat if syncing fails.
SUB > WIRELS > TRN.OFF: [TURN OFF] This option configures the soundbar to handle all bass information and when selected will not output information via the wired or wireless subwoofer connections. Activate by pressing the right directional button and the soundbar will respond with 'OFF'. Activating this option performs the same function as 'SUB > NO.SUB'.
MENU OPTION: BASS LEVEL
BASS.LV: [BASS LEVEL] Enter the 'BASS.LV' submenu by pressing the right directional button. Here you can configure bass output by ±10dB in increments of 2dB.
BASS.LV > -10 to +10: Using the up/down directional buttons, choose the desired bass level (from -10dB to +10dB). Bass level output will be automatically set to match the value currently displayed.
MENU OPTION: SURROUND
SURRND: [SURROUND] Enter the 'SURRND' submenu by pressing the right directional button. This menu allows you to turn simulated surround channels on or off when the soundbar detects a multi-channel source.
SURRND > ON: [SURROUND ON] This option configures the soundbar (when it detects 5.1-channel
encoded content) to fully reproduce all 5.1-channels of information including simulated surround channels. Activate by pressing the right directional button and the soundbar will respond with 'SET'.
SURRND > OFF: [SURROUND OFF] This option configures the soundbar (when it detects 5.1-channel encoded content) to down-mix to 3.1-channel output (left/center/right channels + subwoofer) and does not utilize simulated surround channels. All content originally intended for the surround channels is routed to the left/center/right channels. Activate by pressing the right directional button and the soundbar will respond with 'SET'.
MENU OPTION: STEREO
STEREO: [STEREO] Enter the 'STEREO' submenu by pressing the right directional button. Here you may set how the soundbar reproduces audio from 2-channel (stereo) sources.
STEREO > VOICE+: [VOICE PLUS] This option configures the soundbar (when it detects 2-channel content) to reproduce the left and right channels with a simulated center channel. Activate by pressing the right directional button and the soundbar will respond with 'SET'.
STEREO > PL II: [DOLBY PRO LOGIC II] This option configures the soundbar (when it detects 2-channel content with PLII encoding) to simulate multi-channel surround. Activate by pressing the right directional button and the soundbar will respond with 'SET'.
STEREO > NORMAL: This option configures the soundbar (when it detects 2-channel content) to reproduce the content using only the left and right channels and does not alter the original signal. Activate by pressing the right directional button and the soundbar will respond with 'SET'.
MENU OPTION: INSTALL
INSTAL: [INSTALL] Enter the 'INSTALL' submenu by pressing the right directional button. The settings in this menu will adjust the soundbar's equalization and voicing for optimal performance in on-wall or shelf top installations.
INSTAL > ON.SHLF: [ON SHELF] This option configures the soundbar's audio output to sound best in shelf top installations. Activate by pressing the right directional button and the soundbar will respond with 'SET'.
INSTAL > ON.WALL: [ON WALL] This option configures the soundbar's audio output to sound best in on-wall installations. Activate by pressing the right directional button and the soundbar will respond with 'SET'.
MENU OPTION: DISPLAY
DISPLY: [DISPLAY] Enter the 'DISPLY' submenu by pressing the right directional button. The settings in this menu allow you to adjust the brightness of the soundbar's display, as well as configure the display to automatically turn itself on and off.
DISPLY > BRIGHT: This option configures the soundbar's display to be on at full brightness when the soundbar is on. Activate by pressing the right directional button and the soundbar will respond with 'SET'.
DISPLY > DIM: This option configures the soundbar's display to be on at a reduced brightness when the soundbar is on. Activate by pressing the right directional button and the soundbar will respond with 'SET'.
DISPLY > AUTO.BR: [AUTO BRIGHT] This option configures the soundbar's display to be on
at full brightness when a setting (such as volume or input) is changed. After a few seconds, the display will turn off. Activate by pressing the right directional button and the soundbar will respond with 'SET'.
DISPLY > AUTO.DM: [AUTO DIM] This option configures the soundbar's display to be on at a reduced brightness when a setting (such as volume or input) is changed. After a few seconds the display will turn off. Activate by pressing the right directional button and the soundbar will respond with 'SET'.
MENU OPTION: POWER
POWER: Enter the 'POWER' submenu by pressing the right directional button. Here you may adjust how the soundbar turns on and off.
POWER > AUTO: This option configures the soundbar to turn itself off after no audio signal is detected for approximately 30 minutes. When the soundbar detects an audio signal, it will immediately turn itself on. Activate by pressing the right directional button and the soundbar will respond with 'SET'. Please note: When set to 'AUTO', if the soundbar is manually turned off (using the power button on the top panel or remote control), the soundbar will not respond to an incoming audio signal and will not turn on automatically. In this situation, turn the soundbar on using the power button on the top panel or remote control and the soundbar will resume automatic power handling.
POWER > FULL.ON: [FULL ON] This option configures the soundbar to remain on at all times until it is manually turned off using the power button on the top panel or remote control. Activate by pressing the right directional button and the soundbar will respond with 'SET'.
MENU OPTION: LEARN
Please note: There may be remotes that the soundbar cannot learn or that the soundbar can not learn correctly. Due to the number of available remotes it is impossible to advise which remotes will or will not work.
Please note: When learning from a second remote, you will likely find it does not have buttons that directly correspond with all available soundbar commands. Not all commands have to be programmed. Some remotes offer 'function' buttons (F1, F2, etc.) that can be used to program unique soundbar commands such as 'NITE.MD' or 'OPTIC.1'.
Please note: Some remote controls offer discrete 'power on' and 'power off' buttons. Some offer a single button to toggle power on and off. The learning function of the soundbar allows you to program either scenario.
LEARN: Enter the 'LEARN' submenu by pressing the right directional button. The settings in this menu program the soundbar to respond to a second remote control. The factory supplied remote control will always work with the soundbar, even if the soundbar is programmed to respond to a second remote.
Using the up/down directional buttons, you can select and program the following commands:
• VOL+ [VOLUME +]
• VOL- [VOLUME -]
- MUTE [MUTE VOLUME]
- NX.INPT [NEXT INPUT]
• PR.INPT [PREVIOUS INPUT]
• NITE.MD [NIGHT MODE]
• NRML.MD [NORMAL MODE]
• BASS.MD [BASS+ MODE]
• PWR.TGL [POWER TOGGLE] (toggle on/off)
• PWR.ON [POWER ON] (power on only)
• PWR.OFF [POWER OFF] (power off only)
- MENU
• OPTIC.1 [OPTICAL 1 INPUT] (direct access)
• OPTIC.2 [OPTICAL 2 INPUT] (direct access)
• COAX [COAXIAL INPUT] (direct access)
• ANALOG [ANALOG INPUT] (direct access)
Choose the command you want to program and press the right directional button. The soundbar will respond with 'PUSH.BTN'. Hold the second remote approximately 12 inches (30cm) from the soundbar and press the appropriate button four times.
If the new command is learned successfully, the soundbar's display will display "SET". If the new command is not learned, the soundbar will display "FAILED". Repeat the process if learning fails.
LEARN > ERASE: Enter the 'ERASE' submenu by pressing the right directional button. Erasing will clear programming for the second remote. The 'ERASE' function requires confirmation.
LEARN > ERASE > CONFIRM: Enter the 'CONFIRM' submenu by pressing the right directional button.
LEARN > ERASE > CONFIRM > NO: Activate by pressing the right directional button. Choosing this option will exit without erasing the remote programming.
LEARN > ERASE > CONFIRM > YES: Activate by pressing the right directional button. The soundbar will respond with 'ERASED'. After the remote codes are erased, there is no way to recover the previous user-configured settings.
MENU OPTION: SOURCE NAME
SRC.NAM: [SOURCE NAME] Enter the 'SRC.NAM' submenu by pressing the right directional button. The settings in this menu will allow you to assign new names to display on the soundbar when changing inputs. For example, you can program the 'OPTIC 1' input to display 'DVD'. Using the up/down directional buttons, you can select and program the following input names:
• OPTIC.1 [DIGITAL OPTICAL 1]
• OPTIC.2 [DIGITAL OPTICAL 2]
• COAX [DIGITAL COAXIAL]
• ANALOG [LEFT/RIGHT ANALOG]
Choose the input name you want to reprogram and press the right directional button. The soundbar display will appear to be blank or will display the current name. Pressing the up/down directional buttons will cycle through the available alpha-numeric characters. Pressing the left/right directional buttons will move to the next space. You can use up to seven characters when inputting a new name.
To finish programming an input name, use the left/right directional buttons to move all the way to the left or right.
MENU OPTION: RESET
RESET: Enter the 'RESET' submenu by pressing the right directional button. Resetting the soundbar will erase all user-configured presets and restore all settings to the factory defaults. The 'RESET' function requires confirmation to reduce the risk of performing and accidental reset.
RESET > CONFIRM: Enter the 'CONFIRM' submenu by pressing the right directional button.
RESET > CONFIRM > NO: Activate by pressing the right directional button. Choosing this option will exit without performing a reset.
RESET > CONFIRM > YES: Activate by pressing the right directional button. The soundbar will respond with 'RESETNG' [RESETTING]. Once complete, your soundbar will be reset to factory default settings. After a reset has been performed, there is no way to recover the previous user-configured settings.
CONTACTING CUSTOMER SERVICE
MartinLogan customer service is available Monday–Friday between the hours of 8am–5pm (central time) by calling (785) 749-0133 or by emailing service@martinlogan.com.
GENERAL INFORMATION
WARRANTY INFORMATION
Your soundbar is provided with an automatic Limited 90 Day Warranty coverage. You have the option, at no additional charge, to receive a Limited 2 Year Warranty coverage. To obtain the Limited 2 Year Warranty coverage, please complete and return the Certificate of Registration to MartinLogan within 30 days of purchase. For your convenience, MartinLogan also offers online warranty registration at www.martinlogan.com.
MartinLogan may not honor warranty service claims unless we have a completed Warranty Registration card on file! If you did not receive a Certificate of Registration with your new soundbar, you cannot be assured of having received new units. If this is the case, please contact your authorized MartinLogan dealer.
SERIAL NUMBER
The serial number is located on back of the soundbar, near the connection panel. The serial number may also be found on the product carton.
SERVICE
Should you use your MartinLogan product in a country other than the one in which it was originally purchased, we ask that you note the following:
1 The appointed MartinLogan distributor for any given country is responsible for warranty servicing only on units distributed by or through it in that country in accordance with its applicable warranty.
2 Should a MartinLogan product require servicing in a country other than the one in which it was originally purchased, the end user may seek to have repairs performed by the nearest MartinLogan distributor, subject to that distributor's local servicing policies, but all cost of repairs (parts, labor, transportation) must be borne by the owner of the MartinLogan product.
3 If, after owning your speaker for six months, you relocate to a country other than the one in which you purchased your speaker, your warranty may be transferable. Contact MartinLogan for details.
FREQUENTLY ASKED QUESTIONS
Why is my soundbar not reproducing multi-channel (surround sound) audio?
This could be caused by any number of things. Review the "Connection" section of this manual for a better understanding of recommended connection methods and possible options that might impact the soundbar's ability to receive multi-channel encoded audio from your television and other audio/video source components.
Will this soundbar decode Dolby® TrueHD or DTS-HD Master Audio™?
No. This soundbar will not decode Dolby® TrueHD or DTS-HD Master Audio™. If your audio source (most likely a Blu-ray player) supports either of these formats, you should configure it to default to the Dolby® Digital or DTS Digital Surround™ encoded sound track.
How do I connect the soundbar if my television does not have a digital (optical or coaxial) output?
Connect the audio output of your audio/video sources (DVD, Blu-ray, cable box, game console, etc.) directly to the soundbar using a digital (optical or coaxial) cable.
How do I clean my soundbar?
Use a dust free cloth (such as a micro fiber cloth) or a soft brush to remove dust from your speakers. Do not spray any kind of cleaning agent on or in close proximity to the drivers.
Can I use other cables other than those provided with the soundbar?
The cables included with the soundbar are intended to get you started. You may find it necessary to augment your system with additional cables or replace the included cables with cables of different length.
Can I mount this soundbar on the wall with a mounting bracket that pivots?
MartinLogan does not provide a pivoting wall-bracket for this soundbar. Aftermarket options may exist, but we can not recommend or guarantee a specific brand or model.
I have a MartinLogan subwoofer with a built-in SWT-2 wireless receiver. Do I have to use the wireless connection?
No. MartinLogan subs with built in SWT-2 receivers may still be attached via a wired connection.
Can I use this soundbar as a dedicated center channel speaker?
This soundbar is not designed to operate as a dedicated center channel speaker.
Could you suggest a list of suitable electronics and cables ideal for MartinLogan speakers?
We have no favorites and use electronics and cables quite interchangeably. We would suggest listening to a number of brands—and above all else—trust your ears. Dealers are always the best source for information when purchasing additional audio equipment.
Is there likely to be any interaction between my speakers and the television in my A/V system?
Yes, but only with CRT televisions. This soundbar is not magnetically shielded and should be kept at least 2 feet away from a CRT television. LCD and plasma televisions will not be affected.
How can I remove the grille cloth from the soundbar?
The soundbar grille cover is not removable.
TROUBLESHOOTING
Soundbar does not turn on
- Check that the soundbar's AC power cord is firmly attached to the AC Power In input and plugged into a working AC outlet.
No output from the soundbar
- Check that the soundbar is turned on.
- Check that the soundbar is not muted.
- Check that the soundbar's volume is not turned all the way down.
- Check that the soundbar is set to the proper input.
- Check that all system components are turned on and source material is playing.
- Turn the soundbar off and on using the remote control or the top panel power button.
- Unplug the sound bar, wait 30 seconds, and plug it back in.
- Check that all interconnecting cables are connected at both ends.
- If necessary, try connecting an alternate source component to make sure the original source component isn't the problem.
The sound bar displays 'DSP NG'
- Turn the soundbar off and on using the remote control or the top panel power button.
- Unplug the sound bar, wait 30 seconds, and plug it back in.
No surround sound
- Review the "Connection" section of this manual for a better understanding of recommended connection methods and possible options than might impact the soundbar's ability to receive multi-channel encoded audio from your television and other audio/video source components.
Sound is coming from both my soundbar and my television
- When utilizing the soundbar to reproduce audio, the television's audio output should be defeated. Some televisions will allow you to turn off the internal speaker via the television's menu system. Other televisions may require you to turn the television's volume to "zero" or to "mute" the television.
The soundbar is too quiet even when the soundbar is turned up
- Check that the output on your television or other source components are not connected via a variable level output. Sometimes this option may be configured in your source components menu. Please refer the manual for the source component in question.
Soundbar won't learn remote codes from aftermarket remote
- Review the "Menu Option: Learn" section of this manual.
- Hold the remote 12 inches (30 cm) from the soundbar during the learning process.
- Press the appropriate button on the second remote four times.
- There may be remotes that the soundbar cannot learn or that the soundbar can not learn correctly. Due to the number of available remotes it is impossible to advise which remotes will or will not work.
- Check the user manual and/or manufacturer's web-site for your aftermarket remote to see if MartinLogan is supported. If so, instead of 'learning' with the soundbar, use the code provided by the manufacturer to program the aftermarket remote itself.
Soundbar remote won't work
- Ensure the batteries' protective tab has been removed.
- Replace the remote battery with a matching CR2025 3V type battery.
When using an aftermarket remote, the soundbar turns off when the television turns on
- Turn the television on. Manually press the Power button on the soundbar so that both the soundbar and television are both on at the same time.
No sound coming from external sub
- Check that the external sub is turned on.
- Check that the soundbar is configured for a wired or wireless subwoofer connection. Refer to the "Subwoofer Connection" section of this manual.
- If utilizing a wired connection, check that the subwoofer cables are attached to the Sub Out connection on the soundbar and to the appropriate input on the subwoofer.
- If utilizing a wireless connection, attempt to re-sync the wireless connection. Refer to the "Subwoofer Connection" section of this manual.
- If utilizing a wireless connection, move the subwoofer closer to the soundbar..
- Turn the soundbar off and on using the remote control or the top panel power button.
- Unplug the sound bar, wait 30 seconds, and plug it back in.
External sub is too quiet
• Turn up the volume on the subwoofer.
- Adjust the bass level setting in the soundbar menu system.
- Try moving the subwoofer to a different location in the listening room.
My soundbar is not behaving as expected
- Turn the soundbar off and on using the remote control or the top panel power button.
- Unplug the sound bar, wait 30 seconds, and plug it back in.
SPECIFICATIONS\*
Frequency Response 43-23,000 Hz ± 3 dB
Crossover Frequency. 3,000 Hz
Amplifier Power .... 100 Watts (200 Watts peak) combined total output across 7 amps.
High Frequency Drivers. Three 1" x 1.4" (2.6cm x 3.6cm) Folded Motion Transducers with 5.25" x 1.75" (13.3cm x 4.4cm) diaphragm.
Low Frequency Drivers .... Four 4" (10.2cm) fiber cones with extended throw drive assembly. Non-resonant asymmetrical chamber format.
Cabinet....Ported
Components DSP based preamplifier.
Inputs. (2x) Optical SPDIF (digital optical) (1x) Coax SPDIF (digital coaxial) (1x) Analog RCA Right/Left (1x) AC Power
Output ..... (1x) Subwoofer Out via analog RCA
Wireless Output .... Built-in SWT-2 Subwoofer Wireless Transmitter compatible with select MartinLogan subwoofers.
Decoding .... Dolby® Pro Logic II, Dolby® Digital, DTS Digital Surround™
Power Draw.... Max: 120 Watts, Idle: 9 Watts, Standby: < 0.3 Watts
Remote Battery..... CR2025 3V
Weight. 20.5 lbs. (9.3 kg)
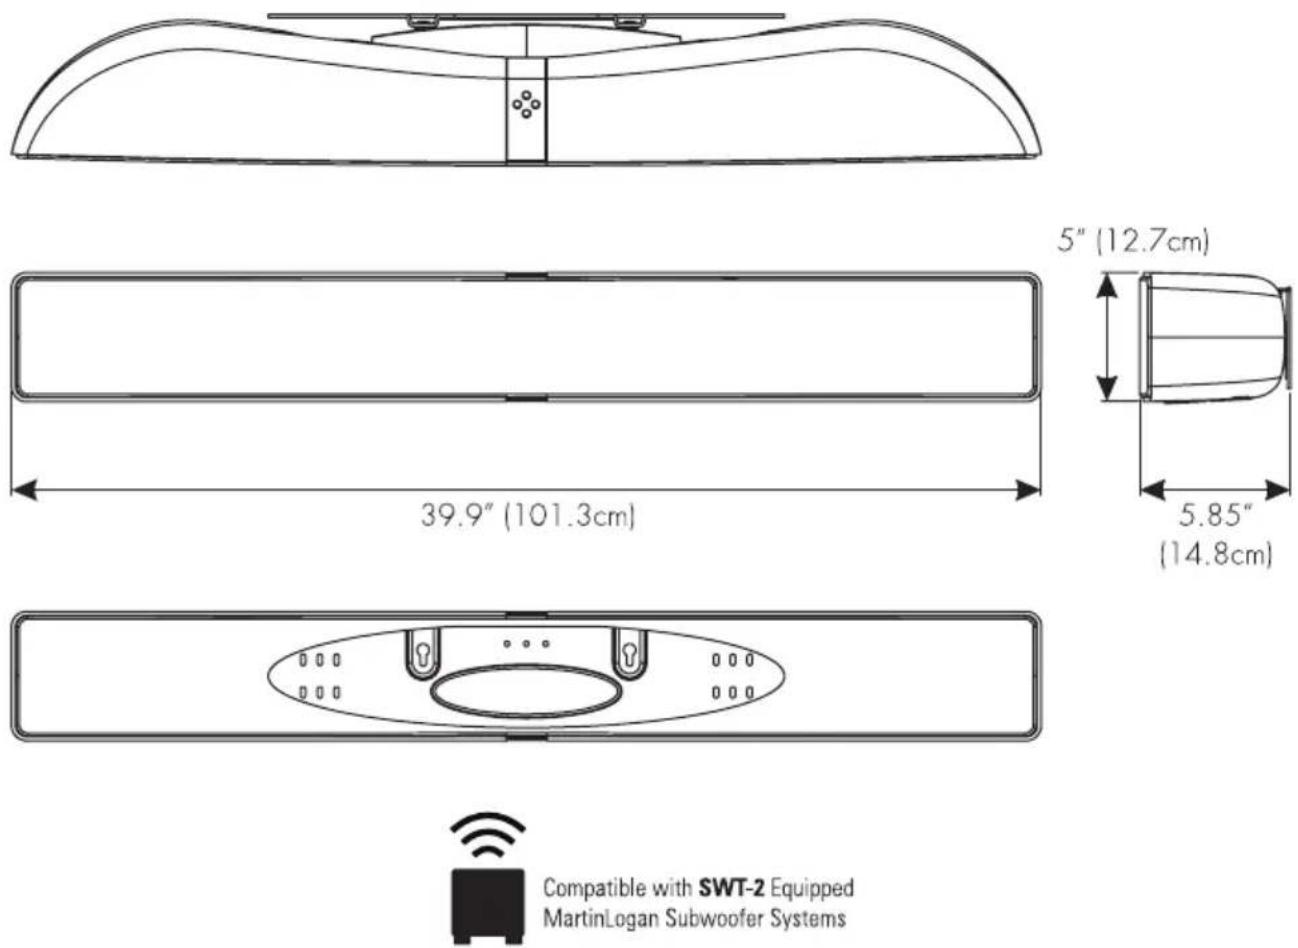
Dimensions (HxWxD) 5" x 39.9" x 5.85" (12.7cm x 101.3cm x 14.8cm)
DIMENSIONAL DRAWING MARTINLOGAN MOTION VISION
Dolby: Manufactured under license from Dolby Laboratories. Dolby and the double-D symbol are trademarks of Dolby Laboratories.
DTS: Manufactured under license under U.S. Patent Nos: 5,956,674; 5,974,380; 6,487,535 & other U.S. and worldwide patents issued & pending. DTS, the Symbol, & DTS and the Symbol together are registered trademarks & DTS Digital Surround and the DTS logos are trademarks of DTS, Inc. Product includes software. © DTS, Inc. All Rights Reserved.

text_image
MARTIN LOGAN®Lawrence, Kansas, USA tel 785.749.0133 fax 785.749.5320 www.martinlogan.com

natural_image
Abstract black ink brushstroke design on gray horizontal stripes (no text or symbols)natural_image
Technical line drawing of a curved mechanical part with a labeled dimension (8.38) on one end, no text or symbols present.
dts
Digital Surround

DOLBY.
DIGITAL
VIRTUAL SPEAKER
Install (Installation) 48
Display (Affichage)....48
Power (Alimentation)....49
Learn (Apprendre) 49
Source Name (Nom de la source) ..... 50
Reset (Réinitialiser) 50
natural_image
Technical line drawing of a mechanical assembly with exploded views (no text or symbols)INTRODUCTION ET APERÇU
natural_image
Technical line drawing of a mechanical assembly with no visible text or symbolsnatural_image
Technical line drawings of a mechanical assembly with multiple views and mounting brackets (no text or symbols)natural_image
Technical line drawing of a curved mechanical component with mounting flanges and a circular housing (no text or symbols)RACCORDEMENT
text_image
Fig. 5 [Analog In] [Sub Out] Violet [Optical 2 In] [Coax In] Orange [AC Power In] [Optical 1 In] [Left] [Right] Blanc Droitnatural_image
Illustration of a 3D connector with a USB cable (no text or symbols visible)natural_image
Illustration of a black cable with a hexagonal connector (no text or symbols)natural_image
Line drawing of a coaxial cable connector (no text or symbols)natural_image
Illustration of two black cables with metallic leads and terminal connectors (no text or symbols)flowchart
graph TD
    A["Volume haut"] --> B["Volume"]
    C["Volume"] --> D["Volume"]
    E["Volume"] --> F["Volume"]
    G["Volume"] --> H["Volume"]
    I["Volume"] --> J["Volume"]
    K["Volume"] --> L["Volume"]
    M["Volume"] --> N["Volume"]
    O["Volume"] --> P["Volume"]
flowchart
graph TD
    A[" "] --> B[" "]
    B --> C[" "]
    C --> D[" "]
    D --> E[" "]
    E --> F[" "]
    style A fill:#fff,stroke:#000
    style B fill:#fff,stroke:#000
    style C fill:#fff,stroke:#000
    style D fill:#fff,stroke:#000
    style E fill:#fff,stroke:#000
    style F fill:#fff,stroke:#000