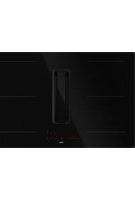
HIDD08471EVX - Cooker Atag - Free user manual and instructions
Find the device manual for free HIDD08471EVX Atag in PDF.


User questions about HIDD08471EVX Atag
0 question about this device. Answer the ones you know or ask your own.
Ask a new question about this device
Download the instructions for your Cooker in PDF format for free! Find your manual HIDD08471EVX - Atag and take your electronic device back in hand. On this page are published all the documents necessary for the use of your device. HIDD08471EVX by Atag.
USER MANUAL HIDD08471EVX Atag
natural_image
Pure electrical circuit lines without any symbolsGEBRUIKSAANWIJZING
natural_image
Simple line drawing of a cooking pot with lid and side handles (no text or symbols)Inductiekokenissnel
text_image
Diagram of a cooking or heating setup with labeled components 1 through 4, showing a pot and evaporating dish.text_image
Diagram illustrating a finger pressing a button on a screen, followed by a numeric display showing 0.0.0 and 0.0.0 with an icon.text_image
0 0 0 A ① 0 * 0 → Ⅱ → Ⅲ Ⅳ 0 1 2 3 4 5 6 7 8 9 P ① 0. 0 0. A 0. * 0.text_image
II → III X 0 1 2 3 4 5 6 7 8 9 P ① → II → III X 0 1 2 3 4 5 6 7 8 9 P ① 0. 0 0. 0. * 0Kokenpauzeren
text_image
0. 0. 0. ① 0. * 0. → x 0. 0 0 0. 0. 0. - - - - ① 0. * 0.text_image
Diagram illustrating a hand press operation with finger positioning and numeric display, showing 3 seconds time.text_image
0. 0. 0. A 0. 1 2 3 4 5 6 7 8 9 P ① 0. * 0. → L L L A ① L * Ltext_image
L L L A ① L * L 3 sec. → L L L A 0 1 2 3 4 5 6 7 8 9 P ① L * Ltext_image
- - - 0. 0 0. ○ 0. * 0 → - - - 0. 0 0. ○ 0. * 0.text_image
|| → || X 0 1 2 3 4 5 6 7 8 9 P ① 0 0 0 → || → || X 0 1 2 3 4 5 6 7 8 9 P ① 0 4 0 8. * 0Boost
text_image
|| → || X 0 1 2 3 4 5 6 7 8 9 P ① 0 0 8 8. → || → || X 0 1 2 3 4 5 6 7 8 9 P ① 0 P 0 8. * 0text_image
II → III X 0 1 2 3 4 5 6 7 8 9 P ① 0 0 0 A → II → III X 0 1 2 3 4 5 6 7 8 9 P ① 0 4 0 0 × 03.Raakhettimerdisplayaan.
- Hettimersymboolvandeafzuigunitlichthelderop.
text_image
Diagram illustrating finger movement and movement of a 3D object, showing hand positioning and motion path with labeled points.natural_image
Technical illustration showing a mechanical device with rotating components and a hand pouring liquid into a bowl (no text or symbols)Roosterenfiltersreinigen
natural_image
Isometric diagram of a device with a rectangular component and a curved arrow indicating motion (no text or symbols)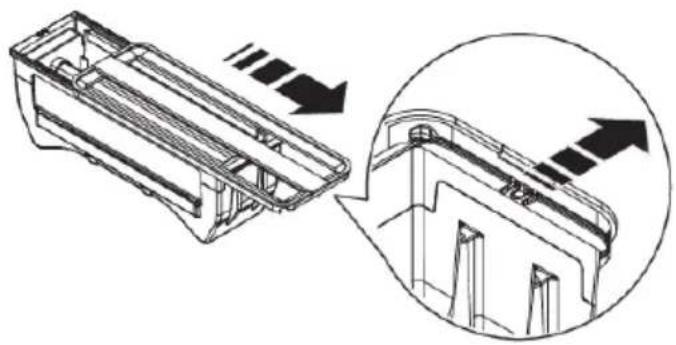
natural_image
Technical line drawing of a mechanical component with an inset showing internal structure (no text or symbols)text_image
Diagram illustrating three different cleaning or inspection methods: a faucet, a cloth-lined door, and a washing machine with checkmarks.Onderhoud
natural_image
Exploded view diagram of a battery pack assembly showing internal components and casing (no text or labels)
WAARSCHUWING!
natural_image
Symbol of a trash bin with crossed lines indicating no waste or discharge, and a black rectangular base (no text or numbers present)natural_image
Pure electrical circuit lines without any symbolsNOTICED'UTILISATION
16Commencerlapréparation......
17Boost....
natural_image
Line drawing of a cooking pot with lid and side handles (no text or symbols)Lacuissonparinductionestrapide
text_image
incorrecttext_image
Diagram illustrating a hand pointing at a black rectangular object with an arrow, alongside a numeric display showing 0.0.0 and 0.0.0 values.text_image
|| → || X 0 1 2 3 4 5 6 7 8 9 P ① 0. 0 0. A 0. * 0. → || → || X 0 0 1 0 6 0 0 1 2 3 4 5 6 7 8 9 P ① 8. * 0Boost
text_image
|| → || X 0 1 2 3 4 5 P ① 0. 0 0. A 0. * 0. → || → || X 0 0 1 0 0 0 0 1 2 3 4 5 6 7 8 9 P ① u. * 0text_image
II → III X 0 1 2 3 4 5 6 7 8 9 P ① → II → III X 0 1 2 3 4 5 6 7 8 9 P ① 0. 0 0. 0. * 0Pausedelacuisson
text_image
0. 0. 0. ① 0. * 0. → x + + + - - - - 0. 0. 0. 0. ① 0. * 0.text_image
|| → || X 0 5 0 ① 8 * 0 → || → || X 0.2 0 0 5 0 - - - * 0text_image
Diagram illustrating a hand press operation with finger positioning and numeric input, labeled '3 sec.'text_image
L L L A ① L * L → L L L A 0 1 2 3 4 5 6 7 8 9 P ① L * L 3 sec.- Appuyezsurlatouchedeverrouillage.
text_image
0 5 0 ① 8 * 0 → 0 5 0 ① 8 * 0ATTENTION!
text_image
- - - 0. 0 0. ① 0. * 0 → - - - 0. 0 0. ① 0. * 0.Couperlemodeaspirationautomatiquependantlacuisson
text_image
|| → || X 0 1 2 3 4 5 6 7 8 9 P ① 0 0 8 8. → || → || X 0 1 2 3 4 5 6 7 8 9 P ① 0 P 0 8. * 0text_image
Diagram illustrating finger movement and movement of a 3D object, showing hand positioning and motion path with labeled points.natural_image
Technical diagram of an electronic device with fan, circuit board, and lock mechanism (no text or symbols)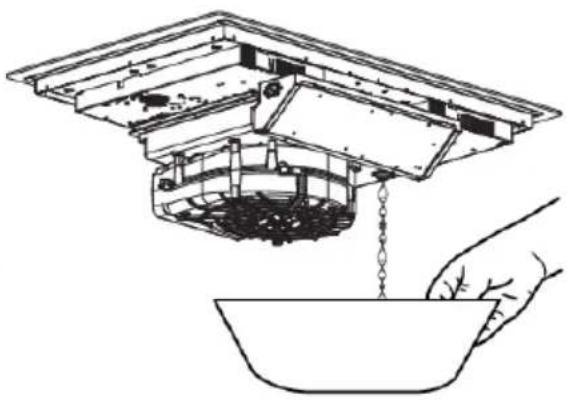
natural_image
Diagram of a hand pouring liquid into a bowl, showing internal components and flow direction (no text or symbols)Nettoyagedelagrilleetdesfiltres
natural_image
Technical line drawing showing a mechanical assembly with an inset close-up of the internal structure (no text or symbols)text_image
Diagram illustrating three-step cleaning or inspection process with labeled items and checkmarksEntretien
Filtreàodeurs/utilisationenrecirculation)
natural_image
Exploded view diagram of a solar panel assembly showing components like battery pack, car, and cooling unit (no text or labels)
ATTENTION!
natural_image
Symbol of a trash bin with crossed lines indicating no waste or discharge, no text or numbers present.natural_image
Pure electrical circuit lines without any symbolsGEBRAUCHSANWEISUNG
natural_image
Line drawing of a cooking pot with lid and side handles (no text or symbols)text_image
Diagram illustrating a hand pointing at a black rectangular object with an arrow, alongside a numeric keypad showing 0.0.0 and 0.0.0 values.text_image
II → III X 0 1 2 3 4 5 6 7 8 9 P ① P P → II → III X 0 1 2 3 4 5 6 7 8 9 P ② 0. 0 0. 0. * 0.text_image
0.0.0. ① 0. * 0. → x 0.0 0.0 0. - - - ① 0. * 0.- StellenSiemitdenTasten' + 'oder' - diegewünschteZeitein (1 Minutebis9 Stundenund 59 Minuten).
text_image
|| → || X 0 5 0 ① 8 * 0 → || → || X 0.0 0 0 5 0 - - - * 0- StellenSiemitdenTasten' + 'oder' - diegewünschteZeitein (1 Minutebis9 Stundenund 59 Minuten).
text_image
Diagram illustrating a hand press operation with finger positioning and numeric input, labeled '3 sec.'text_image
0. 0. 0. 0. 1 2 3 4 5 6 7 8 9 P ① 0. * 0. → L L L ① L * Ltext_image
L L L A ① L * L 3 sec. L L L A 0 1 2 3 4 5 6 7 8 9 P ① L * Ltext_image
- - - 0. 0 0. ○ 0. * 0 → - - - 0. 0 0. ○ 0. * 0.text_image
|| → || X 0 1 2 3 4 5 6 7 8 9 P ① 0 0 0 → || → || X 0 1 2 3 4 5 6 7 8 9 P ① 0 4 0 8. * 0Boost
text_image
|| → || X 0 1 2 3 4 5 6 7 8 9 P ① 0 0 8 8. → || → || X 0 1 2 3 4 5 6 7 8 9 P ① 0 P 0 8. * 0text_image
II → III X 0 1 2 3 4 5 6 7 8 9 P ① 0 0 0 A → II → III X 0 1 2 3 4 5 6 7 8 9 P ① 0 4 0 A 0 × 0text_image
Diagram illustrating finger movement and movement of a 3D object with coordinate axes, showing hand positioning and trajectory path.text_image
Diagram showing a hand pressing a button on a digital display with numeric keypad and control buttons, before and after transformation.natural_image
Technical diagram of an electrical device with fan, circuit board, and switch components (no text or labels)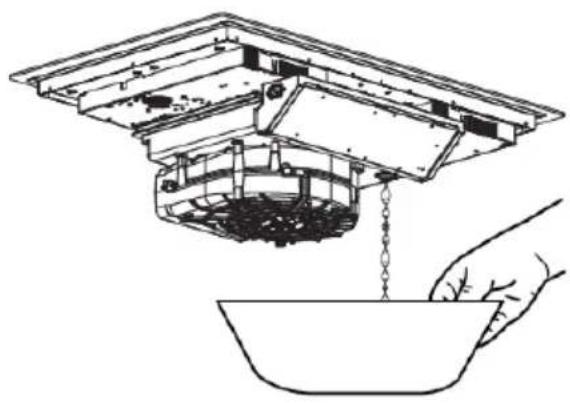
natural_image
Diagram of a hand pouring liquid into a bowl, showing internal components and flow direction (no text or symbols)ReinigungdesRostsundderFilter
natural_image
Technical line drawing showing a mechanical assembly with an inset close-up of the internal structure (no text or symbols)text_image
Diagram showing three-step cleaning process: first with faucet, checkmark, and wash, then with hand holding cloth and checkmark.natural_image
Exploded view diagram of a battery pack assembly showing internal components and mounting base (no text or labels)
WARNUNG!
text_image
Warning symbol for a trash bin with crossed lines indicating no waste or discharge, and a black rectangle below.natural_image
Symbol of a trash bin crossed with diagonal lines, representing waste sorting or disposal (no text or labels)natural_image
Pure electrical circuit lines without any symbolsINSTRUCTIONSFORUSE
Inductionhobwithextractor
EN
HIDD074__EX
HIDD084_EX
HIDD084__EVX
Contents
ConnectingtheBridgeInductioncooking zones......
3Pictogkamsusednforrapidcleaningduring.
4Safetyking.... 22
4Safeuse.... 23
4PowerManagement.... 23
5YorRthobwithextractoricextractionmode.
5Dealuringsdomeking.... 23
6Description.... 23
7Controlpanel.... 24
8Indicationsinthedisplay 24
9Beforefirstuse.... 25
9Inductioncooking.... 25
10IndBetettheumersory.of.thefiltersaturation....
11 Paris diacation cooking 26
13Cookingsettings.... 27
14Useofthedowndraft.... 29
15Operationofthehob.... 29
15StartPreparing.... 31
16Boost.... 31
16Pandetectionsymbol.... 31
16Finishcooking.... 32
17Switchontheautomaticheat-upfunction.... 33
17Switchonthekeepwarmfunction.... 34
17 34
18Pausecooking.... 36
19Redofoenyfuroctaccordingtoregulation(EU)..
19Using20minuteminder 36
20Usingthecookingtimer 39
21Childlock 39
23Operating
23Switchofft
23
23Manuallys
24Boost.....
24Setanumk
25Saturation
25Saturatior
26
27Usermen
29Powerlin
29Powerlimi
31Maintena
31Cleaning
31Watertank
32Cleaningt
33Carbonfilt
34Troubles
34General...
34Troublesr
36Technica
36
39Environn
39Disposalc
40Yournote
The following symbols are used throughout the manual, and they have the following meanings:

INFORMATION!
Information, advice, tip, or recommendation

WARNING!
Warning–general danger

ELECTRICSHOCK!
Warning-dangerofelectricshock

HOTSURFACE!
Warning-dangerofhotsurface

DANGEROFFIRE!
Warning-dangeroffire

RIGHT!

WRONG!
It is important that you carefully read the instructions.
WARNING!
Beforeuse, read these separates safety instructions first!
Safeuse
Temperaturesafety
- Thehobisfittedwithacoolingfanwhichcoolstheelectroniccomponentsduringcooking.
Thefanmayoperateforawhile,evenaftertheendofthecookingprocess. - The induction cooking hob is also fitted with an overheating protector which protects the electronic componentsfromdamage. Theprotectoroperatesinseveralways. Whenthecookingzone temperaturegetsveryhigh, thecookingpowerisautomaticallyreduced. If thisdoesnotsuffice, thecookingzonepowercontinuestodecrease, untilthesafetymechanismsswitchchoffthecooking zonecompletely. Whenthecookinghobiscooleddown, itstotalpowerwillbeavailableagain.
Cookingtimelimiter
WARNING!
The cooking-timelimiterisasafetyfunctionofyourcookingappliance.Itwilloperateifyouforget to switchoffyourhob.
Dependingonthesettingyouhavechosen, the cooking timewillbelimitedas follows:
| Thecookingzoneswitchesoffautomaticallyafter:Setting | |
| 8hours,36min.1 | |
| 6hours,42min.2 | |
| 5hours,18min.3 | |
| 4hours,18min.4 | |
| 3hours,30min.5 | |
| 2hours,18min.6 | |
| 2hours,18min.7 | |
| 1hour,48min.8 | |
| 1hour,30min.9 | |
| 5min(thenswitchesbacktolevel9)P(boost) |
PowerManagement
Twocookingzonesoneinfrontoftheothereffecteachother.Whenbothofthesecookingzonesareswitchedonatthesametime,thepowerisautomaticallysharedbetweenthem.WhentheBoost functionisselected,theothercookingzonewillbesettoasomewhatlowersetting.Ifacooking zoneissetatboostandyouwanttosettheotheronetosetting9,thecookingzonewithboostwill automaticallygotoalowersetting.Automaticheat-upfunctionisdeactivated.
Dearcustomer!
Pleasereadtheoperatinginstructionsbeforeuse. Theyincludegeneraltips,informationaboutthe settingsandadjustmentsyoucanmake,andthebestwaytotakecareofyourappliance.
The manual also serves as reference material for service technicians. Please, therefore, stick the appliance identificationcardinthespaceprovidedatthebackofthemanual. The appliance identificationcardcontainsalltheinformationthattheservicetechnicianwillneedinordertorespond appropriatelytoyourneedsandquestions.
TIP!
You can find them most recent version of the instructions for use on our website.
Enjoy your cooking!
Yourhobwithextractor
Description
Sincetheappliancesforwhichtheseinstructionsweredrawnupmayhavedifferentequipment, somefunctionsorequipmentmaybedescribedinthemanualthatmaynotbepresentinyour appliance.
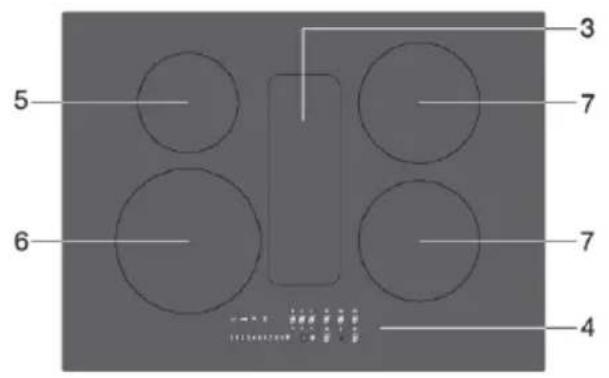
text_image
3 5 7 6 7 4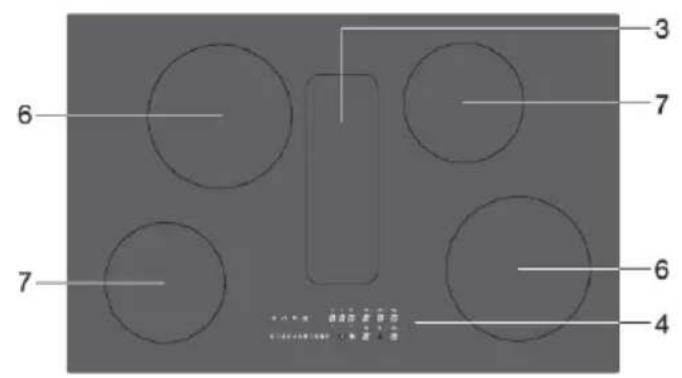
text_image
3 6 7 7 6 4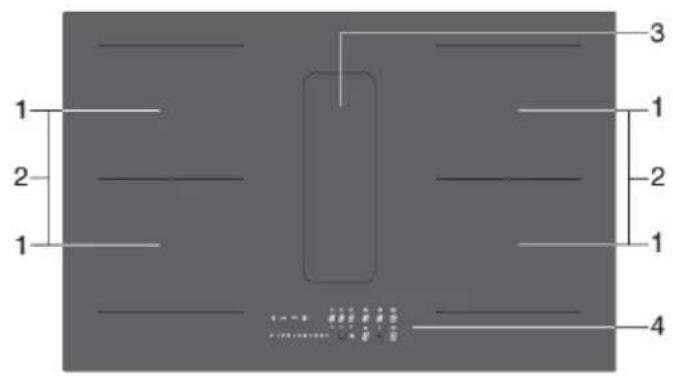
text_image
1 2 1 3 1 2 1 4- Bridge Induction cooking zones 210x190mm/2.1kW (boost 3.0kW)
- Connected Bridge Induction cooking zones 210x390mm/3.7kW
- Extractor
- Control panel (visible only when the hobisturned on)
- Cookingzone∅145mm/1,4kW(boost2.1kW)
- Cookingzone∅210mm/2,3kW(boost3.0kW)
- Cookingzone∅175mm/1,4kW(boost2.1kW)
Controlpanel
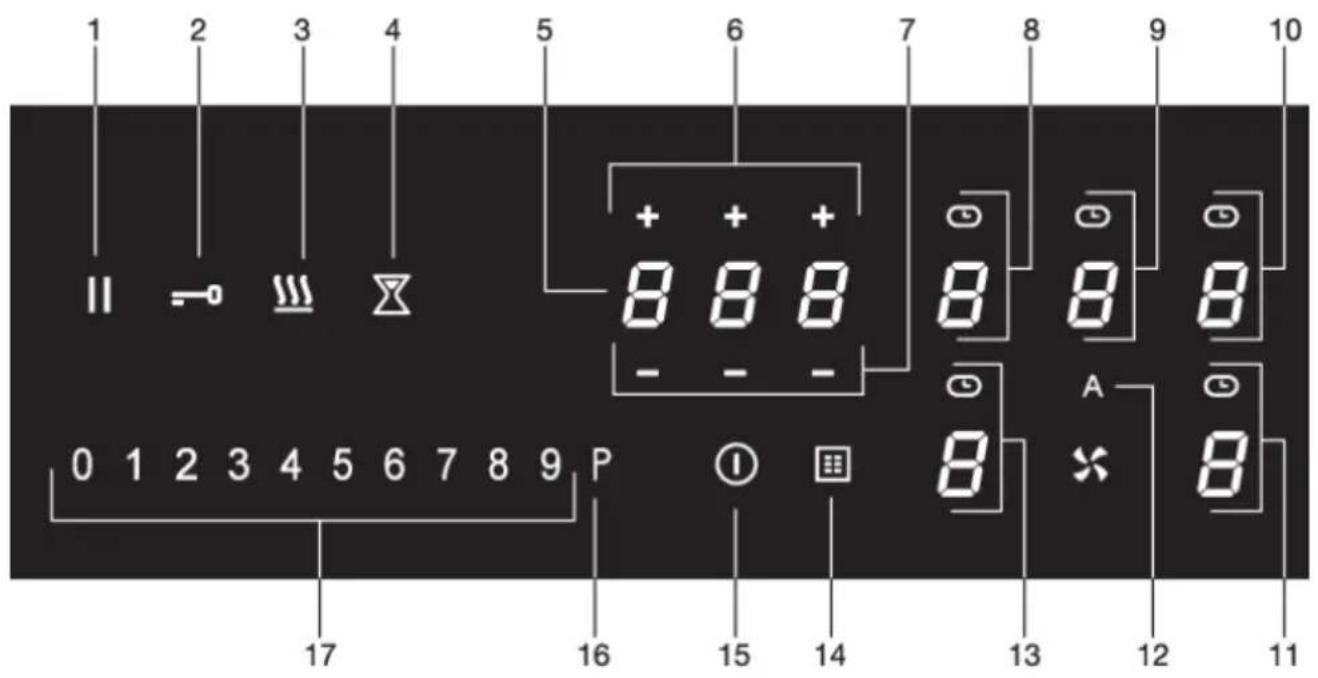
text_image
1 2 3 4 5 6 7 8 9 10 II + + + 8 8 8 - - - 8 8 8 0 1 2 3 4 5 6 7 8 9 P ① ② A × 8 8 17 16 15 14 13 12 111.Pausebutton
2.Lockkey
3.Keepwarmkey
4. Minuteminderkey
5. Timerdisplay
6. Pluskeytimer
7.Minuskeytimer
8.Cookingzonekeyrearleft(cookingzonedisplay)andtimersymbol
-
Extractionkey(extractorunitdisplay)andtimersymbol
-
Cookingzonekeyrearright(cookingzonedisplay)andtimersymbol
-
Cookingzonekeyfrontright(cookingzonedisplay)andtimersymbol
12.Key'Automaticextractionmode'
- Bydefaulttheautomaticmodeisactive. Whenacookingzoneisselectedandapowerlevel (>2)isset, theextractorautomaticallyswitchesonandsetsthenecessaryextractionlevel.
-
Cookingzonekeyfrontleft(cookingzonedisplay)andtimersymbol
-
Greasefiltersymbol
-
On/offkey
-
Boostkeyforacookingzoneandfortheextraction
17.Slidecontrol(fromposition0toposition9)for:
- settingavalueforacookingzoneandfortheextraction
Indicationsinthedisplay
| display | DescriptionCookingzone |
| Powerlevel: 1=lowlevel/9=highlevel. | |
| Boostlevelactive. | |
| No(suitable)panoncookingzone(pandetectionsymbol). | |
| Residualheatindicator:Thehobhasaresidualheatindicatorforeachcooking zonetoshowwhichcookingzonesarehotafterthecookingzoneisturnedoff. Althoughthehobisswitchedoff,theindicatorwillremainonaslongasthe cookingzoneishot!Avoidtouchingthosecookingzoneswhenthisindicator islit. | |
| HOTSURFACE! | |
| Danger!Riskofburns. | |
| Childsafetylockisactivated. | |
| Automaticheat-upfunctionactive. | |
| Keepwarmfunctionactive. | |
| Pausefunctionactive. | |
| ConnectedBridgeInductionzonesactive. |
| display | DescriptionExtractorunit |
| Extractorspeedlevel: 1=lowlevel/9=highlevel. | |
| Boostlevelactive. | |
| Odourfiltersaturationindication. |
| DescriptionTimerdisplay | |
| - - - | Timerhasnotbeenset. |
| 1 2 5 | Timerhasbeenset(1hourand25minutes). |
Inductioncooking
natural_image
Simple line drawing of a cooking pot with lid and side handles (no text or symbols)Inductioncookingisfast
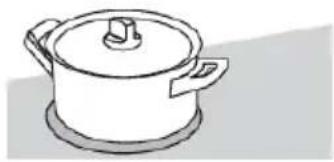
Tostartwith, youwillbesurprisedbythespeedofinductioncooking. Especiallyathighersettings, foodsandliquidswillcometoaboilvery rapidly. Itisbestnottoleavepansunattendedtoavoidthemboiling overorboilingdry. Withinductioncooking, thereisnoheatloss, and thehandlesstaycool.
Thepowerleveladjustsitself
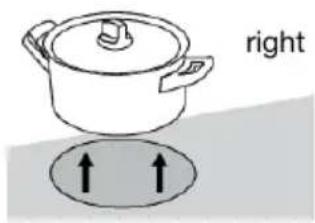
Ininductioncooking, only the zone on which the pan is placed. If you use small pan on a largezone, the zone will adjust the power to the pan's diameter. The power will thus belower, and it will take longer before the food comesto aboil.
natural_image
Simple line drawing of a cooking pot with an upward arrow below it, labeled 'right' (no text or symbols on the pot itself)
INFORMATION!
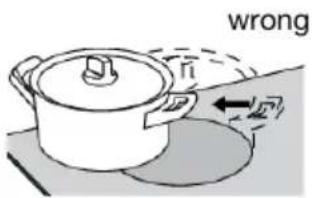
- Grainsofsandmaycausescratchesthatyoucannotremove. Therefore,onlyputpanswithacleanbaseonthecooking surfaceandalwayspickpansuptomovethem.
- Donotusethehobasaworktop.
- Alwayskeepthelidonthepanwhencooking, inordertoavoid energyloss.
text_image
wrongOperationofthetouchkeysandsliders
- Thetouchcontrolsmaytakesomegettingusedtoifyouareusedtoother(rotary)controls. Placethetipofyourfingerflatonthecontroltoachievethebestresults.
- The touch sensors only react to the light pressure of a fingertip. Do not operate the controls with any other objects.
- To set the cooking zone power level, touch the desired spot on the slider. As you touch the slider, theselectedpowerlevelwillappearonthecookingzonedisplayunit.
• Theselectedpartofthesliderwillbefullylit. - Donotuseanyobjectstoooperatetheslider.
Howinductionworks
text_image
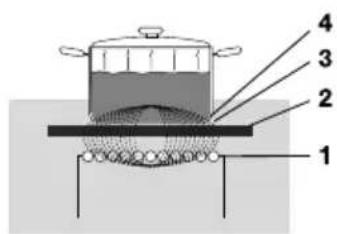
1 2 3 4Thecoil(1)inthehob(2)generatesamagneticfield(3).Byplacinga panwithanironbase(4)onthecoil,acurrentisinducedinthebase ofthepan.
Beforefirstuse
Easy
The electronic controls are accurate and easy to set. On the lowest setting, you can melt chocolate directly in the pan, for example, or cooking ingredients that you would normally heat aubain marie.
Fast
Thankstotheinductionhobhighpowerlevels,bringingfoodtoaboilisveryquick.
Clean
Thehobiseasytoclean.Becausethecookingzonesdonotgetanyhotterthanthepansthemselves, foodspillsareunlikelytoburnintotheglass.
Safe
Theheatisgeneratedinthepanitself.Theglasstopdoesnotgetanyhotterthanthepan.Thismeans thatthecookingzoneisconsiderablycoolerthanaceramichob,forexample.
Onceapanhasbeenremoved, the cookingzonecoolsdownquickly.
Inductionsounds
- Tickingsound
This sound can be caused at lower power level settings or by the automatic pot detection.
•Panmakessounds
Panscanmakesomenoiseduringcooking. This is caused by the energy flowing from the hob to the pan. Athighsettings, this is perfectly normal for some pans. It will not damage either the pans or the hob.
•Ventilatormakessounds
To increase the lifespan and performance of the electronics, the appliance is equipped with fans. During intense appliance use, the fan is activated to cooldown the appliance, and you will hear a buzzings sound. The fan still runs for several minutes after the hob has been switched off.
Pansforinductioncooking
Induction cooking requires a particular type of panintermsof quality.
Pansthathavealreadybeenusedforcookingonagashobarenolongersuitableforuseonan inductionhob.
Onlyusepansthataresuitableforelectricandinductioncookingwith:
•athickbaseofaminimumof2.25mm;
- aflatbase.
TIP!
You can check for yourself whether your pans are suitable using a magnet. A pan is suitable if the base of the pan is sufficiently attracted by them magnet.
| UnsuitableSuitable | |
| EarthenwareSpecialstainlesssteelpans | |
| StainlesssteelClassInduction | |
| PorcelainSolidenamelledpans | |
| CopperEnamelledcast-ironpans | |
| Plastic | |
| Aluminium |

WARNING!
Becarefulwithenamelledsheet-steelpans:
- theenamelmaychip(theenamelcomesloosefromthesteel)ifyouswitchthehobonata highsettingwhenthepanis(too)dry;
- thebaseofthepanmaywarp-forexample:Duetooverheating;
•heatenamelledpansslowly.
Neverusepanswithamisshapenbase.Aholloworroundedbasecaninterferewiththeoperation oftheoverheatingprotection,causingtheappliancetobecometoohot.Thismayleadtothe glasstopcrackingandthepanbasemelting.Damagecausedbyusingunsuitablepansorboiling dryisexcludedfromtheguarantee.
Pandiameter
- Theminimumpandiameterperzoneisasfollows:
-∅145mm/∅160mm:minimumpandiameter120mm.
-∅210mm:minimumpandiameter140mm.
-BridgeInductionzone:minimumpandiameter140mm.
- You will achieve the best results by using a pan with the same diameter as the zone. If a pan is toosmall, thezonewillnotwork.
- ApanusedonconnectedBridgeInductioncookingzonesmusthaveadiameterofatleast 220mm.
Pressurecookers
Inductioncookingisverysuitableforpressurecookers. Thefast-reactingcookingzonebringsthe pressurecookertopressurequickly. As soon as youswitchoffacookingzone, the dish stops cookingimmediately.
Pandetection
- The pan detection system automatically detects a pan that is put on a cooking zone. The display of this cooking zonelightsupmoreintensely and the dot stops flashing.
- If the hob does not detect a (ferrous) pan after a pan is put on a cooking zone, the pan detection symbolflashesinthedisplay. After 20 seconds, the cooking zones switches off.
Cookinglevels
The cooking zones have 9 levels and a 'boost' level (P). Set the cooking level by touch and slide overtheslidecontrol. Byslideovertheslidecontrol, the cooking setting is changed. Bymovetothe right, the level in increasing, while moving to the left decrease the level. When you move your finger away from the slide control, the cooking zone startstooperate at the level set.
Boostfunction
- You can use the 'boost' function to cook at the highest cooking level during a short period of time(max.5minutes).Afterthemaximumboosttimethepowerwillbereducedtosetting9.
- TheBoostfunctionisnotavailablewhenBridgelnductioncookingzonesareconnected!
Cookingsettings
Because the settings depend on the quantity and composition of the pan and its contents, the table below is intended as a guideline only.
| PurposeLevel | |
| Uselevel1-3to: | •simmerbouillon,•stewmeats,•simmervegetables,•meltchocolate,•poach,•meltcheese. |
| Uselevel4-6to: | •completethecookingoflargequantities,•defrosthardvegetables,•frythickslicesofbreadedmeat. |
| Uselevel7and8to: | •frythickpancakes,•frybacon(fat),•cookrawpotatoes,•makebreadedfish,•cookthroughfish,•frythinslicesofbreadedmeat. |
| Uselevel9to: | •searmeats,•cookfish,•cookomelettes,•fryboiledpotatoes,•deepfryfoods. |
| Usesettingboostto: | •bringliquidstoaboilquickly,•shrinkgreens,•heatoilandfat,•wok. |
Beforefirstuse
Useofthedowndraft
Placingpansandlids
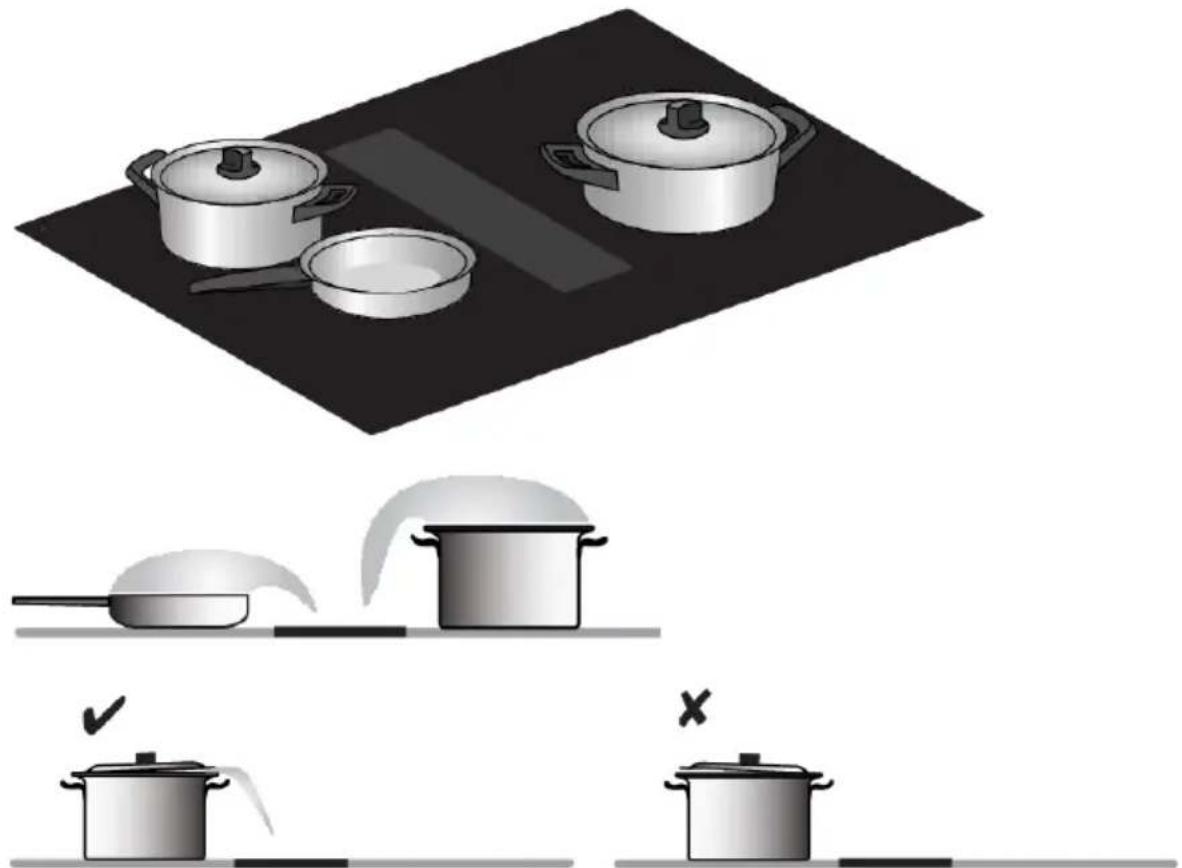
TIP!
Preferablycookwithalidonthepan;thisreducescookingodorsandenergyconsumption. Ifdesired, placethelidonthepanatananglewiththeopeningtotheexhaustside. Thisensures optimalextraction.
StartPreparing
WARNING!
Please read the chapter 'Before first use' very carefully before you start cooking. This prevents incorrect use of the hob.
-
Touchandholdtheon/offkeyuntilyouhearanaudiosignal.
-
Alldisplayslightup;theinductionhobisinstandbymode.
- Thecookingzonesandtheextractionunithavepowerlevelzero.
TIP!
thehobisnotusedfor20seconds, itwillshutoffautomatically.
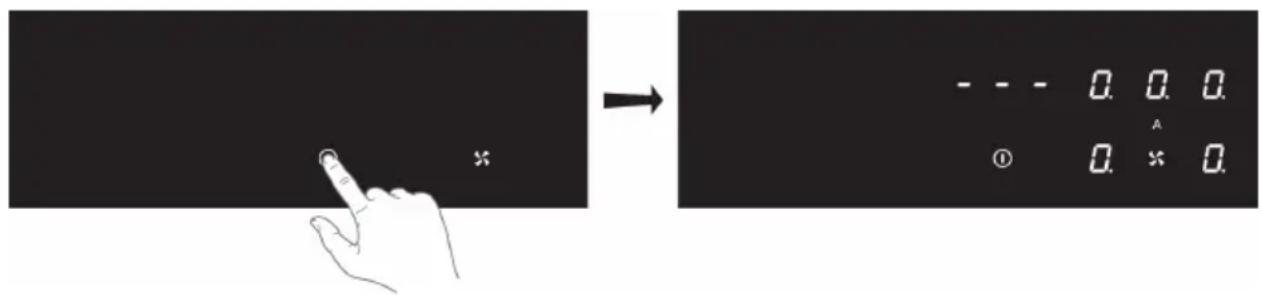
text_image
Diagram illustrating finger movement and pixel input of a button, showing a hand pointing to a button with an asterisk and binary values.- Placeasuitablepanonthecookingzone.
- Thecookingzoneautomaticallydetectsthepan;thedisplayofthiscookingzonelightsup moreintenselyandthedotstopsflashing.
TIP!
Aslongasthedotisnotflashing, the cooking zone is selected and the power level can be set.
- Whentheresponsetimehaselapsed, orduringcooking, youcanactivatethecookingzone by manuallyselectingthedisplayofthedesiredcookingzone.
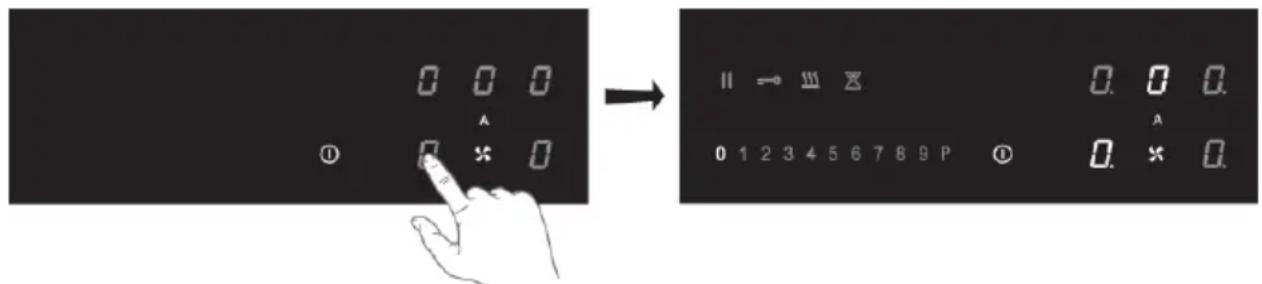
text_image
0 0 0 ① 0 * 0 → Ⅱ → Ⅲ × 0 1 2 3 4 5 6 7 8 9 P ① 0. 0 0. 0. × 0.-
Within 10 seconds, set the power level by touching the slide control.
-
Thecookingzonestartsatthelevelthathasbeenset.
- Theextractionunitswitchesonautomaticallyfromposition3. Theextractionunitcanbe switchedonmanuallyatposition1and2.
- Theextractorunitautomaticallyswitchesonwiththenecessaryextractionspeed.Bydefault theautomaticextractionmodeisactive.
- Setahigherorlowerlevelwiththeslidecontrol.
Operationofthehob
- Touch the key 'Automatic extraction mode' to deactivate the automatic extraction mode. The extraction can now be set manually, if desired. See 'Operating the extractor unit'.
- After 10 second stheslide control will switch off and the cooking time counter is hidden.
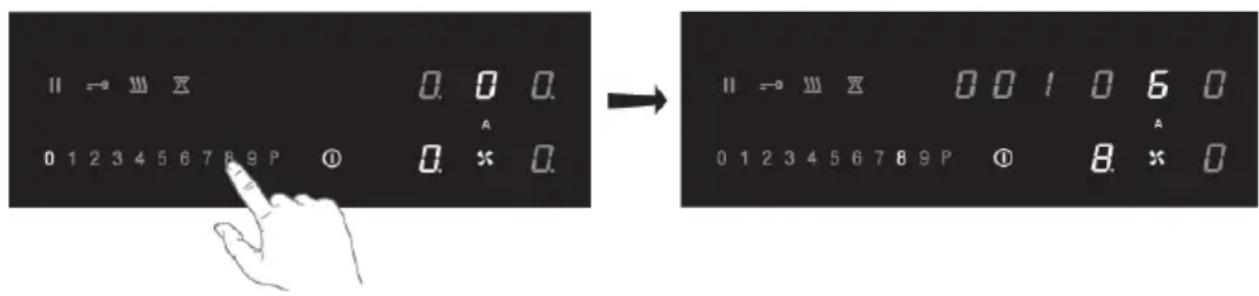
text_image
II → III × 0 1 2 3 4 5 6 7 8 9 P Ⓞ 0. 0 0. A 0. × 0. → II → III × 0 0 1 0 6 0 0 1 2 3 4 5 6 7 8 9 P Ⓞ 8. × 0Boost
Youcanusetheboostfunctiontocookformax.5minutesatthehighestcookinglevel.Youcanuse theBoostfunctionforamaximumoftwocookingzonesalongsideeachotheratthesametime.
- TouchpowerlevelPtoselecttheBoostfunction.
•'P'showsonthedisplay.
- Afterthemaximumboosttimethepowerwillbereducedtopowerlevel9.
Pandetectionsymbol
Whenthepandetectionsymbolappearsinthedisplay:

- youhavenotplacedapanonthecorrectcookingzone;
- thepanyou'reusingisnotsuitableforinductioncooking;
- thepanistoosmallornotproperlycentredonthecookingzone.
The cookingzonewillnotworkunlesssthereisasuitablepanonthecookingzone.
Finishcooking
- Setthepowerlevelto'0'toswitchoffthecookingzone.
2.Switchofftheinductionhobbytouchingtheon/offkey.

HOTSURFACE!
SymbolHwillappearinthedisplayofthecookingzonewhichistoohottotouch. Thesymbol disappearswhenthesurfacehascooleddowntoasafetemperature.Itcanalsobeusedasan energysavingfunction; ifyouwanttoheatotherpans, usethecookingzonethatisstillhot.
Switchontheautomaticheat-upfunction
Thisfunctionsetsthecookingzoneatthehighestlevelinordertobringyourpanrapidlyuptotherequiredtemperature.Afteragiventimeinterval,thepowerlevelreturnstotheestablishedlevel.Thisfunctionisavailableforpowerlevel1to8.
| Heat-uptime(seconds)Powerlevel | |
| 1 | 48 |
| 2 | 144 |
| 3 | 230 |
| 4 | 312 |
| 5 | 408 |
| 6 | 120 |
| 7 | 168 |
| 8 | 216 |
- Switchonthehobandselectthedesiredcookingzone.
- Touchandholdtheslidecontrolforatleast3secondsatthedesiredlevel(from1to8).
- An 'A' appears in the display alternating with the selected power level. When the automatic heat-uptimehasexpired, the cookingzonewillswitchautomatically to theselected level which will show permanently on the display.
- Tostoptheautomaticheat-upfunction, select the cooking zone and touch the slide control.
Switchonthekeepwarmfunction
- Switchonthehobandputasuitablepanonacookingzone.
- Touch the cooking zone key of the desired cooking zone.
- The '0' of the selected cooking zone will light up clearly and a single beep sounds.
- Touchthekeepwarmkey.
- The keep warm symbol 'u' appears in the display. The keep warm function is selected.

text_image
II → III × 0 1 2 3 4 5 6 7 8 9 P ① 0. 0 0. A 0. * 0. → II → III × 0 0 1 0 0 0 0 1 2 3 4 5 6 7 8 9 P ① u. * 0- Set the power level to '0' or touch the keep warm key to switch off the keep warm function.
ConnectingtheBridgeInductioncookingzones
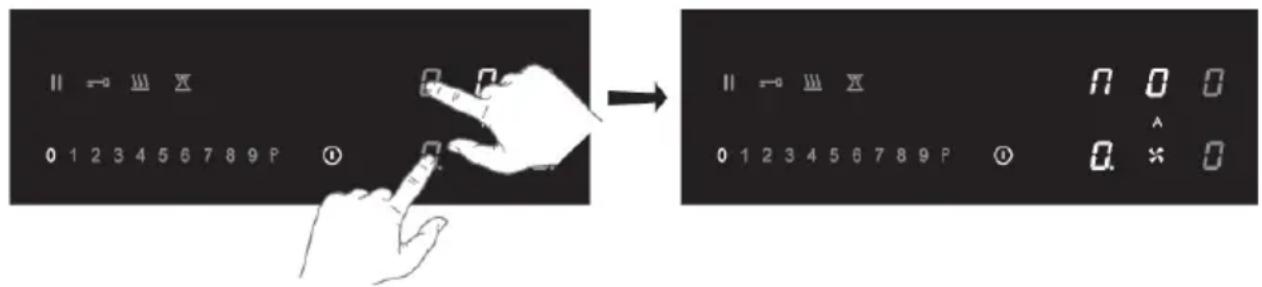
TwoBridgeInductioncookingzonescanbeconnectedtoeachother. Thiscreatesonelargezone thatcanbeused,forexample,withagrillplateorafishpanonthesamepowerlevel.Thepanmust belargeenoughtocoverthecentresofthefrontandrearcookingzone(atleast22cm).
ConnectionofBridgelnductioncookingzones
- Switchonthehob.
- Simultaneously touch the left-hand side cooking zone keys.
- Therearcookingzonedisplayshowsaconnectionsymboltoindicatethatthetwocooking zonesareconnected.
text_image
|| → || X 0 1 2 3 4 5 6 7 8 9 P ① → || → || X 0 1 2 3 4 5 6 7 8 9 P ② N O O 0. * O- Set the power level by touching the slide control.
- Thefrontcookingzonedisplayshowsthepowerlevel.
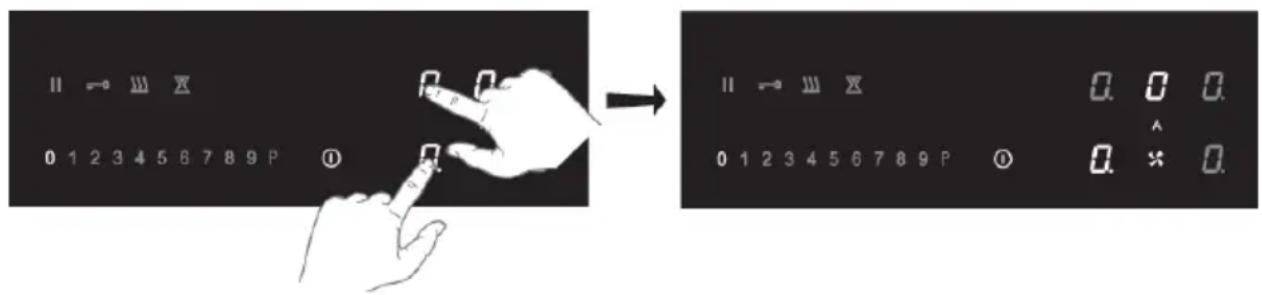
DisconnectionofBridgeInductioncookingzones
- Simultaneously touch the cooking zone key so of the connected cooking zones.
- The connections symbol will disappear on the rear cooking zonedisplay.
text_image
II → III X 0 1 2 3 4 5 6 7 8 9 P ① → II → III X 0 1 2 3 4 5 6 7 8 9 P ② 0. 0 0. 0. * 0.Pausecooking
Thisfunctionstopsthecookingactivitytemporarily(max. 10minutes);timersarealsopaused.
- Touchthepausekeyforatleast1second.
- Allthedisplaysshowthepausesymbol.

text_image
0 6 0 ① 8 * 0 → || -|| X || || || ① || * ||- To continue cooking, touch the pause key for at least 1 second until it flashes.
- Touchanyotherkeywithin10secondsandthecookingprocesswillcontinue.
- Thehobwillautomaticallyswitchchoffafter 10minutesifthepausefunctionisnotswitched offinthemeantime.
Recoveryfunction
If the hobwass switched off accidentally with the On/off key, all settings can be restored using the recall function.
- Touchtheon/offkeyagainwithin5seconds.
• Thepausekeyisflashing.
- Touchthepausekeywithin6seconds.
• Theprevioussettingsareactiveagain.
Using theminuteminder
TIP!
Theminuteminderisnotconnectedtoacookingzone. Theminuteminderdoesnotswitchoffa cookingzone.
Thehobisswitchedonandnopowerlevelhasbeensetforanycookingzone.
- Touchtheminuteminderkeytoswitchontheminuteminder.
• Thetimerdisplayshows'0.00'.

text_image
0. 0. 0. ① 0. * 0. → x + + + 0. 0 0 0. 0. 0. - - - ① 0. * 0.-
Use the ‘+’ or ‘-’ key to set the desired time (from 1 minute to 9 hours and 59 minutes).
-
Theleftpositionofthetimerdisplayshowsthehours,theotherpositionstheminutes.
- Whenthetimeisset, it will begin to count down.
- Thetimerdisplaywillshowtheremainingtime.
- Thelast 10minuteswillbedisplayedinminutesandseconds.
-
Thetimerflashesandthealarmbeepsafterthesetimehaspassed.
-
Touchthetimerdisplaytostopthealarm.
• Thealarmstopsautomaticallyafter2minutes.
TIP!
- Touch the timer display and then touch the '-' key to set the time to '0.00' to switch off the minuteminderbeforethetimehaspassed.
- When the hob is switched off; touch the on/off key twice to switch off the minute minder before the time has passed.
Using the cooking timer
TIP!
The cooking timer is connected to a cooking zone. After the settime has elapsed, the cooking zonewill switch off automatically.
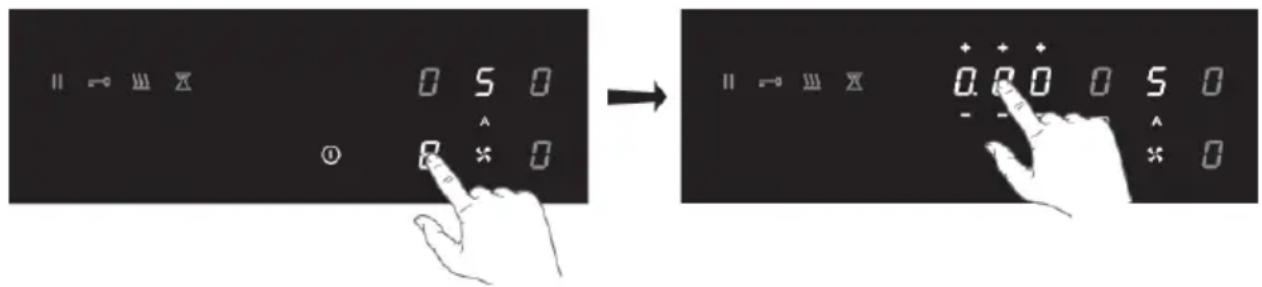
Thehobisswitchedonandforatleastonecookingzoneapowerlevelhasbeenset.
-
Touch the cooking zone key of the desired cooking zone.
-
Touchthetimerdisplay.
- Thetimersymboloftheactivecookingtimerlightsupbrightly.
text_image
|| → || X 0 5 0 ① 8 * 0 → || → || X 0.2 0 0 5 0 - - - * 0-
Use the ‘+’ or ‘-’ key to set the desired time (from 1 minute to 9 hours and 59 minutes).
-
The left position of the timer display shows the hours, the other position the minutes.
- Whenthetimeisset, it will begin to countdown and the timers symbol flashesslowly.
- Thetimerdisplaywillshowtheremainingtime.
- Thelast 10minuteswillbedisplayedinminutesandseconds.
- Theselectedcookingzonewillswitchoffautomaticallyoncethesettimehaselapsed.
-
Thetimerflashesandthealarmbeepsafterthesetimehaspassed.
-
Touchthetimerdisplaytostopthealarm.
• Thealarmstopsautomaticallyafter2minutes.
TIP!
Allthecookingzonescanhaveacookingtimerthathasbeenset. Thedisplaywillalwaysshow thetimeofthecookingzonewiththeshortesttimeremaining.
Changingthepre-setcookingtime
The cookingtime can be changed any timed during the operation.
- Touchtherelevantcookingzonekey.
- Touchthetimerdisplay.
- Use the '+' or '-' key to change the time.
Checkingtheremainingcookingtime
- Touch the cooking zone key to select the zone of which you want to see ether remaining time.
- Azoneconnectedtothecookingtimerisidentifiedbyaflashingtimersymbolabovethe cookingzonedisplay.
- Thetimerwilldisplaytheremainingtimeoftheselectedcookingzone.
- Duringthelast10minutesofcountdown,theremainingtimewillbedisplayedinminutes andseconds.
Switchingoffthecookingtimer
If you want to switch the cooking timer before the end of pre-set time:
- Touch the cooking zone key to select the zone of which you want to switch the cooking timer.
- Azoneconnectedtothecookingtimerisidentifiedbyaflashingtimersymbolabovethe cookingzonedisplay.
- Touch the '-' key(s) to set the time to '0.00'.
- Thetimersymbolisnolongerbrightlylit.
Childlock
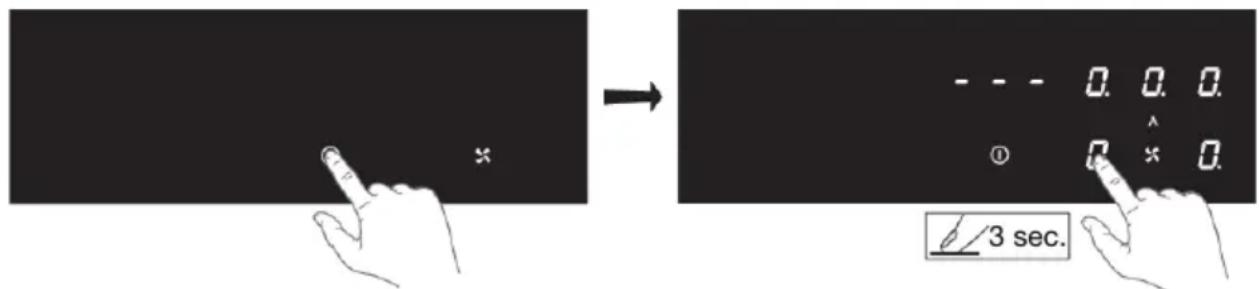
Toactivate the child safety lock, the steps described must be completed within 10 seconds.
- Switchonthehob.
- Touch and hold any of the cooking zone keys for 3 seconds.
text_image
Diagram illustrating a hand press application on a screen, showing how to press the number 3 seconds.- Release and slide your finger from 0 to 9 along the slide control.
- Alldisplaysshowthesymbol'L'.
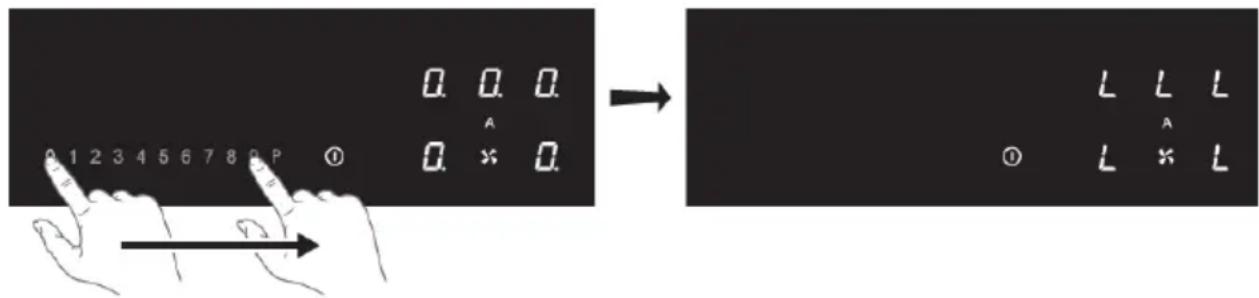
text_image
0. 0. 0. A 0. 1 2 3 4 5 6 7 8 9 P ① 0. * 0. → L L L A ① L * LThehobisnowlocked.Itpreventsunintendedswitchingon.After20seconds,thehobwillwitchoff automatically.
Todeactivatethechildsafetylock, thestepsdescribedmustbecompletedwithin10seconds.
1.Switchonthehob.
2. Touchandholdanyofthecookingzonekeysfor3seconds.
3. Release and slide your finger from 9 to 0 along the slide control.
- ThesymbolLdisappearsinalldisplays;thechildsafetylockisnowdeactivated.
Operationofthehob
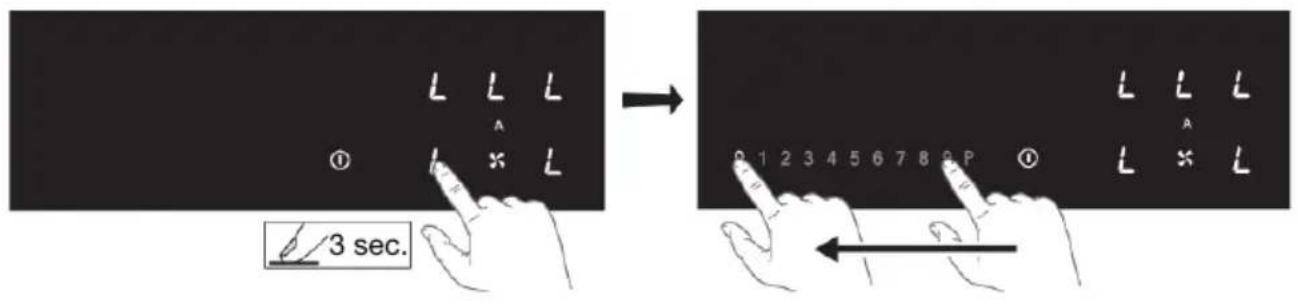
text_image
L L L ① L * L 3 sec. → L L L 0 1 2 3 4 5 6 7 8 9 P ① L * LLockingfunctionforrapidcleaningduringcooking
- Touchthelockkey.
- Thelockkeylightsupbrightly;thesettingsofthehobarelockedtoallowrapidcleaning.
- Touch the lock key again after therapeutic cleaning to switch the function.

text_image
0 5 0 0 8. * 0 → 0 5 0 0 8. * 0WARNING!
Bydefault, the automatic extraction mode is active; the key lights up more intensely. In automatic extraction mode the extraction level adjusts automatically to the use of the cooking zones.
TIP!
If the hobisswitchedoff and disstillhot (symbolHisvisible), the extractor unit will operate in follow-up mode for another 15 minutes.
Switchofftheautomaticextractionmode
-
Touchandholdtheon/offkeyuntilyouhearanaudiosignal.
-
Alldisplayslightup;theinductionhobisinstandbymode.
-
Thecookingzonesandtheextractionunithavepowerlevelzero.
-
Touchthe 'Automaticextractionmode' key.
- The ‘Automatic extraction mode’ key is now less brightly lit; the automatic extraction mode is switched off.

text_image
- - - 0.0 0. ○ 0. * 0 → - - - 0.0 0. ○ 0. * 0.Switchofftheautomaticextractionmodeduringcooking
Acookingzoneisoperating(inthisexamplelevel8)andtheautomaticextractionmodeisactive (level5).
- Touch the 'Automatic extraction mode' key.
- The ‘Automatic extraction mode’ key is now less brightly lit. The extractor unit can now be setmanually.

text_image
|| -○ || X 0 1 2 3 4 5 6 7 8 9 P 0 5 0 8. * 0 → || -○ || X 0 1 2 3 4 5 6 7 8 9 P 0 0 0 8. * 0Manuallyswitchontheextractorunit
1.Switchonthehob.
- Touch the extraction key.
- Thedisplayoftheextractorunitlightsup.
- Settheextractorspeedlevelwithin3secondsbytouchingtheslidecontrol(1to9).
Operatingtheextractionmodule
- Theextractorunitswitchesonwiththeextractionspeedthatisset.
- Setahigherorlowerlevelwiththeslidecontrol.
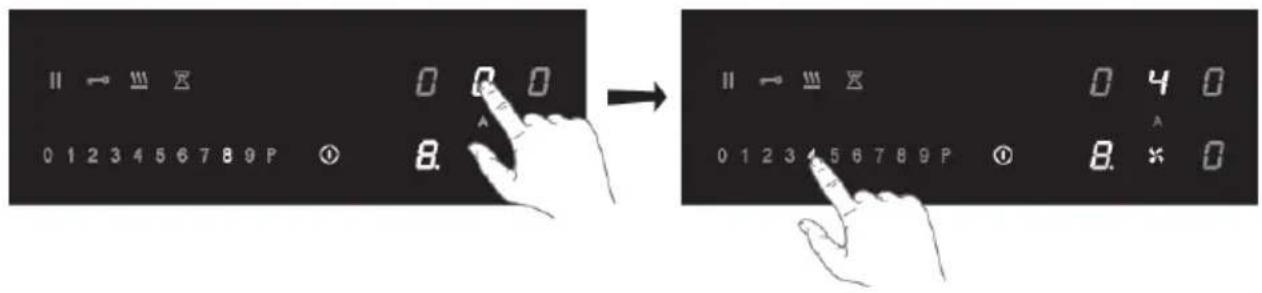
text_image
II → III X 0 1 2 3 4 5 6 7 8 9 P ① 0 0 0 → II → III X 0 1 2 3 4 5 6 7 8 9 P ① 0 4 0 8. * 0Boost
- Switchonthehobandsetapowerlevel (>2).
- Touch the 'Automatic extraction mode' key to switch off the automatic extraction mode.
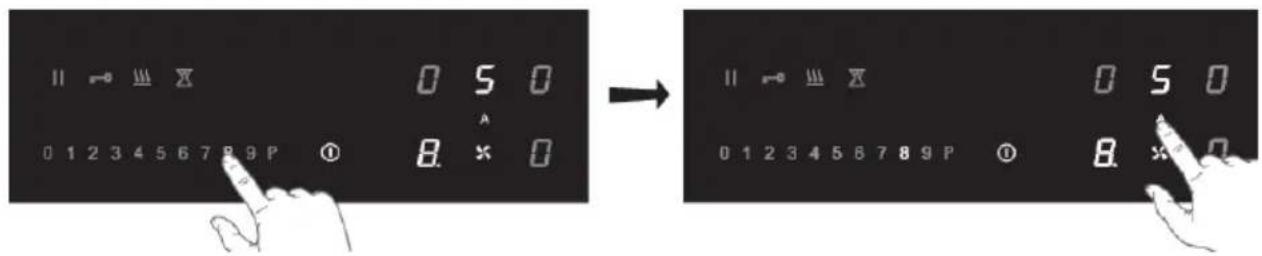
text_image
11 → ≡ ≡ X 0 5 0 0 1 2 3 4 5 6 7 8 9 P Ⓞ B. × 0 → 11 → ≡ ≡ X 0 5 0 0 1 2 3 4 5 6 7 8 9 P Ⓞ B. × 0- Touch the extraction key.
- Thedisplayoftheextractorunitlightsup.
- TouchlevelPtoselect'Boost'.
• TheextractorunitswitchesonatspeedlevelP(Boost).
• 'P'showsonthedisplay.
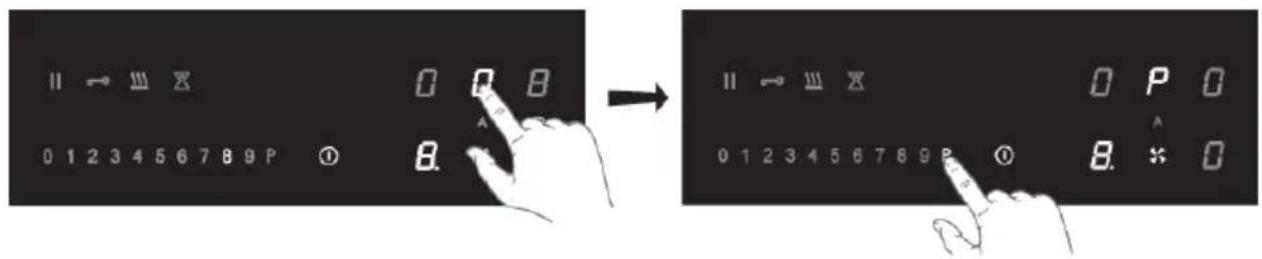
text_image
II → III X 0 1 2 3 4 5 6 7 8 9 P ① 0 0 8 8. → II → III X 0 1 2 3 4 5 6 7 8 9 P ① 0 P 0 8. * 0Setanumberofminutesdelaytime
Usethisfunctiontoswitchofftheextractorunitwithadelayofanumberofminutes.

WARNING!
The automatic extractionmodemustbeswitchedoff.
1.Switchonthehob.
2. Touch the extraction key and set an extractorspeed level.
Operatingtheextractionmodule
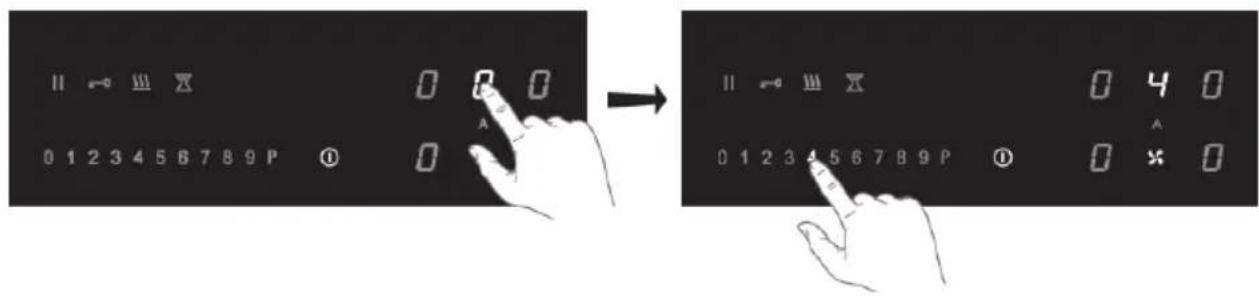
text_image
II → III X 0 1 2 3 4 5 6 7 8 9 P ① 0 0 0 → II → III X 0 1 2 3 4 5 6 7 8 9 P ① 0 4 0 0 × 0- Touchthetimerdisplay.
- Thetimersymboloftheextractorunitlightsupbrightly.
-
Use the '+' or '-' key to set the desired delay time.
-
Countdownstartsautomatically.
• Theextractorunitswitchesoffafterthetimethathasbeenset.
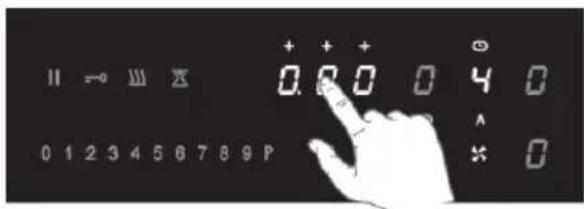
text_image
II → III × 0.00040 0 1 2 3 4 5 6 7 8 9 P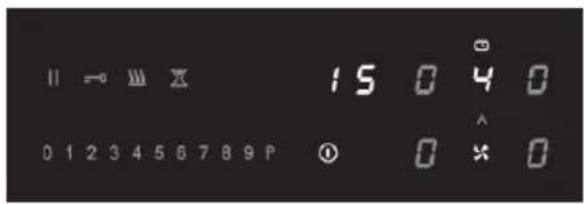
text_image
15 0 4 0 0 0 0 0 0 0 0 0 0 0 0 0 0 0 0 0 0 0 0 0 0 0 0 0 0 0 0 0 0 0 0 0 0 0 0 0 0 0 0 0 0 0 0 0 0 0 0 0 0 15 123456789PSaturationoftheodourfilter

After 100 operating hours, the grease filters symbols illuminated; its necessary to perform maintenance of the grease filter (see 'Maintenance/Cleaning the filters'). The grease filter saturation indication is always enabled.
Saturationoftheodourfilter

Bydefaulttheodourfiltersaturationindicationisdeactivated(whentheextractionisoperatinginductedmode).Activatetheodourfiltersaturationindicationiftheextractionunitisinstalledasa recirculationapplication.
After 200 operating hours, a flashing 'C' will appear in the extractor unit display; it is necessary to perform maintenance of the odour filter (see 'Maintenance/Cleaningthegridandfilters').
Activationoftheodourfiltersaturationindication
-
Touch the extraction key.
-
Again, touch and hold the extraction key for 5 seconds.
• The odour filter symbol 'C' lights up intensely for 1 second.
- Now the symbol 'C' is illuminated in the display when it is necessary to perform maintenance of the odour filter.
Deactivationoftheodourfiltersaturationindication
-
Touchtheextractionkey.
-
Again, touch and hold the extraction key for 5 seconds.
• Theodourfiltersymbol'C'blinkstwices.
Operatingtheextractionmodule
Resetthememoryofthefiltersaturationindication
Resetthememoryafterreplacingthegreasefilterand/ortheodourfilter.
1.Switchonthehob.
- Touchandholdthekey 'Automaticextractionmode' for 5 seconds.
- The grease filter symbol or the odour filter symbol will go off, and the memory starts counting overagain.
TIP!
Theusermenuenablestheusertosetthesignalso thehobasdesired. This concerns both audio (tone and volume) and visual signals.
- Touchtheon/offkeytwicewithinthreeseconds.
• Thepausekeyisflashing.
- Touchandholdthepausekey.
- Then, toucheachcookingzonekeyclockwise(startwiththecookingzonekeyonthefrontleft).
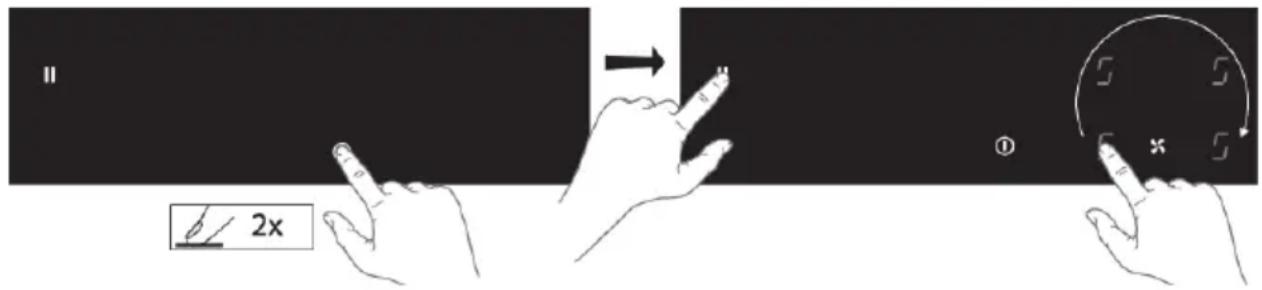
text_image
II 2x ①-
Releasepausekey.
-
'U' is flashing alternately with a number between 2 and 7 on the cooking zone display on therearleft.
-
The configurationvalueappearsinthecookingzonedisplayonthefrontleft.
-
Touch the cooking zone key on there are left and choose the correct number of themenu code (seetable).
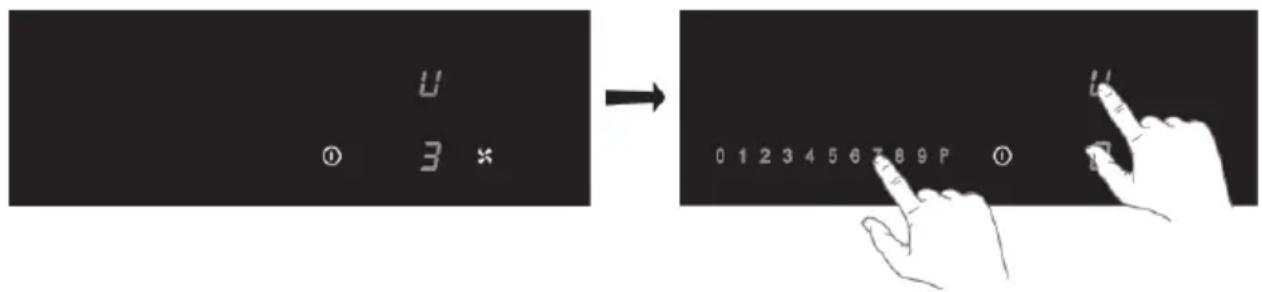
text_image
U ① 3 * → 0 1 2 3 4 5 6 7 8 9 P ① U- Touch the cooking zone key on the front left and select the correct value (seetable).
- Confirm the setting; touch and hold the on/off key until you hear an audiosignal.

text_image
U 0 1 2 3 4 5 6 7 8 9 P ① 2 x → U 0 1 2 3 4 5 6 7 8 9 P ② 2 xUsermenu
| ConfigurationvalueDescriptionMenucode | ||
| 0-1-2-3VolumekeysoundU2 | ||
| 0-1-2-3VolumealarmsignalU3 | ||
| Max.0-1-2-3-4-5-6-7-8-9Min.LightingleveldisplayU4 | ||
| U5 | off) | 0-1Countdownanimation(onor |
| 0-1Pandetection(onoroff)U6 | ||
| 0-1-2AudiosignalcountdowntimerU7 |
WARNING!
Setting the power limiters should only be carried out by a registered and qualified installer. Please read the safety regulations and the installation instructions carefully.
Thehobisequippedwithapowerlimiter.Ifthetotalpowerofoperatingcookingzonesexceedsthe maximumavailableamountofpower,thepowerisautomaticallyreduced.Thedisplayofthecooking zonewhoisbeingreducedinitspowerisfirstflashing;thelevelisthenautomaticallyreducedto thehighestavailablepower.
Thelimiterissetat7400Wbythefactory, butitispossibletochangeitto2800W, 3500Wor4500W.
Powerlimiterconfiguration
Makesuretherearenopotsorpansonthehobbeforeyoustart.
- Disconnect the appliance from themainpowersupply by removing the power connector from the socket, by removing the fuse or turning the circuit breaker off.
- Reconnect the appliance to the powers supply.
• Thekeepwarmkeyisflashing.
- Perform, within2minutesafterreconnectingthehobtothepowersupply, thefollowing steps.
- Makesureallcookingzonesareswitchedoff.
- Touchandholdthekeepwarmkey.
- Then, toucheach cooking zone key counterclockwise (start with the cooking zone key on the frontright).
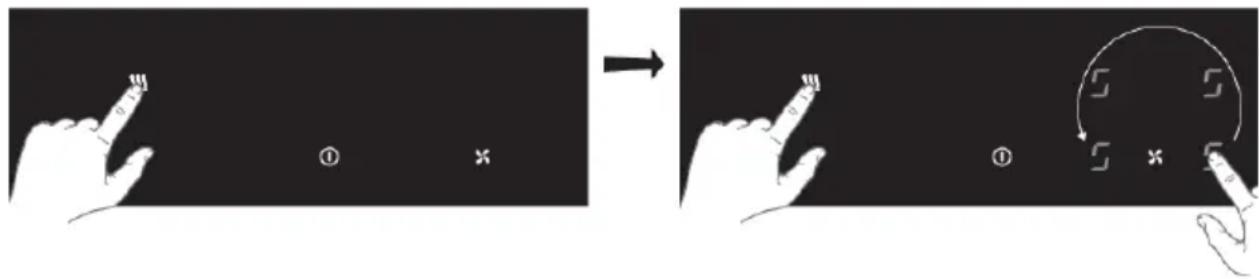
text_image
Diagram illustrating finger movement and movement of a hand with coordinate axes, showing before-and-after states and directional arrows.-
Releasethekeepwarmkey.
-
'C' is flashing alternately with '0' on the cooking zone display on the rear left.
-
Theconfigurationvalueappearsinthecookingzonedisplayonthefrontleft.
-
Touch the cooking zone key on there are left and choose '8' by using the slide control.
- 'C' is flashing alternately with '8' on the cooking zone display on the rear left.
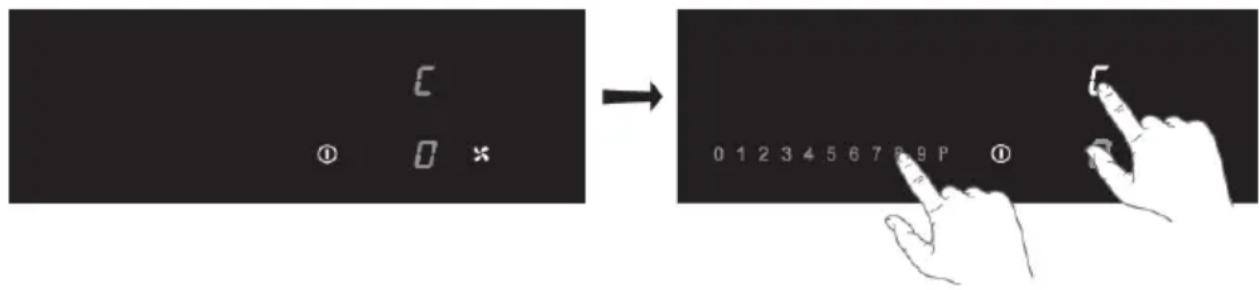
text_image
C ① 0 * → 0 1 2 3 4 5 6 7 8 9 P ①Powerlimiter
-
Touch the cooking zone key on the front left and select the power limitation wanted with the slide control (see table).
-
Then, touchandholdtheOn/offkeyuntilallthedisplaysegmentsdisappear.
- Thehobisnowreadyforusewiththeselectedpowerlimiteractive.
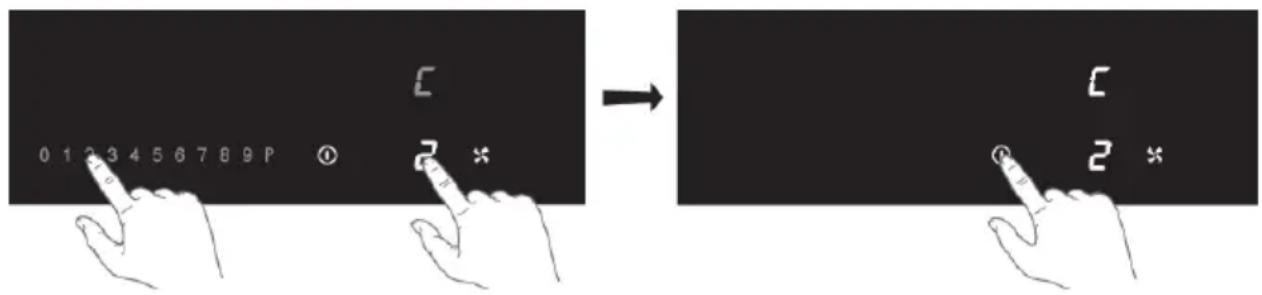
text_image
0 1 2 3 4 5 6 7 8 9 P ① C 2 * → C 2 * →| SettingofthepowerlimiterSettingslidecontrol | |
| 7400W0 | |
| 4500W1 | |
| 3500W2 | |
| 2800W3 |
Cleaningglasstop
TIP!
Activatethechildlockbeforecleaningthehob.
Dailycleaning
- Although food spill cannot burn into the glass, whenever it's recommend you clean the object immediately after use.
- Fordailycleaning, adampcloth with amildcleaning agentisbest.
•Dryoffwithkitchenpaperoradryteatowel.
Stubbornstains
- Stubborn stains can also be removed with a mild cleaning agent, washing-up liquid, for example.
- Removewatercirclesandlimescalewithcleaningvinegar.
- Tracesofmetals(causedbyslidingpans)canbedifficulttoremove.Specialproductsare availableforthis.
- Use a glass scraper to remove food spills. Melted plastic and sugar are also best removed with aglasscraper.
NOTE!
- Neveruseabrasives. These leaves scratches in which dirt and limescale can accumulate.
- Neveruseanythingsharpsuchassteelwoolorscourers.
Watertank
Itisrecommendedtocheckandemptythewatercollectoreverytwoweeks.
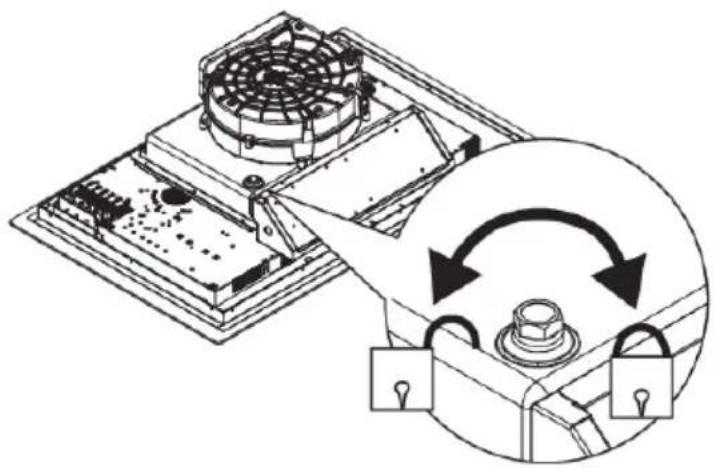
natural_image
Technical line drawing of a mechanical device with fan and lock components, showing rotational motion (no text or symbols)
natural_image
Diagram of a mechanical assembly with a hand pouring liquid into a bowl (no text or symbols present)Maintenance
Cleaningthegridandfilters
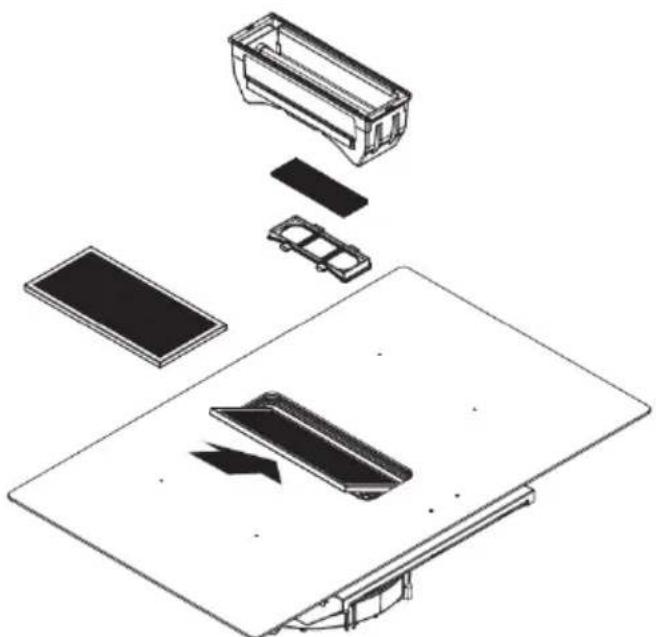
- Removethegridwiththefilterfromtheextractioninlet.
- Carefully slidethe grease filter off the grid.
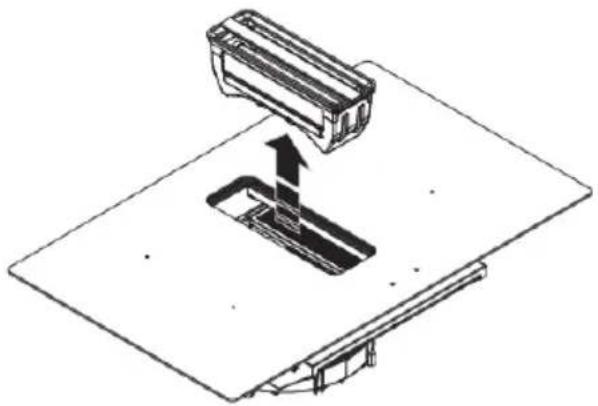
natural_image
Diagram of a device being inserted into a housing, showing internal components and an upward arrow (no text or symbols)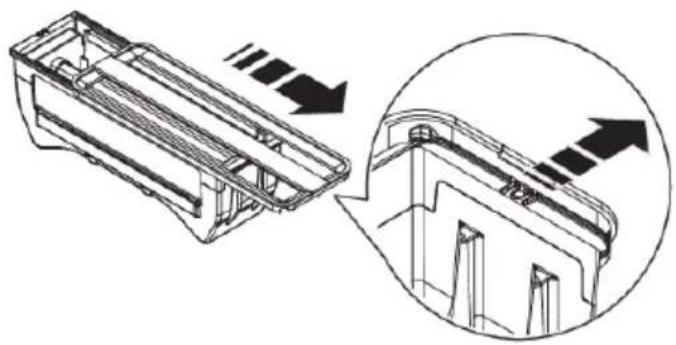
natural_image
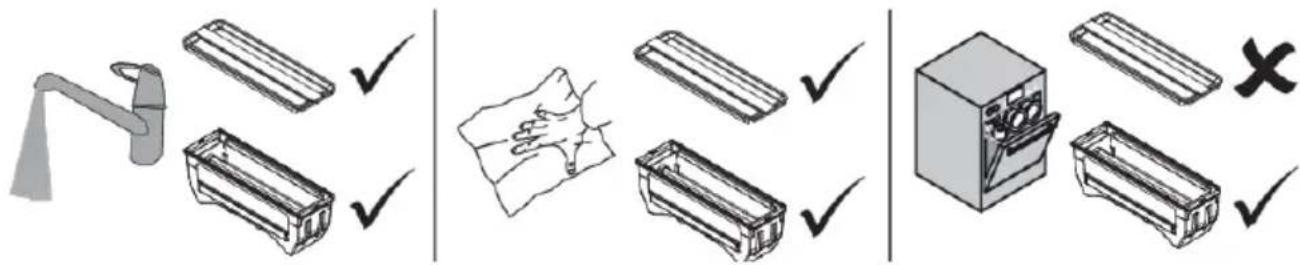
Technical line drawing of a mechanical component with an inset showing internal structure (no text or symbols)- Cleanthegridwithhotwaterandneutralsoap;withoutusingabrasivesponges(donotuse detergents!).Donotwashthecastirongridinadishwasher.
- Clean the grease filter, when in use, at least every week (or when the filter saturation indication system indicates this necessity). This will maintain good performance of the extractor and prevent apotential fire hazard, caused by excessive grease build-up.
- Cleanthegreasefilterwithanon-aggressivedetergents,preferablybyhandorelsinthe dishwasher,whichmustbesettoalowtemperatureandashortcycle.
text_image
Diagram illustrating three-step cleaning or inspection process with labeled boxes and checkmarksCarbonfilters(recirculationuse)
Thecarbonfiltersarelocatedonbothsidesofthegreasefilterandontheundersideofthegrease filter. Thesefiltersareregenerablebywashinganddryingthemwell. Todothis, followthenext procedure.
Theregenerableactivecarbonfiltermustbewashedbyhandwithneutralcleaningproducts,orin thedishwasheratamaximumtemperatureof65°C(thewashingshouldbedonewithoutanyplates, dishes,cups,etc.inthemachine).Donotusewashingdetergent.
Remove excesswater. Becareful to avoid damaging the filter. Placethe filter in theoventodry for at least 1 hour at a maximum temperature of 80^ . Afterupto 3 years (or if the filtres are damaged), the filters will need to be replaced.
natural_image
Exploded view diagram of a battery pack assembly showing internal components and mounting base (no text or labels)
WARNING!
It is important that the grease filter and there generate active carbon filters are properly dried before installation.
General
NOTE!
If you notice a crack in the glass stop (however small), switch off the hob immediately and disconnect the powers supply (removethe plug from the socket).
ThencontacttheServiceDepartment.
Troubleshootingtable
If your hob does not work properly, it does not always mean that it is defective. Makes sure to check the points mentioned below in the table, or visit our website form more information.
| SolutionPossiblecauseProblem | ||
| Thedisplaylightsupwhenthe hobisactivatedforthefirsttime. | routine. | Normaloperation.Thisisthestandardset-up |
| minutesafterthehobhasbeen switchedoff. | Normaloperation.Thehobiscoolingdown.Th | |
| Aslightsmellisnoticeablethe firstfewtimesthehobisused. | Thenewapplianceisheating up. | Thisisnormalanddisappears afterthehobhasbeenuseda fewtimes.Ventilatethekitchen. |
| Youcanhearatickingsoundin yourhob. | limiteronthefrontandback zones.Asofttickingsoundcan alsooccuratlowersettings. | Normaloperation.Thisiscausedbythecapa |
| Thepansmakenoisewhile cooking. | Thisiscausedbytheenergy flowingfromthehobtothe saucepan. | Thisisnormalforcertainpans, particularlyathighsettings.This isnotharmfultothepansorthe hob. |
| Youhaveswitchedonacooking zone,butthedisplayshows'u'. | thetimerhasended. | Useappropriatepans.Thetimethathasbeen |
| workingandyouhearasignal. | Thepresettimehasended.Acooking | Tocrettedeefonlylightsmerkey tostopthealarm. |
| Thehobisnotworkingand nothingappearsinthedisplay. | Thereisnopowersupplydueto adefectivecableorafaulty connection. | Checkthefusesortheelectric switch(ifthereisnoplug). |
| residualheatindicatorisshown | Zoneisoverheated.Zonestopsunin | Afechedhobhascooleddown, cookingcanbecontinued. |
| Afuseblowsassoonasthehob isswitchedon. | Thehobhasbeenwrongly connected. | Checktheelectrical connections. |
Tablecontinuedfromlastpage
| SolutionPossiblecauseProblem | ||
| Theceramicglassplatebroke. | Pulltheplugoutofthesocket.Contactyourinstaller. | |
| Pleasenote!DonotthrowabrokenceramicglassplateintheglassrecyclingbinbuttakethistotheMunicipality'swasterecyclingcentre. |
| code | SolutionPossiblecauseSymptomError | ||
| L | display. | Childsafetylockisactivated.Lshow | Seedchapter‘Operationofthe hob/Childsafetylock’. |
| C | displayofthe extractorunit. | Saturationoftheodourfilter.Cshow | Stimbeessarytoperform maintenanceoftheodourfilter (see‘Maintenance/Cleaningthe gridandfilters). |
| Er03 | Er03appearson display. | wateronit. | Cleanthecontrolpanel.Thecontrolpanelisdi |
| Youhavepressedtwoormore keysatthesametime. | Donotoperatemorethanone keyatthesametime. | ||
| ER21 | display. | Letthehobcooldown.Overheating.Er21app | |
| E2 | E2appearson display. | inductionelement.Empty cookwaremighthavebeen used. | Donotheatemptycookware.Excesstempera |
| E3 | display. | Useappropriatepans.Wrongpan.E3appea | |
| E8 | E8appearson display. | Malfunctionoftheextractorunit. Theextractorunitmaybe blocked. | Removeanyblockagesand cleantheextractorunit. |
In case of other error codes: please writed down the error code and contact the service department.
hob
| HIDD084__EVXHIDD084__I | ||||
| 800mm800mm700mmWidthl | ||||
| 520mm520mm520mmDepth | ||||
| 230mm230mm230mmHeigh | ||||
| Built-inProducttype | ||||
| ~380-415V50/60HzVoltage/frequency~220-240V50/60Hz | ||||
| 7620W7620W7620WPower | ||||
| 20kg20kg18kgWeight | ||||
| Extractor | ||||
| Airflowmax*-Exhaustinstallation | 430m ^3 /h | 430m ^3 /h | 430m ^3 /h | |
| Noise max*- Exhaust installation | 63 dB(A) | 63 dB(A) | 63 dB(A) | |
| Extractionunitpower | 220W | 220W | 220W | |
*Maximumspeed(boostexcluded)
Information according to regulation (EU) 66/2014
MeasurementsaccordingEN60350-2/EN30-2-1
| Modelidentification | HIDD074__EX |
| Trademark | ATAG |
| Type of hob | Induction hob with integrated extractor |
| Numberofelectriccookingzonesand/orareas | 4 |
| Heatingtechnology | Inductioncookingzonesandcooking areas |
| Forcircularelectriccookingzones:diameterofuseful surfaceareaperelectricheatedcookingzoneinmm | 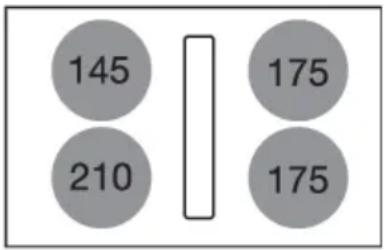 |
Technicaldata
Tablecontinuedfromlastpage
| HIDD074_EXModelidentification | |
| Energyconsumptionpercookingzoneorareacalculated perkg(ECelectriccooking)inWh/kg | 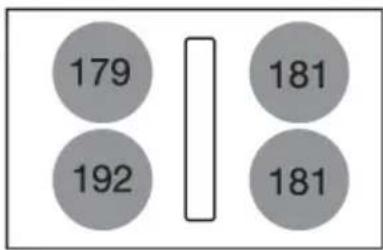 |
| (ECelectricob)inWh/kg | 183.3Energyconsumptionoftheh |
| HIDD084_EXModelidentification | |
| ATAGTrademark | |
| InductionhobwithintegratedextractorTypeofhob | |
| 4Numberofelectriccookingzon | |
| Heatingtechnology | Inductioncookingzonesandcooking areas |
| Forcircularelectriccookingzones:diameterofuseful surfaceareaperelectricheatedcookingzoneinmm | 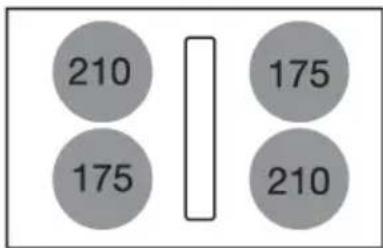 |
| Energyconsumptionpercookingzoneorareacalculated perkg(ECelectriccooking)inWh/kg | 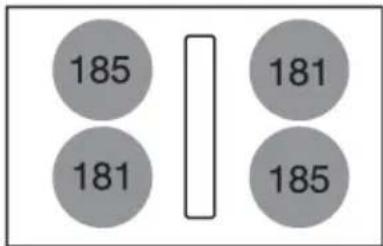 |
| (ECelectricob)inWh/kg | 183Energyconsumptionofthehc |
Technicaldata
| HIDD084__EVXModelidentification | ||
| ATAGTrademark | ||
| InductionhobwithintegratedextractorTypeofhob | ||
| 4Numberofelectriccookingzon | ||
| Heatingtechnology | Inductioncookingzonesandcooking areas | |
| Fornon-circularcookingzonesorareas:lengththandwidth ofusefulsurfaceareaperelectricheatedcookingzoneor areainmm | 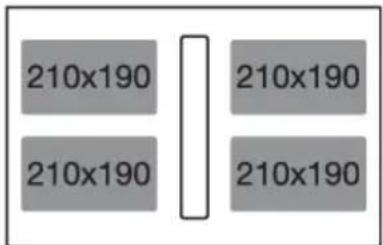 | |
| Energyconsumptionpercookingzoneorareacalculated perkg(ECelectriccooking)inWh/kg | 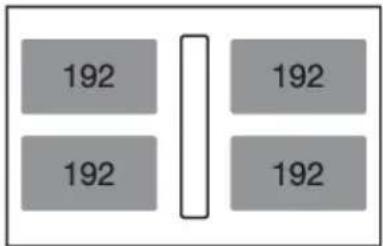 | |
| (ECelectricob)inWh/kg | 192Energyconsumptionofthehc | |
Disposal of the appliance and packaging
Sustainable material have been used during the manufacture of this appliance. This appliance must be disposed of responsibly at the end of its service life. Ask your local authorities for more information about how to do this.
The appliance packaging is recyclable. The following may have been used:
- cardboard;
•polyethylenefilm(PE);
•CFC-freepolystyrene(PSrigidfoam).
Disposeofthesematerialsinaresponsiblemannerandinaccordancewithgovernmentregulations.
text_image
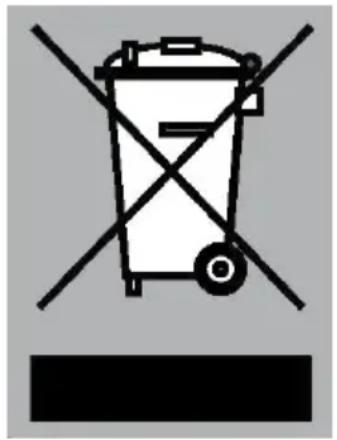
Warning symbol for a trash bin with crossed and unshaded lines indicating no waste or dischargeTheproducthasbeenmarkedwithacrossed-outdustbinsymbolto remindyouoftheobligationtodisposeofelectricalhousehold appliancesseparately.Thismeansthattheappliancemaynotbe includedwithnormaldomesticrefuseattheendofitsservicelife. Theappliancemustbetakentoaspecialmunicipalcentreforseparated wastecollectionortoadealerprovidingthisservice.
Aseparate collection of household appliances help to prevent any potential negative impact on the environment and human health caused by improper disposal. It ensures that them also of which the appliance is composed can be recovered to obtain significant savings in energy and raw materials.
NOTE!
Pleasenote!Donotthrowabrokenceramicglassplateintheglassrecyclingbinbuttakethis totheMunicipality'swasterecyclingcentre.

Declarationofconformity
WeherebydeclarethatourproductssatisfytheapplicableEuropean directives, ordersandregulations, aswellastherequirementsstated inthereferencedstandards.
The appliance identification card is located on the bottom of the appliance.
Sticktheapplianceidentificationcardhere.
ATAG
www.atag.nl
www.atag.be
