ORH-305-W - Refrigerator Orima - Free user manual and instructions
Find the device manual for free ORH-305-W Orima in PDF.


| Product Type | Freestanding Refrigerator-Freezer |
| Brand | Orima |
| Model | ORH-305-W |
| Dimensions (H x W x D) | 1720 x 600 x 600 mm |
| Total Volume | 304 L |
| Refrigerator Volume | 229 L |
| Freezer Volume | 75 L (4 stars) |
| Climate Class | SN, N, ST, T (10°C to 43°C) |
| Annual Energy Consumption | 213 kWh/year |
| Energy Class | E |
| Noise Level | 40 dB(A) - class C |
| Freezing Capacity | 3.4 kg/24h |
| Defrost Type | Automatic (refrigerator), manual (freezer) |
| Refrigerant | R600a (isobutane) |
| Electrical Supply | 220-240 V ~ 50 Hz |
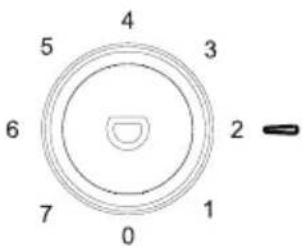
| Thermostat | 8 positions (1 warm to 7 cold, 0 off) |
| Interior Lighting | LED (class G) |
| Door Reversibility | Yes |
| Adjustable Feet | Yes (2 at front) |
| Warranty | 36 months |
| Repairability | LED replaceable only by a qualified technician |
Frequently Asked Questions - ORH-305-W Orima
User questions about ORH-305-W Orima
0 question about this device. Answer the ones you know or ask your own.
Ask a new question about this device
Download the instructions for your Refrigerator in PDF format for free! Find your manual ORH-305-W - Orima and take your electronic device back in hand. On this page are published all the documents necessary for the use of your device. ORH-305-W by Orima.
USER MANUAL ORH-305-W Orima
MANUAL DE INSTRUÇÕES
INSTRUCTION MANUAL
LIVRE D'INSTRUCTIONS
facebook.com/orima.pt
natural_image
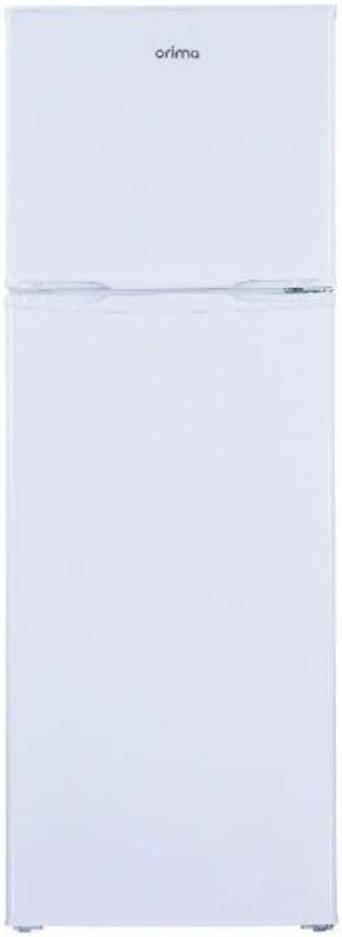
Front view of a white refrigerator with a single water level indicator (no visible text or symbols on the appliance)
MMA
MÁRIO MIRANDA DE ALMEIDA
FRIGORÍFICO
Refrigerator I Frigorifico I Réfrigérateur
ORH 305 W
SERVIÇO DE APOIO AO CLIENTE
Apoio ao Cliente:
Tel.: (+351) 231 467 436
natural_image
Simple line drawing of a mechanical clamp or bracket with a handle and mounting bracket (no text or symbols)natural_image
Technical line drawing of a mechanical assembly with two bolts and curved components (no text or symbols)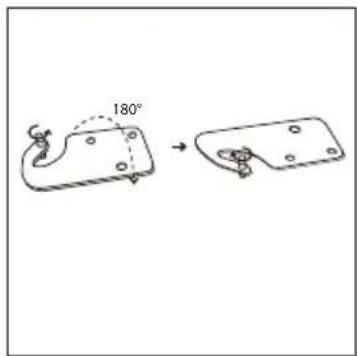
natural_image
Pure mechanical diagram showing a lever and pivot point without any text, numbers, or symbolsnatural_image
Simple line drawing of a door with a hand adjusting the lock and a circular inset showing a device (no text or symbols)natural_image
Simple line drawing of a geometric structure with a semicircular arc and two vertical supports (no text or symbols)natural_image
Pure mechanical diagram showing two symmetrical components with dashed circles indicating features, no text or symbols present.natural_image
Technical line drawing of a mechanical device with a circular inset showing internal components (no text or symbols)natural_image
Technical line drawing of a vehicle suspension system with a magnified inset showing internal components (no text or labels)natural_image
Technical line drawing of a mechanical clamp or bracket assembly (no text or symbols)natural_image
Pure technical line drawing of a mechanical assembly without any text, numbers, or symbols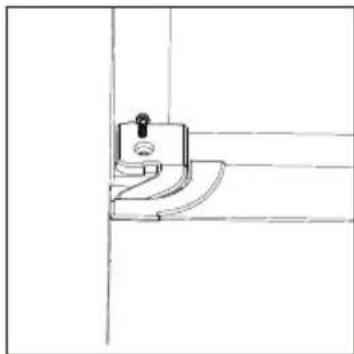
natural_image
Simple line drawing of a door handle with a key inserted, no text or symbols presentnatural_image
Simple line drawing of a roof corner with a downward arrow indicating direction (no text or symbols)natural_image
Simple line drawing of a rectangular frame with curved arrows indicating rotation or movement (no text or symbols)UTILIZAÇÃO DIÁRIA
Posicionamento
natural_image
Line drawing of a hand holding a shelf with a wooden board (no text or symbols)
natural_image
Simple line drawing of a container with two upward arrows indicating flow or movement (no text or symbols)Dicas úteis
natural_image
Diagram showing a mechanical or fluidic system with arrows indicating direction, no text or symbols presentnatural_image
Technical line drawing of a mechanical device with internal components (no text or symbols)To ensure proper use of this appliance and your safety, please read the instruction manual completely before operating this appliance.
natural_image
Simple line drawing of a door handle with a knob and curved handle (no text or symbols)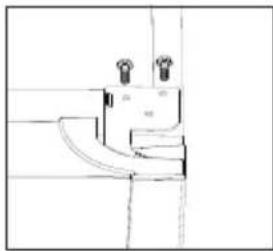
natural_image
Simple line drawing of a mechanical component with two protrusions (no text or symbols)natural_image
Pure mechanical diagram showing a lever and pivot point without any text, numbers, or symbols- Desenrosque la bisagra central.
natural_image
Simple line drawing of a door with a hanging switch and a circular inset showing three small objects (no text or symbols)natural_image
Simple line drawing of a 3D rectangular frame with a curved top edge (no text or symbols)natural_image
Pure mechanical diagram showing symmetrical components with no text or symbolsnatural_image
Simple line drawing of a mechanical structure with a magnified inset showing internal components (no text or symbols)natural_image
Technical line drawing of a mechanical structure with an inset showing a circular component (no text or symbols)natural_image
Pure mechanical assembly diagram showing a clamp or bracket with no text or symbolsnatural_image
Pure technical line drawing of a mechanical joint or bracket (no text or symbols)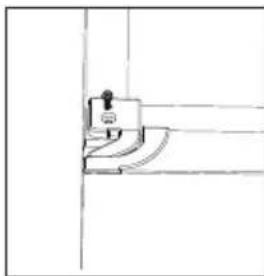
natural_image
Simple line drawing of a door handle with a small object on top (no text or symbols)natural_image
Pure technical line drawing of a corner joint with an arrow indicating direction (no text or symbols)natural_image
Simple line drawing of a square frame with arrows indicating rotation or movement (no text or symbols)UTILIZACIÓN DIARIA
Ubicación
natural_image
Hand installing or adjusting a metal shelf panel on a rack (no text or symbols visible)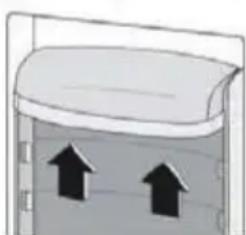
natural_image
Simple line drawing of a container with two upward arrows inside, no text or symbols present.natural_image
Illustration of a hand holding scissors inside a globe with arrows indicating rotation (no text or symbols)natural_image
Technical line drawing of a mechanical device with internal components (no text or symbols)- All accessories, such as drawers, shelves balconies, should be kept there for lower energy consumption.


!
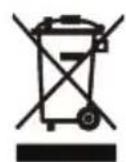
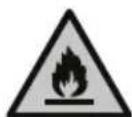
During using, service and disposal the appliance, please pay attention to symbol similar as left side, which is located on rear of appliance (rear panel or compressor) and with yellow or orange color.
It's risk of fire warning symbol. There are flammable materials in refrigerant pipes and compressor.
Please be far away fire source during using, service and disposal.
natural_image
Line drawing of a refrigerator interior showing front and side views (no text or symbols)Reverse Door
Tool required: Philips screwdriver, Flat bladed screwdriver, Hexagonal spanner.
- Ensure the unit is unplugged and empty.
- To take the door off, it is necessary to tilt the unit backwards. You should rest the unit on something solid so that it will not slip during the door reversing process.
- All parts removed must be saved to do the reinstallation of the door.
- Do not lay the unit flat as this may damage the coolant system.
-
It's better that 2 people handle the unit during assembly.
-
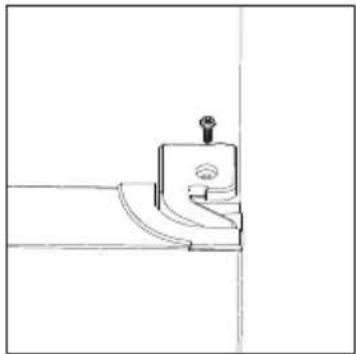
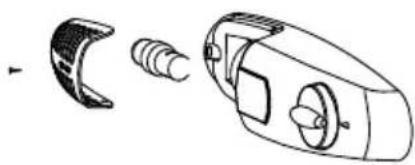
Unscrew top hinge cover and then unscrew the top hinge.
Then lift upper door and place it on a soft pad to avoid scratch and damage.
natural_image
Simple line drawing of a door handle with a knob and curved base (no text or symbols)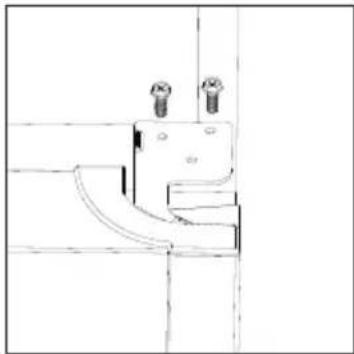
natural_image
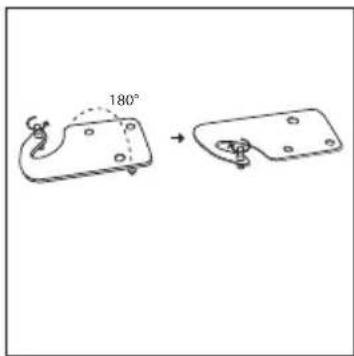
Technical line drawing of a mechanical bracket with two screws (no text or symbols)- Remove the pin with a screwdriver and flip the hinge bracket. Then refit the pin to hinge bracket.
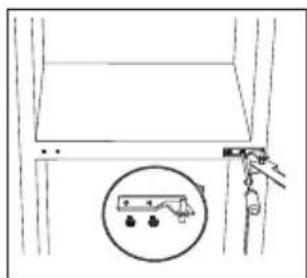
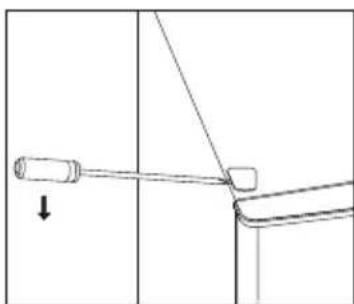
- Remove the top left screw cover.
natural_image
Pure mechanical diagram showing a lever and pivot point without any text, numbers, or symbols- Unscrew middle hinge.
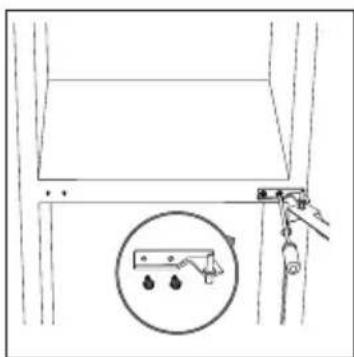
natural_image
Simple line drawing of a cabinet or lift with a hand operating a lever and a circular inset showing a hanging device (no text or symbols)Reverse Door
- Move hinge hole cover in lower door to another side. Then lift lower door and place it on a soft pad to avoid scratch.
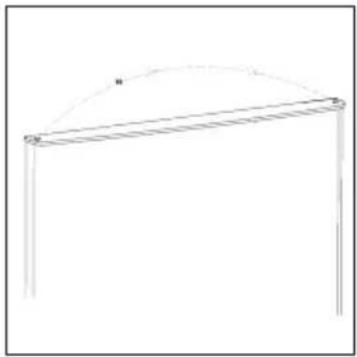
natural_image
Simple line drawing of a roof structure with a curved top edge and vertical supports (no text or symbols)- Move the hinge hole covers from left side to right side.
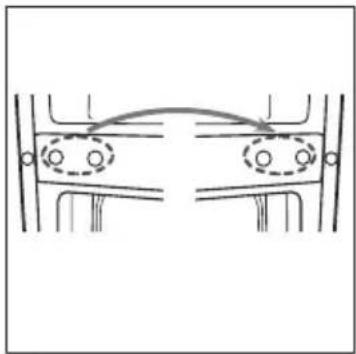
natural_image
Pure mechanical diagram showing two symmetrical components with circular features, no text or symbols present- Unscrew bottom hinge. Then remove the adjustable feet from both side.
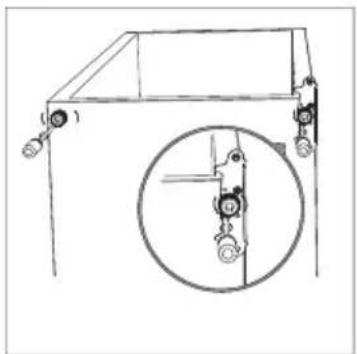
natural_image
Technical line drawing of a mechanical device with a circular inset showing internal components (no text or symbols)- Unscrew and remove the bottom hinge pin, turn the bracket over and replace it.
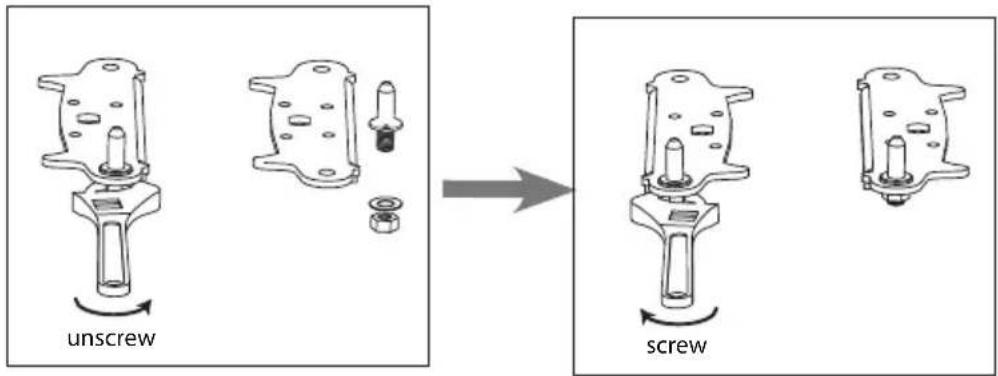
Reverse Door
- Refit the bracket fitting the bottom hinge pin. Replace both adjustable feet. Transfer the lower door to the property position.
natural_image
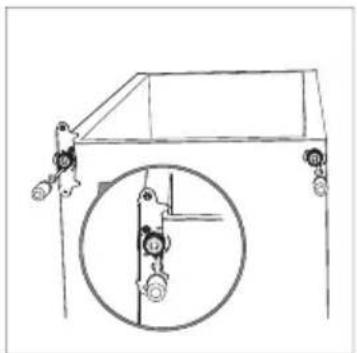
Technical line drawing of a mechanical assembly with a magnified inset showing a pulley mechanism (no text or symbols)- Make the middle hinge reverse the direction 180^ C, then transfer it to the left property position. Make the middle hinge pin in the upper hole of the lower door, then tight the bolts.

natural_image
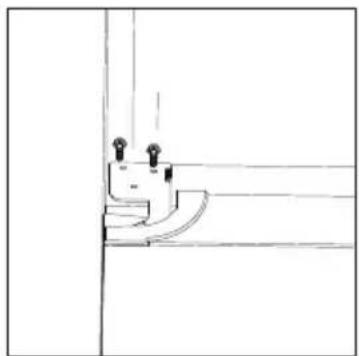
Technical line drawing of a mechanical clamp or bracket assembly (no text or symbols)- Place the upper door back on. Ensure the door is aligned horizontally and vertically so that the seal are closed on all sides before finally tightening the top hinge. Then inert the top hinge and screw it to the top of unit and then fix hinge cover (in accessory bag) by screw.
natural_image
Pure technical line drawing of a corner joint or bracket (no text or symbols)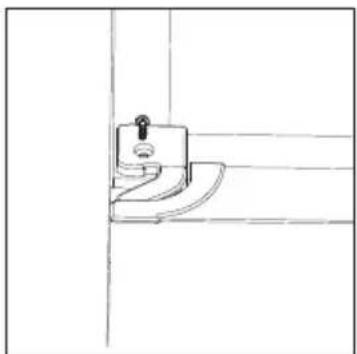
natural_image
Simple line drawing of a door handle with a key inserted, no text or symbols present- Fix the screw cover.
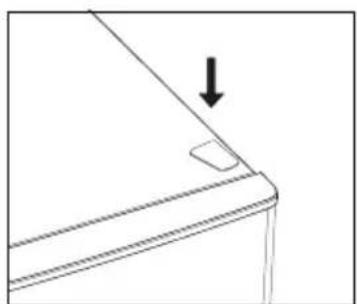
natural_image
Pure technical line drawing of a corner detail with an arrow indicating direction (no text or symbols)- Detach the Fridge and the Freezer door gaskets and then attach them after rotating.
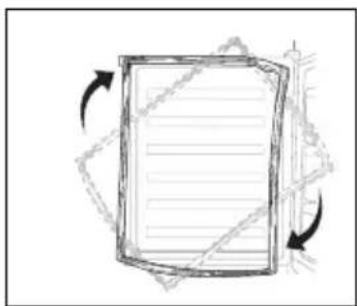
natural_image
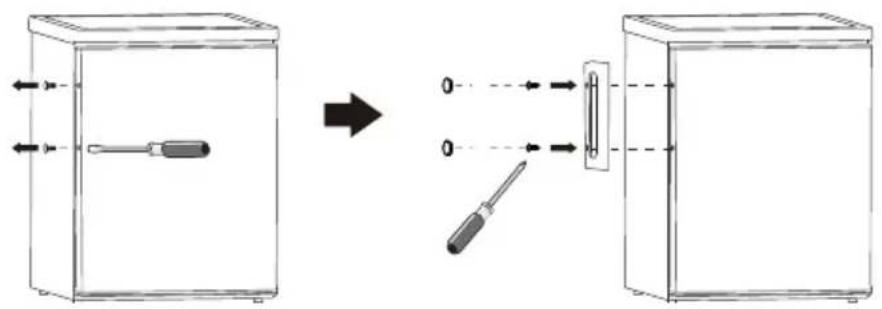
Abstract diagram of a document with arrows indicating rotational movement (no text or symbols)Install door external handle (if external handle is present)
Space Requirement
Keep enough space of door open.
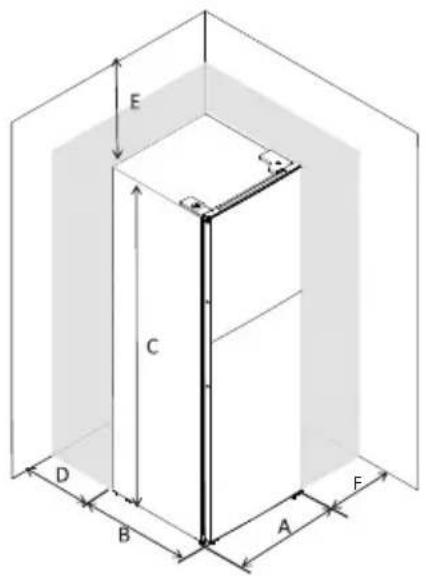
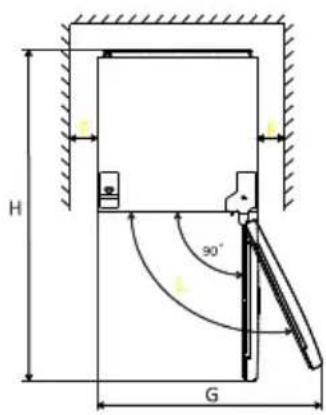
| A | 600 |
| B | 600 |
| C | 1720 |
| D | min=50 |
| E | min=50 |
| F | min=50 |
| G | 1200 |
| H | 1200 |
| L | 135° |
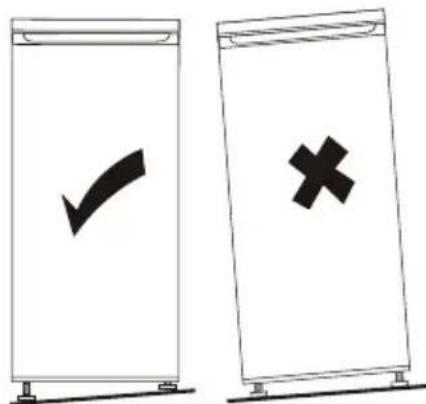
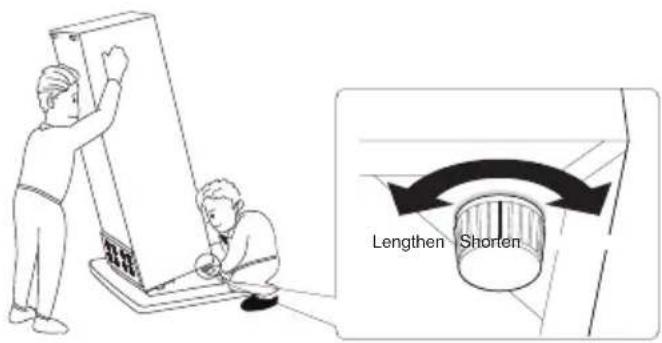
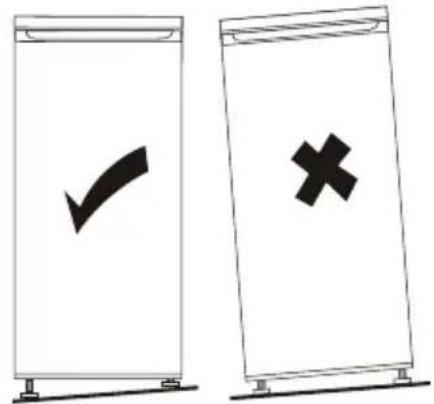
Levelling the unit
To do this adjust the two levelling feet at front of the unit.
If the unit is not level, the doors and magnetic seal alignments will not be covered properly.
Positioning
Install this appliance at a location where the ambient temperature corresponds to the climate class indicated on the rating plate of the appliance:
for refrigerating appliances with climate class:
- extended temperate: this refrigerating appliance is intended to be used at ambient temperatures ranging from 10 °C to 32 °C; (SN)
- temperate: this refrigerating appliance is intended to be used at ambient temperatures ranging from 16 °C to 32 °C; (N)
- subtropical: this refrigerating appliance is intended to be used at ambient temperatures ranging from 16 °C to 38 °C; (ST)
- tropical: this refrigerating appliance is intended to be used at ambient temperatures ranging from 16 °C to 43 °C; (T)
Location
The appliance should be installed well away from sources of heat such as radiators, boilers, direct sunlight etc. Ensure that air can circulate freely around the back of the cabinet. To ensure best performance, if the appliance is positioned below an overhanging wall unit, the minimum distance between the top of the cabi-net and the wall unit must be at least 50 mm. Ideally, however, the appliance should not be positioned below overhanging wall units. Accurate leveling is ensured by one or more adjustable feet at the base of the cabinet.
This refrigerating appliance is not intended to be used as a built-in appliance;

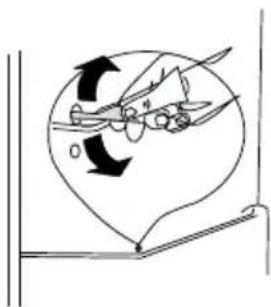
when set is 0, the appliance is switched off. When set is max, compressor will not stop
Daily use
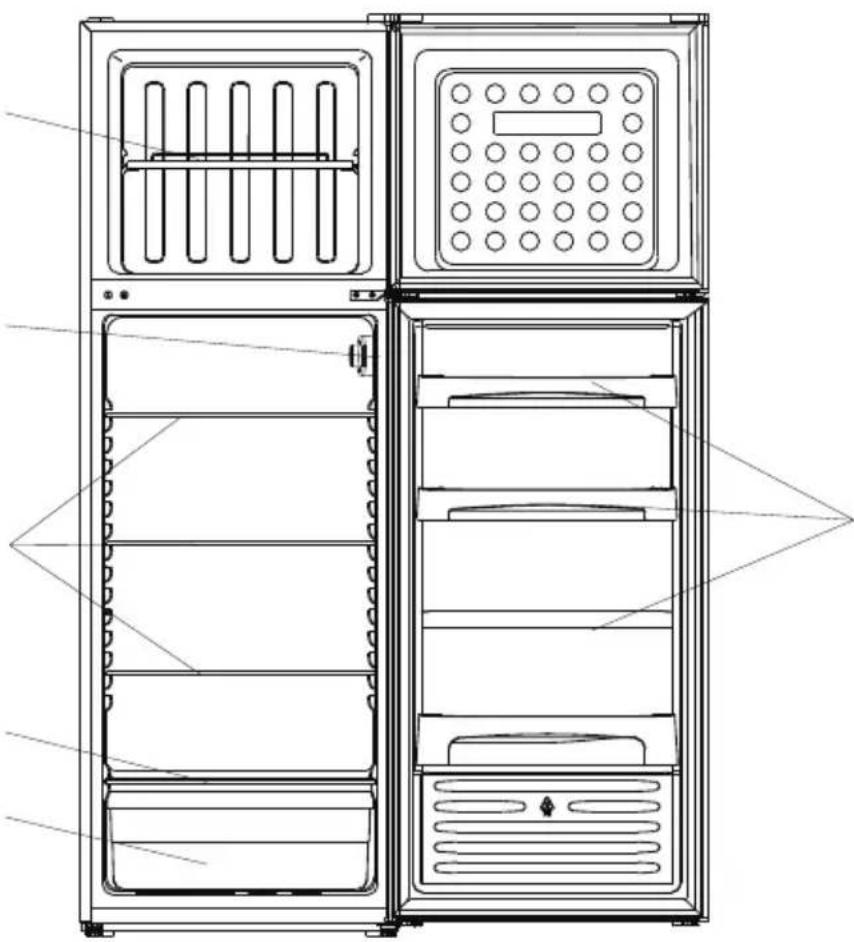
Position different food in different compartments according to be below table
| Refrigerator compartments | Type of food |
| Door or balconies of fridge compartment | ·Foods with natural preservatives, such as jams,juices, drinks, condiments.·Do not store perishable foods. |
| Crisper drawer (salad drawer) | ·Fruits, herbs and vegetables should be placed separately in the crisper bin.·Do not store bananas, onions, potatoes, garlic inthe refrigerator. |
| Fridge shelf – middle | ·Dairy products, eggs |
| Fridge shelf – top | ·Foods that do not need cooking, such as ready-to-eat foods, deli meats, leftovers. |
| Freezer drawer(s)/shelf | ·Foods for long-term storage.·Bottom drawer/shelf for raw meat, poultry, fish.·Middle drawer/shelf for frozen vegetables, chips.·Top drawer/shelf for ice cream, frozen fruit, frozen baked goods. |
Temperature setting recommendation
| Temperature Setting Recommendation | ||
| Environment Temperature | Freezer compartment | Fridge compartment |
| Summer (Above 38°C) | / | 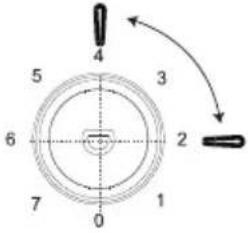 |
| Set on 2~4 | ||
| Normal | / | 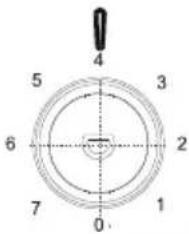 |
| Set on 4 | ||
| Winter (Below 16°C) | / | 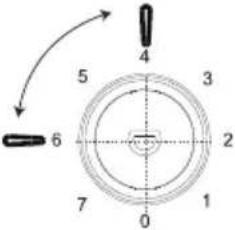 |
| Set on 4~6 | ||
• Information above give users recommendation of temperature setting.
Impact on Food Storage
• Under Recommended setting, the best storage time of fridge is no more than 3 days.
• Under Recommended setting, the best storage time of freezer is no more than 1 month.
- The best storage time may reduce under other settings.

natural_image
Illustration showing a hand placing a shelf item into a rack and then to a container with upward arrows (no text or symbols)
natural_image
Diagram of a mechanical or fluidic system with rotating components and directional arrows, no text or symbols present.
natural_image
Diagram of a device with a curved component and internal components, showing no text or symbols.
This list provides all Eco-design requirements (following the (EU)2019/2019 Eco-design and (EU)2019/2016 Energy labelling), if the requirement is applicable to your product.
The refrigerating appliance is not intended to be used as a built-in appliance, unless specifically shown as such into its instruction manual.
The drawers, baskets and shelves should be kept in their current position unless otherwise specified in this document.
Doors and lids of the refrigeration appliance should be removed before disposal in the landfill, to avoid children or animals getting trapped inside.
Recommended setting:
Refrigerator compartment: +4°C
Freezer compartment: -18°C
FAST FREEZE
The use of this function is recommended when placing a very high quantity of food to be frozen in the freezer compartment. 24 hours before freezing fresh food, press the Fast Freeze button to activate the Fast Freeze function. When activated, the Fast Freeze indicator turns on. After 24 hours place the food to be frozen in the freezing zone of freezer compartment. The function is automatically disabled after 72 hours, or can be manually disabled by pressing Fast Freeze button.
FAST COOL
Using Fast Cool function it is possible to increase the cooling capacity in the refrigerator compartment. The use of this function is recommended when placing a very high quantity of food in the refrigerator compartment. Press the Fast Cool button to activate Fast Cool function. When activated, the Fast Cool indicator turns on. The function is automatically disabled after 6 hours, or can be manually disabled by pressing Fast Cool button again.
How to store foodstuffs:
To avoid food waste, please refer to the recommended setting and storage times:
Fridge compartment: Different food, especially vegetable and fruit, have different storage temperature. The storage time is 1 to 3 days (temp setting: middle)
Freezer compartment: 1 week (temp setting: Min) and 1 month (temp setting: Max)
To optimize freezing speed and get more storage space, the freezer compartment can be used without the freezer drawers.
The quantity of fresh food that can be frozen in a specific time period is indicated on the rating plate. Load limits are determined by baskets, flaps, drawers, shelves etc. Make sure that these components can still close easily after loading.
To avoid food waste, please refer to the recommended setting and storage times found in the user manual.
The model information can be retrieved using the QR-Code reported in the energy label.
The label also includes the model identifier that can be used to consult the portal of the registry at
https://eprel.ec.europa.eu
This product contains a light source of energy efficiency class G (if present).
| Model | ORH 305 W |
| Total Net Volume, L | 304 |
| Refrigerator Net Volume, L | 229 |
| Freezer net volume, L | 75 |
| Actual consumption depends on how the device is used and the location | |
| Energy Class based on EU 2019/2016 | E |
| Power Consumption: KWh/year | 213 |
| Climate class N,ST | |
| Dimensions (A x L x P), mm | 1720*600*600 |
| Noise level, db(A) re 1pw 40 | |
| Electrical Information See in the product rating label | |
| Note: The manufacturer reserves the right to make future changes to the Specifications and technical parameters. | |
IMPORTADO POR: MÁRIO MIRANDA DE ALMEIDA, SA
APARTADO 1, 3060-752 CORTICEIRO DE CIMA, PORTUGAL
INSTRUCTION DE SECURITE
natural_image
Technical line drawing of a mechanical bracket or clamp assembly (no text or symbols)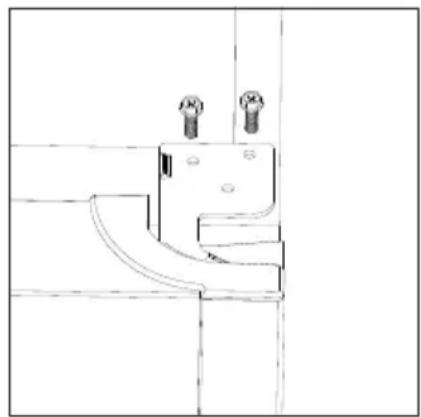
natural_image
Technical line drawing of a mechanical bracket or mounting structure with two protruding components (no text or symbols)natural_image
Pure mechanical diagram showing a lever and pivot mechanism without any text or symbols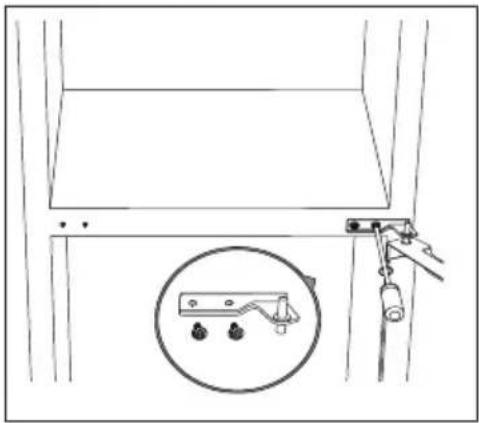
natural_image
Line drawing of a mechanical assembly with a magnified inset showing a bracket and parts (no text or symbols)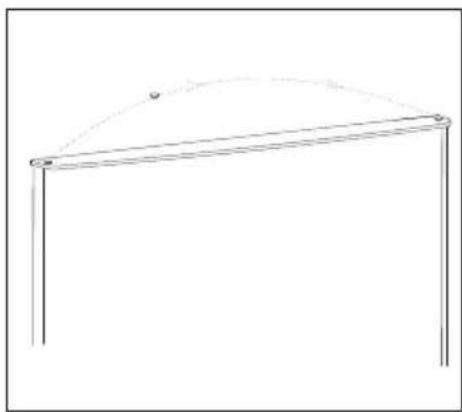
natural_image
Simple line drawing of a geometric structure resembling a tent or arch (no text or symbols)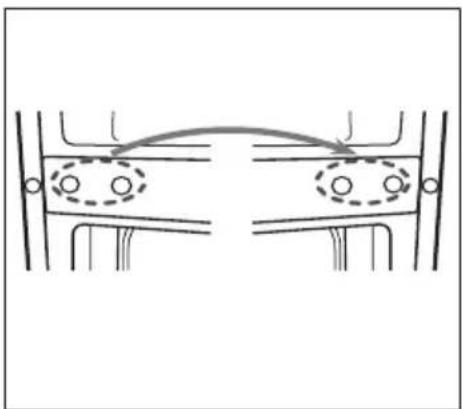
natural_image
Diagram showing two symmetrical mechanical or structural components with circular features, no text or symbols present.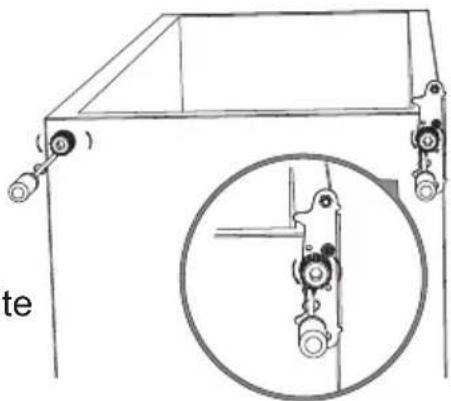
natural_image
Technical line drawing of a mechanical device with a magnified inset showing internal components (no text or symbols)natural_image
Technical line drawing of a mechanical assembly with a circular inset showing a pulley mechanism (no text or symbols)natural_image
Technical line drawing of a mechanical clamp or bracket assembly (no text or symbols)natural_image
Pure technical line drawing of a mechanical assembly without any text, numbers, or symbols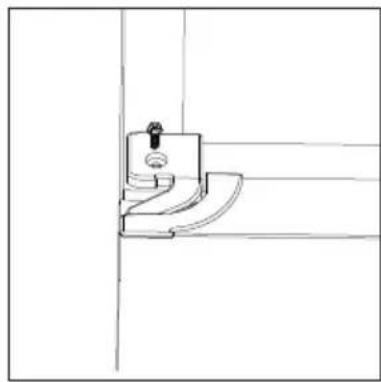
natural_image
Pure technical line drawing of a mechanical bracket or bracket (no text or symbols)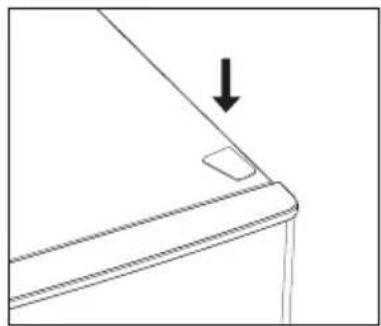
natural_image
Simple line drawing of a corner detail with an arrow indicating direction (no text or symbols)Accessoires Clayettes mobiles
natural_image
Illustration showing a hand placing a shelf item into a storage container with upward arrows indicating flow (no text or symbols)Conseils utiles
natural_image
Line drawing of a double refrigerator with open doors and internal compartments (no text or symbols)natural_image
Cartoon drawing of a sad, anthropomorphic paper character with arms and legs, showing a 45° angle (no text or symbols beyond the angle label)
natural_image
Cartoon character with sad face and limbs, surrounded by floating objects (no text or symbols)natural_image
Cartoon illustration of two anthropomorphic characters reacting with expressive faces, one standing and one sitting on a surface, with a sun and clouds nearby (no text or symbols)natural_image
Two cartoon cubes with smiling faces, one holding a pencil and the other holding a pencil (no text or symbols)natural_image
Cartoon illustration of a sad, anthropomorphic character with arms and legs, holding a book (no text or symbols present)ZONE LA PLUS FROIDE DU REFRIGERATEUR

Model placed on the Union market from 01/03/2024
EPREL registration number: 1864447
Supplier: MARIO MIRANDA DE ALMEIDA, S.A. (Importer)
Customer care service:
Name: MARIO MIRANDA ALMEIDA, SA Website: www.orima.pt
Email: orima@orima.pt Phone: (+351) 231 467 420
Address:
RUA PADRE BASILIO COSTA MORGADO 23/25
3060-752 CORTICEIRO DE CIMA
Portugal

https://eprel.ec.europa.eu/qr/1864447
Website: www.orima.pt
| Product Information SheetCOMMISSION DELEGATED REGULATION (EU) 2019/2016 with regard to energy labelling of refrigerating appliances | |||||
| Supplier's name or trade mark: ORIMA | |||||
| Supplier's address: MARIO MIRANDA ALMEIDA, SA, RUA PADRE BASILIO COSTA MORGADO 23/25, 3060-752CORTICEIRO DE CIMA, PT | |||||
| Model identifier: ORH 305 W | |||||
| Type of refrigerating appliance: | |||||
| Low-noise appliance: No Design type: freestanding | |||||
| Wine storage appliance: No | Other refrigerating appli-ance: | Yes | |||
| General product parameters: | |||||
| Parameter Value Parameter Value | |||||
| Overall dimensions (millimetre) | Height 1720 | Total volume (dm3 or l) 304 | |||
| Width 600 | |||||
| Depth 600 | |||||
| EEI 99 Energy efficiency class | E | ||||
| Airborne acoustical noise emis-sions (dB(A) re 1 pW) | 40 | Airborne acoustical noise emission class | C | ||
| Annual energy consumption (kWh/a) | 213 | Climate class: | temperate, subtropi-cal | ||
| Minimum ambient tempera-ture (oC), for which the refrigerating appliance is suitable | 16 | Maximum ambient tem-perature (oC), for which the refrigerating appliance is suitable | 38 | ||
| Winter setting | No | ||||
| Compartment Parameters: | |||||
| Compartment type | Compartment parameters and values | ||||
| Compartment Vol-ume (dm3 or l) | Recommended temperature setting for opti-mised food storage (oC)These set-tings shall not con-tradict the storage conditions set out in Annex IV, Table 3 | Freezing capacity (kg/24h) | Defrosting type (auto-defrost=A, manual defrost=M) | ||
| Pantry No - - - - | |||||
| Wine storage No - - - - | |||||
| Cellar No - - - - | |||||
| Fresh food Yes 229,0 4 - M | |||||
| Chill No - - - - | |||||
| 0-star or ice-making No - - - - | |||||
| 1-star No - - - - | |||||
| 2-star No - - - - | |||||
| 3-star No - - - - | |||||
| 4-star | Yes | 75,0 | -18 | 3,4 | M |
| 2-star section | No - - - | ||||
| Variable temperature compartment | - | - - - | |||
| For 4-star compartments | |||||
| Fast freeze facility | No | ||||
| Light source parameters: | |||||
| Type of light source | LED | ||||
| Energy efficiency class | G | ||||
| Minimum duration of the guarantee offered by the manufacturer: 36 months | |||||
| Additional information: | |||||
| Weblink to the supplier's website, where the information in point 4 of Annex II of Commission Regulation (EU) 2019/2019 is found: www.orima.pt | |||||
Model placed on the Union market from 01/03/2024

EPREL registration number: 1864447
https://eprel.ec.europa.eu/qr/1864447
Supplier: MARIO MIRANDA DE ALMEIDA, S.A. (Importer)
Website: www.orima.pt
Customer care service:
Name: MARIO MIRANDA ALMEIDA, SA
Website: www.orima.pt
Email: orima@orima.pt
Phone: (+351) 231 467 420
Address:
RUA PADRE BASILIO COSTA MORGADO 23/25
3060-752 CORTICEIRO DE CIMA
Portugal
Model placed on the Union market from 01/03/2024

EPREL registration number: 1864447
https://eprel.ec.europa.eu/qr/1864447
Supplier: MARIO MIRANDA DE ALMEIDA, S.A. (Importer)
Website: www.orima.pt
Customer care service:
Name: MARIO MIRANDA ALMEIDA, SA Website: www.orima.pt
Email: orima@orima.pt Phone: (+351) 231 467 420
Address:
RUA PADRE BASILIO COSTA MORGADO 23/25
3060-752 CORTICEIRO DE CIMA
Portugal
Model placed on the Union market from 01/03/2024

EPREL registration number: 1864447
https://eprel.ec.europa.eu/qr/1864447
Supplier: MARIO MIRANDA DE ALMEIDA, S.A. (Importer)
Website: www.orima.pt
Customer care service:
Name: MARIO MIRANDA ALMEIDA, SA Website: www.orima.pt
Email: orima@orima.pt Phone: (+351) 231 467 420
Address:
RUA PADRE BASILIO COSTA MORGADO 23/25
3060-752 CORTICEIRO DE CIMA
Portugal

- MANUAL DE INSTRUÇÕES
- FRIGORÍFICO
- SERVIÇO DE APOIO AO CLIENTE
- UTILIZAÇÃO DIÁRIA
- Posicionamento
- Dicas úteis
- UTILIZACIÓN DIARIA
- Ubicación
- !
- Reverse Door
- Space Requirement
- Levelling the unit
- Positioning
- Location
- Daily use
- Impact on Food Storage
- FAST FREEZE
- FAST COOL
- INSTRUCTION DE SECURITE
- Accessoires Clayettes mobiles
- Conseils utiles
- ZONE LA PLUS FROIDE DU REFRIGERATEUR
Brand : Orima
Model : ORH-305-W
Category : Refrigerator