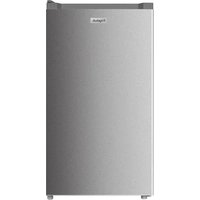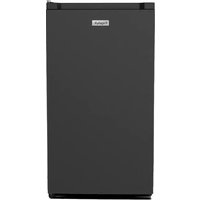
RETT136A - Fridge FRIGELUX - Free user manual and instructions
Find the device manual for free RETT136A FRIGELUX in PDF.


User questions about RETT136A FRIGELUX
0 question about this device. Answer the ones you know or ask your own.
Ask a new question about this device
Download the instructions for your Fridge in PDF format for free! Find your manual RETT136A - FRIGELUX and take your electronic device back in hand. On this page are published all the documents necessary for the use of your device. RETT136A by FRIGELUX.
USER MANUAL RETT136A FRIGELUX
natural_image
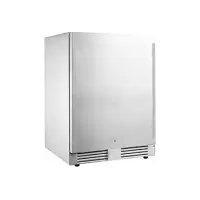
Front view of a white stainless steel enclosure with ventilation grilles and a small logo on the front panel (no visible text or symbols)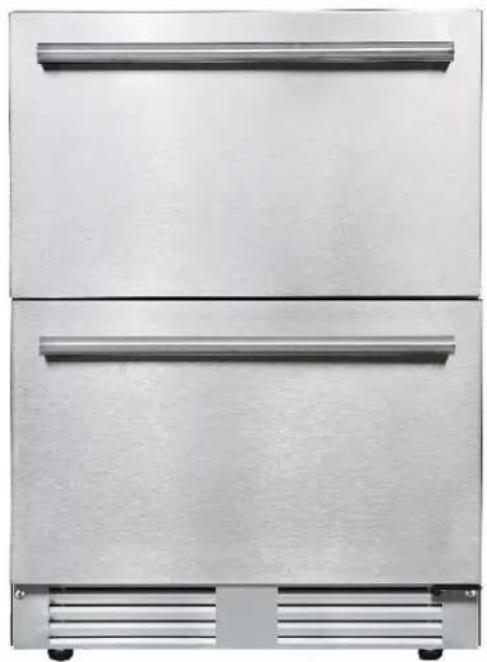
natural_image
Exterior view of a stainless steel double-door refrigerator with two horizontal panels and side grilles (no text or symbols visible)RÉFRIGÉRATEUR / REFRIGERATOR
RETT136A - RE2T136A
FR – MANUEL D'UTILISATION
p.2
GB - USE INSTRUCTIONS
p. 21
CZ – NÁVOD K OBSLUZE
p. 40
SK – NÁVOD NA OBSLUHU
p. 60
Cher client,
text_image
Technical diagram of a rack-mounted server unit with numbered components for identificationtext_image
Technical diagram of an internal device with numbered components for identificationtext_image
Technical diagram showing four different mechanical assembly steps with numbered components and directional arrows indicating motion.Figure 3 ^4
natural_image
Technical line drawing of a mechanical device with internal components and mounting holes (no text or symbols)natural_image
Isometric line drawing of a rectangular frame with internal compartments and a wall, no text or symbols presentFigure 4
natural_image
Technical line drawing of a mechanical assembly with no visible text or symbolstext_image
Drawer Door Handle Screwnatural_image
Close-up of a black circular mechanical component with a grid pattern on its surface (no text or symbols visible)Pour le RE2T136A :
natural_image
Line drawing of an open refrigerator with a door open, showing internal compartments and ventilation slots (no text or symbols)natural_image
Line drawing of an open refrigerator with ventilation grilles and doors open (no text or symbols)flowchart
graph LR
    A["LED Light"] <--> B["Robot Icon"]
    B --> C["LED Light"]
7. GUIDE DE DEPANNAGE
Before placing your new refrigerator into operation, please read these operating instructions carefully. They contain important information for safe use, for installation and for maintenance of the appliance. Please keep these operating instructions for future reference. Pass them on to possible new owners of the appliance.
Notes: which are important for your safety or for the proper functioning of the appliance, are stressed with a warning triangle and or with signal words (Warning! Caution! Important!). Please observe the following carefully.
1. GENERAL SAFETY INSTRUCTIONS
For your safety and correct usage, before installing and first using the appliance, read this user manual carefully, including its hints and warnings. To avoid unnecessary mistakes and accidents, it is important to make sure that all people using the appliance are thoroughly familiar with its operation and safety features. Remember these instructions and be sure that they remain with the appliance if it is moved or sold, so that anyone using it throughout their life will be properly informed on its usage and safety notices. For the safety of life and property, keep the precautions of these user's instructions as the manufacturer is not responsible for damage caused by omission.
Safety of children and other vulnerable people
- This appliance can be used by children aged from 8 years and above, and by people with reduced physical, sensory or mental capabilities or lack of experience and knowledge if they have been given supervision or instruction concerning use of the appliance in a safe way and understand the hazards involved.
- User cleaning and servicing operations should not be carried out by children, unless they are more than 8 years old and are supervised.
- Keep all packaging away from children as there is risk of suffocation.
- Risk of child entrapment. Child entrapment and suffocation are not problems of the past. Junked or abandoned appliances are still dangerous, even if they will “just sit in the garage a few days”.
- If you are discarding the appliance, pull the plug out of the socket, cut the connection cable (as close to the appliance as you can) and remove the door to prevent children playing from suffering an electric shock or from closing themselves inside it.
-
If this appliance, featuring a magnetic door seal, is to replace an older appliance having a spring lock (latch) on the door or lid, be sure to make the spring lock unusable before you discard the old appliance. This will prevent it from becoming a death trap for a child.
-
Keep the appliance and its power cable out of reach of children less than 8 years old.
- Before you throw away your old wine cooler: take off the door. Leave the shelves in place so that children may not easily climb inside.
• Children from 3 to 8 are allowed to load and unload the appliance.
General safety
WARNING — This appliance is intended to be used in the household.
WARNING — Do not store explosive substances such as aerosol cans with a flammable propellant in this appliance.
WARNING — If the supply cord is damaged, it must be replaced by the manufacturer, its service agent or similarly qualified persons in order to avoid a hazard.
WARNING — Keep ventilation openings, in the appliance enclosure or in the built-in structure, clear of obstruction.
WARNING — Do not damage the refrigerant circuit.
WARNING — Do not use electrical appliances inside the compartments of the appliance, unless they are of the type recommended by the manufacturer.
WARNING — The refrigerant and insulation blowing gas are flammable. When disposing of the appliance, do so only at an authorized waste disposal center. Do not expose to flame.
Refrigerant
The refrigerant isobutene (R600a) is contained within the refrigerant circuit of the appliance, a natural gas with a high level of environmental compatibility, which is nevertheless flammable. During transportation and installation of the appliance, ensure that none of the components of the refrigerant circuit become damaged. The refrigerant (R600a) is flammable.
Caution risk of fire
If the refrigerant circuit should be damaged:
- Avoid opening flames and sources of ignition.
- Thoroughly ventilate the room in which the appliance is situated.
It is dangerous to alter the specifications or modify this product in any way. Any damage to the cord may cause a short circuit, fire, and/or electric shock.
Electrical safety
- We cannot be held responsible for any incident caused by poor electrical installation. The power cord must not be lengthened.
■ Make sure that the power plug is not crushed or damaged. A crushed or damaged power plug may overheat and cause a fire.
■ Make sure that you can access the main plug of the appliance. -
Do not pull the main cable.
-
If the power plug socket is loose, do not insert the power plug. There is a risk of electric shock or fire.
- You must not operate the appliance without the interior lighting lamp cover.
- The appliance is only applied with power supply of single-phase alternating current of 220\~240V/50Hz. The device uses a wall socket earthed according to current recommendations.
- If the power cable is damaged, do not proceed with its replacement but contact your after-sales service.
- The socket must be readily accessible but out of reach of children. If unsure, contact your installer.
- When positioning the appliance, ensure that the cord is not trapped or damaged.
Daily use
- WARNING - Refrigerating appliances without 4 stars compartment are not suitable for freezing foodstuffs.
- Do not store flammable gas or liquids in the appliance. There is a risk of an explosion.
- Do not operate any electrical appliances in the appliance (e.g. electric ice cream makers, mixers etc.).
- Never place bottles or jars containing liquids in the refrigerator unless they are filled at 2/3 of their capacity, freezing expands liquids and the container may explode.
- When unplugging always pull the plug from the mains socket. do not pull on the cable.
- Do not place the appliance in direct sunlight.
- Keep burning candles, jumps and other items with naked flames away from the appliance so that do not set the appliance on fire.
This refrigerating appliance is intended to be used as a free standing and built-in appliance. - The appliance is intended for keeping food stuff.
- The appliance is heavy. Care should be taken when moving it.
- If your machine has wheels, remember that they are only used to facilitate small movements. Do not move it on longer journeys.
- Never use the base, drawers, doors etc. to stand on or as supports.
- To avoid items falling and causing injury or damage to the appliance, do not overload the door racks or put too much food in the crisper drawers.
Caution! Care and cleaning
■ Before maintenance, switch off the appliance and disconnect the mains plug from the mains socket.
- Do not clean the appliance with metal objects, steam cleaner, ethereal oils, organic solvents or abrasive cleansers.
- Do not use sharp objects to remove frost from the appliance. Use a plastic scraper.
Installation Important!
For electrical connection, carefully, follow the instructions given in this manual.
- Unpack the appliance and check if there is damage on it. Do not connect the appliance if it is damaged. Report possible damage immediately to the place you bought it. In this case retain packing.
- It is advisable to wait at least 24 hours before connecting the appliance to allow the oil to flow back in the compressor.
- Adequate air circulation should be around the appliance, lacking this leads to overheating. To achieve sufficient ventilation, follow the instructions relevant to installation.
- Wherever possible the back of the product should not be too close to a wall to avoid touching or catching warm parts (compressor, condenser) to prevent the risk of a fire, follow the instructions relevant to installation.
- The appliance must not be located close to radiators or cookers.
■ Make sure that the mains plug is accessible after the installation of the appliance.
ENERGY SAVINGS
- To reduce the power consumption of your device:
- Install it in a suitable location (see "Installing your appliance").
- Keep the doors open for as short a time as possible.
- Do not put hot food into your device.
- Ensure the optimal functioning of your device by periodically cleaning the condenser (see "Routine maintenance of your appliance").
- Ensure the optimal functioning of your device by not allowing too much frost accumulate in the refrigerator (defrost it when the frost thickness exceeds 5-6 mm).
- Periodically check the door seals and make sure they always close effectively. If this is not the case, please contact your after-sales service.
Service
- Any electrical work required to do the servicing of the appliance should be carried out by a qualified electrician or competent person.
- This product must be serviced by an authorized Service Center, and only genuine spare parts must be used.
This appliance is for domestic use only. The manufacturer cannot be held responsible for another use.
Aesthetic and functional spare parts in accordance with REGULATION (EU) 2019/2019
(Annex II, point 3.), are available for after sales service network and end users for a maximum period of 7 or 10 years (List on Annex II, point 3.a.1 et 3.a.2) from the date of end of commercialization on the market of the last unit. The list of spare parts and the procedure for ordering them (professional access / end user access) are available on the following website: www.interfroidservices.fr or by post at the following address: Interfroid Services, 123 Route du Chêne - 72230 ARNAGE.
For other functional spare parts not specified in EU regulation 2019/2019, they are available for a period of 7 years.
The manufacturer's warranty is 1 year for functional parts.
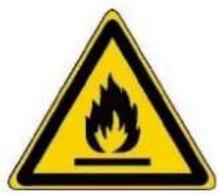
text_image
Warning sign depicting a flame symbol in yellow and black on a white backgroundR600a Safety regulation

Warning: Do not use mechanical devices or other means to accelerate the defrosting process, other than those recommended by the manufacturer.

Warning: Keep ventilation openings in the appliance enclosure or in the structure clear of obstruction.

Do not store explosive substances such as aerosol cans with a flammable propellant in this appliance.

Warning: Do not damage the refrigerant circuit.

Refrigerating units operating on Isobutane (R600a) may not be placed in an area with sources of ignition (e.g. unsealed electrical contacts) or where the refrigerant could gather in the event of a leak. The type of refrigerant is indicated on the cabinet's type plate.

Warning: Do not use electrical appliances inside the compartments of the appliance, unless they are of the type recommended by the manufacturer.
The appliance meets the requirements of all European Directives and their modifications.

text_image
FR + + + +2. PRODUCT DESCRIPTION
RETT136A:
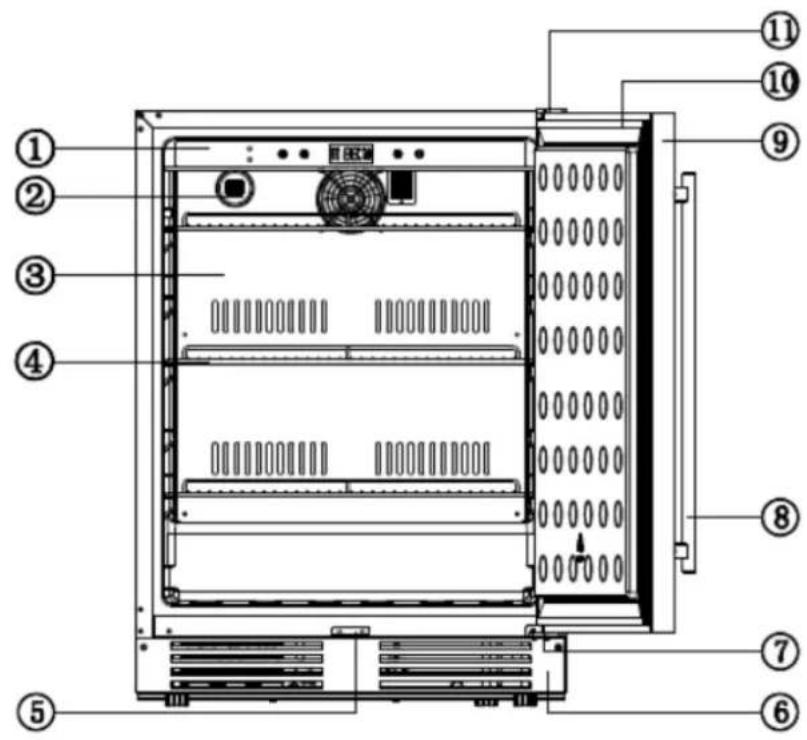
text_image
Technical diagram of an internal rack-mounted server unit with numbered components for identification.| 1 | Control panel |
| 2 | Carbon filter |
| 3 | Air duct plate |
| 4 | Shelf |
| 5 | Lock |
| 6 | Ventilation grille |
| 7 | Lower hinge |
| 8 | Handle |
| 9 | Foaming door |
| 10 | Door gasket |
| 11 | Upper hinge |
RE2T136A:
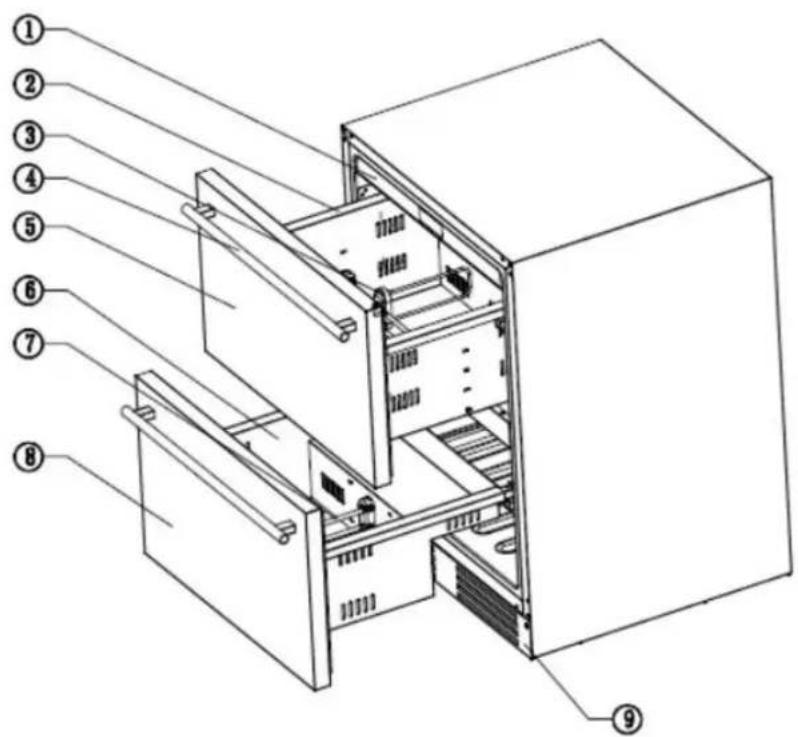
text_image
Technical diagram of an internal device with numbered components for identification| 1 | Control panel |
| 2 | Upper drawer |
| 3 | Upper drawer divider |
| 4 | Upper handle |
| 5 | Upper foaming door |
| 6 | Lower drawer |
| 7 | Lower drawer divider |
| 8 | Lower foaming door |
| 9 | Ventilation grille |
To find out more about your product, consult the online EPREL database.
As defined in Commission Delegated Regulation (EU) 2019/2016, all information relating to this refrigeration appliance is available on the EPREL Base (European Product Database for energy labeling). This database enables you to consult the information and technical documentation of your refrigeration appliance.
You can access the EPREL Database by scanning the QR code on the energy label of your appliance or by going directly to: www.ec.europa.eu and searching the reference of your refrigeration appliance.
Anti-vibration system (depends on the model):
The refrigeration compressor is equipped with special dampers (silent blocks) and the inner space is insulated from the body by a thick layer of polyurethane foam. These characteristics prevent the transmission of vibration to your appliance.
The rating label:
The rating label is located inside, at the bottom of your appliance, on the back wall (depending on the model), or on the left wall (depending on the model).
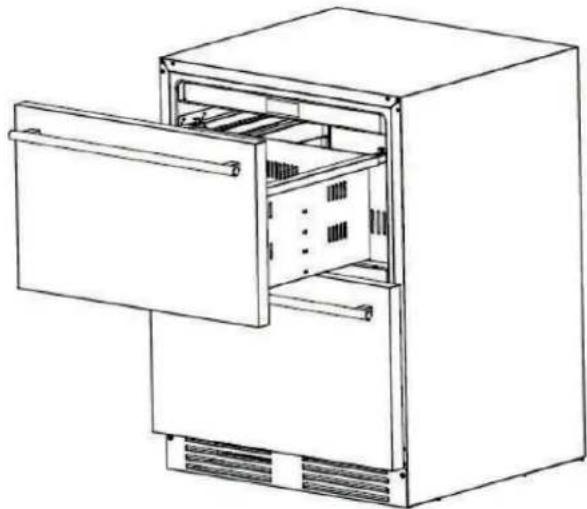
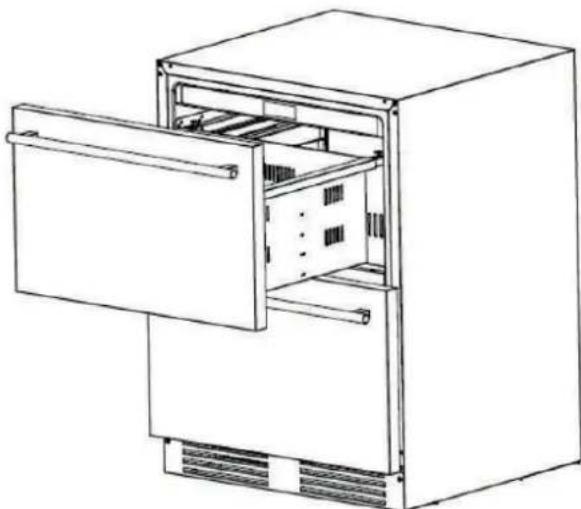
To remove the drawers, refer to chapter "4" which explains how to remove the drawer from model RE2T136A.
3. INSTALLATION INSTRUCTIONS
Location
The climate class is the ambient temperature in which the appliance can be used at its maximum cooling function:
| Climate class | Maximum ambient temperature | Maximum ambient humidity |
| 0 | 20°C | 50% |
| 1 | 16°C | 80% |
| 2 | 22°C | 65% |
| 3 | 25°C | 60% |
| 4 | 30°C | 55% |
| 5 | 40°C | 40% |
| 6 | 27°C | 70% |
| 7 | 35°C | 75% |
| 8 | 24°C | 55% |
Your appliance is of climate class 5 (maximum temperature and humidity are equal to +40°C and 40% ambient humidity). This climatic class is indicated on the rating label located inside your showcase.
Avoid location near a heat source, e.g. cooker, boiler or radiator. Also, avoid direct sunlight in out-buildings or terraces/outside seating areas. If you are placing your appliance in an out-building such as a garage or annex, ensure that it is placed above the damp course, otherwise condensation will occur on the cabinet. Never place the appliance in a recessed wall or into fitted cabinets or furniture when it is working, the metal grid at the back may become hot and the sides warm.
Please follow below diagram for built-in installation:
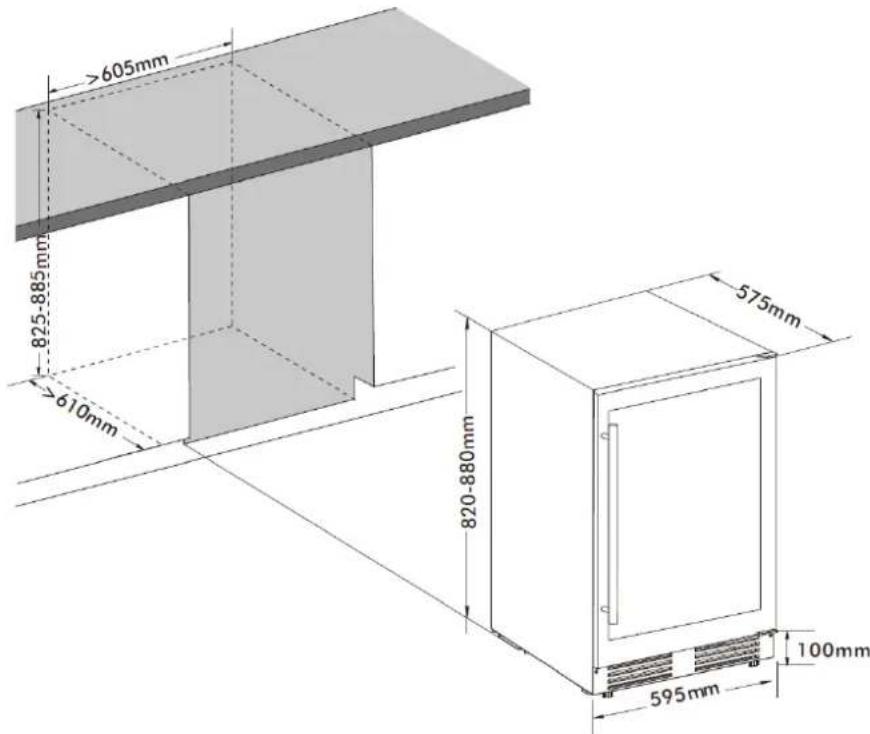
text_image
>605mm 825-885mm 610mm 820-880mm 575mm 595mm 100mmRecommendation combination:
The following combination of drawers, baskets, and shelves is recommended for energy to be used as efficiently as possible by the refrigeration unit.
Leveling the fridge
If the fridge is not level, the door and magnetic seal alignment will be affected and may cause your Fridge to work incorrectly. Once the fridge is placed in its final location, adjust the leveling feet at the front by turning them.
Cleaning before use
Wipe the inside of the fridge with a weak solution of the bicarbonate of soda. Then rinse with warm water using a damp sponge or cloth. Wash the baskets and shelves in warm soapy water and dry completely before putting them in the fridge.
Before plugging in
Check that you have an outlet that is compatible with the plug provided with the refrigerator. If this is not the case, see the section entitled ELECTRICAL INFORMATION.
DO NOT SWITCH ON UNTIL FOUR HOURS AFTER MOVING THE FRIDGE.
The coolant fluid needs time to settle. If the appliance is switched off at any time, wait 30 minutes before switching back on to allow the coolant fluid to settle.
Before filling your fridge
Before storage food in your fridge, turn the fridge on and wait for 24 hours to make sure it is working properly and to allow the fridge to fail to the correct temperature.
4. OPERATING YOUR APPLIANCE
Temperature Control
Attention! This appliance is with infrared sensor, to avoid malfunction of the appliance, do not cover the infrared sensor or place the appliance under direct sunlight or in a bright environment.
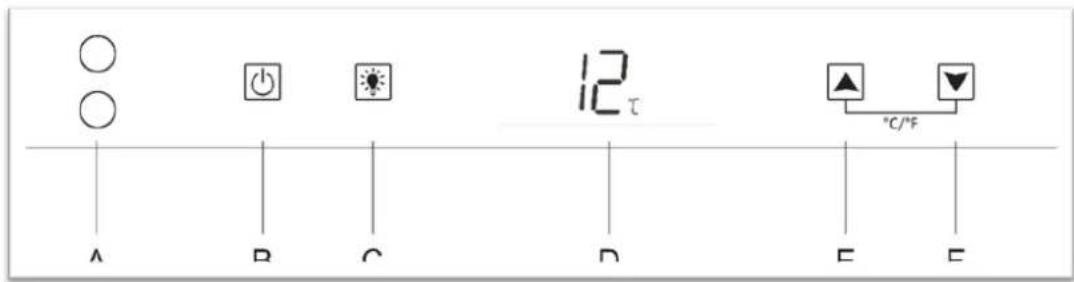
text_image
○ ○ A B C 12℃ ▲ ▼ °C/°F E EA: Infrared sensor
B: Power switch button
C: Light mode selection button
D: Temperature display
E: Temperature adjust button: UP 1°C
F: Temperature adjust button: Down 1°C
- Press power switch button for 3 seconds to turn on or turn off the appliance.
- Light mode selection: Press light mode selection button for 3 seconds to select light mode, there are 2 optional light modes.
1) Light mode 1: When pictogram displays on the LCD screen, the light will be automatically on or off by door open and close.
2) Light mode 2: When pictogram displays on the LCD screen, the light will always turn on.
- Press button to ▲ increase the temperature or to ▼ decrease the temperature.
Important notice: after selecting the desired temperature, the display will continue to show the real temperature inside the appliance, which will vary gradually until it reaches the selected temperature.
- Press temperature adjust buttons together for 3 seconds to change the temperature display from Celsius to Fahrenheit.
Alarm system:
1) Door open alarm:

If the door is left open for over 5 minutes, door open alarm will activate. The alarm pictogram flashes display on the LCD screen with beeping warning sound, press any key to stop beeping warning sound. The warning will automatically stop if the door is properly closed.
2) High temperature alarm:

If the inside temperature is over 25^ C for over 6 hours, high temperature alarm will activate, the pictogram will flash on the screen with beeping warning sound, press any key to stop beeping warning sound. This alarm will stop if the temperature returns to normal. In case the warning continues, contact your after-sales service.
3) Low temperature alarm:

If the inside temperature is below -2^ for over 3 hours, low temperature alarm will activate, the pictogram will flash on the screen with beeping warning sound, press any key to stop beeping warning sound. This alarm will stop if the temperature returns to normal. In case the warning continues, contact your after-sales service.
NOTE:
- If the unit is unplugged, lost power, or turned off; you must wait 3 to 5 minutes before restarting the unit. If you attempt to restart before this time delay, the refrigerator will not start.
- If you choose to change the thermostat setting, adjust thermostat control by one numerical increment at a time. Allow several hours for temperature to stabilize between adjustments.
Do not leave the door open for too long so that the indoor temperature does not rise too much.
Drawer Divider Installation for model RE2T136A:
In order to make better use of the drawer to store different drinks or fruits, RE2T136A model is equipped with 2 sets of drawer dividers.
1) Please find the divider accessories in the accessory plastic bag, the details of the accessories are as follows:
| Divider permanent seat (Left) | 2pcs |
| Divider permanent seat (Right) | 2pcs |
| Movable divider (2 rotators, 2 U-shaped tubes) | 2sets |
| Upper drawer S.S. pipe | 2pcs |
| Lower drawer S.S. pipe | 2pcs |
2) Please follow the steps in the figure to install:
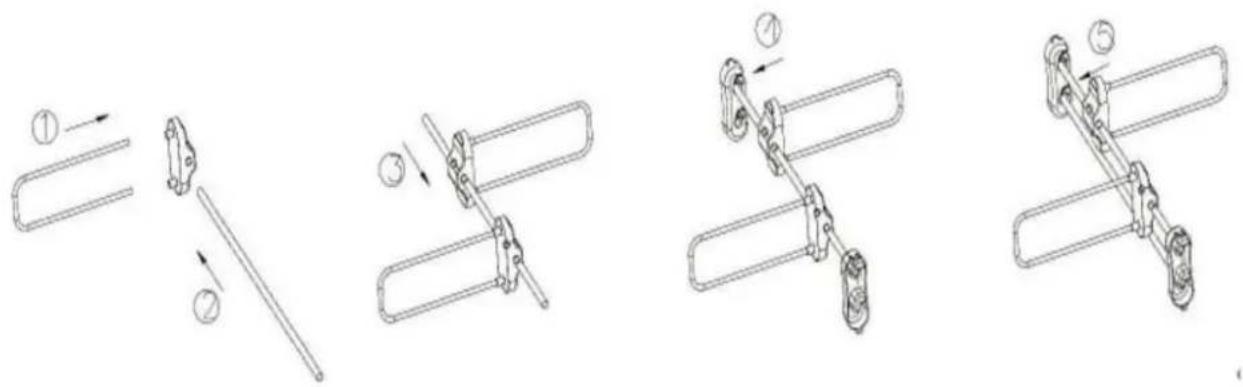
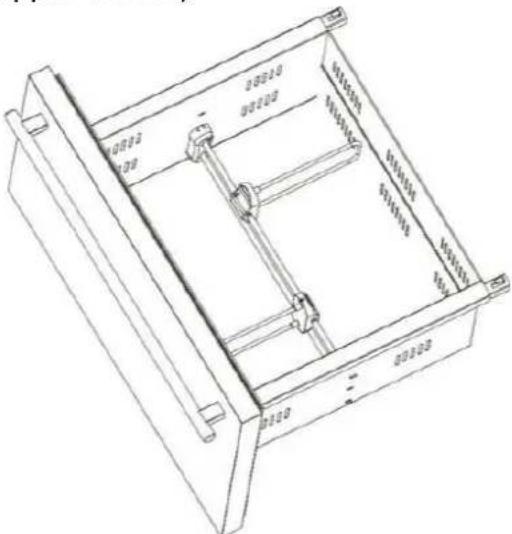
Étape 1: To install 1pc right and 1pc left divider permanent seat on the two side on upper drawer (figure 1) and lower drawer (figure 2)
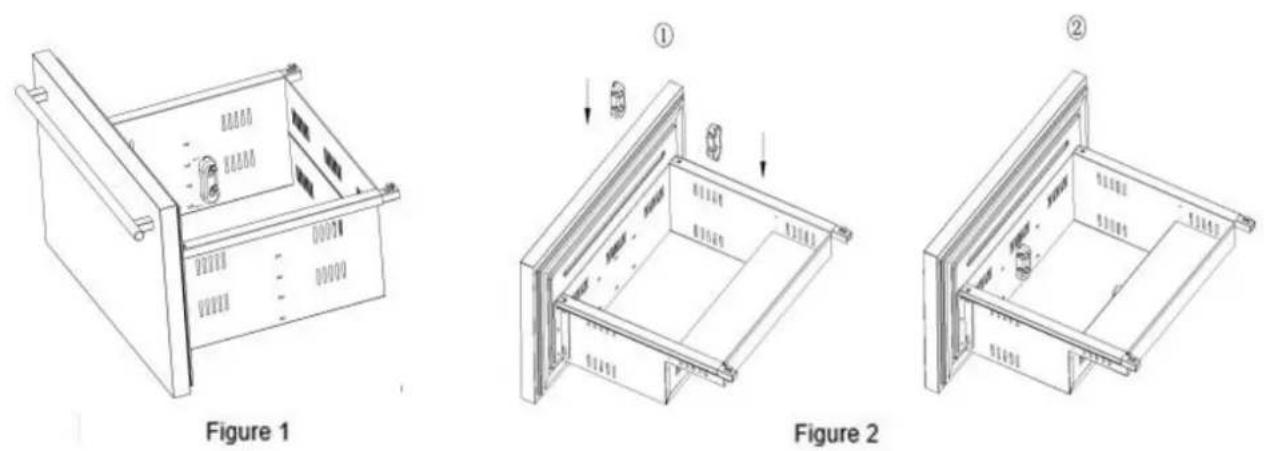
Étape 2: To assemble the movable divider, the parts that need to be prepared are 2pcs upper drawer pipe, 2 U-shaped tubes and 2 rotators, please following below (figure 3).
text_image
Technical diagram showing four different mechanical assembly steps with numbered annotations indicating sequence or components.Figure 3
Étape 3: Complete assembly (Upper drawer)
natural_image
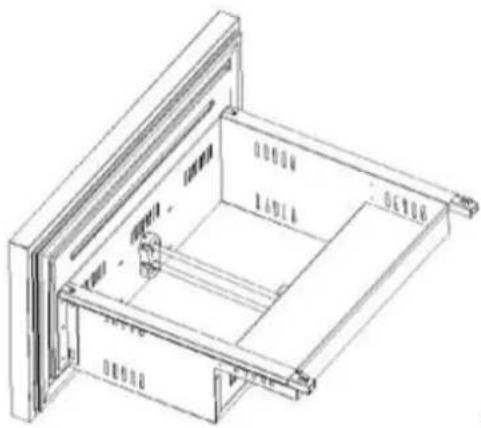
Technical line drawing of a mechanical device with internal components and mounting brackets (no text or symbols)Étape 4: To assemble the divider on lower drawer, please see below (figure 4).
natural_image
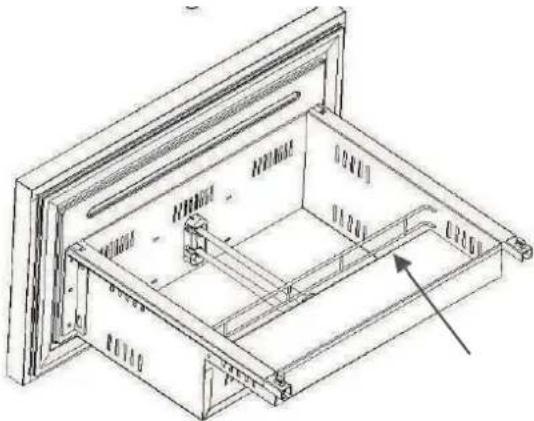
Isometric line drawing of a rectangular room with labeled sections (no text or symbols)Figure 4
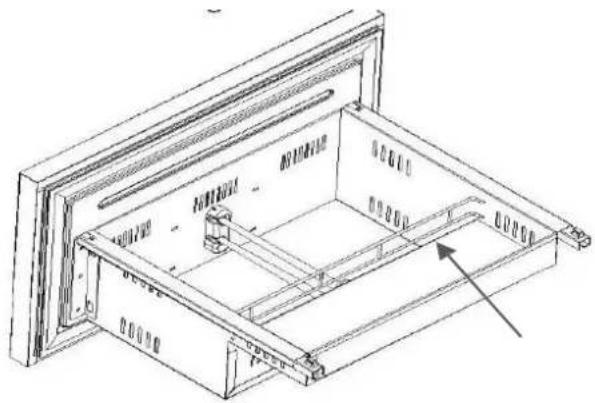
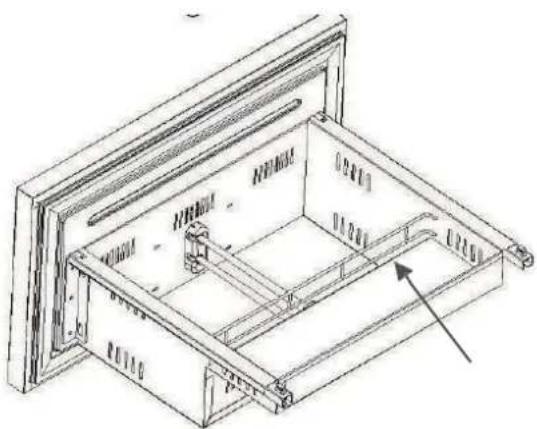
Étape 5: Install S.S. tube to prevent bottles placed in the lower drawer from falling during opening and closing the door.
natural_image
Technical line drawing of a mechanical housing or enclosure with internal components and mounting brackets (no text or symbols)Handle installation (depending on the model):
There is a handle in the accessory bag, please follow below instructions to install handle.
- Remove the door gasket.
- Install the handle with the screws provided. DO NOT overtighten as this will cause damage to the stainless-steel door surface.
- Replace the door gasket.
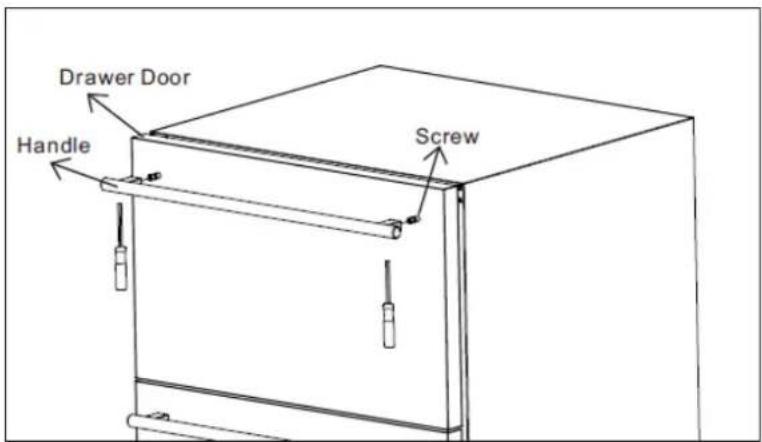
text_image
Drawer Door Handle ScrewCharcoal filter (depending on the model):
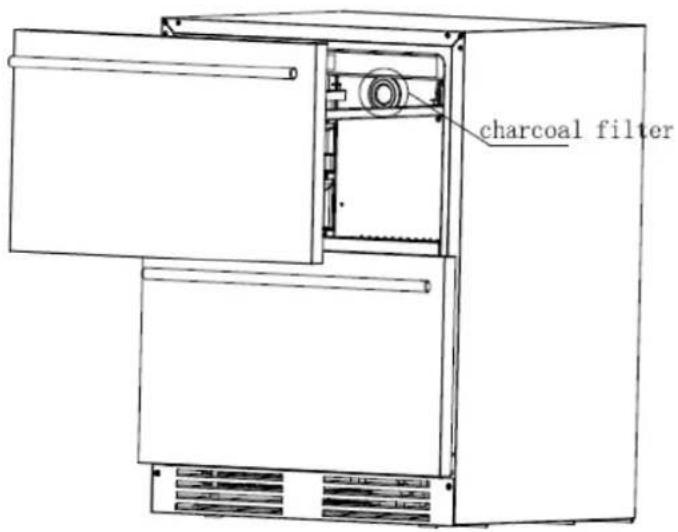
This appliance is equipped with a charcoal filter to freshen the air inside, it is a black washer in the top left at the back of appliance, it should be replaced annually and can be bought from the manufacturer.
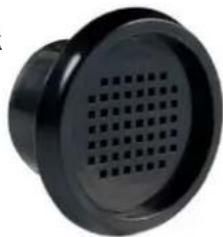
natural_image
Circular black plastic component with a grid pattern on its surface (no text or symbols visible)To remove it, turn the charcoal filter to set free pins and pull it directly from the inside of the appliance towards you.
For RE2T136A:
- Open the upper drawer
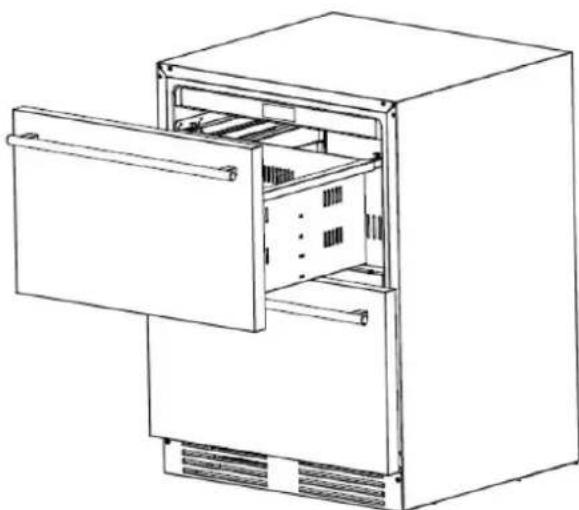
natural_image
Line drawing of an open refrigerator with a door open, showing internal compartments and ventilation slots (no text or symbols)- Grab the sides of the drawer and lift the drawer up at 45 degrees, and then remove out the drawer
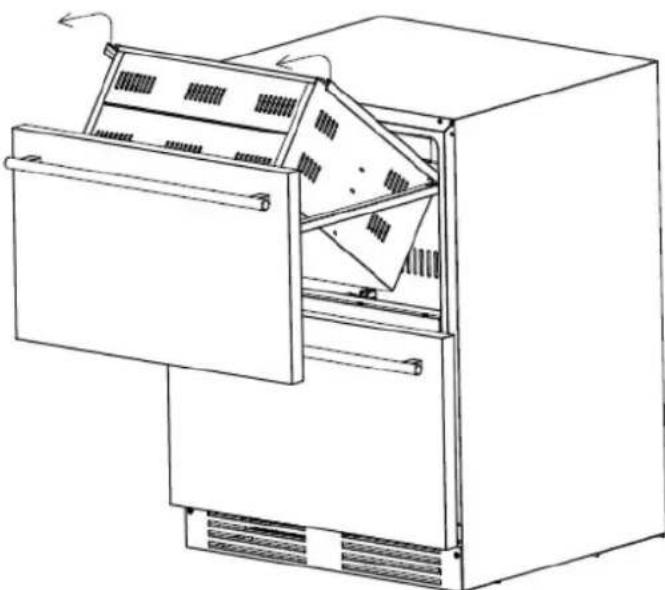
natural_image
Line drawing of an open refrigerator with ventilation grilles and a door, showing internal compartments and airflow direction (no text or symbols)- To remove it, turn the charcoal filter to set free pins and pull it directly from the inside of the cellar towards you
text_image
charcoal filterTo access the nameplate (rating label), follow the same steps to remove the bottom drawer.
5. FOOD CONSERVATION
PREPARING FOOD FOR THE REFRIGERATOR
Carefully wrap fresh foods: they will then keep their flavor, color, humidity content and freshness. You also avoid the taste of some foods contaminating the taste of others. Only vegetables, fruit and salad vegetables can be stored in the vegetable compartment without being packed. Let hot dishes and drinks cool down outside the appliance. Remove the cardboard packs from around yoghurt pots. Check the consume-by dates on the products you have bought. You should not exceed these.
ARRANGING FOOD IN YOUR REFRIGERATOR
The temperature inside your refrigerator is not uniform. Some areas are colder than others and you must store your food in the appropriate areas according to their type to ensure that it can be kept safely. Leave space between the food items to allow the air to circulate freely and avoid different products contaminating each other.
Do not put packages and food in contact with the wall at the back of the appliance, this is a particularly cold and damp area of the appliance and water droplets, and frost condense there as part of your refrigerator's normal operation.
The coldest area, indicated by the logo, is designed for delicate, sensitive and highly perishable food: meat, poultry, fish, cooked meats, prepared dishes, ready-made salads, egg or cream-based dishes and pastries, fresh pasta, pastry, pizza/quiches, fresh produce and raw milk cheese, ready- to-use vegetables sold in plastic bags and, more generally, any fresh product whose consume-by date is linked to its storage at a temperature of +4°C or below.
Food preservation and storage.
The storage of foodstuffs must comply with the regulatory conservation temperatures established by the National Agency for Food, Environmental and Occupational Health Safety (ANSES). Failure to comply with these storage temperatures involves risks of poisoning and food waste.
| Refrigerator compartments | Type of food |
| Door or balconies of fridge compartment | ·Foods with natural preservatives, such as jams,juices, drinks, condiments.·Do not store perishable foods. |
| Crisper drawer (salad drawer) | ·Fruits, herbs and vegetables should be placed separately in the crisper bin.·Do not store bananas, onions, potatoes, garlic in the refrigerator. |
| Fridge shelf – middle | ·Dairy products, eggs |
| Fridge shelf – top | ·Foods that do not need cooking, such as ready-to-eat foods, deli meats, leftovers. |
Under the recommended setting, the best shelf life is no more than 3 days in the refrigerator and 3 months in the freezer (4 stars); The better storage time may reduce other parameters.
| Storage conditions | ||||
| Compartment | Type of compartment | T°C mini | T°C maxi | T°C consigne |
| Compartment for non-frozen food | Compartment for fresh food | 0 | 8 | 4 |
| Compartment for highly perishable food | Compartment for highly perishable food | -3 | 3 | 2 |
| No star and ice making | s.o. | 0 | 0 | |
| Compartment for frozen food | 1 star | s.o. | -6 | -6 |
| 2 stars | s.o. | -12 | -12 | |
| 3 stars | s.o. | -18 | -18 | |
| 4 stars | s.o. | -18 | -18 | |
Failure to comply with these storage temperatures involves risks of poisoning and food waste. For optimal conservation of foodstuffs, it is recommended to adjust the temperatures of the compartments as below:
| Compartments TYPE | Target storage temp.[°C] | Appropriate food | |
| 1 | Fridge | +2≤+8 | Eggs, cooked food, packaged food, fruits and vegetables, dairy products, cakes, drinks and other foods are not suitable for freezing. |
| 2 | Freezer *** | ≤-18 | Seafood (fish, shrimp, shellfish), freshwater aquatic products and meat products (recommended for 3 months, the longer the storage time, the worse the taste and nutrition), suitable for frozen fresh food. |
| 3 | Freezer ** | ≤-18 | Seafood (fish, shrimp, shellfish), freshwater aquatic products and meat products (recommended for 3 months, the longer the storage time, the worse the taste and nutrition), are not suitable for frozen fresh food. |
| 4 | Freezer ** | ≤-12 | Seafood (fish, shrimp, shellfish), freshwater aquatic products and meat products (recommended for 2 months, the longer the storage time, the worse the taste and nutrition), are not suitable for frozen fresh food |
| 5 | Freezer * | ≤-6 | Seafood (fish, shrimp, shellfish), freshwater aquatic products and meat products (recommended for 1 months, the longer the storage time, the worse the taste and nutrition), are not suitable for frozen fresh food. |
| 6 | 0-star compartment | -6≤0 | Fresh pork, beef, fish, chicken, some packaged processed foods, etc. (Recommended to eat within the same day, preferably no more than 3 days). Partially encapsulated processed foods (non-freezable foods) |
| 7 | Chill | 2≤+3 | Fresh/frozen pork, beef, chicken, freshwater aquatic products, etc.(7 days below 0°C and above 0°C is recommended for consumption within that day, preferably no more than 2 days). Seafood (less than 0 for 15 days, it is not recommended to store above 0°C) |
| 8 | Fresh Food | 0≤+4 | Fresh pork, beef, fish, chicken, cooked food, etc. (Recommended to eat within the same day, preferably no more than 3 days) |
| 9 | Wine | +5≤+20 | red wine,white wine,sparkling wine etc. |
6. CARE AND MAINTENANCE
Defrosting
The defrost of the fridge part is automatic.
When the refrigerator is in operation, beads of condensation or frost will form on the back wall. This phenomenon is normal. It is not necessary to wipe off any condensation or frost. The back wall automatically defrosts. The condensed water flows into the condensate channel and is brought to the defrost pan located above the compressor, where it evaporates.
Note: Keep the condensate channel and the drain hole clean, so that the condensed water can drain out.
Cleaning inside the fridge
After defrosting you should clean the fridge internally with a weak solution of bicarbonate of soda. Then rinse with warm water using a damp sponge or cloth and wipe dry. Wash the baskets in warm soapy water and ensure they are completely dry before replacing in the Fridge. Condensation will form on the back wall of the Fridge; however, it will normally run down the back wall and into the drain hole behind the salad bin.
Cleaning outside the fridge
Use standard non-abrasive detergent diluted in warm water to clean the fridge exterior.
The grille of the condenser at the back of the Fridge and the adjacent components can be cleaned by using a soft brush.
Do not use harsh cleaners, scouring pads or solvents to clean any part of the fridge
If you're going on vacation
If your appliance is not to be used for several months, remove all food, turn off and unplug the appliance from the outlet. Clean and dry the inside and outside of the appliance thoroughly. Also leave the door open, block it if necessary, to prevent condensation, odors, mold.
When the appliance is switched on for the first time, there may be a residual odor. In that case, run the appliance empty for a few hours at the coldest possible temperature. The cold will kill any odors.
Moving the unit
- Moving the appliance
First, disconnect your appliance.
Remove all bottles and secure any loose parts.
To avoid damaging the levelling screws on the feet, screw them tightly into the base.
Move the appliance in an upright position (preferably) or note the direction in which the appliance may be laid down by looking at its packaging.
- Location
Do not place your refrigerator near a heat source, for example. Stove, boiler or radiator. Also, avoid direct sunlight.
- Refrigerator upgrade
Make sure the refrigerator is level. Use the rotatable adjustable feet at the front. If the refrigerator is not level, the doors and magnetic sealing alignments will be affected and may cause malfunctions.
- Do not turn on the refrigerator for 4 hours
After any movement, it must not be connected for 4 hours. This delay allows the coolant to be adjusted.
- Installation
Let your device breathe. Heat is released from the walls, so it is important to leave a circulation of air around your device.
Energy saving tips
- The refrigerator should be located in the coolest area of the room, away from heat producing appliances or heating ducts, and out of the direct sunlight.
- Let hot foods cool to room temperature before placing them in the refrigerator. Overloading the refrigerator forces the compressor to run longer. Foods that freeze too slowly may lose quality, or spoil.
-
Be sure to wrap food properly, and wipe containers dry before placing them in the refrigerator. This cuts down on frost build-up inside the refrigerator.
-
Refrigerator storage bin should not be lined with aluminum foil, wax paper, or paper toweling. Liners interfere with cold air circulation, making the refrigerator less efficient.
- Organize and label food to reduce door openings and extended searches. Remove as many items as needed at one time and close the door as soon as possible.
Turn off your appliance
If the unit is not likely to operate for a long period of time:
- Remove all food from your appliance from the refrigerator.
- Switch off the appliance by setting the thermostat to position 0.
- Unplug the appliance.
- Clean it thoroughly.
- Keep the door open to prevent odors from rising.
Changing the light bulb
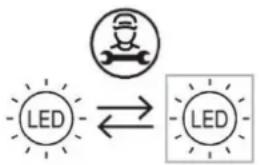
This appliance consists of light-emitting diodes (LEDs). This type of diode cannot be changed by the consumer. The lifetime of these LEDs is normally sufficient for no change to be made. If however, and despite all the care taken during the manufacture of your appliance, the LEDs were defective, please contact your after-sales service for any intervention.
flowchart
graph LR
    A["LED"] <--> B["LED"]
7. TROUBLESHOOTING GUIDE
You can solve many common refrigerator problems easily, saving you the cost of a possible service call. Try the suggestions below to see if you can solve the problem before calling for service.
| Problèmes | Solutions |
| Appliance is not running | √ Appliance is not plugged in√ Appliance is not turned on√ Check if voltage of the installation√ Check the circuit breaker or if fuse has blown |
| Appliance is not cold enough | √ Check the temperature control setting√ Check if ambient temperature is beyond appliance operating temperature√ The door is opened too frequently√ The door is not closed properly√ The door is not sealing properly√ Insufficient free space around the appliance |
| The compressor starts and stops frequently | √ The external temperature is high.√ A large quantity of bottles has been put into the cellar.√ The appliance is opened frequently.√ The door is not properly closed.√ The cellar has not been correctly set. |
| LED lights do not operate | √ The appliance is not plugged in√ The fuse has blown√ LED lights are not broken√ The light switch is off |
| Vibration | √ Check and ensure that the appliance is level. |
| The appliance makes a lot of noise | √ A noise resembling circulating water is produced by the coolant gas and this is normal.√ At the end of a cooling cycle, you can hear the noise of water circulating.√ Expansion and contraction of the internal walls may cause a cracking sound.√ The appliance is not level√ Check if fan is in good condition |
| The door does not close properly | √ The appliance is not level.√ The door seal is dirty or damaged.√ The shelves are not positioned correctly.√ A part of the contents is preventing the door from closing. |
| LED display is not working properly | √ Control panel failed√ Power PCB has broken√ The appliance is not plugged in√ The probe is not working. |
| Error code | Description |
| L1 | Open circuit of temperature probe (Temperature sensor I) |
| H1 | Short circuit of temperature probe (Temperature sensor I) |
| H2 | Open circuit of temperature probe (Temperature sensor II) |
| L2 | Short circuit of temperature probe (Temperature sensor II) |
| F1 | Open circuit of fan |
| ⚠️ H | High temperature alarm: When temperature is over 25°C for over 6 hours |
| ⚠️ L | Low temperature alarm: When the temperature is below 2°C for over 3 hours |
8. ENVIRONMENT
This appliance is marked according to the European directive 2019/290/CE on Waste Electrical and Electronic Equipment (WEEE). By ensuring this product is disposed of correctly, you will help prevent potential negative consequences for the environment and human health, which could otherwise be caused by inappropriate waste handling of this product.
The symbol on the product, or on the documents accompanying the product, the Crossed-Out Wheelie Bin, indicates that this appliance may not be treated as household waste. Instead, it shall be handed over to the applicable collection point for the recycling of electrical and electronic equipment, or, if you are buying an equivalent product, to the retailer of the new product.
The user is responsible for taking the appliance to the appropriate collection center at the end of its useful life. Selective and appropriate collection for the recycling of no longer used appliances and their disposal and destruction in an environmentally friendly manner helps to prevent potential negative effects on the environment and health and encourages the recycling of materials used to make the product.
For more detailed information about the treatment, recovery and recycling of this product, please contact your local authority, your household waste disposal service or the retailer where you purchased the product.
9. WARNING
As we continuously improve our products for the benefit of our customers, we reserve the right to modify technical characteristics without notice.
Warranties for FRIGELUX brand products are offered exclusively by selected retailers. No part of these instructions may be considered as a supplementary guarantee.
FRIO ENTREPRISE cannot be held liable for errors or technical or editorial omissions in this document.
Non-binding document.
Your Economic Operator Contact is:
FRIO ENTREPRISE
143 Boulevard Pierre Lefaucheux
72230 ARNAGE
text_image
Technical diagram of a rack-mounted server unit with numbered components for identificationtext_image
Exploded view diagram of a computer case with numbered components for identificationtext_image
Technical diagram showing three views of a rack cabinet with labeled internal compartments and mounting points, including numbered annotations.Obrázok 1 Obrázok 2
text_image
Technical diagram showing four different mechanical assembly steps with labeled components and directional arrowsObrázok 3
natural_image
Technical line drawing of a mechanical device with internal components and mounting brackets (no text or symbols)natural_image
Isometric line drawing of a mechanical or architectural component with no visible text, numbers, or symbols.Krok 5 : Nainštalujte tyč, aby ste zabránili vypadnutiu fliaš zo spodnej zásuvky pri otváraní a zatváraní dvierok.
natural_image
Technical line drawing of a mechanical housing or enclosure with internal components and mounting brackets (no text or symbols)natural_image
Close-up of a black circular mechanical component with grid pattern (no visible text or symbols)Pro model RE2T136A :
- Otvorte horné dvere.
natural_image
Line drawing of an open refrigerator with doors open, showing internal compartments and ventilation slots (no text or labels)natural_image
Line drawing of an open refrigerator with ventilation grilles and cooling fins (no text or symbols)natural_image
Technical line drawing of a refrigerator interior showing door, front panel, and side panel (no text or labels)text_image
Technical diagram of a rack-mounted server unit with numbered components for identificationtext_image
Technical diagram of an internal storage unit with numbered components for identificationtext_image
Technical diagram showing three views of a rack cabinet with labeled internal compartments and mounting points.Obrázok 1 Obrázok 2
text_image
Technical diagram showing four different mechanical assembly steps with numbered annotations indicating sequence or components.Obrázok 3
natural_image
Technical line drawing of a mechanical device with internal components and mounting brackets (no text or symbols)natural_image
Isometric line drawing of a mechanical or architectural component with no visible text, numbers, or symbols.Krok 5 : Nainštalujte tyč, aby ste zabránili vypadnutiu fliaš zo spodnej zásuvky pri otváraní a zatváraní dvierok.
natural_image
Technical line drawing of a mechanical assembly with no visible text or symbolsnatural_image
Close-up of a black circular mechanical component with a grid pattern (no visible text or symbols)Ak ho choete vybrat', otočte filter s aktivnym uhlím, aby ste uvol'nili kolíky, a vytiahnite ho zvnútra spotrebiča priamo k sebe.
Pro model RE2T136A :
- Otvorte horné dvere.