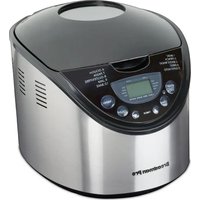
TR875 - Bread maker Breadman - Free user manual and instructions
Find the device manual for free TR875 Breadman in PDF.


User questions about TR875 Breadman
0 question about this device. Answer the ones you know or ask your own.
Ask a new question about this device
Download the instructions for your Bread maker in PDF format for free! Find your manual TR875 - Breadman and take your electronic device back in hand. On this page are published all the documents necessary for the use of your device. TR875 by Breadman.
USER MANUAL TR875 Breadman
Breadman® Bring Home the Bakery™
AUTOMATIC BREAD MAKER MACHINE À PAIN AUTOMATIQUE
RECIPES INCLUDED / RECETTES COMPRISES

text_image
1. BASIC OF BASE 2. FRANCH FRANÇAIS 3. WHOLE WHEAT ILE ENTER 4. SWEET PANS BUCRE 5. SUPER RAPID SUPER RAPIDE 8:17 8:17 10:00 10:00 10:00 10:00 8. DOUGH PATE 7. PASTA PATES 8. GLUTEN FREE SANS GLUTEN 9. JAM CONFITURE 10. BAKE CUSSON MENU BreadmanModel/Modèle:
TR875
IMPORTANT SAFEGUARDS
When using electrical appliances, basic safety precautions should always be followed including the following:
Read all instructions.
☐ Do not touch hot surfaces. Use handles or knobs.
☐ To protect against electrical shock do not immerse cord, plugs, or appliance in water or other liquid.
☐ Close supervision is necessary when any appliance is used by or near children.
☐ Unplug from outlet when not in use and before cleaning. Allow to cool before putting on or taking off parts.
☐ Do not operate any appliance with a damaged cord or plug, or after the appliance malfunctions or has been damaged in any manner. Contact Consumer Services for examination, repair or electrical or mechanical adjustment. Or, call the appropriate toll-free number on the cover of this manual.
☐ The use of accessory attachments not recommended by the appliance manufacturer may cause fire, electric shock or injury.
Do not use outdoors.
☐ Do not let cord hang over edge of table or counter, or touch hot surfaces, including the stove.
☐ Do not place on or near a hot gas or electric burner, or in a heated oven.
☐ Extreme caution must be used when moving an appliance containing hot oil or other hot liquids.
☐ To disconnect, press and hold the STOP (0) button for several seconds; remove plug from wall outlet.
☐ Do not use appliance for other than intended use.
☐ Avoid contacting moving parts.
SAVE THESE INSTRUCTIONS
This product is for household use only.
Customer Care Line:
USA/Canada 1-800-231-9786
Accessories/Parts
(USA / Canada) 1-800-738-0245
For online customer service and to register your product, go to
www.prodprotect.com/applica

text_image
Warning symbol with exclamation mark inside triangle, commonly used for safety alertsCaution, hot surfaces: This appliance generates heat and escaping steam during use. Proper precautions must be taken to prevent the risk of burns, fires or other injury to persons or damage to property.
POLARIZED PLUG (120V Models Only)
This appliance has a polarized plug (one blade is wider than the other). To reduce the risk of electric shock, this plug is intended to fit into a polarized outlet only one way. If the plug does not fit fully into the outlet, reverse the plug. If it still does not fit, contact a qualified electrician. Do not attempt to modify the plug in any way.
TAMPER-RESISTANT SCREW
Warning: This appliance is equipped with a tamper-resistant screw to prevent removal of the outer cover. To reduce the risk of fire or electric shock, do not attempt to remove the outer cover. There are no user-serviceable parts inside. Repair should be done only by authorized service personnel.
ELECTRICAL CORD
a) A short power-supply cord (or detachable power-supply cord) is to be provided to reduce the risk resulting from becoming entangled in or tripping over a longer cord.
b) Longer detachable power-supply cords or extension cords are available and may be used if care is exercised in their use.
c) If a long detachable power-supply cord or extension cord is used,
1) The marked electrical rating of the detachable power-supply cord or extension cord should be at least as great as the electrical rating of the appliance,
2) If the appliance is of the grounded type, the extension cord should be a grounding-type 3-wire cord, and
3) The longer cord should be arranged so that it will not drape over the counter top or tabletop where it can be pulled on by children or tripped over.
Note: If the power supply cord is damaged, it should be replaced by qualified personnel; in Latin America, by an authorized service center.
POWER OUTAGE
7-Minute Power Failure Back-Up
Your Professional Bread Maker has a 7-minute power failure back-up feature. If the electricity goes out, the memory will store your cycle selection for up to 7 minutes. If the power comes back on within this time, bread making will resume where it left off.
If the bread maker loses power for more than 7 minutes and you are using any dairy products, perishables or meat in your bread, you should discard the contents of the recipe and start again with new fresh ingredients due to health and sanitary considerations. For nonperishable recipes you may try starting the bread maker at the beginning of the cycle again. However, this may not always produce an acceptable loaf of bread.
If you are not sure when the outage occurred, remove the dough and discard.
PRODUCT MAY VARY SLIGHTLY FROM ILLUSTRATIONS
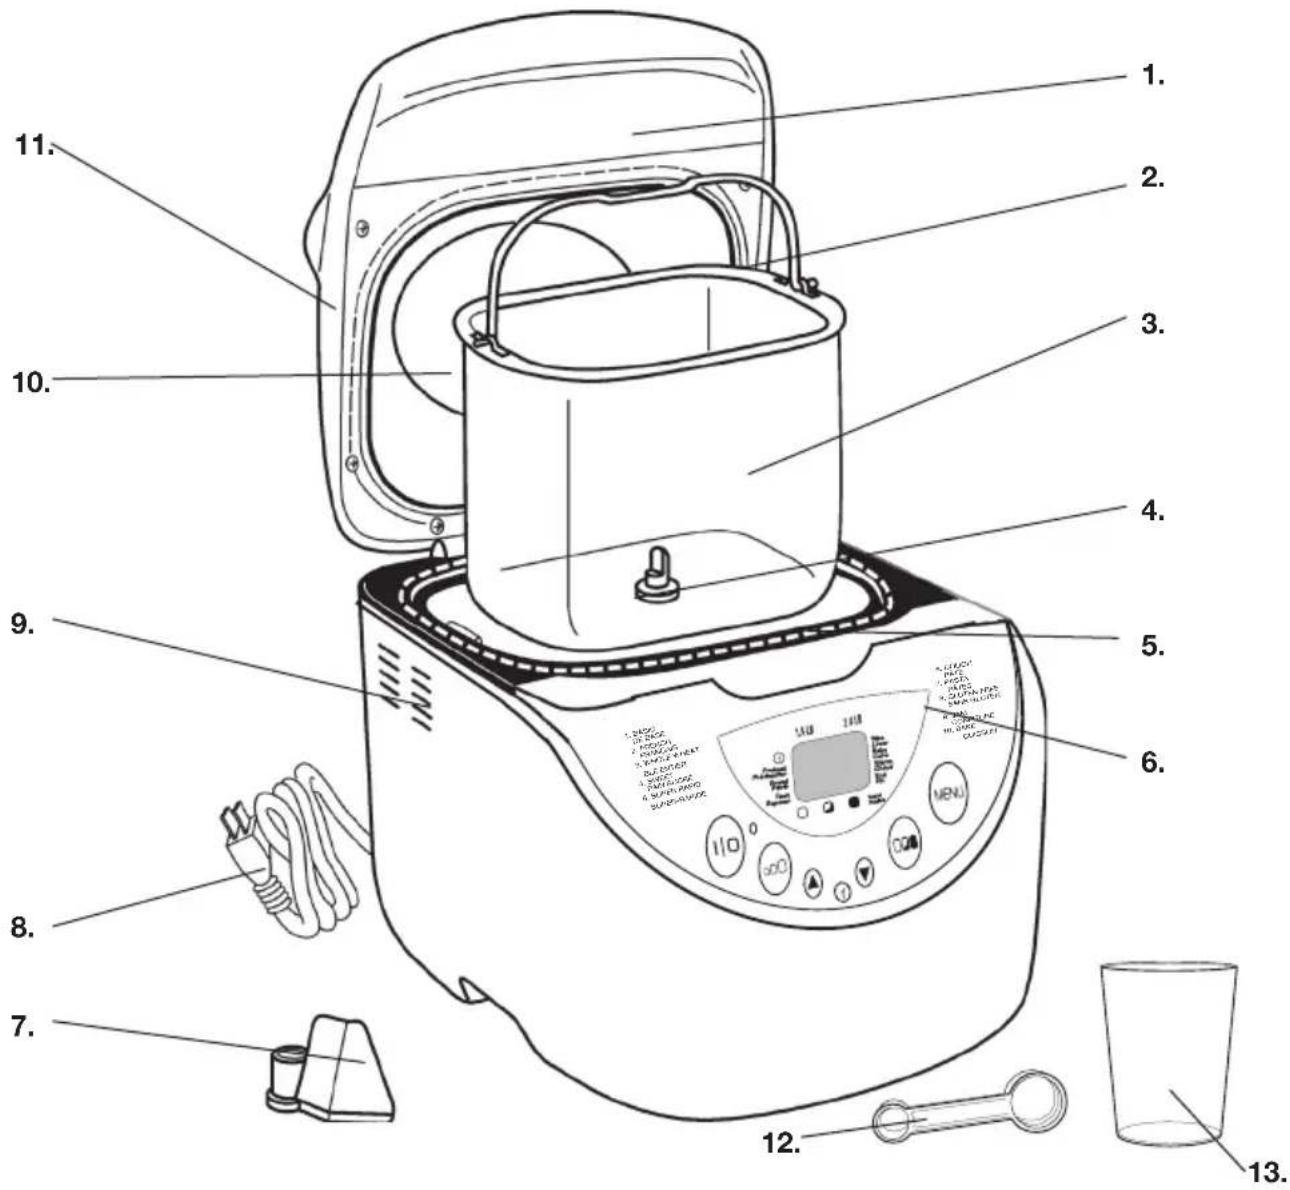
text_image
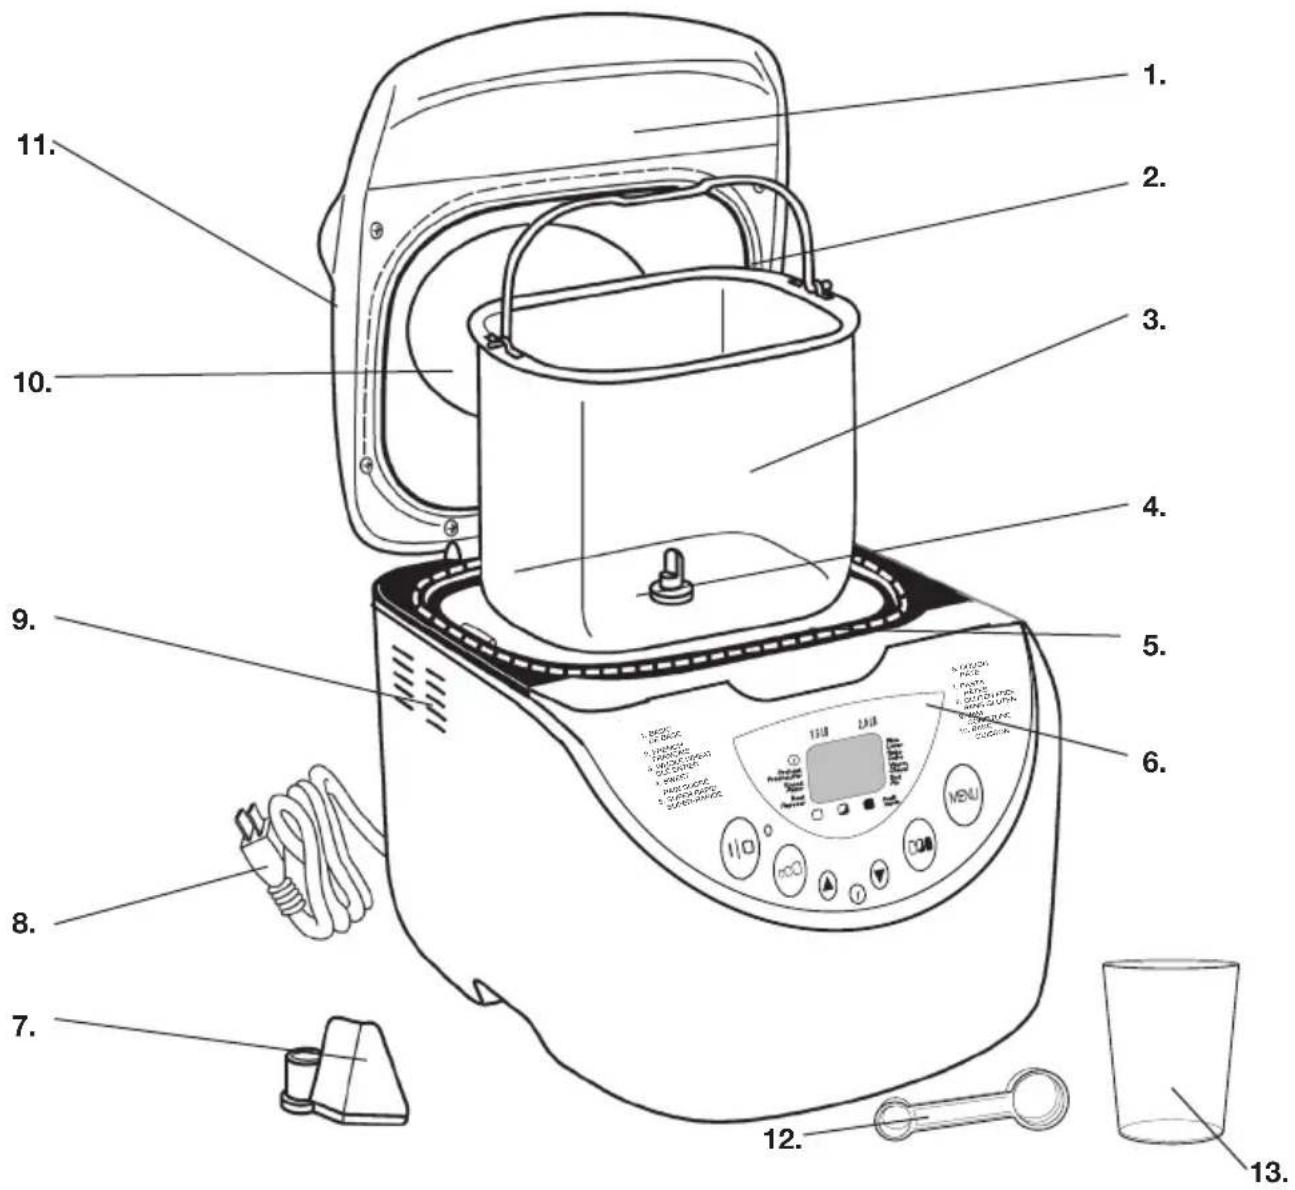
Labeled diagram of a blender with numbered parts for identification and assembly reference.- Removable Lid (P/N 22826)
- Bread Pan Handle
- Bread Pan (P/N 22822)
- Drive Shaft (inside)
- Baking Chamber
- Control Panel
-
Kneading Paddle (P/N 22823)
-
Power Supply Cord with Polarized Plug
- Air Exhaust
- Viewing Window
- Lid Handle
- Measuring Spoon (P/N 22824)
- Measuring Cup (P/N 22825)
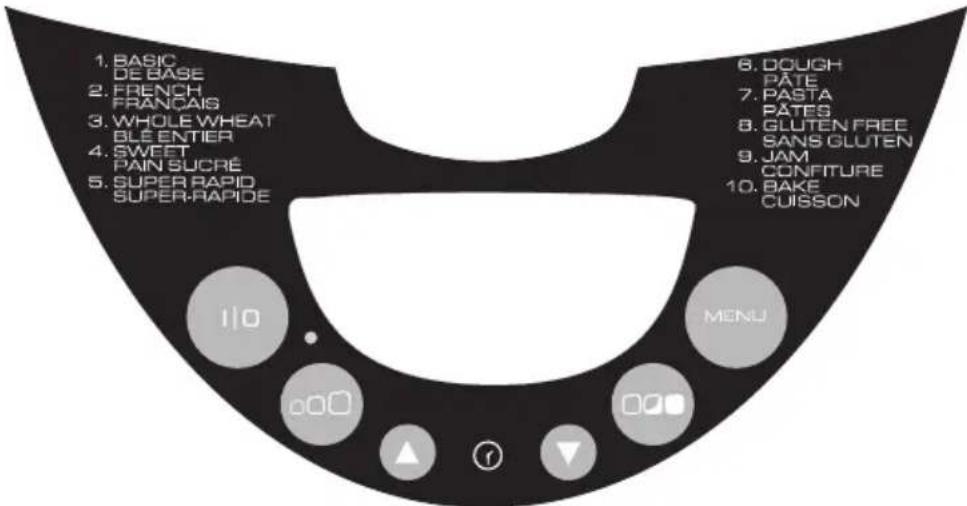
CONTROL PANEL
text_image
1. BASIC DE BASE 2. FRENCH FRANÇAIS 3. WHOLE WHEAT BLE ENTIER 4. SWEET PAIN SUCRÉ 5. SUPER RAPID SUPER-RAPIDE 6. DOUGH PÂTE 7. PASTA PÂTES 8. GLUTEN FREE SANS GLUTEN 9. JAM CONFITURE 10. BAKE CUISSON MENUDISPLAY WINDOW
Shows your MENU cycle selection, TIMER setting, crust COLOR, LOAF size and process.
OPERATION/KEEP WARM LIGHT
The Operation Light next to the START/STOP Button will illuminate while the Breadman® Bread Maker is ON; when the Breadman® is completed and in Keep Warm phase, the Light will flash.
▲ (UP) and ▼ (DOWN) Buttons
Use this pair of Buttons to set the TIMER.
Use this pair of Buttons to add or subtract time displayed in the Display Window.
▲ Each time you press this Button, the Timer advances 10 minutes.
▼ Each time you press this Button, the Timer is set back 10 minutes.
MENU
Press this Button to select the cycle you want out of the ten (1 to 10) listed on the Control Panel. Each time you press this Button, the number of the cycle will change to the next selection in the Display. Press this Button until your choice is indicated.
COLOR
Select the crust COLOR: Light, Medium or Dark. The Breadman® Bread Maker is preset to Medium. Use this Button to select the RAPID cycle for the MENU program indicated in the Display.
LOAF
Select the LOAF size: 1.5 LB, or 2 LB. The Breadman® Bread Maker is preset to 2 LB.
START/STOP
Press this Button to start the chosen cycle and to begin the Timer countdown. Press this Button for a full second to reset the cycle's TIMER setting or to cancel the cycle in progress.
When you press any Button, you should hear a beep. This lets you know you've pressed hard enough to activate your selection.
CONTROL PANEL (CONTINUED)
MENU OPTIONS
Select from these Bread/Dough cycles:
1. BASIC
Basic Light (1.5 LB)
Basic Light (2.0 LB)
Basic Medium (1.5 LB)
Basic Medium (2.0 LB)
Basic Dark (1.5 LB)
Basic Dark (2.0 LB)
Basic Rapid (1.5 LB)
Basic Rapid (2.0 LB)
2. FRENCH
French Light (1.5 LB)
French Light (2.0 LB)
French Medium (1.5 LB)
French Medium (2.0 LB)
French Dark (1.5 LB)
French Dark (2.0 LB)
French Rapid (1.5 LB)
French Rapid (2.0 LB)
3. WHOLE WHEAT
Whole Wheat Light (1.5 LB)
Whole Wheat Light (2.0 LB)
Whole Wheat Medium (1.5 LB)
Whole Wheat Medium (2.0 LB)
Whole Wheat Dark (1.5 LB)
Whole Wheat Dark (2.0 LB)
Whole Wheat Rapid (1.5 LB)
Whole Wheat Rapid (2.0 LB)
4. SWEET
Sweet Light (1.5 LB)
Sweet Light (2.0 LB)
Sweet Medium (1.5 LB)
Sweet Medium (2.0 LB)
Sweet Dark (1.5 LB)
Sweet Dark (2.0 LB)
Sweet Rapid (1.5 LB)
Sweet Rapid (2.0 LB)
5. SUPER RAPID
Super Rapid Light (1.5 LB)
Super Rapid Light (2.0 LB)
Super Rapid Medium (1.5 LB)
Super Rapid Medium (2.0 LB)
Super Rapid Dark (1.5 LB)
Super Rapid Dark (2.0 LB)
6. DOUGH
7. PASTA
8. GLUTEN FREE
Gluten Free Light (1.5 LB)
Gluten Free Medium (1.5 LB)
Gluten Free Dark (1.5 LB)
9. JAM
10. BAKE
Bake Light
Bake Medium
Bake Dark
KNEADING AND BAKING CYCLES
Note: If at any time during bread making process you need to turn bread maker off, press and hold the START/STOP (I/O) button for several seconds, then unplug the unit.
Note: If bread is not removed immediately after baking and START/STOP button is not pressed, a controlled 60-minute Keep Warm mode will begin (except during Dough, Jam & Pasta). For best results, remove bread immediately after baking process is complete.
BASIC
Used for breads that primarily include white bread flour, although some recipes may include small amounts of whole wheat flour.
FRENCH
Traditionally, French bread has a slightly crispier crust and lighter texture than white bread. Recipes usually do not include butter, margarine or milk.
WHOLE WHEAT
Used for recipes with significant amounts of whole wheat or rye flour, oats or bran. Whole wheat cycle begins with rest period during which flours or grains absorb liquid ingredients. Soaking causes flour or grain to soften and helps ingredients to combine. Generally, whole wheat and multi-grain breads are shorter and denser than white, French or sweet.
SWEET
Used for recipes that contain eggs, fruit juice, additional sugar or added sweet ingredients such as coconut flakes, raisins, dried fruit or chocolate. Baking temperature is reduced to prevent burning.
SUPER RAPID
Used for White, Whole Wheat and French cycles to decrease time to approximately 1 hour. Choose recipe, then simply add 12 tsp. to amount of yeast listed for a 2-lb. loaf. Bread may be shorter and denser than bread made using the longer program.
DOUGH
Use to prepare dough for making bread, rolls or pizza which are shaped and allowed to rise before baking in a conventional oven. This setting blends and kneads the dough and takes it through the first rise.
PASTA
Several different kinds of doughs can be mixed using the PASTA program. Remove dough and follow directions with the recipe to complete the baking/cooking.
GLUTEN-FREE
Used for gluten-free recipes.
JAM
Use to prepare preserves, marmalade, chutneys and ketchup. Add fruit, sugar and lemon juice for homemade preserves – a great topping for homemade bread, waffles and ice cream.
BAKE ONLY
Used if crust is too light or you wish to bake pre-made dough – also especially useful if your bread is not quite done. Check every few minutes. Bakes for up to 1 hour, 30 minutes.
KNOW YOUR INGREDIENTS
| FLOUR & OTHER GRAINS | |
| ALL-PURPOSE FLOUR | All-purpose flour is a blend of refined hard and soft wheat flours ideally suited for making quick breads and cakes. |
| BRAN | Bran (unprocessed) is coarse outer portion of wheat or rye grains that is separated from flour by sifting or bolting. It is often added to bread in small quantities for nutritional enrichment, heartiness and flavor. It is also used to enhance bread texture. |
| BREAD FLOUR | Bread flour typically has higher gluten concentration than all-purpose flour. Using bread flour will produce loaves with better volume and structure. |
| CORNMEAL AND OATMEAL | Cornmeal and oatmeal come from coarsely ground white or yellow corn and from rolled or steel-cut oats. They are used primarily to enhance flavor and texture of bread. |
| CRACKED WHEAT | Cracked wheat has very coarse texture. It comes from wheat kernels cut into angular fragments. It gives whole grain breads a nutty flavor and crunchy texture. |
| RYE FLOUR | Rye flour must always be mixed with high proportion of bread flour, as it does not contain enough gluten to develop structure for high, even-grained loaf. |
| SELF-RISING FLOUR | Self-Rising Flour is NOT RECOMMENDED for use with your bread maker. Self-rising flour contains leavening ingredients that will interfere with bread and quick bread making. |
| 7 GRAIN CEREAL BLEND | 7 grain cereal blend is a blend of cracked wheat, oats, bran, rye, cornmeal, flax seeds and hulled millet. It is used primarily to enhance flavor and texture of bread. |
| VITAL WHEAT GLUTEN | Vital Wheat Gluten is manufactured from wheat flour that has been treated to remove nearly all of the starch to leave a very high protein content. (Gluten is the protein in wheat that makes dough elastic.) Vital Wheat Gluten is available at most health food stores. It can be used in small portions to increase volume and lighten texture. |
| WHOLE WHEAT FLOUR | Whole wheat flour is milled from the entire wheat kernel, which contains the bran and germ. This high fiber flour is richer in nutrients than all-purpose or bread flour. Breads made with this flour are usually smaller and heavier than white loaves. Many recipes mix whole wheat flour with bread flour or vital wheat gluten to produce higher, lighter-textured bread. |
TIPS ON FLOUR STORAGE
Keep flour in a secure, airtight container. Store rye and whole wheat flours in a refrigerator, freeze or a cool area to prevent them from becoming rancid. Allow flour to come to room temperature before using.
Note: Flours, while visibly similar, can be very different in how they are ground, milled, stored, etc. You may have to experiment with different brands of flour to help you make the perfect loaf. See RECIPE TIPS to assist with these experiments.
YEAST
Active yeast, through a fermentation process, produces carbon dioxide gas necessary to make bread rise. Yeast feeds on carbohydrates in sugar and flour to produce this gas. Three different types of yeast are available: fresh (cake), active dry and quick-acting. Quick, rapid rise and bread machine yeasts are quick-acting. Fresh (cake) yeast is NOT RECOMMENDED for use with your bread maker.
TIPS ON YEAST
Ensure your yeast is fresh by checking its expiration date. Ideally, yeast should be used several months before the expiration date. Once a package or jar of yeast is opened, it is important that the remaining contents be immediately resealed and refrigerated or frozen for future use. Often dough that fails to rise is due to stale yeast.
Note: Basic bread and dough recipes in this booklet were developed using active dry yeast. You may use chart below to substitute any quick-acting yeast (quick rise, fast rise or bread maker yeast) for active dry yeast.
CONVERSION CHART FOR BREAD MACHINE YEAST
^3/4 tsp. bread machine yeast = ^1/2 tsp. quick-acting yeast
1 tsp. bread machine yeast = 3/4 tsp. quick-acting yeast
1 12 tsp. bread machine yeast = 1 tsp. quick-acting yeast
2¼ tsp. bread machine yeast = 1½ tsp. quick-acting yeast
1 tbsp. bread machine yeast = 2 tsp. quick-acting yeast
RAPID CYCLES
Rapid cycle settings for White, Whole Wheat and French decrease time for making your favorite bread in approximately 1 hour. Choose recipe, then add an additional 12 tsp. of bread machine yeast to the recipe. The bread may be shorter and denser.
MEASURING YOUR INGREDIENTS
The most important step when using your Breadman® Bread Maker for making bread is measuring your ingredients. It is very important to measure each liquid and dry ingredient accurately. For best results, add ingredients into the Bread Pan in the order given in each recipe.
LIQUID MEASUREMENTS
Use transparent plastic or glass liquid measuring cups to measure all liquid ingredients. Place the cup on a horizontal flat surface and view markings at eye level. The level of the liquid must be aligned to the appropriate mark of measurement. A “guesstimate” is not good enough, as it could throw off the critical balance of the recipe.
DRY MEASUREMENTS
Dry ingredients must be measured using standard size dry measuring cups. These cups are available in various sizes. Gently spoon dry ingredients into the measuring cup and level off with a knife. Do not scoop or tap measuring cup, as this will pack the ingredients. This extra amount could affect the balance of the recipe. Do not sift flour in bread making.
When measuring small amounts of dry or liquid ingredients (i.e. yeast, sugar, salt, dry milk, honey or molasses), a standard measuring spoon must be used. Measurements must be level, not heaping.
The Breadman® Bread Maker produces delicious baked goods with ease. This marvelous appliance asks only that you carefully follow the recipe instructions. In most cooking, a pinch of this and a dash of that is fine, but this is not the case for automatic Bread Makers. Using this Breadman® Bread Maker requires that you accurately measure each ingredient.
MEASUREMENT/CONVERSION CHART
$$ \begin{array}{l} 1 - 1 / 2 \text { tsp } = 1 / 2 \text { TBL } 8 \text { TBL } = 1 / 2 \text { cup } \ 3 \mathrm{tsp} = 1 \mathrm{TBL} 1 2 \mathrm{TBL} = 3 / 4 \mathrm{cup} \ 1 / 2 \mathrm{TBL} = 1 - 1 / 2 \text { tsp } 1 6 \mathrm{TBL} = 1 \text { cup } \ 2 \mathrm{TBL} = 1 / 8 \mathrm{cup} 3 / 8 \mathrm{cup} = 1 / 4 \mathrm{cup} + 2 \mathrm{TBL} \ 4 \mathrm{TBL} = 1 / 4 \text {cup} 5 / 8 \text {cup} = 1 / 2 \text {cup} + 2 \mathrm{TBL} \ 5 \mathrm{TBL} + 1 \text {tsp} = 1 / 3 \text {cup} 7 / 8 \text {cup} = 3 / 4 \text {cup} + 2 \mathrm{TBL} \ \end{array} $$
| ADDITIONAL INGREDIENT NOTESImportant: Exact measurements for ingredients are the most important part of baking. It is the key to getting great texture and consistency in your bread.Make sure to measure all ingredients exactly. | |
| BAKING POWDER | Double-acting baking powder is a leavening agent used in quick breads and cakes. This type of leavening agent does not require rising time before baking, as chemical reaction works when liquid ingredients are added and again during baking process. |
| BAKING SODA | Baking soda is another leavening agent, not to be confused or substituted for baking powder.It also does not require rising time before baking, as chemical reaction works during baking process. |
| EGGS | Eggs add richness and velvety texture to bread dough and cakes. When recipe calls for egg(s), large egg(s) at room temperature should be used. |
| FATS | Butter, margarine and oil shorten or tenderize the texture of yeast breads. French bread gets unique crust and texture from the lack of added fat. However, breads that call for fat stay fresh longer.If butter is used directly from refrigerator, it should be cut into small pieces for easier blending during kneading process. |
| LIQUIDS | All liquids should be warm 80°F/27°C to 90°F/32°C for all recipes. Liquids, such as milk, water or a combination of powdered milk and water, can be used when making bread. Milk will improve flavor, provide velvety texture and soften the crust, while water alone will produce a crispier crust. Vegetable or fruit juices and potato water may be used for flavor variety. |
| SALT | Salt is necessary to balance flavor in breads and cakes; it also limits growth of yeast. Changing the amount of salt in a given recipe may result in shorter, gummier bread. When first making a type of bread, do not increase or decrease amount of salt shown in the recipe. |
| SUGAR | Sugar is important for color and flavor of breads. It also serves as food for yeast since it the supports fermentation process. Recipes in this book that call for sugar require granulated sugar.Important: Do not substitute powdered sugar. Artificial sweeteners cannot be used as substitute, as yeast will not react properly with them. |
CLIMATE CHANGES & BAKING
- In high-altitude areas (over 3,000 feet), dough tends to rise faster as there is less air pressure. Therefore, less yeast is necessary.
• In dry climates, flour is drier and requires slightly more liquid. - In humid climates, flour is wetter and will absorb less liquid, so less liquid is required.
How to Use
This product is for household use only.
GETTING STARTED
- Remove packing materials and any stickers.
- Please go to www.prodprotect.com/applica to register your warranty.
- Place bread maker on dry, stable, level surface away from heat and areas where cooking grease or water may splatter on unit. Do not place near edge of counter top. If placing beneath cabinets, make sure there is enough room to open the lid without interference.
Important: Your bread maker will bake up to a 2lb. loaf. Do not put larger quantities of ingredients into bread pan. Bread will not mix and bake correctly and bread maker may become damaged. (See MAXIMUM INGREDIENT AMOUNTS.)
- Before first use, operate on Rapid White cycle without adding ingredients to burn off manufacturing oils. (Follow instructions in USING YOUR BREAD MAKER.)
Note: During first use, bread maker may smoke and/or emit an odor from mineral oils used in manufacturing. This is normal.
MAXIMUM INGREDIENT AMOUNTS
- Bread cycles 4 to 4-2/3 cups
- Batter Breads and prepackaged cake mixes 4 cups
- Dough cycles 4-2/3 cups
- Jam 3 cups fruit
BREAD PAN TIPS
Inserting bread pan
Note: Remember to insert kneading paddles first, then add all ingredients in the order listed BEFORE inserting the bread pan into baking chamber.
- When inserting bread pan into bread maker, make sure to set firmly in place.
Removing bread pan
- To remove bread pan from baking chamber, hold handle with an oven mitt and lift straight up firmly.
Important: When you remove bread pan after baking, be sure to wear oven mitts to prevent burning.
- After removing loaf (by turning bread pan upside down and shaking gently), check to see that kneading paddle is removed from loaf. If it is stuck in bread, allow bread to cool; then use a non-metal utensil to remove it, taking care not to scratch the kneading paddle. Allow bread to cool before removing the kneading paddle.
CHECKING DOUGH CONSISTENCY
Although your bread maker will mix, knead and bake bread automatically, when baking bread from scratch, it is recommended that you learn to recognize condition of your dough. The ratio of flour to liquid is the most critical factor in any bread recipe, yet the most easily remedied. After 5 to 8 minutes in Knead 2, open bread maker to check consistency of dough. Dough should be in a soft, tacky ball (feel sticky like scotch tape). If it is too dry, add 1 tsp. of liquid at a time. If it is too wet, add 1 tbsp. of flour at a time.
natural_image
Line drawing of a hand holding a small object inside a device, labeled 'B' (no text or symbols on the object itself)USING YOUR BREAD MAKER
Note: Depending on the cycle or recipe used, some steps may not apply or there may be additional steps. Refer to the respective recipes instructions in the recipes portion of this booklet, as well as the specific cycle instructions located at the end of these usage instructions.
natural_image
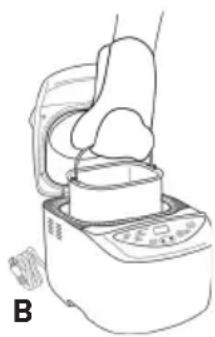
Line drawing of a hand pouring liquid into a container with a handle (no text or symbols)- Open lid and remove bread pan. Lift bread pan straight up and out using the handle (B).
Caution: Do not turn or shake bread pan while taking it out. If the bread pan is bent, temperature sensor may not work properly.
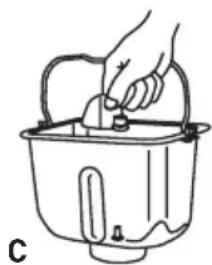
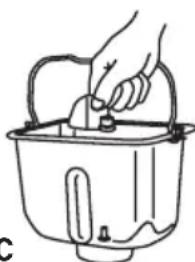
- Position kneading paddle on the drive shaft. Match flat side of drive shaft to flat part of hole in kneading paddle (C). Make sure paddle is secure.
- Place ingredients into the bread pan.
Important: Add ingredients to bread pan in the order listed in the recipe.

text_image
Yeast Dry Liquid DImportant: Always add yeast last.
- Make small indentation on top of dry ingredients (not so deep it reaches the wet layer) and add yeast (D).
Important: Indentation for yeast is important, especially when using the delay bake timer. It keeps yeast away from the wet ingredients until the kneading process begins. (Liquid ingredients will prematurely activate the yeast.)
natural_image
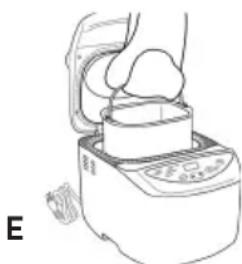
Line drawing of a hand holding a small container with a lid, next to a digital kitchen appliance (no text or symbols)- Insert the bread pan into the baking chamber (E). Press down on rim of bread pan until it snaps securely into place.
-
Close the Lid. Plug into 120V AC outlet. The Breadman® will beep and the Display Window will illuminate.
-
Press the MENU Button to choose the bread or dough cycle (1 to 10) you want. The cycle names and corresponding numbers are listed on the Control Panel.
Each time the MENU Button is pressed, it will beep and the cycle number (1 to 10) will appear in the Display Window.
- Press COLOR to choose crust color. Bread maker is preset for medium crust.
Note: CRUST will not be activated for the following cycles: Jam, Dough and Pasta
- Press LOAF to select loaf size. Bread maker is preset to 2 lb.
Note: Loaf size cannot be activated for the following cycles: Jam, Dough, Pasta & Bake
Note: The smaller size recipes and mixes will not fill the Bread Pan when finished. This is especially true for bread recipes that contain whole grains or other special ingredients.
Note: When using the Gluten Free recipes provided in the Recipe Guide, always choose the 1.5 LB setting.
- Press START/STOP button to begin kneading cycle. The time remaining will begin to count down in display window. Bread making time and loaf size will be shown in display window.
Note: During kneading cycle, yeast will activate and viewing window may begin to fog. (This will clear eventually so you can view the progress.
-
Add ingredients, such as dried fruit or nuts, herbs, oats, etc. at the Add-Ingredient Beep during the BASIC, WHOLE WHEAT and SWEET cycles. See Kneading and Baking Cycles Chart for exact time on each cycle.
-
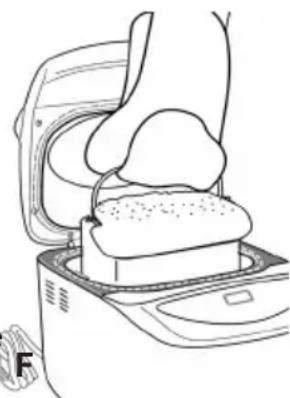
When your bread is finished baking the Breadman® Bread Maker will beep and "0:00" will appear in the Display Window. Press the START/STOP Button and open the Lid. (F)
Important: Remember, bread pan and loaf are both very hot! Be careful not to place either on tablecloth, plastic surface or other heat-sensitive surface that may scorch or melt.
NOTE: Keep Warm does not apply to the following cycles: Jam, Dough, Bake Only, Pasta
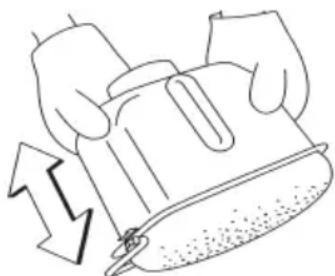
- Turn bread pan upside down and shake to release bread (G). Place bread upright on wire rack to cool at least 20 minutes before slicing.
natural_image
Line drawing of a food processor with a bag and lid (no text or symbols)Caution: Be sure to remove kneading paddle from the bread before serving.
Caution: Bread pan, kneading paddle and bread will be very hot. Allow bread to cool before removing the paddle.
- Unplug unit and allow to cool completely before cleaning. (See CARE AND CLEANING INSTRUCTIONS.)
Important: Make sure to clean the inside of the baking chamber thoroughly after each use.
- Once bread has cooled (approximately 2 hours) store in an airtight container.
G
natural_image
Line drawing of a hand holding a device with an upward arrow indicating motion (no text or symbols)SLICING AND STORING BREAD
For best results, place bread on wire rack and allow to cool at least 20 minutes before slicing. Use electric knife or serrated knife for even slices.
Store unused bread, tightly sealed (sealable plastic bags or plastic containers work well) at room temperature for up to 3 days. For longer storage, (up to 1 month) place bread in sealed container in freezer. Since homemade bread has no preservatives, it tends to dry out and become stale faster. Leftover or slightly hardened bread may be cut into 12 -inch or 1-inch cubes and used in recipes to make croutons, bread pudding or stuffing.
USING 15-HOUR DELAY BAKE TIMER
Important: Delay baking does not activate JAM cycle. Do not use delay bake timer if your recipe includes perishables, such as, eggs, fresh milk, yogurt or other dairy products and meats, etc. To preset your bread maker, follow these steps:
- Add ingredients in the order listed as usual, taking care not to let yeast and liquid ingredients contact one another.
Note: If your recipe contains salt, add it with the liquid ingredients, taking care to keep it away from the yeast. - Close bread maker lid and plug it in.
- Press MENU to select baking cycle. Standard cycle time will be shown in display window.
- Press ▲ to add time in 10-minute intervals. (Use ▼ to subtract time.) Amount of time set is shown in display window.
- For example, if it is 8:00 AM and you want bread ready at 1:00 PM, press ▲ until the display reads 5:00 – meaning it will finish baking in 5 hours. This is the hour difference between 8:00 AM and 1:00 PM.
Note: Actual baking times will not change.
-
Press LOAF to choose loaf size, press COLOR to choose crust color, then press START/STOP to begin timer. The colon (:) in time display begins to flash, letting you know timer is started. When your bread is finished baking, bread maker will beep and "0:00" will appear in display window. Press START/STOP and open lid.
-
If you make an error after you've activated program and want to start over, press and hold START/STOP for several seconds. Timer will clear and you can begin again.
BAKE ONLY
The BAKE ONLY cycle offers the flexibility to vary time. You can bake pre-made dough or dough purchased at the store using this cycle. You may also use this cycle if crust color is too light or if your sweet bread is not quite done. Check every few minutes.
- Press the MENU Button until 10 (BAKE) appears in the Display Window.
- Press the ▲ (UP) and ▼ (DOWN) TIMER Buttons (arrows) to adjust the amount of time you need to BAKE, from 1 to 15 hours.
- Press the START/STOP Button to begin the BAKE cycle.
- If you need less than 1 hour, press the START/STOP Button to cancel the BAKE cycle at the desired time.
Select 1 of the following special glazes to enhance your bread:
- Melted Butter Crust: Brush melted butter over just-baked bread for a softer, more tender crust.
- Milk Glaze: For a softer, shiny crust, brush just-baked bread with milk or cream.
- Sweet Icing Glaze: Mix 1 cup sifted confectioner's sugar with 1 to 2 tablespoons of milk, water or fruit juice until smooth. Drizzle glaze over raisin or sweet bread when they are almost cool.
Note: If desired, generously sprinkle with your choice of nuts or seeds after glazing.
DOUGH CYCLE
Tips for Best Results
- If using delay bake timer, make sure yeast is on top of flour, away from liquids.
Important: Never allow dough to remain in bread maker after cycle is complete; it may over rise and damage machine.
- Rising times for dough after it is shaped and placed in baking pan will vary due to recipe, temperature and humidity level of your kitchen. Optimum temperature for rising is 80°–85°F. Rising is the most essential feature in bread making.
- Bread maker allows dough to have first rise or fermentation before dough is removed. Fermentation conditions gluten, (becoming pliable and elastic with a soft, smooth quality) develops flavor and leavens product.
- Sometimes a double rising is beneficial especially for whole grain or 100% whole wheat bread. Let dough rise once in bread maker. Remove from bread maker, punch down, let rise again, punch down and let rest 10 minutes. Resting allows gluten to relax and makes handling easier. Shape as desired and allow to rise until doubled in volume. If only 1 rise is desired, remove from bread maker, let rest, shape and rise as above.
- Baker's Tip: Dough has doubled in volume when an indentation remains after tip of a finger is pressed lightly and quickly into dough. If indentation springs back, cover and let rise a few more minutes and check again.
Important: For use only with the Dough Cycle.
• Always allow optimum rising of shaped dough.
- Use pastry brush to apply glaze.
- Bake as directed in recipe.
Apply Just Before Baking:
Egg Yolk Glaze
For shiny golden crust, mix 1 slightly beaten egg or egg yolk with 1 tbsp. water or milk.
Egg White Glaze
For shiny, chewy crust, mix 1 slightly beaten egg white with 1 tbsp. water. If desired, sprinkle chopped nuts or fruit and/or seeds after glazing.
Lightly Floured
Sprinkle enough flour onto work area so dough can be handled without sticking.
Shaped Rolls
Important: Once rolls are shaped, cover and let rise until doubled before baking.
Cloverleaf Rolls
Shape into 12 -inch balls. Place 3 balls in each greased muffin tin.
Crisscross Rolls
Shape into balls, setting 2 aside. Combine balls and roll into a 18 -inch thick square. Cut strips 18 -inch wide and 2-inches long. Brush top of roll with beaten egg. Place 1 strip across top of each ball. Repeat process, placing second strip in opposite direction across top of each ball.
Traditional Rolls
Shape into balls. For “pull apart” rolls, place dough balls with sides touching in 8 or 9 inch round or square greased baking pan. For “individual” rolls place dough balls 2-inches apart.
Crescent Rolls
On lightly floured board, roll dough to 12-inch circle. Spread with softened butter. Cut into 16 wedges beginning at wider end. Place rolls 2 inches apart on greased baking sheet with points underneath; curve rolls slightly. If desired, brush with melted butter just before baking.
Rosettes
On lightly floured board, roll about 1 ½ oz piece of dough into 14 inch rope. Tie in a loose knot, leaving 2 long ends. Tuck one end under knot and second end into the top center of the loose knot. Place 2 inches apart on lightly greased baking sheet.
JAM CYCLE METHOD AND RECIPES
Use this cycle for making jams from fresh or frozen fruits. Do not double recipes or allow ingredients to boil over the Baking Pan into the Baking Chamber. Should this happen, stop the Bread Maker immediately. Allow to cool and clean thoroughly.
Press the MENU Button until 9 (JAM) appears in the Display Window.
Method:
- Remove the Bread Pan from the Breadman®. Attach the Kneading Paddle onto the Drive Shaft. Have all ingredients ready. Clean fresh berries or fruit, cut into 1/2-inch cubes and drain. If using frozen fruit, thaw and drain.
- Use a liquid measuring cup to measure the drained fruit, then crush with a potato masher or with your hands.
- Use a dry measuring cup to measure the sugar.
- Use a measuring spoon to measure the lemon juice, if using.
- Place the Bread Pan into the Breadman®. Push down until it fits firmly into place. Close Lid.
- The Display Window will show 9 (JAM). Press the START/STOP Button.
- The Bread Maker will pre-heat for 15 minutes before any movement occurs in the Bread Pan. After pre-heating, the jam will be heated and mixed for approximately 50 minutes. The entire JAM cycle takes 1 hour 5 minutes.
- When the jam is finished, the Breadman® will beep and "0:00" will appear in the Display Window. Press the START/STOP Button and open the Lid.
CAUTION: THE OVEN CAVITY, BREAD PAN, KNEADING PADDLE AND JAM WILL BE VERY HOT USE OVEN MITTS.
- Remove the Bread Pan from the Breadman®. BE SURE TO USE OVEN MITTS.
- Pour the hot jam into a heat-safe container. Leave on the counter top to cool; stir frequently.
- Pour the jam into a refrigerator/freezer-safe container, leaving 1/2" of space at the top.
- Cover tightly to store. Jam will thicken upon cooling.
PASTA CYCLE
Use this cycle to mix doughs and then follow directions with the recipe to complete the baking/cooking. Several different kinds of doughs can be mixed using the PASTA program. Remove dough and follow directions with the recipe to complete the baking/cooking.
- It is very important that you assist the Bread Maker in the stirring process. After 5 minutes (:09), open the Lid and use a rubber spatula to gently scrape the ingredients from the sides and corners of the Bread Pan and fold into the wet mixture. Close the Lid and allow the Bread Maker to complete the cycle.
- Because cookie dough is more difficult to work with, it may be necessary to repeat part or all of the PASTA cycle. Remember to check the mixture after 5 minutes and assist when necessary.
Care and Cleaning
This product contains no user serviceable parts. Refer service to qualified service personnel.
CLEANING
Important: Always unplug bread maker and allow to cool completely prior to cleaning.
Bread pan and kneading paddle have nonstick surfaces, which make cleaning easier.
- After baking each loaf of bread, unplug bread maker and allow to cool; discard any crumbs.
- Remove bread pan from oven chamber and kneading paddle from bread pan. Wash bread pan and kneading paddle inside and out with warm, soapy water. Avoid scratching nonstick surfaces.
Caution: Do not place bread pan in dishwasher, or soak it in water.
- If kneading paddle is stuck to drive shaft, pour warm water into bread pan for up to 30 minutes, to loosen it. Do not use excessive force.
- Wipe inside of lid and oven baking chamber with slightly damp cloth or sponge. If any residue has scorched on heating element or elsewhere, wipe with nonabrasive pad to clean. Lid can be removed for cleaning. Dry baking chamber and lid thoroughly.
Important: Do not put lid in dishwasher, as it may cause warping.
Do not immerse in water, as it contains sensitive electronic sensors.
- To clean glass in lid, use glass cleaner or mild detergent and damp cloth or plastic scouring pad. Do not use abrasive cleaners or scouring pads, as they may scratch glass.
- Do not use vinegar, bleach or harsh chemicals to clean bread maker.
- Be sure bread maker is completely cooled before storing.
- Baking chamber contains heating element and drive shaft. When cleaning, NEVER pour water, solvents or cleaning solutions into this area.
STORAGE
- All removable parts should be thoroughly cleaned and dried.
- Store lid closed. Place bread pan into bread maker with kneading paddle inside.
TROUBLESHOOTING
| QUESTION ANSWER | |
| Why does height and shape of bread differ in each loaf? | Height and shape of bread may differ depending on the ingredients, room temperature and length of timer cycle. Also, accurate measurement of ingredients is essential to make delicious bread. |
| Bread has unusual aroma. Why? | Stale ingredients may have been used or too much yeast may have been used. Always use fresh ingredients. Accurate measurements are essential to make delicious bread. |
| Kneading paddle comes out with bread. | This can happen, as kneading paddle is detachable. Use a nonmetal utensil to remove it.Caution: Kneading paddle will be hot. Allow bread to cool before removing paddles. |
| Bread has floured corners. | Sometimes flour in the corners of the bread pan may not have been completely kneaded into dough. Scrape it off the loaf with a knife. Check bread about 10 minutes into kneading cycle. If all flour is not incorporated, use a rubber spatula to remove the flour from the sides of the bread pan so it can be incorporated into the dough. |
| Can ingredients be halved or doubled? | NO. If there is too little in bread pan, kneading paddle cannot knead well enough. If there is too much, bread rises out of bread pan. |
| Can fresh milk be used in place of dry milk? | YES. Be sure to decrease same measurement of water to equal liquid substitution.Fresh milk is not recommended when using delay bake timer, because it may spoil while sitting in bread pan. |
NEED HELP?
For service, repair or any questions regarding your appliance, call the appropriate 800 number on cover of this book. Please DO NOT return the product to the place of purchase. Also, please DO NOT mail product back to manufacturer, nor bring it to a service center. You may also want to consult the website listed on the cover of this manual.
Two-Year Limited Warranty
(Applies only in the United States and Canada)
What does it cover?
- Any defect in material or workmanship provided; however, Applica's liability will not exceed the purchase price of product.
For how long?
- Two years from the date of original purchase with proof of such purchase.
What will we do to help you?
- Provide you with a reasonably similar replacement product that is either new or factory refurbished.
How do you get service?
- Save your receipt as proof of date of sale.
- Visit the online service website at www.prodprotect.com/applica, or call toll-free 1-800-231-9786, for general warranty service.
- If you need parts or accessories, please call 1-800-738-0245.
What does your warranty not cover?
• Damage from commercial use
- Damage from misuse, abuse or neglect
- Products that have been modified in any way
- Products used or serviced outside the country of purchase
- Glass parts and other accessory items that are packed with the unit
- Shipping and handling costs associated with the replacement of the unit
- Consequential or incidental damages (Please note, however, that some states do not allow the exclusion or limitation of consequential or incidental damages, so this limitation may not apply to you.)
How does state law relate to this warranty?
- This warranty gives you specific legal rights. You may also have other rights that vary from state to state or province to province.
BASIC WHITE BREAD RECIPES
BASIC WHITE/FRENCH BREAD
| Ingredients: 1.5 LB 2 LB | ||
| Water, 80°F/27°C 1-1/8 cup 1-1/2 cup | ||
| Vegetable Oil (optional) 1-1/2 TBL 2 TBL | ||
| Sugar 1/2 TBL 1 TBL | ||
| Salt 1-1/2 tsp 1-1/2 tsp | ||
| Bread Flour 3 cups 4 cups | ||
| Active Dry Yeast | 2 tsp | 2-1/2 tsp |
| Select BASIC cycle | ||
| Select RAPID BASIC cycle | ||
| Active Dry Yeast | 2-1/2 tsp 2-3/4 tsp | |
FRENCH BREAD RECIPES
French BREAD
| Ingredients: 1.5 LB 2 LB | |||
| Water, 80°F/27°C | 1 cup + 2 TBL | 1-1/3 cups | |
| Olive Oil | 1 TBL + 1 tsp 2 TBL | ||
| Sugar | 1 TBL + 1-1/2 tsp | 2 TBL | |
| Salt | 1 tsp | 1-1/2 tsp | |
| Bread Flour | 3-1/4 cups | 4 cups | |
| Active Dry Yeast | 2 tsp | 2-1/4 tsp | |
| Select FRENCH cycle | |||
| Select RAPID FRENCH cycle | |||
| Active Dry Yeast | 2-3/4 tsp | 1 TBL | |
ITALIAN HERB BREAD
| Ingredients: 1.5 LB 2 LB | |||
| Water, 80°F/27°C | 1 cup + 1 TBL | 1-1/4 cups + | 2 TBL |
| Oil | 2 TBL | 3 TBL | |
| Sugar | 2 TBL | 3 TBL | |
| Salt | 1-1/2 tsp | 2 tsp | |
| Dry Milk | 2 TBL | 3 TBL | |
| Bread Flour | 3 cups | 4 cups | |
| Dried Italian Seasoning | 2 tsp | 1 TBL | |
| Active Dry Yeast | 2 tsp | 2-1/4 tsp | |
| Select FRENCH cycle | |||
| Select RAPID FRENCH cycle | |||
| Active Dry Yeast | 2-3/4 tsp | 1 TBL | |
WHOLE WHEAT BREAD RECIPES
CARAWAY RYE BREAD
| Ingredients: 1.5 LB 2 LB | |||
| Eggs(s), large, room temperature 1 2 plus enough Water, 80°F/27°C to equal 1 cup + 1 TBL 1-1/3 cups | |||
| Oil 3 TBL 1/4 cup | |||
| Honey 3 TBL 1/4 cup | |||
| Dry Milk | 2 TBL | 3 TBL | |
| Salt | 1-1/2 tsp | 2 tsp | |
| Bread Flour 1-1/2 cups | 2 cups | ||
| Whole Wheat Flour | 3/4 cup | 1 cup | |
| Rye Flour | 2/3 cup | 1 cup | |
| Caraway Seeds | 2 TBL | 3 TBL | |
| Active Dry Yeast | 2 tsp | 2-1/4 tsp | |
| Select WHOLE WHEAT cycle | |||
| Select RAPID WHOLE WHEAT cycle | |||
| Active Dry Yeast | 2-3/4 tsp | 1 TBL | |
WHOLE WHEAT WITH GLUTEN BREAD
| Ingredients: 1.5 LB 2 LB | |||
| Water, 80°F/27°C 1-1/4 cups | 1-1/2 cups | ||
| Oil | 2-1/2 TBL | 3 TBL | |
| Molasses | 2-1/2 TBL | 3 TBL | |
| Salt | 1-1/2 tsp | 2 tsp | |
| Dry Milk | 2 TBL | 3 TBL | |
| Whole Wheat Flour | 3 3/4 cups | 4 cups | |
| Gluten | 2-1/2 TBL | 3 TBL | |
| Active Dry Yeast | 2 tsp | 2-1/4 tsp | |
| Select WHOLE WHEAT cycle | |||
| Select RAPID WHOLE WHEAT cycle | |||
| Active Dry Yeast | 2-3/4 tsp | 1 TBL | |
SEVEN GRAIN BREAD
| Ingredients: 1.5 LB 2 LB | ||
| Egg, large, room temperature plus 1 1 enough Water, 80°F/27°C to equal 1 cup + 2 TBL 1-1/2 cups | ||
| Oil 2 TBL 3 TBL | ||
| Honey 2 tsp 1 TBL | ||
| Salt | 1-1/2 tsp | 2 tsp |
| Whole Wheat Flour | 1-1/2 cups | 2 cups |
| Bread Flour 1/2 cup | 1 cup | |
| Brown Rice Flour | 1/4 cup | 1/3 cup |
| Spelt Flour | 1/4 cup | 1/3 cup |
| Buckwheat Flour | 1/4 cup | 1/3 cup |
| Rye Flour | 1/4 cup | 1/3 cup |
| Oatmeal | 1/4 cup | 1/3 cup |
| Cornmeal | 2 TBL | 1/4 cup |
| Gluten | 3 TBL | 1/4 cup |
| Active Dry Yeast | 2 tsp | 2-1/4 tsp |
| Select Whole Wheat cycle | ||
| Select Rapid Whole Wheat cycle | ||
| Active Dry Yeast | 2-3/4 tsp | 1 TBL |
SWEET BREAD RECIPES
TRAIL MIX BREAD
| Ingredients: | 1.5 LB | 2 LB |
| Water, 80°F/27°C | 1-1/4 cups | 1-1/2 cups |
| Oil | 3 TBL | 1/4 cup |
| Honey | 3 TBL | 1/4 cup |
| Salt | 1-1/2 tsp | 2 tsp |
| Bread Flour | 3 cups | 4 cups |
| Active Dry Yeast | 2 tsp | 2-1/4 tsp |
| Add ingredients at beep: | ||
| Fruit & Nut Trail Mix | 1/2 cup | 2/3 cup |
| Select SWEET cycle | ||
| Select RAPID SWEET cycle | ||
| Active Dry Yeast | 2-3/4 tsp | 1 TBL |
CINNAMON RAISIN BREAD
| Ingredients: | 1.5 LB | 2 LB |
| Water, 80°F/27°C+ 2 TBL | 1 cup | 1-1/4 cups |
| Oil | 1-1/2 TBL | 2 TBL |
| Brown Sugar | 2-1/2 TBL | 3 TBL |
| Salt | 1-1/2 tsp | 2 tsp |
| Dry Milk | 1-1/2 TBL | 2 TBL |
| Cinnamon | 2 tsp | 1 TBL |
| Bread Flour | 3 cups | 4 cups |
| Walnuts, chopped | 1/2 cup | 2/3 cup |
| Active Dry Yeast | 2 tsp | 2-1/4 tsp |
| Add ingredients at beep: | ||
| Raisins | 1/2 cup | 2/3 cup |
| Select SWEET cycle | ||
| Select Rapid SWEET cycle | ||
| Active Dry Yeast | 2-3/4 tsp | 1 TBL |
ITALIAN HERB BREAD
Ingredients: 1.5 LB 2 LB
| Water, 115°-125°F/45°-51°C (warm) | 1 cup + 3 TBL | 1-1/2 cups |
| Oil 3/4 tsp 1 tsp | ||
| Salt 1 tsp 1-1/2 tsp | ||
| Sugar 2 TBL 3 TBL | ||
| Dry Milk | 4 tsp | 2 TBL |
| Italian Seasoning | 4 tsp | 2 TBL |
| Bread Flour 3 cups | 4 cups | |
| Red Star® Quick-RiseTM Yeast | 1 TBL | 4-1/2 tsp |
| or Bread Machine Yeast | 1 TBL | 4-1/2 tsp |
| Select SUPER RAPID cycle | ||
DOUGH CYCLE RECIPES
DINNER ROLL DOUGH
Ingredients: 1.5 LB 2 LB
18 Rolls 24 Rolls
Egg, large, room temperature plus 1 1 enough Water, 80°F/27°C to equal 3/4 cup + 1 TBL 1-1/3 cups
Oil 3 TBL 1/4 cup
| Sugar | 3 TBL | 1/4 cup |
| Salt | 1-1/2 tsp | 2 tsp |
| Bread Flour | 3 -1/4 cups | 4 cups |
| Active Dry Yeast | 2 tsp | 2-1/4 tsp |
Select DOUGH cycle
Method:
- Place on a lightly floured surface. Divide into pieces and shape.
- Place on a greased baking sheet. Cover and let rise in a warm place for 30 minutes or until doubled in size.
- Bake at 350^ F/ 177^ C for 15 to 25 minutes, or until golden brown.
WHOLE WHEAT DINNER ROLL DOUGH
Ingredients: 2 LB
| 18 Rolls | |
| Water, 80°F/27°C | 1-1/2 cups |
| Oil | 2 TBL |
| Brown Sugar | 1/4 cup |
| Salt | 2 tsp |
| Dry Milk | 2 TBL |
| Bread Flour | 2-1/2 cups |
| Whole Wheat Flour | 2 cups |
| Active Dry Yeast 2-1/4 tsp | |
| Select DOUGH cycle | |
Method:
- Place on a lightly floured surface. Divide into pieces and shape.
- Place on a greased baking sheet. Cover and let rise in a warm place for 30 minutes or until doubled in size.
- Bake at 350^ F/177°C for 25 to 30 minutes, or until golden brown.
FOCACCIA DOUGH
Ingredients: 1.5 LB
1 Loaf
Water, 80°F/27°C 1 cup
Olive Oil 1/3 cup
Sugar 2 tsp
Salt 1-1/2 tsp
Bread Flour 3 cups
Dried Italian Seasoning 1 tsp
Active Dry Yeast 2 tsp
Select DOUGH cycle
Garlic-Cheese Topping:
Olive Oil 1/4 cup
Dried Oregano 1-1/2 tsp
Garlic, finely minced 1/4 cup
Parmesan Cheese, grated 1/3 cup
Salt 1/4 tsp
Greek-Style Topping:
Olive Oil 1/4 cup
Dried Oregano 1-1/2 tsp
Onion, thinly sliced 1 cup
Feta Cheese, crumbled 1/3 cup
Black Olives, sliced - drained 1/4 cup
Salt 1/4 tsp
Method:
- With oiled hands, evenly press dough into a greased 9-inch x 13-inch Pan. Using your fingertips, make indentations in the dough.
- Cover, let rise in a warm place for 20 minutes or until doubled in size. While the dough is rising, select the topping and prepare.
- In a skillet, heat oil. For Garlic-Cheese Topping, stir in oregano and garlic. Immediately remove from heat. For Greek-Style Topping, stir in oregano and onions. Cook until onions are soft but not brown (approximately 5 minutes).
- Spoon topping mixture evenly over dough. Sprinkle with remaining ingredients.
- Bake at 400^ F/205°C for 20 minutes or until golden brown.
PASTA RECIPES
Use this cycle to mix doughs and then follow directions with the recipe to complete the baking/cooking.
Several different kinds of doughs can be mixed using the PASTA program. Remove dough and follow directions with the recipe to complete the baking/cooking.
- It is very important that you assist the Bread Maker in the stirring process. After 5 minutes (:09), open the Lid and use a rubber spatula to gently scrape the ingredients from the sides and corners of the Bread Pan and fold into the wet mixture. Close the Lid and allow the Bread Maker to complete the cycle.
- Because cookie dough is more difficult to work with, it may be necessary to repeat part or all of the PASTA cycle. Remember to check the mixture after 5 minutes and assist when necessary.
SEMOLINA PASTA
Ingredients:
Milk, 80°F/27°C (warm) 3/4 cup
Oil 6 TBL
Salt 1/4 tsp
Semolina (Pasta) Flour 2 cups
Select PASTA cycle
Method:
- Remove the Bread Pan from the Breadman® Bread Maker. Attach the Kneading Paddle onto the Drive Shaft. Have all ingredients ready. Make sure all ingredients, except milk, are at room temperature.
- Use a liquid measuring cup to measure the milk (80°F/27°C) and pour into the Bread Pan.
- Use a measuring spoon to measure the oil and add to the Bread Pan.
- Use a measuring spoon to measure salt; level off with the straight edge of a knife and add to the Bread Pan.
- Lightly spoon semolina (pasta) flour into a dry measuring cup; level off with the straight edge of a knife and add to the Bread Pan.
- Smooth into all corners. Lightly tap Pan on counter top 3 times to settle all ingredients.
- Place the Bread Pan into the Breadman®. Push down on the rim until it fits firmly into place. Close the Lid.
- Press the MENU Button until 7 (PASTA) appears in the Display Window.
- Press the START/STOP Button.
- After 5 minutes (:09), open the Lid and use a rubber spatula to gently scrape the ingredients from the sides and corners of the Bread Pan and fold into the wet mixture. Close the Lid and allow the program to complete.
-
Grasp the Handle to remove the Bread Pan after the end of the kneading/mixing process.
-
Turn Bread Pan upside down and shake several times to remove the dough onto a lightly floured surface.
- Using a rolling pin, on a floured surface, roll out dough to about 1/8 inch thickness. Cut dough into strips about 1/2 inch wide.
- Add finished pasta to 6 cups of boiling salted water and cook 10 to 15 minutes or until tender. DO NOT OVERCOOK. Drain well.
- UNPLUG UNIT AND ALLOW TO COOL COMPLETELY BEFORE CLEANING. Clean Bread Pan after each use, DO NOT IMMERSE THE BREAD PAN IN WATER. (See CLEANING INSTRUCTIONS outlined in this Instruction Manual.) Clean the inside of the Breadman® Bread Maker after each use.
DUMPLINGS
Ingredients:
Milk, 80°F/27°C (warm) 1 cup
Oil 1/2 cup
Salt 1/4 tsp
All-Purpose Flour 2-2/3 cups
Baking Powder 4 tsp
Select PASTA cycle
Method:
- Place dough in bowl.
- Using a teaspoon, carefully drop dumplings into 6 cups of boiling broth.
- Turn down heat to medium and cook 10 to 15 minutes or until tender. DO NOT OVERCOOK.
Makes 4 servings.
PIE CRUST
Ingredients:
Water 80°F/27°C (warm) 1/2 cup
Oil 3/4 cup
Salt 1/4 tsp
All-Purpose Flour 2-1/2 cups
Select PASTA cycle
Method:
- Divide in half and roll out on a lightly floured surface.
- Put in pie pan and pierce bottom with a fork.
- Bake at 425^ F/218°C for 20 minutes or until done.
Makes 2 crusts.
OATMEAL RAISIN COOKIES
Ingredients:
Eggs room temperature 2
Butter, melted 1 cup
Brown Sugar, packed 1 cup
Sugar 1/2 cup
All-Purpose Flour 1-1/2 cups
Cinnamon 1 tsp
Salt 1/2 tsp
Quaker® Quick or
Old Fashioned Oats 3 cups
Raisins 1 cup
Baking Soda 1 tsp
Select PASTA cycle
After 5 minutes, use a spatula to fold in any flour from the sides of the Bread Pan. When the cycle is complete, use a spatula to fold in any unmixed ingredients and if necessary start the cycle again.
Method:
- Spoon onto a lightly greased cookie sheet.
- Bake at 350^ F/177°C for 12-15 minutes or until done.
Makes 2-1/2 dozen cookies.
AMARETTO RAISIN COOKIES
Ingredients:
Amaretto Liquor or Vanilla Extract 1 TBL
Eggs room temperature 2
Butter, softened 1 cup
Brown Sugar, packed 3/4 cup
Raisins 3/4 cup
All-Purpose Flour 2-1/2 cups
Baking Powder 1-1/2 tsp
Select PASTA cycle
After 5 minutes, use a spatula to fold in any flour from the sides of the Bread Pan. When the cycle is complete, use a spatula to fold in any unmixed ingredients and if necessary start the cycle again.
Method:
- Spoon on to a lightly greased cookie sheet.
- Bake at 350^ F/177°C for 12-15 minutes or until done.
Makes 2 dozen cookies.
GLUTEN FREE BREAD RECIPES
GLUTEN FREE COUNTRY WHITE BREAD
| Ingredients: 1.5 LB | |
| Water, 110°– 115°F/43 – 46°C 1-1/3 cups | |
| Extra Large Eggs 3 | |
| Oil 3 TBL | |
| Cider vinegar 1 tsp | |
| Sugar 3 TBL | |
| Salt 1-1/2 tsp | |
| Dry Milk 1/2 cup | |
| White Rice Flour 2 cups | |
| Potato Starch Flour 1-1/4 cups | |
| Soy Flour 1/3 cup | |
| Tapioca Flour | 1/2 cup |
| Xanthan Gum | 1 TBL |
| Red Star Quick RiseTM Yeast | 4-1/2 tsp |
| Select GLUTEN FREE cycle | |
Method:
-
Remove the Bread Pan from the Bread Maker. Attach the Kneading Paddle onto the Drive Shaft. Have all ingredients ready. Make sure all ingredients, except water, are at room temperature.
-
Use a liquid measuring cup to measure the water (110°-115°F/43°-46°C) and pour into the Bread Pan.
-
Place whole, uncracked eggs in a bowl of warm water for 15 minutes to bring to room temperature before adding to the pan.
-
Use a measuring spoon to measure the oil and cider vinegar; add to the Bread Pan.
-
Use a measuring spoon to measure the sugar and salt; level off with the edge of a knife and add to the Bread Pan. Use a measuring cup to measure the dry milk; add to the Bread Pan.
-
Lightly spoon white rice flour into a measuring cup, level off with the straight edge of a knife and add to the Bread Pan. Repeat for the potato starch flour, soy flour, and tapioca flour.
-
Use a measuring spoon to measure the xanthan gum; level off with the straight edge of a knife and add to the Bread Pan. Smooth into all corners. Lightly tap the Bread Pan 3 times to settle dry ingredients.
-
Use a measuring spoon to carefully measure the Red Star Quick RiseTM Yeast; level off with the straight edge of a knife and add to the Bread Pan.
-
Place the Bread Pan into the Bread Maker. Push down on the rim until it snaps into place. Close the lid.
-
Press the MENU Button until 8 (GLUTEN FREE BREAD) appears in the Display Window. Press the COLOR Button to choose crust color. Press the LOAF Button to choose 1.5 LB. Press the START/STOP Button to begin.
- After 5 to 10 minutes into the kneading process, check the mixture. It should swirl about in the machine with a definite raised pattern on top. At this time, use a rubber spatula to push any flour or dough from the sides of the bread down into the mixture.
- After the beeper sounds, press the START/STOP Button and use oven mitts to carefully remove the Bread Pan after baking. The Light will go out when the START/STOP Button is activated.
CAUTION: THE PAN, KNEADING PADDLE AND BREAD WILL BE VERY HOT. USE OVEN MITTS.
-
Turn Bread Pan upside down and shake several times to release the bread. Do not use metal utensils inside the Bread Pan or Bread Machine. Remove the Kneading Paddle and allow loaf to cool standing upright on wire rack approximately 15 to 30 minutes before slicing.
-
Cut the loaf in half, top to bottom and then cut each half into 1/2 inch slices.
-
When the bread has completely cooled, approximately 1 hour, store in an airtight container.
-
UNPLUG UNIT AND ALLOW TO COOL COMPLETELY BEFORE CLEANING. Clean Bread Pan after each use, DO NOT IMMERSE THE BREAD PAN IN WATER. (See CLEANING INSTRUCTIONS outlined in this Instruction Manual.) Clean inside of Breadman® after each use
GLUTEN FREE PUMPERNICKEL BREAD
| Ingredients: 1.5 LB | |
| Water, 110°- 115°F/43 - 46°C 1 cup | |
| Extra Large Eggs 3 | |
| Oil 3 TBL | |
| Cider Vinegar 1 tsp | |
| Molasses 3 TBL | |
| Salt 1-1/2 tsp | |
| Dry Milk 1/2 cup | |
| Brown Rice Flour 2 cups | |
| Potato Starch Flour 1/2 cup | |
| Tapioca Flour 1/2 cup | |
| Cocoa Powder 1 TBL | |
| Xanthan Gum 1 TBL | |
| Caraway Seeds | 1 TBL |
| Red Star Quick RiseTM Yeast | 4-1/2 tsp |
| Select GLUTEN FREE cycle | |
GLUTEN FREE CINNAMON RAISIN BREAD
| Ingredients: | 1.5 LB |
| Water, 110°– 115°F/43 – 46°C | 1-1/4 cups |
| Extra Large Eggs | 3 |
| Oil | 3 TBL |
| Cider Vinegar 1 tsp | |
| Sugar | 1/4 cup |
| Salt | 1-1/2 tsp |
| Dry Milk | 1/2 cup |
| White Rice Flour | 2 cups |
| Potato Starch Flour | 1/3 cup |
| Soy Flour | 1/4 cup |
| Tapioca Flour | 2/3 cup |
| Cinnamon 1-1/2 tsp | |
| Raisin | 3/4 cup |
| Xanthan Gum | 1 TBL |
| Red Star Quick RiseTM Yeast | 4-1/2 tsp |
| Select GLUTEN FREE cycle | |
JAM RECIPES
STRAWBERRY, BLACKBERRY, OR RASPBERRY JAM
Ingredients:
| Fresh or Frozen (thawed) Fruit | 2 cups |
| Sugar | 3-1/4 cups |
| Select JAM cycle | |
BLUEBERRY, APRICOT, PEACH OR PEAR JAM
Ingredients:
| Fresh or Frozen (thawed) Fruit | 2 cups |
| Sugar 3-1/4 cups | |
| Lemon Juice | 2 TBL |
| Select JAM cycle | |
CAUTION: DO NOT EXCEED THESE AMOUNTS!
text_image
Warning symbol with exclamation mark inside triangle, commonly used to indicate caution or hazardPRODUIT PEUT DIFFÉRER LÉGÈREMENT DE ILLUSTRATIONS
text_image
Labeled diagram of a coffee maker with numbered parts for identification and assembly reference.Basic Medium (1.5 LB)
Basic Rapid (1.5 LB)
French Light (1.5 LB)
(pain frâncais pâlé de 680 g)
French Light (2.0 LB)
French Medium (1.5 LB)
French Medium (2.0 LB)
French Dark (1.5 LB)
French Dark (2.0 LB)
French Rapid (1.5 LB)
French Rapid (2.0 LB)
Whole Wheat Light (1.5 LB)
Whole Wheat Light (2.0 LB)
Whole Wheat Medium (1.5 LB)
Whole Wheat Medium (2.0 LB)
Whole Wheat Dark (1.5 LB)
Whole Wheat, Rapid (1.5 LB)
Whole Wheat Rapid (2.0 LB)
Sweet Medium (1.5 LB)
Sweet Rapid (1.5 LB)
(pain súcré à cuisson rapide de 680 g)
Sweet Rapid (2.0 LB)
Super Rapid Medium (1.5 LB)
Gluten Free Light (1.5 LB)
Gluten Free Medium (1.5 LB)
(pain sans gluten moyen de 680 g)
Gluten Free Dark (1.5 LB)
natural_image
Line drawing of a hand holding a small object inside a device (no text or symbols)C
natural_image
Line drawing of a hand holding a small object into a container (no text or symbols)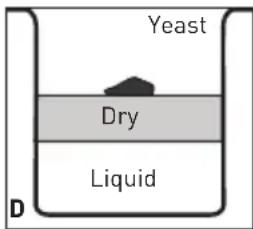
text_image
Yeast Dry Liquid Dnatural_image
Line drawing of a hand holding a small object inside a device, labeled 'E' (no text or symbols on the diagram itself)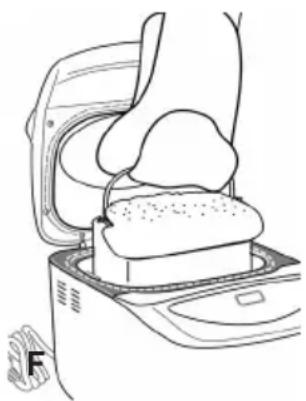
natural_image
Line drawing of a robotic arm with a mesh head and gear mechanism (no text or symbols)natural_image
Line drawing of a hand holding a device with an upward arrow indicating motion (no text or symbols)Farine panifiable 750 ml (3 tasses) 1 l (4 tasses)
Farine panifiable 800 ml (3 1/4 tasses) 1 l (4 tasses)
PAIN AU BLÉ ENTIER ET AU GLUTEN
Farine panifiable 750 ml (3 tasses)
Farine tout-usage 625 ml (2 1/2 tasses)
Choisir le cycle PASTA (PÂTES ALIMENTAIRES).
Méthode:
Sucre 800 ml (3 1/4 tasses)
Choisir le cycle JAM (CONFITURES).
CONFITURE DE BLEUETS, D'ABRICOTS, DE PÈCHES OU DE POIRES
Ingrédients :
Sucre 800 ml (3 1/4 tasses)
© 2013 Applica Consumer Products, Inc.
Made In China
Printed in China