TR845 - Bread maker Breadman - Free user manual and instructions
Find the device manual for free TR845 Breadman in PDF.


User questions about TR845 Breadman
0 question about this device. Answer the ones you know or ask your own.
Ask a new question about this device
Download the instructions for your Bread maker in PDF format for free! Find your manual TR845 - Breadman and take your electronic device back in hand. On this page are published all the documents necessary for the use of your device. TR845 by Breadman.
USER MANUAL TR845 Breadman
natural_image
White rectangular container with two handles and a small bowl on the side (no visible text or symbols)TABLE OF CONTENTS
Important Safeguards 1
Your Breadman ^® 2
Control Panel 3
Using the Breadman ^® 4 - 6
Baking Cycles 7-9
Super Rapid Breads, As Easy As 1-2-3! 10
Super Rapid Bread Recipes 11 - 14
Making Dough and Baking Bread 15 - 19
Using the Batter Breads™ Cycle 20
Dough Cycle Instructions 21
Jam Cycle Instructions 22
Using the Delay Timer 23 - 24
Using the Pause Button 25
Cleaning Instructions 26
Jam Recipes 27
Pizza Dough Recipe 28
Trouble Shooting 29 - 31
Warranty Inside Back Cover
IMPORTANT SAFEGUARDS
When using the Breadman® Automatic Bread Baker, basic safety precautions should always be followed, particularly the following:
-
READ ALL INSTRUCTIONS BEFORE USE.
-
Do not touch hot surfaces. Use handles or knobs. Always use oven mitts when handling hot materials and allow metal parts to cool before cleaning.
-
Unplug this product from wall outlet when not in use and before cleaning. Allow to cool thoroughly before putting on or taking off parts.
-
Do not immerse appliance in water or any other liquid.
-
Close supervision is always necessary when this or any appliance is used by or near children.
-
Do not allow anything to rest on the power cord. Do not plug in cord where persons may walk or trip on it.
-
Do not operate this or any appliance with a frayed or damaged cord, or after the appliance malfunctions, or has been damaged in any manner. Return the appliance to Salton, Inc. Repair Dept. for examination and repair.
-
Avoid contact with any moving parts.
-
Do not use attachments not recommended by Salton, Inc.; they may damage the appliance or cause injury.
-
This appliance is intended for household use only. Do not use outdoors or for commercial purposes.
-
Do not let the cord hang over the edge of a table or counter, or touch hot surfaces. Do not place on an unsteady or cloth-covered surface.
- Do not place the appliance near a hot gas or electric burner, in a heated oven or in a microwave.
- Keep the unit at least 4 inches away from walls or any other objects when using it.
- To disconnect, grip the plug and pull the plug from the wall outlet. Never pull on the cord.
SAVE THESE INSTRUCTIONS
Note:
A. A short power-supply cord is provided to reduce the risk of becoming entangled in or tripping over a longer cord.
B. If an extension cord is used:
(1) the marked electrical rating of the extension cord should be at least as great as the electrical rating of the appliance, and
(2) the cord should be arranged so that it will not drape over the counter top or tabletop where it can be pulled on by children or tripped over unintentionally.
CAUTION: During use, the internal parts of the Breadman® and the area around the Steam Vent are HOT. Keep out of reach of children to avoid possible injury.
- Removable Lid
- Handle
- Bread Pan
- Kneading Paddle
- Oven Chamber
- Drive Shaft
- Heating Element
- Viewing Window
- Control Panel
-
Steam Vents
-
Power Supply Cord with Polarized Plug
POLARIZED PLUG
This appliance has a polarized plug (one blade is wider than the other). To reduce the risk of electric shock, this plug is intended to fit into a polarized outlet only one way. If the plug does not fit fully in the outlet, reverse the plug. If it still does not fit, contact a qualified electrician. Do not attempt to modify the plug in any way.
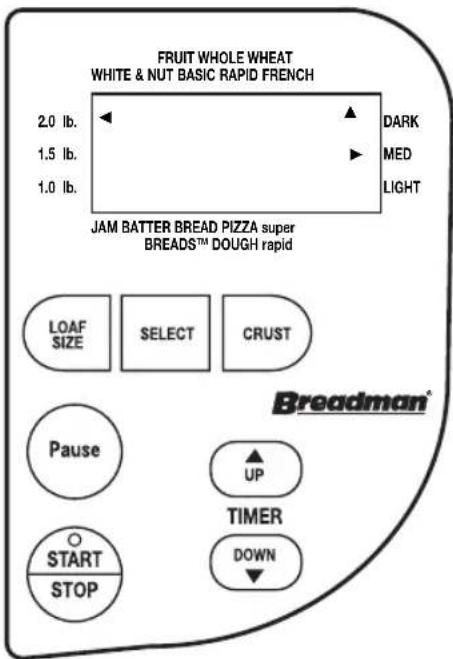
CONTROL PANEL
text_image
FRUIT WHOLE WHEAT WHITE & NUT BASIC RAPID FRENCH 2.0 lb. 1.5 lb. 1.0 lb. JAM BATTER BREAD PIZZA SUPER BREADSTM DOUGH rapid LOAF SIZE SELECT CRUST Pause UP START STOP TIMER DOWN Breadman®A. Display Window
Shows your selection, Loaf Size and Timer setting.
B. Timer
Use this Button to add or subtract time displayed in the Display Window.
▲ Each time you press this Arrow, the Timer advances 10 minutes.
▼ Each time you press this Arrow, the Timer is set back 10 minutes.
(Hint: Holding down the Arrow Buttons in place with either fast forward ▲ or fast reverse ▼ the time.)
C. Pause
The PAUSE function can be activated only after the machine has started a baking program. For more details, refer to the PAUSE section in this book.
D. Select
Press this Button to select the Baking or Dough Cycle you want. Each time the SELECT Button is pressed, the Arrow in the Display Window will correspond with the selection. Press the SELECT Button until your choice is indicated. If at any time during the baking process you would like to check which Cycle has been selected, simply refer to the Display Window on the unit.
E. Loaf Size
Press this Button to select what size loaf you would like to prepare. An indicator symbol (◀) will appear in the Display Window next to either the 1.0 lb., 1.5 lb., or 2.0 lb. loaf.
F. Crust Control
To control the crust color of your loaf, press this Button. You have a choice of Light, Medium or Dark. An indicator symbol (◀) will appear next to your choice when this Button is pressed.
F. Start/Stop
Press START/STOP Button to begin the Cycle that you choose and to begin the Timer. The time remaining will appear in the Display Window. Use this Button to stop the baking process and clear the Program. Press and hold the START/STOP Button to stop a Baking Cycle at any point.
USING THE BREADMAN®
With your new Breadman® Automatic Bread Baker:
- You can use commonly available pre-packaged bread mixes. Follow the instructions on the package. We do not recommend using 1 lb. mixes in this machine!
- You can bake a loaf of bread from scratch. See the Recipe & Menu Planner included with your Breadman® for lots of tasty options.
- You can make dough for rolls, shaped loaves, and for pizza! Choose the Dough or Pizza Dough Cycles. Use either of the Breadman®'s Dough Cycles to do the mixing and kneading for you, then shape, proof, and bake your bread loaves or pizza yourself.
- You can make delicious non-yeast Batter Breads™, and cakes!
- You can make all kinds of tasty jams by using the Jam Cycle.
Power Failure Back-Up
- You have Power Failure Back-Up. If the electricity in your home goes out, or you mistakenly unplug the machine, the Breadman®'s memory stores the active program. If power is re-connected within one hour of that time period, the Breadman® will return to baking your bread.
NOTE: If you experience frequent surges in your area, please use a surge protector.
- If your power is out for longer than 60 minutes, and if you are using any dairy products, perishables or meats in your bread, for health, sanitary and other considerations, you should discard the contents of the recipe and start again with new fresh ingredients.
Inserting and Removing the Bread Pan
- To insert the Bread Pan, place into the Oven Chamber and press down firmly to seat it into place. Then place the Kneading Paddle onto its shaft before adding any ingredients.
USING THE BREADMAN® (continued)
• To remove the Bread Pan from the Bread Machine, hold the Handle with a mitt and lift gently out of the Oven Chamber.
NOTE: Always hold the Bread Pan by the Handle when inserting and removing from the Oven Chamber.
Caution
When removing the Bread Pan after baking, always wear oven mitts to prevent injury.
Operating Tips
- Use oven mitts when working with bread or any part of the Breadman® that is hot from baking.
- Wipe off crumbs and clean the Breadman ^® as needed, after baking.
- Unplug the Breadman ^® when you are not using it.
- It is normal for the Viewing Window to collect moisture during the beginning of the Rise Cycle. As your bread bakes, the moisture will evaporate so you can watch your bread's baking progress.
- Don't open the Lid during baking. This can cause the bread to bake improperly.
Caution
- To protect young children, keep the Breadman ^® out of their reach when you're not there to supervise — especially during the Kneading and Baking Cycles.
- Use the Breadman ^® on a flat, hard surface. Don't place it near an open flame or heat, or on a soft surface (such as a carpet or table cloth). Avoid placing it where it may tip over during use. Dropping the Breadman ^® could cause it to malfunction.
- To avoid burns, stay clear of the Steam Vents during kneading and baking. Also, don't touch the Viewing Window — it gets very hot.
USING THE BREADMAN ^® (continued)
- After baking, wait for the Breadman ^® to cool down thoroughly before touching or cleaning the Bread Pan or metal parts of the Breadman ^® without oven mitts.
- Never use metal utensils with the Breadman: These can scratch the non-stick surface of the Bread Pan.
- Avoid electric shock by unplugging before using a damp cloth or sponge to wipe the interior of the Oven.
- Never use the Bread Pan on a gas or electric cooktop or on an open flame or in a microwave!
- Avoid covering the Steam Vents during Kneading and Baking Cycles. This could cause the Breadman® to warp or discolor.
• Always make sure the Kneading Paddle is removed from the bread prior to slicing.
BAKING CYCLES
Really in a hurry? If you're in a rush and need to bake a white bread flour recipe, try the 59 Minute Start-to-Finish Super Rapid Cycle. Just remember to use the correct type of yeast.*
The Breadman® Automatic Bread Baker has many program settings from which you can choose.
- The Crust Control feature lets you choose Light, Medium or Dark crusts for most bread varieties, including White, French, Fruit & Nut, and Whole Wheat.
- The French Cycle is for breads with crisper crusts, especially those that are lowest in fat and sweeteners, such as French and Italian breads.
- Batter Breads™ uses high amounts of sugar and fat. Eggs are added to make a nutritious sweet bread.
• The Jam Cycle makes your favorite jams.
The table on the following pages show how long each part of the Baking Cycle takes.
*For breads made with the Super Rapid Cycle, always use Quick-Rise™ yeast.
BAKING CYCLES (continued)
© Copyright 1999, Breadman®
BAKING CYCLES (continued)
© Copyright 1999, Breadman®
SUPER RAPID BREADS, AS EASY AS 1-2-3!
The Super Rapid Cycle, with hotter Rise and Bake temperatures, is convenient for baking a hot, fresh loaf of bread in under an hour! The longer bread programs, with lower rise and bake temperatures, will bake a taller, more developed loaf of bread.
-
Add ingredients to the Bread Pan in the order listed. Refer to Super Rapid Cycle Hints below for measuring information. Place the Bread Pan into the Bread Baker.
-
Close the Lid. Select the Super Rapid Cycle and press START/STOP.
-
When finished baking, remove Bread Pan from the Bread Baker. BE SURE TO WEAR OVEN MITTS to prevent burning. Invert and shake to remove the loaf. Allow the loaf to cool standing upright on a wire rack before slicing.
Super Rapid Cycle Hints
• Water temperatures must be 100^-115^/40^-45^ .
- Larger amounts of Quick-Rise, ^TM RapidRise, ^TM Bread Machine* yeast must be used. They may be substituted in equal amounts.
- The dough ball for the Super Rapid Cycle should be a very soft, sticky to the touch, loose ball with a smooth texture. Do not add extra flour.
- Check the dough ball, and if necessary, use a rubber spatula to push any flour or dough from the sides of the Bread Pan down into the dough ball.
- As a result of the increased temperatures during the rise and bake process, the loaf of bread produced from this program may have a dark, crisp crust with a split in the top of the loaf.
SUPER RAPID BREAD RECIPES
We suggest starting your Super Rapid bread baking with this White Bread Recipe. Refer to Super Rapid Cycle Hints for measuring information. Follow each step carefully, noticing the water temperatures must be 100^-115^/40^-45^ that Quick-Rise, ^TM RapidRise, ^TM Bread Machine yeast must be used.
White Bread
1 lb. 1-1/2 lb. 2 lb.
Bread Flour 2-1/4 cups 3 cups 4 cups
Sugar 4 tsp. 2 TBL 2 TBL+2 tsp.
Nonfat Dry Milk 4 tsp. 2 TBL 2 TBL+2 tsp.
Salt 1 tsp. 1-1/8 tsp. 1-1/2 tsp.
Butter/Oil 1 TBL 1-1/2 TBL 2 TBL
Quick-Rise™ Yeast 3 tsp. 3-1/2 tsp. 4 tsp.
Water (100°-115°F/40°-45°C)
1 cup
1-1/8 cups 1-3/4 cups
PROGRAM
Super Rapid
Super Rapid
Super Rapid
SUPER RAPID BREAD RECIPES (continued)
Method
- Remove the Bread Pan from the Bread Baker. Attach the Kneading Paddle onto the Shaft. Have all ingredients ready. Make sure all ingredients, except water, are at room temperature.
- Use a liquid measuring cup to measure the water 100°-115°F / 40°-45°C and pour into the Bread Pan.
- Use a measuring spoon to measure the oil and add to the Bread Pan.
- Use a measuring spoon to measure the sugar, salt and dry milk; level off with the straight edge of a knife and add to the Bread Pan.
- Lightly spoon bread flour into a dry measuring cup, level off with the straight edge of a knife and add to the Bread Pan.
- Carefully measure Quick-Rise™ yeast with a measuring spoon; level off with the straight edge of a knife and add to the Bread Pan.
- Place the Bread Pan into the Bread Baker. Push down on the Rim until it snaps into place. Close the Lid and plug in the Breadman.®
- Select Super Rapid Cycle and press START/STOP.
- At the beep during the Kneading Cycle, (:53), check the dough ball. It should be sticky to the touch. At this time, push down any dough or flour that may be on the sides of the Pan.
- When the Beeper sounds, the bread has finished baking.
- Use oven mitts to carefully remove the Bread Pan.
CAUTION: The Oven Cavity, Bread Pan, Kneading Paddle and bread will be very hot. Use oven mitts.
- Turn Bread Pan upside down and shake several times to release the bread. Do not use metal utensils inside the Bread Pan or Bread Baker. Remove the Kneading Paddle and allow loaf to cool standing upright on wire rack approximately 20 minutes before cutting.
- When the bread has completely cooled, approximately 2 hours, store in an air-tight container.
- Unplug unit before cleaning. Do not immerse the Bread Pan in water. See Cleaning Instructions.
SUPER RAPID BREAD RECIPES (continued)
White Wheat Bread
1 lb. 2 lb.
Water (100°-115°F/40°-45°C) 3/4 cup + 3 TBL 1-1/2 cups + 3 TBL
Oil 2 tsp. 1 TBL + 1 tsp.
Sugar 3 TBL 1/4 cup
Salt 1 tsp. 2 tsp.
Dry Milk 1 TBL + 1 tsp. 2 TBL + 2 tsp.
Bread Flour 1-3/4 cups 3-1/2 cups
Whole Wheat Flour 1/2 cup 1 cup
Quick-Rise™ Yeast 3-1/2 tsp.
4 tsp.
PROGRAM
Super Rapid
Super Rapid
French Bread
1 lb. 2 lb.
Water (100°-115°F/40°-45°C) 3/4 cup + 3 TBL 1-1/2 cups + 2 TBL
Oil 1 TBL 2 TBL
Sugar 2-1/2 tsp. 1-1/2 TBL
Salt 3/4 tsp. 1-1/2 tsp.
Bread Flour 2-1/4 cups 4-1/3 cups
Quick-Rise™ Yeast 3 tsp. 4 tsp.
PROGRAM
Super Rapid
Super Rapid
Italian Bread
1 lb. 2 lb.
Water (100°-115°F/40°-45°C) 1 cup + 1 TBL 1-1/2 cups + 1 TBL
Oil 1 TBL. 2 TBL
Sugar 2 TBL 1/4 cup
Salt 1 tsp. 2 tsp.
Dry Milk 1 TBL + 1 tsp. 2 TBL + 2 tsp.
Dried Italian Seasoning 1-1/2 tsp. 1 TBL
Bread Flour 2-1/4 cup 4 cups
Quick-Rise ^TM Yeast 3-1/2 tsp. 4 tsp.
PROGRAM
Super Rapid
Super Rapid
SUPER RAPID BREAD RECIPES (continued)
Honey Granola Bread
2 lb.
Water (100°-115°F/40°-45°C) 1-1/2 cups + 1 TBL
Oil 4-1/2 TBL
Honey 2-1/2 TBL
Salt 2 tsp.
Dry Milk 4 TBL
Bread Flour 4-1/4 cups
Granola Cereal 1 cup
Quick-Rise™ Yeast 4 tsp.
PROGRAM Super Rapid
Cinnamon Raisin Bread
1 lb. 2 lb.
Water (100°-115°F/40°-45°C) 1 cup + 1 TBL 1-1/4 cups + 1 TBL
Oil 2 tsp. 1 TBL. + 1 tsp.
Brown Sugar 2-1/2 TBL 3-1/2 TBL
Salt 1 tsp. 1-1/2 tsp.
Dry Milk 1 TBL + 1 tsp. 2 TBL + 1 tsp.
Bread Flour 2-1/4 cups 3-1/2 cups
Cinnamon 3/4 tsp. 1 tsp.
Raisins 1/3 cup 1/2 cup
Walnuts 1/3 cup 1/2 cup
Quick-Rise ^TM Yeast 3-1/2 tsp. 4 tsp.
PROGRAM Super Rapid Super Rapid
MAKING DOUGH AND BAKING BREAD
Here's how to bake bread with your Breadman®:
natural_image
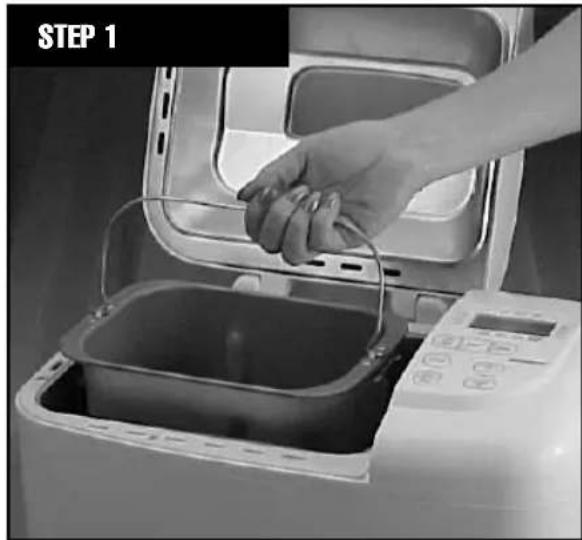
Close-up of a hand placing food into an open kitchen appliance, no visible text or symbols on the appliance itself.Open the Lid and remove the Bread Pan.
Pull the Bread Pan straight up to remove it from the Oven Chamber.
natural_image
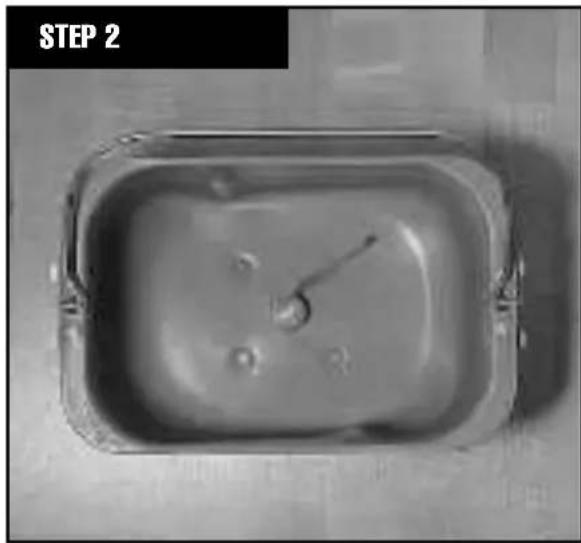
Top-down view of a rectangular container with liquid and a small rod, labeled 'STEP 2' in the top-left corner (no other text or symbols)Position the Kneading Paddle on the Drive Shaft as shown.
Match the flat side of the Kneading Paddle to the bottom of the Baking Pan. Make sure the Paddle is secure.
natural_image
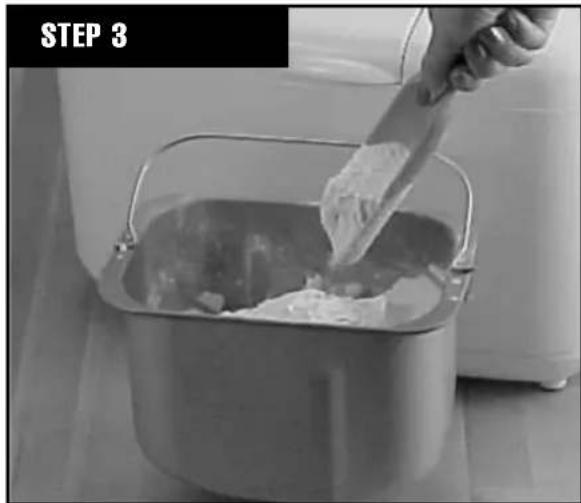
Person pouring a substance into a metal bowl on a surface, labeled 'STEP 3' (no other text or symbols visible)Place the ingredients into the Bread Pan.
For best results, add all liquid ingredients first. Then, add all dry ingredients EXCEPT yeast.
NOTE: If your recipe contains salt, please add salt with liquid ingredients, keeping it away from the yeast. Salt may activate the yeast prematurely.
*For Batter Breads, ^TM Jam and Dough Cycles, the order of ingredients is not important.
natural_image
Black-and-white photo of a hand pouring liquid from a bowl into a square basin, with no visible text or symbols.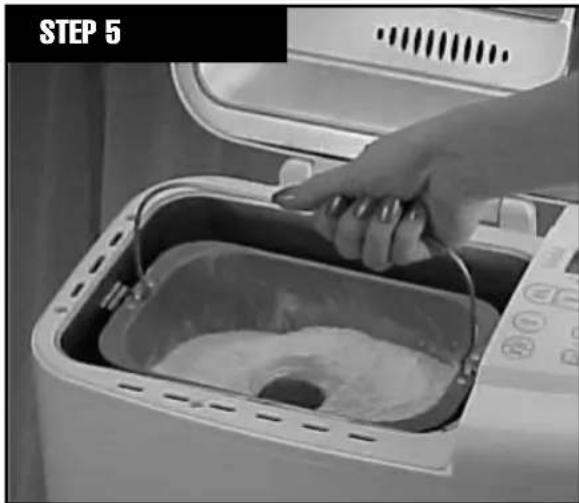
natural_image
Close-up of a hand placing a brown mixture into a square baking machine (no text or symbols visible)Insert the Bread Pan into the Oven Chamber.
Close the Lid and plug in the Breadman®
When you first plug it in, this Breadman® flashes 3:10 in the Display Window. The Breadman® automatically defaults to 1.5 lb. White Bread Cycle, Medium Crust. To clear the Display, press the START/STOP Button for 3 seconds.

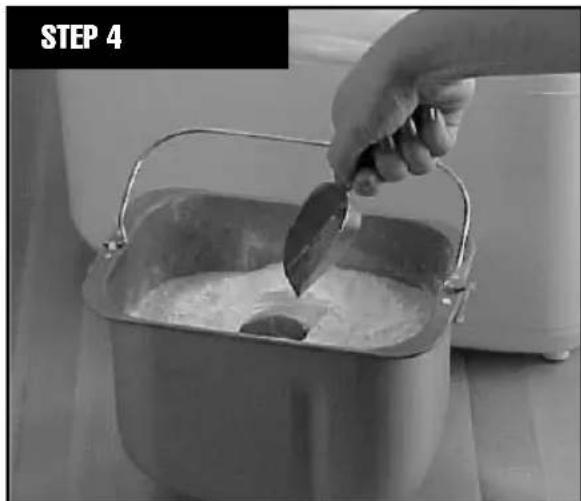
Make a small indentation on top of the dry ingredients (not so deep it reaches the wet layer) and add the yeast to the indentation.
This order of adding ingredients is important, especially when using the Timer, because it keeps the yeast away from the wet ingredients until the Kneading Cycle begins. (Liquid ingredients will prematurely activate the yeast.)
text_image
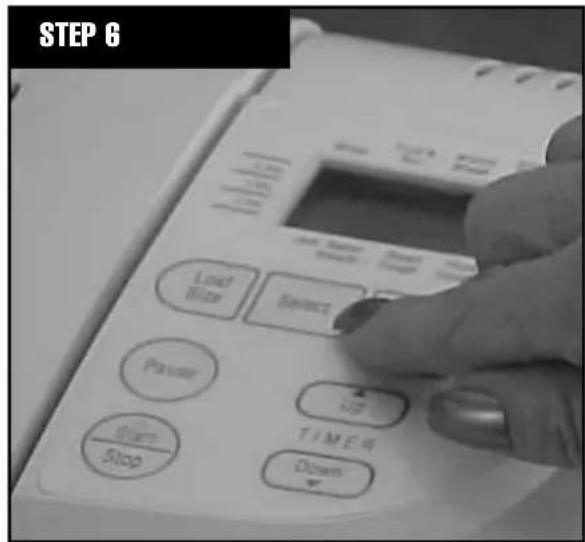
STEP 6 Load Stop Select Pause Stop UP TIMER DownPress the SELECT Button to choose the Cycle you want.
Each time the SELECT Button is pressed, it will beep and the Arrow moves from left to right in the Display Window.
text_image
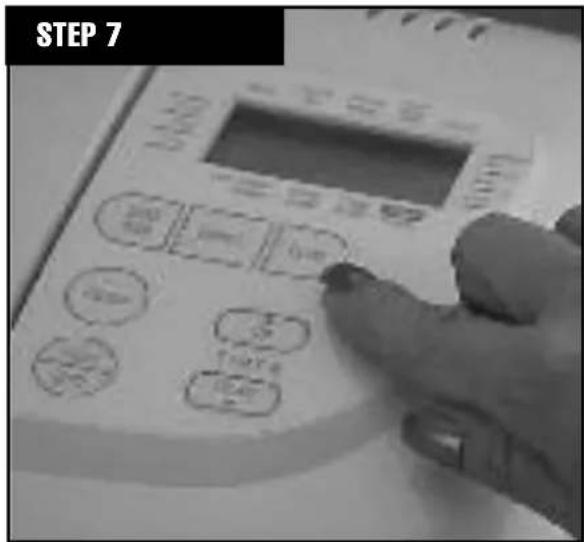
STEP 7Press the CRUST CONTROL Button to select what color you would like your crust to be when the loaf is finished baking. A flashing bar in the Display Window will appear next to your selection, Light, Medium or Dark.
*CRUST CONTROL cannot be activated for:
Batter Breads™
Jam
Bread Dough
Pizza Dough
French
Super Rapid Cycles
STEP 8
Press LOAF SIZE Button for the size you prefer. An Arrow will appear next to either 2 lb., 1.5 lb., or 1 lb. in the Display Window to verify which size is selected. If this Button is not pressed, the Bread Baker will automatically choose 2 lb. loaf size.
Although this Breadman® Bread Machine is capable of making 1lb. loaves, for best results, we recommend baking 1-1/2 and 2 lb. recipes.
NOTE: When using the Dough, Batter Breads™ or Jam Cycles, Steps 7 and 8 are not needed.
NOTE: The smaller the yield the recipe calls for, the lower the bread height will be.
text_image
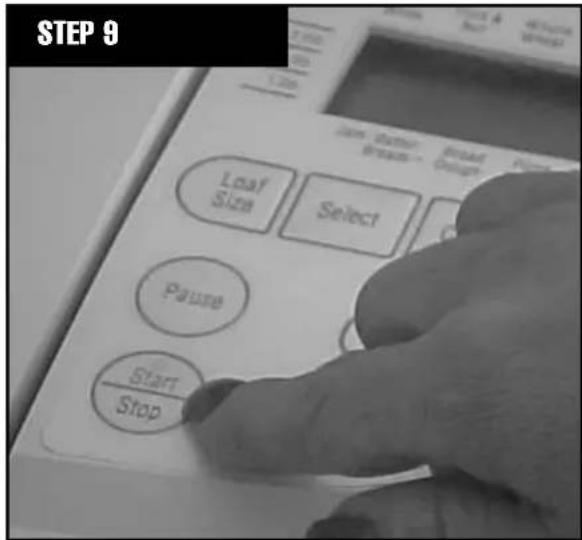
STEP 9 Leaf Size Select Pause Start StopPress START/STOP Button to begin the Kneading Cycle.
The time remaining will begin to count down in the Display Window. The Breadman ^® will begin mixing the ingredients for one minute. Then, it will begin the Kneading Cycle. During this time the Viewing Window may begin to fog. (This will clear eventually so you can view the loaf's progress).
*Whole Wheat Cycles have a rest period for up to 30 minutes before Kneading begins. No movement occurs in the Pan. This is normal.
STEP 10
When your bread is finished baking the Breadman® will beep 3 times and "0:00" will appear in the Display Window. Press the START/STOP Button and open the Lid.
Put on oven mitts and remove the Bread Pan very carefully as it will be very hot.
natural_image
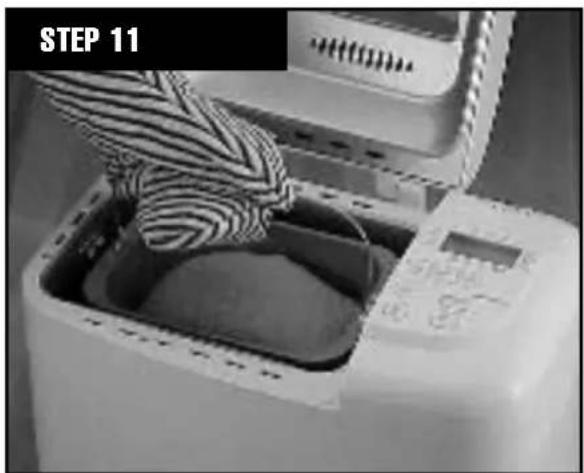
Close-up of a zebra-patterned kitchen machine with a cloth inside, labeled 'STEP 11' (no other text or symbols visible)Remove the loaf from the Bread Pan onto an aerated cooling rack to prevent the loaf from retaining too much moisture. Your loaf should slide easily out of the non-stick Bread Pan onto the rack.
If necessary, remove the Kneading Paddle from the loaf.
Sometimes the Kneading Paddle will stick in a loaf of bread. If it does, use a plastic or non-metal utensil to gently remove it, taking care not to scratch the Kneading Paddle. This is a common procedure with bread makers.
When you are done using the Breadman, ^® be sure to unplug it.
USING THE BATTER BREADS™ CYCLE
The Breadman ^® Batter Breads ^™ Cycle is for non-yeast breads, such as banana bread, pumpkin bread or cake. Batter Breads ^™ usually call for quick-acting leavening agents such as baking powder or baking soda.
The Breadman ^® will mix all of the ingredients and bake a cake-like bread.
NOTE: These breads tend not to rise as high as yeast breads.
For Best Results
Basic cake recipes can be used as well as pre-packaged cake mixes.
When baking cakes from scratch, please note the following:
- Baking cakes such as pound cake or angel food cake or any cake that requires long beating of eggs or egg whites or other ingredients are not recommended in the Breadman®.
- If a recipe calls for a 7-1/2" x 5" cake pan, it will not have any problem fitting into the Baking Pan. On the same note, if a recipe is written to form two layers, the recipe can be cut in half to fit into the Baking Pan.
- Cakes in which all ingredients can be mixed together at one time are prime recipes for the Breadman®
Operating Instructions For Batter Breads™ Cycle
- Measure ingredients in the recipe and add to the Baking Pan. (Make sure the Kneading Paddle is in position.)
- Insert Baking Pan into the Breadman ^® and close the Lid.
- Press SELECT to select the Batter Breads™ Cycle.
- Press START/STOP Button to begin Cycle.
• The baking process will finish in 1 hour 50 minutes. - BE SURE TO WEAR OVEN MITTS AS THE UNIT WILL BE VERY HOT!
- Turn onto a baking rack and let the cake cool completely before slicing or decorating.
PLEASE NOTE:
The Delay Bake Timer can not be used for the Batter Breads™ Cycle.
DOUGH CYCLE INSTRUCTIONS
- The DOUGH setting is used to make a variety of bread dough types (with the exception Pizza dough).
• After the end of the first rise, remove the dough, shape it, and bake it in a conventional oven. - Dough Cycle takes 1 hour 30 minutes.
Pizza Dough
- The Pizza Dough setting will simplify Pizza Dough preparation. When the dough is ready, roll it out with a rolling pin and top with your favorite toppings. Then bake in a conventional oven, following the times and temperatures given in your recipe.
JAM CYCLE INSTRUCTIONS
For Best Results
The Jam Cycle is very similar to the Batter Breads™ Cycle. Just add your ingredients and the Breadman® will do the rest.
- Do not reduce sugar or use sugar substitutes. The exact amounts of sugar, fruit, and pectin (as required by your recipe) are necessary for a good set.
- Use only ripe fruit (not overripe or underripe) for best flavor.
- Be sure to measure fruit after it has been crushed, not before.
- Do not purée fruit. Crush with a potato masher or food processor. Jam should have bits of fruit in it.
- Recipe yield should not exceed 3-1/2 cups.
- Remove stems, seeds, or pits from fruit before crushing.
Operating Instructions
- With Kneading Paddle in position, add the ingredients to the Baking Pan.
- Insert Baking Pan into the Breadman. ^
- Close Lid.
- Press SELECT Button to select the Jam Cycle.
- Press START/STOP Button to begin.
- The Breadman ^® will pre-heat before any movement occurs in the Pan. After pre-heating, the ingredients will be heated and mixed for approximately 80 minutes. The entire Cycle takes 1 hour 20 minutes to complete.
- The Breadman ^® will beep when the Cycle is complete.
- Press START/STOP Button and remove the Baking Pan from the Breadman.® MAKE SURE TO WEAR OVEN MITTS AS THE PAN WILL BE EXTREMELY HOT!
- Pour the hot jam into a refrigerator/freezer-safe container, leaving 1/2" of space at the top. Cover tightly to store.
- Jam will thicken upon cooling and storage.
Please Note:
The Delay Timer cannot be used for the Jam Cycle. See table at bottom of page 9 for times.
You can preset your Breadman® Bread Baker to cook pre-programmed breads from 4 hours to 24 hours in advance.
The Delay Timer cannot be used for Fruit & Nut, Batter Breads, ^TM Dough, Pizza Dough, Jam, Rapid or Super Rapid Cycles.
NOTE: Do not use the Timer if your recipe includes eggs, fresh milk or other ingredients that may spoil.
To preset your Breadman ^® follow these steps:
-
Add the ingredients as usual, taking care not to let the yeast and liquid ingredients contact one another.
-
If your recipe contains salt, please add salt with liquid ingredients, keeping it away from the yeast.
-
Close the Lid and plug it in.
-
Select the Baking Cycle you want.
-
Press the ▲ TIMER SET Button — it will default to 4:00 (4 hours).
Press the ▲ TIMER SET Button once for each 10 minutes you want to add. Use the ▼Button to subtract time from the Timer. The amount of time you set is shown in the Display Window.
- For example, if it is 8 o'clock PM, and you want a loaf of bread ready at 7 o'clock AM, that is 11 hours from now, press the ▲ TIMER Button until 11:00 appears on the Display.
NOTE: Actual baking times will not change.
-
Press START/STOP Button to begin the Timer. The LED Display and START/STOP Light will flash, letting you know the Timer is started. When the Display Window indicates "00:00", baking is completed.
-
If you make an error and want to start over again, press and hold START/STOP Button. The Timer will clear and you can begin again.
USING THE DELAY TIMER (continued)
For Best Results
• Take care to measure ingredients accurately, using a good set of measuring cups and spoons, or a good scale. Make sure to level all dry ingredients as you measure them. Inaccurate measuring could cause unexpected results in your loaf of bread.
• In particular, be precise in measuring the water.
• Take care not to add more than 5 cups of flour per loaf. Excess flour will cause the bread to bake incompletely and the dough to stick to the inside of the Lid.
• After placing all the ingredients in the Baking Pan, wait 10 minutes before pressing START/STOP Button.
- Use fresh ingredients.
- Since moisture is an enemy to flour, be sure to store your flour in an airtight container.
• To keep your yeast active, store it in an airtight container in your refrigerator. DO NOT USE YEAST IF THE DATE CODE HAS EXPIRED!
- Speaking of fresh — when using the Timer, we recommend setting it for as short a time as possible. Because ingredients are partially combined in the Bread Pan, the dough may tend to deteriorate if left too many hours, especially on a warm or humid day.
- When using the Timer Cycle for more than a couple of hours, during times of high humidity or hot weather, cut the liquid by one or two tablespoons to reduce the possibility of over-rising. Salt may be increased by 1/8 to 1/4 teaspoon to keep the dough from rising too quickly and falling. Sugar can also be reduced by up to half the recipe amount.
- Keep the Lid closed during the Baking Cycle. Opening it causes uneven baking.
• After your bread has cooled completely, store it in a plastic bag or plastic wrap to prevent it from drying out.
Power Failure Back-Up
If power should fail or if the unit is mistakenly unplugged, the memory stores the active program. If power is re-connected within 60 minutes of that time period, the Breadman® will return to baking your bread. Power Failure Back-Up does not cover surges. If you experience frequent surges, please use a surge protector.
USING THE PAUSE BUTTON
This Breadman ^® has a horizontal traditional style loaf pan. This feature, in combination with the PAUSE Button, lets you be very creative with bread machine baking.
When you press PAUSE, the Breadman® will stay “on hold” for up to 10 minutes. You can press PAUSE at any time, during any cycle.
To activate the PAUSE mode, simply press PAUSE. You will hear a beep when the pause begins.
To resume the Cycle, press PAUSE again and the machine will start again at the point where it left off. If you forget to press PAUSE again, the machine will automatically reactivate after the 10 minutes have elapsed.
Using the PAUSE Feature will let you do some of the following:
- Decorative crusts • Braided breads • Pull-apart rolls
- Pull-apart rolls • Monkey breads • Add crumble toppings to coffee cakes
- Create rustic-style, Mediterranean-styled rolled bread.
Here's a quick example of a rolled, Mediterranean-style bread using a French bread recipe:
Activate PAUSE at the end of the Knead 2 (see Kneading and Baking Cycle Charts for time details).
Remove the dough. Roll it out on a clean, lightly floured surface. You'll want to roll the dough into an 8-1/2" x 13" rectangle.
Lightly brush with good olive oil, such as Tassos. Then, sprinkle with fresh chopped garlic, basil, rosemary, and sun-dried tomatoes. Top with 1/3 cup of crumbled feta or goat cheese. If you would like, you could even add 2-3 slices of prosciutto.
Roll the dough up tightly into an 8-1/2" wide roll. tuck the ends under and pinch to seal. Place into the Bread Pan. Return the Bread Pan to the Breadmaker, close the Lid and press PAUSE again.
The final rise will begin, immediately followed by the Baking Cycle.
As the baking begins, you could PAUSE again. You can score the top crust, gently mist the loaf with cold water, return the Bread Pan to the Oven, close the Lid and touch PAUSE. Your rustic, alfresco Mediterranean bread will soon finish baking.
NOTE: Do not leave the Lid standing open for extended periods of time. ALWAYS use an oven mitt when handling the Pan and follow the Important Safeguards found in the beginning of this book.
CLEANING INSTRUCTIONS
The Bread Pan and Kneading Paddle have non-stick surfaces which make cleaning easy.
-
After baking each loaf of bread, unplug the Breadman ^® and discard any crumbs.
-
Remove the Bread Pan from the Oven and the Kneading Paddle from the Bread Pan. Then, as needed, wash the Bread Pan and Kneading Paddle inside and out with warm, soapy water. Avoid scratching the non-stick surfaces. DO NOT PUT THE PAN IN A DISHWASHER OR SOAK IT IN WATER.
If the Kneading Paddle is stuck to the Drive Shaft, pour warm water in the Pan to loosen it. DO NOT USE EXCESSIVE FORCE.
- Wipe the inside of the Lid and Oven with a slightly damp cloth or sponge. If any residue has scorched on the Heating Element or elsewhere, wipe with a non-abrasive pad and wipe clean. The Lid can be removed for cleaning.
DO NOT PUT THE LID IN A DISHWASHER.
This can cause the Lid to warp.
Do not use vinegar, bleach, or harsh chemicals to clean the Breadman.®
Do not soak the Bread Pan for a long period of time — this could interfere with the free working of the Drive Shaft.
Be sure the Breadman ^® is completely cooled before storing.
The Oven Chamber contains the Heating Element and Drive Shaft. Therefore, when cleaning, NEVER pour water, solvents, or cleaning solutions into this area.
The Lid is removable for easy cleaning. Because it contains a sensitive electronic sensor, DO NOT LEAVE IT SOAKING IN WATER.
DO NOT PUT LID IN THE DISHWASHER.
Caution
Avoid electric shock, unplug the Breadman® before cleaning!
JAM RECIPES
Blue Kiwi Mango Jam
3/4 cup (6 oz.) Kiwi Fruit, Peeled and Chopped
3/4 cup (6 oz.) Mango, Peeled and Chopped
1-1/2 cups (12 oz.) White Sugar
1 tsp. Lemon Zest, Grated
1 tsp. Orange Zest, Grated
4 drops Blue Food Coloring
Place all ingredients in Baking Pan and start the Jam cycle.
The kiwi fruit should be ripe, but not mushy while the mango should be barely ripe. Lemon and orange zest are grated from the surface of the peel. Make sure none of the bitter white rind is included.
Peach-Raisin Jam
1-1/2 cups (12 oz.) Ripe Peaches, Pitted
1-1/2 cups - 1 TBL White Sugar
2 TBL Golden Raisins, Soaked
1 TBL Brown Sugar
2 Whole Cloves
1/8 tsp. Ground Allspice
Place all ingredients in Baking Pan and start the Jam cycle.
For best results, fruit and sugar should be weighed on a small kitchen or postal scale. 1-1/2 cups of fruit or white sugar weighs 12 oz.
PIZZA DOUGH RECIPE
Pizza Dough, 2 lb.
1-3/8 cups Water
4 cups Bread Flour
1 TBL Sugar
1-3/4 tsp. Salt
1 TBL Margarine
2 TBL Dry Milk
1-3/4 tsp. Active Dry Yeast
When the dough is ready, roll it out with a rolling pin and top with your favorite toppings. Then bake in a conventional oven, following the times and temperatures given in your recipe.
TROUBLE SHOOTING
| Symptom | Possible Solutions |
| Bread has an offensive odor | Check to be sure you added the correct amount of yeast.Measure carefully — too much yeast will cause an unpleasant odor and may cause the loaf to rise too high.Be sure to use only fresh ingredients. |
| Baked bread is soggy or the bread's surface is sticky | Remove the bread from the Bread Pan as soon as it is done baking. Leaving it in the pan allows condensation to collect on the sides touching the pan.Also be sure to cool the loaf on a wire rack; cooling it on a countertop causes the side next to the counter to become soggy. |
| START/STOP Button doesn't start the machine | Make sure the machine is plugged in.If nothing appears in the Display Window, press SELECT to choose your Baking Cycle. (You must select a Baking Cycle before pressing START/STOP Button.)If the baking area is too hot, the Breadman® will not start because of an Automatic Safety Feature. Remove the Bread Pan with your ingredients, and wait until the Breadman® cools down — about 20 minutes — before starting a new loaf. |
| Can't set the Timer | Don't use the Timer if your recipe includes eggs, fresh milk or other ingredients that may spoil.The Timer cannot be used for Fruit & Nut, Batter Breads, ^TM Dough, Pizza Dough, Jam or Super Rapid Cycles. |
| The Kneading Paddle was stuck in the bread | Make sure the Kneading Paddle is mounted properly before adding ingredients to the Bread Pan and baking.Sometimes denser or crustier loaves of bread may pull the Kneading Paddle out with them when you remove the loaves after baking. When this happens, use a non-metal utensil and gently remove the blade from the bottom of the loaf. |
| The bread rose too high | Make sure not to add too much yeast, water or flour. Too much of any of these may cause the loaf to rise more than it should. |
| The bread didn't rise enough | Did you add enough yeast, water or sweetener?Make sure to add ingredients in the proper order: liquids, dry ingredients, yeast. Make sure yeast doesn't get wet until the Breadman® mixes the ingredients together.NOTE: Typically, bread made with whole grain flours will not rise as high as bread made with refined flours. |
| The dough looks like batter, or the dough ball is still sticky, not smooth and round | During the Kneading process, add 1 tablespoon of flour at a time, letting it mix in well. For most breads, your dough ball should become round, smooth, not sticky to the touch, and should bounce back when you press it with your finger. |
| The dough ball is lumpy or too dry | During the Kneading process, add 1 tablespoon of water at a time, letting it mix in well. |
| The bread didn't rise at all | Make sure yeast is not left out. Also check the date code on the yeast and that it is always the last ingredient put into the pan. Make sure the yeast doesn't come into contact with salt or any liquid ingredients. |
TROUBLE SHOOTING (continued)
Symptom Possible Solutions
| The bread is caved in | Make sure liquids are measured correctly. Next time, reduce your liquids by 2 tablespoons. If you're adding fruits or vegetables, make sure they are well drained. |
| “H:E1” is displayed and flashing with a beeping sound | The Breadman® is too hot (over 100°F/40°C) to begin preparing another loaf. Unplug the machine, remove the Bread Pan with your ingredients, and wait until the Breadman® cools down — about 20 minutes — before preparing a new loaf. |
| “H:E2” is displayed and flashing with a beeping sound | The Breadman® has overheated. is too hot Unplug the machine, remove the Bread Pan with your ingredients, and wait until the Breadman® cools down — about 20 minutes. If this error message occurs during the Baking Cycle, you will have to discard the contents of the Bread Pan and start again with new ingredients when the machine has cooled down. |
| Display Window shows nothing | Make sure the Breadman® is plugged in. Also, check the power outlet. If there is no problem with the power outlet and your unit is plugged in, contact Consumer Service for advice or return the unit to place of purchase. |
| “E:S1” is displayed and flashing with a beeping sound | The Breadman® Oven Sensor has short-circuited. Unplug the machine and contact Consumer Service for advice or return the unit to place of purchase. |
NOTES
ONE-YEAR LIMITED WARRANTY
This Salton, Inc. product warranty extends to the original consumer purchaser of the product.
Warranty Duration: This product is warranted to the original consumer purchaser for a period of one (1) year from the original purchase date.
Warranty Coverage: This product is warranted against defective materials or workmanship. This warranty is void if the product has been damaged by accident, in shipment, unreasonable use, misuse, neglect, improper service, commercial use, repairs by unauthorized personnel or other causes not arising out of defects in materials or workmanship. This warranty is effective only if the product is purchased and operated in the USA, and does not extend to any units which have been used in violation of written instructions furnished by Salton, Inc., or to units which have been altered or modified or to damage to products or parts thereof which have had the serial number removed, altered, defaced or rendered illegible. Wear and tear for Bread Pans and Paddles is not considered a manufacturer's defect.
Warranty Disclaimers: This warranty is in lieu of all warranties expressed or implied and no representative or person is authorized to assume for Salton, Inc. any other liability in connection with the sale of our products. There shall be no claims for defects or failure of performance or product failure under any theory of tort, contract or commercial law including, but not limited to, negligence, gross negligence, strict liability, breach of warranty and breach of contract.
Warranty Performance: During the above one-year warranty period, a product with a defect will be either repaired or replaced with a reconditioned comparable model (at Salton, Inc.'s option) when the product is returned to the Salton, Inc.'s warranty period and an additional one-month period. No charge will be made for such repair or replacement.
Service and Repair
Should the appliance malfunction, you should first call toll-free 1-800-233-9054 between the hours of 7:30 am and 6:00 pm Central Standard Time and ask for CONSUMER SERVICE stating that you are a consumer with a problem.
In-Warranty Service: For an appliance covered under the warranty period, no charge is made for service or postage. Contact Consumer Service for return authorization.
Out-of Warranty Service: A flat rate charge by model is made for out-of-warranty service. Include \$15.00 for return shipping and handling.
Salton, Inc. cannot assume responsibility for loss or damage during incoming shipment. For your protection, carefully package the product for shipment and insure it with the carrier. Be sure to enclose the following items with your appliance: any accessories related to your problem; your full return address and daytime phone number; a note describing the problem you experienced; a copy of your sales receipt or other proof of purchase to determine warranty status. C.O.D. shipments cannot be accepted.
Return the appliance to:
ATTN: Repair Department
Salton, Inc.
708 South Missouri St. Macon, MO 63552
For more information on Salton, Inc. products:
visit our website: http://www.breadman.com or E-mail us at breadman@saltonusa.com
IMPORTANT NOTICE
If any parts are missing or defective,
DO NOT return this product.
Please call our Consumer Service Department for assistance.
800-233-9054
Monday - Friday 7:30am - 6pm CST
Thank You

text_image
salton®innovation for a healthier today and tomorrow
If after reading this instruction booklet you still have questions about using the Breadman® Automatic Bread Machine, please write or call:
Salton, Inc. 708 South Missouri St. Macon, MO 63552 1-800-233-9054
Monday - Friday 7:30am - 6pm CST
For more information on Salton, Inc. products, E-mail us at:
breadman@saltonusa.com
OR, visit our website:
http://www.breadman.com
HEALTHY BREAD RECIPIES
& menu planner
1 to 1½ lb
HEALTHY BREAD RECIPES
& menu planner
natural_image
Microscopic view of a porous material structure with no visible text or symbolsIMPORTANT
Please Read
The information in this booklet is intended to increase your knowledge of whole grains and fresh bread baking, and by no means is it intended to diagnose or treat an individual's health problems or ailments. The information given is not medical advice, nor is it presented as medical advice. Before starting any type of diet or medical treatment you should consult your own health care practitioner.
CONTENTS
1 Introduction
2 Health Benefits of Whole Grain Breads
3 Recipe Ingredients
3 Grain Glossary
5 Sample Menus Using Whole Grain Breads
6 Recipes
11 Questions and Answers
INTRODUCTION
Since biblical times, bread has been considered "the staff of life." Today whole grains are still recognized as the foundation of a nutritious diet. The USDA's Food Guide Pyramid, the new food guideline that replaces the old four food groups, recommends that whole grains comprise nearly 50 percent of our daily calories. According to these guidelines, we should eat six to eleven servings of whole grains every day.
This USDA recommendation is easy to follow with the Breadman™ Automatic Bread Baker. Specially designed to handle whole grains, the Breadman bakes up deliciously healthy nutrition with just the touch of a button. And you can guarantee that your family gets only the freshest, most health-giving breads because you are in control. You choose the flour, you select the sweetener (if any), and you decide when the baking process will start: Whenever you desire, you can have an aromatic loaf of just-baked bread, bursting with all the goodness of whole grains and containing no hidden additives, saturated fats, excess sodium or refined sugars.
Let this Recipe and Menu Planner be the beginning of your health-enhancing adventures with bread baking. The suggestions provided here are just that—suggestions. Please feel free to use your imagination and enjoy experimenting with your favorite ingredients.
HEALTH BENEFITS OF WHOLE GRAIN BREADS
Refined grains, and the products made from them, have literally been stripped of their natural goodness. Commonly listed as white flour, wheat flour or even enriched flour, refined grains are almost devoid of the fiber and important nutrients that were intact in the original grain. Besides being processed, white flour is often bleached to achieve that snow-white appearance. All this adulteration has changed a wholesome food into a food fragment containing little nutritional benefit and very little character.
Fiber-rich whole grains and whole grain flours have been the focus of many scientific studies demonstrating that they reduce the risk of diverticulosis, colon and rectal cancer, and atherosclerosis. Diets containing adequate fiber inherently tend to be lower in fat and calories, especially saturated fat and cholesterol, which may contribute to the reduced risk factor.
Fiber is the primary reason that whole grain breads and other products are so satisfying to eat. Fiber is filling, and because it contains so few calories it is an excellent part of the low-fat, high complex carbohydrate diet recommended for better health.
RECIPE INGREDIENTS
Bread recipes begin with a very basic set of ingredients: water, flour, salt and yeast. To this short list, you can add a variety of interesting and delicious ingredients that will give your breads the individuality you are looking for. Seeds, nuts, nut butters, dried fruits, raisins, dates, apples, berries, herbs, spices, carob powder, vegetables and bran are just a few of the many ingredients you can use to create hundreds of unique and flavorful breads.
Purchase fresh ingredients whenever possible for the best taste and results. Dried foods, such as fruits, vegetables, herbs and spices will keep for a virtually unlimited time if stored in a cool, dry environment. Store produce, oils, whole grain flours and other perishable foods in the refrigerator for longer life and retention of flavor. Glass and hard plastic containers with tight fitting lids are preferable for storing most foods; they keep the aromas in but do not expose the foods to the potentially harmful ingredients found in some plastic containers. Plastic may absorb strong odors, so for spicy or pungent ingredients, always use glass.
You will probably be able to find most, if not all, of the ingredients needed for baking healthy breads at your supermarket; consumer demand has helped many grocers become more health conscious. If some of the ingredients are not available yet in your grocery store, your health food store is certain to stock them.
For the widest range of nutrients and a diversity of wonderful flavors and textures, try baking with a variety of the healthy grains listed below.
GRAIN GLOSSARY
Amaranth This petite golden grain is moving quickly from the "unusual" grain category to one of mainstream acceptance. A mainstay in the diet of the Aztecs, amaranth was considered a strength-giving food, probably due to its high protein profile. Both the grain and its flour offer a distinct flavor when added to your favorite bread recipes.
Barley This grain has a hearty, earthy flavor and produces a dense loaf of bread due to its low gluten content. Barley is a good substitute for white flour in recipes, but should be cut with a lighter flour when several cups are being used at a time.
Buckwheat Technically not a grain, buckwheat is really the fruit of a plant related to rhubarb. Its flour (ground buckwheat seed) and groats are both useful for unique bread making. The flavor has been described as a combination of rosemary and green tea.
Corn The only grain eaten fresh as a vegetable, corn (also known as maize) is available in a wide variety of colors. Judge the freshness of cornmeal and flour from its sweet and delicate flavor. Blue cornmeal, a beautiful hue when dry, becomes a purplish color when cooked.
Kamut This "ancient" wheat grain is available as a whole grain, rolled grain, flour and cereal. People who are wheat sensitive have reported a tolerance to kamut products, though this is still being investigated.
Millet Commonly used to feed birds, millet lends a delightful crunch when added in whole grain form to bread recipes. People who are allergic to other grains have had luck with millet. It is considered to be the most digestible grain around.
Oat Rolled oats and oat flour are welcome additions to almost any bread recipe. Their delicately light texture and flavor embody the pleasures of home-baked goodness. Grind your own oat flour by chopping oat flakes in the blender until they reach the desired consistency.
Quinoa This recently rediscovered grain is found in whole form, in flour and in prepared products like pasta. When added to bread recipes, it imparts an earthy flavor matched by no other grain, and it packs a protein punch.
Rye This cold-weather grain is famous for its use in savory pumpernickel and caraway seed-rich rye breads. Rye has very little gluten and rises with the assistance of wheat flours.
Spelt Another of the "ancient" super grains, spelt has been reintroduced with resounding success. Use it in bread recipes in place of wheat for a slightly nutty flavor.
Wheat Wheat and whole wheat flour are the basis for most bread recipes. The gluten content of wheat provides the strength and resiliency necessary for a high and sturdy loaf.
SAMPLE MENUS USING WHOLE GRAIN BREADS
Cholesterol-Free Menu Suggestions
Breakfast Fresh orange-grapefruit juice Slice Honey Granola and Yogurt Bread (page 7), toasted, with 1 tablespoon peanut butter Banana
Mid-Morning Slice Oatmeal Bread (page 6) with 1 tablespoon apple butter
Lunch Sandwich with hummus, celery, sprouts, tomato, cucumber on Sprouted Wheat Berry Bread (page 9)
Afternoon Break Fresh fruit or veggie sticks
Dinner Baked potato with skin, topped with salsa Black bean and rice salad, topped with chilies and tomatoes Slice Pumpernickel Bread (page 8) Raw mixed vegetable salad
Evening Snack Air-popped popcorn or fresh fruit
Menu Suggestions with Fish and Dairy
Breakfast Fresh pineapple juice Slice Orange Apple Bread (page 6), toasted 1/2 cup plain low- or non-fat yogurt
Mid-Morning Slice Rolled Grains Bread (page 8)
Lunch Wild greens salad with rice vinegar dressing Slice Dill Rye Bread (page 9) Minestrone soup Steamed or stir-fried vegetables
Afternoon Break Fresh tomato-cucumber-parsley juice, with a dash of hot sauce or lemon juice if desired
Dinner Poached fish with lemon Slice Oat Bran Bread (page 7) Steamed asparagus and carrots Fresh spinach salad topped with Croutons (page 9)
Evening Snack Low-fat baked corn chips with salsa
Note: These bread recommendations are suggestions only. Your favorite bread recipes may be substituted in any of the above meal plans.
RECIPES
The following recipes, excerpted from The Breadman's Healthy Bread Book by George Burnett (New York: William Morrow & Company, Inc., 1992), are divided into two types: Transition and Elite. Transition recipes use unbleached all-purpose white flour and also include whole grain flours. These breads are meant to help you bridge the gap from baking with only white flour to baking with only whole grain flours. Elite recipes use whole grains only and are nutritionally superior. Elite recipes include some ingredients that might require a visit to your health food store.
For best baking results, use an accurate scale and double check measurements by weighing ingredients.
Oatmeal Bread
Transition
Makes a 1-1/2 pound loaf
1-1/8 cups (9 ounces) warm water
1-1/2 tablespoons canola oil
1 tablespoon maple syrup
2-1/4 cups (10-3/4 ounces) unbleached all-purpose flour
3/4 cup (3-1/2 ounces) whole wheat flour
1/2 cup (1-1/2 ounces) rolled oats)
2 tablespoons powdered milk
1-1/2 teaspoons salt
2-1/2 teaspoons active dry yeast
Put all the ingredients into the Bread Pan in the order listed. Select Basic Wheat cycle, Light setting, on your Breadman machine. Press Start.
Orange Apple Bread
Transition
Makes a 1-1/2 pound loaf
3/4 cup (6 ounces) warm water
1-1/2 tablespoons canola oil
1-1/2 tablespoons honey
1 teaspoon vanilla extract
1/4 cup (2 ounces) orange-apple pulp
Grated zest of 2 oranges
2-1/4 cups (10-3/4 ounces) unbleached all-purpose flour
3/4 cup (3-1/2 ounces) whole wheat flour
2 tablespoons powdered milk
1-1/2 teaspoons salt
1 teaspoon cinnamon
2-1/2 teaspoons active dry yeast
2/3 cup (3 ounces) chopped nuts, such as walnuts
Put all ingredients (except nuts) into the Bread Pan in the order listed. Select Basic Wheat cycle, Medium setting, on your Breadman machine. Press Start. Add nuts when the machine beeps, about 12 minutes after starting.
Honey Granola and Yogurt Bread
Transition
Makes a 1-1/2 pound loaf
1/2 cup (4 ounces) warm water
1-1/2 tablespoons canola oil
3 tablespoons honey
1/2 cup (4 ounces) plain low-fat yogurt
1/2 cup (2-1/2 ounces) granola
2-1/4 cups (10-3/4 ounces)
unbleached all-purpose flour
3/4 cup (3-1/2 ounces) whole wheat flour
2 tablespoons powdered milk
1-1/2 teaspoons salt
2-1/2 teaspoons active dry yeast
Put all ingredients into the Bread Pan in the order listed. Select Basic Wheat cycle, Light setting, on your Breadman machine. Push Start.
Oat Bran Bread
Elite
Makes a 1-1/2 pound loaf
1-1/8 cup (9 ounces) warm water
1-1/2 tablespoons canola oil
2 tablespoons honey
1/2 teaspoon liquid lecithin
1-1/2 cups (7 ounces) whole wheat flour
3/4 cup (3-1/2 ounces) oat flour
1/3 cup (1-1/2 ounces) oat bran
1/3 cup (3/4 ounce) rolled oats
2 tablespoons gluten flour
3 tablespoons powdered whey
1-1/2 teaspoons fine sea salt
2-1/2 teaspoons active dry yeast
Put all ingredients into the Bread Pan in the order listed. Select Basic Wheat cycle, Light setting, on your Breadman machine. Push Start.
Rolled Grains Bread
Elite
Makes a 1-1/2 pound loaf
1-1/8 cup (9 ounces) warm water
1-1/2 tablespoons canola oil
1-1/2 teaspoons honey
1 tablespoon unsulphured molasses
1/2 teaspoon liquid lecithin
3 cups (14 ounces) whole wheat flour
3/4 cup (3-1/2 ounces) rolled multi-grain cereal
2 tablespoons gluten flour
3 tablespoons powdered whey
1-1/2 teaspoons fine sea salt
2 teaspoons active dry yeast
Put all the ingredients into the Bread Pan in the order listed. Select Basic Wheat cycle, Light setting, on your Breadman machine. Push Start.
Pumpernickel Bread
Elite
Makes a 1-1/2 pound loaf
1-1/4 cups (10 ounces) warm water
1 tablespoon canola oil
1 tablespoon unsulphured molasses
1/2 teaspoon liquid lecithin
2 cups (9-1/2 ounces) whole wheat flour
1 cup (4-3/4 ounces) rye flour
3 tablespoons gluten flour
4 tablespoons powdered whey
1 tablespoon caraway seeds
3 tablespoons carob powder
1-1/2 teaspoons fine sea salt
2-1/2 teaspoons active dry yeast
Put all ingredients into the Bread Pan in the order listed. Select European cycle on your Breadman machine. Press Start.
Apricot Nut Bread
Elite
Makes a 1-1/2 pound loaf
1 cup (8 ounces) warm water
1 tablespoon canola oil
1-1/2 tablespoons honey
1/2 teaspoon liquid lecithin
2 tablespoons all-fruit apricot preserves
3 cups (14 ounces) whole wheat flour
2 tablespoons gluten flour
3 tablespoons powdered whey
1-1/2 teaspoons fine sea salt
2-1/2 teaspoons active dry yeast
1/2 cup (4 ounces) unsulphured, dried apricots, chopped
1/2 cup (2 ounces) pecans, chopped
Put all the ingredients (except apricots and pecans) into the Bread Pan in the order listed. Select Fruit and Nut cycle on your Breadman machine. Press Start. Add the apricots and pecans when the machine beeps, about 12 minutes after starting.
Sprouted Wheat Berry Bread Elite
Makes a 1-1/2 pound loaf
3/4 cup (3 ounces) sprouted wheat berries
1-1/8 cup (9 ounces) warm water
1-1/2 tablespoons canola oil
1-1/2 tablespoons barley malt syrup
1/2 teaspoon liquid lecithin
3 cups (14 ounces) wheat flour
2 tablespoons gluten flour
3 tablespoons powdered whey
1-1/2 teaspoons fine sea salt
1-1/2 teaspoons active dry yeast
Put all ingredients into the Bread Pan. Select Basic Wheat cycle, Light setting, on your Breadman machine. Press Start.
Dill Rye Bread Elite
Makes a 1-1/2 pound loaf
1 cup (8 ounces) warm water
1-1/2 tablespoons canola oil
1-1/2 tablespoons unsulphured molasses
1-1/2 tablespoons honey
1/2 teaspoon liquid lecithin
2-1/2 cups (12 ounces) whole wheat flour
1 cup (4-3/4 ounces) rye flour
2 tablespoons gluten flour
3 tablespoons powdered whey
1 teaspoon dill weed
2 teaspoons caraway seeds
1-1/2 teaspoons fine sea salt
2 teaspoons active dry yeast
Put all ingredients in the Bread Pan in the order listed. Select Basic Wheat cycle, Light setting, on your Breadman machine. Press Start.
Croutons
Cube your favorite Breadman bread into 1/2- to 1-inch cubes. Bake slowly in a warm oven (300°F) until crisp all the way through, about 20 minutes. Store in an airtight jar, in a cool dry place. Use to top salads, soups and casseroles.
The Breadman's World-Famous, All-Natural, No-Butter Cinnamon Rolls Elite
Makes 12 rolls
Dough
3/4 cup plus 2 tablespoons (7 ounces) warm water
1-1/2 tablespoons canola oil
1-1/2 tablespoons honey
1/4 teaspoon liquid lecithin
2 cups (9-1/2 ounces) whole wheat flour
3 tablespoons powdered whey
2 teaspoons gluten flour
2 teaspoons powdered egg substitute
3/4 teaspoon fine sea salt
1-1/2 teaspoons active dry yeast
Glaze
1/4 cup almond butter
1/4 cup canola oil
1/2 cup honey
1/2 cup powdered whey
For sprinkling on glaze
2 teaspoons cinnamon
1/3 cup raisins or chopped nuts (optional)
Put all the dough ingredients into the Bread Pan in the order listed. Select Dough setting on your Breadman machine. Press Start. When the machine beeps, after 1 hour and 20 minutes, remove the dough. Turn off machine.
Place dough on a lightly floured counter or cutting board. Flatten it out slightly and roll it into a 10-by-12-inch rectangle. Stir glaze ingredients together until smooth. Warm gently in a saucepan for a couple of minutes if too stiff. Spread half the glaze over the rectangle of dough, leaving a narrow border all around. Sprinkle cinnamon and, if desired, raisins or chopped nuts over the glaze. Beginning at one long side, roll dough into a cylinder and pinch the seam to seal. Cut rolled dough into twelve 1-inch slices.
Using canola oil, lightly oil a 10-inch round cake pan. Spread remaining glaze mixture over bottom of prepared pan. Set rolls in pan on top of glaze and cover with plastic or damp cloth. Let rolls rise in a warm place until doubled in volume, about 1 hour.
Preheat oven to 350^ F. Set pan on a baking sheet and bake on the center rack of the oven for 15 to 20 minutes. (Glaze that bubbles over the pan in the oven will spill onto baking sheet.) Invert pan onto a serving platter and let the glaze drip down sides of the rolls. Scrape any remaining glaze from pan onto rolls. Serve warm.
QUESTIONS AND ANSWERS
How much bread should I eat a day?
The USDA recommends that we eat 6 to 11 servings of complex carbohydrates every day. This recommendation is easy to reach when whole grain breads, other whole grain products, pastas, and a variety of legumes are part of your diet. (One slice of whole grain bread equals one serving of a complex carbohydrate.) Enjoy a slice or two of whole grain bread at every meal and incorporate them into snacks.
Isn't bread a fattening food?
The most fattening part of bread is the high-fat spread applied to the top! Bread is made primarily of wheat or another grain flour and is very low in fat. Other ingredients only make up a fraction of the entire loaf, so each slice is a lowfat treat. Hearty whole grain flour breads will be lower in fat and calories than a sweet, refined flour bread.
What is the healthiest bread?
A bread is only as healthy as its ingredients. Whole grain flours, fiber, nuts, seeds and dried fruit are all wholesome ingredients that make for healthy bread. Avoid ingredients that are dense in calories but offer little nutritional value, like refined flours, candied fruits, refined sugars and an abundance of fats or oils.
Is all bread a good source of fiber?
Not all breads automatically provide a lot of fiber. If refined flours are used, most of the fiber has been removed. Fiber is naturally present in whole grain flours and other ingredients like seeds, nuts, bran and germ.
What if someone has a wheat allergy or sensitivity? What kinds of grains can they eat? Some people cannot digest the wheat protein called gluten. Gluten is mainly found in wheat and rye, but is also present to some extent in oats and barley. Persons with celiac sprue must carefully avoid all gluten. Persons who are merely gluten-sensitive can tolerate a low-gluten instead of gluten-free diet. Generally speaking, most gluten-sensitive people can tolerate a small amount of gluten, particularly when gluten-containing foods are eaten infrequently (once every four days, for instance). Delicious low-gluten and gluten-free grains include amaranth, buckwheat, corn, millet, oats, quinoa and rice. In addition, many natural food stores now stock products that are gluten-free and are made from corn flour, cornmeal, cornstarch, lima bean flour, potato flour, rice, rice flour, soy flour and tapioca.
Please Note:
All recipes listed are for 1^1/2 lb. loaves.
To prepare a 1 pound loaf, simply reduce all of the ingredients by a ratio of 1/3.
To prepare a 2 pound loaf, simply increase the ratio of ingredients by 1/3.