
ARIN122E - Fridge AYA - Free user manual and instructions
Find the device manual for free ARIN122E AYA in PDF.

| Product type | Built-in refrigerator with freezer compartment |
| Brand | AYA |
| Model | ARIN122E |
| Dimensions (H x W x D) | 1221 x 540 x 540 mm |
| Total volume | 179 L |
| Refrigerator volume | 163 L |
| Freezer volume | 16 L (4-star) |
| Energy efficiency class | E |
| Annual energy consumption | 148 kWh/year |
| Noise emissions | 39 dB(A) – Class C |
| Climate class | ST/N/SN (10 °C to 38 °C) |
| Power supply | 220-240 V~, 50 Hz, 0.8 A |
| Interior lighting | LED, 1 W |
| Refrigerant | R600a (37 g) |
| Refrigerator defrost | Automatic |
| Freezer defrost | Manual |
| Freezing capacity | 2.6 kg/24 h |
| Thermostat | Adjustable from 0 (off) to 6 |
| Reversible door hinge | Yes (reversible) |
| Legal warranty | 2 years |
| Availability of spare parts | 10 years |
Frequently Asked Questions - ARIN122E AYA
User questions about ARIN122E AYA
0 question about this device. Answer the ones you know or ask your own.
Ask a new question about this device
Download the instructions for your Fridge in PDF format for free! Find your manual ARIN122E - AYA and take your electronic device back in hand. On this page are published all the documents necessary for the use of your device. ARIN122E by AYA.
USER MANUAL ARIN122E AYA
MANUEL D'UTILISATION ARIN122E
FR

natural_image
Interior view of a modern refrigerator with open doors and shelves (no visible text or symbols)natural_image
Symbolic icon of a person walking inside a circular arrow, with no text or numbers present.
- Ventilation (Figure 1)
• Installation (Figure 2)
natural_image
Illustration of a hand holding a tool inside a ventilation duct (no text or symbols)
natural_image
Illustration of a hand inserting a cable into a device (no text or symbols visible)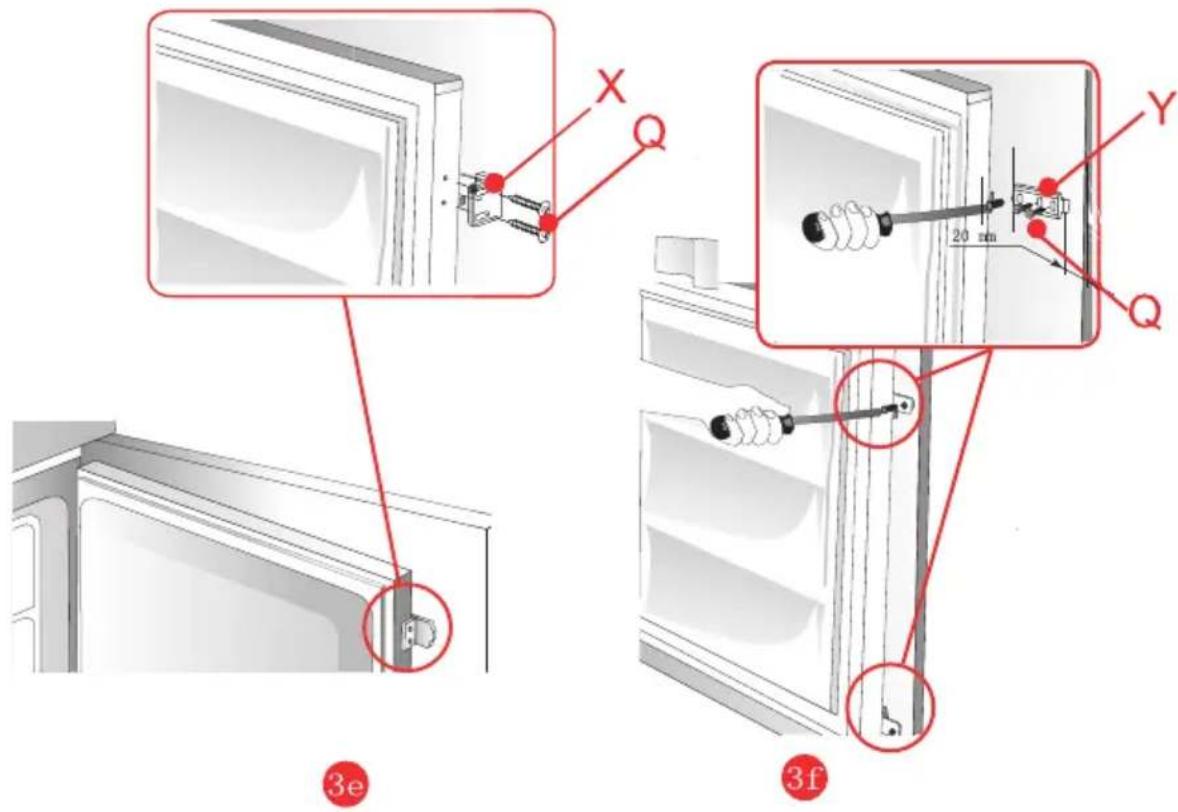
COMMANDE
natural_image
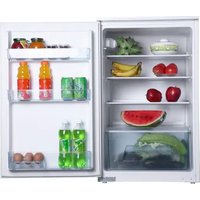
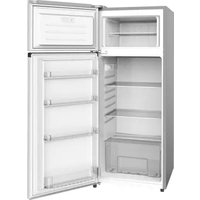
Interior view of a modern refrigerator with open doors and shelves (no visible text or symbols)Refrigerator built-in
Table of contents
Guidelines concerning the safety of use -1-
Refrigerator diagram -6-
Transport and handling -7-
Installation and operating conditions -7-
Controls -15-
Replace the light bulb - 17 -
Storage of food -18-
Coldest zone in the refrigerator - 23-
Helpful hints and tips - 25-
Cleaning and care - 27-
Troubleshooting - 29-
Technical specifications - 32-
Warranty and after sales service - 35-
THIS PRODUCT IS FOR HOUSEHOLD USE ONLY!
Please read these instructions carefully before the first use of this product and save this manual for your future reference.
GUIDELINES CONCERNING THE SAFETY OF USE
This warning is only for EUROPEAN market only!
When using an electrical appliance, basic precautions should always be followed, including the following:
-
This appliance can be used by children aged from 8 years and above and persons with reduced physical, sensory or mental capabilities or lack of experience and knowledge if they have been given supervision or instruction concerning use of the appliance in a safe way and understand the hazards involved. Children shall not play with the appliance. Cleaning and user maintenance shall not be made by children without supervision.
-
Children aged from 3 to 8 years are allowed to load and unload refrigerating appliances.
-
If the supply cord is damaged, it must be replaced by the manufacturer, its service agent or similarly qualified persons in order to avoid a hazard.
-
WARNING: Keep ventilation openings, in the appliance enclosure or in the built-in structure, clear of obstruction.
-
WARNING: Do not use mechanical devices or other means to accelerate the defrosting process, other than those recommended by the manufacturer.
-
WARNING: Do not damage the refrigerant circuit.
-
WARNING: Do not use electrical appliances inside the
food storage compartments of the appliance, unless they are of the type recommended by the manufacturer.
- Do not store explosive substances such as aerosol cans with a flammable propellant in this appliance.
-
This appliance is intended to be used in household and similar applications such as
-
staff kitchen areas in shops, offices and other working environments;
- farm houses and by clients in hotels, motels and other residential type environments;
- bed and breakfast type environments;
- catering and similar non-retail applications.
- Placed the appliance against a wall with a free distance not exceeding 75 mm and more than 50mm
- WARNING: When positioning the appliance, ensure the supply cord is not trapped or damaged.
- WARNING: Do not locate multiple portable socket outlets or portable power supplies at the rear of the appliance.
- To avoid contamination of food, please respect the following instructions:
- Opening the door for long periods can cause a significant increase of the temperature in the compartments of the appliance.
- Clean regularly surfaces that can come in contact with food and accessible drainage systems.
- Store raw meat and fish in suitable containers in the refrigerator, so that it is not in contact with or drip onto other food.
-
Two-star frozen-food compartments are suitable for storing pre-frozen food, storing or making ice cream and making ice cubes.
-
One-, two- and three-star compartments are not suitable for the freezing of fresh food.
- If the refrigerating appliance is left empty for long periods, switch off, defrost, clean, dry, and leave the door open to prevent mould developing within the appliance.
- Unplug the appliance from outlet when not in use, before putting on or taking off parts, before cleaning.
- Make sure to place the plug all the way into socket when connecting your appliance.
- Insert the plug into a single grounded socket.
- Never use the appliance in place where combustible and inflammable materials are kept.
- For safety reason, be sure to repair or replace parts at an authorized service dealers.
- The motor is permanently lubricated and will require no oil.
- The appliance must be positioned so that the plug is accessible.
- Please according to local regulations regarding disposal of the appliance for its flammable blowing gas. Before you scrap the appliance, please take off the doors to prevent children trapped.
- Ensure the refrigerator is unplugged before cleaning or if the product is not in use.
- To clean the appliance use only mild detergents or glass cleaning products. Never use harsh detergents or solvents.
- It is not recommended to use this refrigerator with an extension cord or power board. Please ensure that the appliance is plugged directly into the electrical outlet.
- Do not place hot food or drink into the refrigerator before it cools down to room temperature.
-
Close the door immediately after putting in any items so the inside temperature will not rise dramatically.
-
Keep appliance away from any heat source or direct sunlight.
- To fix stably, the appliance must be placed on a flat and solid surface. It should not be laid on any soft material.
- Do not place any other appliance on top of the refrigerator, and do not wet it.
- To avoid injury or death from electrical shock do not operate the appliance with wet hands, while standing on a wet surface or while standing in water.
- Do not use outdoors or in wet conditions.
- Never pull the cord to disconnect it from the outlet. Grasp the plug and pull it from the outlet.
- Keep the cord away from heated surfaces.
- Check that the voltage of the power supply in your home is the same as the voltage shown on the rating label of this product.
- Connect your refrigerator to an independent electrical socket and use a safe ground wire.
- When the frost in freezer is removed, or when there is no electricity or when refrigerator ceases to be used, it should be cleaned in order to prevent it from smelling.
- Defrost the freezer at least once a month because too much frost may affect refrigeration.
- Turn on electricity only 5 minutes later after electricity goes off. Otherwise, the compressor may be damaged.
- Children should be supervised to ensure that they do not play with the appliance.
- The appliance is not intended to be operated by means of an external timer or a separate remotecontrol system.
- This appliance has been incorporated with a grounded plug. Please ensure the wall outlet in your house is well earthed.
- It is recommended to check regularly the supply cord for any sign of possible deterioration, and the appliance
should not be used if the cable is damaged.
-
Regarding the information for replacing of the lamps of the appliance, thanks to refer to the paragraph "Lighting" of the manual.
-
Regarding the information pertaining to the installation, handling, maintenance, servicing and disposal of the appliance, thanks to refer to the paragraph “Installation and operating conditions”, “Defrosting, washing and maintenance” and “Trouble-shooting” of the manual.
-
Disposal of the appliance: To prevent possible harm to the environment or human health from uncontrolled waste disposal, recycle it responsibly to promote the sustainable reuse of material resources. And the disposal should only be done through public collection points. Old refrigerators can contain CFC that destroy the ozone; contact the waste treatment center nearest your home formore details on the correct procedures for disposal.
-
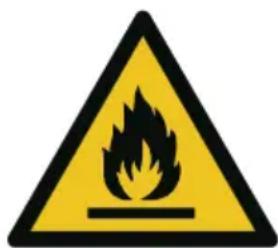
WARNING! Risk of fire – flammable material. Please keep the product far away fire source during using, service and disposal. There are flammable materials at the back of the appliance.
-
WARNING: To avoid any risk due to the instability of the device, it must be secured in accordance with the instructions.
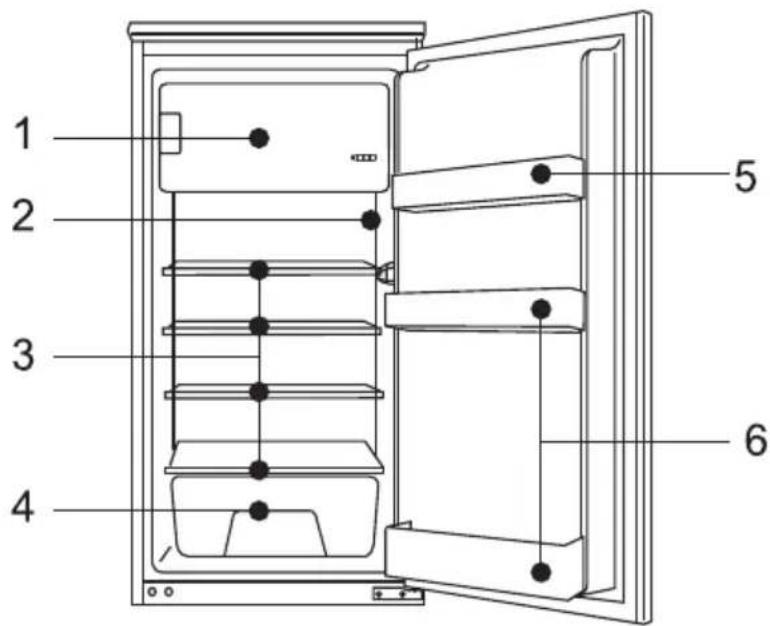
- Freezer compartment
- Shelves
-
Balcony for eggs
-
Thermostat
- Vegetable box
- Balcony for bottles
TRANSPORT AND HANDLING
During transportation, hold the base and lift the refrigerator carefully with an angle inferior than 45 degrees. Never hold the door handle as a support. Never place it upside down nor horizontally. Push refrigerator on its basis and place it with the help of its roller feet.
INSTALLATION AND OPERATING CONDITIONS
This refrigeration appliance is intended for use as a built-in appliance.
• Installation before using the appliance for the first time
- Take the product out of the package, remove the scotch tape protecting the door and the equipment. Any remaining adhesive stains may be removed with a mild washing agent.
- Do not throw away the polystyrene elements of the packaging. If it is necessary to transport the appliances, pack it in the polystyrene elements and film as well as protecting it with scotch tape
- Clean the interior surface of the appliances and the elements of the equipment with a washing agent dissolved in lukewarm water, then wipe it dry.
- Ventilation (Figure 1)
- Level the kitchen cabinet with a level and a square. If necessary, add shims in the base.
- Keep a minimum distance of 38mm behind the appliances for ventilation.
- The air intake A must be at least 200 cm ^4 and the air must enter the base of the cabinet through the panel.
- Check that the position of the socket (1) is correct. The AC voltage at the point where the appliance will be used must comply with the data on the nameplate affixed to the inside left wall of the appliance, near the vegetable box. The outlet must be properly grounded.

• Installation (Figure 2)
- Check that the kitchen cabinet door is in the correct position.
- Pass the power cable through the cabinet so that it can be connected to the outlet after installing the appliance. Remove the cover (6) only if there is no space.
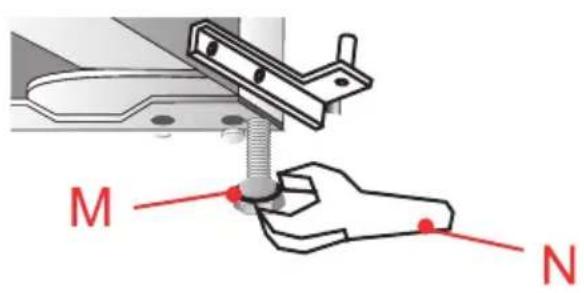
- Place the refrigerator in the cabinet. Secure the mounts (1) with the screws (2) to the frame at the top after pushing the refrigerator into the niche for two thirds. Then push the refrigerator all the way while checking that the cleat of the watches casts on the horizontal frame of the cabinet.
Adjust the position of the refrigerator leaving a space of 6 mm between the inside wall of the cabinet and the outside walls of the refrigerator. Secure the watches to the horizontal frame using the screws.
-
Place the gasket in the opening (about 10mm) between the lower front frame and the bottom of the cabinet. Secure the lower brackets (3) to the lower front frame with the screws (2). Secure the lower brackets to the bottom of the cabinet using the screws (2).
-
Position the gaskets correctly in the refrigerator openings on the left, top and right.
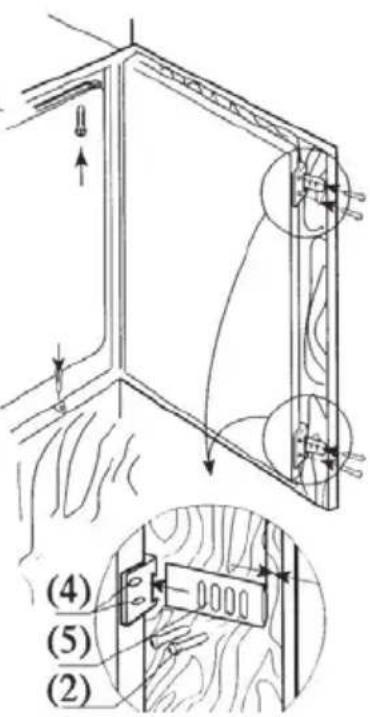
-
Secure the door to the brackets (4) (one for each position at the top and bottom) with the screws (2). Close the refrigerator and cabinet doors, then open them fully and mount the connection plate (5) on the corresponding support, fixing it to the cabinet door. The space " +" between the connection plate and the edge of the cabinet is equal to the thickness of the outside panel of the cabinet, approximately 20mm. Adjust the connection element so that the handle side of the cabinet door does not come into contact with the body of the appliance when it is closed (space of approx. 1 mm for large appli-ances). Fit the second eventual door connection element.
-
Close the hole in the appliance door with the plug.
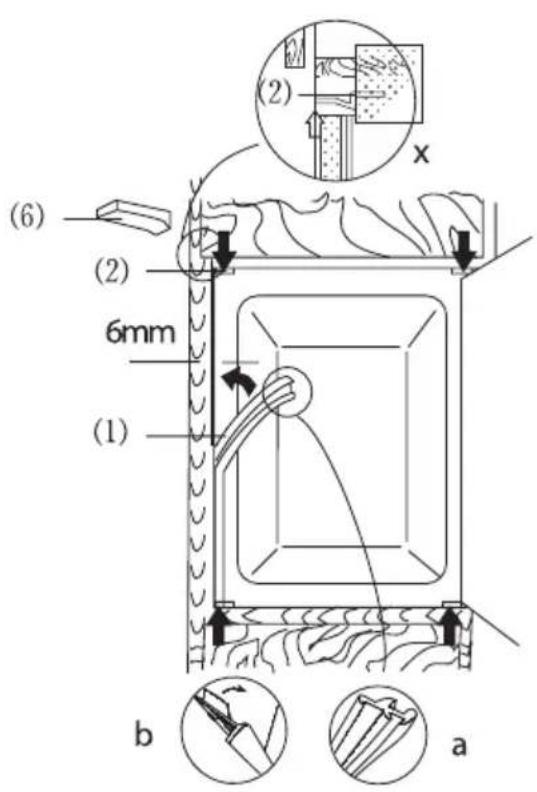
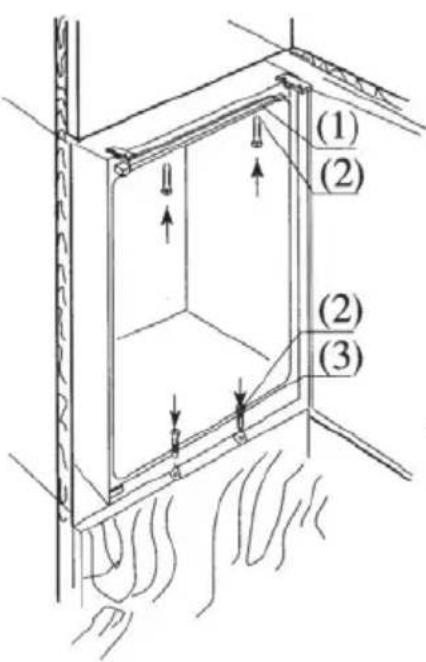
Figure 2
It is necessary, if not mandatory, to add ventilation under and behind the product in order to create better airflow and avoid poor cooling performance, high internal temperatures, excessive consumption and condensation in the device.
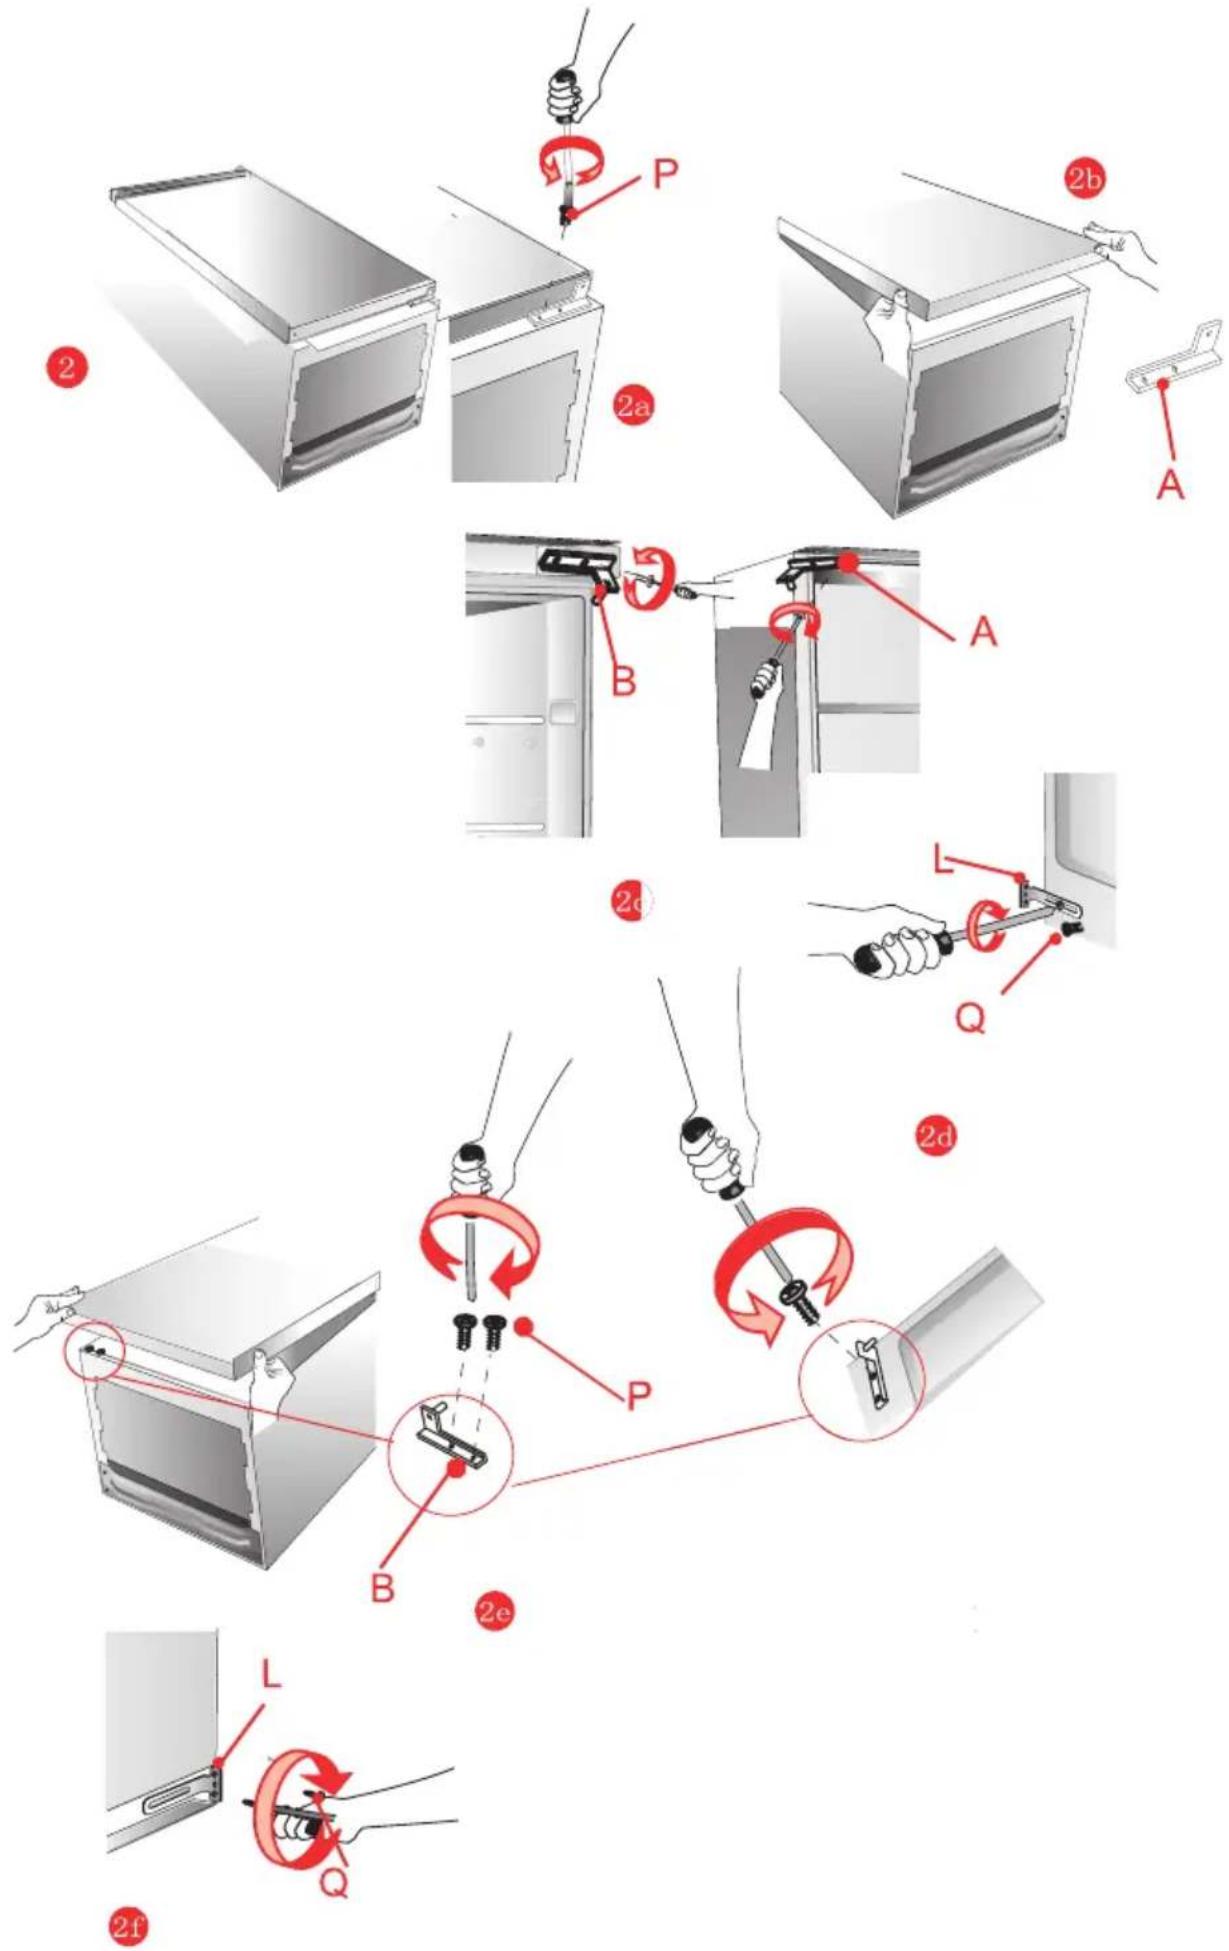
- Setting up and installing the device
- After unpacking the device, check that the mains voltage corresponds to that indicated on the nameplate.
- If the door opens in the desired direction, go to the next paragraph.
- Otherwise, reverse the position of the hinges. After that, carefully lay the unit on its back side, resting it on shims to avoid crushing the condenser pipes and damaging the compressor unit.
2a Remove the lower axis P
2b Remove the lower axis A and release the door.
2C Remove the top hinge B and mount the hinge A on the opposite side.
2d Remove the lower support L.
2e Reassemble the door and hinge B on the left side.
2f Reassemble the lower support L on the opposite side.
- For product installation, please consider the following instructions:
- Avoid installing the device near sources of heat, such as radiators, stoves, cookers, etc. or exposed to direct sunlight.
- After having placed the device in the desired position, let it stand for at least one hour before connecting it to the power supply.
- Check that the appliance is working properly before putting food in it.
CAUTION: DO NOT INSTALL THE APPLIANCE NEAR HEAT SOURCES AND LEAVE A SPACE OF AT LEAST 5 CM ABOVE THE APPLIANCE.
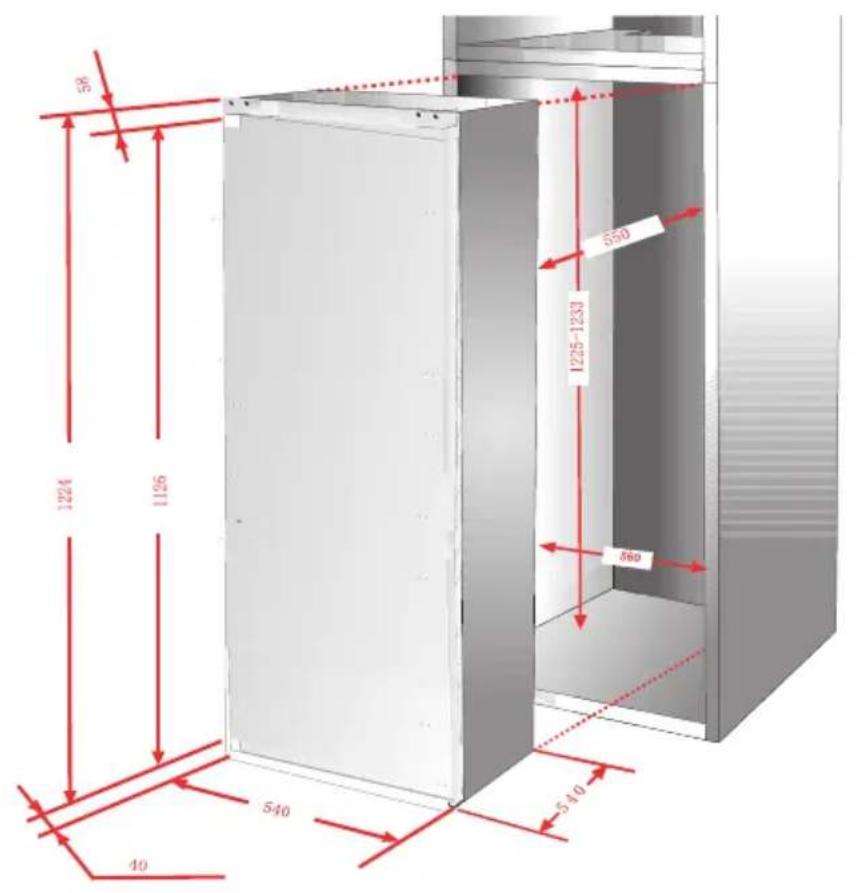
• Installation in the column
The dimensions of the housing in the column must correspond to those shown in the figure.
3 Place the unit in the slot against the side panel adjacent to the opening.
3a Adjust the foot until the upper panel is in contact with the cabinet and fix the upper part of the appliance using the screws provided, in the panel previously drilled above the strip.
3b Anchor the bottom of the appliance to the wall of the cabinet using the special parts provided.
3c Fix the two lower legs in the holes in the base of the cabinet.
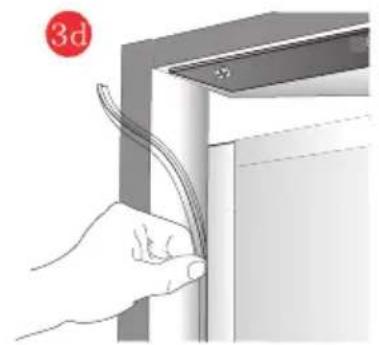
3d If supplied as standard, apply the plastic seal.
3e Anchor part X to the appliance door using the screws.
3f Fit and fix the sliding Y part with screws, after adjusting the housing door.
3
3a
natural_image
Illustration of a hand holding a tool inside a ventilation duct (no text or symbols)

natural_image
Illustration of a hand inserting a cable into a device (no text or symbols visible)
CONTROLS
• Appliance controls
The control panel is shown in figure 10. For reference it is also shown below:
1 - Light
2 - Temperature control dial
- Adjust temperature inside the appliance
Turn the dial to adjust the temperature in the appliance:
OFF/0 Position Appliance is off
Setting 1 The highest temperature inside the appliance (warmer)
Setting 2-5 Medium temperature inside the appliance
Setting 6 The lowest temperature inside the appliance (cooler)
Note:
If there is no position marked "OFF" or "0" on the dial, turn off your appliance by unplugging the power cord from the wall outlet. Before unplugging set the lowest setting on the temperature control dial.
• Additional information on the temperature
- The temperature inside the appliance is influenced by many factors. How you set the temperature control dial depends on the ambient temperature, sun exposure, how often you open the door and the amount of food stored. The middle setting of the dial is most optimal in most cases.
- Do not put food into the fridge freezer before it has reached its operating temperature, which takes minimum 4 hours.
- Do not change the temperature settings due to the change in the season of the year. The ambient temperature increase will be detected by the sensor and the compressor will be switched on automatically for a longer period of time in order to maintain the temperature set inside the chambers.
- The slight changes in temperature are perfectly normal and may occur, for instance during the storage of great quantities of fresh products in the fridge, or when the door is open for a longer period of time. This will not affect the condition of the stored foodstuff, and the temperature will quickly return to its set value.
REPLACE THE LIGHT BULB
This section applies to units factory equipped with incandescent lightbulb and selected appliances equipped with LED lighting with E14 thread.
- Replace the light bulb
- Set the knob to "OFF", then unplug the appliance.
- Remove the bulb cover
- Replace the bulb with one having identical parameters as the factory installed bulb (E14 thread, 220-240V\~, maximum dimensions: 26 mm diameter, 55 mm length).
- Replace the bulb cover.
- Bulbs of a higher or lower power should not be used, only use bulbs of the specification given above.
Note:
The light bulb must not be used for room illumination.
STORAGE OF FOOD
Your appliance has the accessories as the “REFRIGERATOR DIAGRAM” showed in general, with this part instruction you can have the right way to storage your food. The glass shelves and crisper can be removed to store food if needed.
Note: Food is not allowed to touch directly all surface inside the appliance, and should be stored in proper containers.
Storing food in the refrigerator compartment
The fridge freezer compartment helps to extend the storage times of fresh perishable foods.
Fresh food care for best results:
- Store foods that are very fresh and of good quality.
- Ensure that food is well wrapped or covered before it is stored. This will prevent food from dehydrating, deteriorating in colour or losing taste and will help maintain freshness. It will also prevent odour transfer. Vegetables and fruit need not be wrapped if they are stored in the vegetable container of the fridge compartment.
- Make sure that strong smelling foods are wrapped or covered and stored away from foods such as butter, milk and cream which can be tainted by strong odours.
- Cool hot foods down before placing them in the fridge compartment.
Dairy foods and eggs
- Most pre-packed dairy foods have a recommended 'use by /best before/best by/ date stamped on them. Store them in the fridge compartment and use within the recommended time.
- Butter can become tainted by strong smelling foods so it is best stored in a sealed container.
- Eggs should be stored in the fridge compartment.
Red meat
- Place fresh red meat on a plate and loosely cover with plastic wrap or foil.
- Store cooked and raw meat on separate plates. This will prevent any juice lost from the raw meat from contaminating the cooked product.
Fish and seafood
- Until required, refrigerate on a plate loosely covered with plastic wrap, waxed paper or foil.
• Whole fish should be rinsed in cold water to remove loose scales and dirt and then patted dry with paper towels. Place whole fish or fillets in a sealed plastic bag. - Keep shellfish chilled at all times. Use within 1-2 days.
Cooked food
• These should be stored in suitable covered containers so that the food will not dry out.
- Keep for only 1-2 days.
Vegetable container
- The vegetable container is the optimum storage location for fresh fruit and vegetables.
• Take care not to store the following at temperatures of less than 7^ C for long periods: Citrus fruit, melons, aborigines, pineapple, papaya, curettes, passion fruit, cucumber, peppers, tomatoes. - Undesirable changes will occur at low temperatures such as softening of the flesh, browning and/or accelerated decaying.
- Do not refrigerate avocados (until they are ripe), bananas and mangoes.
Refrigerated food
For optimized storage, please refer to the storage time shown in the table below.
| Refrigerator comportments | Type of food Storage time | |
| Door or balconies of fridge compartment | · Food with natural preservatives, such jams,juices, drinks, condiments.· Do not store perishable foods. | 3 days |
| Crisper drawer | · Fruits, herbs and vegetables should be placed separately in the crisper bin.· Do not store bananas,onions,potatoes, garlic in the refrigerator. | 1 week |
| Fridge shelf-middle | · dairy products, readymade food, desserts.. | 1 week |
| Fridge shelf-top | · Foods that do not need cooking,such as ready-to-eat food,deli meats,leftovers | 1 week |
Freezing and storing food in the freezer compartment
• To store deep-frozen food.
• To make ice cubes.
• To freeze food.
Purchasing frozen food
- Packaging must not be damaged.
- Use by the 'use by /best before/best by/' date.
- If possible, transport deep-frozen food in an insulated bag and place quickly in the freezer compartment.
Storing frozen food
Store at -18^ C or colder. Avoid opening the freezer compartment door unnecessarily.
Freezing fresh food
Freeze fresh and undamaged food only.
To retain the best possible nutritional value, flavour and colour, vegetables should be blanched before freezing.
Aubergines, peppers, zucchini and asparagus do not require blanching.
Note: Keep food to be frozen away from food which is already frozen.
• The following foods are suitable for freezing :
Cakes and pastries, fish and seafood, meat, game, poultry, vegetables, fruit, herbs, eggs without shells, dairy products such as cheese and butter, ready meals and leftovers such as soups, stews, cooked meat and fish, potato dishes, soufflés and desserts.
- The following foods are not suitable for freezing :
Types of vegetables, which are usually consumed raw, such as lettuce or radishes, eggs in shells, grapes, whole apples, pears and peaches, hard-boiled eggs, yoghurt, soured milk, sour cream, and mayonnaise.
Packing frozen food
To prevent food from losing its flavor or drying out, place food in airtight packaging.
- Place food in packaging.
-
Remove air.
-
Seal the wrapping.
- Label packaging with contents and dates of freezing. Suitable packaging :
Plastic film, tubular film made of polyethylene, aluminum foil.
Recommended storage times of frozen food in the freezer compartment
These times vary depending on the type of food. The food that you freeze can be preserved from 1 to 12 months (minimum at -18°C).
| Food Storage time | |
| Bacon, casseroles, milk | 1 month |
| Bread, ice cream, sausages, pies, prepared shellfish, oily fish | 2 months |
| Non-oily fish, shellfish, pizza, scones and muffins | 3 months |
| Ham, cakes, biscuits, beef and lamb chops, poultry pieces | 4 months |
| Butter, vegetables (blanched), eggs whole and yolks, cooked crayfish, minced meat (raw), pork (raw) | 6 months |
| Fruit (dry or in syrup), egg whites, beef (raw), whole chicken, lamb (raw), fruit cakes | 12 months |
Never forget:
- When you freeze fresh foods with a 'use by /best before/best by/' date, you must freeze them before this date expires.
- Check that the food was not already frozen. Indeed, frozen food that has thawed completely must not be re-frozen.
- Once defrosted, food should be consumed quickly.
CODEST ZONE IN THE REFRIGERATOR
This symbol indicates the location of the coldest zone of the refrigerator, The area is bounded below by the glass crisper, and above by the symbol or the rack positioned at the same height.
To ensure the temperatures in this area, do not change the positioning of the shelf. In forced air refrigerators (equipped with a fan or No Frost models), the symbol of the coldest zone is not represented because the temperature inside is homogeneous.
Temperature indicator setting
To help you set your refrigerator well, it is equipped with a temperature indicator that will monitor the average temperature in the coldest zone.
WARNING: This indicator is intended to work only with your refrigerator, do not use it in another refrigerator (in fact, the coldest zone is not the same), or for any other use.
Checking the temperature in the coldest zone
With the temperature indicator, you can check regularly that the temperature of the coldest zone is correct. Indeed, the internal temperature of the refrigerator depends on several factors such as the ambient temperature of the room, the amount of food stored and the frequency of door open-ing. Take these factors into consideration when setting the device.
When the indicator shows « OK », this means that your thermostat is well adjusted and the internal temperature correct.

If the indicator of temperature turns WHITE, this means that the temperature is too high; in this case, increase the refrigerator temperature control setting and wait for 12 hours before performing a new visual inspection of the indicator.
When fresh food has been introduced or the door has been left open, it is possible for the indicator of temperature to turn WHITE after a while.
We recommend that you follow the tips below to save energy.
- Try to avoid keeping the door open for long periods in order to conserve energy.
- Don't set the temperature colder than necessary.
- Don't store warm food or evaporating liquid in the appliance.
- The “REFRIGERATOR DIAGRAM” shows the correct combination for the drawers, crisper and shelves, do not adjust the combination as this is designed to be the most energy efficient configuration.
Hints for fresh food refrigeration
- Do not place hot food directly into the refrigerator or freezer, the internal temperature will increase resulting in the compressor having to work harder and will consume more energy.
- Do cover or wrap the food, particularly if it has a strong flavor.
- Place food properly so that air can circulate freely around it.
Hints for refrigerator
- Meat (All Types) Wrap in polythene food: wrap and place on the glass shelf above the vegetable drawer. Always follow food storage times and use by dates suggested by manufacturers.
- Cooked food, cold dishes, etc.: They should be covered and may be placed on any shelf.
- Fruit and vegetables: They should be stored in the special drawer provided.
- Butter and cheese: Should be wrapped in airtight foil or plastic film wrap.
- Milk bottles: Should have a lid and be stored in the door racks.
Hints for freezing
- When first starting-up or after a period out of use, let the appliance run at least 2 hours on the higher settings before putting food in the compartment.
- Prepare food in small portions to enable it to be rapidly and complete frozen and to make it possible to subsequently thaw only the quantity required.
- Wrap up the food in aluminum foil or polyethylene food wraps which are airtight.
- Do not allow fresh, unfrozen food to touch the food which is already frozen to avoid temperature rise of the latter.
- Iced products, if consumed immediately after removal from the freezer compartment, will probably cause frost burns to the skin.
- It is recommended to label and date each frozen package in order to keep track of the storage time.
Hints for the storage of frozen food
- Ensure that frozen food has been stored correctly by the food retailer
- Once defrosted, food will deteriorate rapidly and should not be re-frozen. Do not exceed the storage period indicated by the food manufacturer.
Switching off your appliance
If the appliance needs to be switched off for an extended period, the following steps should be taken prevent mould on the appliance.
- Remove all food;
- Remove the power plug from the mains socket;
- Clean and dry the interior thoroughly;
- Ensure that all the doors are wedged open slightly to allow air to circulate.
Never clean the product's casing or plastic parts using solvents or strong, abrasive detergents (e.g. washing powders or creams)! Use mild liquid detergents and soft cloths only. Do not use sponges.
- Defrosting the fridge
1 The appliance operates in cycles: it refrigerates (then the frost settles on the rear wall), and defrosts (water flows down the rear wall).
2. Disconnect the appliance from the mains before cleaning by removing the plug from the mains socket or switching off the fuse. Prevent water from penetrating the control panel or the light.
3. Do not use defrosting aerosols. They may cause the formation of an explosive mixture, or contain solvents which may damage the plastic components of the appliance and even be harmful to health.
4. Make sure the water used for cleaning does not flow into the evaporation container through the discharge opening.
5. The whole appliance, except for the door gasket must be cleaned with a mild cleaning detergent. The door gasket should be cleaned with water and wiped dry.
6. Wash all the accessories (vegetable containers, door shelves, glass shelves, etc.).
- Defrosting the freezer
- It is recommended to combine defrosting the appliance with washing it.
- Excessive accumulation of ice on the freezing areas impairs the appliance's freezing capacity and increases the energy consumption.
-
Defrost the appliance at least once or twice a year. In case of a higher ice build-up, defrosting must be carried out more frequently. Il est conseillé de dégivrer le compartiment congélateur en même temps que le nettoyage de l'appareil.
-
If there is food in the freezer, set the knob to the max. position about 4 hours before the planned defrosting. This will ensure the possibility of storing the food at the ambient temperature for a longer time.
- After taking the food out of the freezer, put it in a container, wrap it with several layers of paper, a blanket and store it at a cool place.
- The defrosting operation should last as short as possible. Long storage of food at the ambient temperature shortens their shelf life.
TROUBLE-SHOOTING
| Problems Possible causes Remedies | ||
| The appliance does not work | The electric circuit is disrupted | - check whether the plug is properly inserted into the socket- check whether the power cable of the appliance is not damaged- check whether there's voltage in the socket, by plugging another appliance, e.g. a night lamp- check whether the appliance is switched on by setting the thermo-stat to a position above 0. |
| The lighting inside the chamber does not work | The bulb is loose or fused (only appliances with bulb lightning type) | -fit the bulb correctly or replace it (see section above “Replacing the interior light bulb) |
| The appliance works continuously | Incorrect setting of the adjustment knob | -reset the knob to a lower position |
| See.”Temperature inside the appliance is not low enough for description of other possible causes | See.”Temperature inside the appliance is not low enough for description of other possible causes | |
| Water collects in the lower part of the appliance | The water discharge opening is clogged (depending on the model) | -clean the discharge opening (see the operating manual - chapter entitled “Defrosting the fridge”) |
| Internal air circulation obstructed | -place the food an containers in such a way as that they do not touch the rear wall of the fridge | |
| Problems | Possible causes | Remedies |
| The appliance generates unusual noise | Incorrect levelling of the appliance | -level the appliance properly |
| The appliance is touching furniture and/or other objects | -place the applianc at a location that ensures proper clearances around it | |
| Temperature inside the appliance is not low enough or too high | Incorrect setting of the adjustment knob | -reset the knob to a higher position |
| The ambient tempature is higher or lower than the climate range from table with technical specification | -the appliance is adapted to operation in the climate range from table with technical specification. | |
| The appliance is located in a sunlit place or near heat sources | -move the applianc to another place. Observe the guidelines contained in the manual | |
| Too much warm food loaded at a time | -wait 72 hours until the food becomes cool (freezes) and the required temperature is reached inside the chamber | |
| Internal air circulation obstructed | -place the food an containers in such a way that they do not touch the rear wall of the fridge | |
| The air circulation at the back of the appliance is obstructed | -move the applianc min. 30 mm away from the wall | |
| The door of the fridge/freezer is opened too often and/or remains open for too long | -reduce the frequency of opening the door and/or shorten the time when door remains open | |
| Problems Possible causes Remedies | ||
| The door does not close completely | ||
| The compressor is switched on too rarely | ||
| Door gasket inserted incorrectly | ||
Certain sounds can be heard during normal use of the refrigerator, which do not affect its correct operation.
Sounds, which can be easily prevented:
- noise caused by the appliance which is not level - adjust the position with the adjustable turn-in front feet. Alternatively, place pads made of soft material under the rear rollers, especially when the appliance is placed on tiles.
- touching the adjacent piece of furniture - move the refrigerator away.
- creaking of the drawers or shelves - take out and put back the drawer or shelf.
- sounds of clinking bottles - move bottles apart.
Sounds heard during normal use are mainly due to operation of the thermostat, compressor (switching on) and cooling system (thermal expansion and contraction of the radiator caused by flow of the cooling agent).
| General information cooling | |||||
| Supplier's name or trademark: AYA | |||||
| Supplier's address: BUT INTERNATIONAL, 1 AVENUE SPINOZA 77184 EMERAINVILLE, FRANCE | |||||
| Model identifier: ARIN122E | |||||
| Type of refrigerating appliance: | |||||
| Low-noise appliance: | no | Design type: | Built In | ||
| Wine storage appliance: | no | Other refrigerating appliance: | yes | ||
| General product parameters: | |||||
| Parameter | Value | Parameter | Value | ||
| Overall dimensions (millimetre) | Height | 1221 | Total volume (dm ^3 ou l) | 179 | |
| Width | 540 | ||||
| Depth | 540 | ||||
| EEI | 99.7% | Energy efficiency class | E | ||
| Airborne acoustical noise emissions (dB(A) re 1 pW) | 39 | Airborne acoustical noise emission class | C | ||
| Annual energy consumption | 148 | Climate class: | ST/N/SN | ||
| Minimum ambient temperature (°C), for which the refrigerating appliance is suitable | 10 | Maximum ambient temperature (°C), for which the refrigerating appliance is suitable | 38 | ||
| Winter setting | no | ||||
| Compartment Parameters: | |||||
| Compartment type | Compartment parameters and values | ||||
| Compartment Volume (dm3 or l) | Recommended temperature setting for optimized food storage (°C) These settings shall not contradict the storage conditions set out in Annex IV, Table 3 | Freezing capacity (kg/24 h) | Defrosting type (auto-defrost = A, manual defrost = M) | ||
| Pantry | no | - | - | - | - |
| Wine | no | - | - | - | - |
| Cellar | no | - | - | - | - |
| Fresh food | yes | 163 | 4 | - | A |
| Chill | non | - | - | - | - |
| Compartment type | Compartment parameters and values | ||||
| Compartment Volume (dm3 or l) | Recommended temperature setting for optimised food storage (°C) These settings shall not contradict the storage conditions set out in Annex IV, Table 3 | Freezing capacity (kg/24 h) | Defrosting type (auto-defrost = A, manual defrost = M) | ||
| 0-star or ice-making | non | - | - | - | - |
| 1-star | non | - | - | - | - |
| 2-star | non | - | - | - | - |
| 3-star | non | - | - | - | - |
| 4-star | oui | 16 | -18 | 2.6 | M |
| 2-star section | non | - | - | - | - |
| Variable temperature compartment | non | - | - | - | - |
| For 4-star compartments | |||||
| Fast freeze facility | No | ||||
| Light source parameters: | |||||
| Type of light source | LED Module | ||||
| Energy efficiency class | N/A | ||||
| Minimum duration of the guarantee offered by the manufacturer: 2 years | |||||
| Additional information: N/A | |||||
| Weblink to the manufacturer's website, where the information in point 4(a) Annex of Commission Regulation (EU) 2019/2019 is found: www.but.fr | |||||
| Reference: | ARIN122E |
| Rated voltage: | 220-240V~ |
| Ampere: | 0.8A |
| Rated frequency: | 50Hz |
| Lamp power: | 1 W |
| Climate class: | ST/N/SN |
| Refrigerant: | R600a(37g) |
| Protection against electrical shock: | I |
| Insulation foam: | CYCLOPENTANE |
Climate class:
- Extended temperate(SN): 'this refrigerating appliance is intended to be used at ambient temperatures ranging from 10 °C to 32 °C';
- Temperate(N): 'this refrigerating appliance is intended to be used at ambient temperatures ranging from 16 °C to 32 °C';
- Subtropical(ST): 'this refrigerating appliance is intended to be used at ambient temperatures ranging from 16 °C to 38 °C';
- Tropical(T): 'this refrigerating appliance is intended to be used at ambient temperatures ranging from 16 °C to 43 °C';
Note: More data information, please scan the QR code on the energy label.
WARRANTY AND AFTER SALES SERVICE
• In accordance with Article L. 217 of the Consumer Code, your product has 2 year legal guarantee of conformity.
- Period of availability of repair spare parts: 10 years.
• To contact our After-Sales Service, before going to BUT store, call 09 78 97 97 97, from Monday to Saturday from 8:00 a.m. to 8:00 p.m. (Price of a local call).
We decline liability for any damage or accident derived from any use of this product which is not in conformity with the instructions contained in this booklet.
| CORRECT DISPOSAL OF THIS PRODUCT | |
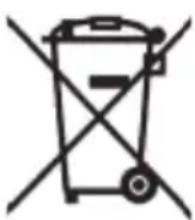 | European directive 2012/19/EU on Waste from Electrical and Electronic Equipment (WEEE), requires that used household appliances are not thrown into the normal municipal waste stream. Used appliances must be collected separately in order to optimize the rate of recovery and recycling of materials that compose them, and to reduce the impact on human health and on the environment. The crossed bin symbol is affixed to all the products to remind you of the obligations of separated collection. |

natural_image
Symbolic icon of a person walking inside a circular arrow, representing cycle or progress (no text or symbols)LE TRI

FACILE
natural_image
Simple line drawing of a stack of papers or documents (no text or symbols)
- MANUEL D'UTILISATION ARIN122E
- • Installation (Figure 2)
- COMMANDE
- Table of contents
- GUIDELINES CONCERNING THE SAFETY OF USE
- TRANSPORT AND HANDLING
- INSTALLATION AND OPERATING CONDITIONS
- CONTROLS
- REPLACE THE LIGHT BULB
- STORAGE OF FOOD
- Dairy foods and eggs
- Red meat
- Fish and seafood
- Cooked food
- Vegetable container
- Refrigerated food
- Freezing and storing food in the freezer compartment
- Purchasing frozen food
- Storing frozen food
- Freezing fresh food
- Packing frozen food
- Recommended storage times of frozen food in the freezer compartment
- Never forget:
- CODEST ZONE IN THE REFRIGERATOR
- Temperature indicator setting
- Checking the temperature in the coldest zone
- Hints for fresh food refrigeration
- Hints for refrigerator
- Hints for freezing
- Hints for the storage of frozen food
- Switching off your appliance
- Climate class:
- WARRANTY AND AFTER SALES SERVICE
Brand : AYA
Model : ARIN122E
Category : Fridge