STPS60TM-1 - Oven Porter & Charles - Free user manual and instructions
Find the device manual for free STPS60TM-1 Porter & Charles in PDF.


| Brand and model | Porter & Charles STPS60TM-1 |
| Product type | Built-in steam oven |
| External dimensions (W x H x D) | 760 x 455 x 542 mm |
| Cooking cavity dimensions (W x H x D) | 420 x 210 x 390 mm |
| Useful capacity | 35 L |
| Net weight | 35 kg |
| Power supply | 240 V, 60 Hz, 3200 W, 14 A |
| Steam power | 1500 W |
| Grill power | 1200 W |
| Convection power | 1600 W |
| Cooking functions | Steam, Grill, Convection, Convection + Steam, Fan Grill, Programmed start |
| Steam temperature range | 40°C to 100°C |
| Convection temperature range | 160°C (adjustable during operation) |
| Child safety | Oven lock by long press on Stop |
| Automatic descaling | Yes, with indicator and programmed cycle |
| Interior lighting | Halogen bulb G9 25W |
| Included accessories | Perforated tray, solid tray, support grid |
| Water tank | Capacity approx. 1 L, for 50-60 min of steam cooking |
| Cleaning | Damp cloth, no abrasive products |
| Repairs | Reserved for qualified technician |
Frequently Asked Questions - STPS60TM-1 Porter & Charles
User questions about STPS60TM-1 Porter & Charles
0 question about this device. Answer the ones you know or ask your own.
Ask a new question about this device
Download the instructions for your Oven in PDF format for free! Find your manual STPS60TM-1 - Porter & Charles and take your electronic device back in hand. On this page are published all the documents necessary for the use of your device. STPS60TM-1 by Porter & Charles.
USER MANUAL STPS60TM-1 Porter & Charles
Contents
Grounding Instructions....3
Safety Information ....4
Safety Instructions ....6
Description of your oven....7
Basic settings 9
Basic Functions....12
Special Functions....15
Filling the water tank....16
When the oven is working....17
Usage, Tables and Tips....19
Cooking with the Broiler 24
Cooking with Convection....25
Cooking with Convection....26
Care and maintenance 27
Oven Cleaning....30
What should I do if the oven doesn't work? 31
Technical characteristics....32
Installation instructions ....33
Installation dimensions....71
Grounding Instructions
This appliance must be connected to a grounded, metallic, permanent wiring system, or an equipment grounding conductor should be run with the circuit conductors and connected to the equipment grounding terminal or lead on the appliance.
Warning! IMPROPER USE OF THE GROUNDING CAN RESULT IN A RISK OF ELECTRICAL SHOCK.
Please refer to the Installation Instructions for further information.
Safety Information
⚠️ Carefully read the instructions before installing and using the equipment. The manufacturer is not liable for improper installation and use of the equipment that may cause injuries and damage. Always keep the instructions at hand, so they can be easily referred to during use.
IMPORTANT SAFEGUARDS
When using electrical appliances, basic safety precautions should always be followed including the following:
-
Proper Installation – Be sure your appliance is properly installed and grounded by a qualified technician or electrician.
-
Never Use Your Appliance for Warming or Heating the Room.
-
Do Not Leave Children Alone – Children should not be left alone or unattended in area where appliance is in use. They should never be allowed to sit or stand on any part of the appliance.
-
Wear Proper Apparel – Loose-fitting or hanging garments should never be worn while using the appliance.
-
User Servicing – Do not repair or replace any part of the appliance unless specifically recommended in the manual. All other servicing should be referred to a qualified technician.
-
Storage in or on Appliance – Flammable materials should not be stored in an oven
-
Do Not Use Water on Grease Fires – Smother fire or flame or use dry chemical or foam-type extinguisher.
-
Use Only Dry Potholders – Moist or damp potholders on hot surfaces may result in burns from steam. Do not let potholder touch hot heating elements. Do not use a towel or other bulky cloth.
-
Use Care When Opening Door – Let hot air or steam escape before removing or replacing food.
-
Do Not Heat Unopened Food Containers – Build-up of pressure may cause container to burst and result in injury.
-
Keep Oven Vent Ducts Unobstructed.
-
Placement of Oven Racks – Always place oven racks in desired location while oven is cool. If rack must be moved while oven is hot, do not let potholder contact hot heating element in oven.
-
DO NOT TOUCH HEATING ELEMENTS OR INTERIOR SURFACES OF OVEN – Heating elements may be hot even though they are dark in color. Interior surfaces of an oven become hot enough to cause burns. During and after use, do not touch, or let clothing or other flammable materials contact heating elements or interior surfaces of oven until they have had sufficient time to cool.
- This Steam Oven is for household use.
Safety Information
Safety of children and vulnerable adults
- WARNING! Risk of choking, injury or permanent disability.
- This appliance can be used by children aged 8 years and above and persons with reduced physical, sensory or mental capabilities or lack of experience and knowledge if they are given supervision or instructions concerning how to use the appliance in a safe way and understand the hazards involved.
• Children should not play with the appliance. - Keep packaging materials away from children. Risk of suffocation!
- Keep children away from the appliance during operation or when cooling.
- Cleaning and maintenance should not be done by children without supervision .
Warnings on general safety
- During installation, follow the instructions supplied separately.
- Only qualified personnel can install the appliance and replace the cable.
- ⚠ WARNING: The appliance and its accessible parts become hot during use. Care should be taken to avoid touching heating elements. Children less than 8 years of age shall be kept away unless continuously supervised.
- During use the appliance becomes hot. Care should be taken to avoid touching heating elements inside the oven.
- ⚠ WARNING: Accessible parts may become hot during use. Young children should be kept away.
- Do not use steam cleaners to clean the appliance.
- Do not use abrasive detergents or metal scrapers to clean the appliance.
- The connection should include correct earthing, in compliance with current norms.
- Disconnect the appliance from the power supply before carrying out any maintenance operation.
Safety Instructions
! WARNING!
Before connecting the appliance compare the power data (voltage and frequency) indicated on the characteristics plate with those of the power supply in question. If these data do not match there may be problems. In case of doubt, contact an electrician.
! WARNING!
The appliance must be installed and connected by a technician. Contact a qualified electrician who knows and respects current safety standards. The manufacturer cannot be held responsible for damage resulting from fitting or connecting errors.
! WARNING!
The electrical safety of the appliance can only be guaranteed if it is earthed. The manufacturer cannot be held responsible for damage resulting from the absence of or defects in the installation's protection system (e.g. electrical shock).
! WARNING!
Only use the appliance once it has been fitted into its built-in position. Only in this manner can it be guaranteed that users cannot access the electrical components.
! WARNING!
Never open up the appliance's frame. Possible contacts with electrical conducting parts or
changes to electrical or mechanical components may represent a danger to users' safety and prejudice the correct working of the appliance.
! WARNING!
Repairs and maintenance, especially of parts carrying electrical current, must only be done by technicians authorised by the manufacturer. The manufacturer and retailers do not accept responsibility for any damaged caused to people, animals or property as a result of repairs and maintenance carried out by non-authorised personnel.
! WARNING!
Repairs undertaken during the guarantee period must only be done by technicians authorised by the manufacturer. If this is not the case then any damage resulting from the repair in question is excluded from the guarantee
! WARNING!
The appliance must be disconnected from the electrical current when installation and repair work is being done. To disconnect the appliance from the current, one of the following conditions must apply:
- The switchboard fuses / circuit breakers must be disconnected.
Description of your oven
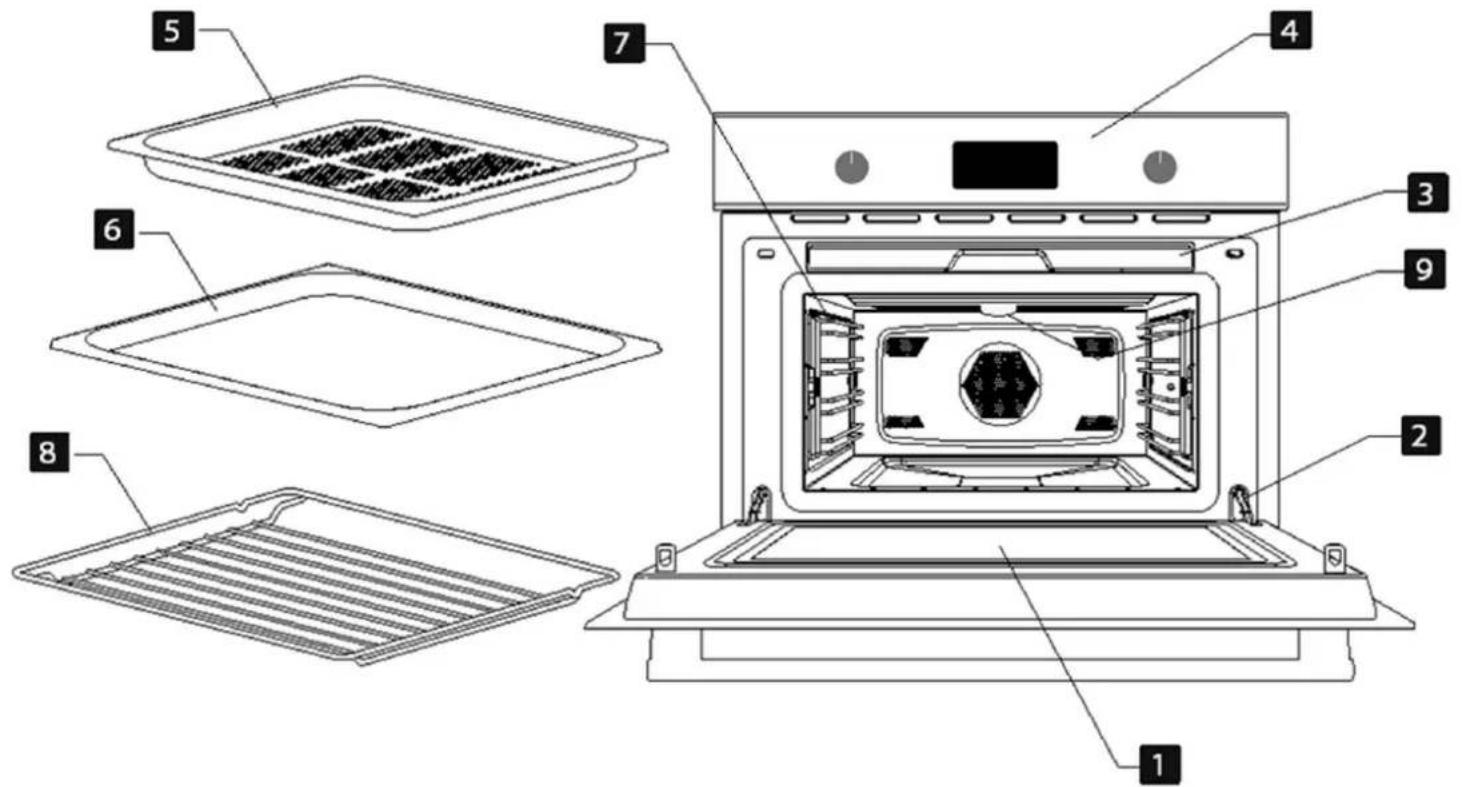
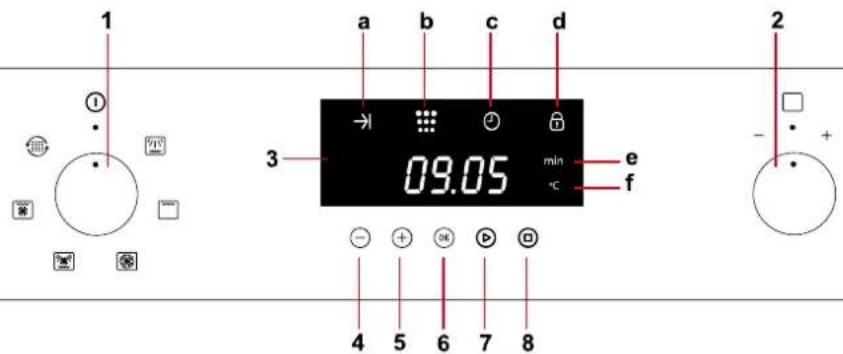
- Door window glass
- Safety catches
- Water tank
-
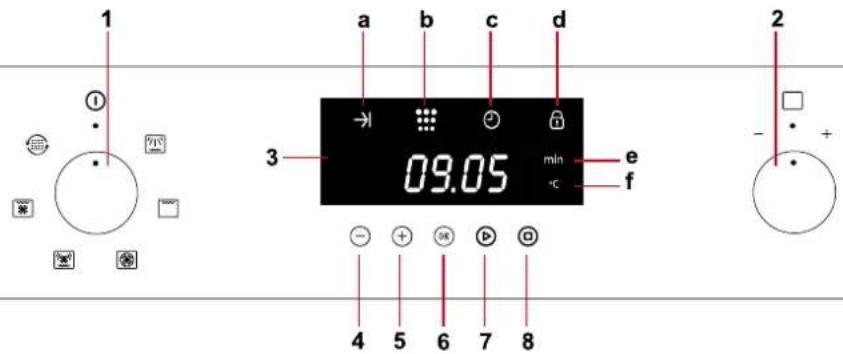
Control panel
-
Perforated baking tray
- Baking tray
- Shelf guides
- Rack
- Lamp bulb
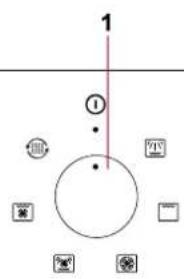
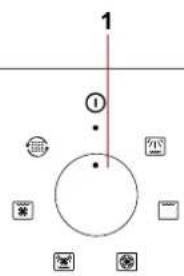
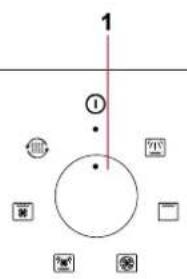
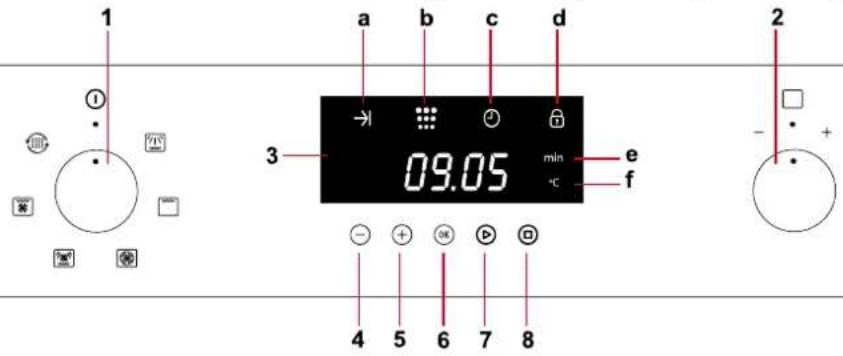
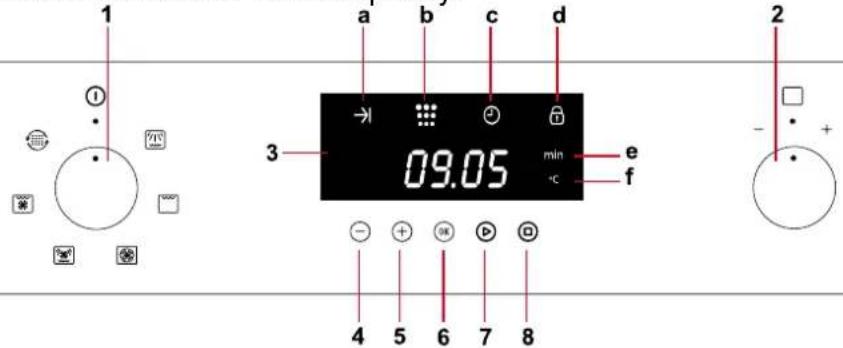
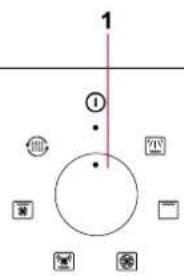
- Function Selector knob
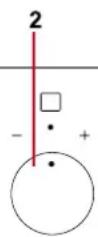
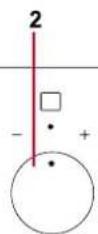
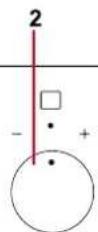
- “+” / “-” / °C Selector knob
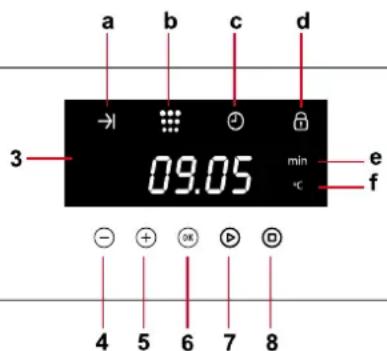
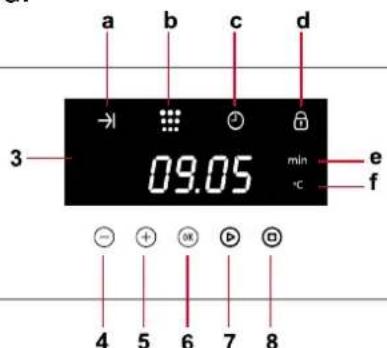
- Display
- “-” key
- “+” key
- OK key
- Start key
- Stop key
a. Delayed Start indicator
b. Descale indicator
c. Clock indicator
d. Safety Block indicator
e. Operating Time / Duration indicator
f. Temperature indicator
Description of your oven
Description of Functions
| Symbol | Function | Foods / Function |
 | Steam | Cooking vegetables and food.Cooking and heating carefully.Heating and cooking small portions of food. |
 | Broiler | Broiling food. |
 | Convection | Roasting and baking. |
 | Steam + Convection | Cooking meals with hot damp circulating air.Cooking potatoes, rice.Moist garnishing. |
 | Broiler + Fan | Broiling meat and fish. |
| Broiling poultry. | ||
| Potatoes – deep frozen, defrosting and roasting. | ||
 | Water Hardness / Descaling | Water Hardness setting / Descaling function |
Basic settings
Initial Settings
After your steam oven is first connected in or after a power failure, the clock display will flash to indicate that the time shown is not correct.
The oven will not operate until the clock and the water hardness parameter is set.
The default setting for water hardness is typically Medium. This can be adjusted based on the water hardness in your area. This can be confirmed with your municipality.
To set the clock and the water hardness parameter value proceed as described in the following chapters:
Setting the clock
Before using the oven, adjust the clock through the procedure described below but starting on Step 3. To set the clock, proceed as follows:
- Press the "+" key until the Clock Indicator Light starts to flash.
- Press the OK key.
-
Press the “+” and “-” keys to set the correct hour value.
-
Press the OK key to validate the hour value. The minute numbers will start to flash.
- Press the “+” and “-” keys to set the correct minute value.
- To finish, press the OK key again.
Hiding / Displaying the Clock
If the clock display disturbs you, you can hide it by proceeding as follows:
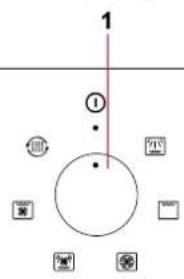
-
To block, the oven press the "+" key and the "-" key simultaneously for 5 seconds. The dots that separate the hours and minutes and the clock symbol will flash, but the rest of the clock display will be hidden.
-
If you want to see the clock display again, press the "+" and "-" keys again for 5 seconds.
Water Hardness setting
The system can be optimised for households with very soft water (also through using a water softening appliance) and very hard water, by changing the user settings to the relevant range of water hardness (see table below). To set the water hardness parameter, proceed as follows:
(The appliance features a system that automatically indicates when it is time to descale, showing the message "CRL".)
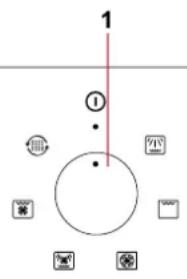
-
Rotate the Function Selector knob to the position corresponding to the Water Hardness Setting / Descaling function (not necessary after connecting the device to the network, or after a power failure). The water hardness indicator light begins to flash.
-
Turn the “+” / “-” Selector Knob to set the correct water hardness parameter value, according to the below table.
- Press the OK key to set the parameter (or wait until the parameter is set by time-out). The clock is displayed.
| Type | Water hardness | Display | |||
| Ca + Mg (ppm) | English deg. [°eH] | French deg. [°dF] | German deg. [°dH] | ||
| Soft water | 0 to 150 | 0 to 11 | 0 to 15 | 0 to 8 | SOFT |
| Medium water | 151 to 350 | 12 to 25 | 16 to 35 | 9 to 20 | MED |
| Hard water | 351 to 500 | 26 to 35 | 36 to 50 | 21 to 28 | HARD |
Child Lock
The oven can be blocked against improper use (e.g., to prevent children from using it).
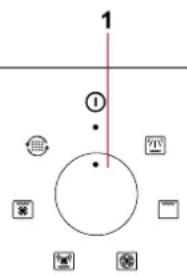
-
To block, the oven press the Stop key for 3 seconds. The display shows the Safety Block indicator light. If a key is pressed now, the oven will not operate.
-
To unlock, press again the Stop key for 3 seconds.
Basic settings
Showroom mode
In the Showroom mode the oven works like described in every function, but there will be no heating.
-
To enter the Showroom mode press simultaneously the “-” key and the Stop key for 5 seconds. The display shows the messages “dE,0” and “OFF” intermittently (showing the actual status).
-
Turn the “+”/“-” Selector Knob to the left or right to alternate status (“OFF” or “On”).
- Press the OK key to validate.
Note: To exit the Showroom mode proceed in the same manner.
Steam function
Use this function to cook all sorts of vegetables, rice, fish and meat. It is also suitable for extracting juice from berries and for simultaneous defrosting, cooking and regenerating.
- Rotate the Function Selector knob to the position corresponding to the Steam function. The Temperature indicator and the display flash indicating "100°C" (by default).
- Turn the “+”/“-” Selector Knob to the left or right to set the desired temperature (40°C to 100°C).
-
Press the OK key to confirm. The Duration indicator will start to flash.
-
Turn the “+”/“-” Selector Knob to the left or right to set the desired duration (for example, to 10 minutes).
- Press the START key. The oven will start to operate.
Broiler
Use this function to brown the surface of food quickly.
- Rotate the Function Selector knob to the position corresponding to the Broiler function. The Operating Time Indicator Light and the Display start to flash.
-
Turn the "+"/"- "Selector Knob to the left or right to set the desired operating time.
-
Press the Start key. The oven will start to operate.
Note: The cooling fan keeps on working for some time. When the temperature has dropped sufficiently, the fan will switch itself off.
Basic Functions
Convection
Use this function to bake and roast.
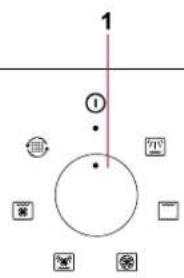
- Rotate the Function Selector knob to the position corresponding to the Convection function. The Temperature indicator and the display flash indicating "160°C" (by default).
- Turn the “+”/“-” Selector Knob to the left or right to set the desired temperature.
-
Press the OK key to confirm. The Duration indicator will start to flash.
-
Turn the "+"/"-Selector Knob to the left or right to set the desired duration.
-
Press the Start key. The oven will start to operate.
Note: The cooling fan keeps on working for some time. When the temperature has dropped sufficiently, the fan will switch itself off.
Convection + Steam
Use this function to rapidly bake food.
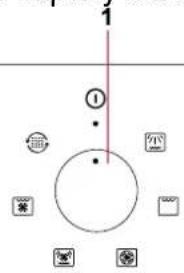
- Rotate the Function Selector knob to the position corresponding to the Convection + Steam function. The Temperature indicator and the display flash indicating “160°C” (by default).
- Turn the “+”/“-” Selector Knob to the left or right to set the desired temperature.
-
Press the OK key to confirm. The Duration indicator will start to flash.
-
Turn the "+"/"-Selector Knob to the left or right to set the desired duration.
-
Press the Start key. The oven will start to operate.
Note: The cooling fan keeps on working for some time. When the temperature has dropped sufficiently, the fan will switch itself off.
Basic Functions
Broiler + Fan
Use this function to cook lasagne, poultry, baked potatoes and casseroles.

-
Rotate the Function Selector knob to the position corresponding to the Broiler + Fan function. The Operating Time Indicator Light and the Display start to flash.
-
Turn the “+”/“-” Selector Knob to the left or right to set the desired operating time.
-
Press the Start key. The oven will start to operate.
Note: The cooling fan keeps on working for some time. When the temperature has dropped sufficiently, the fan will switch itself off.
Special Functions
Delayed Start Time
Use this function to program the start of the cooking to a different time.
- Rotate the Function Selector knob to the desired function position (This function works with: Steam function, Convection, Convection + Steam).
- Set the parameters (e.g.: operating time, temperature) as described in the "Basic Functions".
- Press the "OK" key (instead of Start) to enter the Delayed Start Time. (The Delayed Start indicator flashes in the display.)
- Turn the "+"/"-Selector Knob to the left or right to adjust the delayed start time. (0:00 appears by default on the display and you can
delay the start of the programme up to 9 hours and 59 minutes - 3:59).
- Press the Start key to validate the delayed start time.
- The cooking duration and delayed start (+ respective indicators) will be displayed alternating.
- The delayed start will start counting down
- The oven will start to operate when the delayed start reaches 00:00.
Filling the water tank
Filling the water tank
All steam functions require the water tank to be full.
Fill the water tank up with cold, fresh drinking water (approximately 4 cups / 1 liter) and insert it into the slot located above the cavity until you hear a click.
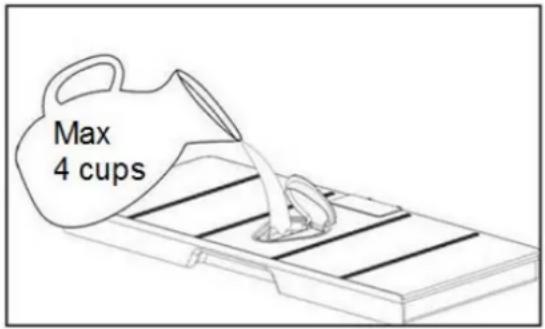
If the indication “rES” appears, it means that the water tank was not properly inserted.
NOTE: No sterilized or distilled water can be used for cooking with the steam oven. The minerals in the water are actually essential for the cooking process to work.
Refilling the water
The contents of the water tank normally suffice for one cooking session of 50-60 minutes.
If, however, the water tank needs to be refilled, the Water refill light switches on.

Only fill the water tank up to a maximum of 2 cups to ensure that the water does not overflow when it is pumped back to the water tank. RISK OF OVERFLOW.
Emptying the water tank
When the appliance is switched off, the residual water is pumped back into the water tank.
While the water is being pumped the display shows "PUMP".
This message stays on until the temperature of the water reaches 75° C before it can be pumped back to the water tank.
Warning: the water in the tank may be hot. Danger of burns!
After the water is pumped back to the water tank, the display will show the message "DEP" requiring the following actions:
- Remove and empty the water tank.
- Dry the water tank and insert it back into the slot located above the cavity. Clean and dry the cooking space.
- Leave the appliance door open so that the cooking space can cool down and dry completely.
IMPORTANT NOTE: It is advisable to remove the water tank and empty it after a cooking cycle. This prevents the formation of bacteria and limestone inside the appliance.
If the water tank has not been removed from the oven and a new cooking cycle is started, the oven displays the warning "DEP".
This warning can be cleared by pressing the Stop key and proceed with the new cooking cycle without removing and emptying the water tank.
When the oven is working...
Interrupting a cooking cycle
You can stop the cooking process at any time by pressing the Stop key once.
The oven incorporates a steam-reduction function that is activated when the Start/Stop key is pressed to gradually release the steam from the cavity, so that there is no sudden rush of steam when the appliance door is opened.
This function takes around 3 minutes and during it the display shows the word "VAP".
Warning! When opening the door during or upon completion of the cooking cycle, be careful of the flow of Convection and/or steam coming out of the cooking chamber. Step back or to the side to avoid burns.
At this point:
- The steam generation is interrupted.
- The cavity walls and the water tank are still very hot. Danger of burning!
- The timer stops and the display shows the remaining operating time (if this has been set).
If you wish, at this point you can:
- Turn or stir the food to ensure it will be evenly cooked.
- Change the cooking parameters.
To restart the process, close the door and press the Start key.
Altering parameters
The duration can be altered when the cooking process has been interrupted by turning the rotating knob. The new duration defined is valid when the display stops blinking.
The temperature can only be altered when the oven is interrupted. Alter the temperature by pressing the Function Selector key and turning the Rotating Knob until the new temperature is blinking. Validate the selection by pressing again the Function Selector key.
Cancelling a cooking cycle
If you wish to cancel the cooking process, press the Stop key for 3 seconds.
You will then hear a beep and the "END" will appear on the display.
End of a cooking cycle
At the end of the set duration or when you press the Stop key to finish the cooking cycle, you will hear three beeps and the display will show the word "End", the oven starts the steam-reduction function.
This function gradually releases the steam from the cavity, so that there is no sudden rush of steam when the appliance door is opened.
This function takes around a minute and during it the display shows the word "VAP".
Warning! When opening the door during or upon completion of the cooking cycle, be careful of the flow of Convection and/or steam coming out of the cooking chamber. Step back or to the side to avoid burns.
The cooling fan can continue to run for a certain length of time after the appliance has been switched off. This is a normal function that is meant to reduce the temperature inside the oven.
When the display shows the word "DEP", this means that the water was pumped and that the water tank can be removed.
Remove the water tank and dry it thoroughly. Let the cooking space cool down for a moment and then clean and dry it with a cloth. The door should be left open for some time so that the appliance can dry completely.
When the oven is working...
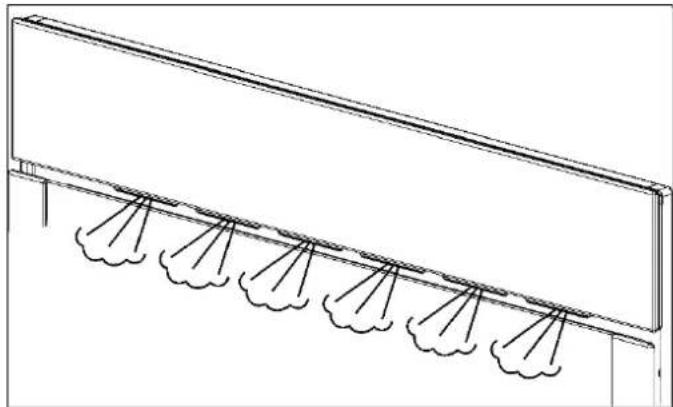
Steam Flow
It is normal to have an intermittent steam flow, coming out from the oven front.
This is especially noticeable in winter time or in high moisture environments.
Residual water in the oven
To reduce the residual water in the oven, it is recommended to insert a tray in the bottom rack level. The condensation released from the food begins to drip on the tray. The remaining residual water can be easily dried with a cloth.
Usage, tables and tips
The perforated container is suitable for cooking fresh or deep frozen vegetables, meat and poultry. In this case it is important that the non-perforated container is introduced into the bottom level. This way, dripping liquids are collected and the appliance does not get dirty. The perforated container with the food should be inserted into the second level.
The non-perforated container is used to steam sensitive foods, e.g. compotes and dumplings.
The rack is used when cooking with small containers, as for example, dessert bowls and to regenerate plate dishes.
For more precise information refer to the tables. The suggested times and temperatures are guideline values. The actual cooking time can vary according to the type and quality of the foods.
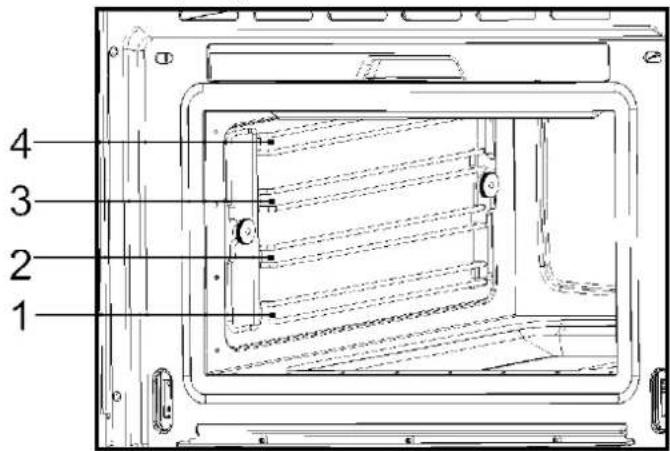
To remove the rack, lift it upwards slightly at the front when the safety notches connect with the sides of the oven (see illustration).
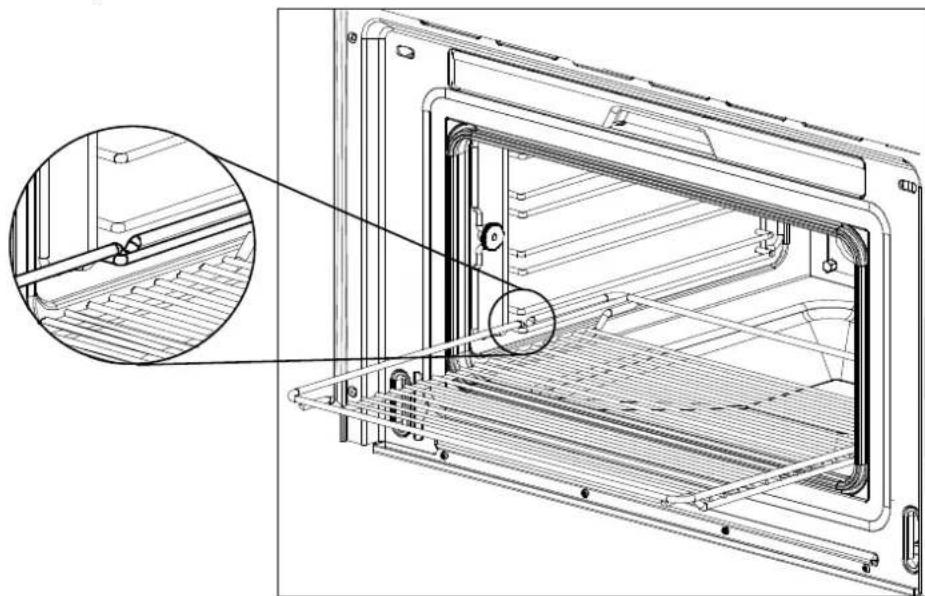
We recommend using the rack together with the baking tray when cooking items on the rack which might drip.
Usage, tables and tips
Steam cooking - Fish
| Fish | Quantity | Temperature °C | Time min. | Container | Level |
| Gilthead sea bream | 800-1200 g | 80 | 30-40 | Perforated | 2 |
| Trout | 4 x 250 g | 80 | 20-25 | Perforated | 2 |
| Salmon filet | 500-1000 g | 80 | 15-25 | Perforated | 2 |
| Salmon trout | 1000-1200 g | 80 | 25-35 | Perforated | 1/2 |
| King prawns | 500-1000 g | 80 | 15-20 | Perforated | 2 |
| Green-shell mussel | 1000-1500 g | 100 | 25-35 | Perforated | 2 |
| Halibut filet | 500-1000 g | 80 | 20-25 | Perforated | 2 |
| Cockles | 500-1000 g | 100 | 10-20 | Perforated | 2 |
| Lobster | 800-1200 g | 100 | 25-30 | Perforated | 1/2 |
| Cod filet | 1000-1200 g | 80 | 20-25 | Perforated | 2 |
| Blue mussel | 1000-1200 g | 100 | 15-25 | Perforated | 2 |
| Lake trout | 4 x 250 g | 80 | 25-30 | Perforated | 2 |
| Haddock | 1000-1200 g | 80 | 20-25 | Perforated | 2 |
| Tuna filet | 500-1000 g | 80 | 15-20 | Perforated | 2 |
| Pike perch | 4 x 250 g | 80 | 25-30 | Perforated | 2 |
Meat
| Meat | Quantity | Temperature °C | Time min. | Container | Level |
| Chicken leg | 4-10 | 100 | 40-45 | Perforated | 2 |
| Chicken breast | 4-6 | 100 | 25-35 | Perforated | 2 |
| Smoked pork loin | 500g – 1000 g | 100 | 40-50 | Perforated | 2 |
| Turkey escalope | 4-8 | 100 | 20-25 | Perforated | 2 |
| Pork filet, whole | 4-8 | 100 | 20-30 | Perforated | 2 |
| Sausages | 80-100 | 10-15 | Perforated | 2 |
Eggs
| Eggs | Temperature °C | Time min. | Container | Level |
| Eggs in Glass | 100 | 10-15 | Rack | 2 |
| Eggs, hard | 100 | 15 | Rack | 2 |
| Eggs, soft | 100 | 10-12 | Rack | 2 |
Side dishes
| Side dishes | Quantity | Temperature °C | Time min. | Container | Level |
| Pearl barley + Liquid | 200g + 400 ml | 100 | 30-35 | Rack, glass bowl | 2 |
| Semolina + Liquid | 200g + 300 ml | 100 | 10-20 | Rack, glass bowl | 2 |
| Lentils + Liquid | 200g + 375 ml | 100 | 20-50 | Rack, glass bowl | 2 |
| Rice + Liquid | 200g + 250 ml | 100 | 25-40 | Rack, glass bowl | 2 |
Usage, tables and tips
Vegetables
| Vegetables | Temperature °C | Time min. | Container | Level | |
| Eggplant/Aubergine | in slices | 100 | 15-20 | Perforated | 2 |
| Beans | 100 | 35-45 | Perforated | 2 | |
| Broccoli | florets with stalk | 100 | 25-30 | Perforated | 2 |
| Broccoli | florets without stalk | 100 | 15-20 | Perforated | 2 |
| Cauliflower | florets | 100 | 25-30 | Perforated | 2 |
| Cauliflower | whole head | 100 | 40-45 | Perforated | 1 |
| Peas | 100 | 30-35 | Perforated | 2 | |
| Fennel | in stripes | 100 | 15-20 | Perforated | 2 |
| Fennel | cut in half | 100 | 20-30 | Perforated | 2 |
| Potatoes with skin | whole, very small | 100 | 20-25 | Perforated | 2 |
| Potatoes with skin | whole, very big | 100 | 45-50 | Perforated | 2 |
| Potatoes without skin | in pieces | 100 | 20-25 | Perforated | 2 |
| Turnip | in sticks | 100 | 20-25 | Perforated | 2 |
| Snow peas | 100 | 15-20 | Perforated | 2 | |
| Carrots | in slices | 100 | 25-30 | Perforated | 2 |
| Corn cobs | 100 | 50-60 | Perforated | 2 | |
| Bell peppers | in stripes | 100 | 12-15 | Perforated | 2 |
| Hot pepper | 100 | 12-15 | Perforated | 2 | |
| Mushrooms | in quarters | 100 | 12-15 | Perforated | 2 |
| Leeks | in slices | 100 | 10-12 | Perforated | 2 |
| Brussels sprouts | 100 | 25-35 | Perforated | 2 | |
| Celery | in stripes | 100 | 15-20 | Perforated | 2 |
| Asparagus | 100 | 20-35 | Perforated | 2 | |
| Spinach | 100 | 12-15 | Perforated | 2 | |
| Celery stalks | 100 | 25-30 | Perforated | 2 | |
| Courgette | in slices | 100 | 12-18 | Perforated | 2 |
Dumplings
| Dumplings | Temperature °C | Time min. | Container | Level |
| Sweet dumpling | 100 | 20-30 | Not perforated | 2 |
| Sweet yeast dumpling | 100 | 15-20 | Not perforated | 2 |
| Yeast dumpling | 100 | 15-25 | Not perforated | 2 |
| Bread dumpling | 100 | 20-25 | Not perforated | 2 |
| Napkin dumpling | 100 | 25-30 | Not perforated | 2 |
Usage, tables and tips
Desserts
| Desserts | Quantity | Temperature °C | Time min. | Container | Level |
| Stewed apples | 500-1500 g | 100 | 15-25 | Not perforated | 2 |
| Stewed pears | 500-1500 g | 100 | 25-30 | Not perforated | 2 |
| Crème brûlée | 80 | 20-25 | Rack - bowl | 2 | |
| Crème caramel | 80 | 25-30 | Rack - bowl | 2 | |
| Yogurt | 40 | 4-6 hrs. | Rack - bowl | 2 | |
| Stewed peaches | 500-1500 g | 100 | 15-20 | Not perforated | 2 |
Fruit (Sterilising/Boiling down)
| Fruit | Quantity | Temperature °C | Time min. | Container | Level |
| Pears | 4-6 1l glasses | 100 | 30-35 | Rack | 1 |
| Cherries | 4-6 1l glasses | 80 | 30-35 | Rack | 1 |
| Peaches | 4-6 1l glasses | 80 | 30-35 | Rack | 1 |
| Plums | 4-6 1l glasses | 80 | 30-35 | Rack | 1 |
Regenerate
| Warming-up | Quantity | Temperature °C | Time min. | Container | Level |
| Plate dishes | 1-2 | 100 | 12-15 | Rack | 2 |
| Plate dishes | 3-4 | 100 | 15-20 | Rack | 2 |
| Ready-made meals | -- | 100 | 15-20 | Rack | 2 |
Blanch
| Vegetables | Quantity | Temperature °C | Time min. | Container | Level |
| e.g. Beans, Leek | 100 | 10-12 | Perforated | 2 | |
| Curly Kale | 1000-2000 g | 100 | 12-16 | Perforated | 2 |
| Savoy cabbage | 10-20 | 100 | 12-15 | Perforated | 2 |
| White cabbage, whole | 2000-2500 g | 100 | 30-45 | Perforated | 1 |
| Tomatoes, peeled | 80 | 12 | Rack | 2 |
Usage, tables and tips
Defrost
| Vegetables / Side dish | Temperature °C | Time min. | Container | Level | |
| Broccoli | florets with stalk | 100 | 15-20 | Perforated | 2 |
| Mixed vegetables | 100 | 15-20 | Perforated | 2 | |
| Spinach leaves | portions | 100 | 10-15 | Not perforated | 2 |
| Cauliflower | florets | 100 | 15-20 | Perforated | 2 |
| Peas | 100 | 15-25 | Perforated | 2 | |
| Curly kale | bigger portion | 100 | 25-35 | Not perforated | 2 |
| Carrots | in slices | 100 | 15-20 | Perforated | 2 |
| Brussels sprouts | 100 | 20-25 | Perforated | 2 | |
| Asparagus | 100 | 25-30 | Perforated | 2 | |
| Ready-made meals | 100 | as required | Rack | 2 | |
| Bread | 100 | 10-25 | Rack | 2 | |
| Rice | 100 | 15-25 | Not perforated | 2 | |
| Lentils | 100 | 15-20 | Not perforated | 2 | |
| Noodles | 100 | 15-20 | Not perforated | 2 | |
Two level cooking
Some suggestions:
When cooking with two levels the Broiler always belongs to the 2nd or 3rd level of insertion from the bottom to the top.
This way the usual vessels of porcelain, Jena glass or of stainless steel can be put inside the oven.
The container of cooking perforated or not, will be inserted in the 1st level from the bottom. It can also be cooked with two Broilers.
Different cooking times are controlled this way:
Foods that need a longer cooking time should be placed in the upper area of the oven. Foods with a shorter cooking time should be placed on the bottom level.
One example: Vegetables, potatoes and fish.
Place the vegetables and potatoes in any suitable container on the rack inserted in the 2nd or 3rd level. Insert the fish in the 1st level.
When using the perforated tray to cook fish, the non-perforated tray must be inserted in the bottom of the appliance to collect liquid dripping from the fish. This way the appliance is kept clean.
Time: Vegetables and potatoes 25-35 Min.
Time: Fish – depending on type – 15-25 Min.
Select the longest cooking time. Because of the different levels the food is ready at the same time, without any over cooking.
Cooking with the Broiler
For good results with the Broiler, use the grill rack supplied with the oven.
IMPORTANT POINTS:
- When the Broiler is used for the first time there will be some smoke and a smell coming from the oils used during oven manufacture.
- The oven door window becomes very hot when the Broiler is working. Keep children away.
-
When the Broiler is operating, the cavity walls and the grill rack become very hot. You should use oven gloves.
-
If the Broiler is used for extended period of time it is normal to find that the elements will switch themselves off temporarily due to the safety thermostat.
- Important! When food is to be broiled or cooked in containers you must check that the container in question is suitable for use. See the section on types of ovenware!
- When the Broiler is used it is possible that some splashes of fat may go onto the elements and be burnt. This is a normal situation and does not mean there is any kind of operating fault.
- After you have finished cooking, clean the interior and the accessories so that cooking remains do not become encrusted.
| Type of food | Quantity | Time (min.) | Instructions |
| Fish | |||
| Bass | 800g | 18-24 | Spread lightly with butter. After half of cooking time turn and spread with seasoning. |
| Sardines/gurnard | 6-8 fish | 15-20 | |
| Meat | |||
| Sausages | 6-8 units | 22-26 | Prick after half cooking time and turn. |
| Frozen hamburgers | 3 units | 18-20 | |
| Spare rib (approx. 3 cm thick) | 400 g | 25-30 | After half of cooking time, baste and turn. |
| Others | |||
| Toast | 4 units | 11/2-3 | Watch toasting. |
| Toasted sandwiches | 2 units | 5-10 | Watch toasting. |
Heat up the Broiler beforehand for 2 minutes. Unless indicated otherwise, use the grill rack. Place the grid on a bowl so that the water and the fat can drop. The times shown are merely indicative and can vary as a function of the composition and quantity of the food, as well as the final condition wished for. Fish and meat taste great if, before broiling, you brush them with vegetable oil, spices and herbs and leave to marinate for a few hours. Only add salt after broiling.
Sausages will not burst if you prick them with a fork before broiling.
After half the broiling time has passed, check on how the cooking is going and, if necessary, turn the food over.
The Broiler is especially suitable for cooking thin portions of meat and fish. Thin portions of meat only need to be turned once, but thicker portions should be turned several times.
Cooking with Convection
Roasting and baking
| Type | Quantity (g) | Temperature °C | Time (min) | Standing Time (min) | Comments |
| Beef stew | 1000 | 160/170 | 80/90 | 10 | Do not put lid on container |
| Pork loin | 500 / 600 | 180/190 | 35/40 | 10 | Do not put lid on container |
| Whole chicken | 1000 / 1200 | 200 | 30/40 | 10 | Put lid on container.Breast facing upwards.Do not turn. |
| Chicken portions | 800 | 200 | 25/35 | 10 | Do not put lid on container. Arrange portions with skin facing upwards. Do not turn. |
| Duck | 1500 / 1700 | 200 | 70/80 | 10 | Put lid on container. Do not turn. |
Advice for roasting meat
Turn the pieces of meat halfway through the cooking time. When the roasted meat is ready you should let it stand for 10 minutes in the oven with this switched off and closed. This will ensure the juices in the meat are well distributed.
Add 2 to 3 soup spoons of gravy or similar liquid to lean meat and 8 to 10 soup spoons to stews, depending on the amount of meat in question.
The roasting temperature and time required depends on the type and amount of meat being cooked.
If the weight of the meat to be roasted does not appear on the table choose the settings for the weight immediately below and extend the cooking times.
Advice on ovenware
Check that the ovenware fits inside the oven.
Hot glass containers should be put on a dry kitchen cloth. If such containers are put on a cold or wet surface the glass may crack and break. Use oven gloves to take the ovenware out of the oven.
Cooking with Convection
Cooking – Cakes
| Type | Container | Level | Temperature °C | Time (min) |
| Walnut cake | Spring-form type tin | 1 | 170/180 | 30/35 |
| Fruit tart | Spring-form type tin | 2 | 150/160 | 35/45 |
| Fruit cakes | Cake tin with central hole | 1 | 170/190 | 30/45 |
| Savoury tarts | Spring-form type tin | 2 | 160/180 | 50/70 |
| Simple cake (sponge cake) | Spring-form type tin | 1 | 160/170 | 40/45 |
| Almond cakes | Cake tray | 2 | 110 | 35/45 |
| Puff pastry | Cake tray | 2 | 170/180 | 35/45 |
Advice on cake baking ware
The most commonly used type of baking ware is black metal tins.
Advice on how to bake cakes
Different amounts and types of pastry require different temperatures and baking times. Try low settings first of all and then, if necessary, use higher temperatures next time. A lower temperature will result in more uniform baking.
Baking suggestions
How to check if the cake is properly cooked
Start sticking a tooth pick in the highest part of the cake 10 minutes before the end of the baking time. When no dough sticks to the tooth pick the cake is ready.
If the cake is very dark on the outside
Next time choose a lower temperature and let the cake bake for a longer time.
If the cake is very dry
Make small holes in the cake with a tooth pick after baking has finished. Then sprinkle the cake with some fruit juice or alcoholic drink. Next time increase the temperature by about 15° C and reduce the baking time.
If the cake does not come free when turned Let the cake cool down for 5 to 10 minutes after baking and it will come out of the tin more easily. If the cake still does not come free run a knife carefully around the edges. Next time grease the cake tin well.
Care and maintenance
Cleaning the cooking space
Avoid using abrasive cleaners such as scouring pads, steel wool, etc. as they can damage the surface.
Wipe the cooking space clean using a damp cloth whilst the appliance is still warm. Finish off by drying the cooking space.
For ease of cleaning, the shelf guides can be removed (see the following chapter).
Removing the shelf guides
Unscrew and remove the knurled nuts 1 in the front of the shelf guides in an anti-clockwise direction.
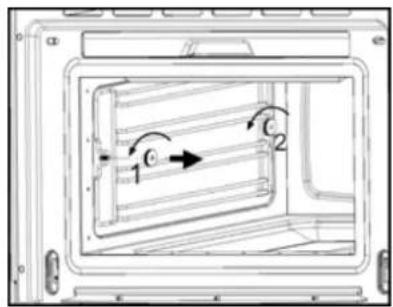
Unscrew and loosen the knurled nuts 2 in the back of the shelf guides in an anti-clockwise direction. Do not completely remove these nuts.
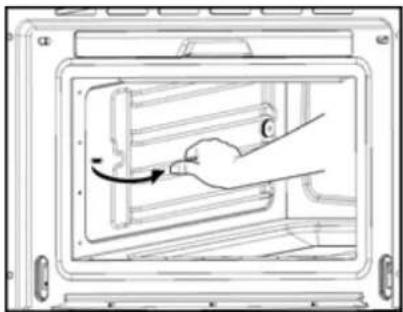
Pull the shelf guides to the inside of the cavity and remove from the front.
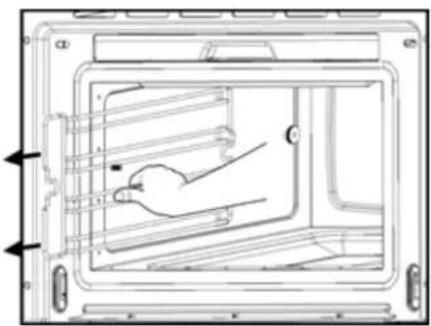
To put them back, insert the shelf guides into the knurled nuts 2 in the back and position on the screws in the front. Screw the knurled nuts 1 and 2 in a clockwise direction till tight.
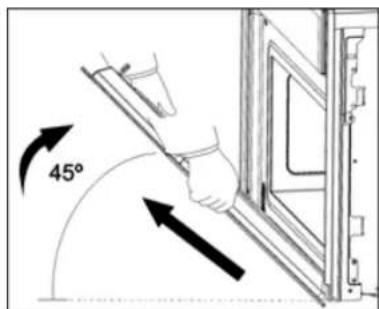
Removing the appliance door
- Open the appliance door as far as it will go.
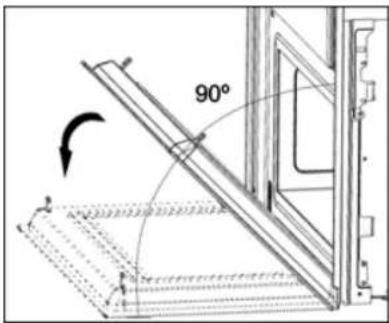
- Insert 2 pins inside the holes in the hinges.
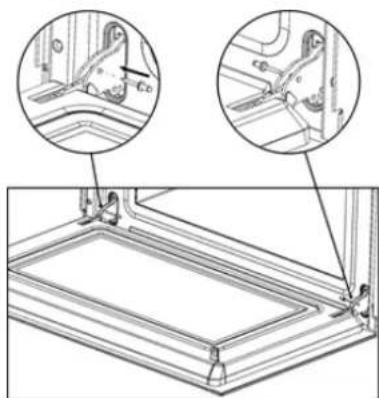
- Close the appliance door just enough that it can be lifted out.
-
To reassemble, push the hinges into the holes from the front.
-
Open the appliance door as far as it will go and remove the pins.
Care and maintenance
Descaling
Whenever steam is produced, irrespective of the hardness of the local water supply (i.e. the limescale content of the water), limescale is deposited inside the steam generator.
The time interval between descaling depends on the hardness of the water and frequency of use. If steaming 4×30 minutes per week, the appliance must be descaled (depending on water hardness) roughly as follows:
| Water hardness | Descale after about |
| Very soft | 18 months |
| Medium | 9 months |
| Very hard | 6 months |
The appliance automatically detects when descaling is necessary and when this happens the Descale light stays on. If the Descaling procedure is not performed, some steam cooking cycles may not function after the Descale light starts to flash. If once again the Descaling procedure is not performed, some cooking cycles after the oven functioning is blocked, the Descale light stays on and the display shows “CAL” blinking.
IMPORTANT NOTE: Failure to descale the appliance will likely impair the functioning of or cause damage to the appliance.
Suitable descaling solutions
For descaling, use the descaling solution "durgol®".
This solution allows a professional and careful descaling of your appliance. Available at Customer Care Centres.
Warning! Do not use vinegar or vinegar-based products as they can cause damage to the oven's internal circuit.
Traditional descaling solutions are not appropriate because they can contain foaming agents.
Care and maintenance
Descaling procedure
Warning: For safety reasons, the descaling process cannot be interrupted and it takes about 45 minutes.
The appliance must be in idle state prior to starting the descaling cycle.
To run a descaling cycle proceed as follows:
-
Rotate the Function Selector knob to the position corresponding to the Descaling function. The display shows the Water Hardness "SOFT / MED / HARD".
-
Press the "OK" key for 5 seconds to enter the Descaling Procedure. The display shows "CAL" and there is an intermittent beep.
-
(If you wish to cancel the descale process at this stage Press the STOP key).
-
Press the START key to start the descaling process.
-
When the display shows "2 CUP", Short beeps are emitted. Remove the water tank.
-
Pour 2 cups of an adequate descaling solution into the water tank and put the water tank back.
-
Press the START key. The Descale cycle is initiated and takes about 30 minutes.
-
The descaling process is silent and during this process the display shows continuously "2 CUPS" (without blinking).
-
When the display shows "4 CUP" flashing and the oven emits a beep, remove and empty the water tank.
-
Fill the water tank with 4 cups of cold water and put the water tank back.
-
Press the START key. The first rinsing cycle starts.
-
When the display again shows "4 CUP" flashing and the oven emits a new beep, remove and empty the water tank.
-
Fill the water tank with 4 cups of cold water and put the water tank back.
-
Press the START key. The second rinsing cycle starts.
-
When the rinsing cycle has finished the display shows "End". The message "DEP" will be displayed until the water tank is removed.
-
Remove, empty and dry the water tank.
Oven cleaning
Warning! Cleaning should be done with the oven power switched off. Switch off the oven's power circuit.
Do not use aggressive or abrasive cleaning products, scourers that scratch surfaces or sharp objects, since stains may appear.
Do not use high pressure or steam jet cleaning appliances.
Do not use harsh abrasive cleaners or sharp metal scrapers to clean the oven door glass since they can scratch the surface, which may result in shattering of the glass.
Front surface
Normally you just need to clean the oven with a damp cloth. If it is very dirty, add a few drops of dishwashing liquid to the cleaning water.
Afterwards, wipe the oven with a dry cloth.
In an oven with an aluminium front, use a mild glass cleaning product and a soft cloth that does not release any fibres or threads. Wipe from side to side without exerting any pressure on the surface.
Immediately remove limescale, fat, starch or egg white stains. Corrosion can occur under these stains.
Do not let any water get inside the oven.
Oven interior
After use, remove any water on the bottom of the cooking space with a soft cloth. Leave the appliance door open so that the cooking space can cool down.
To remove dirt that is harder to shift, use a non-aggressive cleaning product. Do not use oven sprays or other aggressive or abrasive cleaning products.
Always keep the door and the oven front very clean to ensure that the door opens and closes properly.
Make sure water does not enter the oven ventilation holes.
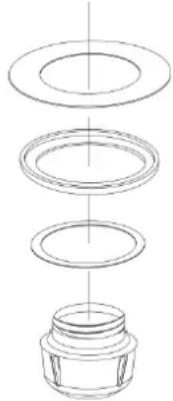
The glass lamp cover is located on the oven ceiling and can be removed easily for cleaning. For this you just need to unscrew it and clean it with water and dishwashing liquid.
Accessories
Clean the accessories after each use. If they are very dirty, soak them first of all and then use a brush and sponge. The accessories can be washed in a dish washing machine.
What should I do if the oven doesn't work?
WARNING! Any type of repair must only be done by a specialised technician. Any repair done by a person not authorised by the manufacturer is dangerous.
You do not need to contact Technical Assistance to resolve the following questions:
- The display is not showing! Check if:
- The time indication has been switched off (see section on Basic Settings).
- Nothing happens when I press the keys! Check if:
- The Safety Block is active (see section on Basic Settings).
- The oven does not work! Check if:
- The oven's power is switched on.
- When the oven is operating I can hear some strange noises! This is not a problem.
- It has to do with the operating noises that can occur during the cooking process, e.g., by the water pumps in the steam generator.
- The steam inside the cavity produces a pressure build-up and sometimes the cavity walls may produce noise when they react to the pressure.
- This noises are normal, there is no problem.
- The food doesn't heat up or heats very slowly! Check if:
- You have selected the correct operating times and temperature setting.
- The food you have put inside the oven is a larger amount or colder than you usually put in.
- If the message "Err_" appears in the display, please contact the Company:
- EURO-PARTS
1-866-722-2262
service@euro-parts.ca
- The appliance still makes a noise after the cooking process is finished! This is not a problem.
- The cooling fan keeps on working for some time. When the temperature has dropped sufficiently, the fan will switch itself off.
- The oven switches on but the interior light does not go on!
- If all the functions work properly it is probable that the lamp has blown. You can keep on using the oven.
Replacing the light bulb
To replace the light bulb, proceed as follows:
- Switch off the oven's power circuit, fuses or breakers.
- Unscrew and remove the glass light cover.
- Remove the light bulb. Warning! The bulb may be very hot.
- Fit a new G9 230V / 25W halogen bulb. Follow the lamp manufacturer's instructions.
- Screw the glass light cover into place.
- Connect the oven again to the power supply.
Technical characteristics
Displays
| Display | Description |
| Descaling | |
| SOFT | Soft water. |
| MED | Medium water. |
| HARD | Hard water. |
| / CAL | Appliance must be descaled. |
| Flashing – descaling starts. | |
| 2 CUP | Feed 2 cups descaling solution into the water tank. |
| 4 CUP | Feed 4 cups cold water into the water tank for rinsing. |
| Water tank | |
| RES | Indication that water tank is missing. |
| DEP | The water tank must be removed, emptied and reinserted. |
| -LO- | Tank is empty, please fill with a cup of water. |
| Steam reduction | |
| VAP | Indication that steam reduction process is ongoing. |
| PUMP | Indication that cold water is entering the boiler and hot water is being pumped to the water tank. |
| System warnings | |
| LAMP | Damaged lamp. |
| Please contact the Technical Assistance Service in case of the following errors: | |
| HOT | Temperature in the PCB is too high. |
| Err_ | Various Errors in the sensors. |
Specifications
- AC Voltage...... (see rating plate)
• Power required 3200 W - Current required.... 20 AMP
- Steam power 1500 W
- Broiler power 1200 W
- Convection power 1600 W
- Exterior dimensions (W×H×D).... 760 x 455 x 542 mm
- Interior dimensions (W×H×D).... 420 x 210 x 390 mm
- Oven capacity.... 381
- Weight 35kg
Installation instructions
Before installation
Check that the input voltage indicated on the rating plate is the same as the voltage of the power outlet you are going to use. The rating plate is located on the front part of the cavity and it is only visible after opening the door.
If required by the National Electrical Code (or Canadian Electrical Code), this appliance must be installed on a separate branch circuit.
Installer – show the owner the location of the circuit breaker or fuse. Mark it for easy reference.
Before installing, turn power OFF at the service panel. Lock service panel to prevent power from being turned ON accidentally.
Be sure your appliance is properly installed and grounded by a qualified technician. Installation, electrical connections and grounding must comply with all applicable codes.
Open the oven door and take out all the accessories and remove the packing material.
Warning! The front surface of the oven may be wrapped with a protective film. Before using the oven for the first time, carefully remove this film, starting on the inside.
Make sure that the oven is not damaged in any way. Check that the oven door closes correctly and that the interior of the door and the front of the oven opening are not damaged. If you find any damage contact the Technical Assistance Service.
DO NOT USE THE OVEN if the metal conduit is damaged, if the oven does not function correctly or if it has been damaged or dropped. Contact the Technical Assistance Service.
Place the oven on a flat and stable surface. The oven must not be put close to any sources of heat, radios or televisions.
Electrical supply
Before installing the oven have a qualified electrician verify that your home is provided with adequate electrical service and that the addition of the oven will not overload the branch circuit on which it is to be installed.
A separate three-wire or four-wire single phase, 240 Volt, 60 Hz, branch circuit is required.
For hook-up of the oven you will need to have an approved junction box installed where it will be easily reached through the front of the cabinet where the oven will be located. The oven has 3 feet of conduit.
Allow two to three feet of slack in the line so that the oven can be moved if servicing is ever necessary.
DO NOT shorten the flexible conduit.
Wiring requirements
When making the wire connections, use the entire length of the conduit provided (3 feet). The conduit must not be cut.
Before making connections make sure the power is off and read and observe the following:
- A separate three-wire or four-wire, single phase, 240 Volt, 60 Hz branch circuit is required for the oven.
- The oven must be connected with Copper or Aluminum wire.
- In the United States:
Wiring must conform to the National Electrical Code, ANSI/NFPA No. 7 latest edition. You can obtain a copy of the National Electrical Code by writing to: National Fire Protection Association Batterymarch Park Quincy, MA 02269
In Canada:
Wiring must conform to Cana dian Electrical Code C22.1- latest edition. You can obtain a copy of the Canadian Electrical Code by writing to: Canadian Standards Association 178 Rexdale Boulevard Rexdale (Toronto), Ontario, Canada M9W 1R3
- Wire size (Copper or Aluminum wire) and connections must be suitable for the rating of the appliance as per the National Electrical Code requirements. The flexible armoured cable extending from the oven should be connected directly to the junction box.
- The junction box should be located so as to allow as much slack as possible between the junction box and the oven so it can be moved if servicing is ever required.
- A U.L. listed conduit connector must be provided at each end of the power supply cable.
Electrical connections
Be sure your appliance is properly installed and grounded by a qualified technician. Ask your dealer to recommend a qualified technician or an authorized repair service.
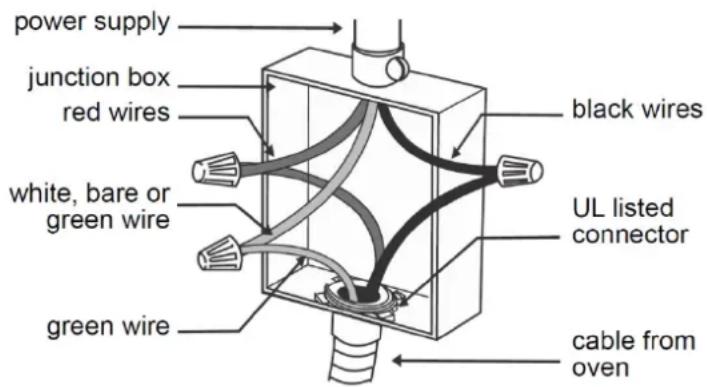
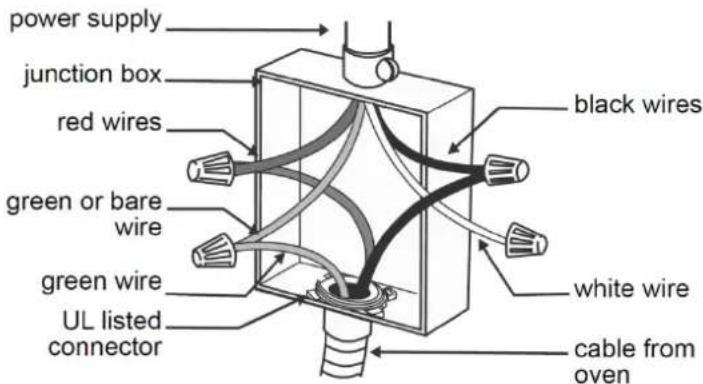
This appliance is manufactured with a green GROUND wire connected to the oven chassis. After making sure that the power has been turned off, connect the flexible conduit from the oven to the junction box using a U.L. listed conduit connector. The figures and the instructions provided below present the most common way of connecting the ovens.
Your local codes and ordinances, of course, take precedence over these instructions.
WARNING" Risk of Electric Shock, frame grounded to neutral of appliance through a link.
Grounding through the neutral conductor is prohibited for new branch-circuit installations (1996 NEC); mobile homes; and recreational vehicles, or in an area where local codes prohibit grounding through the neutral conductor. For installations where grounding through the neutral conductor is prohibited:
- Disconnect the ground from the neutral at free end of conduit;
- Use grounding terminal or lead to ground unit; and
- Connect neutral terminal or lead to branch circuit neutral in usual manner.
3-Wire branch circuit (for US only)
Refer to the following Figure, where local codes allow the connection of GROUND wire from the oven to the branch circuit NEUTRAL wire (gray or white colored wire):
- If local codes permit, connect the green GROUND wire from the oven and the white wire from the oven to the branch circuit NEUTRAL wire (gray or white colored wire).
- Connect the red and black leads from the oven to the corresponding leads in the junction box.
Grounded Neutral
4-Wire branch circuit (for US and CANADA)
Refer to the following Figure:
- Disconnect ground from neutral at free end of conduit.
- Connect the green GROUND wire from the oven to the GROUND wire in the junction box (bare or green colored wire).
- Connect the red and black leads from the oven to the corresponding leads in the junction box.
Ungrounded Neutral
After installation
The oven only functions when the door is closed correctly.
After the first use, clean the inside of the oven and the accessories, following the cleaning instructions given in the section "Oven cleaning and maintenance".
Sommaire
service@euro-parts.ca
- Push oven completely into the cabinet and centre it.
- Open microwave door and fasten the appliance to the cabinet using the four screws provided. Insert the screws through the front holes.
FR
Warranty
Porter&Charles products are designed and built to the highest standards.
We expect your appliances to provide many years of trouble free enjoyment.
In the event of an appliance requiring attention, each appliance is covered by a 2-year warranty from the date of purchase.
Refer to warranty policy for complete terms and conditions.
Coverage is for costs of parts and labour for appliances in capital cities & metropolitan areas. We reserve the right to charge directly for handling expenses outside the metropolitan region.
Porter&Charles products are supported by a national service support system. Call our customer service department for attention.
Please retain your invoice to quote should you require service assistance. This will identify your product for our priority service back-up. Please attach your invoice to this manual for easy future reference. To register your purchase, you can either complete the section below to mail or fax, or register online at www.porterandcharles.ca/warranty-information.
Porter&Charles
871 Cranberry Court
Oakville, ON L6L 6J7
Canada
Toll: 1-866-699-4973
Tel: 905-829-8389
Fax: 905-829-8409
info@ela.ca
www.porterandcharles.ca
For Service & Parts:
EURO-PARTS
Toll: 1-866-722-2262
service@euro-parts.ca
parts@euro-parts.ca
www.euro-parts.ca
Important: Please record details of your purchase below and mail or e-mail to Porter&Charles
-cut along line
Name: ____ Tel No ____
Address:
City : ____ Prov/State: ____ Postal Code/ZIP: ____
Where purchased: ____ Purchase date: ____
Items purchased:
Serial No's: :


- CONTENTS
- GROUNDING INSTRUCTIONS
- SAFETY INFORMATION
- IMPORTANT SAFEGUARDS
- SAFETY OF CHILDREN AND VULNERABLE ADULTS
- WARNINGS ON GENERAL SAFETY
- SAFETY INSTRUCTIONS
- WARNING
- DESCRIPTION OF YOUR OVEN
- BASIC SETTINGS
- INITIAL SETTINGS
- SETTING THE CLOCK
- HIDING / DISPLAYING THE CLOCK
- WATER HARDNESS SETTING
- CHILD LOCK
- SHOWROOM MODE
- STEAM FUNCTION
- BROILER
- BASIC FUNCTIONS
- CONVECTION
- CONVECTION + STEAM
- BROILER + FAN
- SPECIAL FUNCTIONS
- DELAYED START TIME
- FILLING THE WATER TANK
- REFILLING THE WATER
- EMPTYING THE WATER TANK
- WARNING: THE WATER IN THE TANK MAY BE HOT. DANGER OF BURNS
- IMPORTANT NOTE: IT IS ADVISABLE TO REMOVE THE WATER TANK AND EMPTY IT AFTER A COOKING CYCLE. THIS PREVENTS THE FORMATION OF BACTERIA AND LIMESTONE INSIDE THE APPLIANCE
- WHEN THE OVEN IS WORKING
- INTERRUPTING A COOKING CYCLE
- ALTERING PARAMETERS
- CANCELLING A COOKING CYCLE
- END OF A COOKING CYCLE
- STEAM FLOW
- RESIDUAL WATER IN THE OVEN
- USAGE, TABLES AND TIPS
- TWO LEVEL COOKING
- SOME SUGGESTIONS
- COOKING WITH THE BROILER
- IMPORTANT POINTS
- COOKING WITH CONVECTION
- ADVICE FOR ROASTING MEAT
- ADVICE ON OVENWARE
- ADVICE ON CAKE BAKING WARE
- ADVICE ON HOW TO BAKE CAKES
- BAKING SUGGESTIONS
- HOW TO CHECK IF THE CAKE IS PROPERLY COOKED
- IF THE CAKE IS VERY DRY
- CARE AND MAINTENANCE
- CLEANING THE COOKING SPACE
- REMOVING THE SHELF GUIDES
- REMOVING THE APPLIANCE DOOR
- DESCALING
- SUITABLE DESCALING SOLUTIONS
- WARNING! DO NOT USE VINEGAR OR VINEGAR-BASED PRODUCTS AS THEY CAN CAUSE DAMAGE TO THE OVEN'S INTERNAL CIRCUIT
- DESCALING PROCEDURE
- WARNING: FOR SAFETY REASONS, THE DESCALING PROCESS CANNOT BE INTERRUPTED AND IT TAKES ABOUT 45 MINUTES
- OVEN CLEANING
- FRONT SURFACE
- OVEN INTERIOR
- ACCESSORIES
- WHAT SHOULD I DO IF THE OVEN DOESN'T WORK
- REPLACING THE LIGHT BULB
- TECHNICAL CHARACTERISTICS
- SPECIFICATIONS
- INSTALLATION INSTRUCTIONS
- BEFORE INSTALLATION
- ELECTRICAL SUPPLY
- WIRING REQUIREMENTS
- IN CANADA
- ELECTRICAL CONNECTIONS
- 3-WIRE BRANCH CIRCUIT (FOR US ONLY)
- 4-WIRE BRANCH CIRCUIT (FOR US AND CANADA)
- AFTER INSTALLATION
- SOMMAIRE
- FR
- WARRANTY
Brand : Porter & Charles
Model : STPS60TM-1
Category : Oven