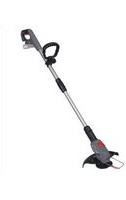
KX-ART 1826 Li - Grass trimmer Kraftixx - Free user manual and instructions
Find the device manual for free KX-ART 1826 Li Kraftixx in PDF.


User questions about KX-ART 1826 Li Kraftixx
0 question about this device. Answer the ones you know or ask your own.
Ask a new question about this device
Download the instructions for your Grass trimmer in PDF format for free! Find your manual KX-ART 1826 Li - Kraftixx and take your electronic device back in hand. On this page are published all the documents necessary for the use of your device. KX-ART 1826 Li by Kraftixx.
USER MANUAL KX-ART 1826 Li Kraftixx
GB Original operating instructions Cordless grass trimmer
natural_image
Line drawing of a golf club with handle and gear (no text or symbols)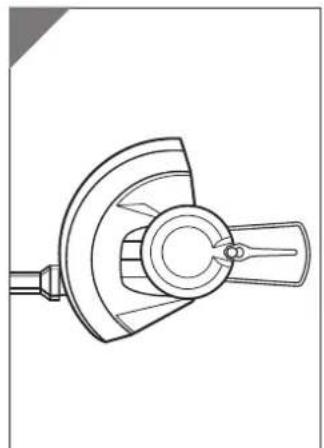
natural_image
Technical line drawing of a mechanical component with a curved housing and shaft (no text or symbols)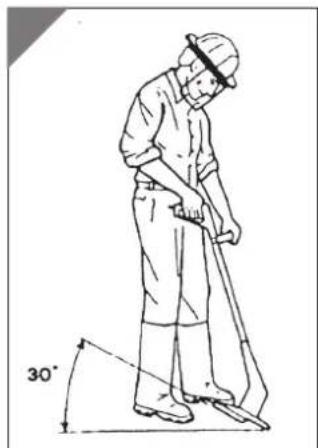
natural_image
Line drawing of a worker using a walking stick with a 30-degree angle marker (no text or symbols)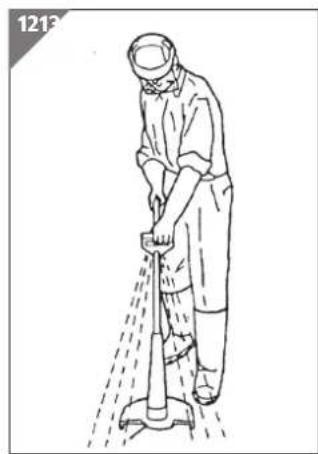
natural_image
Line drawing of a person using a power tool to clean or spray the pipe (no text or symbols)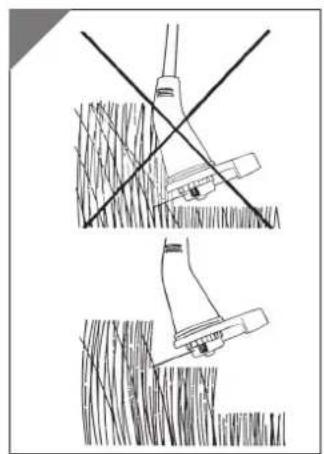
natural_image
Technical line drawing showing two mechanical assembly steps with no visible text or symbols14
D
Gefahr!
When using equipment, a few safety precautions must be observed to avoid injuries and damage. Please read the complete original operating instructions and safety information with due care. Keep these operating instructions in a safe place so that the information is available at all times. If you give the equipment to any other person, hand over these original operating instructions and the safety information as well. We cannot accept any liability for damage or accidents which arise due to failure to follow these instructions and the safety information.
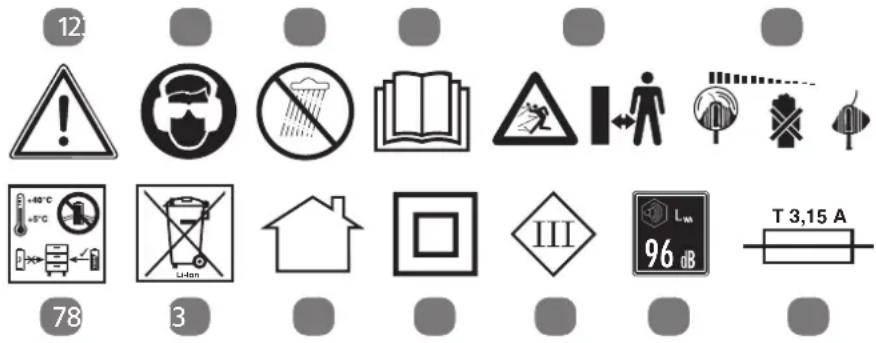
Explanation of the symbols used (see Fig. 14)
1. Warning!
- Wear eye protection and ear plugs.
- Do not expose to rain.
- Read the instruction manual before starting.
- Keep other persons and animals away from the danger zone.
- The tool will continue to rotate.
- The ideal charging and storage temperature is between 10 °C and 40 °C. Do not throw into water. Fully charge the battery before putting it into storage.
- Never place batteries in your household refuse! The batteries must be removed from the tool before it is disposed of.
- Use only in dry indoor areas.
- Protection class II (double-insulated)(charger)
- Protection class III (cordless grass trimmer)
- The guaranteed sound power level ( L_WA ) is 96 dB.
- If the charger's current strength rises above T 3.15 A, the cut-out will be activated. The supply of current to the output is then interrupted.
1. Safety information
For the relevant safety information please refer to the booklet included in delivery.
Warning!
Read all the safety information, instructions, illustrations and technical data provided on or with this power tool. Failure to adhere to the following instructions may result in electric shock, fi re and/or serious injury.
Keep all the safety information and instructions in a safe place for future use.
2. Layout and items supplied
2.1 Layout (Fig. 1/2)
- Safety lock-off
- On/Off switch
- Catch for turning the handle
- Additional handle
- Height adjustment (union nut)
- Edge guide
- Blade head
- Safety hood
- Blade
- Charging unit (in the case of Art. No.: 45.150.52 it is not included in delivery)
- Battery (in the case of Art. No.: 45.150.52 it is not included in delivery)
- Lock for rotatable motor head
2.2 Items supplied
Please check that the article is complete as specified in the scope of delivery. If parts are missing, please contact our service center or the sales outlet where you made your purchase at the latest within 5 working days after purchasing the product and upon presentation of a valid bill of purchase. Also, refer to the warranty table in the service information at the end of the operating instructions.
- Open the packaging and take out the equipment with care.
- Remove the packaging material and any packaging and/or transportation braces (if available).
• Check to see if all items are supplied. - Inspect the equipment and accessories for transport damage.
- If possible, please keep the packaging until the end of the guarantee period.
Danger!
The equipment and packaging material are not toys. Do not let children play with plastic bags, foils or small parts. There is a danger of swallowing or suffocating!
• Cordless grass trimmer
- Guard hood
- Battery (in the case of Art. No.: 45.150.52 it is not included in delivery)
• Charging unit (in the case of Art. No.: 45.150.52 it is not included in delivery)
• Additional handle with spare blades
• Original operating instructions
- Safety information
GB
3. Intended use
The equipment is designed for cutting lawns and small areas of grass in private and hobby gardens.
Equipment designed for use in private and hobby gardens is regarded as unsuitable for use in public facilities, parks and sports centers, along roadways, or in agriculture and forestry. The operating instructions as supplied by the manufacturer must be kept and referred to in order to ensure that the equipment is properly used and maintained. Important. This equipment must not be used for composting purposes (shredding) as this could result in injury or damage to property.
The equipment may be used only for the tasks it is designed to handle. Any other use is deemed to be a case of misuse. The user/operator and not the manufacturer will be liable for any damage or injuries of any kind resulting from such misuse.
Please note that our equipment has not been designed for use in commercial, trade or industrial applications. Our warranty will be voided if the equipment is used in commercial, trade or industrial businesses or for equivalent purposes.
4. Technical data
Speed n_0 .....8,500 min ^-1
Cutting circle 26 cm
Max. operating time .... approx. 60 min
Protection class ....III
L_WA sound power level 88.3 dB (A)
K uncertainty 3.04 dB
Vibration 5.8 m/s ^4
K uncertainty 2.3 m/s ^4
Sound pressure level
at the operator's ear 78 dB(A)
K uncertainty 3 dB
Guaranteed sound power level L_WA ..... 96 dB (A)
Weight 2.2 kg
18 V 2.0 Ah Kraftixx battery
Rechargeable (lithium-ion) .....18 V, 2.0 Ah
Measured and guaranteed sound power level determined in accordance with 2000/14/EC, extended by 2005/88/EC.
18 V Kraftixx battery charger
Mains voltage
200-250 V\~, 50-60 Hz, max. 72 W
Output
Rated voltage 20 V DC
Rated current 3000 mA
Protection class ...... II (double-insulated) / ☐
The quoted vibration value was measured in accordance with a standardized testing method. It might change according to how the electric tool is used, and in exceptional circumstances it might exceed the quoted value.
The quoted vibration value can be used to compare one electric tool with another.
The quoted vibration value can also be used for initial assessment of a harmful effect.
Reduce noise generation and vibration to a minimum!
- Use only equipment that is in perfect condition.
- Maintain and clean the equipment regularly.
• Adapt your way of working to the equipment.
• Do not overload the equipment.
• Have the equipment checked if necessary. - Switch off the equipment when not in use.
- Wear gloves.
Caution!
Residual risks
Even if you use this electric power tool in accordance with instructions, certain residual risks cannot be rules out. The following hazards may arise in connection with the equipment's construction and layout:
- Lung damage if no suitable protective dust mask is used.
- Damage to hearing if no suitable ear protection is used.
- Health damage caused by hand-arm vibrations if the equipment is used over a prolonged period or is not properly guided and maintained.
GB
5. Before putting into operation
5.1 Fitting the guard hood and edge guide (Fig. 3)
Push the guard hood (Fig. 3/Item 8) in the direction of the arrow onto the motor housing as shown in Fig. 3. Make sure that it latches in place correctly! Make sure that the guard hood is fitted as in Fig. 1. Then take the edge guide (Fig. 3/Item 6) and insert it in the holes provided for it in the motor head as illustrated in Fig. 3.
5.2 Height adjustment (Fig. 4)
Undo the union nut (Item 5) until the grass trim-mer handle can be moved in and out freely. Now set the required working height and secure the handle in this position by tightening the union nut again.
5.3 Fitting the additional handle (Fig. 5)
Fit the additional handle to the mount provided, paying attention to the teeth (Fig. 5/Item 1). Then fit the additional handle (Fig. 5/Item 4) with the help of the supplied nut (Fig. 2/Item A) and the adjustment lock (Fig. 5/Item 3).
5.4 Adjusting the additional handle (Fig. 5)
Undo the adjustment lock (Item 3) for the additional handle until it can be moved forwards and backwards without any great resistance. Set the required position and tighten the adjustment lock again.
5.5 Adjusting the angle of tilt of the guide handle (Fig. 3)
Press the button for the angle of tilt adjustment (Item B). Now you can set the long handle to the required tilt. Release the button and allow the handle to lock into position to fix the angle of tilt. Three different locking angles are possible.
| Cutting angle positions | |
| 1 | 0° |
| 2 20° | |
| 3 40° | |
| 4 55° | |
Using as a grass trimmer: Cutting angle positions 2, 3 and 4 (see Fig. 3). The motor head must be in middle position (Fig. 1/Item 12). The edge guide (Fig. 1/Item 6) in bottom position.
Using as a grass edge trimmer: Cutting angle position 1
5.6 Installing the battery (Fig. 6/Item 11)
Press the side pushlock buttons of the battery pack as shown in Fig. 6 and push the battery pack into the mount provided. When the battery pack is positioned as in Fig. 6, make sure that the pushlock buttons latch in place! To remove the battery pack, proceed in reverse order.
5.7 Charging the battery (Fig. 7)
WARNING! Use only with the supplied 18V Kraftixx charger.
- Take the battery pack out of the equipment. Do this by pressing the side pushlock buttons.
- Check that your mains voltage is the same as that marked on the rating plate of the battery charger. Insert the power plug of the charger (10) into the mains socket outlet. The green LED will then begin to fl ash.
- Insert the battery pack (11) into the battery charger (10).
- In section „Charger indicator“ you will find a table with an explanation of the LED indicator on the charger.
The battery pack can become a little warm during the charging. This is normal. If the battery pack fails to charge, check:
• whether there is voltage at the socket outlet
- whether there is good contact at the charging contacts
If the battery pack still fails to charge, send the charging unit
• and the battery pack
to our customer service center.
To ensure that items are properly packaged and delivered when you send them to us, please contact our customer service or the point of sale at which the equipment was purchased.
When shipping or disposing of batteries and cordless tools, always ensure that they are packed individually in plastic bags to prevent short circuits and fi res.
To ensure that the battery pack provides long service, you should take care to recharge it promptly. You must recharge the battery pack when you notice that the performance of the device drops.
GB
Never allow the battery pack to become fully discharged. This will cause it to develop a defect.
5.8 Battery capacity indicator (Fig. 2)
Press the button for the battery capacity indicator (Item E). The battery capacity indicator (Item F) shows the charge status of the battery using 3 LEDs.
All 3 LEDs are lit:
The battery is fully charged.
2 or 1 LED(s) are lit:
The battery has an adequate remaining charge.
1 LED fl ashes:
The battery is empty, recharge the battery.
All LEDs blink:
The battery temperature is too low. Remove the battery from the equipment, keep it at room temperature for one day. If the fault reoccurs, this means that the rechargeable battery has undergone exhaustive discharge and is defective. Remove the battery from the equipment. Never use or charge a defective battery.
6. Operation
To obtain maximum performance from your grass trimmer, please follow these instructions:
- Never use the grass trimmer without the guard.
- Do not mow grass when it is wet. The best results are achieved with dry grass.
- To switch on your grass trimmer, press the safety lock-off (Fig. 1 / Item 1) and the On/Off switch (Fig. 1 / Item 2).
- To switch off your grass trimmer, let go of the On/Off switch again (Fig. 1 / Item 2).
- Do not allow the grass trimmer near the grass until the switch is pressed, i.e. the grass trimmer is in operation.
- To cut properly, swing the machine sideways while moving forwards. Keep the grass trimmer inclined at an angle of approx. 30° while you do so (see Figs. 11 and 12).
- If the grass is long, the grass must be cut shorter in stages, starting from the tip (see Fig. 13).
- Use the guard hood to prevent unnecessary wear.
- To avoid unnecessary wear, keep the grass trimmer away from hard objects.
6.1 Using the grass trimmer as an edge trim-mer
To cut the edges of lawns and flower beds, the grass trimmer can be converted as follows:
- Remove the battery pack
- Pull the lock for the rotatable motor head in the direction of the arrow as shown in Fig. 8.
- Turn the motor head through 90° in the required direction until it latches in place (Fig. 9).
• Now you have converted the grass trimmer to an edge trimmer for cutting the lawn vertically.
• To convert the equipment back to its original state, proceed in reverse order.
- Using the grass trimmer as a grass edge trimmer is permitted only in position 1 (0°) and with the motor head rotated (+/- 90°) as shown in Fig. 9. The edge guide (Item 6) must then be in the top position.
While you are working, make sure that you are protected by the safety guard in front of the cutting unit.
7. Cleaning, maintenance and ordering of spare parts
Danger!
Before putting away or cleaning the grass trim-mer, switch off and remove the battery pack.
7.1 Cleaning
- Keep all safety devices, air vents and the motor housing free of dirt and dust as far as possible. Wipe the equipment with a clean cloth or blow it down with compressed air at low pressure.
• We recommend that you clean the equipment immediately after you use it. - Clean the equipment regularly with a damp cloth and some soft soap. Do not use cleaning agents or solvents; these may be aggressive to the plastic parts in the equipment. Ensure that no water can get into the interior of the equipment. The ingress of water into an electric tool increases the risk of an electric shock.
- Use a brush to remove deposits from the safety guard.
GB
7.2 Replacing the blade (Fig. 10)
IMPORTANT! Be sure to remove the battery pack before replacing!
- To remove the blade, push the blade inwards and remove it through the larger opening as shown in Fig. 10.
- To fit the new blade, proceed in reverse order. Make sure the blade locks into place correctly as shown in Fig. 10.
7.3 Maintenance
• There are no other parts inside the equipment which require maintenance.
- Check the tool for damage every time after it has been used.
- To ensure that the cordless grass trimmer works safely, check at regular intervals that all the screw connections are secure.
7.4 Ordering spare parts
Please provide the following information on all orders for spare parts:
• Model/type of the equipment
• Article number of the equipment
• ID number of the equipment
- Spare part number of the required spare part For our latest prices and information please go to www.isc-gmbh.info
8. Disposal and recycling
The equipment is supplied in packaging to prevent it from being damaged in transit. The raw materials in this packaging can be reused or recycled. The equipment and its accessories are made of various types of material, such as metal and plastic. Defective components must be disposed of as special waste. Ask your dealer or your local council.
9. Storage
Store the equipment and accessories in a dark and dry place at above freezing temperature. The ideal storage temperature is between 10 and 40 °C. Store the electric tool in its original packaging.
10. Transport
- Always hold the tool with one hand on the handle and the other hand on the additional handle. Do not carry the tool by its motor housing.
- Secure the tool against slipping if you transport it in a vehicle.
• If possible, use the original packaging for transporting the tool.
11. Faults
The equipment does not work:
Check that the battery is charged and whether the charging unit is working. If the equipment will not work in spite of the voltage supply being OK, please send it to the customer service address below.
12. Charger indicator
| Indicator status Explanations and actions | ||
| Red LED Green LED | ||
| Off | Flashing | Ready for useThe charger is connected to the mains and is ready for use; there is no battery pack in the charger |
| On Off Charging | The charger is charging the battery pack in quick charge mode. The charging times are shown directly on the charger.Important! The actual charging times may vary slightly from the stated charging times depending on the existing battery charge. | |
| Off | On | The battery is charged and ready for use. (READY TO GO)The unit then changes over to gentle charging mode until the battery is fully charged.To do this, leave the rechargeable battery on the charger for approx. 15 minutes longer.Action:Take the battery pack out of the charger. Disconnect the charger from the mains supply. |
| Flashing Off | Adapted charging | The charger is in gentle charging mode.For safety reasons the charging is performed less quickly and takes more time. The reasons can be:- The rechargeable battery has not been used for a very long time.- The battery temperature is outside the ideal range.Action:Wait for the charging to be completed; you can still continue to charge the battery pack. |
| Flashing Flashing Fault | Charging is no longer possible. The battery pack is defective.Action:Never charge a defective battery pack.Take the battery pack out of the charger. | |
| On On Temperature fault | The battery pack is too hot (e.g. due to direct sunshine) or too cold (below 0^ ).Action:Remove the battery pack and keep it at room temperature (approx. 20^ ) for one day . | |
GB

For EU countries only
Never place any electric power tools in your household refuse.
To comply with European Directive 2012/19/EC concerning old electric and electronic equipment and its implementation in national laws, old electric power tools have to be separated from other waste and disposed of in an environment-friendly fashion, e.g. by taking to a recycling depot.
Recycling alternative to the return request:
As an alternative to returning the equipment to the manufacturer, the owner of the electrical equipment must make sure that the equipment is properly disposed of if he no longer wants to keep the equipment. The old equipment can be returned to a suitable collection point that will dispose of the equipment in accordance with the national recycling and waste disposal regulations. This does not apply to any accessories or aids without electrical components supplied with the old equipment.
Please note that batteries and lamps (e.g. light bulbs) must be removed from the tool before it is disposed of.
The reprinting or reproduction by any other means, in whole or in part, of documentation and papers accompanying products is permitted only with the express consent of the iSC GmbH.
Subject to technical changes
GB
Service information
We have competent service partners in all countries named on the guarantee certificate whose contact details can also be found on the guarantee certificate. These partners will help you with all service requests such as repairs, spare and wearing part orders or the purchase of consumables.
Please note that the following parts of this product are subject to normal or natural wear and that the following parts are therefore also required for use as consumables.
| Category Example | |
| Wear parts* Blade plate, Battery | |
| Consumables* Blade | |
| Missing parts |
* Not necessarily included in the scope of delivery!
In the effect of defects or faults, please register the problem on the internet at www.isc-gmbh.info. Please ensure that you provide a precise description of the problem and answer the following questions in all cases:
• Did the equipment work at all or was it defective from the beginning?
• Did you notice anything (symptom or defect) prior to the failure?
• What malfunction does the equipment have in your opinion (main symptom)?
Describe this malfunction.
GB
Warranty certifi cate
Dear Customer,
All of our products undergo strict quality checks to ensure that they reach you in perfect condition. In the unlikely event that your device develops a fault, please contact our service department at the address shown on this guarantee card. You can also contact us by telephone using the service number shown. Please note the following terms under which guarantee claims can be made:
- These guarantee terms apply to consumers only, i.e. natural persons intending to use this product neither for their commercial activities nor for any other self-employed activities. These warranty terms regulate additional warranty services, which the manufacturer mentioned below promises to buyers of its new products in addition to their statutory rights of guarantee. Your statutory guarantee claims are not affected by this guarantee. Our guarantee is free of charge to you.
- The warranty services cover only defects due to material or manufacturing faults on a product which you have bought from the manufacturer mentioned below and are limited to either the rectification of said defects on the product or the replacement of the product, whichever we prefer. Please note that our devices are not designed for use in commercial, trade or professional applications. A guarantee contract will not be created if the device has been used by commercial, trade or industrial business or has been exposed to similar stresses during the guarantee period.
-
The following are not covered by our guarantee:
-
Damage to the device caused by a failure to follow the assembly instructions or due to incorrect installation, a failure to follow the operating instructions (for example connecting it to an incorrect mains voltage or current type) or a failure to follow the maintenance and safety instructions or by exposing the device to abnormal environmental conditions or by lack of care and maintenance.
- Damage to the device caused by abuse or incorrect use (for example overloading the device or the use or unapproved tools or accessories), ingress of foreign bodies into the device (such as sand, stones or dust, transport damage), the use of force or damage caused by external forces (for example by dropping it).
-
Damage to the device or parts of the device caused by normal or natural wear or tear or by normal use of the device.
-
The guarantee is valid for a period of 24 months starting from the purchase date of the device. Guarantee claims should be submitted before the end of the guarantee period within two weeks of the defect being noticed. No guarantee claims will be accepted after the end of the guarantee period. The original guarantee period remains applicable to the device even if repairs are carried out or parts are replaced. In such cases, the work performed or parts fitted will not result in an extension of the guarantee period, and no new guarantee will become active for the work performed or parts fitted. This also applies if an on-site service is used.
-
To make a claim under the guarantee, please register the defective device at: www.isc-gmbh.info. Please keep your bill of purchase or other proof of purchase for the new device. Devices that are returned without proof of purchase or without a rating plate shall not be covered by the guarantee, because appropriate identification will not be possible. If the defect is covered by our guarantee, then the item in question will either be repaired immediately and returned to you or we will send you a new replacement.
Of course, we are also happy offer a chargeable repair service for any defects which are not covered by the scope of this guarantee or for units which are no longer covered. To take advantage of this service, please send the device to our service address.
Also refer to the restrictions of this warranty concerning wear parts, consumables and missing parts as set out in the service information in these operating instructions.
F
Danger!
Batteri (Li-jon) 18 V, 2,0 Ah
200–250 V \~ 50–60 Hz, max. 72 W
Výstup
Akumulator (litij-ionski) .....18 V, 2,0 Ah
Accumulator (Li-Ion) 18 V, 2,0 Ah
Akü (Li-Ion) 18 V, 2,0 Ah
X 2006/42/EC
□ Annex IV
Notified Body:
Reg. No.:
X 2000/14/EC_2005/88/EC
□ Annex V
X Annex VI
Noise: measured L_WA = 88,3 dB (A); guaranteed L_WA = 96 dB (A)
P = kW; L/∅ = 26 cm
Notified Body::TÜV SÜD Industrie Service GmbH (0036)
2012/46/EU_(EU)2016/1628 Emission No.:
Standard references: EN 60335-1; EN 62233; EN 50636-2-91; EN IEC 55014-1; EN IEC 55014-2
Subject to change without notice
Archive-File/Record: NAPR029721
Documents registrar: Daniel Laubmeier
Wiesenweg 22, D-94405 Landau/Isar
* 1. Bondless grass trimmer - F-Couple-bordure a accumulator - T-Immra a betanza - DVXN Battedreven gristrimmer - S-Betterlinden gratlimmer - CZ Akulatumorak's strenzove soxaksa - SK Akulatumorak's strenzove kosačka - NL Aocugezotrimmer - R Epcodore do cespidi da bateria - FIN Akusdyttömm ranohtrimmar - SLO Batejskas kostrica za travo - N Aklu - pärästtrimmer - RO Trimmar peniu gazon za accumulator - GV Mýgov mýročovouje yojrdu mýrogrup - P rágodor de reva sam loo - HR/39 IN Akumisatorke trimer za travljak - RS Akulitatorki trimer za travljak - PL Akumisatorki trimer za travljak - LV Akumisatorki trimer za travljak - LV Akumisatorki trimer za travljak - LV Akumisatorki trimer za travljak - LV Akumisatorki trimer za travljak - LV Akumisatorki trimer za travljak - LV Akumisatorki trimer za travljak - LV Akumisatorki trimer za travljak - LV Akumisatorki trimer za detrivne na třešna na třešna na třešna na třešna na třešna na třešna na třešna na třešna na třešna na třešna na třešna na třešna na třešna na třešna na třešna na třešna na třešna na třek

Declaration of conformity
We, Einhell UK Ltd
Champions Business Park, First Floor Unit 10, Arrowe Brook Rd, Upton, Wirral CH49 0AB, United Kingdom
declare the conformity to UK standards and legislation was assessed for:
Cordless Lawn Trimmer KX-ART 1826 Li (Kraftixx)
UK legislation
□ Simple Pressure Vessels (Safety) Regulation
□ Electrical Equipment (Safety) Regulation
□ Radio Equipment Regulation
□ Personal Protective Equipment Regulation
☐ The Ecodesign for Energy-Related Products and Energy Information Regulation
X The Restriction of the Use of Certain Hazardous Substances in Electrical and Electronic Equipment Regulation
X Noise Emission in the Environment by Equipment for use Outdoors Regulation
X Electromagnetic Compatibility Regulation
□ Measuring Instruments Regulation
☐ Pressure Equipment (Safety) Regulation
[Non-Text]
Information Regulation
ces in Electrical and Electronic Equipment Regulation
e Outdoors Regulation
Annex V
X Annex VI
Noise:measuredL WA =88.3 dB (A); guaranteed L WA =96 dB (A)
P = kW; L/∅ = 26 cm
UK Approved Body:
X Supply of Machinery (Safety) Regulation
□ Annex IV
UK Approved Body:
UKTE Certifi cate No.:
[Non-Text]
[Non-Text]
,
,
,
,
,
[Non-Text]
[Non-Text]
[Non-Text]
[Non-Text]
[Non-Text]
[Non-Text]
[Non-Text]
[Non-Text]
[Non-Text]
Standards: BS EN 60335-1; BS EN 62233; BS EN 50636-2-91; BS EN IEC 55014-1; BS EN IEC 55014-2
Wirral, 2023.06.21
Tom Chambers, Managing Director Einhell UK Ltd.
Archive-File/Record: NAPR029721
Article Number: 45.140.50 / 45.150.52
I.-No.: 21022
Subject to change without notice Wiesenweg 22, 94405 Landau/Isar, Germany
Documents registrar: Daniel Laubmeier
EH 09/2023 (02)