
FM-80 - Measuring equipment VOLTCRAFT - Free user manual and instructions
Find the device manual for free FM-80 VOLTCRAFT in PDF.

| Product type | 2-in-1 portable moisture meter |
| Brand | Voltcraft |
| Model | FM-80 |
| Power supply | 3 AAA 1.5 V batteries |
| Measurement modes | Penetration probe (electrical resistance) and inductive humidity sensor |
| Measuring range (wood probe) | 6 - 44 % (accuracy ±1 %) |
| Measuring range (mineral materials probe) | 0.2 - 2.0 % (accuracy ±0.1 %) |
| Inductive measuring range | 0 - 99.9 % (relative measurements only) |
| Measurable materials (inductive) | 10 types: drywall, brick, hardwood, softwood, anhydrite, cement, concrete, plaster, etc. |
| Special functions | MAX/MIN/AVG values, HOLD function, audible alarm (3 levels), auto power off (15 min) |
| Display | LCD 35 x 30 mm |
| Battery life | Approximately 15 minutes of inactivity before auto power off |
| Operating conditions | 0 °C to +50 °C, <80 % RH non-condensing |
| Protection rating | IP54 |
| Drop resistance | Up to 1 m |
| Maintenance | Clean with a dry, lint-free cloth |
| Safety | Instructions: do not expose to water, extreme temperatures, shocks; use with care |
| Package contents | Moisture meter, storage pouch, instruction manual, 3 AAA batteries |
Frequently Asked Questions - FM-80 VOLTCRAFT
User questions about FM-80 VOLTCRAFT
0 question about this device. Answer the ones you know or ask your own.
Ask a new question about this device
Download the instructions for your Measuring equipment in PDF format for free! Find your manual FM-80 - VOLTCRAFT and take your electronic device back in hand. On this page are published all the documents necessary for the use of your device. FM-80 by VOLTCRAFT.
USER MANUAL FM-80 VOLTCRAFT
GB Operating Instructions
FM-80 moisture meter
Item No. 2886455 Page 22 - 41
F Mode d'emploi
2 Introduction....24
3 Downloading the operating instructions....24
4 Intended use....25
5 Features and functions 25
6 Delivery content....25
7 Explanation of symbols....26
8 Safety instructions 26
8.1 General information 26
8.2 Handling....26
8.3 Operating environment....26
8.4 Operation....27
8.5 Batteries....28
9 Controls 29
9.1 Display Description....30
10 Getting started 31
10.1 Inserting/replacing the batteries....31
11 Operation....31
11.1 Tips on improving results 31
11.2 Switching the device on/off 32
11.3 Automatic shut-off .... 33
11.4 Measuring maximum and minimum values....34
11.5 Display hold function....34
11.6 Selecting the INT/EXT mode....35
11.7 Alarm mode for inductive moisture measurement....35
11.8 Changing material types 36
11.9 Testing the penetration probes ....37
12 Troubleshooting....37
13 Cleaning and care....37
14 Disposal....38
14.1 Product ......38
14.2 (Rechargeable) batteries 39
15 Technical data....40
15.1 Power supply ....40
15.2 Measuring range....40
15.3 Ambient conditions....40
15.4 Miscellaneous....41
2 Introduction
Dear customer,
Thank you for purchasing this product.
If there are any technical questions, please contact: www.conrad.com/contact
3 Downloading the operating instructions

You can download the complete operating instructions (or new/updated versions if available) by using the link www.conrad.com/downloads or by scanning the QR code. Follow the instructions on the website.
4 Intended use
The product is a hand-held moisture meter. Use this device to scan for moisture using the two penetration probes or without physically penetrating the surface.
Using the product for purposes other than those described above may damage the product. Improper product use can cause a short circuit, fire, electric shock, other hazards.
This product complies with statutory, national and European regulations. For safety and approval purposes, you must not rebuild and/or modify the product.
Read the operating instructions carefully and store them in a safe place. Always provide these operating instructions when giving the product to a third party.
All company and product names contained herein are trademarks of their respective owners. All rights reserved.
5 Features and functions
The 2-in-1 moisture meter can detect moisture in two types of materials (wood and building materials) using the penetration probes and ten types of materials using the inductive moisture sensor, including drywall, masonry, hardwood, softwood, hard plaster floor (Wt%), hard plaster floor (CM%), cement (Wt%), concrete (CM%), and gypsum plaster.
– MAX/MIN and data storage
- Alarm Function
– Display for weak battery.
– Automatic shut-off (after 15 minutes of inactivity)
Note:
CM% is the carbide method, Wt% is the water weight per cent method.
6 Delivery content
Moisture meter
3 x AAA batteries
Storage pouch
Operating instructions
7 Explanation of symbols
The following symbols appear on the product/device or in the text:

This symbol warns of hazards that can lead to injury.

This symbol warns of a dangerous voltage which can lead to injuries due to electric shock.
8 Safety instructions

Read the operating instructions carefully and especially observe the safety information. If you do not follow the safety instructions and information on proper handling, we assume no liability for any resulting personal injury or damage to property. Such cases will invalidate the warranty/guarantee.
8.1 General information
This product is not a toy. Keep it out of the reach of children and pets.
Do not leave packaging material lying around carelessly. It may become a dangerous plaything for children.
Should you have any questions or concerns after reading this document, please contact our technical support or a professional technician.
Maintenance, modifications and repairs must only be carried out by a technician or a specialist repair centre.
8.2 Handling
Please handle the product carefully. Impact, shocks or a fall even from a low height can damage the product.
8.3 Operating environment
Do not expose the product to any mechanical stress.
Protect the product from extreme temperatures, strong jolts, flammable gases,
vapours and solvents.
Protect the product from high humidity and moisture.
Protect the product from direct sunlight.
Never switch the device on immediately after taking it from a cold into a warm environment. This may cause condensation to form, which can destroy the product. Allow the product to reach room temperature before using it.
Avoid using the product near strong magnetic or electromagnetic fields, transmitter aerials or HF generators. Otherwise, the product may not function properly.
8.4 Operation
Consult an expert when in doubt about the operation, safety or connection of the device.
If it is no longer possible to operate the product safely, stop using it and prevent unauthorised use. DO NOT attempt to repair the product yourself. Safe operation can no longer be guaranteed if the product:
– is visibly damaged,
– is no longer working properly,
– has been stored in poor ambient conditions for extended periods or
– has been subjected to any serious transport-related stress.
8.5 Batteries
When inserting batteries, it is essential to ensure that the correct polarity is observed.
If the device is not going to be used for an extended period of time, take the batteries out to prevent any potential damage caused by battery leakage. In the event of contact with the skin, any leaking or damaged batteries can cause corrosive burns. When handling any damaged batteries, it is therefore essential to wear suitable protective gloves.
Batteries must be kept out of reach of children. Do not leave batteries lying around, as they constitute a choking hazard and risk of injury if swallowed by children or pets.
All batteries should be replaced at the same time. Using old and new batteries in the device at the same time could lead to battery leakage and product damage.
Batteries must not be disassembled, short-circuited or thrown into fire. Never recharge a non-rechargeable battery. This could cause an explosion! Open the battery compartment in the rear panel by loosening the screw.
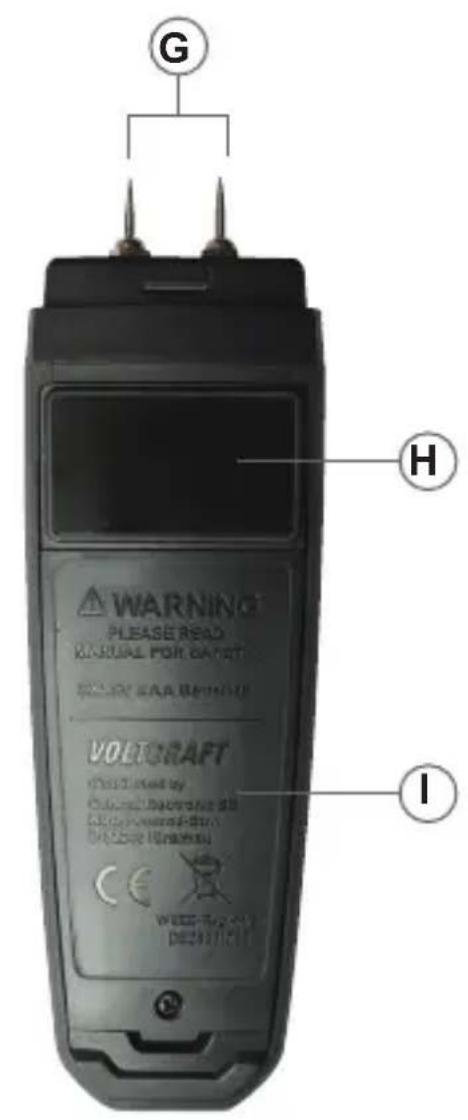
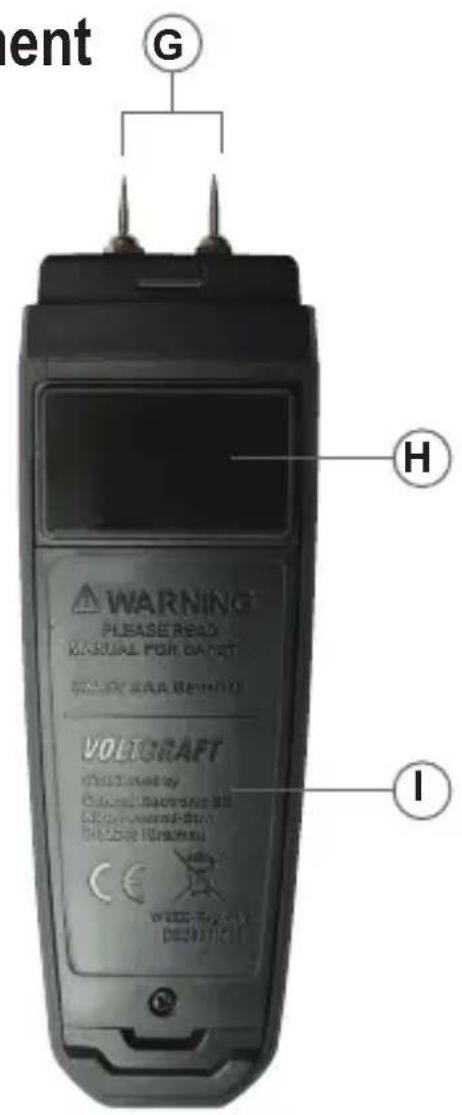
9 Controls
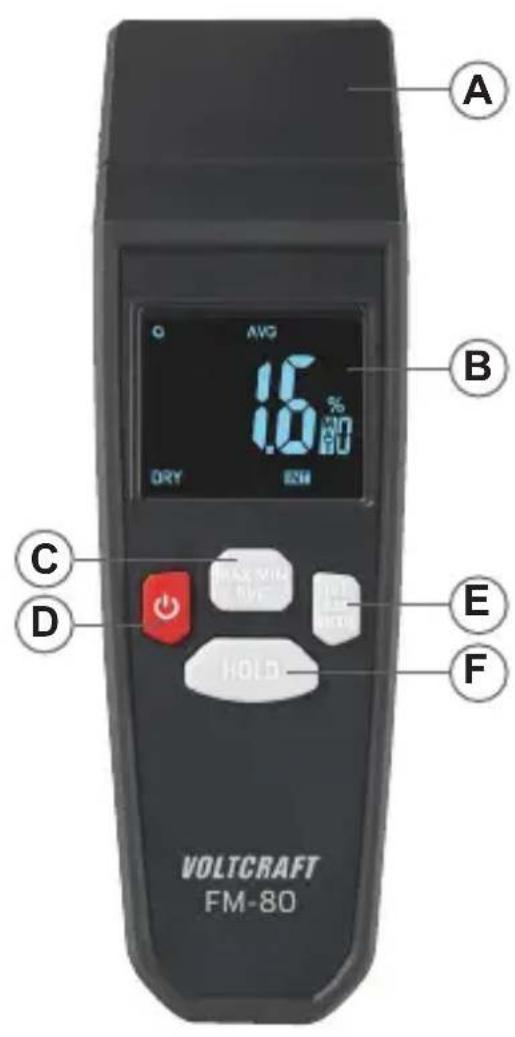

A. Penetration probes protective cover
B. LCD display
C. MAX MIN AVG: button
D. Power button
E. INT EXT MODE button
F. HOLD button
G. Insertion probe
H. Inductive moisture sensor
I. Battery cover
9.1 Display Description
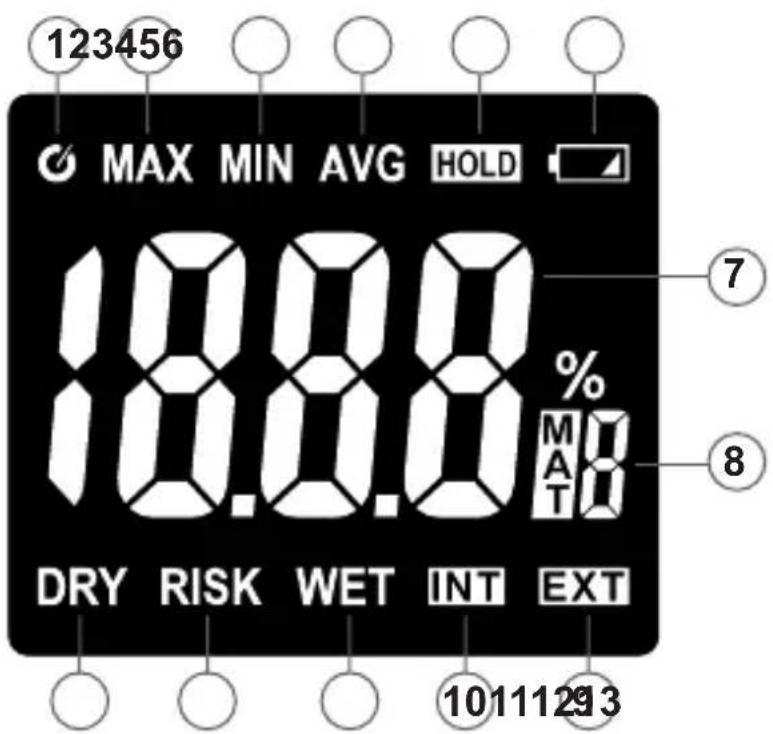
- Auto shut-off symbol
- Max: Maximum measurement mode symbol
- Min: Minimum measurement mode symbol
- AVG: Average measurement mode symbol
- HOLD: Hold mode symbol
- Low battery symbol
- Wood moisture content measurement data
- Wood material number
- EXT symbol for probe measurement mode
- INT symbol for inductive measurement mode
- WET symbol for moisture content
- RISK symbol for moisture content
- DRY symbol for moisture content
10 Getting started
10.1 Inserting/replacing the batteries
Note:
Replace the batteries when the low battery symbol lights up.
- Use a cross-head screwdriver to remove the compartment cover screw.
- Place 3 x 1.5 V AAA batteries in the battery compartment. Ensure that the batteries are inserted in the correct polarity (+/-) as indicated in the battery compartment.
- Replace the battery compartment cover taking care not to over-tighten the screw.
11 Operation
11.1 Tips on improving results
Preparing the surface
■ Wipe off any visible surface moisture and let dry.
■Clean the measuring surface of any residue or dirt (e.g., residual paint, dust, grime).
Holding the meter
Grip the meter below the display to reduce the effect of hand moisture on the inductive moisture sensor readings.
Place on smooth surfaces, as rough surfaces cause inaccurate readings.
Keep a minimum 8-10 cm distance from wall corners or other surfaces to avoid interference.
The penetration probes should be perpendicular to the measured surface.
Material properties
The meter cannot accurately measure materials that are strong electrical conductors (e.g., metals).
The device penetrates 20-40 mm deep depending on material density. Values may be less accurate for thin materials.
Higher material density increases the measured moisture value.
Taking comparative measurements
Compare measurements against a similar but known to be dry surface. This will help determine if an area is damp (e.g., water damage, leaks, or high humidity).
11.2 Switching the device on/off
Hold the button down to switch the measuring device on or off.
11.3 Automatic shut-off
Note:
- Automatic shut-off is activated by default, and is indicated by the symbol.
- This energy saving feature will switch the device off after about 15 minutes of no activity.
To deactivate automatic shut-off:
Required conditions:
The measuring instrument is switched on.
- The hold function is activated.
- Press the button briefly to switch the automatic shut-off function on or off.
Note:
If the automatic switch-off function is deactivated, the Ⓧ symbol is no longer displayed.
- The automatic shut-off function will be reactivated after the device has been switched off.
11.4 Measuring maximum and minimum values
Switching on the meter activates the AVG average measurement mode by default.
Press the MAX/MIN/AVG button to enable MAX/MIN feature.
Press the MAX MIN AVG button once briefly. The “MAX” symbol appears on the display. The LCD display now shows the maximum reading. This reading remains constant until a higher reading is registered.
Press the MAX MIN AVG button briefly again. The “MIN” symbol appears on the display. The LCD display now shows the minimum reading. This reading remains constant until a lower reading is registered.
Briefly press the MAX MIN AVG button again. The "AVG" symbol appears on the display. The LCD display shows the average reading again.
Sequence cycle: AVG → MAX → MIN → AVG.
11.5 Display hold function
Important:
- The display hold function freezes the display.
- The display hold function should be switched off before taking measurements.
Press the HOLD button to switch the display hold function on or off.
When hold function is switched on, the „HOLD“ symbol will be displayed.
11.6 Selecting the INT/EXT mode
Switching on the meter activates the inductive moisture sensor.
Press and hold the INT EXT MODE button to toggle between the inductive moisture sensor and penetration probes.
The EXT symbol indicates that the penetration probes are active.
Important:
When the penetration probes are active, ensure their tips are driven as deeply as possible into the material.
The INT symbol indicates that the inductive moisture sensor is active.
Important:
While in this mode, place the meter's bottom side flat on the object being measured.
11.7 Alarm mode for inductive moisture measurement
The alarm function has three levels.
No buzzer sounds when the moisture value has the DRY status.
The meter emits low frequency buzz when the moisture value is in Risk level.
The meter emits high frequency buzz when the moisture value is in Wet level.
11.8 Changing material types
Using the penetration probes, you can measure two types of materials, with numbers 0-1 corresponding to wood and building materials. Press the MODE button briefly to change the number from 0 to 1.
Using the inductive moisture sensor, you can measure ten types of materials. Press the INT EXT MODE button to select the number from 0 to 9.
Refer to the tables below for details.
| Insertion probe | |||
| Materials Scope Resolution | Accuracy | ||
| Wood moisture 6 – 44% 0.1% | ±1% | ||
| building materials 0.20 – 2.00 | % 0.01% ± 0.1% | ||
| Inductive moisture sensor | |||
| Hard wood 0 – 35.0% 0.1% ± | 5% | ||
| Drywall Installation 0 – 99.9% | 0.1% Relative | measurements only | |
| Other materials see table | |||
| Nummer | Material Scope | Resolution | ||
| 0 | Drywall (dry lining) | 0 - 99.9% | 0.1% | |
| 1 | Masonry (brickwork) | 0 - 89.5% | 0.1% | |
| 2 | Hardwood | 0 - 35.0% | 0.1% | |
| 3 | Cork (softwood) | 0 - 55.0% | 0.1% | |
| 4 | Hard plaster floor (Wt%) (anhydrite screed) | 0 - 3.5% | 0.1% | |
| 5 | Hard plaster floor (CM%) (anhydrite screed) | 0 - 1.5% | 0.1% | |
| 6 | Cement (Wt%) (cement screed) | 0 - 4.7% | 0.1% | |
| 7 | Cement (CM%) (cement screed) | 0 - 3.0% | 0.1% | |
| 8 | Concrete (cement) | 0 - 6.0% | 0.1% | |
| 9 | Gypsum plaster (gypsum screed) | 0 - 10.0% | 0.1% | |
11.9 Testing the penetration probes
Insert the two metal probe tips into the test contacts of the protective cover.
Use the “o--T--o” contacts to check the measuring accuracy. The device should read 18.0%±1% for the wood scale and 0.80%±0.1% for the building materials scale.
Use the “o--B--o” contacts to verify the measuring accuracy. The device should read 26.0%±1% for the wood scale and 1.20%±0.1% for the building materials scale.
If different readings are displayed, clean the contacts. If there are no changes in the readings, contact our customer service.
12 Troubleshooting
| Problem Cause Remedy | ||
| Blank display Battery empty replace Batteries | ||
| No reading The other sensor is active | Switch the sensor | |
| The protective cover cannot be fitted | The cover has a recess Turn the cover by 180 degrees | |
13 Cleaning and care
Important:
- Do not use aggressive cleaning agents, rubbing alcohol or other chemical solutions. They can damage the housing and can cause the product to malfunction.
- Do not submerge the product in water.
Clean the product with a dry, lint-free cloth.
14 Disposal
14.1 Product
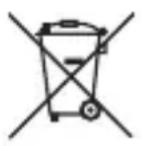
This symbol must appear on any electrical and electronic equipment placed on the EU market. This symbol indicates that this device should not be disposed of as unsorted municipal waste at the end of its service life.
Owners of WEEE (Waste from Electrical and Electronic Equipment) shall dispose of it separately from unsorted municipal waste. Spent batteries and accumulators, which are not enclosed by the WEEE, as well as lamps that can be removed from the WEEE in a non-destructive manner, must be removed by end users from the WEEE in a non-destructive manner before it is handed over to a collection point.
Distributors of electrical and electronic equipment are legally obliged to provide free take-back of waste. Conrad provides the following return options free of charge (more details on our website):
in our Conrad offices
at the Conrad collection points
at the collection points of public waste management authorities or the collection points set up by manufacturers or distributors within the meaning of the ElektroG
End users are responsible for deleting personal data from the WEEE to be disposed of.
It should be noted that different obligations about the return or recycling of WEEE may apply in countries outside of Germany.
14.2 (Rechargeable) batteries
Remove batteries/rechargeable batteries, if any, and dispose of them separately from the product. According to the Battery Directive, end users are legally obliged to return all spent batteries/rechargeable batteries; they must not be disposed of in the normal household waste.
Batteries/rechargeable batteries containing hazardous substances are labelled with this symbol to indicate that disposal in household waste is forbidden. The abbreviations for heavy metals in batteries are: Cd = Cadmium, Hg = Mercury, Pb = Lead (name on (rechargeable) batteries, e.g. below the trash icon on the left).
Used (rechargeable) batteries can be returned to collection points in your municipality, our stores or wherever (rechargeable) batteries are sold. You thus fulfil your statutory obligations and contribute to environmental protection.
Batteries/rechargeable batteries that are disposed of should be protected against short circuit and their exposed terminals should be covered completely with insulating tape before disposal. Even empty batteries/rechargeable batteries can contain residual energy that may cause them to swell, burst, catch fire or explode in the event of a short circuit.
15 Technical data
15.1 Power supply
Power supply....3 x 1.5 V AAA batteries
15.2 Measuring range
Insertion probe
Measurement principle ....Electrical resistance
Probe length....27 mm
Measuring range for wood (25 °C) ....6 – 44% (± 1%)
Measuring range for mineral
building materials (25 °C)....0.2 - 2.0% (± 0.1%)
Inductive measurement depth ....up to 19 mm beneath the surface
Measuring range....0 - 99.9%
Accuracy....Relative measurements only
Resolution....0.1
Response Time....0.5 Seconds typical
15.3 Ambient conditions
Operating conditions.... 0 °C to +50 °C,
< 80 % RH (not condensing)
Storage conditions....-10°C to +60°C,
< 80 % RH (non-condensing)
15.4 Miscellaneous
LCD size....35 x 30 mm
Automatic shut-off.....yes, after 15 minutes
Protection type.....IP54
Dimensions (W x H x D)....28 x 156 x 48 mm
Weight 137 g
Drop protection....up to 1m drop height
Cher cliente, cher client
France (email): technique@conrad-france.fr
Suisse: www.conrad.ch ____
Dimensions (L x H x P)....18 x 156 x 48 mm
Poids....137 g
2 Introduction....24
3 Downloading the operating instructions....24
4 Intended use....25
5 Features and functions....25
6 Delivery content....25
7 Explanation of symbols....26
8 Safety instructions ....26
8.1 General information....26
8.2 Handling....26
8.3 Operating environment 26
8.4 Operation....27
8.5 Batteries....28
9 Controls 29
9.1 Display Description 30
10 Getting started 31
10.1 Inserting/replacing the batteries....31
11 Operation....31
11.1 Tips on improving results ....31
11.2 Switching the device on/off 32
11.3 Automatic shut-off .... 33
11.4 Measuring maximum and minimum values....34
11.5 Display hold function....34
11.6 Selecting the INT/EXT mode....35
11.7 Alarm mode for inductive moisture measurement....35
11.8 Changing material types ....36
11.9 Testing the penetration probes ....37
12 Troubleshooting....37
13 Cleaning and care....37
14 Disposal....38
14.1 Product ......38
14.2 (Rechargeable) batteries 39
15 Technical data....40
15.1 Power supply ....40
15.2 Measuring range....40
15.3 Ambient conditions....40
15.4 Miscellaneous....41
2 Inleiding
Geachte klant,

A. Beschermkap van de steekvoelers
B. LCD display
C. MAX/MIN/AVG-toets
D. Inschakeltoets
E. INT/EXT/MODE-toets
Copyright 2024 by Conrad Electronic SE.

This is a publication by Conrad Electronic SE, Klaus-Conrad-Str. 1, D-92240 Hirschau (www.conrad.com).
All rights including translation reserved. Reproduction by any method, e.g. photocopy, microfilming, or the capture in electronic data processing systems require the prior written approval by the editor. Reprinting, also in part, is prohibited. This publication represent the technical status at the time of printing.
Copyright 2024 by Conrad Electronic SE.

Copyright 2024 by Conrad Electronic SE.

Copyright 2024 by Conrad Electronic SE.
- Introduction
- Downloading the operating instructions
- Intended use
- Features and functions
- Note:
- Delivery content
- Explanation of symbols
- Safety instructions
- General information
- Handling
- Operating environment
- Operation
- Batteries
- Display Description
- Getting started
- Inserting/replacing the batteries
- Operation
- Tips on improving results
- Preparing the surface
- Holding the meter
- Material properties
- Taking comparative measurements
- Switching the device on/off
- Automatic shut-off
- Measuring maximum and minimum values
- Display hold function
- Important:
- Selecting the INT/EXT mode
- Alarm mode for inductive moisture measurement
- Changing material types
- Testing the penetration probes
- Troubleshooting
- Cleaning and care
- Disposal
- Product
- (Rechargeable) batteries
- Technical data
- Power supply
- Measuring range
- Ambient conditions
- Miscellaneous
- Inleiding
Brand : VOLTCRAFT
Model : FM-80
Category : Measuring equipment