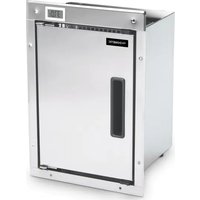
CoolMatic MH 07 - Fridge DOMETIC - Free user manual and instructions
Find the device manual for free CoolMatic MH 07 DOMETIC in PDF.


User questions about CoolMatic MH 07 DOMETIC
0 question about this device. Answer the ones you know or ask your own.
Ask a new question about this device
Download the instructions for your Fridge in PDF format for free! Find your manual CoolMatic MH 07 - DOMETIC and take your electronic device back in hand. On this page are published all the documents necessary for the use of your device. CoolMatic MH 07 by DOMETIC.
USER MANUAL CoolMatic MH 07 DOMETIC
natural_image
Exterior view of a modern stainless steel laboratory oven with digital display (no visible text or symbols)MR07, MRR07, MH07
EN Refrigerator MR07, MRR07 Heating cabinet MH07
Installation and Operating Manual.....7
DE Kühlschrank MR07, MRR07 Wärmeschrank MH07
natural_image
Exterior view of a modern stainless steel oven with control panel and digital display (no visible text or symbols)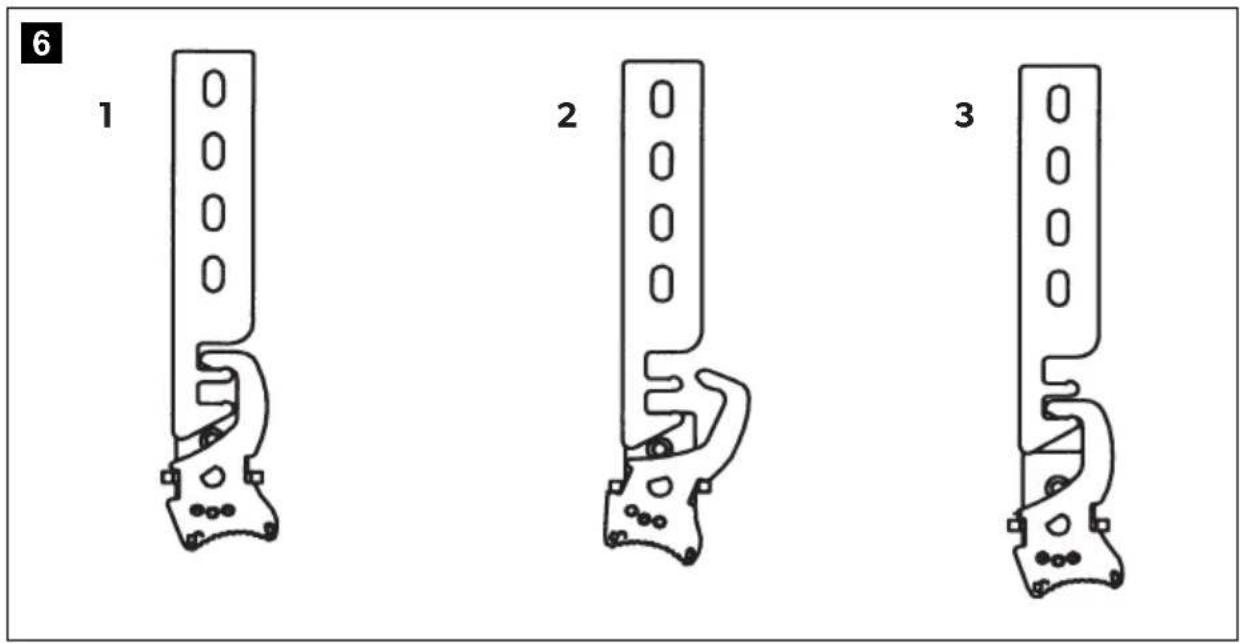
text_image
6 1 2 3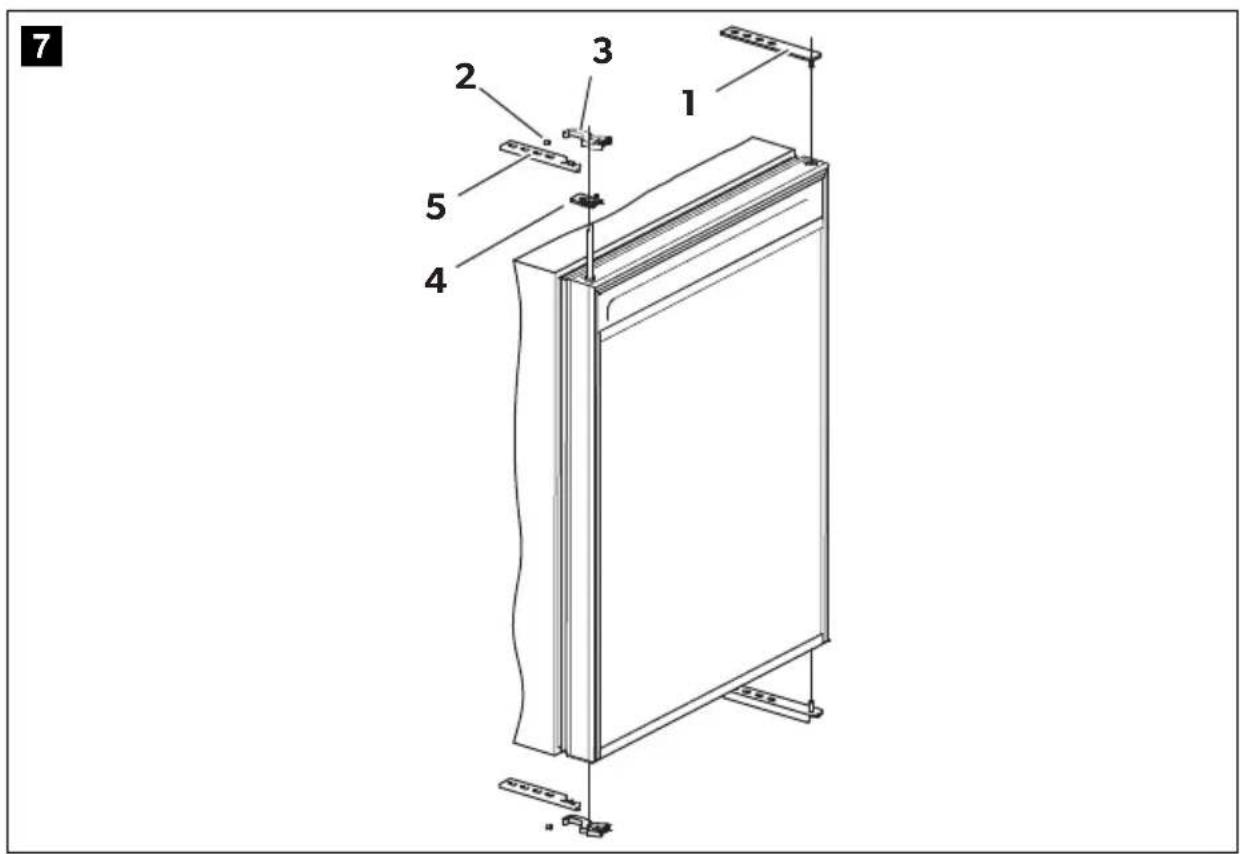
text_image
7 1 2 3 4 5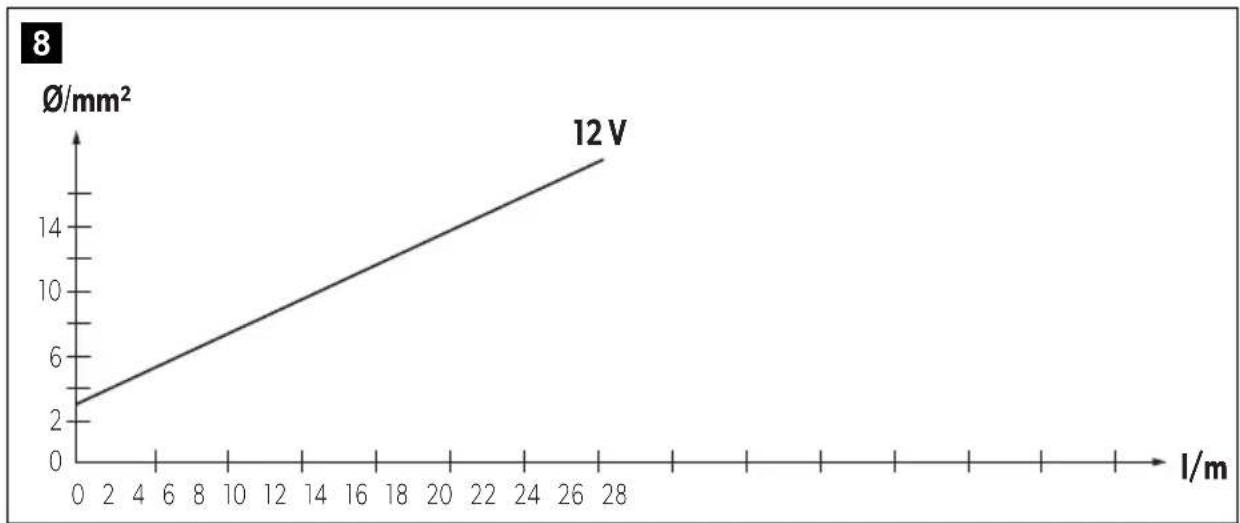
line
| I/m | Ø/mm² | | --- | ---- | | 0 | 2.5 | | 28 | 16.0 |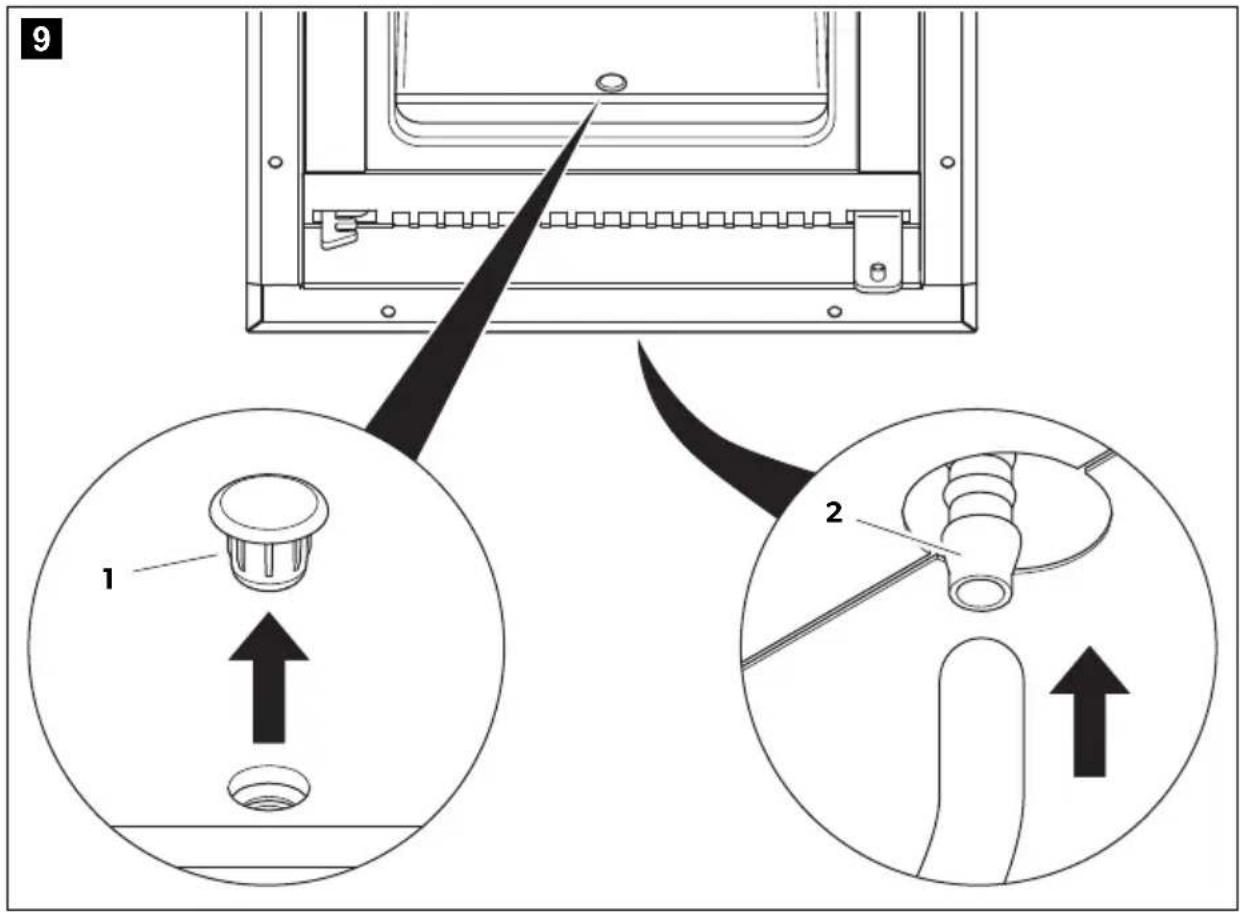
text_image
9 1 210 MR07
text_image
520 165 278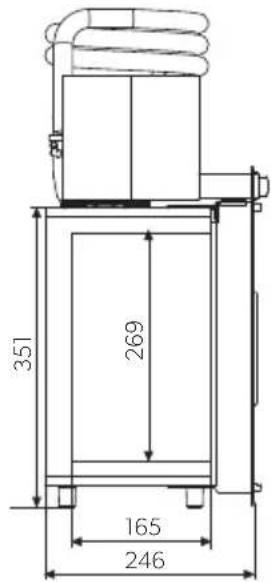
text_image
351 269 165 24611 MH07
text_image
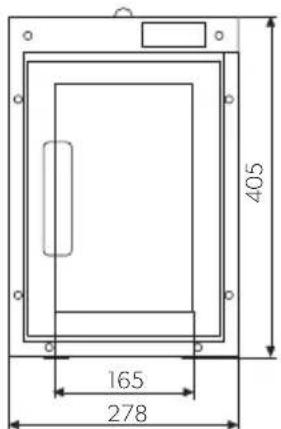
405 165 278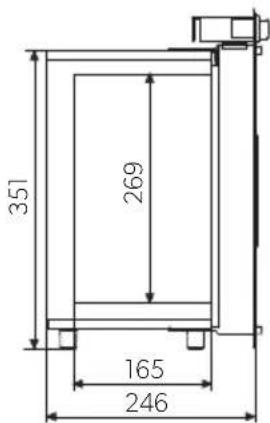
text_image
351 269 165 24612 MRR07
text_image
405 165 278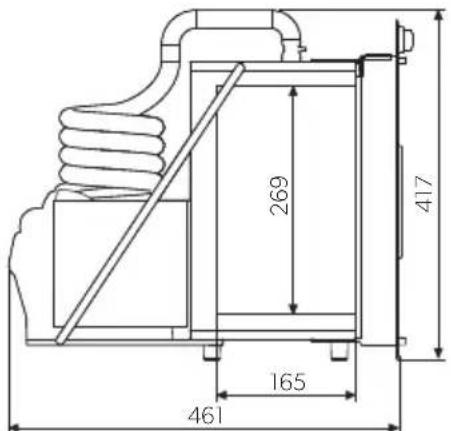
text_image
269 417 165 461Please read this instruction manual carefully before installation and first use, and store it in a safe place. If you pass on the product to another person, hand over this instruction manual along with it.
Contents
1 Explanation of symbols....7
2 Safety instructions....8
3 Scope of delivery 9
4 Intended use ....10
5 Technical description ....10
6 Installing and connecting the device ..... 11
7 Using the device .....14
8 Cleaning and maintenance....16
9 Guarantee....17
10 Disposal....17
11 Troubleshooting....17
12 Technical data.... 20
1 Explanation of symbols

DANGER!
Safety instruction: Failure to observe this instruction will cause fatal or serious injury.

WARNING!
Safety instruction: Failure to observe this instruction can cause fatal or serious injury.

CAUTION!
Safety instruction: Failure to observe this instruction can lead to injury.

NOTICE!
Failure to observe this instruction can cause material damage and impair the function of the product.

NOTE
Supplementary information for operating the product.
2 Safety instructions
The manufacturer accepts no liability for damage in the following cases:
- Damage to the product resulting from mechanical influences and incorrect connection voltage
• Alterations to the product without express permission from the manufacturer - Use for purposes other than those described in the operating manual
2.1 General safety

WARNING!
- Before you start up the appliance for the first time, check that the operating voltage matches the battery voltage (see type plate).
- If the cable is damaged, it must be replaced to prevent possible electrical hazards. Only replace a damaged cable with one of the same type and specifications.
- Have a trained technician perform the installation in wet rooms.
- Do not operate the appliance if it is visibly damaged.
- This appliance may only be repaired by qualified personnel. Inadequate repairs can cause considerable hazards. If you device should need repairing, please contact customer service.

NOTICE!
- Do not open the refrigerant or caloric circuit under any circumstances.
- Set up the appliance in a dry location where it is protected against splashing water.
- Do not mount the device near other heat sources (heater, strong direct sunlight, gas ovens, etc.)
-
Ensure that the ventilation slots are not covered.
-
The appliance is not suitable for the storage of caustic materials or materials containing solvents.
- Do not store any explosive substances, such as spray cans with propellants in the device.
2.2 Operating the appliance safely

DANGER!
• Danger of fatal injury!
Do not touch exposed cables with your bare hands. This especially applies when operating the appliance from an AC mains.

WARNING!
• Electronic devices are not toys.
Always keep and use the device well out of the reach of children.
- Persons (including children) whose physical, sensory or mental capabilities or lack of experience and knowledge prevent them from using the refrigerator safely should not use this appliance without initial supervision or instruction by a responsible person.
- If you connect the appliance to a battery, make sure that no food comes into contact with the battery acid.
- Protect the device and the cable against heat and moisture.
- Disconnect the device and other consumers from the battery before charging the battery with a quick charging device.
Over voltages can damage the electronics of the device.

NOTE
- Defrost the appliance in good time to save energy.
- Disconnect the device if you are not going to use it for a prolonged period.
3 S c o p e o f d
Quantity Description
1 Stainless steel refrigerator or heating cabinet
1 Operating manual
4 Intended use
The refrigerator or heating cabinet is especially suited for use in emergency vehicles.
The MR07 and MRR07 refrigerators are ideal for cooling goods down to a temperature of 5 °C and keeping them cool.
The heating cabinet MH07 is suitable for heating goods to a temperature of 37^ C and for keeping them warm.
In continuous operation, the air humidity may not exceed 90%.

CAUTION! Health hazard!
Please check if the cooling capacity of the device is suitable for storing the food or medicine you wish to cool.
5 Technical description
5.1 Refrigerator MR07
The refrigerator MR07 is suitable for use with a voltage of 12 V--- and can therefore be used in emergency vehicles.
The refrigerator can cool goods to a fixed temperature of 5^ C and keep them cool.
The refrigerant circuit is maintenance-free.
The device is equipped with a removable and separable mountable cooling unit (fig. 1, page 2).
5.2 Refrigerator MRR07
The refrigerator MRR07 is suitable for use with a voltage of 12 V=== and can therefore be used in emergency vehicles.
The refrigerator can cool goods to a fixed temperature of 5^ C and keep them cool.
The refrigerant circuit is maintenance-free.
5.3 Heating cabinet MH07
The heating cabinet MH07 is suitable for use with a voltage of 12 V--- and can therefore be used in emergency vehicles.
The heating cabinet can warm up goods to a fixed temperature of 37^ C and keep them warm.
5.4 Control elements MR07/MRR07/MH07
No. in fig. 2, page 2 Explanation
1 Temperature indication
6 Installing and connecting the device
6.1 Removing the cooling unit (MR07 only)
▶ Bend back the guard plate (fig. 3 1, page 2) slightly.
Remove the two fastening screws (fig. 3 3, page 2) using a long Phillips screw-driver.
▶Remove the cable binder from the rolled up cable.
▶Unroll the cable.
With the help of another person, lift up the cooling unit and turn it in the opposite coiling direction of the suction line (fig. 3 2, page 2), until the suction line is unrolled.
6.2 Installing the device
▶Observe the following installation instructions for the place of installation:
- Avoid placing the device next to heat sources such as heaters, gas ovens, hot water pipes, etc.
- Install the device in a dry, sheltered place.
- The device must be installed so that heated air from it can dissipate easily. Therefore make sure there is adequate ventilation (fig. 4, page 3).
| No. in fig. 4, page 3 | Explanation |
| 1 Hot waste air | |
| 2 Cold intake air | |
| 3 Condenser | |
| 4 With decorative panel 50 mm space at the top! | |
▶ Fix the device with eight screws (fig. 5 1, page 3).
6.3 Removing the transport protection
The device has a locking mechanism to protect it during transport. The following settings are possible (fig. 6, page 4):
- Position 1 (transport lock): (1). The door is locked and secured. To open the door, turn the bolt to position 2.
- Position 2: (2). The door can be opened.
- Position 3 ("VENT" position): (3). The door is slightly open, but fixed in position. Use this position, for example, if you are not going to use the device for a long time.
6.4 Changing the door hinge
You can also change the hinge of the door, so that it opens to the left rather than the right.
To change the door hinge, proceed as follows (fig. 7, page 4):
▶ Remove the upper door hinge (1).
▶ Carefully lift out the door.
▶Remove the threaded pins (2).
▶ Pull the locking hook (3) off the rod.
▶ Remove the locking plate (4) and fit it on the opposite side.
▶ Pull the rod downwards and out and put it in the other side.
▶ Fasten the locking hook (3) back on the rod.
▶ Detach the top and bottom lock holders (5) on the left side.
▶ Detach the top and bottom door hinges (1) on the right side.
▶ Fasten the top and bottom door hinges (1) to the left side.
▶ Fasten the top and bottom lock holders (5) to the left side.
6.5 Connecting the device to a battery

NOTICE!
- To avoid voltage drops and loss of performance, keep the cable as short as possible and avoid joins. For this reason avoid additional switches, plugs or multi-way adapters.
- Disconnect the refrigerator and other electric loads from the battery before connecting the battery to a quick charging device. Overvoltage can damage the electronics of the device.
- Fit a fuse of at least 15 A to the positive connection.
- If possible, connect the device directly to the battery's pole.
For safety reasons the device is equipped with an electronic system to prevent polarity reversal. This protects the device against short-circuiting when it is connected to a battery.
MR07 and MRR07 only: To protect the battery, the device switches off automatically if the voltage is insufficient (see table below).
| 12 V | |
| Cut-off voltage | 11.6 V |
| Cut-in voltage | 12.1 V |
▶Determine the required cross section of the cable in relation to the cable length according to fig. 8, page 5.
Key to fig. 8, page 5
Co-ordinate axis Meaning Unit
| Cable length m
∅Cable cross section mm²

NOTICE!
When connecting the battery, observe the correct polarity.
▶ Before starting up the device for the first time, check whether the operating voltage and the battery voltage match (see type plate).
MR07, MRR07
▶Connect the red cable to the positive pole of the battery.
▶Connect the black cable to the negative pole of the battery.

NOTE
The red/yellow cable is the starter cable for the device. When the red/yellow cable is switched to 12 V, the device is switched on.
▶ Connect the red/yellow cable to a switch (not included in the supply).
▶ Connect the other side of the switch to the positive connection.
MH07
▶ Connect the positive pole of the battery to the positive socket terminal block.
▶ Connect the negative pole of the battery to the negative socket terminal block.
7 Using the device

NOTICE!
The interior temperature of the device is affected by the ambient temperature.
- MR07 and MRR07 only: Observe that the set fixed temperature of 5 °C is fallen below, if the ambient temperature sinks to below 4 °C.
- Only MH07: Observe that the set fixed temperature of 37 °C is exceeded, if the ambient temperature rises to above 37 °C .

NOTE
Before using the device for the first time, clean it inside and out with a damp cloth for hygienic reasons (see also chapter "Cleaning and maintenance" on page 16).
7.1 Energy saving tips
- Choose a well ventilated location which is protected from direct sunlight.
- Do not open the device more often than necessary.
- Do not leave the door open for longer than necessary.
- MR07 and MRR07 only: Defrost your refrigerator as soon as a layer of ice forms.
- MR07 and MRR07 only: Clean dust and dirt from the condenser at regular intervals.
7.2 Using the device

NOTICE!
- The goods may only be stored in their original packaging or in suitable containers.
- Only put items in the refrigerator which can be cooled or heated to the selected temperature:
- MR07 and MRR07: 5 °C
- MH07: 37 °C

NOTE
MR07 and MRR07 only: After switching on, the refrigerator requires approx. 60 s until the compressor starts up.
Defrosting the refrigerator (MR07 and MRR07 only)
Humidity can form frost in the interior of the refrigerator or on the vaporiser. This reduces the cooling capacity. Defrost the device in good time to avoid this.

NOTICE!
Never use hard or sharp tools to remove ice or to loosen objects stuck to the device.
This is how to defrost the refrigerator:
▶Take the contents out.
▶If necessary, put them in another cooling device.
▶Leave the door open.
▶If you wish to drain the thawed water through a hose:
Connect a hose with an inside diameter of 6 mm to the outlet port (fig. 9 2, page 5).
▶ Remove the drain plug (fig. 9 1, page 5).
▶The thawed water now drains off through the hose.
▶Wipe the refrigerator dry with a cloth after thawing.
Switching off and storing the device
If you do not intend to use the device for a prolonged period, proceed as follows:
▶Disconnect the connecting cable from the battery.
▶ Clean the device (see chapter "Cleaning and maintenance" on page 16).
▶ Set the lock to the "VENT" position (see chapter "Removing the transport protection" on page 12).
This prevents odours from forming.
Securing the cabinet door
You can prevent the cabinet door from being opened inadvertently.
▶ Put the locking mechanism on the top of the door to position 1 (fig. 6 1, page 4).
8 Cleaning and maintenance

NOTICE!
Do not use abrasive cleaning agents or hard objects during cleaning as these can damage the device.
▶Clean the device regularly with a damp cloth once it becomes dirty.
▶Make sure that no water drips into the seals. This can damage the electronics.
▶If necessary, wipe up the condensation that has gathered on the floor.
▶Wipe the device dry with a cloth after cleaning.
9 G u a r a n t e e
The statutory warranty period applies. If the product is defective, please contact the manufacturer's branch in your country (see the back of the instruction manual for the addresses) or your retailer.
For repair and warranty processing, please include the following documents when you send in the device:
• A copy of the receipt with purchasing date
- A reason for the claim or description of the fault
10 Disposal
▶If possible, always take the packaging material for recycling.
If you wish to finally dispose of the device, ask your local recycling centre or specialist dealer for details about how to do this in accordance with the applicable disposal regulations.
11 Troubleshooting
Compressor does not run
| Fault Possible cause Remedy | ||
| U_TERM=0V There is an interruption in the connection between the battery and the electronics | Establish a connection | |
| Additional supply line fuse has blown (if installed) | Replace the supply line fuse | |
| U_TERM≤ U_ON | Battery voltage is too low Charge the battery | |
| Start attempt with U_TERM≤ U_OFF | Loose cablesPoor contact (corrosion) | Establish a connection |
| Battery capacity too low | Replacing the battery | |
| Cable cross section too small | Replace the cable (fig. 8, page 5) | |
Fault Possible cause Remedy
| Start attempt with U_TERM ≥ U_ON | Ambient temperature too high – | |
| Insufficient ventilation and/or air supply | Move the refrigerator to another location | |
| Condenser is dirty Clean the condenser | ||
| Fan defective (if installed) Replace the fan | ||
| Electric circuit between the pins in the compressor interrupted | Defective compressor This can only be repaired by an authorised customer services unit. | |
U_TERM Voltage between the positive and negative terminals of the electronics
U_ON Cut-in voltage of the electronics
U_OFF Cut-off voltage of the electronics
Poor cooling, interior temperature increases
Fault Possible cause Remedy
| Compressor runs for a long time/continuously | Vaporiser is iced over Defrost the vaporiser | |
| Ambient temperature too high – | ||
| Insufficient ventilation and/or air supply | Move the refrigerator to another location | |
| Condenser is dirty Clean the condenser | ||
| Fan defective (if installed) Replace the fan | ||
| Compressor runs intermittently | Battery capacity exhausted Charge the battery | |
Unusual noises
Fault Possible cause Remedy
| Loud humming A component of the refrigerant circuit cannot move freely (touching the wall) | Bend the component carefully away from the obstruction |
| Foreign body jammed between the cooling unit and the wall | Remove the foreign body |
| Fan noise (if installed) – |
Device does not heat
Fault Possible cause Remedy
| U_TERM=0V There is an interruption in the connection between the battery and the electronics | Establish a connection | |
| Additional supply line fuse has blown (if installed) | Replace the supply line fuse | |
| U_TERM≤ U_ON | Battery voltage is too low Charge the battery | |
| Start attempt with U_TERM≤ U_OFF | Loose cablesPoor contact (corrosion) | Establish a connection |
| Battery capacity too low Replacing the battery | ||
| Cable cross section too small Replace the cable (fig. 8, page 5) | ||
U_TERM Voltage between the positive and negative terminals of the electronics
U_ON Cut-in voltage of the electronics
U_OFF Cut-off voltage of the electronics
12 Technical data
| MR07 MRR07 MH07 | |||
| Ref. no.: 9105204550 9105204551 | |||
| Voltage: | 12 V--- | 12 V--- | 12 V--- |
| Overall capacity: 717171 | |||
| Fixed temperature: 5±1.5°C | 5±1.5°C | 37±1.5°C | |
| Average power consumption: | 32 W | 32 W | 56 W |
| Relative humidity: | maximum 90% | maximum 90% | maximum 90% |
| Coolant quantity: | 45 g | - | |
| CO2 equivalent: | 0.064 t | - | |
| Global warming potential (GWP): | 1430 | - | |
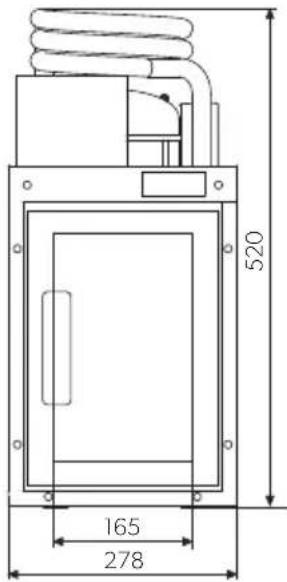
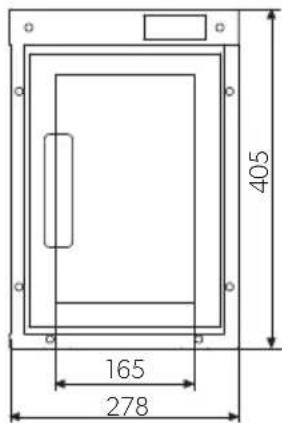
| Dimensions (W x H x D) in mm: | fig. 10, page 6 | fig. 12, page 6 | fig. 11, page 6 |
| Weight: | 8 kg | 8.7 kg | 4.3 kg |
| Test/certificates: | 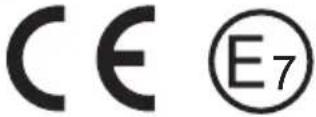 | ||
The coolant circuit contains R134a.
Contains fluorinated greenhouse gases
Hermetically sealed equipment
5 Description technique
Dometic Australia Pty. Ltd.
1 John Duncan Court
Varsity Lakes QLD 4227
1800 212121
+61 7 55076001
Mail: sales@dometic.com.au
AUSTRIA
Dometic Austria GmbH
Neudorferstraße 108
A-2353 Guntramsdorf
+43 2236 908070
+43 2236 90807060
Mail: info@dometic.at
BENELUX
Dometic Branch Office Belgium
Lourdesstraat 84
B-8940 Geluwe
+32 2 3598040
+32 2 3598050
Mail: info@dometic.be
BRAZIL
Dometic DO Brasil LTDA
Avenida Paulista 1754, conj. 111
SP 01310-920 Sao Paulo
+551132513352
+551132513362
Dometic Group Asia Pacific
Suites 2207-11 · 22/F · Tower 1
The Gateway · 25 Canton Road,
Tsim Sha Tsui · Kowloon
+852 2 4611386
+852 2 4665553
Mail: info@waeco.com.hk
HUNGARY
Dometic Zrt. Sales Office
Kerékgyártó u. 5.
H-1147 Budapest
+3614684400
+3614684401
Dometic Italy S.r.l.
Via Virgilio, 3
I-47122 Forlì (FC)
+39 0543 754901
+390543754983
Mail: vendite@dometic.it
JAPAN
Dometic KK
Maekawa-Shibaura, Bldg. 2
2-13-9 Shibaura Minato-ku
Tokyo 108-0023
+81 3 5445 3333
品 +81354453339
Mail: info@dometic.jp
MEXICO
Circuito Médicos No. 6 Local 1
Colonia Ciudad Satélite
CP 53100 Naucalpan de Juárez
Estado de México
+52 55 5374 4108
+52 55 5393 4683
Mail: info@dometic.com.mx
NETHERLANDS
Dometic Benelux B.V.
Ecustraat 3
NL-4879 NP Etten-Leur
+31 76 5029000
+31 76 5029019
Mail: info@dometic.nl
NEW ZEALAND
Dometic New Zealand Ltd.
PO Box 12011
Penrose
Auckland 1642
+6496221490
+6496221573
Mail: customerservices@dometic.co.nz
NORWAY
Dometic Norway AS
∅sterøyveien 46
N-3232 Sandefjord
+47 33428450
+47 33428459
Mail: firmapost@dometic.no
POLAND
Dometic Poland Sp. z o.o.
Ul. Puławska 435A
PL-02-801 Warszawa
+48 22 414 3200
+48 22 414 3201
Mail: info@dometic.pl
PORTUGAL
Dometic Spain, S.L.
Komsomolskaya square 6-1
RU-107140 Moscow
+7 495 780 79 39
+7 495 916 56 53
Mail: info@dometic.ru
SINGAPORE
Dometic Pte Ltd
18 Boon Lay Way
06-141 Trade Hub 21
Singapore 609966
+65 6795 3177
+65 6862 6620
Mail: dometic@dometic.com.sg
SLOVAKIA
Dometic Slovakia s.r.o.
Sales Office Bratislava
Nádražná 34/A
900 28 Ivánka pri Dunaji
+421 2 45 529 680
Mail: bratislava@dometic.com
SOUTH AFRICA
Dometic (Pty) Ltd.
Regional Office
South Africa & Sub-Saharan Africa
2 Avalon Road
West Lake View Ext 11
Modderfontein 1645
Johannesburg
+27 87 3530380
Mail: info@dometic.co.za
SPAIN
Dometic Spain S.L.
Avda. Sierra del Guadarrama, 16
E-28691 Villanueva de la Cañada
Madrid
+34 91 833 60 89
+34 900 100 245
Mail: info@dometic.es
SWEDEN
Dometic Scandinavia AB
Gustaf Melins gata 7
Dometic Switzerland AG
Riedackerstrasse 7a
CH-8153 Rümlang
+41 44 8187171
+41 44 8187191
Mail: info@dometic.ch
UNITED ARAB EMIRATES
Dometic Middle East FZCO
P. O. Box 17860
S-D 6, Jebel Ali Freezone
Dubai
+97148833858
+97148833868
Mail: info@dometic.ae
UNITED KINGDOM
Dometic UK Ltd.
Dometic House, The Brewery
Blandford St. Mary
Dorset DT119LS
+44 344 626 0133
+44 344 626 0143
Mail: customerservices@dometic.co.uk
USA
Dometic RV Division
1120 North Main Street
Elkhart, IN 46515
+1574-264-2131