
PreAmp II - Audio Amplifier TANGENT - Free user manual and instructions
Find the device manual for free PreAmp II TANGENT in PDF.

| Brand | Tangent |
| Model | PreAmp II |
| Product Type | Audio Preamplifier |
| Inputs | RCA (Line), AUX (3.5 mm), Optical, Bluetooth |
| Outputs | Pre-out RCA/XLR, subwoofer output (SUB), headphone output |
| Power Supply | AC 100-240V, 50/60 Hz |
| Power Consumption | Standby: 1.4 W, Active mode: < 0.5 W |
| Main Functions | Bluetooth, equalizer adjustment (treble/bass), input selection, remote control |
| Equalizer | Treble and bass adjustable from -8 dB to +8 dB in 2 dB steps |
| Auto Standby | After 15 minutes of inactivity |
| Thermal Protection | Auto shutdown if temperature > 85°C, restart at < 60°C |
| Cleaning | Dry cloth |
| Safety Instructions | Do not expose to moisture, do not block ventilation, disconnect during storms |
| Included Accessories | Remote control, user manual |
Frequently Asked Questions - PreAmp II TANGENT
User questions about PreAmp II TANGENT
0 question about this device. Answer the ones you know or ask your own.
Ask a new question about this device
Download the instructions for your Audio Amplifier in PDF format for free! Find your manual PreAmp II - TANGENT and take your electronic device back in hand. On this page are published all the documents necessary for the use of your device. PreAmp II by TANGENT.
USER MANUAL PreAmp II TANGENT

PreAmp II
Mini stereo pre-amplifier

User's manual
Brugermanual
Mode d'emploi
Bedienungsanleitung
Bruksanvisning
Käyttöopas
Manual del usuario
Bruksanvisningen
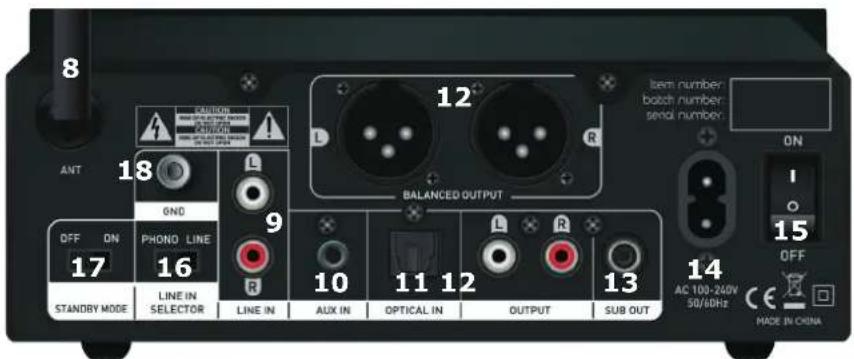
PreAmplifier:
- Power Indicator
- Bluetooth Indicator
- OPT Indicator
- Line In Indicator
- AUX Indicator
- Remote Sensor
- Volume Knob/Input Selector
- Antenna
- Line input RCA L/R Input
- AUX In
- Optical Input
- Pre-out RCA & XLR to Amplifier or Active speakers
- Subwoofer Output
- Power inlet
- On/Off Switch
- Selector Line In / Phono
- Standby mode selector
- Ground screw for Phono
- Headphone out
Including in the package:
Remote Control
Instruction Manual

(UK)
Remote control:
- Off Button
- Optical Source
- Volume +/-
- Previous/Next (BT mode)
- Line In Source
- Play/Pause (BT mode)
- AUX Source
- Bluetooth Source
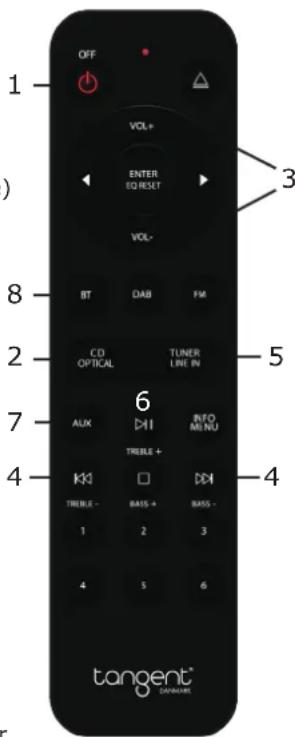
Note: The remote control is a system remote control, that can be used for other units, so some of the buttons are not to be used with this unit.
Connect:
- Connect the power cord to the back of the amplifier then connect it to a wall outlet.
- Connect your devices to the desired input.
- Turn the power button to the On position, after two seconds the unit will enter working status and the input indicator will lit up.
- Press the Bluetooth, OPT, LINE or AUX button on the remote or the volume knob to choose the desired audio source.
Control the playback via the remote control by pressing the buttons.
Bluetooth Pairing:
- Press the Bluetooth on the remote (or push the selector button) to activate the Bluetooth source.
- Activate Bluetooth on your phone/tablet and start searching for new Bluetooth devices.
- When your phone/tablet finds the Tangent preAmp II, choose this unit and begin pairing up. (You can force the preAmp into pairing mode, with long press on BT)
Note: The pre amplifier will shut off automatically if the temperature exceeds 85^ C, to indicate this the Power indicator will turn orange. The amplifier will re-start automatically when the temperature has dropped below 60±10^ C.
(UK)
Connect Your Device:
Connect your Active loudspeakers / power amplifier to Left Right RCA & XLR Output.
Connect your subwoofer to SUB out.
Connect a CD player or other device via its RCA cable to the RCA L/R input. Make sure you connect the "L" plug to the left input channel and the "R" plug to the right input channel.
Connect your phone/tablet/MP3 via an AUX cable to AUX Input.
Use the optical input by connecting a device using a optical fiber cable to the Optical Input.
Note:
Remember to change into the desired source on the pre amplifier.
EQ Setting:
Increase treble: Long press (2-3sec) on Play/Pause increase with 2dB each time. (max.8dB)
Decrease treble: Long press (2-3sec) on Skip backwards decrease with 2dB each time. (max.8dB)
Increase bass: Long press (2-3sec) on Stop increase with 2dB each time. (max.8dB)
Decrease bass: Long press (2-3sec) on Skip forward decrease with 2dB each time. (max.8dB)
Reset EQ: Long press (2-3sec) on Enter will reset the EQ settings.
Standby Mode:
Standby ON: Only BT input can wake on signal
Standby OFF: All inputs can wake on signal
Note: Power consumption is higher in OFF mode.
OFF mode: 1.4Watt
ON mode: Below 0.5Watt
(UK)
Indicator Function
Power/Standby indicator
Power: Power on-The product in power off status, then push the power source button on rear panel at "ON" position the LED indicator blinks one time and the startup sound from electric relay in the unit, after about 2 seconds the amplifier will be in working status. Note that the unit will remember the settings from before it was powered off.
Power off:
Push the power source button at "OFF" position, and unit will go into power off status.
Standby:
Press the standby button on the remote control, or push the Volume/selector button, then the unit will go into standby, and the standby LED will be red color. The unit is in standby status.
(When the preAmp goes into auto standby when inactive in 15min, you can wake it up via bluetooth signal)
Power on (from standby mode): Press standby on the remote control or push the Volume/selector button. And after about 2 seconds the amplifier will be in last time working status before standby.
Bluetooth input indicator
Press to select Bluetooth as your audio source.
Optical input indicator
Press to select input method as optical audio source.
AUX input indicator
Press to select input method as 3.5mm audio jack line in.
Line-in input indicator
Press to select input method as wired RCA Line-in.(If you connect a turntable without RIIA, you need to change the switch setting to Phono, to get the correct sensitivity on the input)
Volume and input switch button
This selector can adjust volume (turn left or right) and also switch the input mode (push) (For standby push and hold the button)
(UK)
Important Safety Instructions:
To reduce the risk of electrical shock, fire, etc.:
- Do not place unit near any heat source such as radiators, heat registers, stoves, or other apparatus (including amplifiers) that produce heat.
- Do not block any ventilation openings of unit.
- The unit shall not be exposed to dripping or splashing and no objects filled with liquids, such as vases, shall be placed on the unit.
- Do not place any heavy loads onto the unit, and do not step on it, the load may fall and cause serious injury to the unit.
- Never unplug your unit by pulling on the power cord. Always grap the plug firmly and pull straight out from the outlet.
- Repair or replace all electric service cords that have become frayed or otherwise damaged immediately. Do not use a cord that shows cracks or abrasion damage along its length, the plug, or the connector end.
- To prevent fire or shock hazard, do not expose unit to rain or moisture.
- During lightning or raining days, unplug the unit for additional protection during thunderstorms or when the unit is not used for prolonged periods. This will prevent damage to the unit from lightning and power surges.
- Do not attempt to carry out any service work yourself. By opening or removing the cabinet, you may be exposed to dangerous voltage or other hazards. Any service work should be carried out by qualified technicians.
- In the interests of safety and to avoid unnecessary energy consumption, never leave the unit switched on while unattended for long periods of time, e.g. overnight, while on holiday or while out of the house. Switch it off and disconnect the mains plug from the mains socket.
- Clean only with dry cloth
- Please pay attention to the environmental aspects of battery disposal. Battery must be recycled or disposed of properly. This product must not be disposed together with the domestic waste. This product has to be disposed at an authorized place for recycling of electrical and electronic appliances. By collecting and recycling waste, you help save natural resources, and make sure the product is disposed in an environmental friendly and healthy way.

This symbol on the product or in the instructions means that your electrical and electronic equipment should be disposed at the end of its life separately from your household waste. There are separate collection systems for recycling in the EU. For more information, please contact the local authority or your retailer where you purchased the product.
The Bluetooth® word mark and logos are registered trademarks owned by Bluetooth SIG, Inc. and any use of such marks is under license. Other trademarks and trade names are those of their respective owners.
(UK)
The Bluetooth® word mark and logos are registered trademarks owned by Bluetooth SIG, Inc. and any use of such marks is under license. Other trademarks and trade names are those of their respective owners.
(DK)
preAmplificateur :
The Bluetooth® word mark and logos are registered trademarks owned by Bluetooth SIG, Inc. and any use of such marks is under license. Other trademarks and trade names are those of their respective owners.
VorVerstärker:
The Bluetooth® word mark and logos are registered trademarks owned by Bluetooth SIG,. Inc. and any use of such marks is under license. Other trademarks and trade names are those of their respective owners.
Förförstärkare:
The Bluetooth® word mark and logos are registered trademarks owned by Bluetooth SIG, Inc. and any use of such marks is under license. Other trademarks and trade names are those of their respective owners.
Vahvistin:
The Bluetooth® word mark and logos are registered trademarks owned by Bluetooth SIG, Inc. and any use of such marks is under license. Other trademarks and trade names are those of their respective owners.
(FIN)
preAmplificador:
The Bluetooth® word mark and logos are registered trademarks owned by Bluetooth SIG, Inc. and any use of such marks is under license. Other trademarks and trade names are those of their respective owners.
(ES)
forforsterker:
- Strømindikator
- Bluetooth-indikator
- OPT-indikator
- Line In indikator
- AUX indikator
- Fjernsensor
- Volumknapp / inngangsvelger
- Antenne
- RCA L / R
- AUX In
- Optisk inngang
- Pre-out RCA/XLR til forsterker eller aktive høyttalere
- Subwooferutgang
- Strøminntak
- På / Av bryter
- Selector Line In / Phono
- Standby-modusvelger
- Jordskrue for dreieskive
- Hodetelefon ut
Inkludert i pakken:
Fjernkontroll
Bruksanvisningen


(N)
Fjernkontroll:
- På / Av-knapp
- Optisk kilde
- volum +/-
- Forrige/Neste (BT-modus)
- Linje i kilde
- Spill / Pause (BT-modus)
- AUX-kilde
- Bluetooth-kilde
Koble:
Product name: Tangent preAmp II
Power supply: AC 100V\~240V/50Hz
Frequency response: 20Hz \~ 20KHz
Bluetooth range: 10 meters
Dimensions: 195 x 194 x 70mm
Weight: 1,2 kg